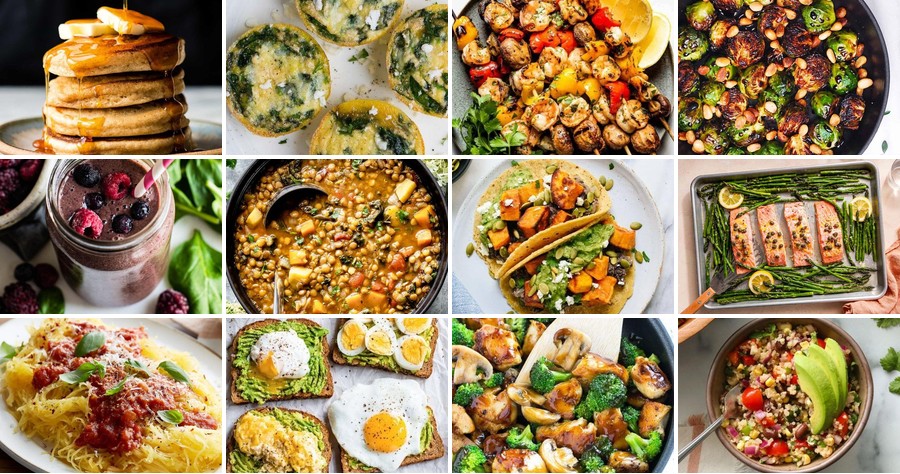
Our 21 Day Fix journey just got tastier! We’ve gathered 21 delicious, nutritious recipes that fit perfectly into your plan, making healthy eating feel effortless and exciting. From quick dinners to satisfying comfort food, each dish is designed to keep you on track without sacrificing flavor. Dive in and discover meals that will inspire your kitchen and nourish your body—let’s make every bite count!
Turkey and Veggie Stuffed Peppers

Just when you thought bell peppers were merely salad bowl decorations, they’re about to become the star of your dinner table with this turkey and veggie-packed masterpiece. Picture this: vibrant peppers cradling a savory, herb-kissed filling that’s so good, you’ll forget you’re eating something wholesome. It’s the ultimate weeknight hero that’s as fun to make as it is to devour—no culinary cape required!
Serving: 4 | Pre Time: 20 minutes | Cooking Time: 35 minutes
Ingredients
– 4 large bell peppers (any color), tops removed and seeds discarded
– 1 lb ground turkey (93% lean)
– 1 cup cooked quinoa
– 1 cup finely diced yellow onion
– 2 cloves garlic, minced
– 1 cup diced zucchini
– 1 cup diced cremini mushrooms
– 1/2 cup grated Parmesan cheese
– 1/4 cup chopped fresh parsley
– 1 tbsp extra-virgin olive oil
– 1 tsp dried oregano
– 1/2 tsp smoked paprika
– 1/4 tsp freshly ground black pepper
– 1/4 tsp fine sea salt
– 1 cup low-sodium chicken broth
Instructions
1. Preheat your oven to 375°F (190°C) and lightly grease a 9×13-inch baking dish with olive oil.
2. In a large skillet over medium-high heat, heat 1 tbsp extra-virgin olive oil until shimmering, about 1 minute.
3. Add 1 cup finely diced yellow onion and sauté until translucent, approximately 4-5 minutes, stirring occasionally.
4. Incorporate 2 cloves minced garlic and cook for 30 seconds until fragrant, being careful not to burn it.
5. Add 1 lb ground turkey to the skillet, breaking it apart with a wooden spoon, and cook until no pink remains, about 6-7 minutes.
6. Stir in 1 cup diced zucchini and 1 cup diced cremini mushrooms, cooking until softened, roughly 5 minutes.
7. Mix in 1 cup cooked quinoa, 1 tsp dried oregano, 1/2 tsp smoked paprika, 1/4 tsp fine sea salt, and 1/4 tsp freshly ground black pepper, combining thoroughly.
8. Remove the skillet from heat and fold in 1/2 cup grated Parmesan cheese and 1/4 cup chopped fresh parsley until evenly distributed.
9. Spoon the turkey-quinoa mixture evenly into the 4 prepared bell peppers, packing it gently to fill each cavity.
10. Arrange the stuffed peppers upright in the greased baking dish and pour 1 cup low-sodium chicken broth around the base.
11. Cover the dish tightly with aluminum foil and bake at 375°F for 25 minutes.
12. Remove the foil and continue baking uncovered for an additional 10 minutes, or until the pepper edges are tender and slightly charred.
13. Let the peppers rest for 5 minutes before serving to allow the flavors to meld.
Yield to their tender-crisp texture and smoky-savory depth, with the quinoa adding a delightful nuttiness that plays off the juicy turkey. For a creative twist, drizzle with a balsamic reduction or top with a dollop of herbed Greek yogurt—it’s a feast that’s as vibrant on the plate as it is on the palate!
Baked Lemon Garlic Chicken

Aren’t we all secretly craving that magical weeknight dinner that feels fancy but requires minimal effort? Behold the Baked Lemon Garlic Chicken—your ticket to a flavor-packed meal that’ll have everyone thinking you attended culinary school. It’s the kind of dish that turns a regular Wednesday into a ‘wow, you made this?’ kind of evening.
Serving: 4 | Pre Time: 15 minutes | Cooking Time: 35 minutes
Ingredients
– 4 boneless, skin-on chicken breasts (about 6 ounces each)
– 3 tablespoons extra-virgin olive oil
– 4 cloves garlic, finely minced
– 2 lemons, zested and juiced
– 1 tablespoon fresh thyme leaves, finely chopped
– 1 teaspoon kosher salt
– ½ teaspoon freshly cracked black pepper
– ¼ cup dry white wine (such as Sauvignon Blanc)
– 1 cup low-sodium chicken broth
– 2 tablespoons unsalted butter, chilled and cubed
– Fresh parsley, finely chopped for garnish
Instructions
1. Preheat your oven to 400°F (204°C) and position a rack in the center.
2. Pat the chicken breasts completely dry with paper towels to ensure a crisp skin.
3. In a small bowl, whisk together the olive oil, minced garlic, lemon zest, lemon juice, thyme, kosher salt, and black pepper to form a marinade.
4. Rub the marinade evenly over both sides of the chicken breasts, coating them thoroughly.
5. Heat a large oven-safe skillet over medium-high heat for 2 minutes until hot.
6. Place the chicken breasts skin-side down in the skillet and sear for 5–6 minutes until the skin is golden brown and crispy.
7. Flip the chicken breasts using tongs and sear the other side for 3 minutes.
8. Pour the white wine into the skillet to deglaze, scraping up any browned bits with a wooden spoon for 1 minute.
9. Add the chicken broth to the skillet, bringing it to a simmer for 2 minutes.
10. Transfer the skillet to the preheated oven and bake for 20 minutes until the chicken reaches an internal temperature of 165°F (74°C).
11. Remove the skillet from the oven using oven mitts and place it on a heatproof surface.
12. Transfer the chicken to a serving platter and tent loosely with aluminum foil to rest for 5 minutes.
13. Return the skillet to the stovetop over medium heat and simmer the pan juices for 3–4 minutes until slightly reduced.
14. Whisk in the chilled butter cubes one at a time until the sauce is glossy and emulsified.
15. Spoon the sauce over the rested chicken and garnish with fresh parsley.
Succulent and aromatic, this chicken boasts a crispy skin giving way to tender, juicy meat infused with zesty lemon and pungent garlic. Serve it over a bed of creamy polenta or alongside roasted asparagus for a complete meal that’s as vibrant on the plate as it is on the palate.
Quinoa and Black Bean Salad
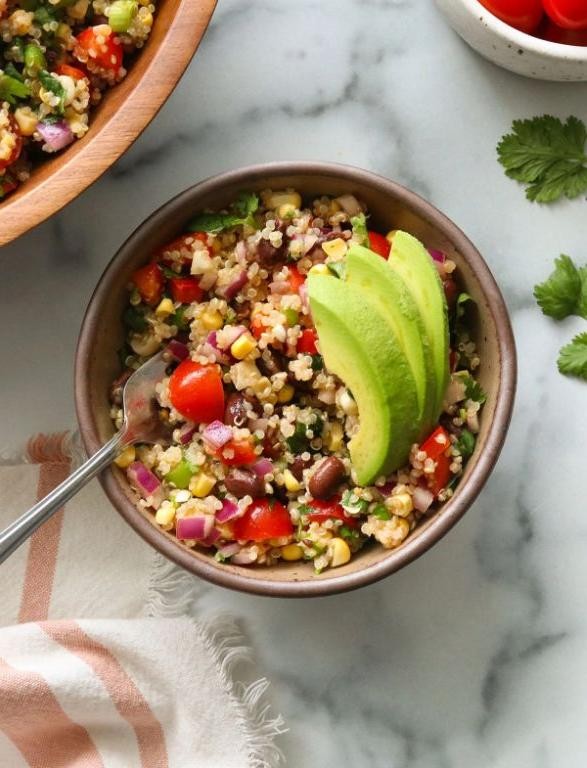
Zesty quinoa and black bean salad is the culinary superhero you didn’t know you needed—it swoops in to save your meal prep with a vibrant, protein-packed punch that’s as easy to make as it is delicious. Perfect for busy weeknights or a festive potluck, this dish brings a fiesta of flavors to your table without any fuss. Let’s dive into this colorful creation that’s sure to become a staple in your kitchen!
Serving: 4 | Pre Time: 15 minutes | Cooking Time: 20 minutes
Ingredients
– 1 cup quinoa, rinsed under cold water
– 1 ¾ cups filtered water
– 1 (15-ounce) can black beans, drained and rinsed
– 1 cup cherry tomatoes, halved
– ½ cup red onion, finely diced
– ¼ cup fresh cilantro, chopped
– 3 tablespoons extra-virgin olive oil
– 2 tablespoons freshly squeezed lime juice
– 1 teaspoon ground cumin
– ½ teaspoon smoked paprika
– ¼ teaspoon fine sea salt
Instructions
1. In a medium saucepan, combine 1 cup rinsed quinoa and 1 ¾ cups filtered water over high heat until it reaches a rolling boil.
2. Reduce the heat to low, cover the saucepan tightly, and simmer for 15 minutes, or until all the water is absorbed and the quinoa grains are tender and fluffy.
3. Tip: Fluff the cooked quinoa with a fork immediately after cooking to prevent clumping and allow it to cool slightly for a better texture in the salad.
4. In a large mixing bowl, add 1 can drained and rinsed black beans, 1 cup halved cherry tomatoes, ½ cup finely diced red onion, and ¼ cup chopped fresh cilantro.
5. In a small bowl, whisk together 3 tablespoons extra-virgin olive oil, 2 tablespoons freshly squeezed lime juice, 1 teaspoon ground cumin, ½ teaspoon smoked paprika, and ¼ teaspoon fine sea salt until fully emulsified.
6. Tip: For a brighter flavor, let the dressing sit for 5 minutes to allow the spices to meld before tossing with the salad ingredients.
7. Add the cooled quinoa to the large mixing bowl with the vegetables and beans.
8. Pour the prepared dressing over the quinoa mixture and gently toss everything together until evenly coated.
9. Tip: Chill the assembled salad in the refrigerator for at least 30 minutes before serving to enhance the flavors and allow the ingredients to marry beautifully.
10. Serve the quinoa and black bean salad chilled or at room temperature as desired.
Ooh-la-la! This salad boasts a delightful contrast of textures, from the fluffy quinoa to the creamy black beans and crisp vegetables, all tied together with a zesty, smoky dressing that sings with every bite. Get creative by serving it in lettuce cups for a low-carb twist or topping it with avocado slices for extra creaminess—it’s versatile enough to shine as a main dish or a vibrant side at any gathering.
Zucchini Noodles with Avocado Pesto
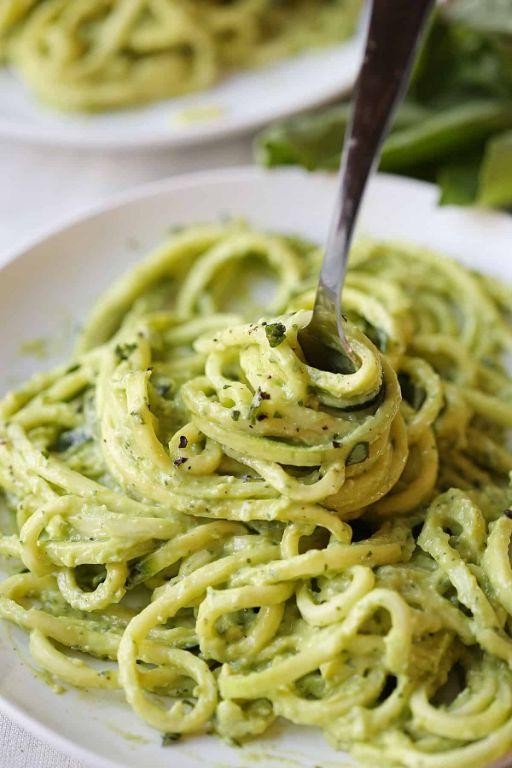
Sick of the same old pasta routine? Let’s spiralize our way to something spectacular! This zucchini noodle dish swaps carb-heavy guilt for vibrant veggie glory, topped with a creamy avocado pesto that’ll make your taste buds do a happy dance.
Serving: 4 | Pre Time: 15 minutes | Cooking Time: 5 minutes
Ingredients
– 4 medium zucchini, spiralized into noodles
– 2 ripe Hass avocados, halved and pitted
– ½ cup fresh basil leaves, packed
– ¼ cup raw pine nuts, toasted
– 2 cloves garlic, minced
– ¼ cup extra-virgin olive oil
– 2 tablespoons freshly squeezed lemon juice
– ½ teaspoon fine sea salt
– ¼ teaspoon freshly ground black pepper
– ¼ cup grated Parmigiano-Reggiano cheese
Instructions
1. Using a spiralizer, transform the zucchini into uniform noodle strands, then set them aside in a large mixing bowl.
2. In a food processor, combine the avocado flesh, basil leaves, toasted pine nuts, and minced garlic.
3. Pulse the mixture for 15 seconds until coarsely chopped, scraping down the sides with a spatula to ensure even blending.
4. With the processor running on low speed, slowly drizzle in the extra-virgin olive oil over 30 seconds until fully incorporated.
5. Add the lemon juice, fine sea salt, and freshly ground black pepper to the processor, then pulse for 10 seconds to combine.
6. Transfer the avocado pesto to the bowl with the zucchini noodles, using a rubber spatula to scrape all contents from the processor.
7. Toss the noodles and pesto vigorously with tongs for 1 minute until every strand is evenly coated with the creamy sauce.
8. Sprinkle the grated Parmigiano-Reggiano cheese over the top of the tossed noodles.
9. Serve immediately on chilled plates to maintain the vibrant green color of the avocado pesto.
Freshly tossed, this dish offers a delightful contrast of crisp zucchini noodles against the luxuriously smooth avocado pesto. The bright lemon and basil notes cut through the richness, while the toasted pine nuts add a satisfying crunch. For a playful twist, top with grilled shrimp or cherry tomatoes for extra color and protein!
Slow Cooker Beef Stew

Crank up the cozy vibes, because we’re diving into a slow-cooked masterpiece that practically hugs you from the inside. This beef stew is the ultimate ‘set it and forget it’ hero, transforming humble ingredients into a soul-warming bowl of deliciousness with minimal effort—perfect for when you’d rather binge-watch than babysit a pot.
Serving: 6 | Pre Time: 20 minutes | Cooking Time: 480 minutes
Ingredients
– 2 pounds chuck roast, cut into 1-inch cubes
– 3 tablespoons all-purpose flour
– 2 tablespoons extra-virgin olive oil
– 1 large yellow onion, diced
– 4 cloves garlic, minced
– 4 medium carrots, peeled and cut into 1-inch pieces
– 3 medium Yukon Gold potatoes, peeled and cut into 1-inch cubes
– 2 cups beef broth
– 1 cup dry red wine (such as Cabernet Sauvignon)
– 2 tablespoons tomato paste
– 2 sprigs fresh rosemary
– 2 bay leaves
– 1 teaspoon kosher salt
– ½ teaspoon freshly ground black pepper
Instructions
1. Pat the chuck roast cubes dry with paper towels, then toss them in a bowl with the all-purpose flour until evenly coated.
2. Heat the extra-virgin olive oil in a large skillet over medium-high heat until shimmering, about 2 minutes.
3. Add the floured beef cubes in a single layer, working in batches if needed, and sear until deeply browned on all sides, approximately 4–5 minutes per batch.
4. Transfer the seared beef to a 6-quart slow cooker insert.
5. In the same skillet, add the diced yellow onion and sauté over medium heat until translucent and lightly caramelized, about 5 minutes.
6. Add the minced garlic and cook for 1 minute until fragrant, stirring constantly to prevent burning.
7. Pour in the dry red wine to deglaze the skillet, scraping up any browned bits with a wooden spoon, and simmer for 3 minutes to reduce slightly.
8. Stir in the tomato paste and cook for 1 minute until it darkens in color.
9. Transfer the onion-wine mixture to the slow cooker with the beef.
10. Add the carrot pieces, potato cubes, beef broth, rosemary sprigs, bay leaves, kosher salt, and black pepper to the slow cooker.
11. Stir all ingredients gently to combine, ensuring the beef is submerged in the liquid.
12. Cover and cook on low heat for 8 hours, until the beef is fork-tender and the vegetables are soft.
13. Discard the rosemary sprigs and bay leaves before serving.
14. Ladle the stew into bowls while hot.
Yielding a rich, velvety broth and melt-in-your-mouth beef, this stew boasts deep umami notes from the wine reduction and a hearty texture from the tender vegetables. For a creative twist, serve it over creamy polenta or with a crusty baguette for dipping—it’s comfort food that’s seriously show-stopping.
Greek Yogurt Chicken Salad

Tired of the same old chicken salad that tastes like it came from a sad deli counter? This Greek Yogurt Chicken Salad is about to become your new lunchtime obsession—it’s creamy, tangy, and packed with enough flavor to make your taste buds do a happy dance. Think of it as the upgraded, protein-packed version that won’t leave you in a mayo-induced coma.
Serving: 4 | Pre Time: 15 minutes | Cooking Time: 20 minutes
Ingredients
– 1.5 lbs boneless, skinless chicken breasts, trimmed of excess fat
– 1 cup plain whole-milk Greek yogurt
– 1/3 cup mayonnaise
– 1 tbsp Dijon mustard
– 1 tbsp freshly squeezed lemon juice
– 1/2 cup finely diced celery
– 1/3 cup finely chopped red onion
– 1/4 cup chopped fresh dill
– 1 tsp kosher salt
– 1/2 tsp freshly ground black pepper
– 1 tbsp extra-virgin olive oil
– 4 cups mixed salad greens
Instructions
1. Pat the chicken breasts dry with paper towels to ensure even browning.
2. Season both sides of the chicken breasts evenly with the kosher salt and black pepper.
3. Heat the extra-virgin olive oil in a large skillet over medium-high heat until it shimmers, about 2 minutes.
4. Place the chicken breasts in the skillet and cook for 6-7 minutes per side, or until the internal temperature reaches 165°F on an instant-read thermometer.
5. Transfer the cooked chicken to a cutting board and let it rest for 5 minutes to allow the juices to redistribute.
6. While the chicken rests, combine the Greek yogurt, mayonnaise, Dijon mustard, and lemon juice in a medium mixing bowl, whisking until smooth.
7. Finely dice the celery and red onion, and chop the fresh dill.
8. Add the diced celery, chopped red onion, and chopped dill to the yogurt mixture, stirring to incorporate evenly.
9. Dice the rested chicken into 1/2-inch cubes.
10. Gently fold the diced chicken into the yogurt mixture until all pieces are evenly coated.
11. Divide the mixed salad greens among four plates.
12. Spoon the chicken salad mixture over the greens, serving immediately.
And just like that, you’ve got a chicken salad that’s delightfully creamy yet light, with a bright tang from the Greek yogurt and a satisfying crunch from the fresh veggies. Serve it piled high on toasted whole-grain bread for a hearty sandwich, or scoop it into crisp lettuce cups for a low-carb twist—either way, it’s a lunch that’ll have you skipping the takeout line.
Cauliflower Fried Rice
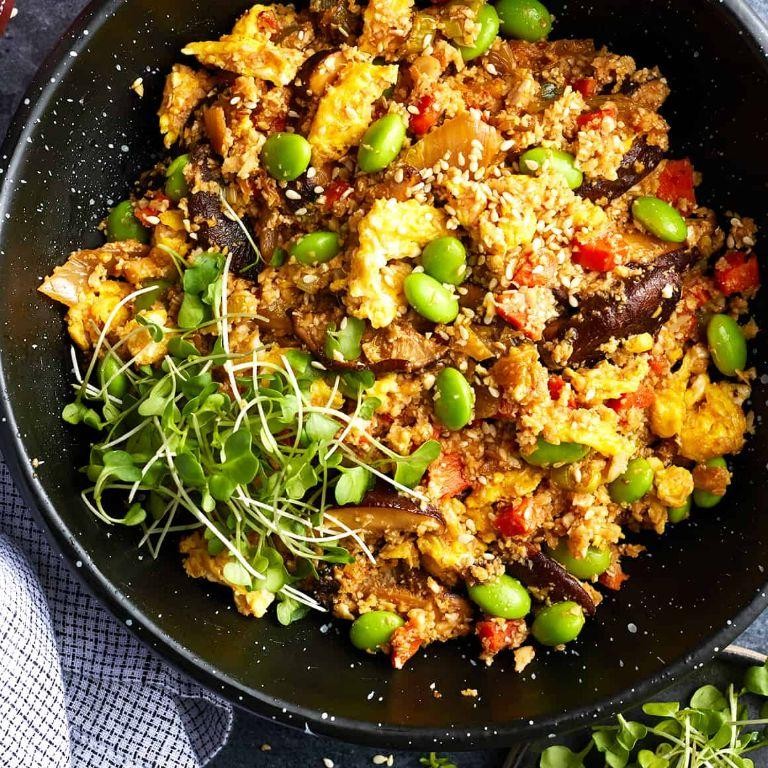
Forget everything you thought you knew about cauliflower—this isn’t your average, mushy side dish. We’re transforming this humble veggie into a sizzling, savory masterpiece that’ll have you questioning why you ever bothered with actual rice, all while keeping things light, bright, and downright delicious.
Serving: 4 | Pre Time: 15 minutes | Cooking Time: 15 minutes
Ingredients
– 1 large head of cauliflower, riced (about 4 cups)
– 2 tbsp avocado oil
– 3 pasture-raised eggs, lightly beaten
– 1 cup finely diced yellow onion
– 3/4 cup diced carrots
– 3/4 cup frozen peas, thawed
– 3 cloves garlic, minced
– 2 tbsp low-sodium tamari
– 1 tbsp toasted sesame oil
– 2 thinly sliced green onions
– 1/4 tsp white pepper
Instructions
1. Place the riced cauliflower in a clean kitchen towel and wring firmly over the sink to remove excess moisture, which prevents sogginess.
2. Heat 1 tbsp of avocado oil in a large wok or skillet over medium-high heat until it shimmers, about 90 seconds.
3. Pour the lightly beaten eggs into the hot oil and scramble for 45-60 seconds until just set, then transfer to a plate.
4. Add the remaining 1 tbsp of avocado oil to the wok and heat for 30 seconds.
5. Sauté the diced yellow onion and carrots for 4-5 minutes until the onions are translucent and the carrots begin to soften.
6. Stir in the minced garlic and cook for 45 seconds until fragrant, being careful not to let it burn.
7. Add the wrung cauliflower rice and thawed peas, stirring to combine.
8. Cook the mixture, stirring occasionally, for 6-7 minutes until the cauliflower is tender but still has a slight bite.
9. Pour the low-sodium tamari and toasted sesame oil over the cauliflower mixture, stirring to coat evenly.
10. Fold the scrambled eggs back into the wok along with the thinly sliced green onions and white pepper.
11. Cook for an additional 1-2 minutes until everything is heated through and well incorporated.
12. Remove from heat and serve immediately.
What you get is a dish with the perfect al dente texture—each grain-like floret holds its own against the savory tamari and rich sesame oil. The sweetness from the peas and carrots balances the subtle heat of the white pepper, creating a symphony of flavors that’s both comforting and exciting. Try topping it with a fried egg for extra decadence or folding in some shredded rotisserie chicken for a heartier meal.
Spaghetti Squash with Marinara
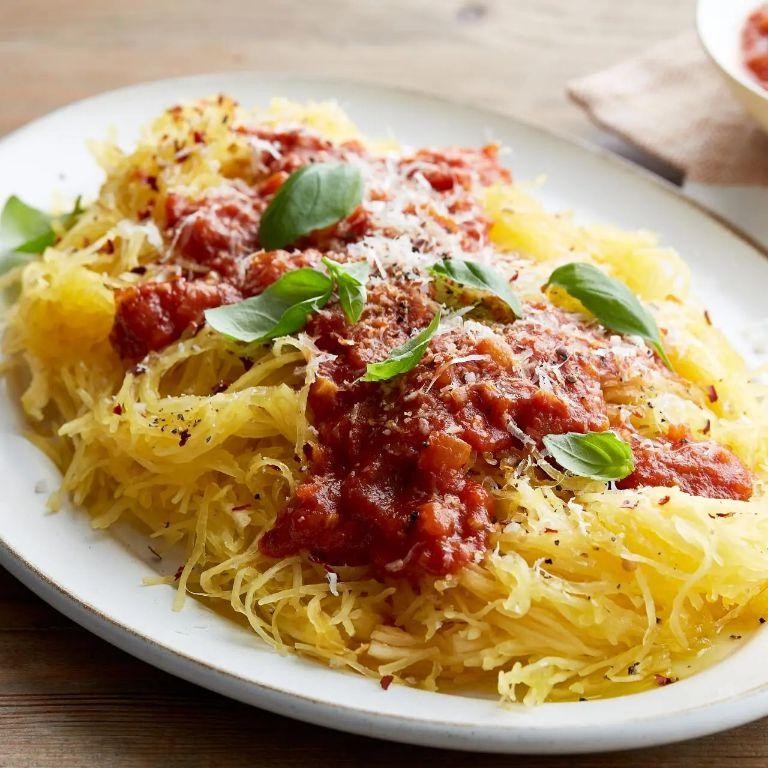
Oh, the humble spaghetti squash—nature’s cleverest pasta imposter, ready to save your carb-conscious soul with a wink and a twirl. This Spaghetti Squash with Marinara ditches the doughy guilt for a veggie-packed, flavor-forward fiesta that’ll have even your skeptical uncle asking for seconds. Let’s turn that gourd into golden, twirlable strands and smother it in a rich, herb-kissed sauce that’s pure comfort without the carb coma.
Serving: 4 | Pre Time: 15 minutes | Cooking Time: 50 minutes
Ingredients
– 1 large spaghetti squash (about 3 pounds), halved lengthwise and seeds removed
– 2 tablespoons extra-virgin olive oil, divided
– 1 teaspoon fine sea salt, divided
– ½ teaspoon freshly cracked black pepper, divided
– 1 small yellow onion, finely diced
– 3 garlic cloves, minced
– 1 (28-ounce) can San Marzano tomatoes, crushed by hand
– ¼ cup dry red wine (such as Chianti)
– 1 tablespoon tomato paste
– 1 teaspoon dried oregano
– ½ teaspoon crushed red pepper flakes
– ¼ cup fresh basil leaves, thinly sliced
– 2 ounces Parmigiano-Reggiano cheese, finely grated
Instructions
1. Preheat your oven to 400°F and line a rimmed baking sheet with parchment paper.
2. Brush the cut sides of the spaghetti squash with 1 tablespoon of extra-virgin olive oil, then season evenly with ½ teaspoon of fine sea salt and ¼ teaspoon of freshly cracked black pepper.
3. Place the squash halves cut-side down on the prepared baking sheet and roast for 40–45 minutes, until the flesh is tender and easily pierced with a fork.
4. While the squash roasts, heat the remaining 1 tablespoon of extra-virgin olive oil in a large saucepan over medium heat.
5. Add the finely diced yellow onion and sauté for 5–7 minutes, stirring occasionally, until translucent and lightly golden.
6. Stir in the minced garlic cloves and cook for 1 minute, just until fragrant—avoid browning to prevent bitterness.
7. Pour in the dry red wine to deglaze the pan, scraping up any browned bits with a wooden spoon, and simmer for 2–3 minutes until reduced by half.
8. Add the hand-crushed San Marzano tomatoes, tomato paste, dried oregano, crushed red pepper flakes, remaining ½ teaspoon of fine sea salt, and remaining ¼ teaspoon of freshly cracked black pepper.
9. Reduce the heat to low, partially cover the saucepan, and simmer the sauce for 25–30 minutes, stirring occasionally, until thickened and deeply aromatic.
10. Once the squash is roasted, remove it from the oven and let it cool for 5 minutes until safe to handle.
11. Use a fork to scrape the squash flesh lengthwise, creating long, spaghetti-like strands, and transfer them to a large serving bowl.
12. Fold the simmered marinara sauce and thinly sliced fresh basil leaves into the squash strands until evenly coated.
13. Divide the mixture among four plates and top each serving with finely grated Parmigiano-Reggiano cheese.
Yes, you’ve just crafted a dish with tender, al dente-like squash strands that hold their shape against a robust, garlicky marinara—each bite is a savory, slightly sweet symphony with a hint of heat from the pepper flakes. Serve it piled high in bowls with a crisp green salad, or get fancy by stuffing the mixture back into the roasted squash shells for a stunning, edible centerpiece that’s as Instagram-worthy as it is delicious.
Grilled Shrimp and Veggie Skewers

Tired of the same old dinner routine? Let’s shake things up with these vibrant, flavor-packed skewers that are basically a summer party on a stick—no actual party required, but we won’t judge if you invite the neighbors! They’re quick, customizable, and guaranteed to make your taste buds do a happy dance.
Serving: 4 | Pre Time: 20 minutes | Cooking Time: 10 minutes
Ingredients
– 1 lb large wild-caught shrimp, peeled and deveined
– 2 medium zucchini, cut into 1-inch rounds
– 1 red bell pepper, seeded and cut into 1-inch squares
– 1 yellow bell pepper, seeded and cut into 1-inch squares
– 1 red onion, cut into 1-inch wedges
– ¼ cup extra-virgin olive oil
– 3 tbsp freshly squeezed lemon juice
– 2 cloves garlic, finely minced
– 1 tsp smoked paprika
– ½ tsp kosher salt
– ¼ tsp freshly ground black pepper
– 8-10 wooden skewers, soaked in water for 30 minutes
Instructions
1. In a medium bowl, whisk together the extra-virgin olive oil, freshly squeezed lemon juice, finely minced garlic, smoked paprika, kosher salt, and freshly ground black pepper to create a marinade.
2. Add the peeled and deveined shrimp to the marinade, tossing gently to coat, and let it rest at room temperature for 15 minutes to enhance flavor absorption.
3. While the shrimp marinates, thread the zucchini rounds, red bell pepper squares, yellow bell pepper squares, and red onion wedges alternately onto the soaked wooden skewers, leaving small gaps for even cooking.
4. Preheat a grill or grill pan to medium-high heat, approximately 400°F, ensuring the grates are clean and lightly oiled to prevent sticking.
5. Remove the shrimp from the marinade, reserving the excess, and thread them onto separate skewers to allow for different cooking times.
6. Place the vegetable skewers on the preheated grill and cook for 4-5 minutes per side, turning once, until they develop visible grill marks and soften slightly.
7. Add the shrimp skewers to the grill and cook for 2-3 minutes per side, basting occasionally with the reserved marinade, until the shrimp turn opaque and firm to the touch.
8. Transfer all skewers to a serving platter and let them rest for 2 minutes to allow the juices to redistribute.
9. Brush the skewers with any remaining marinade just before serving for an extra burst of flavor.
10. Serve immediately while hot.
Bite into these skewers for a delightful contrast: the shrimp are juicy and tender with a smoky hint, while the veggies offer a crisp, charred sweetness. Drizzle with a squeeze of lemon or pair with a cilantro-lime rice for a complete meal that’s as colorful as it is delicious—perfect for al fresco dining or a quick weeknight upgrade!
Sweet Potato and Black Bean Tacos

Let’s be real—some days you want a taco that’s both a flavor fiesta and a nutritional powerhouse, without spending hours in the kitchen. This vibrant, veggie-packed number is your weeknight hero, delivering smoky sweetness and hearty satisfaction in every messy, delicious bite. Consider it your ticket to taco Tuesday (or any day) glory, no meat required.
Serving: 4 | Pre Time: 15 minutes | Cooking Time: 25 minutes
Ingredients
– 2 medium sweet potatoes, peeled and diced into ½-inch cubes
– 1 (15-ounce) can black beans, rinsed and drained
– 1 small yellow onion, finely diced
– 2 cloves garlic, minced
– 1 tablespoon extra-virgin olive oil
– 1 teaspoon ground cumin
– ½ teaspoon smoked paprika
– ¼ teaspoon ground chipotle powder
– ½ teaspoon fine sea salt
– 8 small corn tortillas
– ¼ cup crumbled queso fresco
– ¼ cup fresh cilantro leaves, roughly chopped
– 1 lime, cut into wedges
Instructions
1. Preheat your oven to 425°F and line a rimmed baking sheet with parchment paper.
2. In a large mixing bowl, toss the diced sweet potatoes with 2 teaspoons of the olive oil, the cumin, smoked paprika, chipotle powder, and sea salt until evenly coated.
3. Spread the seasoned sweet potatoes in a single layer on the prepared baking sheet.
4. Roast for 20–25 minutes, flipping once halfway through, until the potatoes are tender and caramelized at the edges.
5. While the potatoes roast, heat the remaining 1 teaspoon of olive oil in a medium skillet over medium heat.
6. Add the diced onion and sauté for 5–7 minutes, stirring occasionally, until softened and translucent.
7. Stir in the minced garlic and cook for 1 additional minute until fragrant.
8. Add the rinsed black beans to the skillet and cook for 3–4 minutes, just until heated through, then remove from heat.
9. Warm the corn tortillas by heating a dry skillet over medium heat for 30–60 seconds per side, or wrapping them in a damp towel and microwaving for 30 seconds—this prevents cracking.
10. To assemble, divide the roasted sweet potatoes and black bean mixture evenly among the warm tortillas.
11. Top each taco with a sprinkle of crumbled queso fresco and a pinch of fresh cilantro.
12. Serve immediately with lime wedges on the side for squeezing.
Outrageously satisfying, these tacos offer a delightful contrast: the creamy, caramelized sweet potatoes against the earthy beans, all brightened by the zesty lime and fresh cilantro. For a fun twist, try them as a taco salad by crumbling the tortillas over a bed of greens, or double the smoky spices if you’re craving extra heat.
Baked Salmon with Asparagus
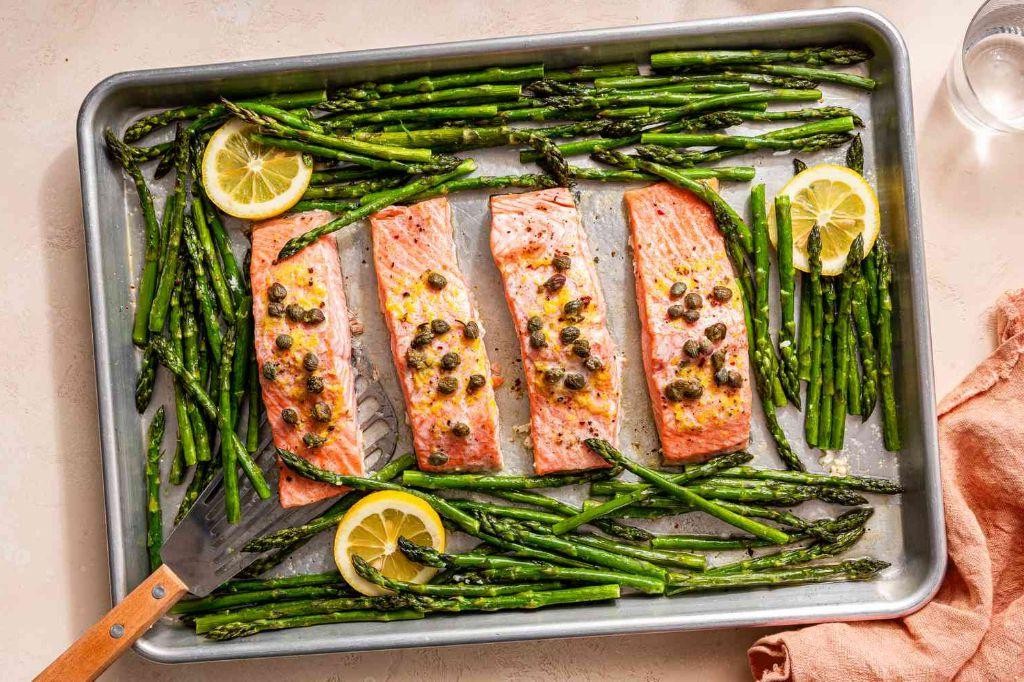
Just when you thought your oven was only good for reheating pizza, let’s elevate it with a dish that’s as easy as it is elegant. This baked salmon with asparagus is your ticket to a stress-free, show-stopping dinner that’ll have everyone thinking you secretly attended culinary school—no need to confess it’s mostly just good timing and a hot oven!
Serving: 4 | Pre Time: 15 minutes | Cooking Time: 15 minutes
Ingredients
– 4 (6-ounce) skin-on salmon fillets, patted dry
– 1 pound fresh asparagus spears, woody ends trimmed
– 3 tablespoons extra-virgin olive oil, divided
– 2 tablespoons freshly squeezed lemon juice
– 2 cloves garlic, minced
– 1 teaspoon kosher salt
– ½ teaspoon freshly ground black pepper
– 1 tablespoon chopped fresh dill
– Lemon wedges, for serving
Instructions
1. Preheat your oven to 400°F (204°C) and line a large rimmed baking sheet with parchment paper for easy cleanup.
2. In a small bowl, whisk together 2 tablespoons of extra-virgin olive oil, freshly squeezed lemon juice, minced garlic, kosher salt, and freshly ground black pepper to create a marinade.
3. Place the patted-dry salmon fillets skin-side down on the prepared baking sheet, spacing them evenly.
4. Arrange the trimmed asparagus spears around the salmon in a single layer on the same baking sheet.
5. Drizzle the remaining 1 tablespoon of extra-virgin olive oil over the asparagus and toss lightly to coat.
6. Brush the prepared marinade generously over the top of each salmon fillet, ensuring even coverage.
7. Sprinkle the chopped fresh dill over the salmon fillets for an aromatic finish.
8. Bake in the preheated oven for 12–15 minutes, until the salmon flakes easily with a fork and the asparagus is tender-crisp.
9. Remove the baking sheet from the oven and let it rest for 3 minutes to allow the juices to redistribute.
10. Serve immediately with lemon wedges on the side for squeezing.
Finally, savor the buttery, flaky texture of the salmon paired with the crisp-tender asparagus—each bite is a bright, lemony delight. For a creative twist, flake the leftovers into a grain bowl tomorrow or pile it onto toasted baguette slices for an impromptu appetizer that’ll make weeknights feel festive.
Egg Muffins with Spinach and Feta

Aren’t you tired of the same old breakfast scramble? Let’s ditch the boring and embrace the brilliant with these portable, protein-packed pockets of joy. Think of them as your morning’s best friend—fluffy, flavorful, and ready to rescue you from hangry meltdowns.
Serving: 12 | Pre Time: 15 minutes | Cooking Time: 25 minutes
Ingredients
– 8 large pasture-raised eggs, lightly beaten
– 1 cup fresh baby spinach, finely chopped
– ½ cup crumbled feta cheese
– ¼ cup whole milk
– 2 tablespoons unsalted butter, melted
– 1 teaspoon kosher salt
– ½ teaspoon freshly ground black pepper
– Non-stick cooking spray
Instructions
1. Preheat your oven to 350°F (175°C) and generously coat a standard 12-cup muffin tin with non-stick cooking spray.
2. In a large mixing bowl, combine the lightly beaten pasture-raised eggs, whole milk, melted unsalted butter, kosher salt, and freshly ground black pepper. Whisk vigorously for 60 seconds until fully emulsified and slightly frothy.
3. Fold in the finely chopped fresh baby spinach and crumbled feta cheese with a rubber spatula until evenly distributed throughout the egg mixture.
4. Evenly divide the mixture among the 12 prepared muffin cups, filling each about three-quarters full to allow for rising.
5. Bake on the center oven rack for 22–25 minutes, or until the tops are golden brown and a toothpick inserted into the center of a muffin comes out clean.
6. Remove the tin from the oven and let the muffins cool in the pan for 5 minutes to set.
7. Gently run a butter knife around the edges of each muffin to loosen, then transfer them to a wire rack to cool completely.
Remarkably fluffy with a savory punch, these muffins boast a tender crumb from the feta’s creamy tang and pops of earthy spinach. Serve them warm alongside a drizzle of hot sauce for a kick, or slice and layer into a breakfast sandwich for the ultimate grab-and-go glory.
Lentil and Vegetable Soup

Rally your taste buds, folks—this Lentil and Vegetable Soup is the cozy, one-pot wonder that’ll rescue you from winter’s chill (or a lazy Tuesday). Packed with earthy lentils and vibrant veggies, it’s basically a hug in a bowl that’s as nourishing as it is delicious. Let’s get simmering!
Serving: 6 | Pre Time: 15 minutes | Cooking Time: 40 minutes
Ingredients
– 2 tablespoons extra-virgin olive oil
– 1 large yellow onion, finely diced
– 3 cloves garlic, minced
– 2 medium carrots, peeled and diced into ½-inch pieces
– 2 stalks celery, diced into ½-inch pieces
– 1 cup dried green lentils, rinsed and drained
– 6 cups vegetable broth
– 1 (14.5-ounce) can diced tomatoes, with juices
– 1 teaspoon dried thyme
– 1 bay leaf
– 1 teaspoon kosher salt
– ½ teaspoon freshly ground black pepper
– 2 cups fresh spinach, roughly chopped
– 2 tablespoons fresh lemon juice
Instructions
1. Heat 2 tablespoons extra-virgin olive oil in a large Dutch oven or heavy-bottomed pot over medium heat until shimmering, about 2 minutes.
2. Add 1 large yellow onion, finely diced, and sauté until translucent and fragrant, 5–7 minutes, stirring occasionally with a wooden spoon.
3. Stir in 3 cloves garlic, minced, and cook for 1 minute until aromatic but not browned.
4. Add 2 medium carrots, peeled and diced into ½-inch pieces, and 2 stalks celery, diced into ½-inch pieces, cooking for 5 minutes until slightly softened.
5. Pour in 1 cup dried green lentils, rinsed and drained, and toast for 1 minute to enhance their nutty flavor.
6. Add 6 cups vegetable broth, 1 (14.5-ounce) can diced tomatoes with juices, 1 teaspoon dried thyme, 1 bay leaf, 1 teaspoon kosher salt, and ½ teaspoon freshly ground black pepper, stirring to combine.
7. Bring the mixture to a boil over high heat, then reduce to a simmer and cover partially, cooking for 25–30 minutes until lentils are tender but not mushy.
8. Stir in 2 cups fresh spinach, roughly chopped, and cook for 2 minutes until wilted.
9. Remove from heat and discard the bay leaf, then stir in 2 tablespoons fresh lemon juice to brighten the flavors.
10. Ladle the soup into bowls and serve immediately.
Warm, hearty, and brimming with rustic charm, this soup boasts a velvety texture from the softened lentils and a vibrant pop from the fresh spinach. For a creative twist, top it with a dollop of tangy Greek yogurt or a sprinkle of crispy croutons—it’s the ultimate comfort food that’ll have everyone asking for seconds!
Chicken and Broccoli Stir-Fry
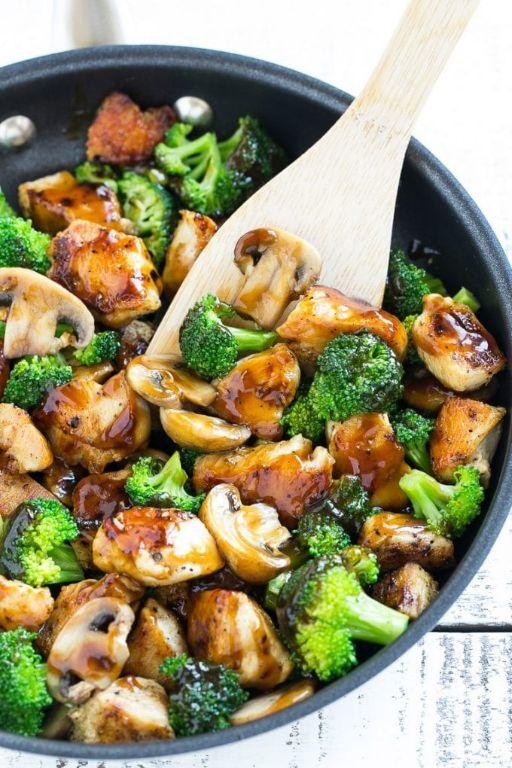
Oh, the eternal weeknight dinner dilemma—you want something that feels like a treat but cooks faster than you can say “takeout menu.” Enter this saucy, sizzling stir-fry that transforms humble chicken and broccoli into a flavor-packed fiesta, proving that your skillet can indeed outshine the delivery guy’s insulated bag. It’s the kind of meal that makes you feel like a kitchen wizard without requiring a magic wand (just a good whisk and a hot pan).
Serving: 4 | Pre Time: 15 minutes | Cooking Time: 15 minutes
Ingredients
– 1.5 pounds boneless, skinless chicken thighs, cut into 1-inch cubes
– 1 tablespoon cornstarch
– 3 tablespoons soy sauce
– 2 tablespoons oyster sauce
– 1 tablespoon rice vinegar
– 1 teaspoon toasted sesame oil
– 2 tablespoons neutral oil (such as avocado oil)
– 4 cloves garlic, minced
– 1 tablespoon fresh ginger, finely grated
– 1 pound broccoli florets, cut into bite-sized pieces
– 1/2 cup low-sodium chicken broth
– 1 teaspoon granulated sugar
– 2 scallions, thinly sliced
Instructions
1. In a medium bowl, combine the cubed chicken thighs, cornstarch, and 1 tablespoon of soy sauce, tossing until the chicken is evenly coated—this creates a velvety texture when cooked.
2. In a small bowl, whisk together the remaining 2 tablespoons of soy sauce, oyster sauce, rice vinegar, toasted sesame oil, and granulated sugar until fully dissolved; set this sauce mixture aside.
3. Heat a large skillet or wok over high heat until a drop of water sizzles and evaporates immediately, about 2 minutes.
4. Add 1 tablespoon of neutral oil to the hot skillet, swirling to coat the surface evenly.
5. Add the coated chicken in a single layer, cooking undisturbed for 3–4 minutes until the bottom develops a golden-brown crust.
6. Flip the chicken pieces and cook for an additional 2–3 minutes until cooked through and no longer pink in the center; transfer to a clean plate.
7. Reduce the heat to medium-high and add the remaining 1 tablespoon of neutral oil to the same skillet.
8. Add the minced garlic and grated ginger, stirring constantly for 30–45 seconds until fragrant but not browned—this prevents bitterness.
9. Add the broccoli florets and chicken broth, covering the skillet immediately to steam the broccoli for 3–4 minutes until bright green and tender-crisp.
10. Uncover the skillet and return the cooked chicken to the pan, pouring in the reserved sauce mixture.
11. Stir everything together, cooking for 1–2 minutes until the sauce thickens slightly and coats the ingredients evenly.
12. Remove from heat and garnish with thinly sliced scallions.
Chicken emerges tender and juicy from its cornstarch marinade, while broccoli retains a satisfying crunch, all enveloped in a glossy, umami-rich sauce that clings perfectly to every bite. For a creative twist, serve it over cauliflower rice for a low-carb delight or alongside fluffy jasmine rice to soak up every last drop of that savory goodness.
Avocado and Egg Toast

Ever had one of those mornings where your stomach is staging a full-blown protest, and only something creamy, savory, and gloriously simple will appease it? Enter the humble yet heroic avocado and egg toast—a dish so straightforward it feels like cheating, yet so satisfying it deserves a standing ovation. It’s the culinary equivalent of a warm hug, ready in minutes to turn your day around.
Serving: 1 | Pre Time: 5 minutes | Cooking Time: 5 minutes
Ingredients
– 1 slice of artisanal sourdough bread, approximately 1/2-inch thick
– 1 large pasture-raised egg
– 1/2 ripe Hass avocado
– 1 tablespoon unsalted European-style butter
– 1 teaspoon fresh lemon juice
– 1/4 teaspoon flaky sea salt, such as Maldon
– 1/8 teaspoon freshly cracked black pepper
– 1 teaspoon extra-virgin olive oil
– 1 teaspoon finely chopped fresh chives
Instructions
1. Place a small non-stick skillet over medium heat and add 1 teaspoon of extra-virgin olive oil, swirling to coat the surface evenly.
2. Crack 1 large pasture-raised egg directly into the center of the skillet and cook undisturbed for 2 minutes, or until the egg white is fully set and opaque.
3. While the egg cooks, toast 1 slice of artisanal sourdough bread in a toaster or under a broiler until golden-brown and crisp, about 2 minutes.
4. Tip: For extra flavor, rub the warm toast lightly with the cut side of a garlic clove—it’ll infuse a subtle aroma without overpowering the dish.
5. Immediately spread 1 tablespoon of unsalted European-style butter over the hot toast, allowing it to melt completely.
6. In a small bowl, mash 1/2 ripe Hass avocado with 1 teaspoon of fresh lemon juice until smooth but slightly chunky.
7. Tip: Use a fork for mashing to control the texture, leaving some small chunks for a more interesting mouthfeel.
8. Season the mashed avocado with 1/4 teaspoon of flaky sea salt and 1/8 teaspoon of freshly cracked black pepper, stirring to incorporate.
9. Spread the seasoned avocado mixture evenly over the buttered toast, covering the surface completely.
10. Using a spatula, carefully transfer the cooked egg from the skillet onto the avocado-covered toast.
11. Tip: For a perfectly runny yolk, cover the skillet with a lid for the last 30 seconds of cooking—this steams the top of the egg gently.
12. Garnish the assembled toast with 1 teaspoon of finely chopped fresh chives scattered over the top.
Start by admiring that golden yolk, just waiting to burst over the creamy avocado and crisp sourdough. The contrast between the rich, buttery avocado and the bright, peppery chives creates a symphony of flavors that’s both comforting and sophisticated. For a creative twist, add a drizzle of chili crisp or a sprinkle of smoked paprika to introduce a subtle heat that elevates this simple dish into something truly memorable.
Turkey Meatballs with Zucchini Noodles
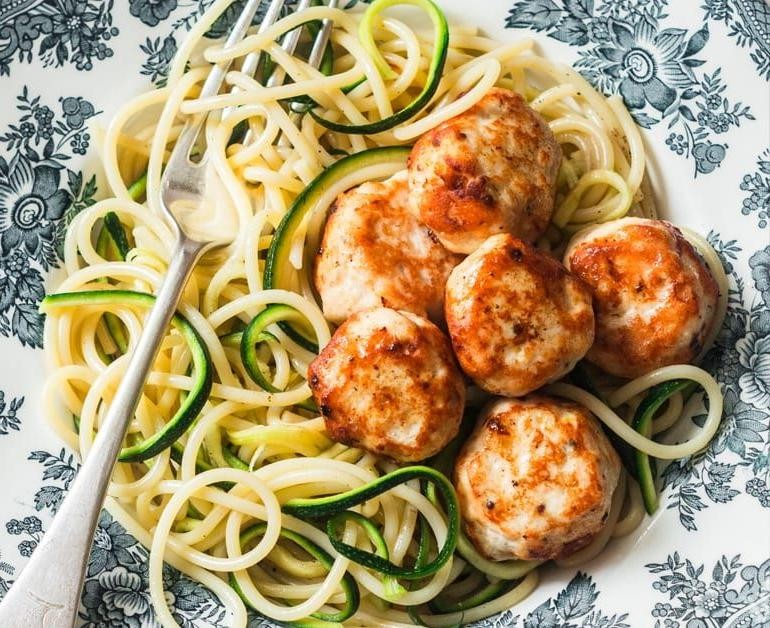
Sick of the same old spaghetti routine? Let’s twirl things up with a lighter, brighter twist that’s as fun to make as it is to devour—these juicy turkey meatballs lounging on a bed of crisp zucchini noodles are about to become your new weeknight hero. Seriously, who needs carb-comas when you can have this vibrant, flavor-packed plate ready in a flash?
Serving: 4 | Pre Time: 15 minutes | Cooking Time: 20 minutes
Ingredients
– 1 lb ground turkey (93% lean)
– 1 large zucchini, spiralized into noodles
– ½ cup panko breadcrumbs
– ¼ cup grated Parmesan cheese
– 1 pasture-raised egg, lightly beaten
– 2 cloves garlic, minced
– 1 tbsp extra-virgin olive oil
– 1 tsp dried oregano
– ½ tsp kosher salt
– ¼ tsp freshly ground black pepper
– 2 cups marinara sauce
– Fresh basil leaves, for garnish
Instructions
1. Preheat your oven to 400°F and line a baking sheet with parchment paper.
2. In a large mixing bowl, combine the ground turkey, panko breadcrumbs, grated Parmesan cheese, lightly beaten pasture-raised egg, minced garlic, dried oregano, kosher salt, and freshly ground black pepper.
3. Gently mix the ingredients with your hands until just combined—overmixing can toughen the meatballs.
4. Roll the mixture into 1-inch meatballs, placing them evenly on the prepared baking sheet.
5. Bake the meatballs in the preheated oven for 15–18 minutes, or until they reach an internal temperature of 165°F and are golden brown.
6. While the meatballs bake, heat the extra-virgin olive oil in a large skillet over medium-high heat.
7. Add the spiralized zucchini noodles to the skillet and sauté for 2–3 minutes, just until tender-crisp—avoid overcooking to prevent sogginess.
8. Pour the marinara sauce into the skillet with the zucchini noodles, stirring to coat and warming through for 1–2 minutes.
9. Remove the meatballs from the oven and nestle them into the skillet with the saucy zucchini noodles.
10. Garnish with fresh basil leaves before serving.
Perfectly tender meatballs with a savory, herb-kissed bite contrast delightfully with the al dente zucchini noodles, all swathed in a rich marinara hug. Play with presentation by topping it all with a sprinkle of extra Parmesan or a drizzle of chili oil for a spicy kick—this dish is as versatile as it is delicious!
Greek Yogurt Pancakes

Every morning deserves a breakfast that feels like a cozy hug, but let’s be real—sometimes you want fluffy, dreamy pancakes without the guilt trip. Enter Greek yogurt pancakes, the clever kitchen hack that swaps out heaviness for protein-packed lightness, turning your griddle into a brunch superstar with a tangy twist that’ll make your taste buds do a happy dance.
Serving: 4 | Pre Time: 10 minutes | Cooking Time: 15 minutes
Ingredients
- 1 cup all-purpose flour, sifted
- 2 teaspoons baking powder
- ¼ teaspoon fine sea salt
- 1 cup plain Greek yogurt, full-fat
- 2 pasture-raised eggs, lightly beaten
- ¼ cup granulated sugar
- 1 teaspoon pure vanilla extract
- ¼ cup whole milk
- 2 tablespoons clarified butter, for cooking
- Maple syrup, for serving
Instructions
- In a large mixing bowl, whisk together the sifted all-purpose flour, baking powder, and fine sea salt until fully combined.
- In a separate bowl, combine the plain Greek yogurt, lightly beaten pasture-raised eggs, granulated sugar, pure vanilla extract, and whole milk, stirring until smooth.
- Pour the wet ingredients into the dry ingredients, folding gently with a spatula until just incorporated—avoid overmixing to keep the batter light. Tip: A few lumps are fine; they prevent tough pancakes.
- Heat a non-stick skillet or griddle over medium heat (350°F) and add 1 tablespoon of clarified butter, swirling to coat the surface evenly.
- Pour ¼ cup portions of batter onto the hot surface, spacing them apart to allow for spreading.
- Cook the pancakes for 2–3 minutes, or until bubbles form on the surface and the edges appear set. Tip: Wait for those bubbles to pop and stay open before flipping for perfect doneness.
- Flip each pancake carefully using a spatula and cook for an additional 1–2 minutes, until golden brown and cooked through. Tip: Adjust heat as needed to prevent burning—medium-low works best for even browning.
- Repeat with the remaining batter, adding more clarified butter to the skillet as necessary.
- Serve the pancakes immediately, drizzled with maple syrup.
Craving something beyond basic? These pancakes boast a tender, cake-like crumb with a subtle tang from the yogurt, making them sturdy enough to stack high without collapsing. For a creative twist, top them with fresh berries and a dollop of whipped cream, or go savory with a sprinkle of herbs and a fried egg—they’re versatile enough to steal the show at any meal.
Roasted Brussels Sprouts with Balsamic Glaze
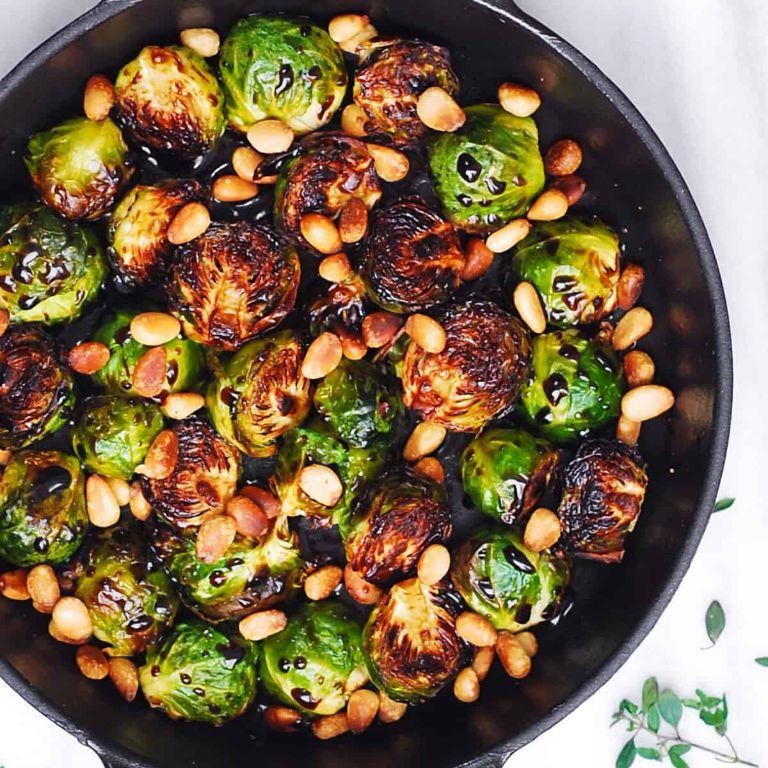
Ever wondered how to turn those often-maligned little cabbages into a showstopping side dish that’ll have everyone begging for seconds? Enter roasted Brussels sprouts with a balsamic glaze—a dish so deliciously transformative, it might just convert the staunchest sprout skeptic. Trust me, this isn’t your grandma’s boiled veggie situation; we’re talking crispy, caramelized perfection with a tangy-sweet punch.
Serving: 4 | Pre Time: 10 minutes | Cooking Time: 25 minutes
Ingredients
– 1 ½ pounds fresh Brussels sprouts, trimmed and halved
– 3 tablespoons extra-virgin olive oil
– ¾ teaspoon kosher salt
– ½ teaspoon freshly cracked black pepper
– ⅓ cup aged balsamic vinegar
– 2 tablespoons pure maple syrup
– 1 tablespoon unsalted butter
– 2 cloves garlic, minced
– ¼ cup toasted pine nuts
– 2 tablespoons freshly grated Parmigiano-Reggiano cheese
Instructions
1. Preheat your oven to 425°F and position a rack in the center.
2. In a large mixing bowl, toss the halved Brussels sprouts with extra-virgin olive oil, kosher salt, and freshly cracked black pepper until evenly coated.
3. Arrange the sprouts in a single layer on a rimmed baking sheet, cut-side down, to maximize caramelization.
4. Roast for 20–25 minutes, until the edges are deeply browned and crispy, shaking the pan halfway through for even cooking.
5. While the sprouts roast, combine aged balsamic vinegar and pure maple syrup in a small saucepan over medium heat.
6. Simmer the mixture for 5–7 minutes, stirring occasionally, until it reduces to a syrupy glaze that coats the back of a spoon.
7. Remove the glaze from heat and whisk in unsalted butter until fully incorporated and glossy.
8. In a separate small skillet over medium-low heat, toast the pine nuts for 2–3 minutes, stirring constantly, until fragrant and lightly golden.
9. Transfer the roasted Brussels sprouts to a serving platter and drizzle generously with the warm balsamic glaze.
10. Sprinkle the toasted pine nuts and freshly grated Parmigiano-Reggiano cheese over the top.
11. Serve immediately while hot.
Oh, the glorious contrast here! You get a symphony of textures: crispy, almost chip-like outer leaves giving way to tender centers, all slicked with that sticky-sweet glaze. The nutty pine nuts and salty Parmigiano-Reggiano add little bursts of flavor that make each bite exciting. For a fun twist, try serving these atop a creamy polenta or alongside a juicy roast chicken—they’re versatile enough to shine anywhere on your table.
Blackened Tilapia with Mango Salsa
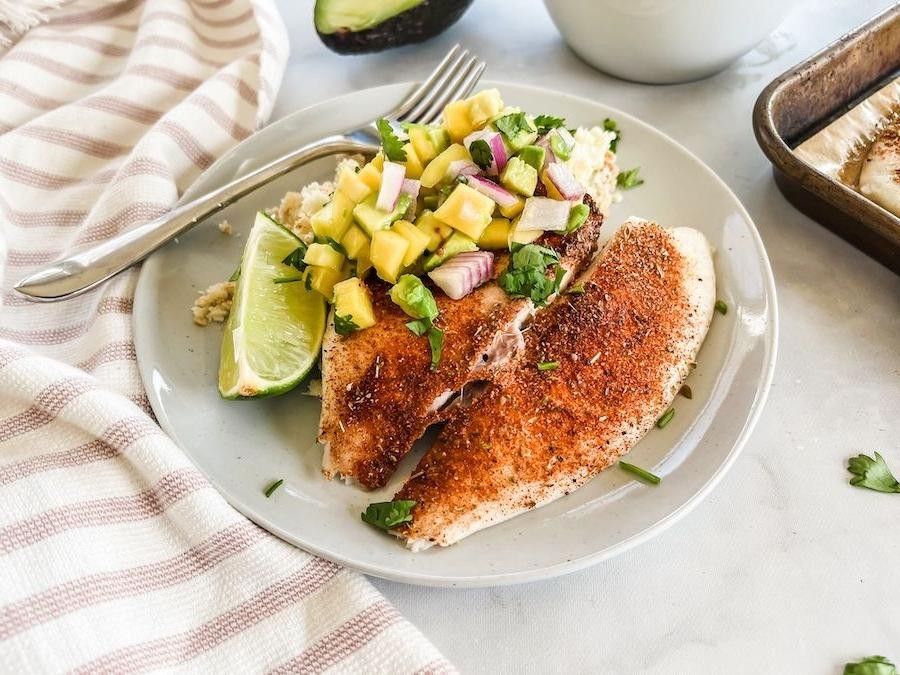
Oh, the holidays have you feeling a bit… charred? Let’s channel that energy into something deliciously smoky and sweet instead. This blackened tilapia with mango salsa is your ticket to a vibrant, flavor-packed dinner that’s faster than wrapping one more awkward gift.
Serving: 4 | Pre Time: 15 minutes | Cooking Time: 10 minutes
Ingredients
– 4 (6-ounce) tilapia fillets, patted dry
– 2 tablespoons clarified butter, melted
– 2 tablespoons smoked paprika
– 1 tablespoon garlic powder
– 1 tablespoon onion powder
– 2 teaspoons dried thyme
– 1 teaspoon cayenne pepper
– 1 teaspoon fine sea salt
– 1 large ripe mango, peeled and finely diced
– ½ medium red onion, finely diced
– 1 jalapeño pepper, seeds removed and finely minced
– ¼ cup fresh cilantro leaves, finely chopped
– 2 tablespoons freshly squeezed lime juice
– 1 tablespoon extra-virgin olive oil
Instructions
1. In a small bowl, combine the smoked paprika, garlic powder, onion powder, dried thyme, cayenne pepper, and fine sea salt to create the blackening spice blend.
2. Generously coat both sides of each patted-dry tilapia fillet with the prepared spice blend, pressing gently to adhere.
3. In a separate medium bowl, combine the finely diced mango, finely diced red onion, finely minced jalapeño, finely chopped cilantro, freshly squeezed lime juice, and extra-virgin olive oil to make the salsa. Set aside.
4. Heat a large cast-iron skillet or heavy-bottomed pan over medium-high heat until a drop of water sizzles and evaporates upon contact, about 3 minutes.
5. Add the melted clarified butter to the hot skillet, swirling to coat the surface evenly.
6. Carefully place the seasoned tilapia fillets in the skillet, ensuring they are not touching. Tip: A properly preheated skillet is crucial for achieving a crisp, blackened crust without sticking.
7. Cook the fillets undisturbed for 3–4 minutes, until the underside develops a deep, dark crust and releases easily from the pan.
8. Using a thin spatula, gently flip each fillet. Cook for an additional 2–3 minutes, until the fish is opaque throughout and flakes easily with a fork. Tip: Avoid moving the fish prematurely; patience ensures that perfect sear.
9. Immediately transfer the cooked fillets to a serving platter. Tip: Letting the fish rest for 2 minutes after cooking allows the juices to redistribute, keeping it moist.
10. Top each warm fillet generously with the prepared mango salsa.
Marvel at the contrast: the fillets boast a audaciously spicy, crackly exterior giving way to tender, mild flesh, while the salsa bursts with juicy sweetness and a bright, herbaceous kick. Serve it over a bed of cilantro-lime rice to soak up the vibrant juices, or stuff it into warm tortillas for instant fish tacos that’ll make any Tuesday feel festive.
Cauliflower and Chickpea Curry

Pondering what to whip up when your fridge looks like a sad produce graveyard? This Cauliflower and Chickpea Curry is your culinary superhero—transforming humble veggies into a vibrant, flavor-packed bowl of comfort that’ll make your taste buds do a happy dance. It’s the cozy, one-pot wonder you didn’t know you needed, especially on a chilly evening like today.
Serving: 4 | Prep Time: 15 minutes | Cooking Time: 25 minutes
Ingredients
– 2 tablespoons clarified butter (ghee)
– 1 large yellow onion, finely diced
– 3 garlic cloves, minced
– 1 tablespoon freshly grated ginger
– 1 tablespoon garam masala
– 1 teaspoon ground turmeric
– 1/2 teaspoon cayenne pepper
– 1 (14.5-ounce) can diced tomatoes, with juices
– 1 (13.5-ounce) can full-fat coconut milk
– 1 medium head cauliflower, cut into 1-inch florets
– 1 (15-ounce) can chickpeas, drained and rinsed
– 1/2 cup vegetable broth
– 1/2 cup fresh cilantro leaves, chopped
– Kosher salt, as needed
Instructions
1. Heat 2 tablespoons clarified butter in a large Dutch oven or heavy-bottomed pot over medium heat until shimmering, about 2 minutes.
2. Add 1 finely diced yellow onion and cook, stirring occasionally, until translucent and lightly golden, 6–8 minutes.
3. Stir in 3 minced garlic cloves and 1 tablespoon freshly grated ginger; cook until fragrant, 1 minute.
4. Sprinkle in 1 tablespoon garam masala, 1 teaspoon ground turmeric, and 1/2 teaspoon cayenne pepper; toast the spices, stirring constantly, for 30 seconds to bloom their flavors.
5. Pour in 1 can diced tomatoes with juices and 1 can full-fat coconut milk, scraping the bottom of the pot to incorporate any browned bits.
6. Add 1 head of cauliflower florets, 1 can drained chickpeas, and 1/2 cup vegetable broth; season with kosher salt to layer the seasoning.
7. Bring the mixture to a gentle simmer, then reduce heat to medium-low, cover, and cook until the cauliflower is tender but not mushy, 15–18 minutes.
8. Remove from heat and stir in 1/2 cup chopped fresh cilantro leaves.
9. Taste and adjust seasoning with additional kosher salt if needed, remembering that flavors deepen as the curry rests.
Unbelievably creamy yet light, this curry boasts tender cauliflower that soaks up the aromatic spices, while the chickpeas add a satisfying bite. Serve it over fluffy basmati rice or with warm naan for scooping up every last bit of that luscious sauce—it’s a bowl that feels like a hug from the inside out.
Berry and Spinach Smoothie
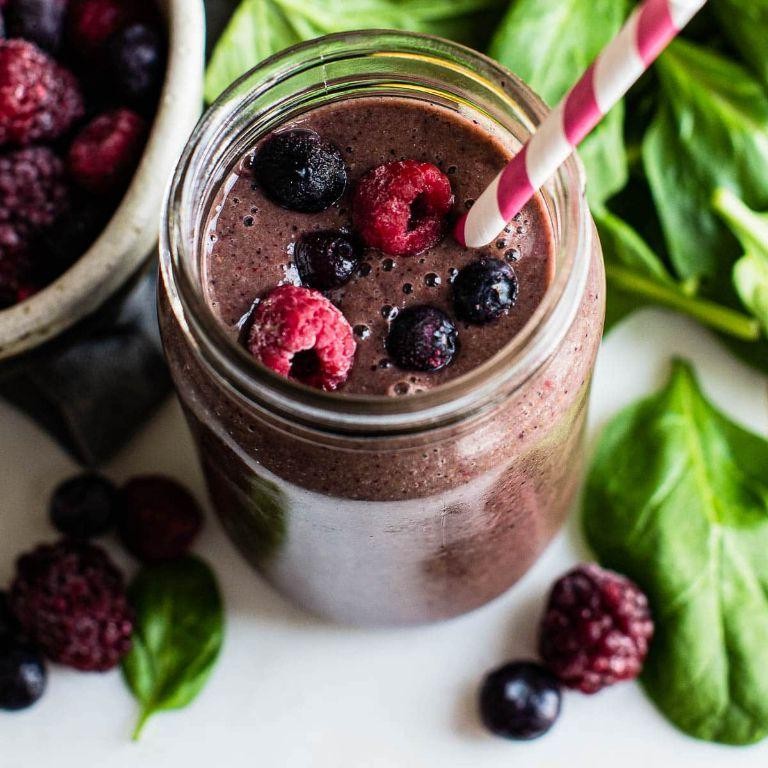
Hear that? It’s your blender calling your name, begging to whip up this vibrant Berry and Spinach Smoothie that’s basically a party in a glass—and yes, the spinach is the surprisingly fun guest who actually shows up on time. Let’s ditch the boring green juice and make something that tastes as good as it looks, shall we?
Serving: 2 | Pre Time: 5 minutes | Cooking Time: 0 minutes
Ingredients
– 1 cup frozen mixed berries (such as blueberries, raspberries, and blackberries)
– 2 cups fresh baby spinach leaves, tightly packed
– 1 cup unsweetened almond milk
– 1/2 cup plain Greek yogurt
– 1 tablespoon pure maple syrup
– 1/2 teaspoon pure vanilla extract
– 1/4 teaspoon ground cinnamon
Instructions
1. Place 1 cup of frozen mixed berries into the base of a high-speed blender.
2. Add 2 cups of tightly packed fresh baby spinach leaves directly on top of the berries.
3. Pour 1 cup of unsweetened almond milk over the spinach and berries to help the blending process begin smoothly.
4. Spoon 1/2 cup of plain Greek yogurt into the blender for creaminess and protein.
5. Drizzle 1 tablespoon of pure maple syrup into the mixture to balance the tartness of the berries.
6. Add 1/2 teaspoon of pure vanilla extract and 1/4 teaspoon of ground cinnamon for aromatic depth.
7. Secure the blender lid tightly and blend on high speed for 45-60 seconds, or until the mixture is completely smooth with no visible spinach flecks.
8. Stop the blender and use a rubber spatula to scrape down the sides if any ingredients are clinging, then blend again for 10-15 seconds to ensure uniformity.
9. Pour the smoothie immediately into two chilled glasses to maintain its cool, refreshing temperature.
Absolutely velvety and bursting with berry sweetness, this smoothie has a lush texture that’s neither too thick nor too watery—just right for sipping through a reusable straw. For a creative twist, pour it into popsicle molds for a frosty treat, or layer it with granola in a parfait glass for a deconstructed breakfast vibe that’s as Instagram-worthy as it is delicious.
Summary
Perfectly portioned and packed with flavor, these 21 Day Fix recipes make healthy eating a breeze. I hope you find some new favorites to add to your weekly rotation! Give a few a try, then drop a comment below to tell me which one you loved most. If you enjoyed this roundup, please share it on Pinterest to help other home cooks discover these nutritious meals.


