
Gather ’round, tea lovers! Whether you’re planning a sophisticated soiree or a cozy afternoon treat, these elegant recipes will transform your teatime into something truly special. From delicate finger sandwiches to decadent scones, we’ve curated 20 delightful ideas to inspire your next gathering. Ready to elevate your spread? Let’s steep ourselves in delicious possibilities!
Classic English Scones with Clotted Cream and Jam
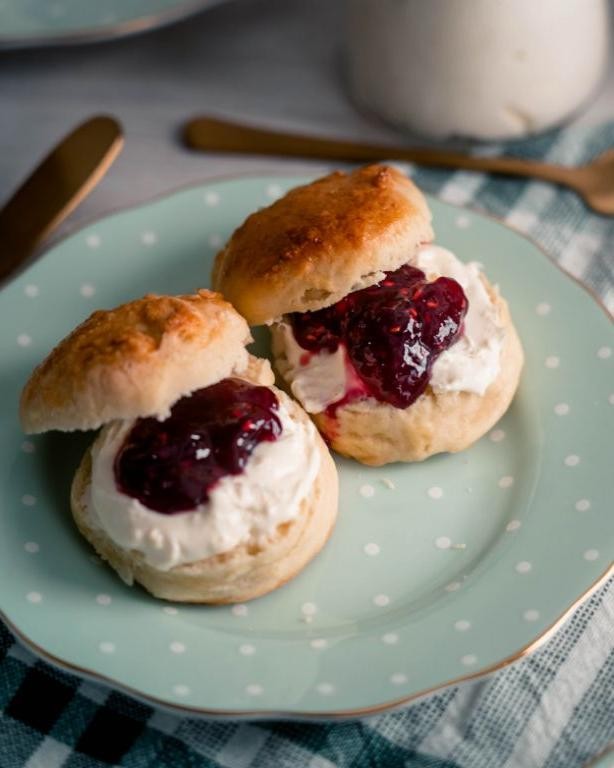
There’s something wonderfully nostalgic about pulling a batch of warm, crumbly scones from the oven, especially around the holidays. I always make these on Christmas Eve—it’s become a cozy tradition in my house, and the smell of buttery dough baking is pure comfort. Today, as I’m writing this with snow falling outside, I’m reminded why these simple treats feel so special.
Serving: 8 | Pre Time: 15 minutes | Cooking Time: 15 minutes
Ingredients
– 2 cups all-purpose flour, plus extra for dusting
– 1/4 cup granulated sugar
– 1 tablespoon baking powder
– 1/2 teaspoon fine sea salt
– 1/2 cup cold unsalted butter, cut into small cubes
– 1/2 cup heavy cream, plus extra for brushing
– 1 large farm-fresh egg
– 1 teaspoon pure vanilla extract
– Clotted cream, for serving
– Strawberry jam, for serving
Instructions
1. Preheat your oven to 400°F and line a baking sheet with parchment paper.
2. In a large mixing bowl, whisk together 2 cups all-purpose flour, 1/4 cup granulated sugar, 1 tablespoon baking powder, and 1/2 teaspoon fine sea salt until well combined.
3. Add 1/2 cup cold unsalted butter cubes to the dry ingredients. Use a pastry cutter or your fingertips to work the butter into the flour mixture until it resembles coarse crumbs with pea-sized bits of butter remaining—this creates flaky layers. Tip: Keep the butter cold to prevent the scones from spreading too much.
4. In a small bowl, whisk together 1/2 cup heavy cream, 1 large farm-fresh egg, and 1 teaspoon pure vanilla extract until smooth.
5. Pour the wet ingredients into the dry mixture and stir gently with a fork until a shaggy dough forms; avoid overmixing to keep the scones tender.
6. Turn the dough out onto a lightly floured surface and gently pat it into a 1-inch thick circle.
7. Use a 2.5-inch round cutter to cut out scones, pressing straight down without twisting to help them rise evenly. Tip: Dip the cutter in flour between cuts to prevent sticking.
8. Place the scones on the prepared baking sheet, spacing them about 2 inches apart.
9. Brush the tops of the scones lightly with extra heavy cream for a golden-brown finish.
10. Bake in the preheated oven for 12–15 minutes, or until the scones are puffed and the tops are lightly golden. Tip: Check at 12 minutes—they’re done when a toothpick inserted comes out clean.
11. Remove from the oven and let cool on the baking sheet for 5 minutes before transferring to a wire rack.
Flaky and tender, these scones have a subtle sweetness that pairs perfectly with the rich clotted cream and bright strawberry jam. For a festive twist, split them warm and add a dollop of lemon curd alongside the jam—it’s a delightful burst of citrus that balances the richness beautifully.
Earl Grey Tea-Infused Shortbread Cookies
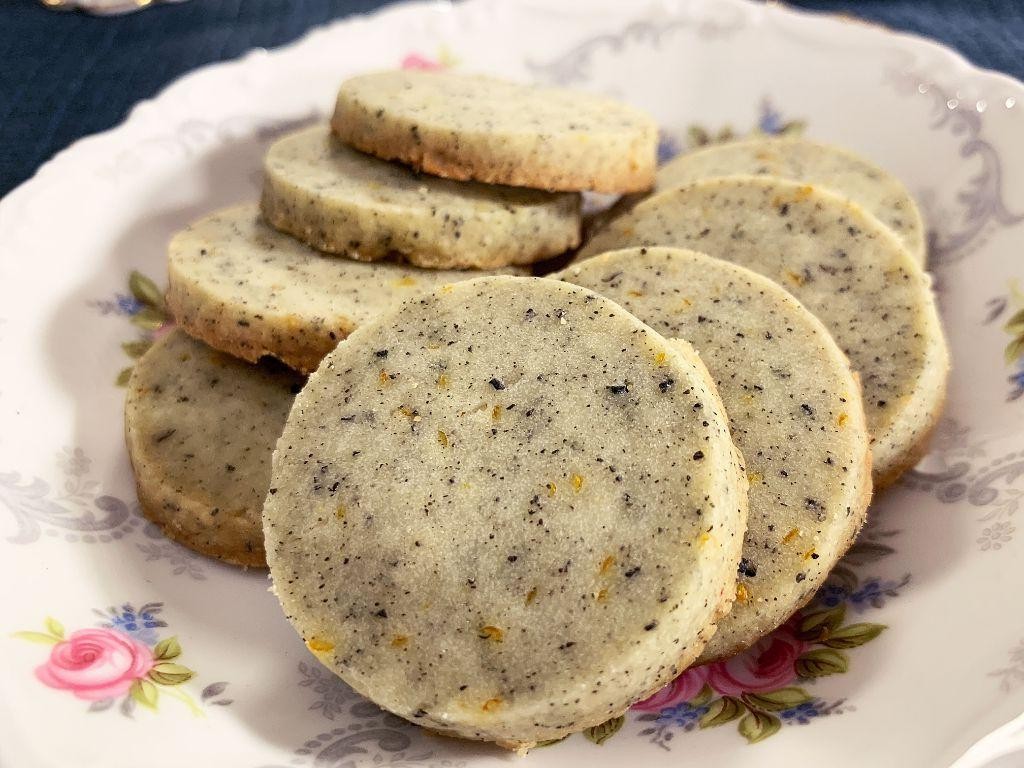
Whenever I need a moment of calm during the holiday hustle, I turn to baking these fragrant cookies. The aroma of bergamot and butter that fills my kitchen is pure, cozy magic, and I love how this recipe transforms a simple afternoon tea into something truly special.
Serving: 24 cookies | Pre Time: 20 minutes | Cooking Time: 12 minutes
Ingredients
– 1 cup (2 sticks) of high-quality, unsalted butter, softened to room temperature
– 1/2 cup of fine, granulated white sugar
– 2 cups of all-purpose flour, spooned and leveled for accuracy
– 2 tablespoons of finely ground Earl Grey tea leaves from fragrant, high-quality tea bags
– 1/4 teaspoon of fine sea salt
Instructions
1. In a large mixing bowl, use an electric mixer on medium speed to cream the softened, unsalted butter and granulated white sugar together for exactly 3 minutes, until the mixture is pale, fluffy, and well-combined.
2. Sift the all-purpose flour, finely ground Earl Grey tea leaves, and fine sea salt directly into the butter mixture.
3. Using a sturdy spatula or your hands, gently fold and mix the dry ingredients into the wet ingredients until a soft, cohesive dough forms with no dry flour pockets visible. Tip: Avoid overmixing to ensure the cookies stay tender.
4. Turn the dough out onto a lightly floured surface and shape it into a smooth log about 2 inches in diameter.
5. Wrap the dough log tightly in plastic wrap and refrigerate it for a minimum of 1 hour, or until it is firm to the touch. Tip: Chilling is crucial for clean slices and prevents spreading.
6. Preheat your oven to 350°F (175°C) and line two baking sheets with parchment paper.
7. Unwrap the chilled dough log and use a sharp knife to slice it into 1/4-inch thick rounds, placing them 1 inch apart on the prepared baking sheets.
8. Bake one sheet at a time in the center of the preheated oven for 10 to 12 minutes, until the edges are just beginning to turn a very light golden brown. Tip: They will firm up as they cool, so don’t wait for a deep color.
9. Let the cookies cool on the baking sheet for 5 minutes before transferring them to a wire rack to cool completely.
Verdict? These shortbread cookies are wonderfully crumbly and melt-in-your-mouth tender, with the floral, citrusy notes of Earl Grey shining through every buttery bite. I love serving them alongside a hot cup of the same tea for a perfectly matched pairing, or gifting them in a pretty tin—they’re as delightful to give as they are to eat.
Cucumber and Cream Cheese Finger Sandwiches
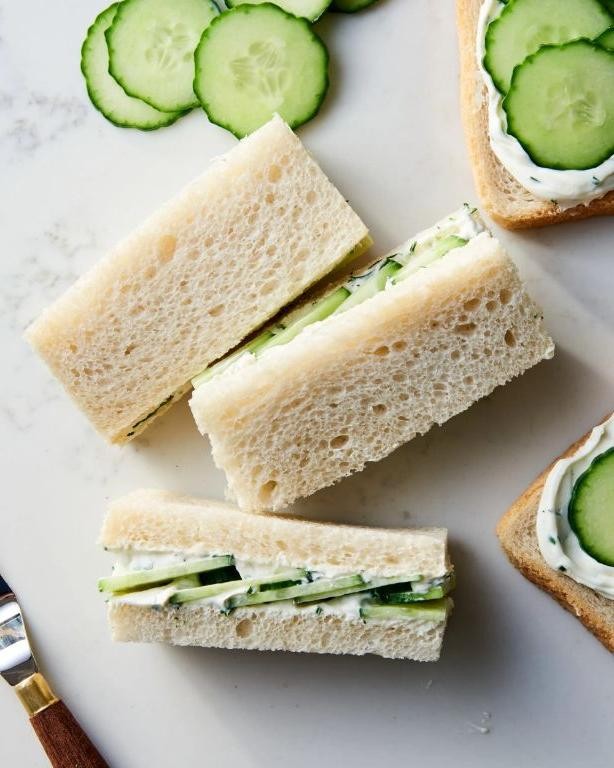
Remember those lazy summer afternoons when you need something light yet satisfying? I do—that’s exactly why I keep coming back to these cucumber and cream cheese finger sandwiches. They’re my go-to for effortless entertaining or a quiet treat with tea, and I love how they remind me of garden parties at my grandma’s house.
Serving: 12 | Pre Time: 15 minutes | Cooking Time: 0 minutes
Ingredients
– 1 package (8 ounces) of full-fat cream cheese, softened to room temperature
– 1/4 cup of mayonnaise, preferably a rich, high-quality brand
– 1 tablespoon of fresh lemon juice, squeezed from a bright, juicy lemon
– 1/4 teaspoon of kosher salt, finely ground
– 1/4 teaspoon of freshly cracked black pepper, coarsely ground for texture
– 1 large English cucumber, thinly sliced into crisp, refreshing rounds
– 12 slices of soft white sandwich bread, crusts removed for a delicate finish
– 2 tablespoons of fresh dill, finely chopped for a fragrant, herbal touch
Instructions
1. Place the softened full-fat cream cheese in a medium mixing bowl. Tip: Let it sit out for about 30 minutes beforehand to ensure it blends smoothly without lumps.
2. Add the rich, high-quality mayonnaise, bright, juicy lemon juice, finely ground kosher salt, and coarsely ground black pepper to the bowl.
3. Use a hand mixer or whisk to combine all ingredients on medium speed for 1-2 minutes until the mixture is creamy and uniformly mixed, with no streaks remaining.
4. Stir in the finely chopped fresh dill by hand until it’s evenly distributed throughout the cream cheese spread.
5. Lay out the 12 slices of soft white sandwich bread on a clean work surface and remove the crusts using a sharp knife for neat, even edges. Tip: Save the crusts for breadcrumbs or snacks to reduce waste.
6. Spread a generous, even layer of the cream cheese mixture onto each slice of bread, covering it completely from edge to edge.
7. Arrange the crisp, refreshing cucumber rounds in a single, overlapping layer on top of the cream cheese spread on half of the bread slices. Tip: Pat the cucumber slices dry with a paper towel first to prevent the bread from getting soggy.
8. Place the remaining bread slices on top, cream cheese-side down, to form sandwiches.
9. Use a sharp knife to cut each sandwich diagonally into four triangular finger sandwiches, wiping the blade clean between cuts for clean edges.
10. Arrange the finger sandwiches on a serving platter and cover lightly with plastic wrap. Chill in the refrigerator for at least 10 minutes before serving to allow the flavors to meld.
These sandwiches offer a delightful contrast: the cool, crisp cucumber against the creamy, tangy spread creates a refreshing bite. Try serving them on a tiered stand for an elegant touch at brunch, or pack them in a lunchbox for a light, satisfying snack.
Lemon Drizzle Cake with a Hint of Lavender
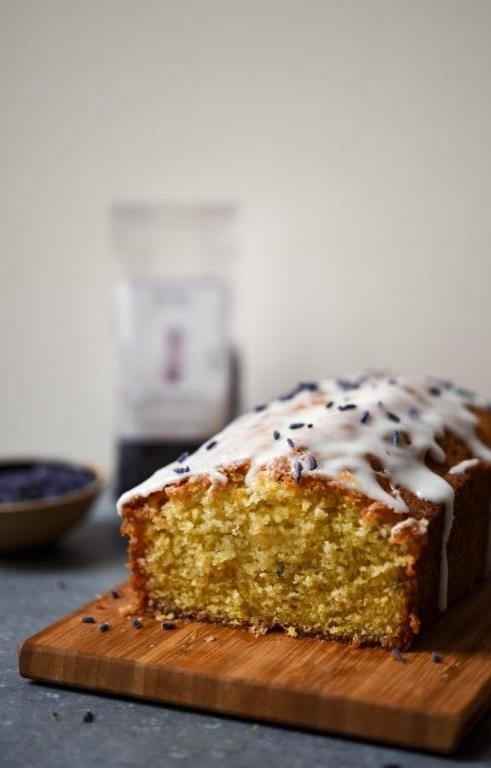
A few years back, I stumbled upon a lavender farm during a summer road trip, and the sweet, floral aroma stuck with me—I’ve been sneaking it into baked goods ever since. This Lemon Drizzle Cake with a Hint of Lavender is my latest obsession, a bright, zesty treat that’s perfect for afternoon tea or a cozy weekend bake. Trust me, the subtle lavender note makes it feel a bit fancy without any fuss.
Serving: 8 | Pre Time: 20 minutes | Cooking Time: 45 minutes
Ingredients
– 1 cup granulated sugar
– ½ cup unsalted butter, softened at room temperature
– 2 large farm-fresh eggs
– 1 ½ cups all-purpose flour, sifted
– 1 teaspoon baking powder
– ¼ teaspoon fine sea salt
– ½ cup whole milk
– Zest of 2 juicy lemons
– 1 tablespoon fresh lemon juice
– 1 teaspoon culinary-grade dried lavender buds
– ½ cup powdered sugar, for the glaze
– 1 tablespoon fresh lemon juice, for the glaze
Instructions
1. Preheat your oven to 350°F and grease a 9-inch loaf pan, lining it with parchment paper for easy removal—this little trick saves so much hassle later.
2. In a large mixing bowl, cream together 1 cup granulated sugar and ½ cup softened unsalted butter using an electric mixer on medium speed until light and fluffy, about 3 minutes.
3. Beat in 2 large farm-fresh eggs one at a time, ensuring each is fully incorporated before adding the next to avoid a curdled texture.
4. In a separate bowl, whisk together 1 ½ cups sifted all-purpose flour, 1 teaspoon baking powder, and ¼ teaspoon fine sea salt.
5. Gradually add the dry ingredients to the wet mixture, alternating with ½ cup whole milk, mixing on low speed just until combined—overmixing can lead to a dense cake, so stop as soon as you see no streaks of flour.
6. Fold in the zest of 2 juicy lemons, 1 tablespoon fresh lemon juice, and 1 teaspoon culinary-grade dried lavender buds until evenly distributed.
7. Pour the batter into the prepared loaf pan and smooth the top with a spatula.
8. Bake in the preheated oven for 40–45 minutes, or until a toothpick inserted into the center comes out clean and the top is golden brown.
9. While the cake bakes, make the glaze by whisking together ½ cup powdered sugar and 1 tablespoon fresh lemon juice in a small bowl until smooth.
10. Once baked, remove the cake from the oven and let it cool in the pan on a wire rack for 10 minutes.
11. Poke small holes all over the top of the warm cake with a skewer, then slowly drizzle the glaze over it, allowing it to soak in—this step ensures every bite is moist and flavorful.
12. Let the cake cool completely in the pan before slicing, about 1 hour.
Buttery and tender with a crackly lemon glaze, this cake has a lovely crumb that melts in your mouth, while the lavender adds a whisper of floral elegance. Serve it with a dollop of whipped cream or alongside a hot cup of Earl Grey tea for a truly delightful treat.
Smoked Salmon and Dill Tea Sandwiches
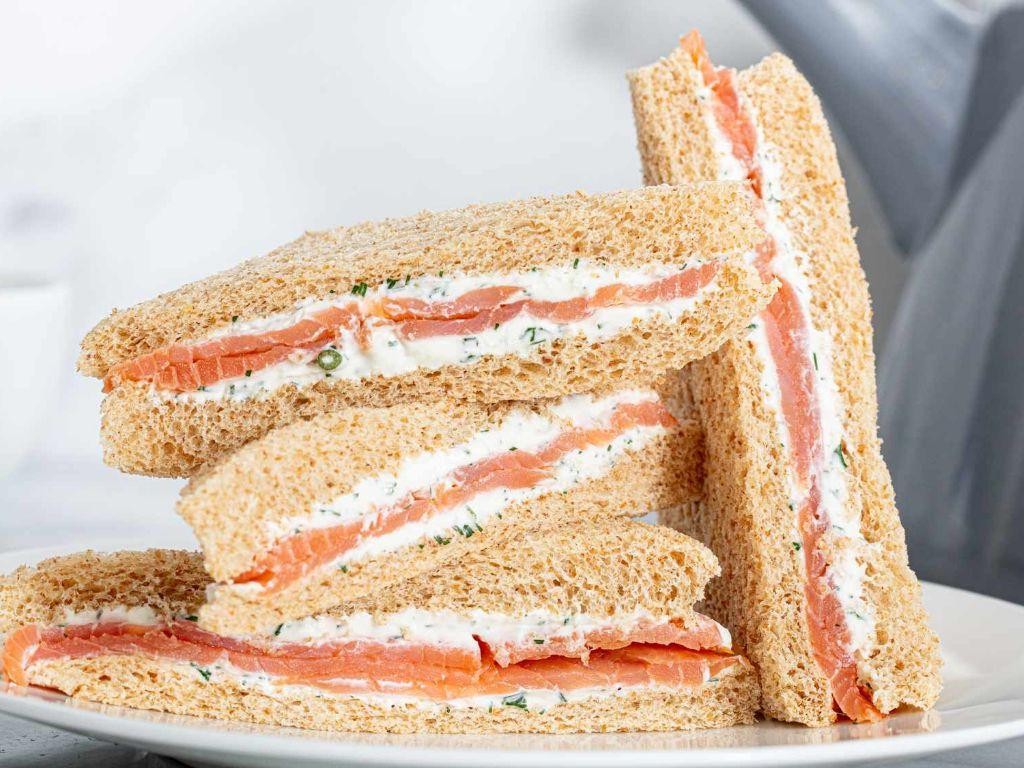
My holiday party last year was a bit of a disaster—I spent hours on elaborate appetizers that went untouched while a simple platter of tea sandwiches disappeared in minutes. That’s when I realized the power of an elegant, no-fuss finger food, and these smoked salmon and dill tea sandwiches have been my secret weapon ever since.
Serving: 12 sandwiches | Pre Time: 15 minutes | Cooking Time: 0 minutes
Ingredients
– 8 ounces of cold-smoked salmon, thinly sliced
– 1/2 cup of full-fat cream cheese, softened to room temperature
– 2 tablespoons of fresh dill, finely chopped
– 1 tablespoon of freshly squeezed lemon juice
– 1/4 teaspoon of finely ground black pepper
– 12 slices of soft white sandwich bread, crusts removed
– 1 tablespoon of unsalted butter, softened
Instructions
1. Place the softened cream cheese in a medium mixing bowl. (Tip: Letting the cream cheese sit out for 30 minutes makes it easier to blend.)
2. Add the finely chopped fresh dill, freshly squeezed lemon juice, and finely ground black pepper to the bowl.
3. Use a fork or spatula to stir the ingredients together until they are fully combined into a smooth, pale green spread.
4. Lay out the 12 slices of soft white sandwich bread on a clean work surface.
5. Use a butter knife to spread a thin, even layer of the softened unsalted butter onto one side of each bread slice. (Tip: This butter layer acts as a moisture barrier to keep the bread from getting soggy.)
6. Flip half of the buttered bread slices so the buttered side faces down.
7. Evenly divide the cream cheese and dill mixture among the 6 buttered-side-down slices, spreading it to the edges with a knife or offset spatula.
8. Arrange the thinly sliced cold-smoked salmon in a single layer over the cream cheese spread on each of the 6 slices.
9. Top each prepared slice with one of the remaining buttered bread slices, placing the buttered side against the salmon. (Tip: Gently press down on each sandwich with the palm of your hand to help the layers adhere before cutting.)
10. Use a sharp serrated knife to carefully cut each sandwich diagonally into two triangles.
11. Arrange the finished tea sandwich triangles on a serving platter.
Ridiculously simple, right? The result is a perfect bite: the soft, pillowy bread gives way to the cool, creamy spread and the delicate, smoky salmon. I love serving these on a tiered stand for a truly elegant afternoon tea, or packing them for a sophisticated picnic—they always steal the show.
Chocolate-Dipped Strawberry Tartlets
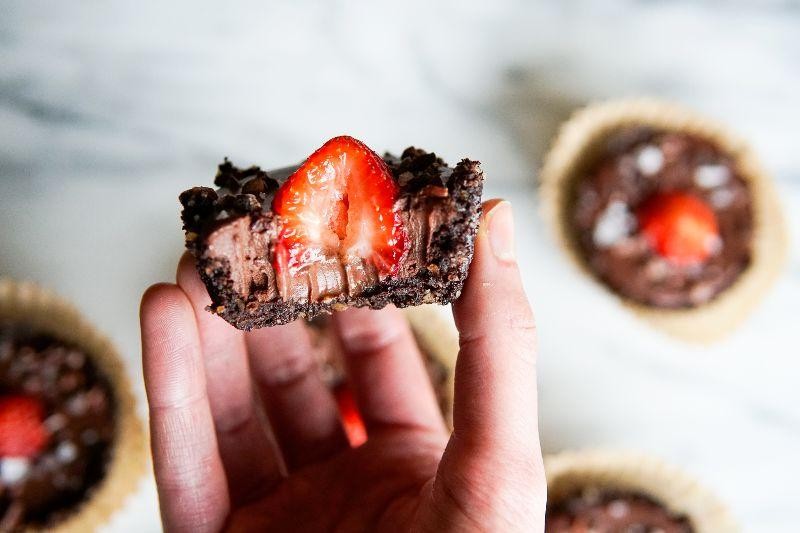
Nothing says holiday cheer quite like a dessert that’s both elegant and easy to share, and these Chocolate-Dipped Strawberry Tartlets are my go‑for. I whipped them up last Christmas Eve when I realized I’d forgotten a hostess gift—they saved the day and have been a family favorite ever since.
Serving: 12 tartlets | Pre Time: 25 minutes | Cooking Time: 15 minutes
Ingredients
– 1 ½ cups all-purpose flour, sifted for a light, flaky crust
– ½ cup unsalted butter, cold and cubed
– ¼ cup granulated sugar, plus 2 tablespoons for the filling
– 1 large egg, farm-fresh and lightly beaten
– 8 ounces cream cheese, softened to room temperature
– 1 teaspoon pure vanilla extract, with its warm, aromatic notes
– 1 pound fresh strawberries, hulled and thinly sliced
– 6 ounces semi-sweet chocolate, finely chopped for smooth melting
– 1 tablespoon heavy cream, rich and velvety
Instructions
1. Preheat your oven to 375°F and lightly grease a 12-cup mini tart pan.
2. In a food processor, pulse the sifted all-purpose flour, cold cubed unsalted butter, and ¼ cup granulated sugar until the mixture resembles coarse crumbs.
3. Add the lightly beaten farm-fresh egg and pulse just until the dough comes together into a ball. Tip: Avoid overmixing to keep the crust tender.
4. Press about 1 tablespoon of dough evenly into each cup of the prepared tart pan, forming a thin layer up the sides.
5. Bake the crusts in the preheated oven for 12–15 minutes, or until they turn a light golden brown. Let them cool completely in the pan on a wire rack.
6. While the crusts cool, beat the softened cream cheese, remaining 2 tablespoons granulated sugar, and pure vanilla extract in a bowl until smooth and creamy.
7. Spoon the cream cheese filling evenly into the cooled tart shells.
8. Arrange the thinly sliced fresh strawberries in a single layer over the filling.
9. In a heatproof bowl set over a saucepan of simmering water, melt the finely chopped semi-sweet chocolate with the rich heavy cream, stirring constantly until smooth. Tip: Ensure no water gets into the chocolate to prevent seizing.
10. Drizzle the melted chocolate over the strawberry-topped tartlets. Tip: For clean lines, use a spoon or piping bag.
11. Refrigerate the tartlets for at least 30 minutes to set the chocolate before serving.
Delightfully crisp crusts give way to a creamy, tangy filling, topped with juicy strawberries and a glossy chocolate drizzle that adds a decadent finish. Serve these chilled on a platter for a festive touch, or pack them individually as sweet little gifts—they’re as charming to look at as they are irresistible to eat.
Mini Victoria Sponge Cakes with Fresh Berries
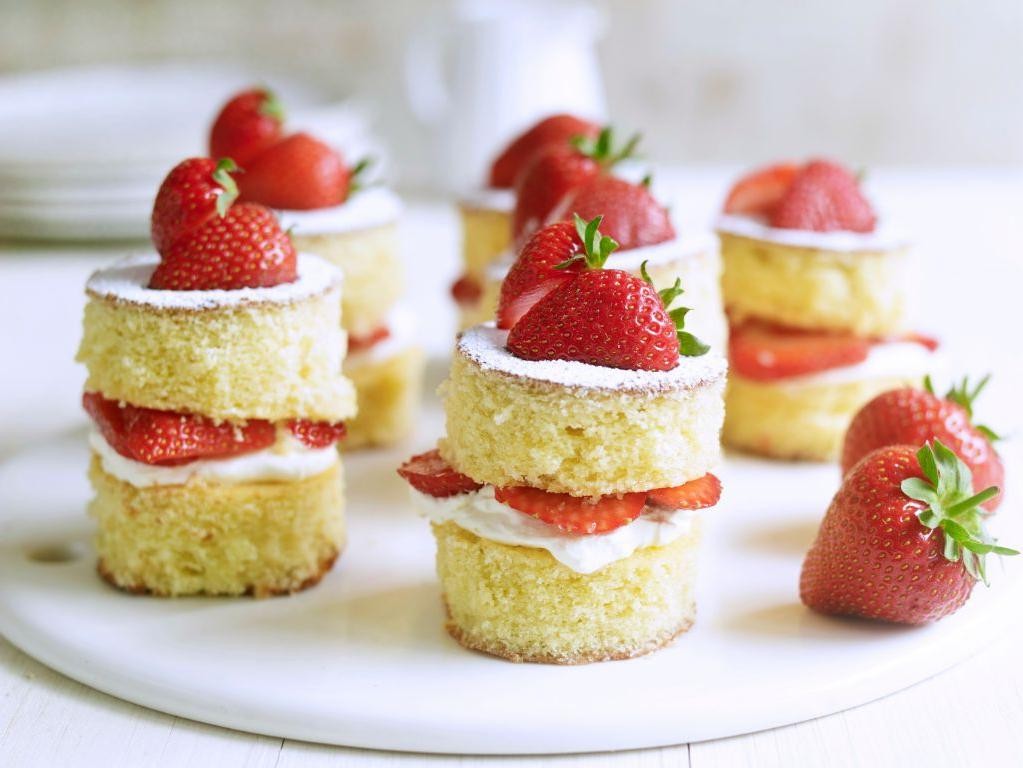
Remember those lazy summer afternoons when you’d sneak a slice of cake from the kitchen counter? I’m bringing that cozy, nostalgic vibe to your table with these adorable mini Victoria sponge cakes, each one bursting with fresh, juicy berries and a cloud of whipped cream. They’re the perfect little treat for holiday gatherings or a sweet moment to yourself—simple, elegant, and utterly delicious.
Serving: 12 | Pre Time: 20 minutes | Cooking Time: 15 minutes
Ingredients
– 1 cup of soft unsalted butter, at room temperature
– 1 cup of fine granulated sugar
– 4 large farm-fresh eggs, lightly beaten
– 1 cup of all-purpose flour, sifted
– 1 teaspoon of pure vanilla extract
– 1 cup of heavy whipping cream, chilled
– 2 tablespoons of powdered sugar
– 1 cup of mixed fresh berries (like plump strawberries, blueberries, and raspberries), rinsed and patted dry
Instructions
1. Preheat your oven to 350°F and line a 12-cup mini muffin tin with paper liners.
2. In a large mixing bowl, cream together the soft unsalted butter and fine granulated sugar until light and fluffy, about 3-4 minutes with an electric mixer on medium speed.
3. Gradually add the lightly beaten farm-fresh eggs to the butter mixture, mixing well after each addition until fully incorporated.
4. Gently fold in the sifted all-purpose flour and pure vanilla extract using a spatula until just combined, being careful not to overmix to keep the cakes tender.
5. Divide the batter evenly among the prepared muffin cups, filling each about two-thirds full.
6. Bake in the preheated oven for 12-15 minutes, or until the cakes are golden brown and a toothpick inserted into the center comes out clean.
7. Remove the cakes from the oven and let them cool completely in the tin on a wire rack, about 30 minutes, to prevent them from becoming soggy.
8. While the cakes cool, whip the chilled heavy whipping cream and powdered sugar in a clean bowl until stiff peaks form, about 2-3 minutes on high speed.
9. Once cooled, slice each mini cake in half horizontally with a serrated knife for a clean cut.
10. Spread a generous dollop of the whipped cream on the bottom half of each cake, then top with a handful of the mixed fresh berries.
11. Place the top half of the cake over the berries and lightly dust with extra powdered sugar if desired.
12. Arrange the assembled cakes on a serving platter and enjoy immediately for the best texture.
As you bite into these mini delights, you’ll love the light, airy sponge paired with the creamy whipped filling and the burst of tart-sweet berries—they’re like little bites of summer heaven. Try serving them on a rustic wooden board for a charming presentation, or pair with a cup of Earl Grey tea to elevate the whole experience.
Homemade Raspberry Macarons
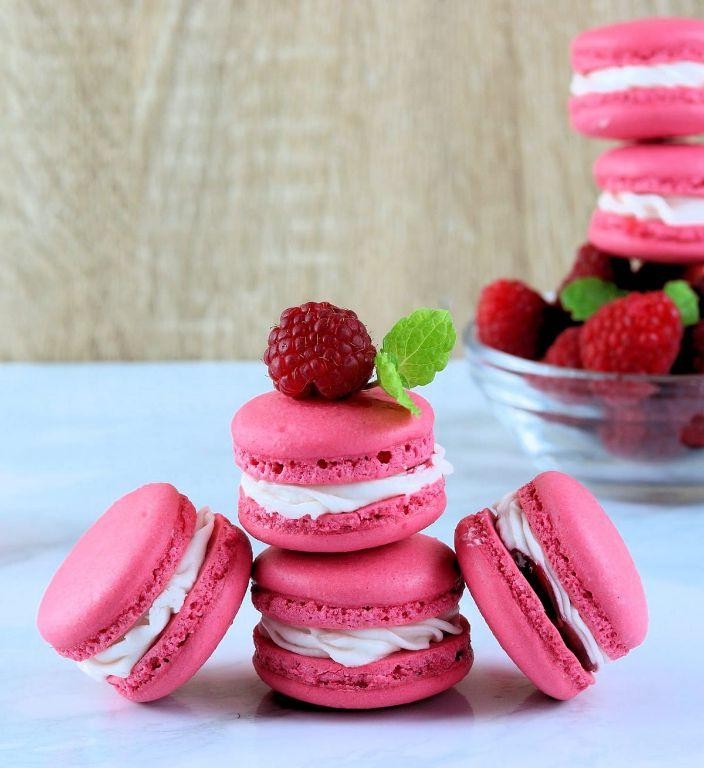
Dazzling and delicate, these homemade raspberry macarons are my go-to treat for holiday gatherings—they always disappear faster than I can plate them! I love how the sweet-tart raspberry filling perfectly complements the crisp, chewy shells, making them a festive favorite that feels both elegant and approachable. Over the years, I’ve learned that patience is key with macarons, so I always set aside a quiet afternoon to bake them, often with a cozy playlist in the background.
Serving: 24 macarons | Pre Time: 45 minutes | Cooking Time: 15 minutes
Ingredients
– 1 cup finely ground almond flour
– 1¾ cups powdered sugar
– 3 large room-temperature egg whites
– ¼ cup granulated sugar
– ½ teaspoon pure vanilla extract
– 2–3 drops vibrant pink gel food coloring
– ½ cup seedless raspberry jam
– 4 tablespoons softened unsalted butter
– 1 cup powdered sugar for filling
Instructions
1. Sift 1 cup finely ground almond flour and 1¾ cups powdered sugar into a large bowl to remove any lumps, which helps create smooth macaron shells.
2. In a separate clean, dry bowl, beat 3 large room-temperature egg whites with an electric mixer on medium speed until foamy, about 1 minute.
3. Gradually add ¼ cup granulated sugar while beating, then increase speed to high and whip until stiff, glossy peaks form, approximately 3–4 minutes.
4. Gently fold in ½ teaspoon pure vanilla extract and 2–3 drops vibrant pink gel food coloring until evenly distributed.
5. Carefully fold the sifted dry ingredients into the egg white mixture in three additions, using a spatula to mix just until the batter flows like lava and a ribbon forms when lifted—overmixing can cause flat macarons.
6. Transfer the batter to a piping bag fitted with a ½-inch round tip and pipe 1½-inch circles onto parchment-lined baking sheets, spacing them 1 inch apart.
7. Firmly tap the baking sheets on the counter 2–3 times to release air bubbles, then let the piped shells sit at room temperature for 30 minutes until a skin forms on top.
8. Preheat the oven to 300°F and bake the shells for 12–14 minutes, rotating the pans halfway through, until they are set and easily lift off the parchment.
9. Cool the shells completely on the baking sheets for 15 minutes before carefully removing them.
10. For the filling, beat 4 tablespoons softened unsalted butter with an electric mixer on medium speed until creamy, about 2 minutes.
11. Gradually add 1 cup powdered sugar and beat until light and fluffy, then mix in ½ cup seedless raspberry jam until smooth.
12. Pipe or spread the filling onto the flat side of half the shells and sandwich with the remaining shells, pressing gently to adhere.
13. Refrigerate the assembled macarons in an airtight container for at least 24 hours to allow the flavors to meld and the texture to soften—this resting step is crucial for that classic chewy center.
Velvety and rich, these macarons boast a crisp exterior that gives way to a tender, slightly chewy interior, with the raspberry filling adding a bright, fruity punch. I love serving them stacked on a vintage cake stand for a pop of color, or packaging them in clear boxes tied with ribbon as edible gifts—they’re sure to impress at any winter celebration!
Orange and Almond Madeleines
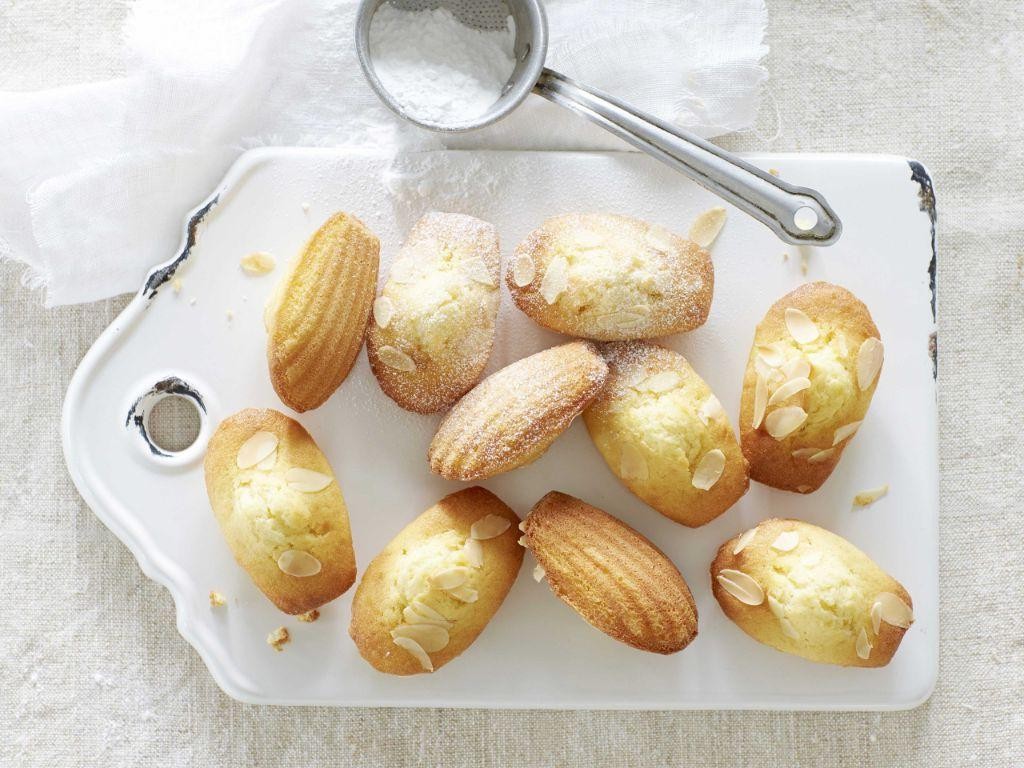
Crisp winter afternoons always make me crave something cozy and citrusy to brighten the day, which is exactly why I find myself baking these Orange and Almond Madeleines. They’re my go-treat when I want a little kitchen project that feels fancy but comes together in a flash, and the scent of orange zest filling the house is pure happiness.
Serving: 12 | Pre Time: 15 minutes | Cooking Time: 10 minutes
Ingredients
– ½ cup granulated sugar
– 2 large farm-fresh eggs, at room temperature
– 1 teaspoon pure vanilla extract
– ½ cup all-purpose flour
– ½ cup finely ground almond flour
– 1 teaspoon baking powder
– ¼ teaspoon fine sea salt
– Zest of 1 large, juicy orange
– ½ cup unsalted European-style butter, melted and slightly cooled
– 1 tablespoon fresh orange juice
– 2 tablespoons powdered sugar, for dusting
Instructions
1. Preheat your oven to 375°F and generously butter a madeleine pan, ensuring every shell cavity is coated to prevent sticking—this is key for those classic ridges!
2. In a large mixing bowl, whisk together the granulated sugar, farm-fresh eggs, and pure vanilla extract for about 2 minutes until the mixture is pale and slightly thickened.
3. Sift in the all-purpose flour, finely ground almond flour, baking powder, and fine sea salt directly into the bowl, then gently fold with a spatula until just combined; overmixing can lead to dense madeleines, so stop when no dry streaks remain.
4. Fold in the zest of 1 large, juicy orange, followed by the melted unsalted European-style butter and fresh orange juice, mixing until the batter is smooth and glossy.
5. Spoon 1 tablespoon of batter into each prepared madeleine cavity, filling them about ¾ full to allow for rising without overflowing.
6. Bake in the preheated oven for 8–10 minutes, or until the edges are golden brown and the centers spring back lightly when touched—a toothpick inserted should come out clean.
7. Immediately remove the madeleines from the pan and transfer them to a wire rack to cool completely; if they stick, a gentle tap usually loosens them.
8. Once cooled, dust the madeleines lightly with powdered sugar using a fine-mesh sieve for an elegant finish.
Heavenly and tender, these madeleines boast a delicate crumb with a subtle nuttiness from the almond flour, perfectly balanced by the bright, citrusy punch of orange. Serve them warm with a cup of tea for a cozy treat, or get creative by dipping the edges in dark chocolate for an extra indulgent twist—they disappear fast in my house!
Pistachio and Rosewater Financiers
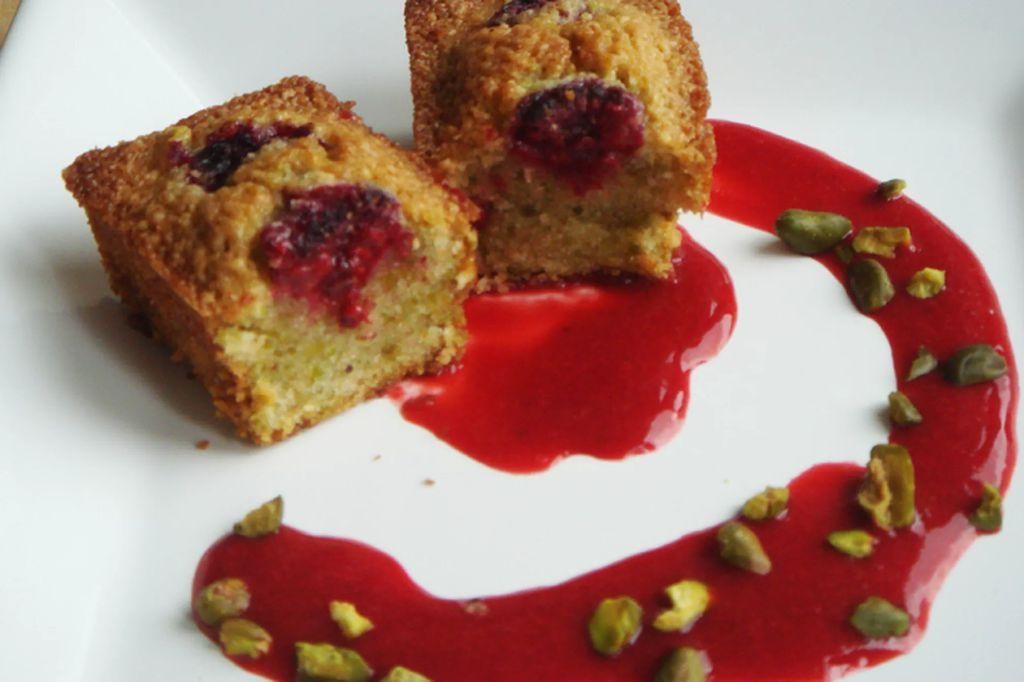
A few years ago, I stumbled upon these delicate little cakes at a Parisian patisserie and have been obsessed with recreating their magic ever since. There’s something so elegant about the subtle floral notes paired with nutty richness, and they’ve become my go-to treat for holiday gatherings or a quiet afternoon with tea. Let me show you how to make these beauties in your own kitchen—trust me, your home will smell incredible.
Serving: 12 | Pre Time: 15 minutes | Cooking Time: 15 minutes
Ingredients
– 1 cup unsalted butter, melted and cooled to room temperature
– 1 cup granulated sugar, fine and sparkling
– 1 cup almond flour, finely sifted for a smooth texture
– ½ cup all-purpose flour, spooned and leveled
– 5 large egg whites, at room temperature for better volume
– ½ cup shelled pistachios, finely chopped for a vibrant green fleck
– 2 teaspoons rosewater, pure and fragrant
– ¼ teaspoon fine sea salt, to balance the sweetness
Instructions
1. Preheat your oven to 375°F and generously grease a 12-cup financier or mini muffin pan with butter, ensuring every crevice is coated to prevent sticking—this is my secret for easy release later.
2. In a large mixing bowl, whisk together the melted unsalted butter, granulated sugar, almond flour, all-purpose flour, and fine sea salt until just combined, being careful not to overmix to keep the batter light.
3. Gently fold in the room-temperature egg whites one at a time using a spatula, mixing until fully incorporated and the batter is smooth and glossy.
4. Stir in the finely chopped pistachios and fragrant rosewater until evenly distributed throughout the batter, which should have a thick, pourable consistency.
5. Divide the batter evenly among the prepared pan cups, filling each about ¾ full to allow for rising without overflowing.
6. Bake in the preheated oven for 12–15 minutes, or until the edges are golden brown and a toothpick inserted into the center comes out clean—keep an eye on them, as they can go from perfect to overdone quickly.
7. Remove the pan from the oven and let the financiers cool in the pan for 5 minutes to set, then transfer them to a wire rack to cool completely, which helps them develop a crisp exterior.
8. Serve the financiers once cooled, or store them in an airtight container at room temperature for up to 3 days for best freshness.
Soft and tender with a slight crunch from the pistachios, these financiers melt in your mouth with a hint of floral aroma that’s not overpowering. I love serving them dusted with powdered sugar alongside a cup of Earl Grey tea, or for a festive twist, drizzle them with a simple rosewater glaze—they’re sure to impress at any gathering.
Chai-Spiced Tea Loaf with Vanilla Glaze
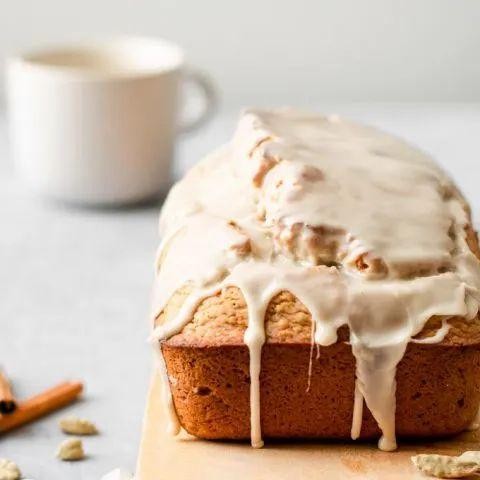
Sipping a warm mug of chai on a chilly December evening always makes me think of my grandmother’s kitchen, where the scent of spices would linger for hours. This chai-spiced tea loaf is my cozy tribute to those memories—a moist, fragrant cake infused with black tea and warming spices, topped with a simple vanilla glaze that makes it feel like a holiday treat. It’s the perfect bake for sharing with friends over coffee or wrapping up as a homemade gift.
Serving: 10 | Pre Time: 20 minutes | Cooking Time: 60 minutes
Ingredients
– 1 cup strongly brewed black tea, cooled to room temperature
– 1 cup granulated sugar
– ½ cup unsalted butter, softened to room temperature
– 2 large farm-fresh eggs, at room temperature
– 2 cups all-purpose flour, sifted
– 1 teaspoon baking powder
– ½ teaspoon baking soda
– ¼ teaspoon fine sea salt
– 1 teaspoon ground cinnamon
– ½ teaspoon ground ginger
– ¼ teaspoon ground cardamom
– ¼ teaspoon ground cloves
– ½ cup whole milk
– 1 teaspoon pure vanilla extract
– 1 cup powdered sugar, sifted
– 2 tablespoons whole milk, for the glaze
– ½ teaspoon pure vanilla extract, for the glaze
Instructions
1. Preheat your oven to 350°F (175°C) and generously grease a 9×5-inch loaf pan, then line it with parchment paper for easy removal—this tip prevents sticking and ensures clean slices.
2. In a large mixing bowl, use an electric mixer on medium speed to cream together the softened unsalted butter and granulated sugar until light and fluffy, about 3-4 minutes.
3. Add the farm-fresh eggs one at a time, beating well after each addition until fully incorporated and the mixture is smooth.
4. In a separate bowl, whisk together the sifted all-purpose flour, baking powder, baking soda, fine sea salt, ground cinnamon, ground ginger, ground cardamom, and ground cloves until evenly combined.
5. Gradually add the dry ingredients to the butter mixture in three parts, alternating with the cooled strongly brewed black tea and whole milk, beginning and ending with the dry ingredients, and mix on low speed just until no flour streaks remain—overmixing can lead to a dense loaf, so stop as soon as it’s blended.
6. Stir in the pure vanilla extract by hand until the batter is uniform.
7. Pour the batter into the prepared loaf pan and smooth the top with a spatula.
8. Bake in the preheated oven for 55-60 minutes, or until a toothpick inserted into the center comes out clean and the top is golden brown—this visual cue ensures it’s fully baked without drying out.
9. Remove the loaf from the oven and let it cool in the pan on a wire rack for 15 minutes, then transfer it out of the pan to cool completely, which helps it set properly for glazing.
10. While the loaf cools, make the glaze by whisking together the sifted powdered sugar, whole milk, and pure vanilla extract in a small bowl until smooth and pourable.
11. Once the loaf is completely cool, drizzle the vanilla glaze evenly over the top, allowing it to drip down the sides for a pretty finish.
12. Let the glaze set for about 30 minutes before slicing to serve.
You’ll love how this loaf stays incredibly moist from the tea infusion, with the chai spices offering a warm, aromatic flavor that pairs beautifully with the sweet vanilla glaze. Try serving it slightly warmed with a dollop of whipped cream or alongside a hot cup of coffee for an extra cozy treat—it’s become my go-to for holiday gatherings or a quiet morning indulgence.
Blueberry and Lemon Curd Thumbprint Cookies
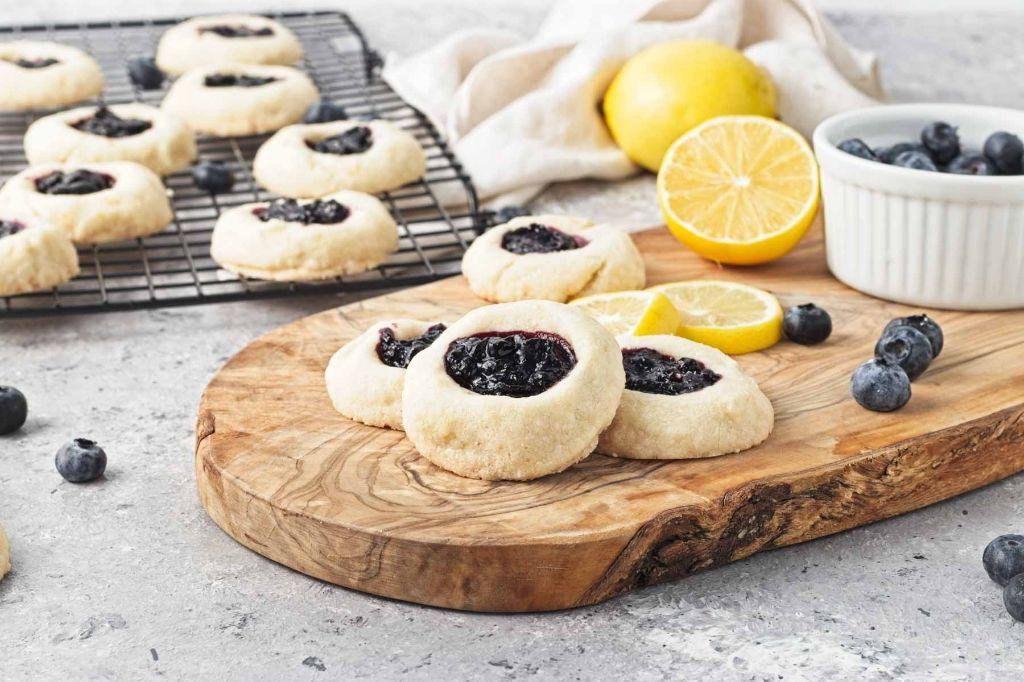
Aren’t we all looking for that perfect holiday cookie that feels both festive and a little bit fancy? I first made these Blueberry and Lemon Curd Thumbprint Cookies a few years ago when I wanted to use up some homemade lemon curd, and they’ve been a December tradition ever since. They’re buttery, bright, and just the thing to balance out all the rich chocolate treats this time of year.
Serving: 24 cookies | Pre Time: 20 minutes | Cooking Time: 12 minutes
Ingredients
– 1 cup (2 sticks) of unsalted, high-quality butter, softened to room temperature
– ¾ cup of fine, granulated white sugar
– 2 large farm-fresh eggs, at room temperature
– 1 teaspoon of pure vanilla extract
– 2 ½ cups of all-purpose flour, spooned and leveled for accuracy
– ½ teaspoon of fine sea salt
– ⅔ cup of vibrant, high-quality blueberry jam
– ⅓ cup of tangy, homemade or store-bought lemon curd
Instructions
1. Preheat your oven to 350°F (175°C) and line two large baking sheets with parchment paper.
2. In a large mixing bowl, use an electric mixer on medium speed to cream the softened butter and granulated sugar together for 2–3 minutes, until the mixture is light, fluffy, and pale yellow.
3. Tip: Scrape down the sides of the bowl halfway through to ensure everything is evenly incorporated.
4. Add the room-temperature eggs one at a time, beating well after each addition until fully combined.
5. Beat in the pure vanilla extract until just mixed.
6. In a separate medium bowl, whisk together the all-purpose flour and fine sea salt.
7. Tip: Whisking the dry ingredients helps prevent overmixing later, which can lead to tough cookies.
8. Gradually add the flour mixture to the butter mixture, mixing on low speed just until a soft dough forms and no dry streaks remain.
9. Scoop the dough into 1-tablespoon portions and roll them into smooth balls between your palms.
10. Place the dough balls about 2 inches apart on the prepared baking sheets.
11. Use your thumb or the back of a small spoon to press a deep, generous indentation into the center of each dough ball.
12. Tip: If the dough cracks, gently smooth the edges with your fingers—this ensures the filling stays put.
13. Fill half of the indentations with about ½ teaspoon of vibrant blueberry jam each.
14. Fill the remaining indentations with about ½ teaspoon of tangy lemon curd each.
15. Bake one sheet at a time in the preheated oven for 10–12 minutes, or until the cookie edges are just set and very lightly golden.
16. Let the cookies cool on the baking sheet for 5 minutes to firm up, then transfer them to a wire rack to cool completely.
17. Makes 24 cookies.
My favorite part is the contrast: the tender, buttery cookie melts in your mouth, while the bright lemon curd and sweet-tart blueberry jam offer little bursts of flavor. Serve them on a platter with a dusting of powdered sugar for a snowy effect, or pack them in a festive tin as a homemade gift that’s sure to impress.
Matcha Green Tea Mousse Cups
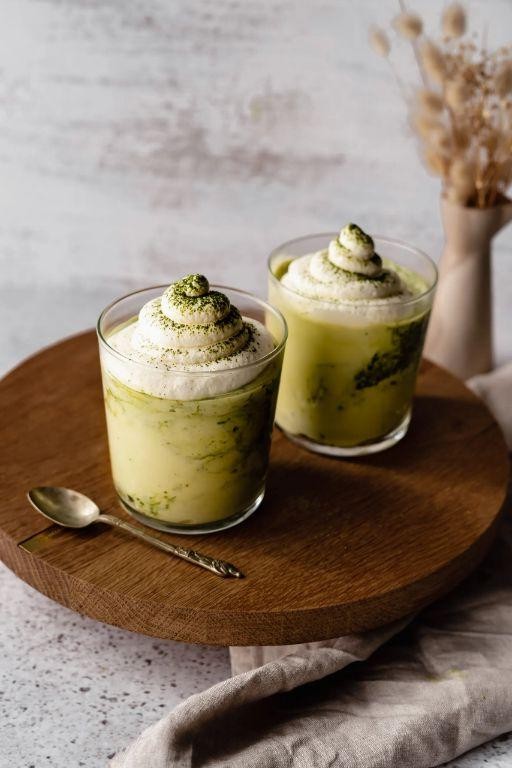
Dazzling yet delightfully simple, these Matcha Green Tea Mousse Cups have become my go-to dessert for last-minute holiday gatherings. I first tried a version at a friend’s potluck and have been tweaking it ever since to achieve that perfect balance of earthy matcha and sweet creaminess. It’s the kind of treat that looks impressive but comes together with minimal fuss, which is exactly my style in the kitchen.
Serving: 6 | Pre Time: 20 minutes | Cooking Time: 0 minutes
Ingredients
– 1 cup of heavy whipping cream, chilled until ice-cold
– 1/2 cup of granulated sugar, fine and sparkling
– 8 ounces of full-fat cream cheese, softened to room temperature
– 2 tablespoons of high-quality ceremonial-grade matcha powder, vibrant green and finely sifted
– 1 teaspoon of pure vanilla extract, with its warm, aromatic notes
– A pinch of fine sea salt, to balance the sweetness
– Fresh berries or mint leaves for garnish, optional but beautiful
Instructions
1. In a large mixing bowl, combine the softened full-fat cream cheese, fine granulated sugar, vibrant ceremonial-grade matcha powder, pure vanilla extract, and a pinch of fine sea salt.
2. Using an electric mixer on medium speed, beat the mixture for 2-3 minutes until completely smooth and free of lumps, scraping down the sides of the bowl with a spatula halfway through. (Tip: Ensure the cream cheese is fully softened to avoid a grainy texture.)
3. In a separate chilled bowl, pour the ice-cold heavy whipping cream.
4. Whip the cream on high speed for 3-4 minutes until stiff peaks form that hold their shape when the beaters are lifted. (Tip: Chill your bowl and beaters in the freezer for 10 minutes beforehand for faster, fluffier results.)
5. Gently fold the whipped cream into the matcha mixture using a spatula, using broad, sweeping motions to incorporate it fully without deflating the air.
6. Divide the mousse evenly among 6 serving cups or glasses, tapping them lightly on the counter to settle the mixture.
7. Cover the cups with plastic wrap and refrigerate for at least 4 hours, or ideally overnight, to set firmly. (Tip: For best texture, don’t skip the chilling time—it allows the flavors to meld beautifully.)
8. Just before serving, garnish with fresh berries or mint leaves if desired.
Kick back and savor the silky, cloud-like texture that melts on your tongue with each spoonful. The earthy matcha shines through without bitterness, complemented by the subtle sweetness and creamy richness. For a fun twist, layer it with crushed graham crackers or serve it in edible chocolate cups to make it even more festive.
Black Forest Mini Trifles
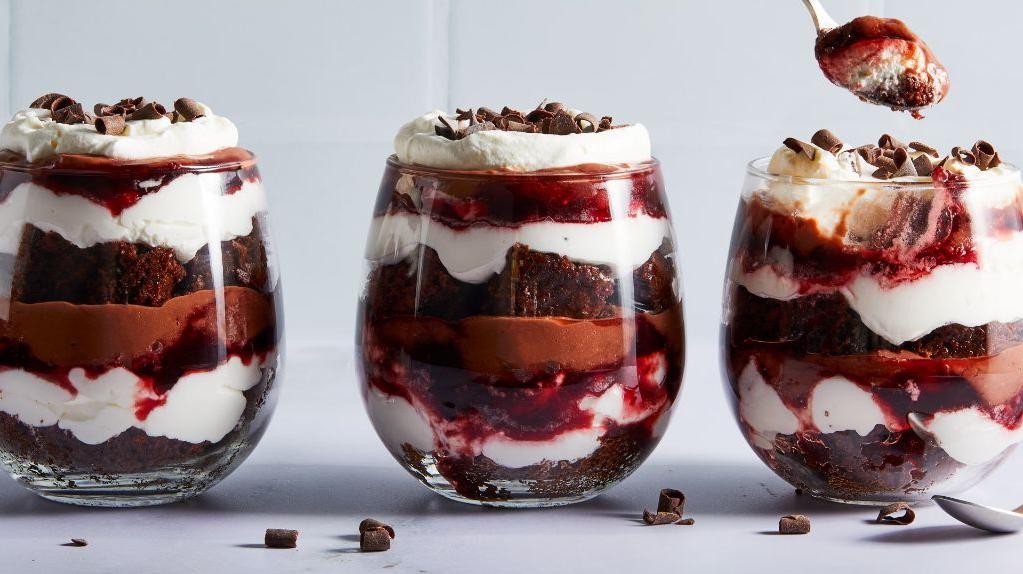
Venturing into holiday baking always brings back memories of my grandmother’s kitchen, where chocolate and cherries were a festive staple. This year, I’ve put a playful, individual twist on that classic combo with these Black Forest Mini Trifles—they’re quick to assemble, stunning to present, and perfect for last-minute gatherings. I love how they let everyone have their own little dessert masterpiece without the fuss of slicing a cake.
Serving: 6 | Pre Time: 20 minutes | Cooking Time: 0 minutes
Ingredients
– 1 package (15.25 ounces) of rich, fudgy chocolate cake mix
– 1 ½ cups of cold whole milk
– 1 package (3.4 ounces) of instant chocolate pudding mix
– 1 can (21 ounces) of tart, pitted cherry pie filling
– 2 cups of freshly whipped heavy cream, sweetened with ¼ cup of granulated sugar
– ½ cup of dark chocolate shavings, from a high-quality bar
– 6 sprigs of fresh mint for garnish
Instructions
1. Prepare the chocolate cake according to the package directions in a 9×13-inch pan, baking at 350°F for 30–35 minutes until a toothpick inserted comes out clean, then let it cool completely on a wire rack—this prevents sogginess later.
2. While the cake cools, whisk together the cold whole milk and instant chocolate pudding mix in a medium bowl for 2 minutes until thick and smooth, then refrigerate it for 5 minutes to set further.
3. Cut the cooled chocolate cake into 1-inch cubes using a serrated knife for clean edges, aiming for about 4 cups total.
4. In a large bowl, whip the heavy cream with granulated sugar on medium-high speed for 3–4 minutes until stiff peaks form, being careful not to overbeat to avoid a grainy texture.
5. Assemble the trifles in six clear glasses or jars: start with a layer of chocolate cake cubes, pressing them down gently.
6. Spoon 2 tablespoons of the set chocolate pudding over the cake layer in each glass.
7. Add a generous 2 tablespoons of tart cherry pie filling on top of the pudding, spreading it evenly.
8. Dollop or pipe a layer of the freshly whipped cream over the cherries, covering them completely.
9. Repeat the layers once more—cake, pudding, cherries, and cream—ending with a final swirl of cream on top.
10. Garnish each trifle with a sprinkle of dark chocolate shavings and a fresh mint sprig just before serving.
Creating these mini trifles feels like crafting edible art in a glass. Creamy, decadent layers of chocolate and tart cherries meld into a dessert that’s both elegant and comforting. For a fun twist, try serving them with a drizzle of warm chocolate sauce or alongside a cup of strong coffee to balance the sweetness.
Lavender Honey Butter Cookies
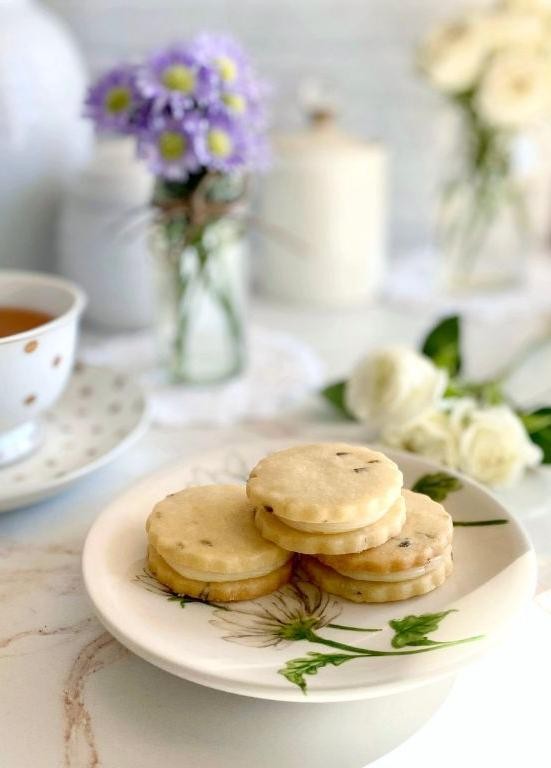
Unwrapping a tin of these lavender honey butter cookies always feels like opening a little piece of summer, even on a chilly December evening like this one. I first fell for their delicate floral sweetness at a farmers’ market years ago, and after countless batches, I’ve finally perfected a recipe that’s as simple as it is stunning—perfect for holiday gifting or a quiet moment with a cup of tea.
Serving: 24 cookies | Pre Time: 20 minutes | Cooking Time: 12 minutes
Ingredients
– 1 cup (2 sticks) of high-quality unsalted butter, softened at room temperature
– 3/4 cup of fragrant, raw local honey
– 1 large farm-fresh egg, at room temperature
– 2 1/2 cups of all-purpose flour, spooned and leveled for accuracy
– 1/2 teaspoon of fine sea salt
– 2 teaspoons of culinary-grade dried lavender buds
Instructions
1. In a large mixing bowl, use an electric mixer on medium speed to cream the softened unsalted butter and raw local honey together for 3–4 minutes, until the mixture is light, fluffy, and pale in color.
2. Crack the farm-fresh egg into the bowl and beat on low speed for 30 seconds, just until fully incorporated—overmixing can make the cookies tough.
3. In a separate medium bowl, whisk together the all-purpose flour and fine sea salt to ensure even distribution.
4. Gradually add the dry ingredients to the butter mixture, mixing on low speed until a soft, cohesive dough forms with no streaks of flour visible.
5. Gently fold in the culinary-grade dried lavender buds by hand until they are evenly dispersed throughout the dough.
6. Wrap the dough tightly in plastic wrap and refrigerate it for at least 1 hour; this chilling step is crucial for preventing the cookies from spreading too much during baking.
7. Preheat your oven to 350°F (175°C) and line two baking sheets with parchment paper.
8. Scoop the chilled dough with a tablespoon measure, roll it into 1-inch balls, and place them 2 inches apart on the prepared baking sheets.
9. Use the bottom of a glass or a fork to gently flatten each ball to about 1/4-inch thickness, creating a slight crisscross pattern if desired.
10. Bake the cookies in the preheated oven for 10–12 minutes, until the edges are just set and lightly golden—they will continue to firm up as they cool, so avoid overbaking.
11. Let the cookies cool on the baking sheets for 5 minutes before transferring them to a wire rack to cool completely.
You’ll love how these cookies melt in your mouth with a tender, crumbly texture and a subtle floral aroma from the lavender. They’re delightful on their own, but for an extra touch, try drizzling them with a bit of melted dark chocolate or serving them alongside a scoop of vanilla bean ice cream.
Mini Banoffee Pie Bites
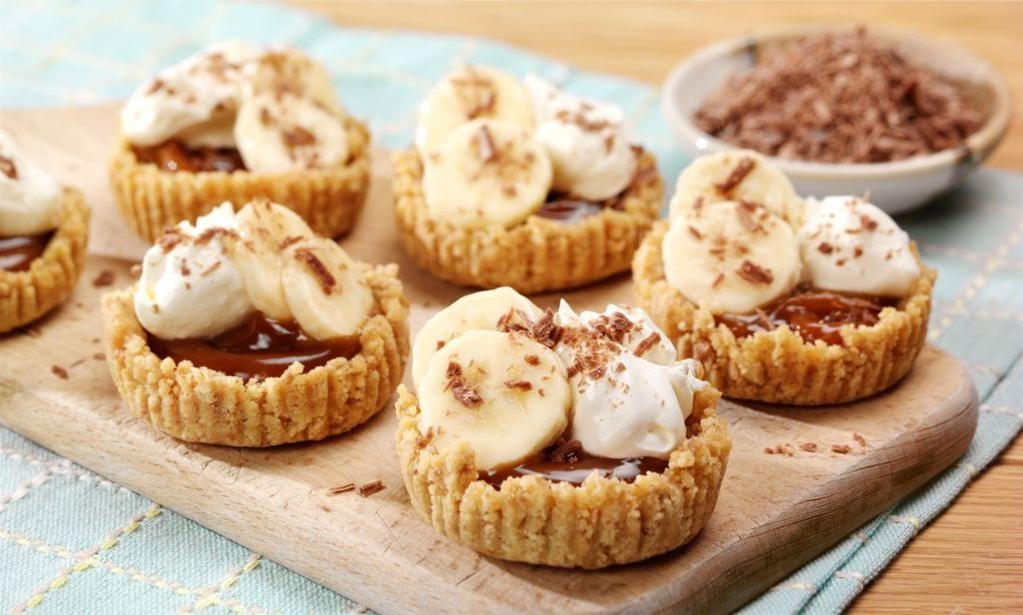
Over the holidays, I’m always looking for a sweet treat that feels festive but doesn’t require hours in the kitchen. These Mini Banoffee Pie Bites are my go‑to—they’re adorable, no‑bake, and combine all the classic flavors in a single, irresistible bite. I love making them with my kids because we can assemble them together, and they disappear almost as fast as we can put them out!
Serving: 12 | Pre Time: 20 minutes | Cooking Time: 0 minutes
Ingredients
– 1 cup of finely crushed graham cracker crumbs
– 4 tablespoons of unsalted butter, melted and slightly cooled
– 1 (14‑ounce) can of sweetened condensed milk, for a rich, caramel-like dulce de leche
– 2 medium ripe bananas, sliced into ¼‑inch rounds
– 1 cup of heavy whipping cream, chilled
– 2 tablespoons of powdered sugar, for sweetening the cream
– 1 teaspoon of pure vanilla extract, for aromatic depth
– A pinch of flaky sea salt, for a subtle salty contrast
– Dark chocolate shavings, for garnish (optional)
Instructions
1. In a medium bowl, combine 1 cup of finely crushed graham cracker crumbs with 4 tablespoons of melted unsalted butter until the mixture resembles wet sand.
2. Firmly press about 1 tablespoon of the crumb mixture into the bottom of each cup of a 12‑cup mini muffin tin to form a compact crust. Tip: Use the back of a spoon or a small glass to press evenly—this prevents crumbling later.
3. Spoon 1 teaspoon of sweetened condensed milk over each crust, spreading it gently with the back of the spoon.
4. Place one slice of ripe banana on top of the dulce de leche in each cup.
5. In a large chilled bowl, combine 1 cup of heavy whipping cream, 2 tablespoons of powdered sugar, and 1 teaspoon of pure vanilla extract.
6. Using an electric mixer on medium-high speed, whip the cream mixture until stiff peaks form, about 2–3 minutes. Tip: Chill your bowl and beaters beforehand for faster, fluffier whipped cream.
7. Pipe or dollop a generous tablespoon of the whipped cream over each banana slice.
8. Sprinkle a tiny pinch of flaky sea salt over the whipped cream for balance.
9. Garnish with dark chocolate shavings if desired. Tip: For the best texture, assemble just before serving to keep the bananas from browning and the crust crisp.
Zesty and creamy, these bites deliver a perfect contrast of textures—the crunchy graham cracker base, soft banana, and silky whipped cream. I sometimes drizzle extra dulce de leche on top or serve them on a platter with a dusting of cocoa powder for an elegant touch at parties.
Champagne and Strawberry Jelly Cups

This holiday season, I found myself with leftover champagne after a small gathering and a craving for something festive yet simple. These Champagne and Strawberry Jelly Cups are my elegant solution—they’re like edible party favors that capture the sparkle of celebration in every spoonful, and they’ve become my go-to for turning extra bubbly into a stunning dessert that impresses with minimal effort.
Serving: 6 | Pre Time: 15 minutes | Cooking Time: 5 minutes
Ingredients
– 1 cup of dry champagne, chilled
– 2 cups of fresh strawberries, hulled and sliced
– 1/4 cup of granulated sugar
– 2 packets of unflavored gelatin powder
– 1/2 cup of cold water
– 1 teaspoon of fresh lemon juice
– 6 small glass cups or ramekins
Instructions
1. In a small saucepan, combine 1/2 cup of cold water and sprinkle 2 packets of unflavored gelatin powder evenly over the surface. Let it sit for 5 minutes until the gelatin blooms and looks spongy.
2. Place the saucepan over low heat and stir constantly for 2–3 minutes until the gelatin dissolves completely and the mixture becomes clear and smooth. Tip: Avoid boiling to preserve the gelatin’s setting power.
3. Remove the saucepan from heat and stir in 1/4 cup of granulated sugar until fully dissolved, which should take about 1 minute.
4. Gently pour in 1 cup of chilled dry champagne and 1 teaspoon of fresh lemon juice, stirring slowly to combine without creating too many bubbles.
5. Divide 2 cups of hulled and sliced fresh strawberries evenly among 6 small glass cups or ramekins, arranging them in a single layer at the bottom.
6. Carefully pour the champagne-gelatin mixture over the strawberries in each cup, filling them nearly to the top. Tip: Use a spoon to guide the liquid and prevent splashing for a cleaner presentation.
7. Refrigerate the cups for at least 4 hours, or until the jelly is fully set and firm to the touch. Tip: Cover loosely with plastic wrap to avoid absorbing other fridge odors.
8. Serve chilled directly from the refrigerator. Here’s the magic: each spoonful bursts with the effervescent tang of champagne, softened by the sweet, juicy strawberries that peek through the shimmering jelly. I love garnishing these with a mint sprig or a drizzle of honey for an extra touch of luxury—they’re perfect for toasting special moments without any fuss.
White Chocolate and Cranberry Scones

Last weekend, as I was digging through my pantry for holiday baking inspiration, I stumbled upon a bag of dried cranberries and some white chocolate chips leftover from last year’s cookie marathon. It felt like fate—I knew I had to whip up a batch of these cozy, festive scones. There’s something magical about the combination of sweet white chocolate and tart cranberries that just screams holiday mornings, and I love how simple they are to throw together, even when I’m still half-asleep with my first cup of coffee.
Serving: 8 | Pre Time: 15 minutes | Cooking Time: 18 minutes
Ingredients
– 2 cups all-purpose flour, plus extra for dusting
– 1/3 cup granulated sugar
– 1 tablespoon baking powder
– 1/2 teaspoon fine sea salt
– 1/2 cup cold unsalted butter, cubed
– 1/2 cup dried cranberries
– 1/2 cup white chocolate chips
– 1 large egg, at room temperature
– 1/2 cup heavy cream, plus 1 tablespoon for brushing
– 1 teaspoon pure vanilla extract
– 1 tablespoon coarse sugar for sprinkling
Instructions
1. Preheat your oven to 400°F and line a baking sheet with parchment paper.
2. In a large mixing bowl, whisk together the all-purpose flour, granulated sugar, baking powder, and fine sea salt until well combined.
3. Add the cold unsalted butter cubes to the dry ingredients and use a pastry cutter or your fingers to work the butter into the flour mixture until it resembles coarse crumbs with pea-sized butter pieces.
4. Gently fold in the dried cranberries and white chocolate chips until evenly distributed throughout the mixture.
5. In a separate small bowl, whisk together the large egg, heavy cream, and pure vanilla extract until smooth.
6. Pour the wet ingredients into the dry ingredients and stir with a fork just until a shaggy dough forms, being careful not to overmix—this keeps the scones tender.
7. Turn the dough out onto a lightly floured surface and gently pat it into a 1-inch thick circle.
8. Use a sharp knife or bench scraper to cut the circle into 8 equal wedges, like slicing a pizza.
9. Transfer the scone wedges to the prepared baking sheet, spacing them about 2 inches apart.
10. Lightly brush the tops of each scone with the remaining tablespoon of heavy cream and sprinkle generously with coarse sugar for a crunchy, sparkly finish.
11. Bake in the preheated oven for 16–18 minutes, or until the scones are golden brown on top and a toothpick inserted into the center comes out clean.
12. Remove from the oven and let the scones cool on the baking sheet for 5 minutes before transferring to a wire rack to cool completely.
Right out of the oven, these scones are delightfully crisp on the outside with a soft, buttery crumb inside, and every bite bursts with pockets of melty white chocolate and tangy cranberries. I love serving them warm with a dollop of clotted cream or a drizzle of honey for an extra touch of sweetness—they’re perfect for a lazy weekend brunch or as a festive treat with afternoon tea.
Spiced Apple and Walnut Tea Cake
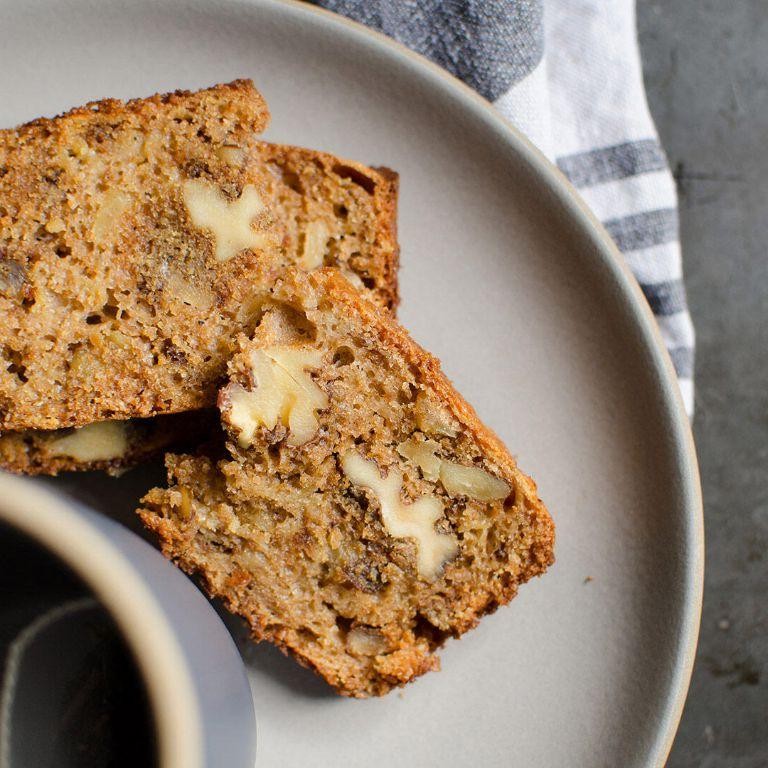
Savoring the cozy aroma of cinnamon and apples wafting through my kitchen is one of my favorite holiday traditions—this Spiced Apple and Walnut Tea Cake is my go-to treat for chilly December evenings, inspired by my grandmother’s love for baking with seasonal fruits. It’s a simple, comforting cake that pairs perfectly with a hot cup of tea or coffee, and I always make an extra loaf to share with neighbors during this festive time of year.
Serving: 8 | Pre Time: 20 minutes | Cooking Time: 50 minutes
Ingredients
– 2 cups all-purpose flour
– 1 cup granulated sugar
– 1/2 cup unsalted butter, softened to room temperature
– 2 large farm-fresh eggs
– 1/2 cup whole milk
– 1 teaspoon pure vanilla extract
– 1 teaspoon baking powder
– 1/2 teaspoon baking soda
– 1 teaspoon ground cinnamon
– 1/2 teaspoon ground nutmeg
– 1/4 teaspoon salt
– 1 cup crisp Granny Smith apples, peeled and finely diced
– 1/2 cup chopped walnuts
Instructions
1. Preheat your oven to 350°F (175°C) and grease a 9×5-inch loaf pan with butter or non-stick spray.
2. In a large mixing bowl, cream together the softened unsalted butter and granulated sugar using an electric mixer on medium speed for 3–4 minutes, until light and fluffy—this step is key for a tender crumb.
3. Add the farm-fresh eggs one at a time, beating well after each addition to incorporate fully.
4. Stir in the pure vanilla extract and whole milk until just combined.
5. In a separate bowl, whisk together the all-purpose flour, baking powder, baking soda, ground cinnamon, ground nutmeg, and salt to ensure even distribution of leaveners and spices.
6. Gradually fold the dry ingredients into the wet mixture using a spatula, mixing until no flour streaks remain, but avoid overmixing to prevent a dense cake.
7. Gently fold in the finely diced crisp Granny Smith apples and chopped walnuts until evenly distributed throughout the batter.
8. Pour the batter into the prepared loaf pan and smooth the top with the spatula.
9. Bake in the preheated oven at 350°F for 45–50 minutes, or until a toothpick inserted into the center comes out clean—if it starts browning too quickly, tent it with aluminum foil halfway through.
10. Remove the cake from the oven and let it cool in the pan on a wire rack for 15 minutes before transferring it out to cool completely, which helps it set without crumbling.
Just out of the oven, this cake boasts a moist, tender crumb speckled with juicy apple bits and crunchy walnuts, while the warm spices like cinnamon and nutmeg create a fragrant, cozy flavor that deepens as it sits. I love serving it slightly warm with a dollop of whipped cream or a drizzle of caramel sauce for an extra indulgent touch, and it stores beautifully in an airtight container for up to three days—if it lasts that long!
Summary
Lovingly curated, these 20 elegant recipes transform your afternoon tea into a special occasion. I hope they inspire you to create beautiful moments at home. Pick a recipe to try this weekend, leave a comment with your favorite, and if you enjoyed this roundup, please share it on Pinterest to spread the joy!


