Fancy a culinary time machine? We’re bringing 18 authentic Ancient Egyptian recipes straight to your modern kitchen. Discover surprisingly familiar comfort foods and exotic flavors that have delighted palates for millennia—all adapted for today’s home cook. Get ready to explore history’s tastiest secrets and impress your dinner guests with dishes that are both ancient and utterly delicious. Let’s cook like a pharaoh!
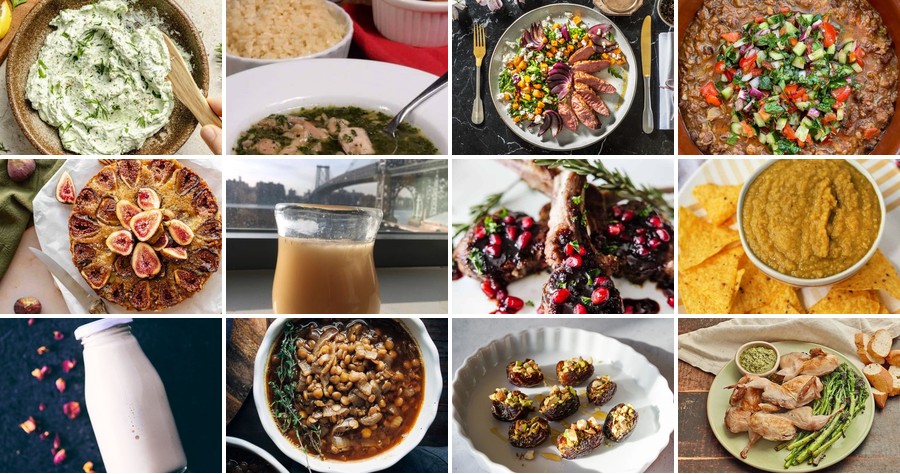
Ful Medames with Garlic and Lemon
Whether you’re looking for a protein-packed breakfast or a satisfying vegetarian meal, ful medames is a hearty Egyptian dish that’s surprisingly simple to make. With just a few pantry staples, you can create a flavorful, comforting bowl of spiced fava beans. We’ll walk through the process methodically, ensuring perfect results every time.
Serving: 4 | Pre Time: 5 minutes | Cooking Time: 10 minutes
Ingredients
– Canned fava beans – 2 (15-ounce) cans
– Garlic – 4 cloves
– Lemon – 1
– Olive oil – ¼ cup
– Ground cumin – 1 tsp
– Salt – 1 tsp
– Water – ½ cup
Instructions
1. Drain and rinse the 2 cans of fava beans thoroughly in a colander under cold running water.
2. Mince the 4 cloves of garlic finely with a sharp knife.
3. Juice the 1 lemon completely, straining out any seeds, to yield about 3 tablespoons of juice.
4. Heat the ¼ cup of olive oil in a medium saucepan over medium-low heat for 1 minute.
5. Add the minced garlic to the hot oil and sauté for 2 minutes, stirring constantly until fragrant but not browned.
6. Tip: Keeping the heat low prevents the garlic from burning and turning bitter.
7. Add the drained fava beans, 1 teaspoon of ground cumin, 1 teaspoon of salt, and ½ cup of water to the saucepan.
8. Bring the mixture to a gentle simmer over medium heat, then reduce to low and cook uncovered for 8 minutes.
9. Tip: Simmering gently helps the beans soften and absorb the flavors without breaking apart.
10. Use a potato masher or fork to lightly mash about half of the beans directly in the pan, creating a creamy texture with some whole beans remaining.
11. Remove the saucepan from the heat and stir in the 3 tablespoons of fresh lemon juice.
12. Tip: Adding the lemon juice off the heat preserves its bright, fresh acidity.
13. Taste and adjust seasoning with more salt if desired, then divide the ful medames among 4 bowls.
Enjoy the creamy, mashed beans contrasted with tender whole beans, all infused with the warm earthiness of cumin and the sharp zing of garlic and lemon. For a traditional touch, drizzle with extra olive oil and serve with warm pita bread or sliced vegetables for dipping, making it a versatile centerpiece for any meal.
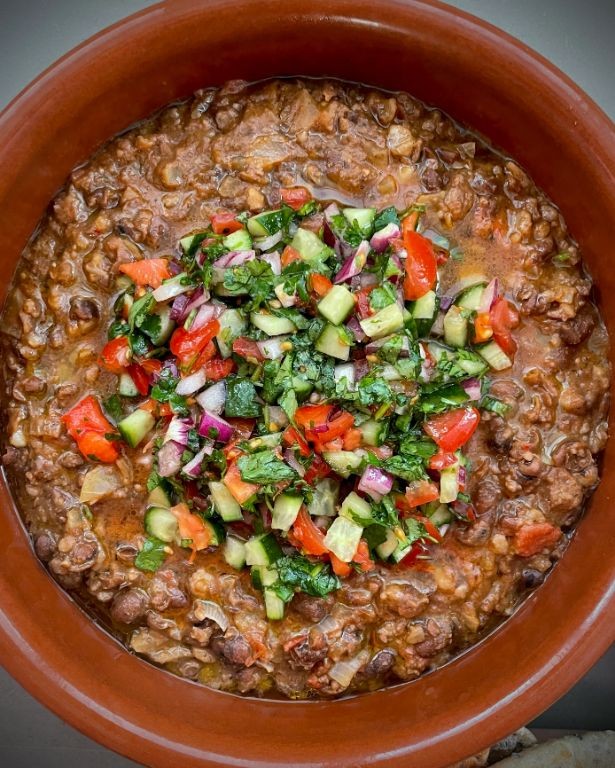
Barley Bread with Honey and Dates
Diving into ancient grains can transform your baking, and this barley bread with honey and dates offers a wholesome, slightly sweet twist perfect for breakfast or a snack. Let’s walk through it step by step, ensuring even beginners can achieve a tender, flavorful loaf. Serving: 8 | Pre Time: 15 minutes | Cooking Time: 45 minutes
Ingredients
– Barley flour – 2 cups
– Baking powder – 2 tsp
– Salt – ½ tsp
– Honey – ¼ cup
– Dates – ½ cup, pitted and chopped
– Milk – 1 cup
– Butter – 2 tbsp, melted
Instructions
1. Preheat your oven to 350°F (175°C) and grease a 9×5-inch loaf pan lightly with butter or oil.
2. In a large mixing bowl, combine 2 cups of barley flour, 2 tsp of baking powder, and ½ tsp of salt, whisking them together until evenly mixed.
3. Add ¼ cup of honey, ½ cup of chopped dates, 1 cup of milk, and 2 tbsp of melted butter to the dry ingredients.
4. Stir the mixture gently with a spatula until just combined, being careful not to overmix to keep the bread tender.
5. Pour the batter into the prepared loaf pan, smoothing the top with the spatula for an even bake.
6. Place the pan in the preheated oven and bake for 45 minutes, or until a toothpick inserted into the center comes out clean.
7. Remove the bread from the oven and let it cool in the pan for 10 minutes to set.
8. Transfer the bread to a wire rack to cool completely before slicing to prevent crumbling.
Lovingly crafted, this bread boasts a moist, dense crumb with subtle nuttiness from the barley, balanced by the natural sweetness of honey and chewy dates. Serve it warm with a dollop of butter for a cozy treat, or toast slices and top with cream cheese for a delightful contrast.
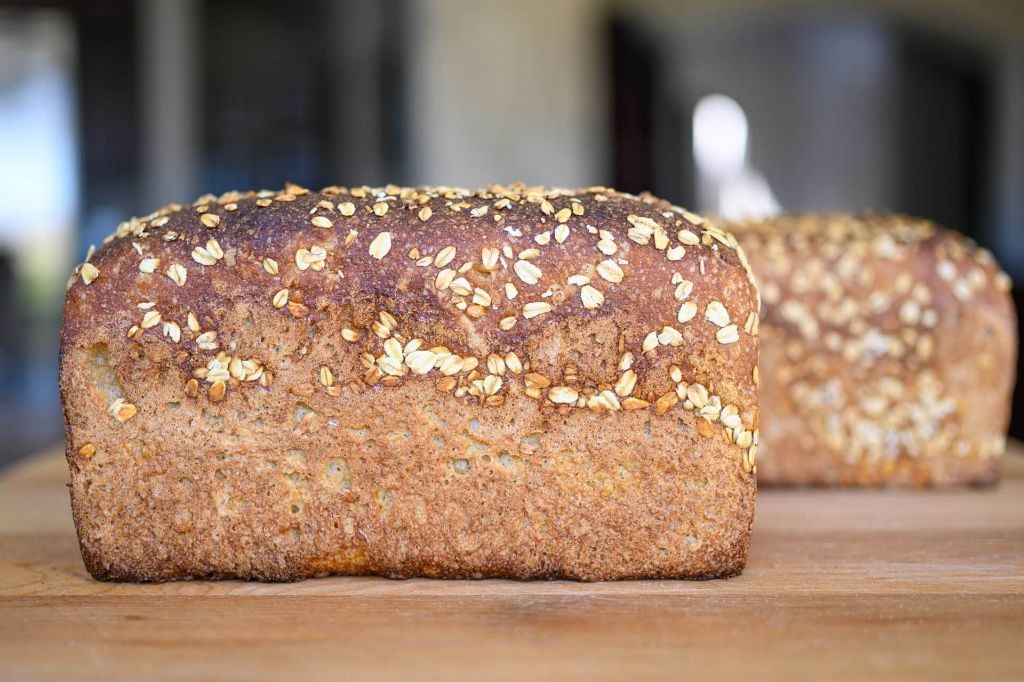
Dukkah-Crusted Roasted Duck
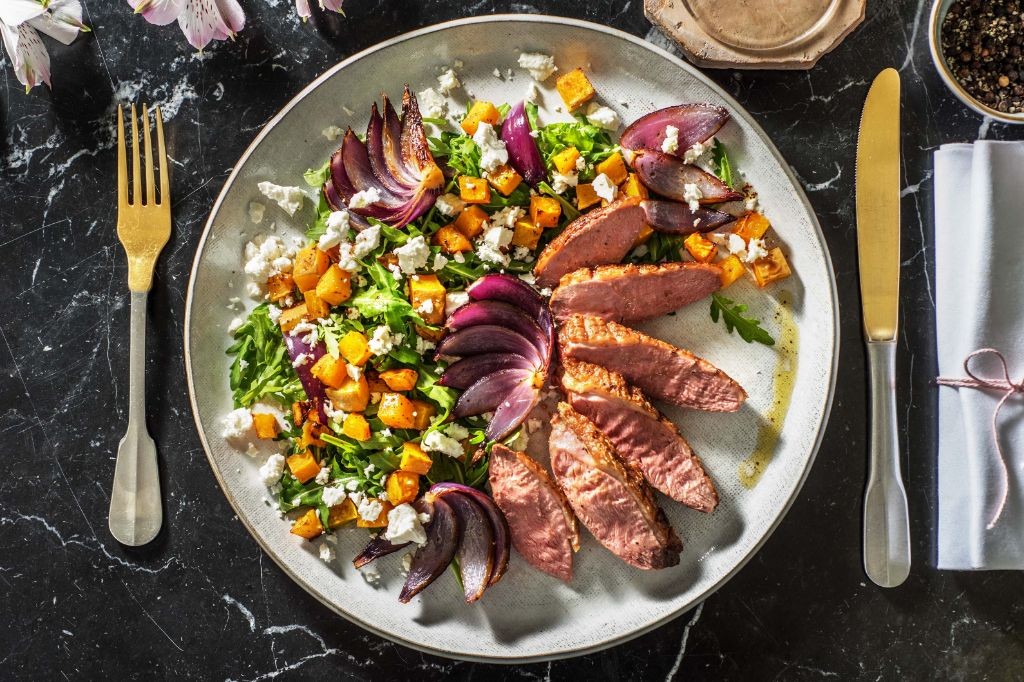
Sometimes the most impressive holiday centerpieces come from combining unexpected flavors with classic techniques. Dukkah-Crusted Roasted Duck does just that, marrying the warm, nutty spice blend of Egyptian dukkah with rich, succulent duck for a show-stopping main course that’s surprisingly approachable. Let’s walk through the process methodically, ensuring a perfectly cooked bird every time.
Serving: 4 | Pre Time: 15 minutes | Cooking Time: 90 minutes
Ingredients
– Whole Duck – 1 (5-6 lbs)
– Salt – 1 tbsp
– Dukkah Spice Blend – ½ cup
– Olive Oil – 2 tbsp
– Carrots – 4, large
– Yellow Onion – 1, large
Instructions
1. Preheat your oven to 425°F (218°C).
2. Pat the whole duck completely dry inside and out with paper towels.
3. Rub the duck’s skin and cavity thoroughly with 1 tablespoon of salt.
4. Place the duck, breast-side up, on a rack set inside a roasting pan.
5. Roast the duck at 425°F for 30 minutes to render fat and crisp the initial skin layer.
6. While the duck roasts, peel the carrots and cut them into 3-inch chunks.
7. Peel the yellow onion and cut it into 8 wedges.
8. After 30 minutes, carefully remove the roasting pan from the oven and reduce the oven temperature to 350°F (177°C).
9. Toss the carrot chunks and onion wedges with 2 tablespoons of olive oil in a bowl.
10. Scatter the oiled carrots and onions around the duck in the bottom of the roasting pan.
11. Brush the top of the duck’s skin lightly with some of the rendered fat from the pan.
12. Press ½ cup of dukkah spice blend firmly onto the duck’s skin to form an even crust.
13. Return the pan to the oven and roast at 350°F for 60 minutes.
14. Check for doneness by inserting an instant-read thermometer into the thickest part of the thigh; it should read 165°F (74°C).
15. Once cooked, transfer the duck to a cutting board, tent it loosely with foil, and let it rest for 15 minutes.
16. Carve the duck and serve it with the roasted carrots and onions from the pan.
Naturally, the dukkah forms a wonderfully fragrant, crunchy crust that contrasts with the tender, juicy meat beneath. The rendered fat beautifully roasts the vegetables, making them sweet and caramelized. For a creative twist, shred any leftover meat and toss it with the roasted vegetables for a fantastic next-day salad or grain bowl.
Lentil and Onion Stew
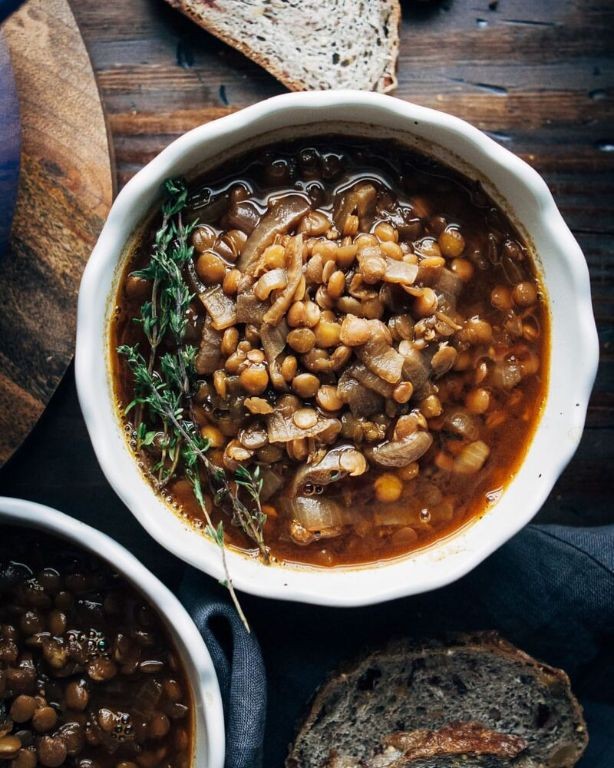
Venturing into hearty comfort food doesn’t require complex techniques or a pantry full of ingredients. This simple lentil and onion stew is a perfect example, building deep flavor from just a few humble components with a straightforward, methodical process.
Serving: 4 | Pre Time: 10 minutes | Cooking Time: 40 minutes
Ingredients
– Olive oil – 2 tbsp
– Yellow onion – 1 large, diced
– Brown lentils – 1 cup
– Vegetable broth – 4 cups
– Salt – 1 tsp
Instructions
1. Heat the olive oil in a large pot over medium heat for 1 minute.
2. Add the diced yellow onion to the pot.
3. Cook the onion, stirring occasionally, for 8-10 minutes until it is soft and translucent. (Tip: This slow cooking, called sweating, builds a sweet flavor base without browning.)
4. Add the brown lentils to the pot with the cooked onion.
5. Stir the lentils and onion together for 1 minute to lightly toast the lentils.
6. Pour in the 4 cups of vegetable broth.
7. Add the 1 tsp of salt to the pot and stir.
8. Increase the heat to bring the mixture to a boil.
9. Once boiling, immediately reduce the heat to low to maintain a gentle simmer.
10. Cover the pot with a lid, leaving it slightly ajar.
11. Simmer the stew for 30 minutes. (Tip: Avoid stirring during this time to prevent the lentils from breaking apart and becoming mushy.)
12. After 30 minutes, remove the lid and check the stew. The lentils should be tender but not falling apart, and the liquid should have thickened slightly.
13. If the stew is too thin for your liking, simmer uncovered for an additional 5-10 minutes to reduce the liquid further. (Tip: The stew will continue to thicken as it cools, so err on the side of slightly more liquid.)
14. Turn off the heat.
Achieving a creamy texture with whole, tender lentils is the hallmark of this stew, offering a savory, earthy flavor that is deeply satisfying. Serve it over a slice of crusty bread to soak up the broth, or top it with a dollop of plain yogurt for a touch of cool tanginess that beautifully contrasts the warm, hearty base.
Spiced Fig and Almond Cake

Fragrant with warm spices and sweet figs, this Spiced Fig and Almond Cake is a delightful treat that’s surprisingly simple to make. Follow these methodical steps to create a moist, flavorful cake perfect for any occasion, and don’t worry—I’ll guide you through each detail like a cooking teacher, ensuring success even if you’re a beginner.
Serving: 8 | Pre Time: 15 minutes | Cooking Time: 45 minutes
Ingredients
– All-purpose flour – 1 cup
– Almond flour – ½ cup
– Baking powder – 1 tsp
– Salt – ¼ tsp
– Ground cinnamon – 1 tsp
– Ground nutmeg – ½ tsp
– Unsalted butter – ½ cup
– Granulated sugar – ¾ cup
– Eggs – 2
– Vanilla extract – 1 tsp
– Milk – ¼ cup
– Fresh figs – 6
Instructions
1. Preheat your oven to 350°F and grease an 8-inch round cake pan.
2. In a medium bowl, whisk together the all-purpose flour, almond flour, baking powder, salt, ground cinnamon, and ground nutmeg until fully combined.
3. In a large bowl, cream the unsalted butter and granulated sugar together with an electric mixer on medium speed for 3 minutes, until light and fluffy.
4. Add the eggs one at a time to the butter mixture, beating well after each addition, then mix in the vanilla extract.
5. Gradually add the dry ingredients to the wet ingredients, alternating with the milk, mixing on low speed just until incorporated—tip: overmixing can make the cake dense, so stop as soon as no streaks of flour remain.
6. Pour the batter into the prepared cake pan and smooth the top with a spatula.
7. Slice the fresh figs into quarters and arrange them evenly on top of the batter, pressing them in slightly.
8. Bake the cake in the preheated oven for 45 minutes, or until a toothpick inserted into the center comes out clean—tip: if the top browns too quickly, loosely tent it with aluminum foil after 30 minutes to prevent burning.
9. Remove the cake from the oven and let it cool in the pan on a wire rack for 10 minutes, then carefully turn it out to cool completely.
10. Serve the cake at room temperature—tip: for extra flavor, drizzle it with a simple glaze made from powdered sugar and lemon juice before slicing.
This cake boasts a tender, moist crumb with a subtle nuttiness from the almond flour, complemented by the juicy bursts of fig and warm spices. Enjoy it as a cozy dessert with a cup of tea, or get creative by topping slices with whipped cream and a sprinkle of toasted almonds for added crunch.
Pomegranate-Glazed Lamb

Perfect for a festive holiday meal, this pomegranate-glazed lamb transforms a classic cut into a show-stopping centerpiece with a sweet-tart glaze that caramelizes beautifully. Preparing it requires just a few key ingredients and simple steps, making it surprisingly approachable for a special occasion dinner.
Serving: 4 | Pre Time: 15 minutes | Cooking Time: 90 minutes
Ingredients
– Lamb shoulder – 3 lbs
– Pomegranate juice – 1 cup
– Honey – ¼ cup
– Garlic cloves – 4
– Olive oil – 2 tbsp
– Salt – 1 tsp
– Black pepper – ½ tsp
Instructions
1. Preheat your oven to 325°F.
2. Pat the lamb shoulder dry with paper towels to ensure a crisp sear.
3. Rub the lamb all over with 1 tbsp of olive oil, 1 tsp of salt, and ½ tsp of black pepper.
4. Heat the remaining 1 tbsp of olive oil in a large oven-safe skillet over medium-high heat until shimmering.
5. Sear the lamb for 3-4 minutes per side until deeply browned.
6. Remove the skillet from heat and transfer the lamb to a plate.
7. Mince the garlic cloves finely.
8. In a small saucepan, combine the pomegranate juice, honey, and minced garlic.
9. Bring the mixture to a boil over medium heat, then reduce to a simmer for 15-20 minutes until it thickens to a syrupy glaze, stirring occasionally to prevent burning.
10. Brush half of the pomegranate glaze evenly over the seared lamb.
11. Place the glazed lamb back in the skillet and roast in the preheated oven for 60 minutes.
12. Brush the lamb with the remaining glaze every 20 minutes during roasting to build layers of flavor.
13. Check the lamb’s internal temperature with a meat thermometer; remove it from the oven when it reaches 145°F for medium-rare.
14. Let the lamb rest on a cutting board for 10 minutes before slicing to allow the juices to redistribute.
15. Slice the lamb against the grain for maximum tenderness.
16. Serve the sliced lamb drizzled with any pan juices from the skillet.
With a caramelized, sticky-sweet crust and juicy, tender interior, this lamb offers a delightful contrast in textures. The pomegranate glaze adds a vibrant, tangy note that cuts through the richness, making it pair wonderfully with roasted vegetables or a simple grain salad for a balanced meal.
Ancient Egyptian Beer Bread

Sometimes the simplest recipes connect us most deeply to history, and this Ancient Egyptian Beer Bread is a perfect example—a rustic, yeasty loaf that requires no modern yeast, just beer and flour. Let’s walk through it step-by-step so you can bake this ancient staple right in your own kitchen.
Serving: 1 loaf | Pre Time: 10 minutes | Cooking Time: 45 minutes
Ingredients
– All-purpose flour – 3 cups
– Beer – 1 cup
– Salt – 1 tsp.
– Honey – 1 tbsp.
Instructions
1. Preheat your oven to 375°F and lightly grease a 9×5-inch loaf pan.
2. In a large mixing bowl, combine 3 cups of all-purpose flour and 1 tsp. of salt, whisking them together to ensure even distribution—this helps the salt activate properly without clumping.
3. Pour 1 cup of beer into the flour mixture, using a flat beer at room temperature for better absorption, and stir with a wooden spoon until a shaggy dough forms.
4. Add 1 tbsp. of honey to the dough, mixing it in thoroughly to incorporate sweetness and aid browning.
5. Knead the dough on a lightly floured surface for 5-7 minutes until it becomes smooth and elastic, adding a sprinkle of flour if it sticks—proper kneading develops the gluten for a better rise.
6. Shape the dough into a loaf and place it in the prepared pan, covering it with a damp cloth to prevent drying out.
7. Let the dough rest at room temperature for 30 minutes to allow the beer’s natural yeasts to work, which gives it a slight rise without modern yeast.
8. Bake in the preheated oven at 375°F for 40-45 minutes, or until the top is golden brown and a toothpick inserted into the center comes out clean—check at 40 minutes to avoid over-baking.
9. Remove the bread from the oven and let it cool in the pan for 10 minutes before transferring to a wire rack to cool completely.
You’ll notice a dense, chewy texture with a subtle tang from the beer and a hint of sweetness from the honey. Try serving it warm with olive oil for dipping or alongside a hearty stew to soak up the flavors—it’s a rustic bread that brings ancient traditions to your modern table.
Date and Sesame Candy
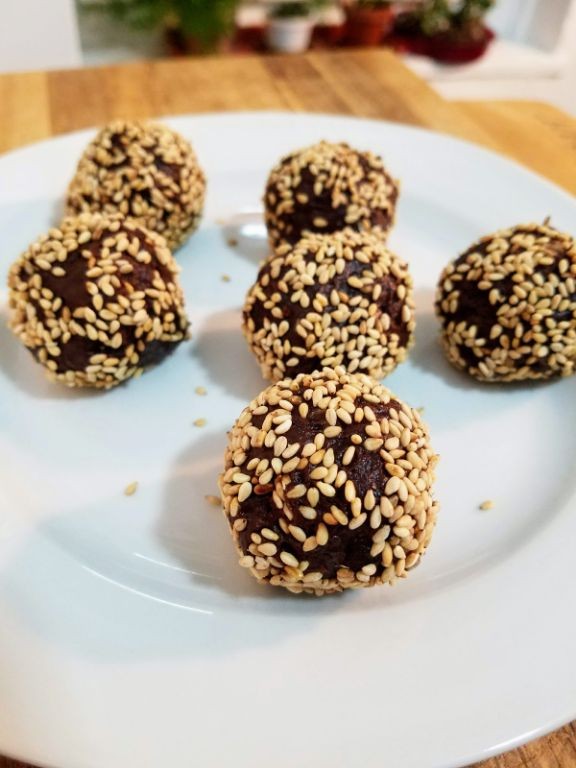
This festive treat combines sweet dates with nutty sesame seeds for a chewy, satisfying candy that’s perfect for holiday gifting or a quick energy boost. Traditionally enjoyed in many cultures, it’s naturally sweetened and requires no baking, making it an accessible project for beginners. Let’s walk through the simple steps to create these delightful bites together.
Serving: 12 pieces | Pre Time: 15 minutes | Cooking Time: 10 minutes
Ingredients
– Pitted dates – 1 cup
– Sesame seeds – ½ cup
– Water – 2 tbsp
– Butter – 1 tbsp
Instructions
1. Place the pitted dates in a food processor and pulse until they form a sticky paste, about 1 minute, scraping down the sides as needed.
2. In a small skillet over medium heat, toast the sesame seeds for 3–4 minutes, stirring constantly until they turn golden brown and fragrant, then remove from heat immediately to prevent burning.
3. Add the water and butter to the same skillet, returning it to medium heat, and stir until the butter melts completely, about 1 minute.
4. Combine the date paste and toasted sesame seeds in a mixing bowl, then pour in the butter-water mixture and mix thoroughly with a spatula until evenly incorporated.
5. Line a small baking sheet with parchment paper and transfer the mixture onto it, pressing it into a flat rectangle about ½-inch thick using your hands or the back of a spoon.
6. Refrigerate the mixture for at least 30 minutes, or until firm to the touch, which helps it set properly for cutting.
7. Remove from the refrigerator and use a sharp knife to cut the rectangle into 12 equal pieces, wiping the blade clean between cuts for neat edges.
8. Store the candies in an airtight container at room temperature for up to one week.
Glossy and rich, these candies offer a chewy texture with a subtle crunch from the sesame seeds, delivering a caramel-like sweetness that’s not overly sugary. For a festive twist, roll them in extra toasted sesame seeds or drizzle with melted dark chocolate before serving as an elegant dessert garnish.
Herbed Goat Cheese with Thyme

Creating a simple yet elegant appetizer is easier than you think, especially with this herbed goat cheese recipe. Combining creamy goat cheese with fresh thyme creates a versatile spread perfect for any gathering, and you’ll master it in just a few straightforward steps.
Serving: 4 | Pre Time: 10 minutes | Cooking Time: 0 minutes
Ingredients
– Goat cheese log – 8 oz
– Fresh thyme – 2 tbsp
– Honey – 1 tbsp
– Crackers – for serving
Instructions
1. Place the 8 oz goat cheese log on a clean cutting board.
2. Use a sharp knife to slice the goat cheese log into ½-inch thick rounds.
3. Arrange the goat cheese rounds on a serving plate, spacing them evenly.
4. Strip the leaves from the fresh thyme sprigs to yield 2 tbsp of thyme leaves.
5. Sprinkle the 2 tbsp of fresh thyme leaves evenly over the goat cheese rounds.
6. Drizzle 1 tbsp of honey over the goat cheese rounds in a thin, steady stream.
7. Let the goat cheese sit at room temperature for 10 minutes to soften slightly.
8. Serve the herbed goat cheese immediately with crackers on the side.
Unwrap the crackers and arrange them around the goat cheese for easy dipping. The cheese will be creamy and spreadable with a tangy flavor balanced by the earthy thyme and sweet honey. Try it as a topping for crostini or mixed into a salad for a delightful twist.
Roasted Quail with Coriander

Savor the delicate, gamey flavor of quail elevated by the citrusy warmth of coriander in this elegant yet approachable dish. This recipe breaks down the process into simple, manageable steps, ensuring even novice cooks can achieve a perfectly roasted bird with crispy skin and juicy meat. Let’s walk through each stage together, focusing on technique to build your confidence in the kitchen.
Serving: 2 | Pre Time: 15 minutes | Cooking Time: 25 minutes
Ingredients
– Whole quail – 2
– Olive oil – 2 tbsp
– Ground coriander – 1 tbsp
– Salt – 1 tsp
– Black pepper – ½ tsp
– Fresh lemon – 1
Instructions
1. Preheat your oven to 425°F and position a rack in the middle.
2. Pat the quail completely dry with paper towels to ensure crispy skin.
3. In a small bowl, combine the ground coriander, salt, and black pepper.
4. Rub the olive oil evenly over the outside of each quail.
5. Sprinkle the spice mixture all over the quail, coating both the exterior and the cavity.
6. Place the quail breast-side up on a wire rack set inside a rimmed baking sheet to allow air circulation.
7. Roast in the preheated oven for 20 minutes, until the skin is golden brown and crisp.
8. Insert an instant-read thermometer into the thickest part of the thigh; it should read 165°F for doneness.
9. Remove the quail from the oven and let them rest on the rack for 5 minutes to redistribute juices.
10. Cut the lemon in half and squeeze the juice over the quail just before serving.
Here, the resting period is crucial for tender meat, while the lemon juice adds a bright, acidic finish that cuts through the richness. Serve each quail whole for a dramatic presentation, perhaps alongside a simple arugula salad to complement the earthy coriander notes.
Emmer Wheat Porridge with Honey
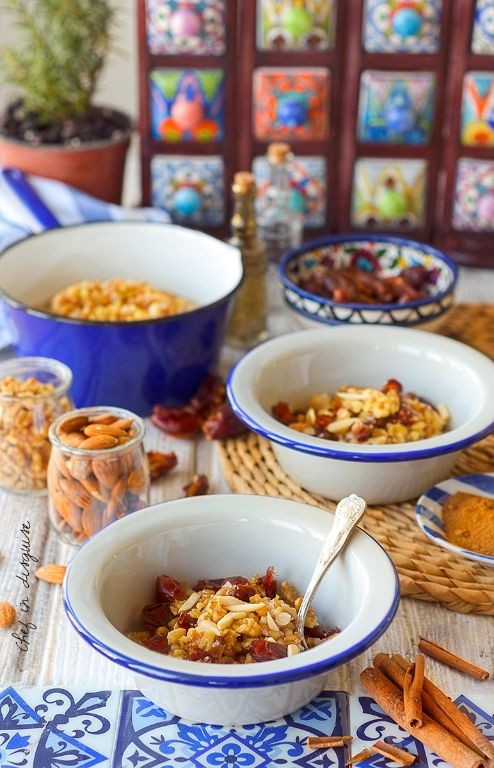
Savor the comforting simplicity of this ancient grain porridge, which transforms humble emmer wheat into a creamy, nourishing breakfast. This recipe requires minimal ingredients but delivers maximum warmth and flavor, perfect for chilly mornings when you want something satisfying yet straightforward to prepare.
Serving: 2 | Pre Time: 5 minutes | Cooking Time: 25 minutes
Ingredients
– Emmer wheat – ½ cup
– Water – 2 cups
– Salt – ¼ tsp
– Honey – 2 tbsp
– Milk – ½ cup
Instructions
1. Rinse ½ cup of emmer wheat under cold running water in a fine-mesh strainer to remove any dust or debris.
2. Combine the rinsed emmer wheat, 2 cups of water, and ¼ tsp salt in a medium saucepan over medium-high heat.
3. Bring the mixture to a boil, then reduce the heat to low and cover the saucepan with a lid.
4. Simmer the porridge for 20 minutes, stirring occasionally to prevent sticking—this low-and-slow cooking helps the grains soften evenly.
5. After 20 minutes, check the texture: the wheat should be tender but still have a slight chew, and most of the water should be absorbed.
6. Stir in ½ cup of milk and continue cooking uncovered for 5 more minutes over low heat, which adds creaminess without curdling.
7. Remove the saucepan from the heat and let the porridge sit for 2 minutes to thicken slightly.
8. Drizzle 2 tbsp of honey over the porridge and stir gently to incorporate—adding honey off the heat preserves its delicate floral notes.
9. Divide the porridge between two bowls and serve immediately.
Zesty with the natural sweetness of honey, this porridge has a pleasantly chewy texture from the whole emmer grains, making it more substantial than typical oatmeal. For a creative twist, top it with toasted nuts or a sprinkle of cinnamon to enhance its earthy flavor, or enjoy it as is for a pure, wholesome start to your day.
Garlic and Cumin Roasted Chickpeas
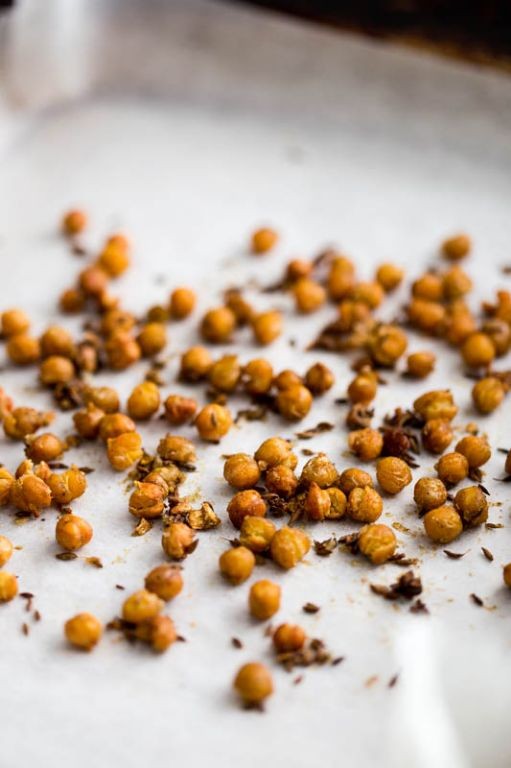
Begin by preheating your oven to 400°F. This simple, savory snack transforms humble chickpeas into a crispy, protein-packed treat with just a few pantry staples. Let’s walk through each step together to ensure perfect results every time.
Serving: 4 | Pre Time: 10 minutes | Cooking Time: 25 minutes
Ingredients
– Canned chickpeas – 2 (15-ounce) cans
– Olive oil – 2 tbsp
– Garlic powder – 1 tsp
– Ground cumin – 1 tsp
– Salt – ½ tsp
Instructions
1. Drain and rinse the canned chickpeas thoroughly in a colander.
2. Pat the chickpeas completely dry with paper towels, removing any loose skins for crispier results (Tip: drying them well prevents steaming in the oven).
3. In a medium bowl, combine the chickpeas, olive oil, garlic powder, ground cumin, and salt.
4. Toss the mixture until the chickpeas are evenly coated with the oil and spices.
5. Spread the chickpeas in a single layer on a parchment-lined baking sheet.
6. Roast in the preheated 400°F oven for 25 minutes, shaking the pan halfway through to promote even browning (Tip: listen for a light sizzle to confirm the oil is hot enough).
7. Check the chickpeas at 20 minutes; they should be golden brown and crisp to the touch (Tip: if they still feel soft, roast for an additional 5 minutes, but watch closely to avoid burning).
8. Remove the baking sheet from the oven and let the chickpeas cool completely on the pan, about 10 minutes, to crisp up further.
Look for a satisfying crunch with each bite, the garlic and cumin melding into a warm, earthy flavor. Serve them straight from the bowl as a snack, or sprinkle over salads for added texture—they’ll stay crisp for days if stored in an airtight container.
Melokhia Stew with Rabbit

Often overlooked in American kitchens, Melokhia Stew with Rabbit is a comforting, earthy dish that transforms simple ingredients into a deeply satisfying meal. This traditional stew features tender rabbit simmered with the unique, slightly mucilaginous melokhia leaves, creating a rich, savory broth perfect for a cozy dinner.
Serving: 4 | Pre Time: 20 minutes | Cooking Time: 90 minutes
Ingredients
– Rabbit, cut into pieces – 2 lbs
– Dried melokhia leaves – 1 cup
– Olive oil – 2 tbsp
– Onion, diced – 1 large
– Garlic cloves, minced – 4
– Chicken broth – 6 cups
– Ground coriander – 1 tbsp
– Salt – 1 tsp
– Lemon juice – 2 tbsp
Instructions
1. Pat the rabbit pieces dry with paper towels to ensure even browning.
2. Heat the olive oil in a large Dutch oven over medium-high heat until it shimmers, about 2 minutes.
3. Add the rabbit pieces and sear for 4-5 minutes per side until golden brown, working in batches if needed to avoid overcrowding.
4. Transfer the seared rabbit to a plate and set aside.
5. In the same pot, add the diced onion and cook over medium heat for 6-8 minutes, stirring occasionally, until softened and translucent.
6. Add the minced garlic and cook for 1 minute until fragrant, being careful not to let it burn.
7. Stir in the ground coriander and toast for 30 seconds to release its aroma.
8. Pour in the chicken broth, using a wooden spoon to scrape up any browned bits from the bottom of the pot.
9. Return the seared rabbit pieces to the pot and bring the liquid to a boil.
10. Reduce the heat to low, cover the pot, and simmer gently for 60 minutes until the rabbit is fork-tender.
11. While the rabbit simmers, place the dried melokhia leaves in a bowl and cover with 2 cups of warm water to rehydrate for 20 minutes; drain and squeeze out excess water before using.
12. After 60 minutes, add the rehydrated melokhia leaves and salt to the stew, stirring to combine.
13. Continue simmering uncovered for 15 minutes to allow the melokhia to soften and thicken the broth slightly.
14. Remove the pot from heat and stir in the lemon juice.
Gently ladle this stew into bowls, where the tender rabbit falls off the bone and the melokhia leaves create a silky, slightly thickened broth with a distinct, earthy flavor. The bright acidity from the lemon juice cuts through the richness, making it ideal served over a bed of fluffy rice or with warm, crusty bread for soaking up every last drop.
Carob and Honey Pudding

Often overlooked in modern dessert menus, this carob and honey pudding offers a nostalgic sweetness with a naturally rich flavor that requires no refined sugar. Our methodical approach ensures even beginners can achieve a silky, comforting result perfect for holiday gatherings or cozy winter evenings.
Serving: 6 | Pre Time: 10 minutes | Cooking Time: 25 minutes
Ingredients
– Whole milk – 2 cups
– Carob powder – ½ cup
– Honey – ¼ cup
– Cornstarch – 3 tbsp
– Vanilla extract – 1 tsp
– Salt – ¼ tsp
Instructions
1. Whisk together ½ cup of the milk with the carob powder, cornstarch, and salt in a medium bowl until completely smooth with no lumps.
2. Pour the remaining 1½ cups of milk into a heavy-bottomed saucepan and heat over medium heat until it reaches 180°F, which takes about 5 minutes—use a thermometer to avoid scalding.
3. Slowly pour the carob mixture into the hot milk while whisking constantly to prevent clumping.
4. Continue cooking the mixture over medium heat, stirring continuously with a wooden spoon, until it thickens and large bubbles break the surface, about 8–10 minutes.
5. Remove the saucepan from the heat and immediately stir in the honey and vanilla extract until fully incorporated.
6. Pour the pudding into six 4-ounce ramekins or a single serving dish, smoothing the top with a spatula.
7. Press plastic wrap directly onto the surface of the pudding to prevent a skin from forming as it cools.
8. Refrigerate the pudding for at least 2 hours, or until completely set and chilled to 40°F.
9. Serve the pudding chilled straight from the refrigerator.
Silky and subtly earthy from the carob, this pudding firms up to a spoonable consistency that pairs beautifully with a drizzle of extra honey or a sprinkle of toasted nuts. For a festive twist, layer it in glasses with crushed gingerbread cookies or top with whipped coconut cream for a dairy-free option.
Fennel and Leek Soup

Crafting a comforting bowl of fennel and leek soup is simpler than you might think, perfect for a cozy winter evening. This methodical guide will walk you through each step, ensuring a smooth, flavorful result even if you’re new to the kitchen. Let’s begin by gathering our minimal ingredients and prepping our vegetables.
Serving: 4 | Pre Time: 15 minutes | Cooking Time: 30 minutes
Ingredients
– Fennel bulb – 1 large
– Leeks – 2 medium
– Unsalted butter – 2 tbsp
– Vegetable broth – 4 cups
– Heavy cream – ½ cup
– Salt – 1 tsp
– Black pepper – ½ tsp
Instructions
1. Trim the fennel bulb by cutting off the stalks and fronds, then slice it thinly.
2. Clean the leeks thoroughly by slicing them lengthwise and rinsing under cold water to remove any grit, then chop them into half-inch pieces.
3. Melt the unsalted butter in a large pot over medium heat until it bubbles slightly.
4. Add the sliced fennel and chopped leeks to the pot, stirring to coat them in butter.
5. Cook the vegetables for 10 minutes, stirring occasionally, until they soften and turn translucent.
6. Pour in the vegetable broth, ensuring it covers the vegetables completely.
7. Bring the mixture to a boil, then reduce the heat to low and let it simmer for 20 minutes.
8. Remove the pot from the heat and use an immersion blender to puree the soup until smooth, or transfer it to a blender in batches if needed.
9. Stir in the heavy cream until fully incorporated into the soup.
10. Season the soup with salt and black pepper, adjusting as necessary after tasting a small spoonful.
11. Ladle the soup into bowls and serve immediately while hot.
Oozing with a velvety texture, this soup balances the subtle licorice notes of fennel with the mild sweetness of leeks, creating a rich, creamy base. For a creative twist, top it with a drizzle of olive oil or a sprinkle of fresh herbs like dill to enhance its aromatic profile, making it a versatile dish for any occasion.
Pistachio-Stuffed Dates
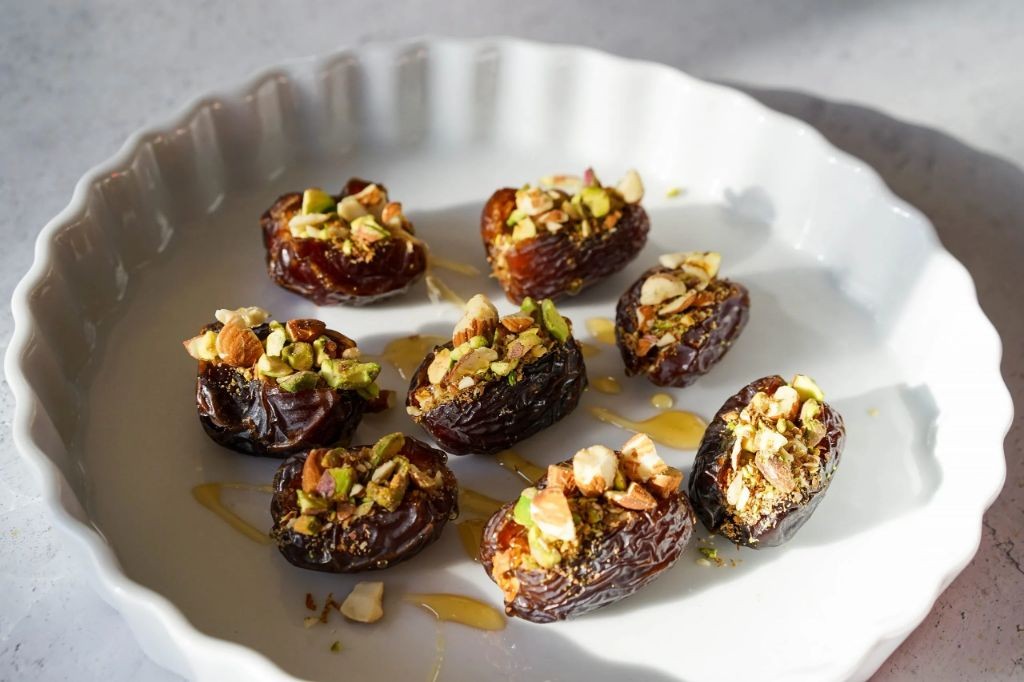
Kicking off a festive treat that’s both elegant and effortless, these Pistachio-Stuffed Dates are a perfect sweet-and-savory bite for holiday gatherings or a simple dessert. Let’s walk through each step together to ensure your success in the kitchen.
Serving: 12 | Pre Time: 15 minutes | Cooking Time: 0 minutes
Ingredients
– Medjool dates – 12
– Pistachios – ½ cup
– Cream cheese – 4 oz
– Honey – 2 tbsp
Instructions
1. Place 12 Medjool dates on a clean cutting board.
2. Use a sharp paring knife to make a lengthwise slit along the top of each date, being careful not to cut all the way through.
3. Remove the pit from each date by gently pulling it out with your fingers.
4. Measure ½ cup of pistachios and place them in a small bowl.
5. Chop the pistachios finely with a knife until they resemble coarse crumbs, which helps them stick better to the filling.
6. In a medium mixing bowl, add 4 oz of cream cheese and 2 tbsp of honey.
7. Mix the cream cheese and honey together with a spoon until fully combined and smooth, about 1–2 minutes.
8. Spoon approximately 1 tsp of the cream cheese mixture into the slit of each date, filling it evenly without overstuffing.
9. Press the stuffed dates gently into the chopped pistachios, coating the cream cheese filling completely.
10. Arrange the stuffed dates on a serving platter in a single layer.
11. Refrigerate the dates for at least 30 minutes to allow the filling to firm up, making them easier to handle.
12. Serve chilled directly from the refrigerator.
Dense and chewy dates contrast beautifully with the creamy, tangy filling, while the pistachios add a delightful crunch. For a festive twist, drizzle with extra honey or sprinkle with sea salt just before serving to enhance the sweet and savory notes.
Red Lentil and Cumin Dip

During the holiday rush, a quick, healthy appetizer can be a lifesaver. This Red Lentil and Cumin Dip is a protein-packed, flavorful spread that comes together with minimal effort and maximum reward.
Serving: 6 | Pre Time: 5 minutes | Cooking Time: 25 minutes
Ingredients
– Red lentils – 1 cup
– Water – 3 cups
– Olive oil – 2 tbsp
– Ground cumin – 1 tsp
– Garlic – 2 cloves
– Lemon juice – 3 tbsp
– Salt – ¾ tsp
Instructions
1. Rinse 1 cup of red lentils under cold running water in a fine-mesh strainer until the water runs clear.
2. Combine the rinsed lentils and 3 cups of water in a medium saucepan.
3. Bring the mixture to a boil over high heat.
4. Once boiling, reduce the heat to low and cover the saucepan with a lid.
5. Simmer the lentils for 20 minutes, or until they are very soft and have absorbed most of the water.
6. While the lentils cook, mince 2 cloves of garlic.
7. Heat 2 tablespoons of olive oil in a small skillet over medium heat for 1 minute.
8. Add the minced garlic and 1 teaspoon of ground cumin to the hot oil.
9. Cook the garlic and cumin for 1 minute, stirring constantly, until fragrant but not browned.
10. Drain any excess water from the cooked lentils and transfer them to a food processor.
11. Add the warm garlic-cumin oil, 3 tablespoons of lemon juice, and ¾ teaspoon of salt to the food processor.
12. Process the mixture for 1 full minute, scraping down the sides once halfway through, until completely smooth.
13. Transfer the dip to a serving bowl and let it rest for 10 minutes to allow the flavors to meld.
This dip achieves a wonderfully smooth, hummus-like texture with a warm, earthy flavor from the cumin. Try it as a vibrant spread on toasted pita or as a unique base for a vegetable platter, where its creamy consistency perfectly complements crunchy crudités.
Rosewater and Almond Milk
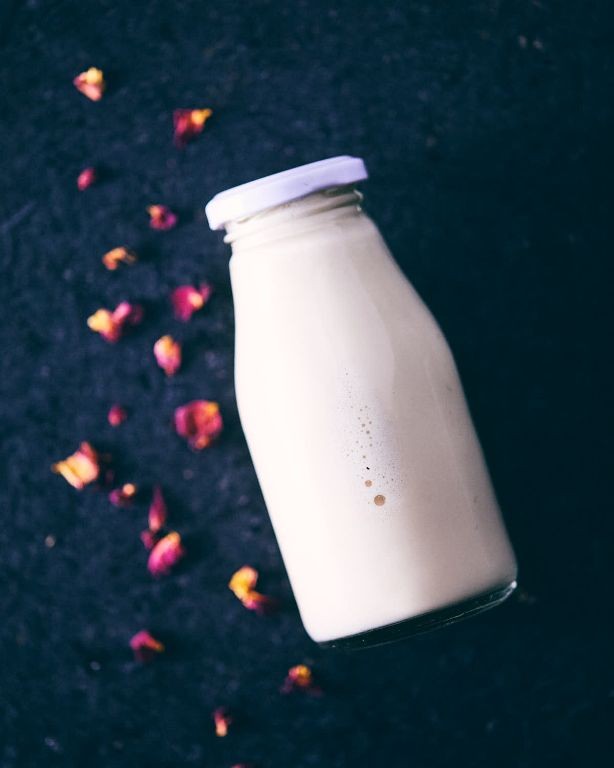
Often overlooked in the rush of holiday baking, a homemade, aromatic beverage can be the perfect, calming centerpiece. This rosewater and almond milk recipe is a simple, elegant drink that feels special yet is surprisingly easy to make from scratch, requiring just a few core ingredients and a bit of patience.
Serving: 4 | Pre Time: 10 minutes | Cooking Time: 0 minutes
Ingredients
– Raw Almonds – 1 cup
– Water – 4 cups
– Rosewater – 1 tbsp
– Honey – 2 tbsp
– Ice – for serving
Instructions
1. Place 1 cup of raw almonds into a medium bowl.
2. Pour enough cool water over the almonds to cover them by at least 1 inch.
3. Cover the bowl and let the almonds soak at room temperature for 8 to 12 hours, or overnight, which softens them for a smoother milk.
4. Drain the soaked almonds and discard the soaking water.
5. Rinse the almonds thoroughly under cool running water.
6. Transfer the rinsed almonds to a high-speed blender.
7. Add 4 cups of fresh, cold water to the blender with the almonds.
8. Secure the blender lid tightly.
9. Blend the mixture on high speed for 1 full minute, until it appears completely white and frothy.
10. Place a nut milk bag or a fine-mesh strainer lined with cheesecloth over a large bowl or pitcher.
11. Pour the blended almond mixture into the strainer to separate the milk from the pulp.
12. Gather the edges of the nut milk bag or cheesecloth and squeeze firmly to extract all the liquid, leaving dry almond pulp behind; save this pulp for baking if desired.
13. Pour the strained almond milk back into the cleaned blender pitcher.
14. Add 1 tablespoon of rosewater and 2 tablespoons of honey to the blender.
15. Blend the mixture on low speed for 15 seconds, just until the honey is fully incorporated and the flavors are combined, being careful not to over-blend and create foam.
16. Pour the finished rosewater almond milk into a glass pitcher or bottle.
17. Chill the milk in the refrigerator for at least 1 hour before serving to allow the flavors to meld.
18. Serve the milk over ice in individual glasses.
Zesty and floral, this milk has a light, silky texture that’s refreshingly cool. The subtle perfume of rosewater pairs beautifully with the natural sweetness of the almonds and honey, making it a sophisticated non-alcoholic option for brunch or a soothing evening treat. For a creative twist, try adding a pinch of cardamom before blending or using it as a base for a delicate chia pudding.
Summary
Step back in time and bring ancient flavors to your table with these 18 authentic Egyptian recipes. They’re a delicious way to explore history through food. We’d love to hear which dish becomes your favorite—leave a comment below! If you enjoyed this culinary journey, please share it on Pinterest to inspire other home cooks. Happy cooking!


