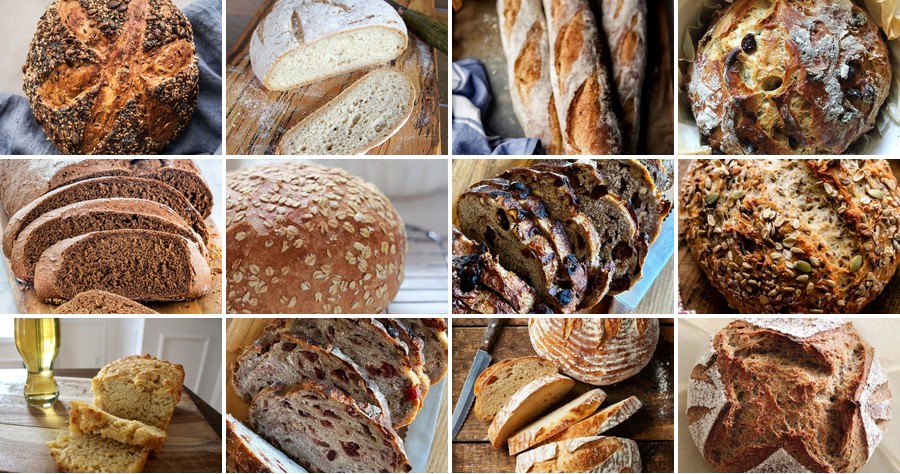
Have you ever dreamed of filling your kitchen with the irresistible aroma of freshly baked bread? Whether you’re a seasoned baker or just starting out, artisan bread is a rewarding adventure. From crusty sourdough to soft focaccia, these 20 delicious recipes offer something for every skill level and taste. Let’s dive into a world of flavor and texture that will inspire your next baking session!
Crusty No-Knead Artisan Bread
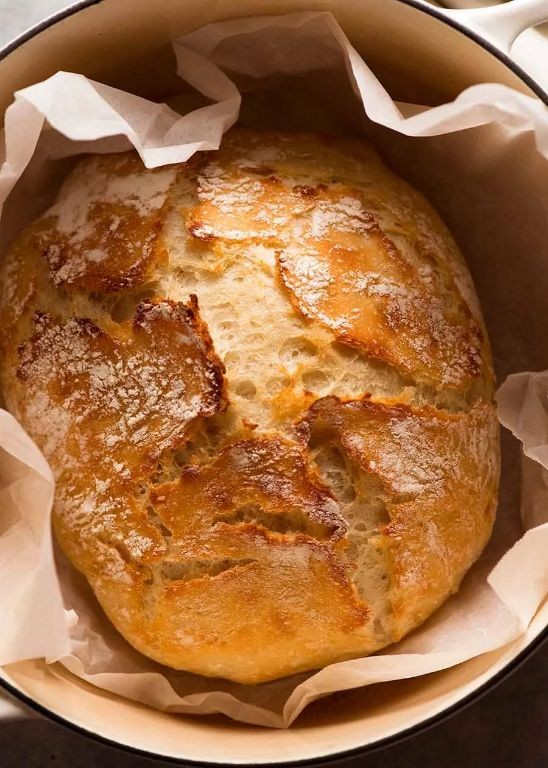
Gather ’round, bread lovers, because I’m about to drop the easiest, most impressive loaf you’ll ever bake—no kneading, no fancy equipment, just pure, crusty magic. Seriously, this no-knead artisan bread is the lazy baker’s secret weapon, delivering a bakery-worthy masterpiece with minimal effort. It’s the perfect project for a cozy day, and the aroma alone will make your kitchen smell like a professional patisserie.
Serving: 1 loaf | Pre Time: 15 minutes (plus 12-18 hours rising) | Cooking Time: 45 minutes
Ingredients
– 3 cups all-purpose flour (I swear by King Arthur for consistent results)
– 1 ½ teaspoons kosher salt (Diamond Crystal is my go-to for its flaky texture)
– ½ teaspoon active dry yeast (just a tiny packet’s worth—trust me, it works!)
– 1 ½ cups lukewarm water (around 105°F, like a warm bath for the yeast)
Instructions
1. In a large mixing bowl, whisk together 3 cups all-purpose flour, 1 ½ teaspoons kosher salt, and ½ teaspoon active dry yeast until fully combined.
2. Pour in 1 ½ cups lukewarm water and stir with a wooden spoon until a shaggy, sticky dough forms—no need to overmix!
3. Cover the bowl tightly with plastic wrap and let it rest at room temperature for 12 to 18 hours (overnight is perfect; the long rise develops amazing flavor).
4. After the rise, the dough will be bubbly and doubled in size. Lightly flour a work surface and your hands, then gently scrape the dough onto it.
5. Fold the dough over itself a few times to shape it into a rough ball—this builds structure without kneading. Tip: Use a bench scraper if it’s too sticky!
6. Place the dough ball seam-side down on a well-floured kitchen towel, then dust the top lightly with flour and cover with another towel.
7. Let the dough rise again for 1 to 2 hours, until it looks puffy and nearly doubled. Meanwhile, preheat your oven to 450°F with a Dutch oven inside for 30 minutes.
8. Carefully remove the hot Dutch oven, place the dough inside seam-side up (it might be messy, but that’s okay!), and cover with the lid. Tip: Score the top with a sharp knife for a prettier crust!
9. Bake covered for 30 minutes, then remove the lid and bake uncovered for another 15 minutes, until the bread is deeply golden and sounds hollow when tapped.
10. Transfer the bread to a wire rack and let it cool completely for at least 1 hour before slicing—patience rewards you with the perfect crumb!
Voilà! You’ve just baked a loaf with a crackly, golden crust and an airy, chewy interior that’s begging to be slathered with butter or dipped in olive oil. Serve it warm with soup for a cozy meal, or toast thick slices for the ultimate avocado toast—this bread is so versatile, it might just become your new kitchen staple.
Classic Sourdough Artisan Loaf
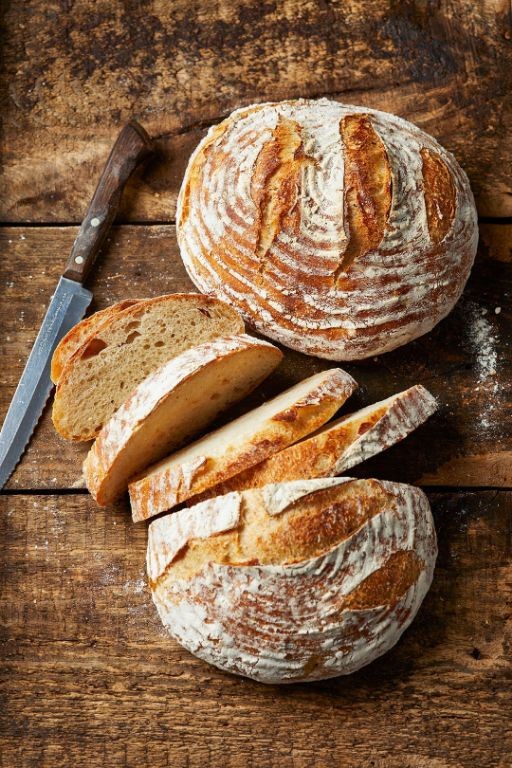
Miraculously, after all those failed attempts at baking bread that could double as a doorstop, you’ve found the one recipe that actually works—and it’s about to make you a sourdough superstar. This classic artisan loaf is the chewy, tangy, crusty masterpiece you’ve been dreaming of, and trust me, your future self (and your Instagram feed) will thank you.
Serving: 1 loaf | Pre Time: 18 hours (mostly hands-off, I promise!) | Cooking Time: 45 minutes
Ingredients
– 1 cup bubbly, active sourdough starter (the heart and soul of this loaf—if it doesn’t float in water, let it nap a bit longer)
– 1 ½ cups warm water (around 85°F, think baby-bottle warm)
– 4 cups bread flour (the high-protein hero for that glorious chew)
– 1 ½ tsp fine sea salt (my secret for balancing the tang)
– Rice flour for dusting (a baker’s trick to prevent sticking without altering flavor)
Instructions
1. In a large bowl, whisk together 1 cup of active sourdough starter and 1 ½ cups of warm water until frothy.
2. Add 4 cups of bread flour and 1 ½ tsp of fine sea salt all at once, and mix with a wooden spoon until a shaggy dough forms—no dry spots allowed!
3. Cover the bowl with a damp kitchen towel and let it rest for 30 minutes; this autolyse step helps develop gluten effortlessly.
4. Perform a series of four stretch-and-folds: wet your hands, grab one edge of the dough, stretch it upward, and fold it over the center. Rotate the bowl 90 degrees and repeat until you’ve gone around four times.
5. Re-cover the bowl and let the dough bulk ferment at room temperature (about 70°F) for 8-10 hours, until it has nearly doubled in size and looks bubbly.
6. Lightly flour a work surface with bread flour and gently turn the dough out onto it.
7. Shape the dough into a tight round by folding the edges toward the center, then flip it seam-side down and cup your hands around it, rotating to create surface tension.
8. Generously dust a proofing basket or bowl lined with a towel with rice flour, then place the dough seam-side up inside it.
9. Cover and refrigerate the dough for 8-12 hours for a slow, flavor-boosting cold proof—this is where that signature sourdough tang really develops.
10. Preheat your oven to 450°F with a Dutch oven inside for at least 30 minutes; a hot, enclosed environment is key for that crackly crust.
11. Carefully remove the hot Dutch oven, take the dough from the fridge, and turn it out onto a piece of parchment paper.
12. Score the top of the dough about ¼-inch deep with a sharp blade or lame in one swift motion—this controls expansion and adds artisanal flair.
13. Lift the parchment with the dough into the Dutch oven, cover with the lid, and bake for 30 minutes to trap steam for oven spring.
14. Remove the lid, reduce the oven temperature to 425°F, and bake for another 15 minutes until the crust is deeply golden brown and sounds hollow when tapped.
15. Transfer the loaf to a wire rack and let it cool completely for at least 2 hours—resisting the urge to slice early prevents a gummy interior.
Absolutely, that first slice reveals a tender, holey crumb with a satisfying chew, all wrapped in a shatteringly crisp crust. Slather it with salted butter for a simple treat, or get fancy and use it as the base for avocado toast that’ll make your brunch guests swoon.
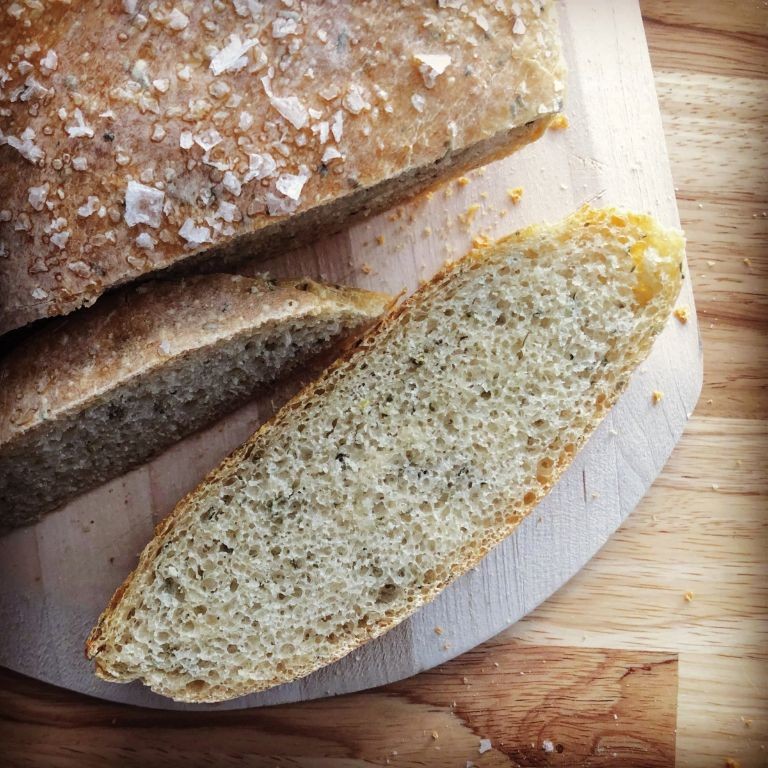
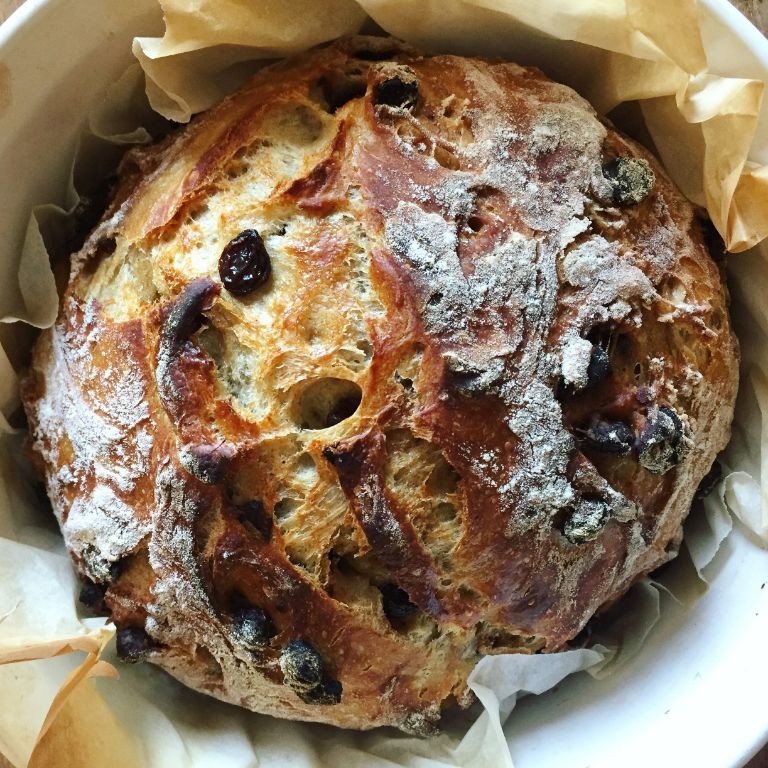
Olive and Rosemary Artisan Bread
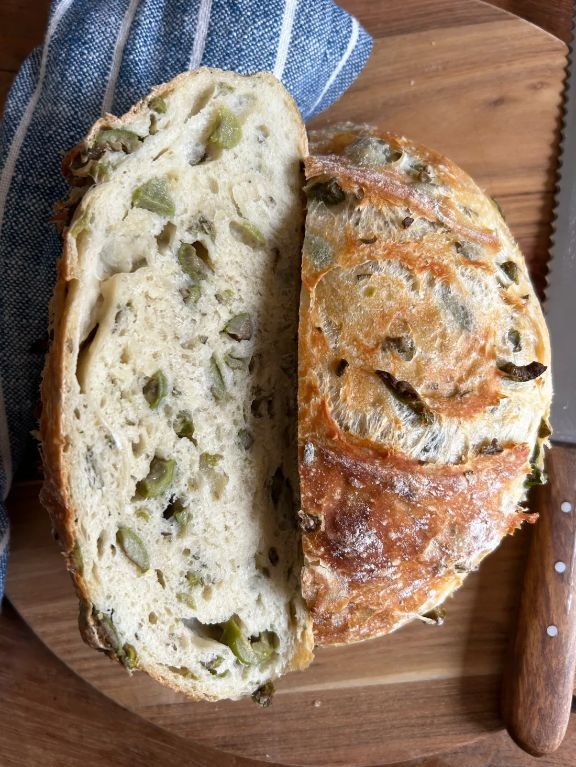
Dare I say, this Olive and Rosemary Artisan Bread is the carb-loaded answer to your holiday hosting prayers—it’s rustic, fragrant, and looks like it came straight from a cozy bakery window, but without the need to put on real pants. Let’s get baking!
Serving: 1 loaf | Pre Time: 20 minutes | Cooking Time: 30 minutes
Ingredients
- 3 cups all-purpose flour (I always spoon and level to avoid a dense loaf)
- 1 ½ cups warm water (around 110°F—think baby-bath warm, not hot tub)
- 2 tsp active dry yeast (check the expiration date; old yeast is a sad, flat story)
- 1 tsp granulated sugar (just a pinch to wake up the yeast)
- 1 ½ tsp fine sea salt (I swear by this for even seasoning)
- 2 tbsp extra virgin olive oil, plus more for drizzling (my go-to for that fruity kick)
- ¾ cup pitted Kalamata olives, roughly chopped (drain them well—no one wants a soggy crumb)
- 2 tbsp fresh rosemary, finely chopped (fresh is key here; dried just doesn’t sing the same tune)
Instructions
- In a large bowl, whisk together the warm water, yeast, and sugar, then let it sit for 5 minutes until frothy—this is your yeast saying “hello!”
- Add the flour, salt, and 2 tbsp olive oil to the yeast mixture, and stir with a wooden spoon until a shaggy dough forms. Tip: If it feels too sticky, add a tablespoon of flour at a time, but don’t overdo it—artisan bread loves a bit of tackiness.
- Knead the dough on a lightly floured surface for 8-10 minutes by hand until smooth and elastic, or use a stand mixer with a dough hook on medium speed for 5-7 minutes.
- Gently fold in the chopped olives and rosemary until evenly distributed—be gentle to avoid crushing the olives.
- Place the dough in a lightly oiled bowl, cover with a damp kitchen towel, and let it rise in a warm spot for 1 hour, or until doubled in size. Tip: I like to pop it in an oven with the light on for a cozy proofing environment.
- Punch down the dough to release air bubbles, then shape it into a round loaf on a parchment-lined baking sheet.
- Score the top of the loaf with a sharp knife in a crisscross pattern, drizzle lightly with olive oil, and let it rest for 20 minutes while you preheat the oven to 450°F.
- Bake the loaf on the center rack for 25-30 minutes, until the crust is deep golden brown and sounds hollow when tapped on the bottom. Tip: For extra crunch, place a pan of water on the lower rack to create steam during the first 10 minutes of baking.
- Transfer the bread to a wire rack and let it cool completely for at least 30 minutes before slicing—patience rewards you with perfect texture!
Just out of the oven, this bread boasts a crackly crust that gives way to a soft, airy crumb studded with briny olives and fragrant rosemary. Serve it warm with a swipe of good butter or alongside a hearty soup, and watch it disappear faster than holiday cookies—it’s that irresistible!
Whole Wheat Artisan Bread with Honey
Fancy a bread that’s wholesome yet indulgent, rustic yet refined? Meet your new kitchen superstar: whole wheat artisan bread kissed with honey. It’s the loaf that says, “I bake from scratch,” without requiring a culinary degree—just a bit of patience and a love for that heavenly, honey-scented aroma wafting through your home.
Serving: 1 loaf | Pre Time: 20 minutes | Cooking Time: 35 minutes
Ingredients
– 3 cups whole wheat flour (I always use King Arthur for its consistent quality—trust me, it matters!)
– 1 cup warm water (around 110°F—think baby-bath warm, not scalding)
– 2 tbsp honey (local raw honey is my go-to for that floral kick)
– 2 tsp active dry yeast (check the expiration date; sleepy yeast equals flat bread)
– 1 tsp salt (fine sea salt blends beautifully without overpowering)
– 2 tbsp extra virgin olive oil (a good glug adds moisture and richness)
Instructions
1. In a large bowl, combine the warm water and honey, stirring until the honey dissolves completely.
2. Sprinkle the active dry yeast over the honey-water mixture, let it sit for 5 minutes until frothy—this “blooming” step ensures your bread rises properly.
3. Add the whole wheat flour and salt to the bowl, mixing with a wooden spoon until a shaggy dough forms.
4. Pour in the extra virgin olive oil, then knead the dough on a floured surface for 8-10 minutes until smooth and elastic—tip: if it sticks, add a tablespoon of flour, but don’t overdo it!
5. Place the dough in a lightly oiled bowl, cover with a damp towel, and let it rise in a warm spot for 1 hour or until doubled in size.
6. Punch down the dough to release air bubbles, then shape it into a round loaf on a parchment-lined baking sheet.
7. Cover the loaf loosely with the towel and let it rise again for 30 minutes—meanwhile, preheat your oven to 375°F.
8. Score the top of the loaf with a sharp knife in a crisscross pattern, which helps it expand evenly in the oven.
9. Bake at 375°F for 30-35 minutes, until the crust is deep golden brown and sounds hollow when tapped—tip: an instant-read thermometer should read 190°F at the center for perfect doneness.
10. Transfer the bread to a wire rack and let it cool completely before slicing, about 1 hour, to avoid a gummy texture.
Mmm, that first slice reveals a tender, slightly chewy crumb with subtle sweetness from the honey, all wrapped in a crisp, rustic crust. Serve it warm with a smear of salted butter for breakfast, or get creative by toasting thick slices and topping with avocado and red pepper flakes for a savory twist. This bread is so good, it might just become your weekly baking ritual—no fancy bakery required!
Garlic and Herb Artisan Boule
Ever had that moment where you stare at a bakery display and think, “I could make that”—then realize you absolutely can? Enter this Garlic and Herb Artisan Boule, a showstopper that’s easier than explaining why you bought another loaf pan. It’s the kind of bread that makes your kitchen smell like a French bistro and your ego swell just enough.
Serving: 8 | Pre Time: 20 minutes | Cooking Time: 35 minutes
Ingredients
– 3 cups all-purpose flour (I always sift mine first to avoid lumps—trust me, it’s worth it)
– 1 ¼ cups warm water (around 110°F, like a cozy bath for yeast)
– 2 tbsp extra virgin olive oil (my go-to for that rich, fruity kick)
– 2 tbsp fresh minced garlic (don’t skimp—this is the star!)
– 1 tbsp dried rosemary (crush it between your palms to wake up the oils)
– 1 tbsp dried thyme (because herbs love company)
– 2 tsp active dry yeast (check the expiration date—yeast drama is real)
– 1 tsp salt (I use fine sea salt for even distribution)
– 1 tsp sugar (just a pinch to feed the yeast party)
Instructions
1. In a large bowl, combine the warm water, yeast, and sugar, stirring gently until dissolved. Let it sit for 5 minutes until frothy—this is your yeast saying “hello!”
2. Add the all-purpose flour, salt, extra virgin olive oil, minced garlic, rosemary, and thyme to the bowl. Tip: Mix with a wooden spoon until a shaggy dough forms to avoid overworking it early.
3. Turn the dough onto a lightly floured surface and knead for 8-10 minutes until smooth and elastic. If it sticks, add a sprinkle of flour, but go easy—too much makes it tough.
4. Place the dough in a greased bowl, cover with a damp towel, and let it rise in a warm spot for 1 hour or until doubled in size. Tip: I pop it in an oven turned off with the light on for a cozy proofing nook.
5. Punch down the dough to release air, then shape it into a round boule on a parchment-lined baking sheet. Score the top with a sharp knife in a crisscross pattern for that artisan look.
6. Preheat your oven to 425°F and let the shaped dough rest for 20 minutes for a second rise—it’ll puff up nicely.
7. Bake the boule for 30-35 minutes until golden brown and it sounds hollow when tapped on the bottom. Tip: For extra crunch, spritz the oven with water in the first 5 minutes.
8. Remove from the oven and cool on a wire rack for at least 15 minutes before slicing—patience is key here!
Buttery and aromatic, this boule boasts a crisp crust that gives way to a soft, garlicky interior. Serve it warm with a swipe of olive oil or tear into chunks for dipping in soup—it’s the carb-loaded hug your dinner table deserves.
Cheesy Pull-Apart Artisan Bread
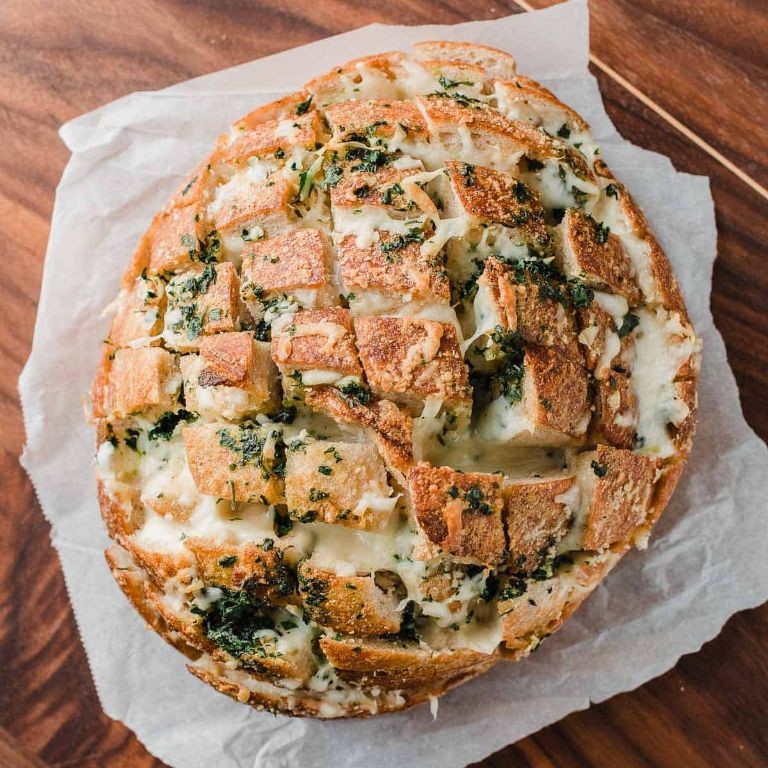
Tired of boring bread? This Cheesy Pull-Apart Artisan Bread is about to become your new favorite carb-loaded masterpiece—it’s basically a cheesy, garlicky cloud of joy that’s perfect for tearing apart with friends (or, let’s be real, hoarding for yourself).
Serving: 8 | Pre Time: 20 minutes | Cooking Time: 30 minutes
Ingredients
– 1 large round artisan bread loaf (I grab a crusty sourdough boule from my local bakery—trust me, it makes a difference)
– ½ cup unsalted butter, melted (extra for brushing is never a bad idea)
– 4 cloves garlic, minced (fresh is best, but I’ve been known to use pre-minced in a pinch)
– 1 tablespoon fresh parsley, chopped (dried works in a crisis, but fresh adds that bright pop)
– 1 cup shredded mozzarella cheese (the low-moisture kind melts like a dream)
– ½ cup shredded cheddar cheese (sharp cheddar gives it a nice tangy kick)
– ¼ cup grated Parmesan cheese (the good stuff from the refrigerated section, not the shaker bottle)
Instructions
1. Preheat your oven to 375°F (190°C) and line a baking sheet with parchment paper.
2. Place the artisan bread loaf on a cutting board and use a serrated knife to make 1-inch crosswise cuts across the top, being careful not to slice all the way through the bottom crust.
3. Rotate the loaf 90 degrees and repeat the crosswise cuts to create a grid pattern, like a checkerboard.
4. In a small bowl, combine the melted butter, minced garlic, and chopped parsley, stirring until fully mixed.
5. Gently pry open the cuts in the bread with your fingers or a butter knife, then generously brush the butter mixture into every crevice, ensuring it soaks into the bread.
6. In a separate bowl, toss together the shredded mozzarella, cheddar, and Parmesan cheeses until evenly combined.
7. Stuff the cheese mixture into the cuts of the bread, pressing it down firmly so it fills the gaps—don’t be shy, pack it in!
8. Wrap the entire loaf loosely in aluminum foil, leaving the top slightly open to allow steam to escape.
9. Bake the wrapped bread on the prepared baking sheet for 20 minutes, then remove the foil and bake for an additional 10 minutes, or until the cheese is bubbly and the top is golden brown.
10. Let the bread cool for 5 minutes on the baking sheet before transferring it to a serving plate.
Just imagine pulling apart those warm, cheesy strands—the garlic butter seeps into every nook, while the trio of cheeses creates a gooey, stretchy texture that’s downright addictive. Serve it as a centerpiece at your next gathering, or pair it with a hearty soup for the ultimate cozy meal; either way, it’s guaranteed to disappear faster than you can say “more bread, please!”
Cranberry Walnut Artisan Loaf

Let’s be real—most holiday breads are as exciting as watching paint dry, but this cranberry walnut artisan loaf is the festive exception that’ll make your taste buds do a happy dance. It’s the perfect blend of tart, nutty, and downright delicious, guaranteed to steal the spotlight at any gathering.
Serving: 8 | Pre Time: 20 minutes | Cooking Time: 40 minutes
Ingredients
– 3 cups all-purpose flour (I always sift mine first for extra fluffiness)
– 1 cup dried cranberries (the plump, juicy ones are best—avoid the sad, shriveled kind)
– 1 cup chopped walnuts (toasted lightly beforehand for a deeper flavor)
– 1 1/4 cups warm water (around 110°F—think baby bottle warm, not scalding)
– 2 tbsp honey (local raw honey adds a lovely floral note)
– 2 tsp active dry yeast (check the expiration date; old yeast is a bread-baking buzzkill)
– 1 tsp salt (I use fine sea salt for even distribution)
– 2 tbsp olive oil (extra virgin is my go-to for its fruity kick)
Instructions
1. In a large bowl, combine the warm water, honey, and active dry yeast, then let it sit for 5 minutes until frothy—this “proofing” step ensures your yeast is alive and kicking.
2. Add the all-purpose flour and salt to the yeast mixture, stirring with a wooden spoon until a shaggy dough forms.
3. Knead the dough on a floured surface for 8-10 minutes until smooth and elastic—if it sticks to your hands, add a sprinkle more flour, but don’t overdo it or you’ll get a tough loaf.
4. Place the dough in a lightly oiled bowl, cover with a damp towel, and let it rise in a warm spot for 1 hour until doubled in size—I often use my oven with the light on for a cozy proofing environment.
5. Punch down the dough gently to release air bubbles, then fold in the dried cranberries and chopped walnuts until evenly distributed.
6. Shape the dough into a round loaf on a parchment-lined baking sheet, cover again, and let it rise for 30 minutes.
7. Preheat your oven to 375°F—a hot oven is key for that perfect crusty exterior.
8. Brush the loaf lightly with olive oil, then bake for 35-40 minutes until golden brown and it sounds hollow when tapped on the bottom.
9. Let the loaf cool on a wire rack for at least 15 minutes before slicing—resisting the urge to cut it hot prevents a gummy texture.
You’ll love the chewy crumb studded with bursts of tart cranberries and crunchy walnuts. Serve it warm with a smear of creamy butter or use thick slices for the ultimate holiday turkey sandwich—it’s so good, you might just skip the main course!
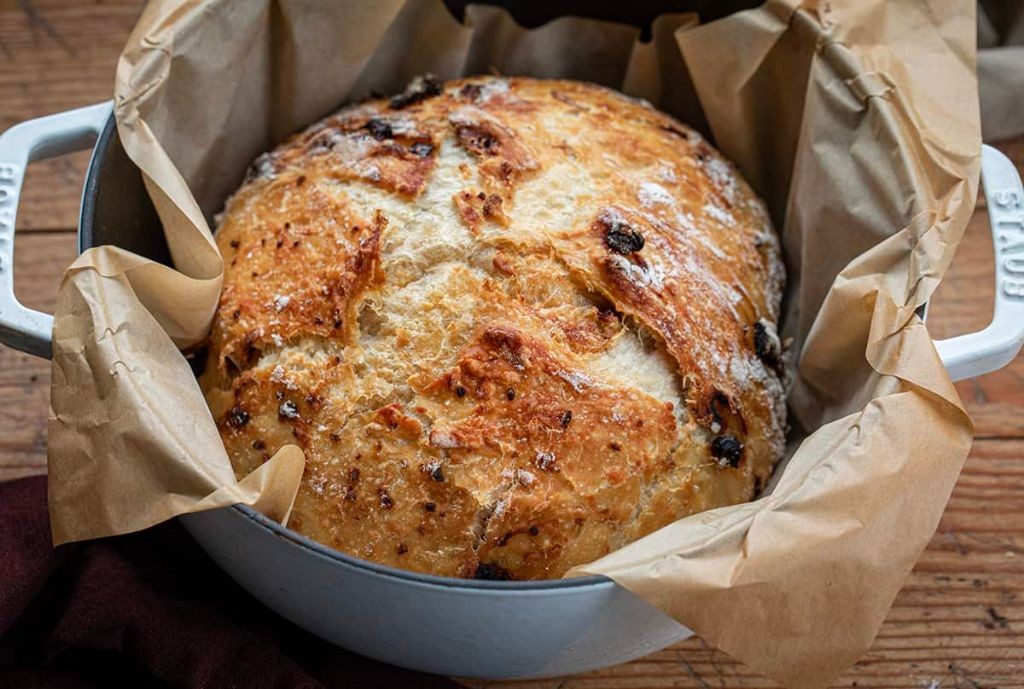
Rustic Italian Artisan Bread

Tired of store-bought bread that tastes like cardboard with commitment issues? Let’s bake some Rustic Italian Artisan Bread that’s crusty on the outside, pillowy on the inside, and guaranteed to make your kitchen smell like a Tuscan bakery (minus the plane ticket). This no-fuss loaf is perfect for beginners who want to impress or seasoned bakers craving that authentic, chewy crumb.
Serving: 1 loaf | Pre Time: 20 minutes (plus 12-18 hours rising) | Cooking Time: 45 minutes
Ingredients
– 3 cups bread flour (the high-protein kind—it’s the secret to that chewy texture, trust me!)
– 1 ½ cups lukewarm water (around 100°F—think baby bottle warm, not hot tub)
– 1 ¼ tsp active dry yeast (I always check the expiration date; sleepy yeast equals sad bread)
– 1 ½ tsp fine sea salt (skip the iodized stuff here for better flavor)
– 1 tbsp extra virgin olive oil (my go-to for a hint of fruitiness)
– Cornmeal for dusting (optional, but it gives that rustic bakery-bottom look)
Instructions
1. In a large mixing bowl, whisk together 3 cups bread flour and 1 ½ tsp fine sea salt until fully combined.
2. In a separate small bowl, dissolve 1 ¼ tsp active dry yeast in 1 ½ cups lukewarm water (100°F) and let it sit for 5 minutes until frothy—this “proofing” step ensures your yeast is alive and kicking.
3. Pour the yeast mixture and 1 tbsp extra virgin olive oil into the flour bowl, and stir with a wooden spoon until a shaggy dough forms and no dry flour remains.
4. Cover the bowl tightly with plastic wrap and let it rise at room temperature (68-72°F) for 12-18 hours—yes, overnight! This slow fermentation builds deep flavor and airy bubbles.
5. Lightly flour a work surface and turn the dough out onto it. Gently shape it into a round loaf by folding the edges toward the center, creating surface tension without kneading.
6. Place the shaped dough on a parchment-lined baking sheet dusted with cornmeal (if using), cover loosely with a towel, and let it rise again for 1-2 hours until nearly doubled in size.
7. Preheat your oven to 450°F with a Dutch oven or heavy lidded pot inside for 30 minutes—this preheating mimics a professional steam-injected oven for that crackly crust.
8. Carefully remove the hot pot, place the dough inside on the parchment (use the parchment as a sling to avoid burns!), and slash the top with a sharp knife in an “X” pattern to allow expansion.
9. Cover with the lid and bake at 450°F for 30 minutes, then remove the lid and bake for another 15 minutes until the crust is deep golden brown and sounds hollow when tapped.
10. Transfer the bread to a wire rack and let it cool completely for at least 1 hour before slicing—resisting the urge to cut it warm prevents a gummy interior.
Yum! This bread boasts a crisp, crackly crust that gives way to a tender, hole-riddled crumb with subtle yeasty notes. Serve it warm with a drizzle of olive oil and balsamic for dipping, or slice thick for sandwiches that’ll make you forget deli bread ever existed.
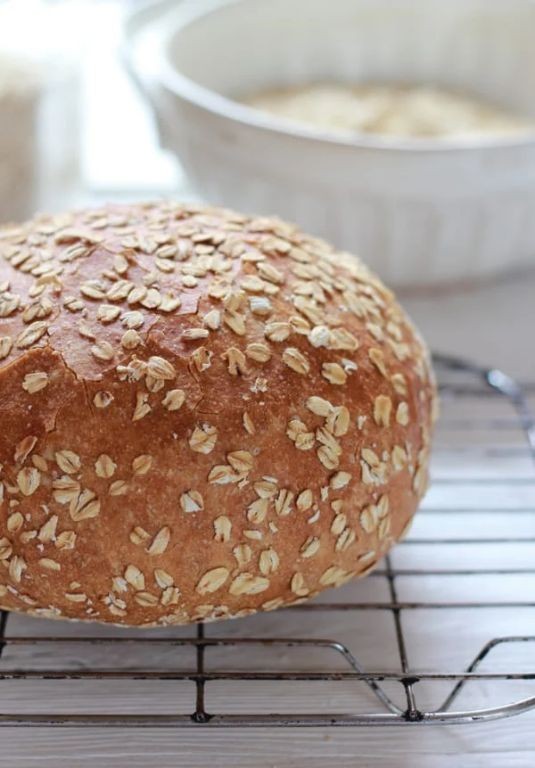
Multigrain Artisan Bread with Seeds
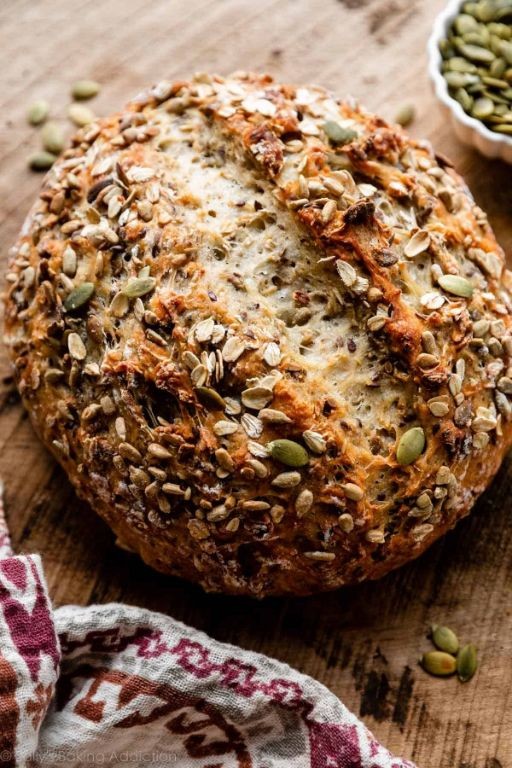
Sourdough starter? Not today! Sometimes you just need a loaf that’s wholesome, hearty, and doesn’t require a week-long commitment. This Multigrain Artisan Bread with Seeds is your ticket to crusty, seedy perfection with a fraction of the fuss—perfect for turning your kitchen into a makeshift bakery that smells like a cozy hug.
Serving: 1 loaf | Pre Time: 20 minutes | Cooking Time: 35 minutes
Ingredients
– 3 cups bread flour (the high-protein hero for that chewy crumb)
– 1 cup whole wheat flour (for that nutty, wholesome depth)
– 1/2 cup rolled oats (old-fashioned, not instant—they add lovely texture)
– 1/4 cup mixed seeds (I’m partial to sunflower, pumpkin, and sesame for a crunchy party)
– 2 tbsp honey (local if you have it, for a subtle sweetness)
– 2 tsp active dry yeast (check the expiration date; sleepy yeast is a loaf’s worst enemy)
– 1 1/2 tsp fine sea salt (don’t skimp—it balances everything)
– 1 1/2 cups warm water (around 110°F, like a pleasant bath for the yeast)
– 2 tbsp extra virgin olive oil (my go-to for a tender crust)
Instructions
1. In a large mixing bowl, whisk together the bread flour, whole wheat flour, rolled oats, mixed seeds, and sea salt until evenly combined.
2. In a separate small bowl or measuring cup, combine the warm water (110°F), honey, and active dry yeast. Let it sit for 5–7 minutes until frothy and bubbly—this “proofing” step ensures your yeast is alive and kicking.
3. Pour the yeast mixture and extra virgin olive oil into the dry ingredients. Stir with a wooden spoon or spatula until a shaggy dough forms and no dry flour remains.
4. Turn the dough out onto a lightly floured surface. Knead by hand for 8–10 minutes, using a push-fold-turn motion, until the dough is smooth, elastic, and slightly tacky but not sticky. Tip: If it sticks to your hands, add a tablespoon of flour at a time, but avoid over-flouring to keep the bread tender.
5. Place the kneaded dough in a lightly oiled bowl, turning once to coat. Cover with a damp kitchen towel or plastic wrap and let rise in a warm, draft-free spot for 1–1.5 hours, or until doubled in size.
6. Punch down the risen dough gently to release air bubbles. Shape it into a round or oval loaf by tucking the edges underneath and pinching the seam at the bottom.
7. Place the shaped loaf on a parchment-lined baking sheet. Cover loosely with the towel and let it rise again for 30–45 minutes, until puffy. Tip: For extra crunch, brush the top lightly with water and sprinkle on an additional tablespoon of seeds before baking.
8. While the loaf proofs, preheat your oven to 425°F. Place an empty metal baking pan on the bottom rack.
9. Once the oven is hot, carefully pour 1 cup of hot water into the empty pan to create steam (this gives you that gorgeous, crackly crust). Quickly slide the loaf on its parchment onto the middle rack.
10. Bake at 425°F for 25 minutes. Then, reduce the oven temperature to 375°F and bake for an additional 10–15 minutes, until the loaf is deeply golden brown and sounds hollow when tapped on the bottom. Tip: Use an instant-read thermometer—the bread is done when it reaches an internal temperature of 190–200°F.
11. Transfer the loaf to a wire rack and let it cool completely for at least 1 hour before slicing (I know, the wait is torture, but it prevents a gummy crumb!).
Nothing beats the rustic charm of this loaf, with its crisp, seed-studded crust giving way to a soft, airy interior flecked with wholesome grains. Slather a warm slice with salted butter for the ultimate treat, or use it to build a killer avocado toast that’ll make your breakfast Instagram-worthy.
Beer Bread Artisan Style with Cheddar
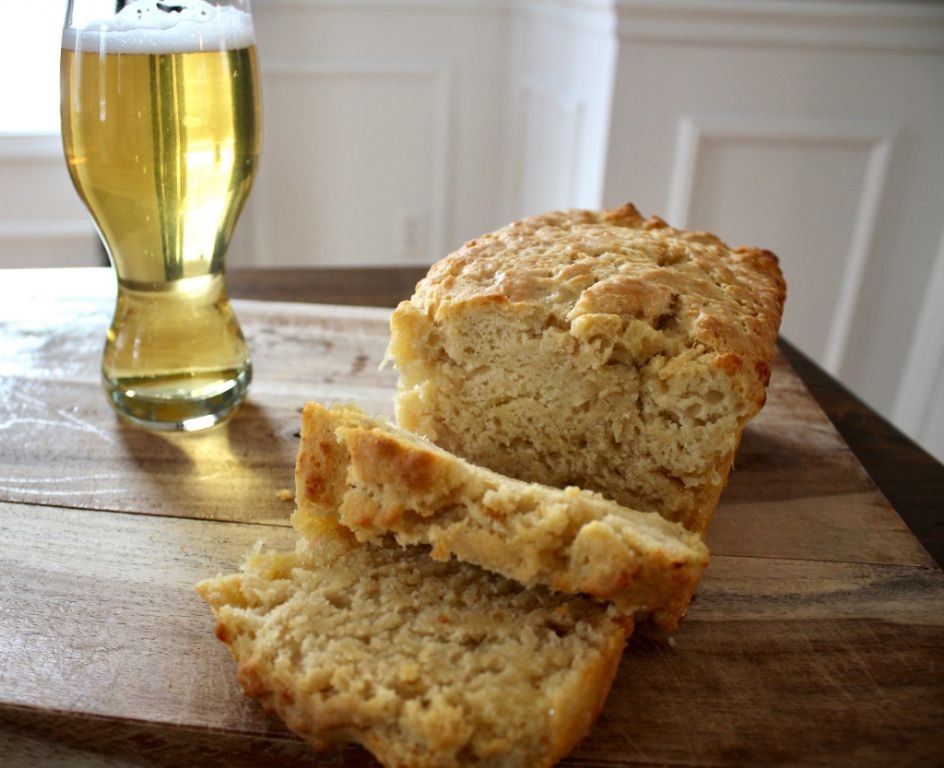
Wondering how to turn a humble loaf into a cheesy, bubbly masterpiece that’ll make your kitchen smell like a cozy pub? This Beer Bread Artisan Style with Cheddar is your golden ticket—no kneading required, just a splash of brewski and a whole lot of cheesy charm. It’s the lazy baker’s dream come true, with a crust that crackles and a crumb that’s tender enough to make you weep (happy tears, of course).
Serving: 8 | Pre Time: 10 minutes | Cooking Time: 50 minutes
Ingredients
– 3 cups all-purpose flour (I swear by King Arthur for that reliable rise)
– 1 tablespoon baking powder (the fresh stuff—check the date!—makes all the difference)
– 1 teaspoon salt (I’m a sea salt fanatic for that subtle crunch)
– 1/4 cup granulated sugar (just a hint to balance the beer’s bitterness)
– 12 oz lager beer, at room temp (grab a cheap one—it’s for baking, not sipping!)
– 1 cup shredded sharp cheddar cheese (go extra sharp if you want that bold, tangy punch)
– 4 tablespoons unsalted butter, melted (I always use Kerrygold for its rich flavor)
Instructions
1. Preheat your oven to 375°F and grease a 9×5-inch loaf pan with butter or cooking spray—trust me, this prevents sticking disasters.
2. In a large mixing bowl, whisk together the all-purpose flour, baking powder, salt, and granulated sugar until fully combined.
3. Pour in the lager beer and stir gently with a wooden spoon just until no dry flour remains; overmixing leads to a tough loaf, so keep it light!
4. Fold in the shredded sharp cheddar cheese evenly throughout the batter—this ensures every bite gets that gooey goodness.
5. Transfer the batter to the prepared loaf pan and spread it out smoothly with a spatula.
6. Drizzle the melted unsalted butter evenly over the top of the batter; it’ll create that irresistible golden crust as it bakes.
7. Bake in the preheated oven for 45-50 minutes, or until the top is deeply golden brown and a toothpick inserted into the center comes out clean.
8. Let the bread cool in the pan for 10 minutes, then turn it out onto a wire rack to cool completely—patience here avoids a crumbly mess.
Perfectly rustic with a crackly crust and a soft, cheesy interior, this bread is begging to be sliced thick and slathered with honey butter. Pair it with a bowl of chili or toast it up for the ultimate grilled cheese—your taste buds will throw a party!
Jalapeño Cheddar Artisan Bread
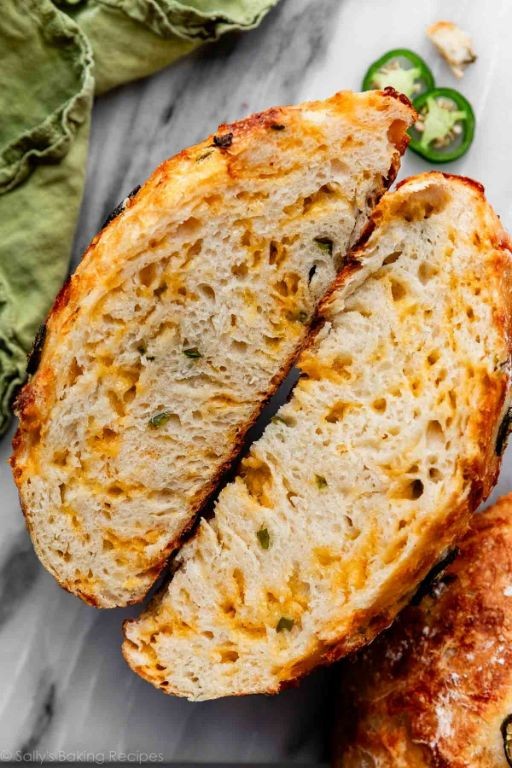
Get ready to spice up your life with this fiery, cheesy masterpiece that’ll make your taste buds do a happy dance—perfect for holiday gatherings or just because you deserve something delicious. This Jalapeño Cheddar Artisan Bread is a flavor-packed loaf that’s surprisingly simple to whip up, turning your kitchen into a bakery in no time.
Serving: 1 loaf | Pre Time: 20 minutes | Cooking Time: 35 minutes
Ingredients
– 3 cups all-purpose flour (I always sift mine for fluffier results)
– 1 ½ cups warm water at 110°F (like a cozy bath for the yeast)
– 2 tsp active dry yeast (the magic starter)
– 1 tsp sugar (a tiny treat to wake up the yeast)
– 1 ½ tsp salt (I prefer fine sea salt for even distribution)
– 1 cup shredded sharp cheddar cheese (extra sharp is my go-to for bold flavor)
– ½ cup diced fresh jalapeños (seeds removed if you’re spice-shy, but I leave ’em in for a kick)
– 2 tbsp olive oil (extra virgin adds a nice fruity note)
Instructions
1. In a large mixing bowl, combine the warm water, yeast, and sugar, then let it sit for 5 minutes until frothy (tip: if it doesn’t bubble, your yeast might be sleepy—start over with fresh stuff).
2. Add the flour and salt to the yeast mixture, stirring with a wooden spoon until a shaggy dough forms.
3. Knead the dough on a floured surface for 8-10 minutes until smooth and elastic (tip: if it sticks, add a sprinkle more flour, but don’t overdo it).
4. Place the dough in a lightly oiled bowl, cover with a damp towel, and let it rise in a warm spot for 1 hour until doubled in size.
5. Punch down the dough, then gently fold in the shredded cheddar and diced jalapeños until evenly distributed.
6. Shape the dough into a round loaf on a parchment-lined baking sheet, cover again, and let it rise for 30 minutes.
7. Preheat your oven to 425°F and brush the loaf top with olive oil for a golden crust.
8. Bake for 30-35 minutes until the bread is deep golden brown and sounds hollow when tapped (tip: use an instant-read thermometer—it should hit 190°F internally).
9. Transfer the bread to a wire rack and let it cool for at least 15 minutes before slicing.
Finally, this bread boasts a crispy crust with a soft, chewy interior, packed with melty cheddar and a spicy jalapeño punch that’s downright addictive. Serve it warm with a smear of butter or alongside a hearty soup for a cozy meal that’ll have everyone asking for seconds.
Pane Siciliano Artisan Bread
Gather ’round, bread lovers, because today we’re diving into a Sicilian masterpiece that’ll make your kitchen smell like a rustic Italian bakery—no passport required! This Pane Siciliano is the kind of loaf that demands a dramatic bread-basket reveal at dinner, and trust me, your friends will be begging for the recipe (or at least another slice).
Serving: 1 loaf | Pre Time: 20 minutes | Cooking Time: 35 minutes
Ingredients
– 3 ½ cups bread flour (I swear by King Arthur for that perfect chew)
– 1 ¼ cups warm water (around 110°F—think baby-bottle warm, not hot tub)
– 2 ¼ tsp active dry yeast (check the expiration date; old yeast is a sad loaf)
– 1 tbsp honey (local if you have it, for a subtle sweetness)
– 1 ½ tsp sea salt (I prefer fine-grain to blend evenly)
– 2 tbsp extra virgin olive oil (my go-to for that fruity aroma)
– Semolina flour for dusting (a light sprinkle prevents sticking like a dream)
Instructions
1. In a large bowl, whisk together the warm water, honey, and yeast, then let it sit for 5 minutes until frothy—this “proofing” step ensures your yeast is alive and kicking.
2. Add the bread flour, sea salt, and extra virgin olive oil to the yeast mixture, stirring with a wooden spoon until a shaggy dough forms.
3. Turn the dough onto a lightly floured surface and knead for 8-10 minutes until smooth and elastic; if it sticks, add a tablespoon of flour at a time, but don’t overdo it—too much flour makes a dense loaf.
4. Place the dough in a greased bowl, cover with a damp kitchen towel, and let it rise in a warm spot for 1 ½ to 2 hours, or until doubled in size (I use my oven with the light on for a cozy environment).
5. Punch down the dough to release air, then shape it into a round loaf on a baking sheet dusted with semolina flour.
6. Score the top with a sharp knife in a cross pattern, about ¼-inch deep, to allow for expansion during baking.
7. Cover the loaf loosely with the towel and let it rise again for 45 minutes until puffy.
8. Preheat your oven to 425°F and place a small oven-safe dish of water on the bottom rack to create steam for a crispy crust.
9. Bake the bread for 30-35 minutes, until golden brown and it sounds hollow when tapped on the bottom—an instant-read thermometer should read 190°F for doneness.
10. Transfer the loaf to a wire rack and let it cool completely for at least 1 hour before slicing; cutting too early releases steam and makes it gummy.
Whoa, that crusty exterior gives way to a soft, airy crumb with a hint of sweetness from the honey, making it ideal for tearing into chunks and dunking in herbed olive oil. Serve it warm with a smear of ricotta and a drizzle of honey for a sweet-savory twist that’ll have everyone reaching for seconds.
Baguette-Style Artisan French Bread
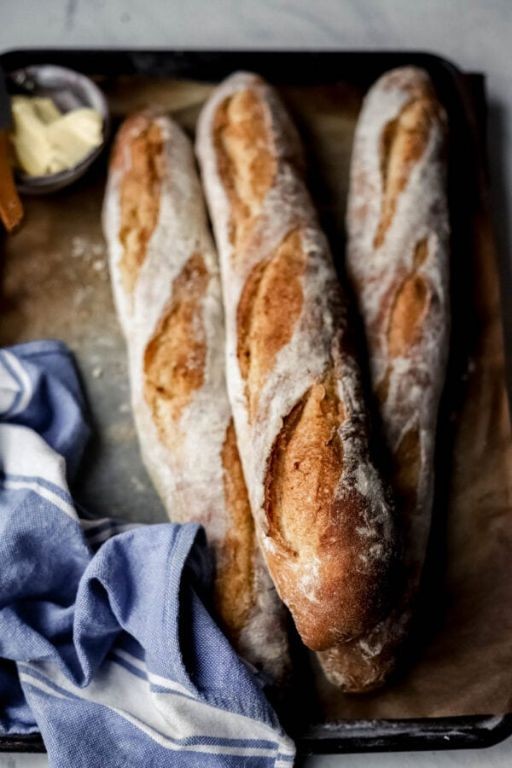
Zesty, crusty, and oh-so-French—this baguette-style artisan bread is about to make your kitchen smell like a Parisian bakery without the plane ticket. It’s the kind of loaf that’ll have you breaking off chunks before it even cools, and trust me, no one will judge you for it. Let’s get baking, because carbs this good are basically a love language.
Serving: 2 loaves | Pre Time: 20 minutes | Cooking Time: 25 minutes
Ingredients
– 4 cups bread flour (I swear by King Arthur for that perfect chew)
– 1 ½ cups warm water (around 110°F—think baby-bath warm, not hot-tub steamy)
– 2 tsp active dry yeast (check the expiration date; sleepy yeast makes sad bread)
– 2 tsp fine sea salt (I prefer Morton’s for consistent flavor)
– 1 tbsp extra virgin olive oil (my go-to for a subtle richness)
– Cornmeal for dusting (just a sprinkle to prevent sticking—it’s a game-changer)
Instructions
1. In a large bowl, combine the warm water and yeast, stirring gently until dissolved. Let it sit for 5 minutes until frothy—this “blooming” step ensures your yeast is alive and kicking.
2. Add the bread flour, sea salt, and extra virgin olive oil to the yeast mixture. Stir with a wooden spoon until a shaggy dough forms.
3. Turn the dough onto a lightly floured surface and knead for 8–10 minutes until smooth and elastic. Tip: If it sticks to your hands, add a tablespoon of flour at a time, but don’t overdo it—too much flour makes dense bread.
4. Place the dough in a greased bowl, cover with a damp kitchen towel, and let it rise in a warm spot for 1 hour or until doubled in size. I like to use my oven with the light on for a cozy proofing environment.
5. Punch down the dough to release air bubbles, then divide it into two equal portions. Shape each into a 12-inch baguette-style loaf by rolling and tapering the ends.
6. Place the loaves on a baking sheet dusted with cornmeal. Score the tops diagonally 3–4 times with a sharp knife or razor blade—this helps the bread expand beautifully in the oven.
7. Cover the loaves loosely with the damp towel and let them rise again for 30 minutes. Meanwhile, preheat your oven to 450°F and place a shallow pan on the bottom rack.
8. Once the oven is hot, carefully pour 1 cup of hot water into the pan on the bottom rack to create steam—this tip is key for that crispy, crackly crust we all crave.
9. Bake the loaves on the middle rack for 20–25 minutes, until golden brown and hollow-sounding when tapped on the bottom. Tip: Rotate the baking sheet halfway through for even browning.
10. Transfer the bread to a wire rack and let it cool for at least 15 minutes before slicing—I know it’s hard to wait, but this prevents a gummy interior.
Perfectly crusty on the outside with a soft, airy crumb inside, this bread sings with a subtle yeasty flavor. Serve it warm with a smear of butter, or get creative by slicing it thick for epic sandwiches or toasting it for bruschetta—it’s versatile enough to steal the show at any meal.
Dark Rye Artisan Bread with Caraway
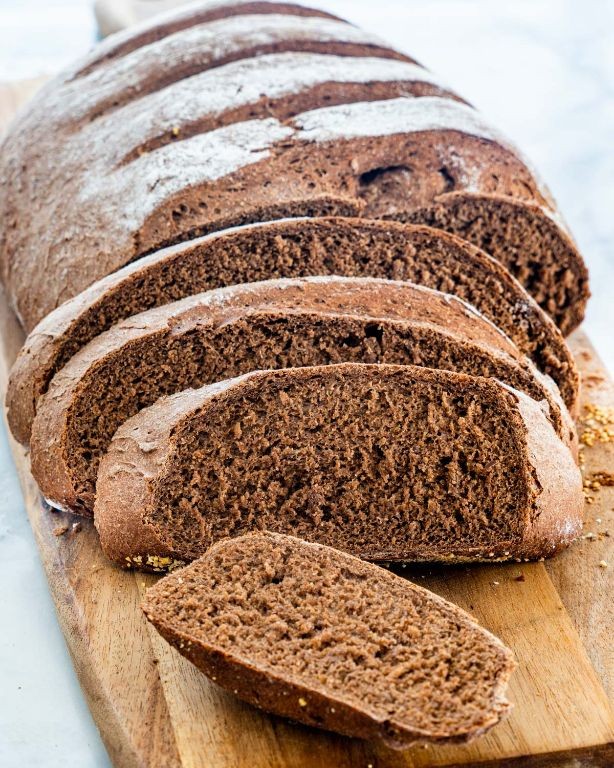
Who says bread can’t be the life of the party? This dark rye artisan loaf with caraway is the moody, flavorful guest that shows up with all the character—earthy, slightly tangy, and speckled with those delightful little seeds that whisper (okay, maybe shout) ‘I’m sophisticated, but I’m also fun.’ Trust me, your kitchen will smell like a cozy European bakery, and you’ll feel like a bread wizard without needing a magic wand.
Serving: 1 loaf | Pre Time: 20 minutes | Cooking Time: 40 minutes
Ingredients
– 2 cups bread flour (the reliable backbone for that perfect chew)
– 1 cup dark rye flour (for that deep, earthy flavor—I love Bob’s Red Mill here)
– 1 ½ cups warm water (around 110°F, like a cozy bath for the yeast)
– 2 tbsp caraway seeds (these little flavor bombs are non-negotiable for that signature kick)
– 1 packet active dry yeast (about 2 ¼ tsp—the tiny powerhouse that makes it all rise)
– 1 tbsp honey (a sweet touch to balance the rye’s tang; local honey is my go-to for extra charm)
– 1 tsp salt (fine sea salt works wonders to enhance everything)
– 2 tbsp olive oil (extra virgin is my favorite for a fruity note)
Instructions
1. In a large mixing bowl, combine the warm water, honey, and yeast, then let it sit for 5 minutes until frothy—this is your yeast saying ‘hello, I’m alive and ready to party!’
2. Add the bread flour, dark rye flour, salt, and caraway seeds to the bowl, then pour in the olive oil.
3. Mix everything with a wooden spoon until a shaggy dough forms, then knead on a floured surface for 8-10 minutes until smooth and elastic. Tip: If the dough feels too sticky, add a sprinkle of bread flour, but don’t overdo it—rye flour can be thirsty!
4. Place the dough in a lightly oiled bowl, cover with a damp towel, and let it rise in a warm spot for 1 hour or until doubled in size. Tip: I like to pop it in an oven with the light on for a cozy proofing environment.
5. Punch down the dough to release air, then shape it into a round loaf on a parchment-lined baking sheet.
6. Cover the loaf loosely with the towel and let it rise again for 30 minutes. Meanwhile, preheat your oven to 375°F.
7. Score the top of the loaf with a sharp knife in a crisscross pattern—this isn’t just for looks; it helps the bread expand evenly in the oven.
8. Bake for 35-40 minutes until the crust is deep golden brown and sounds hollow when tapped on the bottom. Tip: For an extra-crispy crust, place a pan of water on the oven rack below during baking to create steam.
9. Transfer the bread to a wire rack and let it cool completely for at least 1 hour before slicing—patience is key here to avoid a gummy interior!
That crusty exterior gives way to a tender, dense crumb with a subtle tang from the rye, while the caraway seeds add a warm, aromatic punch in every bite. Try it toasted with a smear of salted butter or as the star of a hearty Reuben sandwich—it’s the kind of bread that makes even a simple meal feel like a celebration.
Sun-Dried Tomato and Parmesan Artisan Loaf
Crisp December mornings call for something special, and this sun-dried tomato and Parmesan artisan loaf is the carb-filled hug your soul deserves—it’s basically a cozy sweater for your taste buds, with a savory twist that’ll make you forget all about those boring store-bought loaves.
Serving: 8 | Pre Time: 20 minutes | Cooking Time: 35 minutes
Ingredients
– 3 cups all-purpose flour (I always sift mine for a lighter crumb, trust me on this)
– 1 cup warm water (around 110°F—think baby-bath warm, not hot-tub hot)
– 2 tbsp extra virgin olive oil (my go-to for that fruity kick)
– 1 packet active dry yeast (check the expiration date, or your loaf might just take a nap forever)
– 1 tsp salt (I use fine sea salt for even distribution)
– ½ cup chopped sun-dried tomatoes (the oil-packed ones add extra flavor, but pat them dry to avoid soggy dough)
– ½ cup grated Parmesan cheese (freshly grated melts better than the pre-shredded stuff, which can be a bit stubborn)
Instructions
1. In a large bowl, combine the warm water and active dry yeast, stirring gently until dissolved—let it sit for 5 minutes until frothy (this is your yeast saying “hello, I’m alive!”).
2. Add the all-purpose flour, extra virgin olive oil, and salt to the yeast mixture, mixing with a wooden spoon until a shaggy dough forms.
3. Knead the dough on a floured surface for 8-10 minutes until smooth and elastic (tip: if it sticks, add a sprinkle of flour, but don’t overdo it or your loaf will turn into a brick).
4. Place the dough in a lightly oiled bowl, cover with a damp towel, and let it rise in a warm spot for 1 hour or until doubled in size (I use my oven with the light on for a cozy proofing nook).
5. Punch down the dough and gently fold in the chopped sun-dried tomatoes and grated Parmesan cheese until evenly distributed (tip: fold gently to avoid deflating the dough too much).
6. Shape the dough into a round loaf on a parchment-lined baking sheet, cover again, and let it rise for 30 minutes.
7. Preheat your oven to 375°F and, just before baking, slash the top of the loaf with a sharp knife in a crisscross pattern (this helps it expand beautifully without cracking).
8. Bake for 30-35 minutes until the crust is golden brown and sounds hollow when tapped on the bottom (tip: if it browns too fast, tent it with foil halfway through).
9. Transfer the loaf to a wire rack and let it cool completely before slicing—about 1 hour (resist the urge to cut it warm, or it’ll be gummy inside).
This loaf boasts a chewy crust with a tender, airy crumb speckled with bursts of tangy sun-dried tomatoes and nutty Parmesan. Try serving it warm with a drizzle of olive oil for dipping, or slice it thick for the ultimate grilled cheese—it’s so good, you might just start a bread-baking revolution in your kitchen!
Spelt Flour Artisan Bread
Tired of the same old sandwich bread that tastes like cardboard? This spelt flour artisan loaf is about to become your new carb crush—it’s rustic, nutty, and has a crust that crackles like a campfire. Let’s bake some magic!
Serving: 1 loaf | Pre Time: 20 minutes | Cooking Time: 40 minutes
Ingredients
– 3 cups spelt flour (my go-to for a wholesome, slightly sweet flavor)
– 1 ½ cups warm water (around 110°F—think baby-bath warm, not hot tub)
– 2 tsp active dry yeast (I always check the expiration date to avoid a flat loaf disaster)
– 1 tsp fine sea salt (skip the iodized stuff for better flavor)
– 1 tbsp extra virgin olive oil (my kitchen staple for a tender crumb)
– 1 tbsp honey (a local jar adds a lovely hint of sweetness)
Instructions
1. In a large bowl, whisk together the spelt flour and sea salt until well combined.
2. In a separate small bowl, dissolve the honey in the warm water, then sprinkle the active dry yeast on top and let it sit for 5 minutes until frothy (this “proofing” step ensures your yeast is alive and kicking!).
3. Pour the yeast mixture and extra virgin olive oil into the flour bowl, and stir with a wooden spoon until a shaggy dough forms.
4. Turn the dough onto a lightly floured surface and knead for 8–10 minutes until smooth and elastic (tip: if it sticks to your hands, add a sprinkle more flour, but don’t overdo it!).
5. Place the dough in a greased bowl, cover with a damp towel, and let it rise in a warm spot for 1 hour or until doubled in size.
6. Punch down the dough to release air bubbles, then shape it into a round loaf on a parchment-lined baking sheet.
7. Cover the loaf loosely with the towel and let it rise again for 30 minutes (this second rise gives it that airy, artisan texture).
8. While the dough rises, preheat your oven to 425°F and place an empty oven-safe dish on the bottom rack.
9. Score the top of the loaf with a sharp knife in a crisscross pattern, then carefully pour 1 cup of hot water into the empty dish in the oven to create steam (this trick helps form that gorgeous, crackly crust!).
10. Bake the loaf for 35–40 minutes until golden brown and it sounds hollow when tapped on the bottom.
11. Transfer the bread to a wire rack and let it cool completely for at least 1 hour before slicing (resisting the urge to cut it warm prevents a gummy interior!).
What emerges is a loaf with a crisp, golden crust and a soft, chewy interior that’s perfect for tearing into chunks. Slather it with butter or use it to scoop up soups—its nutty flavor pairs wonderfully with sharp cheeses or a drizzle of honey for a sweet twist.
Seeded Artisan Bread with Poppy and Sesame
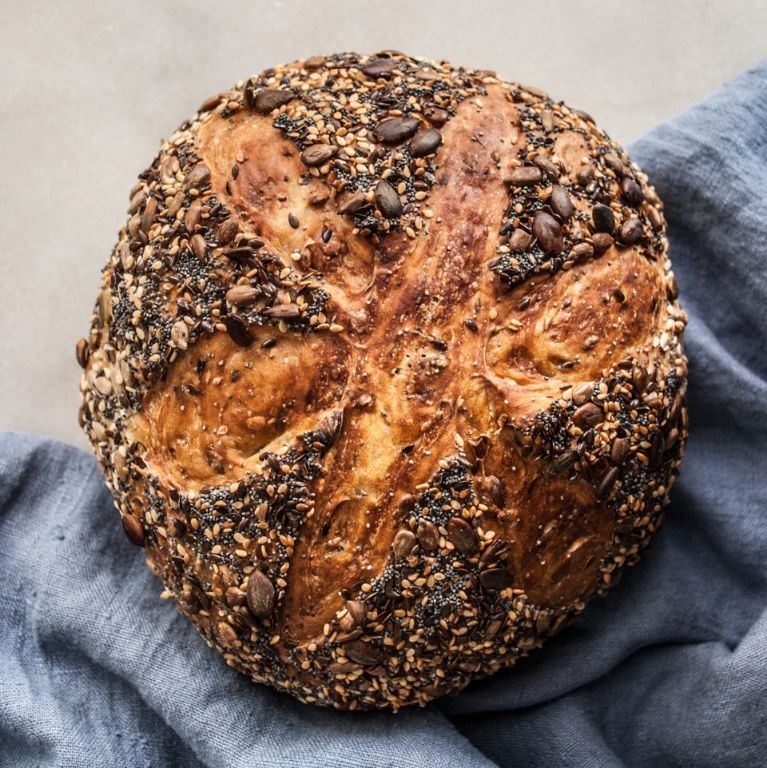
Just when you thought your bread game couldn’t get any more bougie, along comes this seeded artisan loaf that’s basically a crunchy, nutty party on a crust. Picture this: a golden-brown masterpiece speckled with poppy and sesame seeds that crackles when you slice it—it’s the kind of bread that makes you feel like a professional baker, even if your last baking attempt was a sad, flat pancake. Trust me, this recipe is so straightforward, you’ll be showing off your ‘artisan skills’ in no time.
Serving: 1 loaf | Pre Time: 20 minutes | Cooking Time: 35 minutes
Ingredients
- 3 ½ cups all-purpose flour (I always sift mine first for a lighter crumb—no one wants dense bread!)
- 1 ½ cups warm water (around 110°F, like a cozy bath for the yeast)
- 2 ¼ tsp active dry yeast (that little packet is your bread’s best friend)
- 1 ½ tsp salt (I use fine sea salt for even distribution)
- 2 tbsp honey (a sweet touch to balance the savory seeds)
- 2 tbsp olive oil (extra virgin is my go-to for that fruity aroma)
- 2 tbsp poppy seeds (for that delightful pop of texture)
- 2 tbsp sesame seeds (toasted ones add an extra nutty kick)
- 1 egg white, lightly beaten (room temp eggs here work best for a smooth glaze)
Instructions
- In a large mixing bowl, combine the warm water, honey, and active dry yeast. Let it sit for 5 minutes until frothy—this is your yeast waking up and saying hello!
- Add the all-purpose flour, salt, and olive oil to the yeast mixture. Stir with a wooden spoon until a shaggy dough forms. Tip: If the dough feels too sticky, add a tablespoon of flour at a time until it’s manageable.
- Turn the dough onto a lightly floured surface and knead for 8-10 minutes until smooth and elastic. You’ll know it’s ready when it springs back slowly when poked.
- Place the dough in a greased bowl, cover with a damp towel, and let it rise in a warm spot for 1 hour or until doubled in size. Tip: I like to put it in my oven with the light on for a cozy proofing environment.
- Punch down the dough to release air bubbles, then shape it into a round loaf on a parchment-lined baking sheet.
- Brush the top of the loaf evenly with the beaten egg white—this gives it that gorgeous golden shine.
- Sprinkle the poppy seeds and sesame seeds generously over the top, pressing lightly so they stick. Tip: For extra flavor, toast the sesame seeds in a dry pan over medium heat for 2-3 minutes until fragrant before using.
- Cover the loaf loosely with the damp towel and let it rise again for 30 minutes. Meanwhile, preheat your oven to 375°F.
- Use a sharp knife to score the top of the loaf with 3 shallow cuts—this helps it expand beautifully in the oven.
- Bake for 30-35 minutes until the crust is deep golden brown and sounds hollow when tapped on the bottom.
- Transfer the bread to a wire rack and let it cool completely for at least 1 hour before slicing. Resist the urge to cut it warm, or you’ll end up with a gummy mess!
That crackly crust gives way to a soft, airy interior with a subtle nuttiness from the seeds. Serve it thickly sliced with a smear of creamy butter or use it as the base for an epic avocado toast—it’s versatile enough for breakfast, lunch, or just snacking straight from the loaf!
Cinnamon Raisin Artisan Bread
Venture beyond the basic loaf with this Cinnamon Raisin Artisan Bread—it’s the cozy, aromatic hug your kitchen has been craving, perfect for turning a regular December morning into a festive, flour-dusted adventure. Imagine pulling a golden, crackly-crusted masterpiece from the oven, its sweet spice scent wafting through the air like a holiday promise.
Serving: 1 loaf | Pre Time: 20 minutes | Cooking Time: 40 minutes
Ingredients
- 3 ½ cups all-purpose flour (I always spoon and level it for accuracy—no packed cups here!)
- 1 ¼ cups warm water (around 110°F, think baby-bath warm, not hot)
- 2 ¼ teaspoons active dry yeast (one standard packet, check the expiration date—yeast naps are real)
- 1 teaspoon fine sea salt (my go-to for even seasoning)
- ¼ cup granulated sugar (for a hint of sweetness)
- 2 tablespoons unsalted butter, melted (extra for brushing, because shiny tops are everything)
- 1 cup raisins (plump them in hot water for 10 minutes first—trust me, it prevents dry bits)
- 2 teaspoons ground cinnamon (the star of the show, don’t skimp!)
Instructions
- In a large bowl, combine the warm water, yeast, and 1 tablespoon of the sugar; let it sit for 5 minutes until frothy (this “blooming” step ensures your yeast is alive and kicking—a kitchen tip!).
- Add the remaining sugar, melted butter, salt, and 3 cups of flour to the yeast mixture; stir with a wooden spoon until a shaggy dough forms.
- Turn the dough onto a lightly floured surface; knead for 8–10 minutes, gradually adding the remaining ½ cup flour as needed, until smooth and elastic (knead until it passes the “windowpane test”: stretch a small piece thinly without tearing—another pro tip!).
- Place the dough in a greased bowl, cover with a damp towel, and let rise in a warm spot for 1–1.5 hours, until doubled in size (I use my oven with the light on for a cozy proofing environment).
- Punch down the dough; gently knead in the plumped raisins and cinnamon until evenly distributed (fold them in gently to avoid crushing the raisins).
- Shape the dough into a round loaf; place it on a parchment-lined baking sheet, cover, and let rise again for 45 minutes.
- Preheat your oven to 375°F; slash the top of the loaf with a sharp knife in a cross pattern (this helps it expand beautifully in the oven—final tip!).
- Bake for 35–40 minutes, until the crust is deep golden brown and sounds hollow when tapped on the bottom.
- Remove from the oven; brush the top with melted butter for a glossy finish, then cool on a wire rack for at least 30 minutes.
Let this bread cool completely to avoid a gummy crumb—the wait is worth it! The texture is delightfully chewy with a crisp crust, bursting with sweet raisins and warm cinnamon in every bite. Serve it toasted with a smear of cream cheese for breakfast, or slice it thick for a festive French toast twist on Christmas morning.
Fig and Walnut Artisan Loaf

Hark! If you’ve ever dreamed of a bread that’s both rustic and a little fancy—like a lumberjack in a tuxedo—this Fig and Walnut Artisan Loaf is your dream come true. It’s packed with sweet, chewy figs and crunchy walnuts, making it the perfect centerpiece for your holiday table or just a Tuesday night when you’re feeling extra. Trust me, your kitchen will smell like a cozy bakery in no time!
Serving: 1 loaf | Pre Time: 20 minutes | Cooking Time: 40 minutes
Ingredients
– 3 cups all-purpose flour (I always sift mine first for a lighter crumb)
– 1 cup warm water (about 110°F—test it on your wrist like a baby’s bottle!)
– 2 tbsp extra virgin olive oil (my go-to for that rich, fruity flavor)
– 1 tsp active dry yeast (check the expiration date—no one wants sleepy yeast)
– 1 tsp salt (I prefer fine sea salt for even distribution)
– 1 cup dried figs, chopped (go for the soft ones; they’re easier to work with)
– 1/2 cup walnuts, roughly chopped (toasted first for extra crunch, if you’re fancy)
Instructions
1. In a large bowl, combine the warm water and active dry yeast, stirring gently until dissolved. Let it sit for 5 minutes until frothy—this is your yeast waking up and saying hello!
2. Add the all-purpose flour, extra virgin olive oil, and salt to the yeast mixture. Mix with a wooden spoon until a shaggy dough forms. Tip: If it feels too sticky, add a tablespoon of flour at a time until manageable.
3. Turn the dough onto a lightly floured surface and knead for 8-10 minutes until smooth and elastic. Imagine you’re giving it a good massage!
4. Place the dough in a greased bowl, cover with a damp towel, and let it rise in a warm spot for 1 hour, or until doubled in size. I like to put it near the oven if it’s on.
5. Punch down the dough to release air, then gently knead in the dried figs and walnuts until evenly distributed. Don’t overwork it—just fold them in like you’re tucking in a blanket.
6. Shape the dough into a round loaf and place it on a parchment-lined baking sheet. Cover and let it rise again for 30 minutes. Tip: Score the top with a sharp knife for that artisanal look and to prevent cracking.
7. Preheat your oven to 375°F. Bake the loaf for 35-40 minutes, until golden brown and it sounds hollow when tapped on the bottom. Tip: If it’s browning too fast, tent it with foil halfway through.
8. Let the loaf cool on a wire rack for at least 15 minutes before slicing—patience is key here!
Just sliced, this loaf boasts a crisp crust that gives way to a tender, chewy interior studded with sweet figs and nutty walnuts. Serve it warm with a smear of creamy goat cheese or toasted for breakfast with a drizzle of honey—it’s versatile enough to steal the show at any meal!
Gluten-Free Artisan Bread Alternative

So, you’ve sworn off gluten but still dream of that crusty, chewy, tear-it-with-your-hands bread? Welcome to the club—and to this glorious gluten-free artisan bread alternative that’s about to become your new kitchen BFF. Let’s ditch the dense, sad loaves and bake something that actually makes you do a happy dance.
Serving: 1 loaf | Pre Time: 15 minutes | Cooking Time: 45 minutes
Ingredients
- 2 cups gluten-free all-purpose flour blend (I swear by Bob’s Red Mill for that perfect texture)
- 1 cup warm water (around 110°F—think baby-bottle warm, not hot tub)
- 2 tbsp extra virgin olive oil (my go-to for a fruity kick)
- 1 packet active dry yeast (check the expiration date—no one wants a lazy yeast situation)
- 1 tsp salt (I prefer fine sea salt to avoid any gritty surprises)
- 1 tsp sugar (just a pinch to wake up the yeast)
Instructions
- In a small bowl, combine the warm water, sugar, and yeast, then let it sit for 5 minutes until frothy—this is your yeast saying “hello, I’m alive!” (Tip: If it doesn’t bubble, start over with fresh yeast.)
- In a large mixing bowl, whisk together the gluten-free all-purpose flour blend and salt until evenly combined.
- Pour the yeast mixture and extra virgin olive oil into the dry ingredients, then stir with a wooden spoon until a sticky dough forms—no need to knead, gluten-free dough is chill like that.
- Cover the bowl with a damp kitchen towel and let the dough rise in a warm spot for 1 hour, until it doubles in size. (Tip: I pop it in the oven with the light on for a cozy proofing environment.)
- Preheat your oven to 375°F and lightly grease a standard loaf pan with olive oil or non-stick spray.
- Transfer the dough to the prepared pan, smoothing the top with wet hands to prevent sticking.
- Bake for 45 minutes, until the loaf is golden brown and sounds hollow when tapped on the bottom. (Tip: Use an instant-read thermometer—it should hit 200°F internally for perfect doneness.)
- Remove the bread from the pan and let it cool completely on a wire rack for at least 30 minutes before slicing—patience is key here to avoid a gummy mess.
Craving that first bite? This loaf boasts a crisp, golden crust that gives way to a tender, airy crumb with just the right chew. Slather it with avocado for a trendy toast, or dunk it in soup—either way, it’s a gluten-free win that’ll have you forgetting all about the “real” stuff.
Summary
You’ve just discovered a treasure trove of 20 artisan bread recipes to elevate your baking. Whether you’re a beginner or a seasoned pro, there’s a perfect loaf waiting for you. We’d love to hear which recipe becomes your new favorite—leave a comment below! If you enjoyed this roundup, please share it on Pinterest to help fellow bakers find their next baking adventure. Happy baking!


