
Savor the vibrant tastes of Asia right in your own kitchen with these 18 irresistible appetizers! Whether you’re hosting a lively party or craving a quick, flavorful snack, this collection has something for every occasion. From crispy spring rolls to savory dumplings, get ready to impress your guests and treat your taste buds. Let’s dive into these delicious recipes that bring Asian flair to your table!
Steamed Pork and Shrimp Siomai

Venturing into the world of dim sum, steamed pork and shrimp siomai offers a delightful, savory parcel of flavor, its delicate wrapper cradling a succulent filling that is both comforting and elegant. This classic recipe yields tender, juicy dumplings with a satisfying texture, perfect for sharing as an appetizer or light meal. Mastering the art of folding these little bundles is simpler than it appears, rewarding you with restaurant-quality results from your own kitchen.
Serving: 24 pieces | Pre Time: 40 minutes | Cooking Time: 10 minutes
Ingredients
For the Filling:
– 1/2 pound ground pork (80% lean)
– 1/2 pound raw shrimp, peeled, deveined, and finely chopped
– 1/4 cup finely chopped water chestnuts
– 2 tablespoons finely chopped green onions
– 1 tablespoon soy sauce
– 1 teaspoon sesame oil
– 1/2 teaspoon grated fresh ginger
– 1/4 teaspoon white pepper
For Assembly and Cooking:
– 24 round siomai or wonton wrappers (about 3-inch diameter)
– 1 tablespoon water, for sealing
– 1 large cabbage leaf or parchment paper, for lining the steamer
Instructions
1. In a large mixing bowl, combine the ground pork, chopped shrimp, water chestnuts, green onions, soy sauce, sesame oil, grated ginger, and white pepper. Mix vigorously with your hands or a spoon for 2-3 minutes until the mixture becomes sticky and well-combined; this helps bind the filling for a cohesive texture.
2. Place one siomai wrapper in the palm of your hand and spoon 1 heaping teaspoon of the filling into the center. Tip: Keep unused wrappers covered with a damp towel to prevent drying out.
3. Gently gather the edges of the wrapper up around the filling, pleating slightly as you go, leaving the top exposed. Use your finger to dab a tiny amount of water on the pleated edges to help them adhere.
4. Press the base of the dumpling lightly on a flat surface to create a stable bottom. Repeat with all wrappers and filling.
5. Line a steamer basket with the cabbage leaf or parchment paper to prevent sticking. Arrange the siomai in the basket, leaving 1/2 inch of space between each to allow steam circulation.
6. Bring 1 inch of water to a boil in a pot or wok over high heat (212°F). Place the steamer basket over the boiling water, cover tightly, and steam for 8-10 minutes until the filling is cooked through and the wrappers become translucent. Tip: Avoid overcrowding the steamer; cook in batches if necessary for even cooking.
7. Carefully remove the steamer from the heat. Let the siomai rest for 1 minute before serving to set the texture.
Zesty and aromatic, these siomai boast a juicy, springy bite from the pork and shrimp, with subtle crunch from the water chestnuts. Serve them warm with a side of soy sauce or chili oil for dipping, or present them on a platter garnished with extra green onions for a vibrant touch at your next gathering.
Crispy Vegetable Spring Rolls
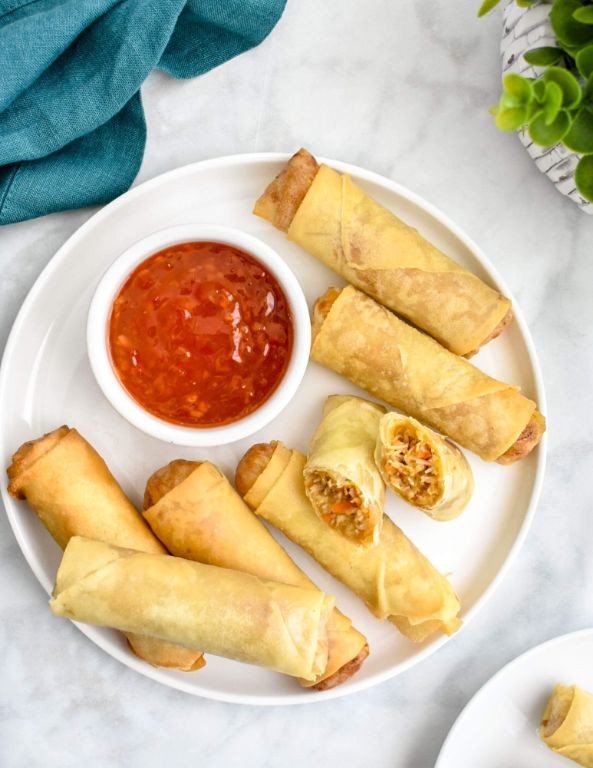
Glistening with golden perfection, these Crispy Vegetable Spring Rolls offer a delightful crunch that gives way to a vibrant, savory filling, making them an irresistible appetizer or light meal for any gathering. Crafted with fresh vegetables and delicate wrappers, they bring a touch of elegance to your table while remaining surprisingly simple to prepare. Whether served as a festive starter or a wholesome snack, their crisp texture and aromatic flavors are sure to impress even the most discerning palates.
Serving: 12 | Pre Time: 25 minutes | Cooking Time: 15 minutes
Ingredients
- For the filling:
- 2 cups shredded cabbage
- 1 cup shredded carrots
- 1/2 cup thinly sliced bell peppers
- 2 tbsp soy sauce
- 1 tbsp minced garlic
- 1 tsp grated ginger
- For assembly and cooking:
- 12 spring roll wrappers
- 1/4 cup water
- 2 cups vegetable oil
Instructions
- Heat a large skillet over medium-high heat and add 1 tablespoon of vegetable oil.
- Sauté the shredded cabbage, shredded carrots, and thinly sliced bell peppers in the skillet for 5 minutes, stirring frequently until the vegetables soften slightly.
- Add the minced garlic and grated ginger to the skillet, cooking for 1 minute until fragrant.
- Pour the soy sauce over the vegetable mixture, stirring to combine, then remove from heat and let the filling cool completely to prevent soggy wrappers.
- Lay one spring roll wrapper on a clean surface with a corner pointing toward you.
- Place 2 tablespoons of the cooled filling in the center of the wrapper, shaping it into a horizontal line.
- Fold the bottom corner over the filling, then fold in the left and right corners tightly.
- Brush the top corner with water using your finger, then roll the wrapper upward firmly to seal, ensuring no air pockets remain for maximum crispiness.
- Repeat steps 5 through 8 with the remaining wrappers and filling.
- Heat the remaining vegetable oil in a deep pot to 350°F, using a thermometer to maintain the temperature for even frying.
- Carefully place 3 to 4 spring rolls into the hot oil, frying for 3 to 4 minutes until golden brown and crispy, turning occasionally with tongs.
- Remove the spring rolls from the oil and drain on a paper towel-lined plate to absorb excess grease.
- Repeat steps 10 through 12 with the remaining spring rolls, allowing the oil to return to 350°F between batches.
These spring rolls emerge with a shatteringly crisp exterior that contrasts beautifully with the tender, savory vegetable filling inside. For a creative twist, serve them alongside a tangy dipping sauce or garnish with fresh herbs to enhance their aromatic appeal, making each bite a harmonious blend of textures and flavors.
Spicy Tuna Sushi Bites

Zesty yet refined, these Spicy Tuna Sushi Bites transform the classic roll into elegant, single-serve morsels perfect for holiday gatherings or sophisticated appetizers. Featuring a vibrant blend of sushi-grade tuna and creamy avocado atop crisp cucumber rounds, each bite delivers a harmonious balance of heat, freshness, and texture. This no-cook recipe comes together in minutes, offering a stunning presentation that belies its simplicity.
Serving: 4 | Pre Time: 20 minutes | Cooking Time: 0 minutes
Ingredients
For the base:
– 1 large English cucumber, sliced into 24 rounds (1/4-inch thick)
– 1 teaspoon toasted sesame oil
For the spicy tuna:
– 8 ounces sushi-grade ahi tuna, finely diced
– 2 tablespoons mayonnaise
– 1 tablespoon sriracha sauce
– 1 teaspoon soy sauce
– 1/2 teaspoon fresh lime juice
For assembly:
– 1 ripe avocado, diced into 1/4-inch pieces
– 1 tablespoon black sesame seeds
– 2 green onions, thinly sliced
Instructions
1. Pat the cucumber rounds completely dry with paper towels to prevent sogginess, then arrange them on a serving platter.
2. In a medium bowl, combine the diced tuna, mayonnaise, sriracha, soy sauce, and lime juice; fold gently with a spatula until evenly coated.
3. Spoon approximately 1 teaspoon of the spicy tuna mixture onto the center of each cucumber round, mounding it slightly.
4. Top each tuna mound with 2-3 pieces of diced avocado, pressing lightly to adhere.
5. Sprinkle the assembled bites evenly with black sesame seeds and sliced green onions.
6. Drizzle the toasted sesame oil lightly over the finished bites just before serving to enhance flavor.
Firm yet yielding, these bites offer a delightful contrast between the cool cucumber, creamy avocado, and piquant tuna. The sriracha provides a gentle heat that builds gradually, while the sesame oil adds a nutty aroma. For a festive twist, garnish with edible flowers or serve alongside pickled ginger and wasabi.
Thai Chicken Satay with Peanut Sauce
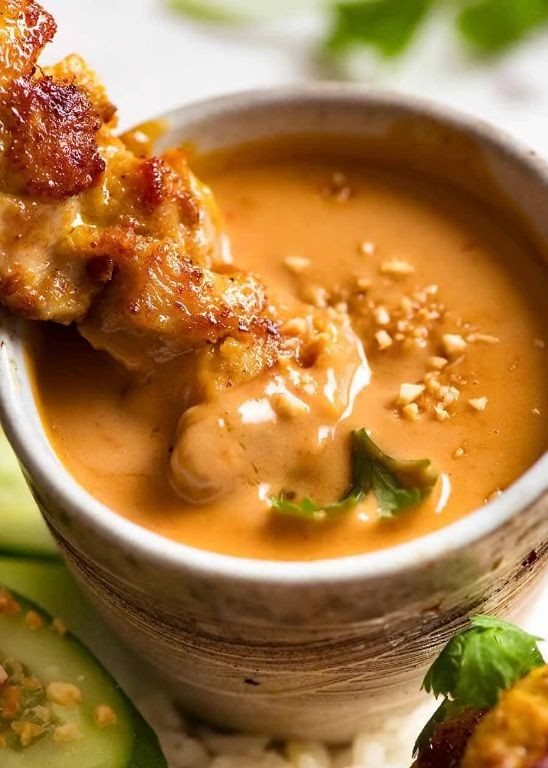
Oozing with the aromatic allure of Southeast Asia, Thai Chicken Satay with Peanut Sauce transforms simple skewers into an elegant, flavor-packed centerpiece. This dish masterfully balances the savory char of grilled chicken with a luxuriously creamy, sweet, and spicy peanut sauce, creating a harmonious interplay of textures and tastes. It’s a culinary journey that brings the vibrant spirit of a Thai street market directly to your table, perfect for both intimate gatherings and festive occasions.
Serving: 4 | Pre Time: 30 minutes | Cooking Time: 10 minutes
Ingredients
For the Marinade & Chicken:
– 1.5 lbs boneless, skinless chicken thighs, cut into 1-inch strips
– 1/4 cup coconut milk
– 2 tbsp soy sauce
– 1 tbsp brown sugar
– 1 tbsp curry powder
– 2 cloves garlic, minced
– 1 tbsp vegetable oil
– 8-10 wooden skewers, soaked in water for 30 minutes
For the Peanut Sauce:
– 1/2 cup creamy peanut butter
– 1/4 cup coconut milk
– 2 tbsp soy sauce
– 2 tbsp lime juice
– 1 tbsp brown sugar
– 1 tsp red curry paste
– 1/4 cup water
Instructions
1. In a medium bowl, whisk together 1/4 cup coconut milk, 2 tbsp soy sauce, 1 tbsp brown sugar, 1 tbsp curry powder, and 2 minced garlic cloves until fully combined.
2. Add 1.5 lbs of chicken strips to the marinade, tossing to coat each piece evenly, then cover and refrigerate for at least 20 minutes to allow the flavors to penetrate.
3. While the chicken marinates, prepare the peanut sauce by combining 1/2 cup peanut butter, 1/4 cup coconut milk, 2 tbsp soy sauce, 2 tbsp lime juice, 1 tbsp brown sugar, 1 tsp red curry paste, and 1/4 cup water in a small saucepan.
4. Heat the saucepan over medium-low heat, stirring constantly with a whisk for 3-4 minutes until the sauce is smooth, warm, and slightly thickened, then remove from heat and set aside.
5. Thread the marinated chicken strips onto the pre-soaked wooden skewers, weaving them through to secure the meat firmly for even cooking.
6. Preheat a grill or grill pan to medium-high heat (approximately 400°F) and lightly brush the grates with 1 tbsp vegetable oil to prevent sticking.
7. Place the chicken skewers on the hot grill, cooking for 4-5 minutes per side until the chicken develops visible grill marks and reaches an internal temperature of 165°F, turning only once to achieve a perfect sear.
8. Transfer the grilled satay to a serving platter and immediately drizzle with the warm peanut sauce or serve it alongside for dipping.
Firm yet tender, the chicken boasts a subtly smoky crust that yields to a juicy interior, beautifully contrasted by the sauce’s velvety richness and tangy undertones. For a creative presentation, arrange the skewers over a bed of jasmine rice or crisp cucumber ribbons, garnishing with chopped peanuts and fresh cilantro to elevate the visual and textural appeal.
Vietnamese Fresh Spring Rolls

Zestfully vibrant and refreshing, Vietnamese fresh spring rolls are a delicate, translucent package of crisp vegetables, fragrant herbs, and tender protein, all wrapped in a soft rice paper sheath. These rolls are a celebration of texture and freshness, offering a light yet satisfying bite that is as beautiful to behold as it is to eat. Perfect for a summer appetizer or a light meal, they invite customization and are served with a deeply savory, tangy dipping sauce.
Serving: 8 rolls | Pre Time: 30 minutes | Cooking Time: 5 minutes
Ingredients
For the Filling:
– 8 ounces rice vermicelli noodles
– 8 ounces medium shrimp, peeled and deveined
– 1 cup thinly sliced red leaf lettuce
– 1 cup julienned English cucumber
– 1 cup julienned carrot
– 1/2 cup fresh mint leaves
– 1/2 cup fresh cilantro leaves
For Assembly:
– 8 round rice paper wrappers (8.5-inch diameter)
– 1 large bowl of warm water (about 110°F)
For the Dipping Sauce:
– 1/4 cup hoisin sauce
– 2 tablespoons creamy peanut butter
– 1 tablespoon rice vinegar
– 1 tablespoon water
– 1 teaspoon sriracha sauce
– 1 tablespoon crushed roasted peanuts
Instructions
1. Bring a medium pot of water to a rolling boil over high heat. Add the rice vermicelli noodles and cook for 3-5 minutes, or until tender but still slightly chewy. Drain immediately and rinse under cold water to stop the cooking process; set aside.
2. In the same pot, bring fresh water to a boil. Add the shrimp and cook for 2-3 minutes, until they turn pink and opaque. Drain and rinse under cold water; pat dry with paper towels and slice each shrimp in half lengthwise.
3. Prepare all vegetables and herbs: thinly slice the lettuce, julienne the cucumber and carrot, and pick the mint and cilantro leaves. Arrange the cooked noodles, shrimp, lettuce, cucumber, carrot, mint, and cilantro on a large platter for easy assembly.
4. Fill a large, shallow bowl or pie plate with warm water (about 110°F). Working with one rice paper wrapper at a time, submerge it completely in the water for 10-15 seconds until pliable but still slightly firm. Tip: Do not oversoak, or the wrapper will become too sticky and tear easily.
5. Lay the softened wrapper flat on a clean, damp kitchen towel. In the lower third of the wrapper, place a small handful of noodles, 3-4 shrimp halves, a few pieces of lettuce, cucumber, carrot, and 3-4 leaves each of mint and cilantro, leaving about 1 inch of space on the sides.
6. Fold the bottom edge of the wrapper over the filling, then fold in the left and right sides. Roll tightly upward to enclose the filling completely, like a burrito. Tip: Roll firmly but gently to avoid tearing the delicate wrapper.
7. Place the finished roll on a plate and cover with a damp paper towel. Repeat with the remaining wrappers and filling. Tip: Keep the rolls covered to prevent them from drying out and becoming brittle.
8. For the sauce, in a small bowl, whisk together the hoisin sauce, peanut butter, rice vinegar, water, and sriracha until smooth. Stir in the crushed peanuts.
Offering a delightful contrast, the soft, slightly chewy rice paper gives way to a crisp, cool interior bursting with herbal notes from the mint and cilantro. The rich, nutty dipping sauce provides a savory counterpoint that enhances every bite. For a creative presentation, slice the rolls in half on a diagonal and serve them standing upright on a platter garnished with extra herbs.
Korean Kimchi Pancakes
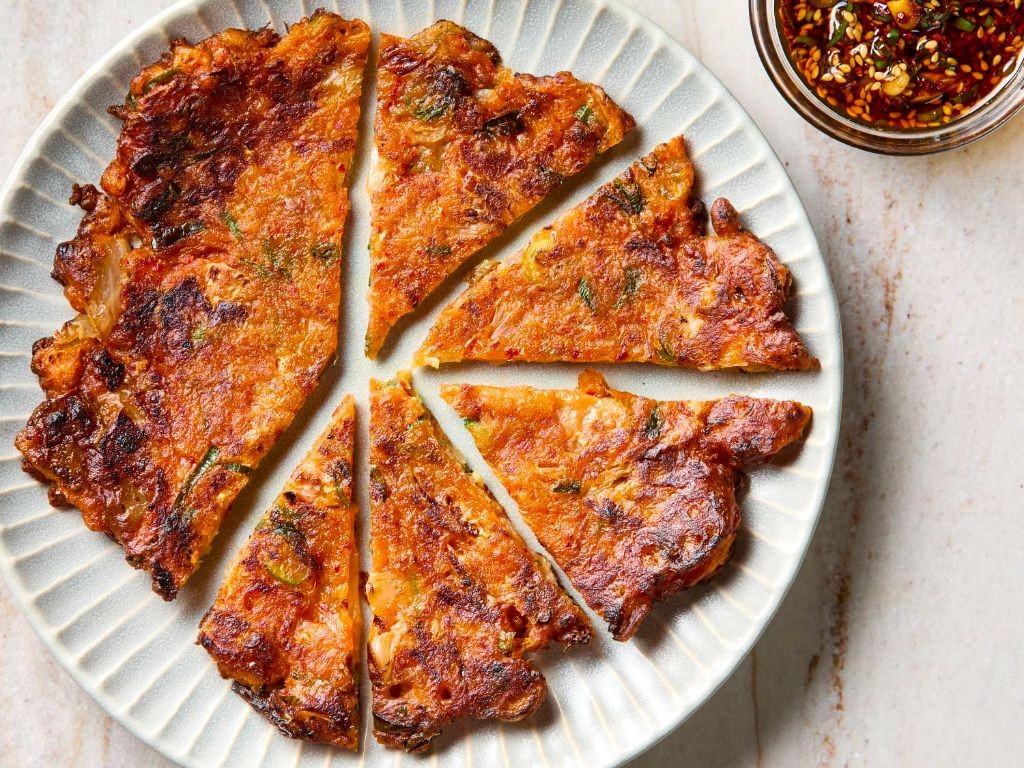
Nestled between the crisp bite of fermented cabbage and the savory warmth of a golden-brown crust, Korean kimchi pancakes offer a delightful fusion of tangy, spicy, and umami flavors that transform a humble batter into a crave-worthy meal. This versatile dish, known as kimchijeon, balances the pungent kick of aged kimchi with a simple, satisfying base, creating a textural masterpiece that is both comforting and elegantly complex. Perfect for a quick weeknight dinner or an impressive appetizer, these pancakes are a celebration of Korean culinary tradition, ready to be enjoyed straight from the skillet.
Serving: 4 | Pre Time: 10 minutes | Cooking Time: 20 minutes
Ingredients
For the batter:
– 1 cup all-purpose flour
– 1 cup cold water
– 1 large egg
– 1/2 teaspoon salt
For the filling:
– 1 cup chopped kimchi, drained and squeezed of excess liquid
– 2 tablespoons kimchi juice (reserved from draining)
– 3 green onions, thinly sliced
– 1/4 cup thinly sliced onion
For cooking:
– 4 tablespoons vegetable oil, divided
Instructions
1. In a large mixing bowl, whisk together 1 cup all-purpose flour, 1 cup cold water, 1 large egg, and 1/2 teaspoon salt until a smooth, lump-free batter forms, about 1 minute.
2. Add 1 cup chopped kimchi, 2 tablespoons kimchi juice, 3 sliced green onions, and 1/4 cup sliced onion to the batter, folding gently with a spatula to combine evenly.
3. Heat a large non-stick skillet over medium-high heat and add 1 tablespoon vegetable oil, swirling to coat the surface.
4. Pour one-quarter of the batter into the skillet, spreading it into a 6-inch round pancake about 1/4-inch thick using the back of a spoon.
5. Cook the pancake for 3–4 minutes until the edges appear set and the bottom turns golden-brown and crisp.
6. Carefully flip the pancake using a spatula and cook for an additional 3–4 minutes until the second side is golden-brown and the center is cooked through.
7. Transfer the cooked pancake to a wire rack or paper towel-lined plate to drain excess oil.
8. Repeat steps 3–7 with the remaining batter and 3 tablespoons vegetable oil, adding 1 tablespoon oil to the skillet for each new pancake.
9. Cut each pancake into wedges and serve immediately while hot.
Creating a perfectly crisp exterior with a tender, flavorful interior, these pancakes boast a delightful contrast that highlights the kimchi’s tangy fermentation. Complement their savory profile by drizzling with a simple soy-vinegar dipping sauce or pairing with a light, refreshing salad for a balanced meal.
Japanese Gyoza Dumplings

Whether you’re hosting a festive gathering or seeking a comforting weeknight meal, Japanese gyoza dumplings offer a delightful interplay of savory fillings and crispy, golden-brown wrappers. These delicate parcels, with their tender interiors and satisfying crunch, transform simple ingredients into an elegant appetizer or main course that feels both familiar and exotic. Mastering their preparation unlocks a world of culinary artistry, where each bite reveals layers of umami-rich flavor and textural contrast.
Serving: 24 dumplings | Pre Time: 30 minutes | Cooking Time: 15 minutes
Ingredients
For the filling:
– 1 pound ground pork
– 1 cup finely chopped napa cabbage
– 2 green onions, thinly sliced
– 2 cloves garlic, minced
– 1 tablespoon grated fresh ginger
– 1 tablespoon soy sauce
– 1 teaspoon sesame oil
– 1/4 teaspoon ground white pepper
For assembly and cooking:
– 24 round gyoza wrappers
– 1/4 cup water
– 2 tablespoons vegetable oil
For the dipping sauce:
– 1/4 cup soy sauce
– 2 tablespoons rice vinegar
– 1 teaspoon chili oil (optional)
– 1 teaspoon toasted sesame seeds
Instructions
1. In a large bowl, combine 1 pound ground pork, 1 cup finely chopped napa cabbage, 2 thinly sliced green onions, 2 minced garlic cloves, 1 tablespoon grated fresh ginger, 1 tablespoon soy sauce, 1 teaspoon sesame oil, and 1/4 teaspoon ground white pepper. Mix thoroughly with your hands or a spoon until well incorporated.
2. Place 1 round gyoza wrapper on a clean work surface. Spoon 1 heaping teaspoon of the filling into the center of the wrapper.
3. Dip your finger into 1/4 cup water and moisten the edges of the wrapper. Fold the wrapper in half over the filling to create a half-moon shape.
4. Pinch the edges together firmly to seal, pleating one side of the wrapper 3-4 times for a traditional look. Tip: Ensure no air pockets remain inside to prevent bursting during cooking.
5. Repeat steps 2-4 with the remaining wrappers and filling, placing assembled dumplings on a parchment-lined tray.
6. Heat 2 tablespoons vegetable oil in a large non-stick skillet over medium-high heat until shimmering, about 2 minutes.
7. Arrange dumplings in the skillet in a single layer, flat-side down, without crowding. Cook undisturbed for 3-4 minutes until the bottoms turn golden brown and crispy.
8. Carefully pour 1/4 cup water into the skillet, immediately cover with a tight-fitting lid, and reduce heat to medium-low. Steam for 8-10 minutes until the wrappers become translucent and the filling is cooked through. Tip: Listen for a gentle sizzle to gauge proper steaming.
9. Uncover the skillet and cook for 1-2 more minutes to evaporate any remaining liquid and re-crisp the bottoms.
10. While dumplings cook, whisk together 1/4 cup soy sauce, 2 tablespoons rice vinegar, 1 teaspoon chili oil (if using), and 1 teaspoon toasted sesame seeds in a small bowl for the dipping sauce.
11. Transfer cooked dumplings to a serving plate using a spatula. Tip: Serve immediately for optimal crispiness, as they soften over time.
12. Serve dumplings hot with the prepared dipping sauce on the side.
Keenly crafted, these gyoza boast a symphony of textures—from the shatteringly crisp base to the tender, juicy filling that releases aromatic ginger and garlic with each bite. Their savory depth, accentuated by the tangy dipping sauce, makes them perfect for pairing with a light cucumber salad or presenting artfully on a slate platter garnished with microgreens for an elevated touch.
Chinese Scallion Pancakes
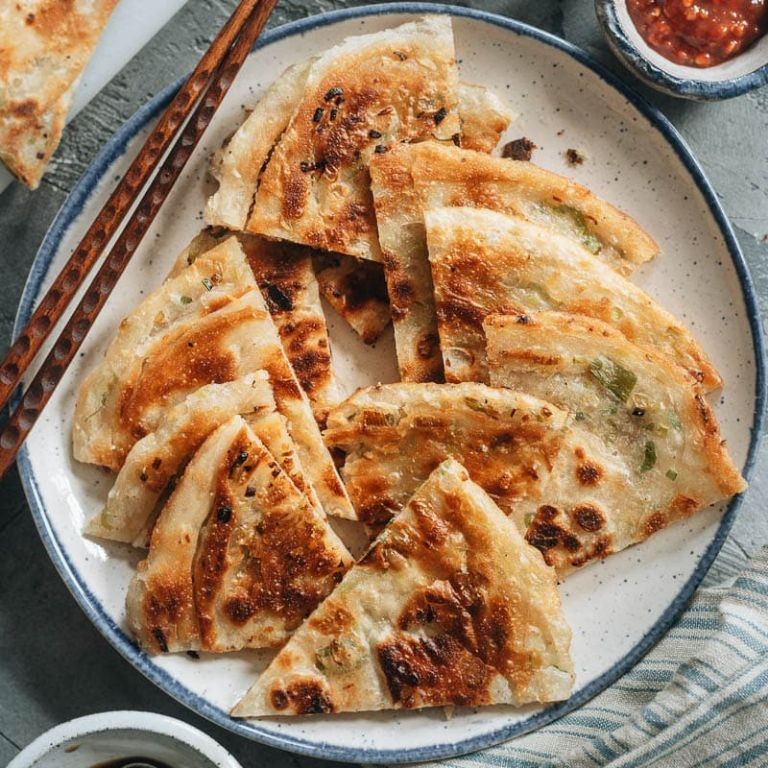
On a chilly winter afternoon, few culinary comforts rival the crisp, savory layers of a freshly made Chinese scallion pancake, a beloved street food that transforms simple pantry staples into a golden, aromatic delight. This recipe demystifies the process, guiding you through creating flaky, restaurant-quality pancakes at home with ease and elegance.
Serving: 4 | Pre Time: 30 minutes | Cooking Time: 20 minutes
Ingredients
For the dough:
– 2 cups all-purpose flour
– 3/4 cup warm water (about 110°F)
– 1/2 teaspoon salt
For the filling and cooking:
– 1 cup finely chopped scallions (green parts only)
– 1/4 cup vegetable oil
– 1/4 cup toasted sesame oil
– 1/2 teaspoon salt
Instructions
1. In a large bowl, combine 2 cups all-purpose flour and 1/2 teaspoon salt. Gradually add 3/4 cup warm water while stirring with a fork until a shaggy dough forms.
2. Knead the dough on a lightly floured surface for 5 minutes until smooth and elastic, then cover with a damp cloth and let rest at room temperature for 20 minutes to relax the gluten.
3. Divide the rested dough into 4 equal pieces. Roll one piece into a thin rectangle about 1/8-inch thick on a floured surface.
4. Brush the entire surface of the dough with a mixture of 2 tablespoons vegetable oil and 2 tablespoons toasted sesame oil, then sprinkle evenly with 1/4 cup chopped scallions and a pinch of salt.
5. Tightly roll the dough into a long log, starting from one short end, then coil the log into a spiral shape and tuck the end underneath.
6. Gently flatten the spiral with your palm, then roll it out again into a 6-inch circle about 1/4-inch thick, being careful not to tear the layers.
7. Heat a non-stick skillet over medium heat and add 1 tablespoon vegetable oil. Cook the pancake for 3-4 minutes per side, pressing down lightly with a spatula, until golden brown and crisp.
8. Repeat steps 3-7 with the remaining dough, oil, and scallions, adding more oil to the skillet as needed.
9. Transfer cooked pancakes to a wire rack to cool slightly, then slice into wedges.
You’ll savor the contrast of the crackling exterior with the tender, scallion-studded interior, a harmony of savory oils and fresh allium notes. Try serving these pancakes warm with a drizzle of chili crisp or alongside a simple cucumber salad for a vibrant, textural meal that delights with every bite.
Indonesian Beef Satay
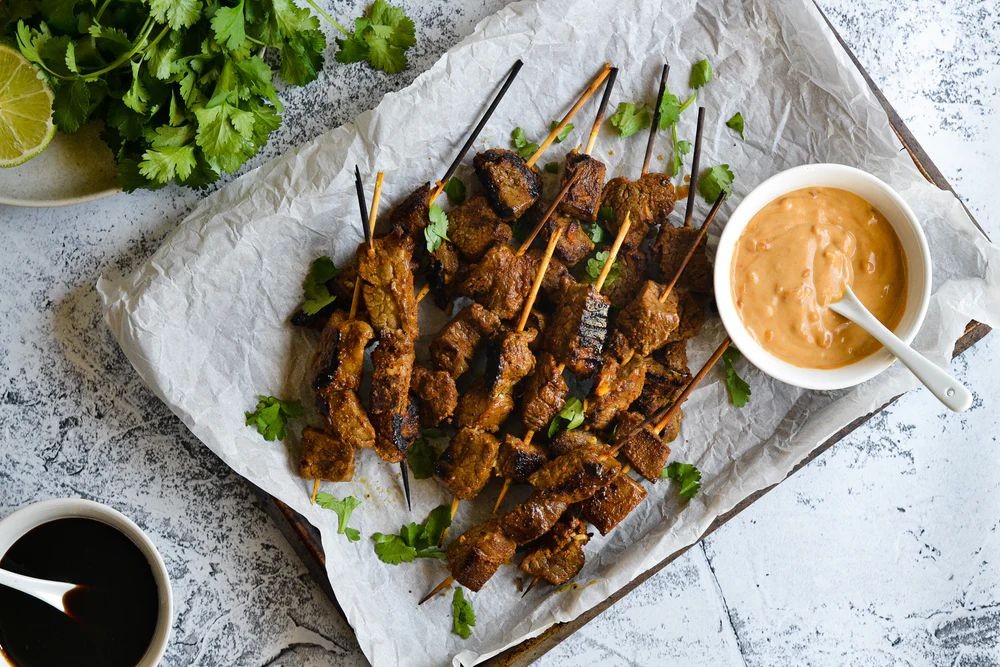
Marvel at the aromatic allure of Indonesian Beef Satay, where tender, skewered beef meets a symphony of sweet, savory, and smoky notes, transporting your senses straight to a bustling Southeast Asian night market. This beloved street food classic, with its charred edges and deeply marinated meat, offers an irresistible balance of flavors that’s both sophisticated and utterly craveable. Perfect for gatherings or a weeknight indulgence, it promises a culinary adventure that’s as elegant as it is approachable.
Serving: 4 | Pre Time: 30 minutes | Cooking Time: 10 minutes
Ingredients
For the marinade:
– 1.5 pounds beef sirloin, cut into 1-inch cubes
– 3 cloves garlic, minced
– 1 tablespoon fresh ginger, grated
– 2 tablespoons soy sauce
– 1 tablespoon brown sugar
– 1 tablespoon vegetable oil
– 1 teaspoon ground coriander
– 1/2 teaspoon ground turmeric
For the peanut sauce:
– 1/2 cup creamy peanut butter
– 1/4 cup coconut milk
– 2 tablespoons soy sauce
– 1 tablespoon lime juice
– 1 teaspoon sriracha
– 1/4 cup water
For grilling:
– 8 wooden skewers, soaked in water for 30 minutes
– 2 tablespoons vegetable oil for brushing
Instructions
1. In a large bowl, combine the beef cubes, minced garlic, grated ginger, 2 tablespoons soy sauce, brown sugar, 1 tablespoon vegetable oil, ground coriander, and ground turmeric, tossing until the beef is evenly coated. 2. Cover the bowl and refrigerate the beef for at least 20 minutes to allow the flavors to penetrate, with 1 hour being ideal for deeper marination. 3. While the beef marinates, soak 8 wooden skewers in water for 30 minutes to prevent burning during grilling. 4. In a small saucepan over medium heat, whisk together the creamy peanut butter, coconut milk, 2 tablespoons soy sauce, lime juice, sriracha, and 1/4 cup water until smooth and heated through, about 3-5 minutes, then set aside. 5. Thread the marinated beef cubes onto the soaked skewers, leaving a small space between each piece for even cooking. 6. Preheat a grill or grill pan to medium-high heat, approximately 400°F, and lightly brush the grates with vegetable oil to prevent sticking. 7. Place the skewers on the grill and cook for 3-4 minutes per side, turning once, until the beef is charred on the edges and reaches an internal temperature of 145°F for medium doneness. 8. Remove the skewers from the grill and let them rest for 2 minutes before serving to allow the juices to redistribute. 9. Serve the satay hot with the warm peanut sauce on the side for dipping.
Each bite delivers a tender, juicy interior with a delightfully smoky crust, while the creamy peanut sauce adds a rich, tangy contrast that elevates the experience. For a creative twist, serve the satay over a bed of jasmine rice with a side of quick-pickled cucumbers, or garnish with chopped cilantro and a squeeze of fresh lime to brighten the dish.
Malaysian Curry Puffs

Beneath a golden, flaky crust lies a world of aromatic spices and savory filling in Malaysian curry puffs, a beloved street food snack that transforms humble ingredients into an elegant handheld feast. These crescent-shaped pastries offer a delightful contrast of textures and a complex flavor profile, making them a perfect centerpiece for gatherings or a sophisticated appetizer. Serving: 12 | Pre Time: 45 minutes | Cooking Time: 25 minutes
Ingredients
For the Filling:
– 1 tablespoon vegetable oil
– 1 small yellow onion, finely diced
– 2 cloves garlic, minced
– 1 teaspoon grated fresh ginger
– 1 pound ground chicken
– 2 tablespoons Malaysian curry powder
– 1/2 teaspoon ground turmeric
– 1/4 teaspoon cayenne pepper
– 1 large russet potato, peeled and diced into 1/4-inch cubes
– 1/2 cup frozen peas
– 3/4 cup chicken broth
– 1/2 teaspoon granulated sugar
– 1 teaspoon kosher salt
For the Dough:
– 2 cups all-purpose flour
– 1/2 teaspoon kosher salt
– 1/2 cup cold unsalted butter, cubed
– 1/2 cup ice water
For Assembly:
– 1 large egg, beaten
Instructions
1. Heat 1 tablespoon vegetable oil in a large skillet over medium heat until shimmering, about 2 minutes.
2. Add 1 small finely diced yellow onion and cook, stirring frequently, until translucent and soft, about 5 minutes.
3. Stir in 2 cloves minced garlic and 1 teaspoon grated fresh ginger, cooking until fragrant, about 1 minute.
4. Add 1 pound ground chicken, breaking it up with a wooden spoon, and cook until no longer pink, about 6-8 minutes.
5. Sprinkle in 2 tablespoons Malaysian curry powder, 1/2 teaspoon ground turmeric, and 1/4 teaspoon cayenne pepper, toasting the spices with the meat for 1 minute to deepen their flavor.
6. Incorporate 1 large diced russet potato, 1/2 cup frozen peas, 3/4 cup chicken broth, 1/2 teaspoon granulated sugar, and 1 teaspoon kosher salt, stirring to combine.
7. Reduce heat to medium-low, cover the skillet, and simmer the filling until the potatoes are tender and the liquid is mostly absorbed, about 15 minutes, then uncover and cook for 2 more minutes to evaporate any excess moisture. Tip: Let the filling cool completely before assembling to prevent the dough from becoming soggy.
8. While the filling cools, make the dough by whisking together 2 cups all-purpose flour and 1/2 teaspoon kosher salt in a large bowl.
9. Cut in 1/2 cup cold cubed unsalted butter using a pastry cutter or your fingers until the mixture resembles coarse crumbs with some pea-sized butter pieces remaining.
10. Gradually add 1/2 cup ice water, mixing with a fork just until the dough begins to come together, then gently knead it into a ball. Tip: Avoid overworking the dough to ensure a flaky, tender crust.
11. Wrap the dough ball in plastic wrap and refrigerate for at least 30 minutes to relax the gluten and firm up the butter.
12. Preheat your oven to 400°F and line a baking sheet with parchment paper.
13. On a lightly floured surface, roll the chilled dough out to a 1/8-inch thickness.
14. Using a 4-inch round cutter, cut out 12 circles from the dough, re-rolling scraps as needed.
15. Place 1 heaping tablespoon of the cooled filling in the center of each dough circle.
16. Brush the edges of each circle lightly with water, fold the dough over the filling to form a half-moon shape, and press the edges firmly to seal.
17. Crimp the sealed edges with the tines of a fork to create a decorative pattern and ensure they are fully closed.
18. Arrange the shaped curry puffs on the prepared baking sheet and brush the tops evenly with 1 large beaten egg. Tip: The egg wash will give the pastries a beautiful, glossy golden-brown finish.
19. Bake in the preheated 400°F oven until the crust is puffed and deeply golden brown, about 20-25 minutes.
20. Transfer the baked curry puffs to a wire rack and let them cool for 5 minutes before serving. Heirloom recipes like these curry puffs reveal their magic in the first bite: the shatteringly crisp exterior yields to a warmly spiced, savory filling with soft potatoes and pops of sweet peas. For a creative presentation, serve them alongside a tangy cucumber raita or a sweet chili dipping sauce to complement the rich curry flavors, making them an irresistible addition to any festive table.
Filipino Lumpia Shanghai

Crisp, golden, and irresistibly savory, Filipino Lumpia Shanghai offers a delightful bite-sized journey into the heart of Filipino party cuisine. These slender, deep-fried spring rolls are traditionally filled with a well-seasoned mixture of ground pork and vegetables, creating a perfect harmony of textures and flavors that makes them a beloved appetizer at any gathering.
Serving: 25 pieces | Pre Time: 30 minutes | Cooking Time: 15 minutes
Ingredients
For the Filling:
- 1 lb ground pork
- 1/2 cup finely chopped yellow onion
- 1/3 cup finely chopped carrot
- 2 tbsp soy sauce
- 1 tsp ground black pepper
- 1 tsp salt
- 1 large egg
For Assembly and Frying:
- 25 lumpia wrappers (spring roll wrappers), thawed if frozen
- 1 tbsp all-purpose flour mixed with 1 tbsp water (for sealing)
- 4 cups vegetable oil (for frying, about 1-2 inches deep in pot)
Instructions
- In a large mixing bowl, combine 1 lb ground pork, 1/2 cup finely chopped yellow onion, 1/3 cup finely chopped carrot, 2 tbsp soy sauce, 1 tsp ground black pepper, 1 tsp salt, and 1 large egg.
- Mix the ingredients thoroughly with your hands or a spoon until fully incorporated and the mixture becomes slightly sticky, about 2 minutes. Tip: For the best texture, ensure the vegetables are chopped very finely to prevent tearing the wrappers.
- Place 1 lumpia wrapper on a clean surface with a corner pointing toward you, keeping the remaining wrappers covered with a damp towel to prevent drying.
- Spoon about 1 tablespoon of the filling into a log shape horizontally across the wrapper, about 1 inch from the bottom corner.
- Fold the bottom corner over the filling, then fold in the left and right sides tightly.
- Roll the wrapper upward firmly but gently toward the top corner. Tip: Avoid overfilling to ensure the rolls seal properly and cook evenly.
- Seal the final corner by brushing it lightly with the flour-water mixture, then press to adhere. Repeat with remaining wrappers and filling.
- In a deep, heavy-bottomed pot or Dutch oven, heat 4 cups vegetable oil to 350°F over medium-high heat, using a deep-fry thermometer to monitor the temperature.
- Carefully add 4-5 lumpia rolls to the hot oil without overcrowding, frying for 3-4 minutes until golden brown and crisp, turning occasionally with tongs for even cooking.
- Transfer the fried lumpia to a wire rack set over a baking sheet or a plate lined with paper towels to drain excess oil. Tip: Letting them drain on a rack helps maintain maximum crispiness.
- Repeat the frying process with the remaining lumpia, allowing the oil to return to 350°F between batches.
Just out of the fryer, these lumpia boast a shatteringly crisp exterior that gives way to a juicy, savory filling with subtle sweetness from the carrots. Their compact size makes them ideal for dipping into a sweet chili sauce or serving as part of a vibrant appetizer platter, where their golden hue and aromatic allure are sure to captivate every guest.
Thai Mango Sticky Rice Bites
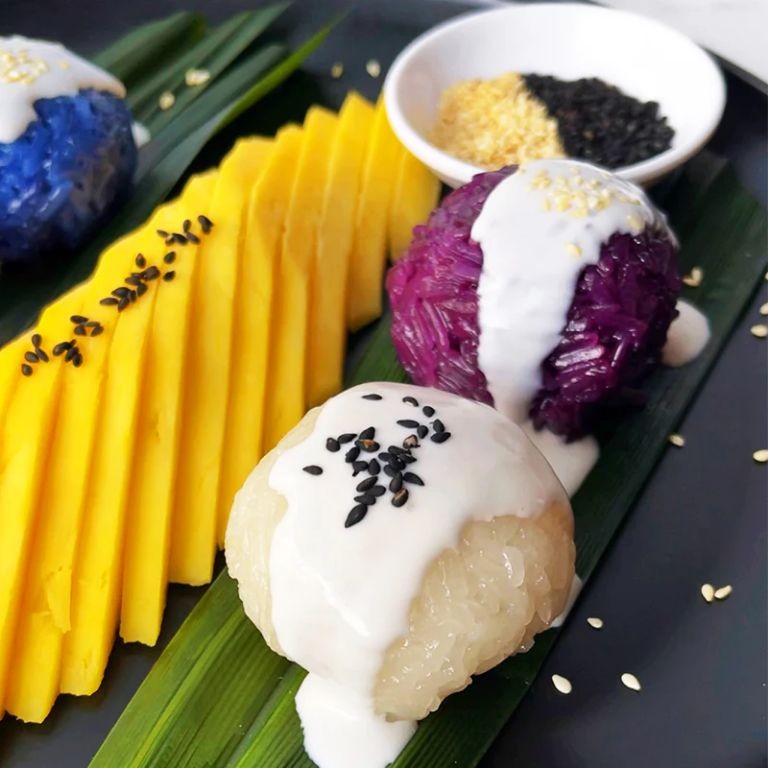
On a sweltering summer afternoon, few desserts capture the essence of tropical indulgence quite like these elegant, bite-sized interpretations of a classic Thai street food. Our Thai Mango Sticky Rice Bites transform the beloved combination of sweet, creamy coconut rice and juicy, fragrant mango into a sophisticated, handheld treat perfect for entertaining or a moment of personal luxury.
Serving: 12 bites | Pre Time: 30 minutes | Cooking Time: 25 minutes
Ingredients
For the Sticky Rice
– 1 cup glutinous (sweet) rice
– 1 cup full-fat coconut milk
– 1/4 cup granulated sugar
– 1/4 teaspoon salt
For Assembly & Topping
– 1 large ripe mango, peeled and finely diced
– 2 tablespoons toasted sesame seeds
– 12 fresh mint leaves (for garnish)
Instructions
1. Rinse 1 cup of glutinous rice under cold water in a fine-mesh strainer until the water runs clear, which removes excess starch for a perfectly textured final product.
2. Soak the rinsed rice in 2 cups of cold water for 30 minutes, then drain completely using the strainer.
3. Steam the drained rice over boiling water for 20 minutes in a steamer basket lined with cheesecloth, until the grains are fully translucent and tender.
4. While the rice steams, combine 1 cup of coconut milk, 1/4 cup sugar, and 1/4 teaspoon salt in a small saucepan over medium heat.
5. Heat the coconut milk mixture, stirring constantly, for 3-4 minutes until the sugar dissolves completely and the mixture is hot but not boiling.
6. Transfer the hot, steamed rice to a medium bowl and immediately pour the hot coconut milk mixture over it.
7. Fold the coconut milk into the rice gently with a spatula until fully absorbed, then let the mixture rest, covered, for 15 minutes to allow the flavors to meld.
8. Lightly moisten your hands with water to prevent sticking, then form the coconut rice into 12 compact, tablespoon-sized balls, pressing firmly to ensure they hold their shape.
9. Place a small mound of finely diced mango on top of each rice ball, pressing it gently into the surface.
10. Sprinkle each bite evenly with toasted sesame seeds and garnish with a fresh mint leaf.
Just as the final mint leaf is placed, these bites offer a delightful contrast: the warm, creamy sweetness of the coconut rice perfectly complements the cool, bright acidity of the fresh mango. For a stunning presentation, arrange them on a platter lined with banana leaves and serve immediately, as the textures are best enjoyed fresh.
Korean Japchae Glass Noodle Salad
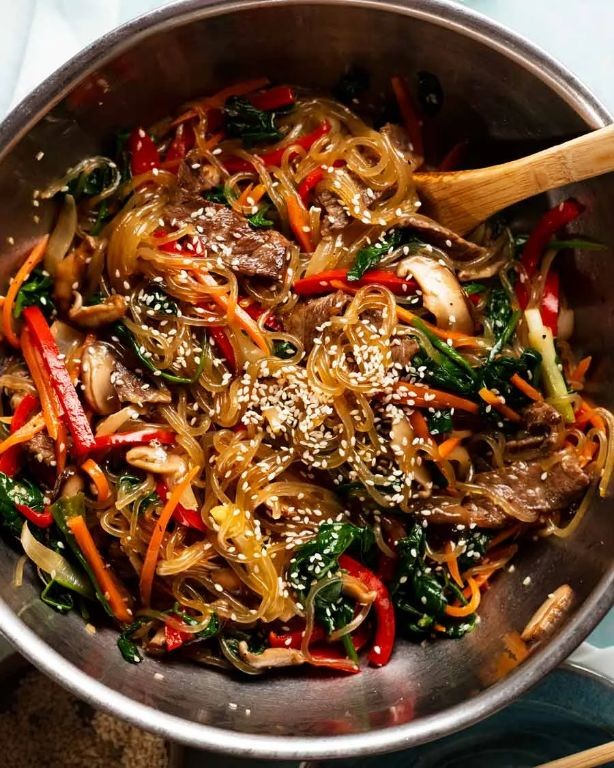
A vibrant tangle of translucent glass noodles, colorful vegetables, and savory-sweet flavors, Korean japchae transforms humble ingredients into an elegant salad that’s as beautiful on the plate as it is satisfying to eat. This beloved dish, often served at celebrations, balances chewy noodles with crisp vegetables in a glossy, perfectly seasoned sauce that clings to every strand. Its versatility makes it equally fitting for a festive holiday table or a refreshing weeknight meal.
Serving: 4 | Pre Time: 20 minutes | Cooking Time: 15 minutes
Ingredients
For the Noodles & Vegetables:
– 8 ounces sweet potato glass noodles (dangmyeon)
– 1 tablespoon toasted sesame oil
– 1 tablespoon vegetable oil
– 1 medium carrot, julienned into 2-inch matchsticks
– 1 small yellow onion, thinly sliced
– 4 ounces fresh spinach
– 4 ounces shiitake mushrooms, stems removed and thinly sliced
– 2 cloves garlic, minced
For the Sauce:
– ¼ cup soy sauce
– 2 tablespoons granulated sugar
– 1 tablespoon toasted sesame oil
– 1 teaspoon toasted sesame seeds
Instructions
1. Place the sweet potato glass noodles in a large bowl and cover completely with hot tap water; let them soak for 20 minutes until pliable but still firm.
2. While the noodles soak, whisk together the soy sauce, granulated sugar, 1 tablespoon toasted sesame oil, and toasted sesame seeds in a small bowl until the sugar dissolves completely.
3. Heat 1 tablespoon vegetable oil in a large skillet or wok over medium-high heat until it shimmers, about 1 minute.
4. Add the julienned carrot and thinly sliced onion to the skillet; stir-fry for 3–4 minutes until the carrot softens slightly and the onion turns translucent.
5. Push the vegetables to one side of the skillet, add the sliced shiitake mushrooms, and cook for 2–3 minutes until they release their moisture and become tender.
6. Stir in the minced garlic and cook for 30 seconds until fragrant, then combine all the vegetables in the skillet.
7. Add the fresh spinach to the skillet and toss continuously for 1–2 minutes until it wilts completely; transfer the entire vegetable mixture to a large bowl.
8. Drain the soaked noodles thoroughly and add them to the same skillet over medium heat.
9. Pour the prepared sauce over the noodles, using tongs to toss and coat them evenly for 2–3 minutes until the noodles absorb the sauce and become glossy.
10. Return the cooked vegetables to the skillet with the noodles, add 1 tablespoon toasted sesame oil, and toss everything together over low heat for 1 minute to combine.
11. Remove the skillet from the heat and let the japchae rest for 5 minutes to allow the flavors to meld.
Here, the glossy noodles offer a delightfully chewy contrast to the crisp-tender vegetables, while the savory-sweet sauce, brightened by a hint of sesame, creates a harmonious balance in every bite. For a creative presentation, serve it slightly warm or at room temperature garnished with extra sesame seeds and thinly sliced scallions, making it a stunning centerpiece for any gathering.
Vietnamese Banh Mi Sliders
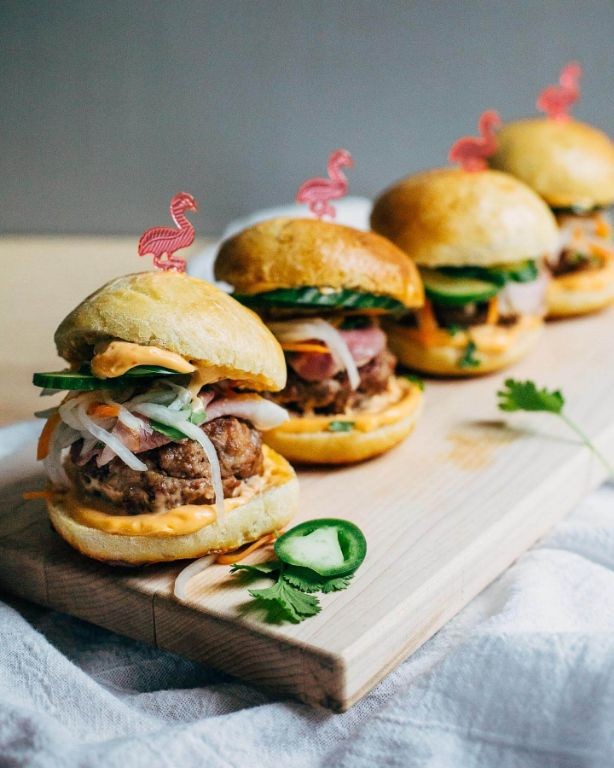
Unveiling a modern twist on a beloved classic, these Vietnamese Banh Mi Sliders transform the iconic sandwich into elegant, shareable bites perfect for festive gatherings. Imagine tender, savory fillings nestled within soft, toasted buns, each component harmonizing to deliver a burst of vibrant, aromatic flavors that dance on the palate. This recipe elevates the traditional street food into a sophisticated appetizer or light meal, ideal for impressing guests with minimal fuss.
Serving: 12 sliders | Pre Time: 20 minutes | Cooking Time: 15 minutes
Ingredients
For the Pickled Vegetables:
– 1 cup julienned carrots
– 1 cup julienned daikon radish
– 1/2 cup rice vinegar
– 1/4 cup granulated sugar
– 1/2 tsp salt
For the Pork Filling:
– 1 lb ground pork
– 2 tbsp soy sauce
– 1 tbsp fish sauce
– 1 tbsp minced garlic
– 1 tsp grated ginger
– 1/2 tsp black pepper
For Assembly:
– 12 slider buns
– 1/2 cup mayonnaise
– 1/4 cup chopped fresh cilantro
– 1 jalapeño, thinly sliced
Instructions
1. In a medium bowl, combine the carrots, daikon, rice vinegar, sugar, and salt, stirring until the sugar dissolves completely. Let the mixture sit at room temperature for 20 minutes to pickle, stirring occasionally for even flavor distribution.
2. In a large skillet over medium-high heat, add the ground pork and cook for 5 minutes, breaking it into small crumbles with a spatula until no pink remains.
3. Stir in the soy sauce, fish sauce, minced garlic, grated ginger, and black pepper, cooking for an additional 3 minutes until the pork is browned and aromatic. Tip: For deeper flavor, let the pork simmer on low heat for 2 extra minutes after adding the sauces.
4. Preheat your oven to 350°F. Slice the slider buns in half horizontally and place them cut-side up on a baking sheet.
5. Toast the buns in the oven for 5 minutes until lightly golden and crisp around the edges. Tip: Watch closely to prevent burning, as oven temperatures can vary.
6. Spread 1 teaspoon of mayonnaise evenly on the bottom half of each toasted bun.
7. Spoon 2 tablespoons of the cooked pork filling onto the mayonnaise-covered bun halves.
8. Drain the pickled vegetables using a slotted spoon and pat them dry with a paper towel to remove excess moisture.
9. Top the pork with 1 tablespoon of the pickled vegetables, followed by a sprinkle of chopped cilantro and 2 slices of jalapeño per slider. Tip: For a milder heat, remove the seeds from the jalapeño before slicing.
10. Place the top halves of the buns over the fillings and press gently to secure.
Yielded from the oven, these sliders offer a delightful contrast of textures: the soft, slightly chewy buns cradle the savory, umami-rich pork, while the pickled vegetables provide a crisp, tangy crunch that cuts through the richness. For a creative presentation, arrange them on a platter with extra cilantro sprigs and serve alongside a light cucumber salad to balance the bold flavors.
Japanese Takoyaki Octopus Balls
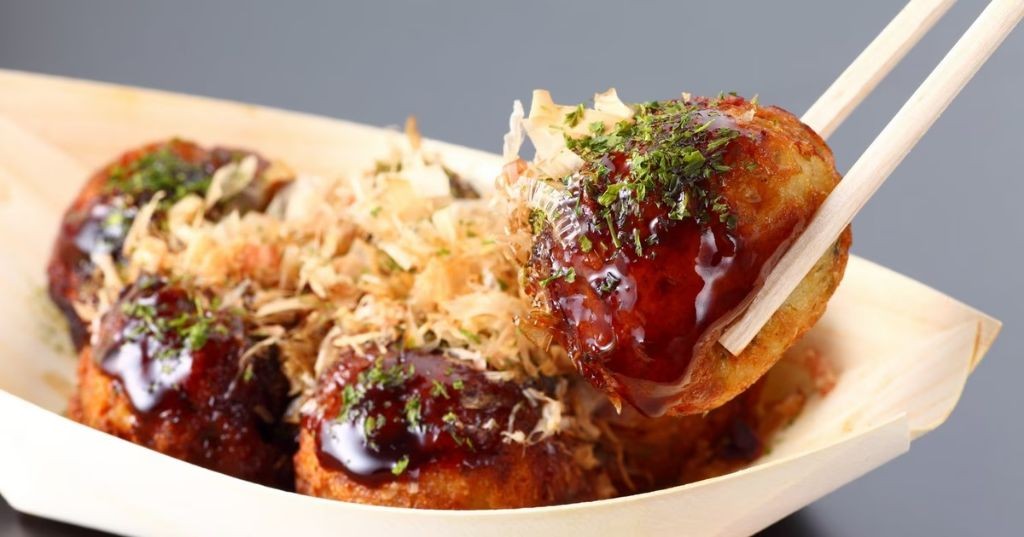
Crafted with precision and bursting with savory delight, Japanese takoyaki octopus balls are a beloved street food treasure that transforms humble ingredients into golden, tender spheres. These bite-sized wonders feature a crisp exterior giving way to a soft, custardy interior, traditionally filled with tender octopus and aromatic garnishes, making them an irresistible centerpiece for any gathering. Mastering this dish at home brings the vibrant energy of a Japanese festival right to your kitchen, offering a delightful culinary adventure that’s both interactive and deeply satisfying.
Serving: 4 | Pre Time: 20 minutes | Cooking Time: 15 minutes
Ingredients
For the Batter:
– 1 cup all-purpose flour
– 2 large eggs
– 1 ½ cups dashi stock (or water with 1 tsp dashi powder)
– 1 tsp soy sauce
For the Filling:
– 4 oz cooked octopus, cut into ½-inch pieces
– ¼ cup finely chopped green onions
– 2 tbsp pickled red ginger (beni shoga), finely chopped
– ¼ cup tenkasu (tempura scraps)
For Cooking and Serving:
– 2 tbsp vegetable oil
– ½ cup takoyaki sauce (or okonomiyaki sauce)
– ¼ cup Japanese mayonnaise
– ½ cup bonito flakes (katsuobushi)
– ½ cup aonori (dried seaweed flakes)
Instructions
1. In a large mixing bowl, whisk together 1 cup all-purpose flour, 2 large eggs, 1 ½ cups dashi stock, and 1 tsp soy sauce until smooth to form the batter, then let it rest for 10 minutes at room temperature to allow the gluten to relax, ensuring a tender texture.
2. Heat a takoyaki pan over medium heat until a drop of water sizzles upon contact, then brush each mold with 2 tbsp vegetable oil using a pastry brush for even coating.
3. Pour the batter into each mold until it is three-quarters full, taking care not to overfill to prevent spillage during cooking.
4. Immediately place 1 piece of 4 oz cooked octopus, a pinch of ¼ cup finely chopped green onions, a pinch of 2 tbsp pickled red ginger, and a pinch of ¼ cup tenkasu into the center of each batter-filled mold.
5. Cook for 3 minutes until the edges start to set and pull away slightly from the molds, then use takoyaki picks or skewers to gently flip each ball 90 degrees, tucking the uncooked batter inside to form a sphere.
6. Continue cooking for 4 minutes, rotating the balls every 60 seconds to ensure even browning on all sides and a crisp, golden exterior.
7. Transfer the cooked takoyaki to a serving plate and brush each ball generously with ½ cup takoyaki sauce using a silicone brush for a glossy finish.
8. Drizzle ¼ cup Japanese mayonnaise in a zigzag pattern over the takoyaki for a creamy contrast.
9. Sprinkle ½ cup bonito flakes and ½ cup aonori evenly over the top, allowing the heat to make the bonito flakes dance enticingly.
Delightfully crisp on the outside with a soft, almost molten center, these takoyaki offer a symphony of textures that meld the briny sweetness of octopus with the tangy punch of ginger and sauce. Serve them piping hot straight from the pan, perhaps with a side of chilled Japanese beer or as part of a larger izakaya-style spread, to fully appreciate their warm, comforting essence and communal appeal.
Chinese Char Siu Pork Buns
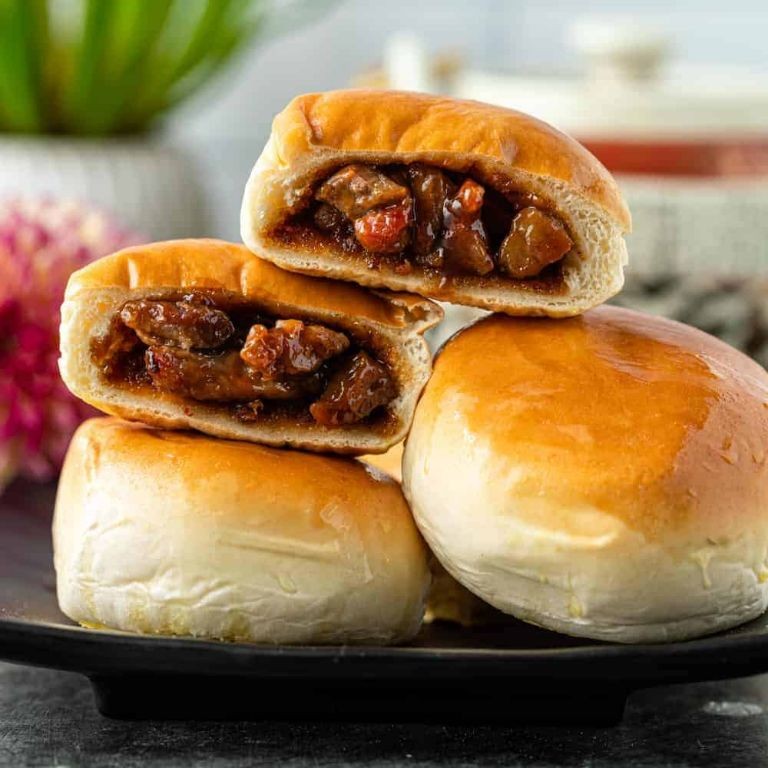
Zesty yet subtly sweet, Chinese Char Siu Pork Buns offer a delightful contrast of soft, pillowy dough enveloping a savory-sweet barbecue pork filling. These steamed buns, known as char siu bao, are a beloved dim sum classic that bring restaurant-quality flavor to your home kitchen. Perfect for gatherings or a special weekend project, they reward patience with their irresistible aroma and tender texture.
Serving: 12 buns | Pre Time: 2 hours 30 minutes (includes rising) | Cooking Time: 15 minutes
Ingredients
For the Dough
– 2 cups all-purpose flour
– 1/4 cup granulated sugar
– 1 tsp active dry yeast
– 1/2 cup warm water (110°F)
– 1 tbsp vegetable oil
For the Filling
– 1 lb char siu pork, finely diced
– 1/4 cup hoisin sauce
– 2 tbsp oyster sauce
– 1 tbsp soy sauce
– 1 tbsp honey
– 1 tsp sesame oil
– 1/2 cup finely chopped yellow onion
– 1 tbsp cornstarch mixed with 2 tbsp water
Instructions
1. In a small bowl, combine warm water (110°F) and yeast, letting it sit for 5 minutes until frothy.
2. In a large mixing bowl, whisk together flour and sugar.
3. Pour the yeast mixture and vegetable oil into the flour mixture, stirring until a shaggy dough forms.
4. Turn the dough onto a lightly floured surface and knead for 8-10 minutes until smooth and elastic.
5. Place the dough in a lightly oiled bowl, cover with a damp cloth, and let rise in a warm place for 1 hour 30 minutes until doubled in size.
6. While the dough rises, heat a tablespoon of vegetable oil in a skillet over medium heat.
7. Sauté the chopped onion for 3-4 minutes until translucent and fragrant.
8. Add the diced char siu pork to the skillet, stirring to combine with the onions.
9. In a small bowl, mix hoisin sauce, oyster sauce, soy sauce, honey, and sesame oil until well blended.
10. Pour the sauce mixture over the pork and onions, stirring to coat evenly.
11. Cook the filling for 2-3 minutes until heated through and slightly thickened.
12. Stir in the cornstarch slurry and cook for an additional 1 minute until the filling is glossy and thick, then remove from heat and let cool completely.
13. Punch down the risen dough and divide it into 12 equal pieces, rolling each into a smooth ball.
14. Flatten each dough ball into a 3-inch circle with slightly thicker edges than the center.
15. Place 1 tablespoon of the cooled filling in the center of each dough circle.
16. Gather the edges of the dough around the filling, pinching and twisting at the top to seal tightly.
17. Place each bun seam-side down on a 2-inch square of parchment paper.
18. Arrange the buns in a steamer basket, leaving 1 inch of space between them to allow for expansion.
19. Cover the steamer and let the buns rest for 20 minutes until slightly puffed.
20. Steam the buns over boiling water for 12-15 minutes until the dough is firm and springs back lightly when touched.
These buns emerge from the steamer with a cloud-like texture that yields to a rich, savory-sweet filling. The tender dough perfectly complements the glossy, caramelized pork, making each bite a harmonious blend of flavors. For a creative twist, serve them alongside a spicy chili crisp dipping sauce or as part of a brunch spread with pickled vegetables.
Indian Samosas with Mint Chutney

On a crisp winter day, few culinary delights rival the aromatic allure of golden, flaky samosas paired with a vibrant mint chutney—a beloved Indian snack that transforms any gathering into a festive occasion. These triangular pastries, filled with a spiced potato and pea mixture, offer a satisfying crunch yielding to a warmly spiced interior, while the zesty chutney provides a refreshing, herbaceous contrast. Perfect for holiday entertaining or a cozy night in, this recipe balances tradition with approachable techniques for impressive results.
Serving: 12 samosas | Pre Time: 45 minutes | Cooking Time: 25 minutes
Ingredients
For the Samosa Dough:
– 2 cups all-purpose flour
– 1/4 cup vegetable oil
– 1/2 teaspoon salt
– 1/2 cup cold water
For the Potato Filling:
– 3 medium russet potatoes, peeled and diced into 1/2-inch cubes
– 2 tablespoons vegetable oil
– 1 teaspoon cumin seeds
– 1/2 cup frozen peas, thawed
– 1 teaspoon ground coriander
– 1/2 teaspoon turmeric powder
– 1/2 teaspoon garam masala
– 1/4 teaspoon cayenne pepper
– 1 teaspoon salt
– 2 tablespoons fresh cilantro, finely chopped
For the Mint Chutney:
– 2 cups fresh mint leaves, packed
– 1/2 cup fresh cilantro leaves, packed
– 1/4 cup plain yogurt
– 1 tablespoon fresh lemon juice
– 1 small green chili, seeded
– 1/2 teaspoon salt
– 1/4 cup cold water
For Frying:
– 4 cups vegetable oil
Instructions
1. In a large bowl, combine 2 cups all-purpose flour, 1/4 cup vegetable oil, and 1/2 teaspoon salt until the mixture resembles coarse crumbs. 2. Gradually add 1/2 cup cold water, mixing until a firm dough forms; knead for 3 minutes until smooth, then cover with a damp cloth and rest for 30 minutes. 3. Place 3 diced potatoes in a pot, cover with water, and boil over high heat for 12 minutes until fork-tender; drain thoroughly and lightly mash, leaving some chunks for texture. 4. Heat 2 tablespoons vegetable oil in a skillet over medium heat; add 1 teaspoon cumin seeds and sizzle for 30 seconds until fragrant. 5. Stir in the boiled potatoes, 1/2 cup thawed peas, 1 teaspoon ground coriander, 1/2 teaspoon turmeric powder, 1/2 teaspoon garam masala, 1/4 teaspoon cayenne pepper, and 1 teaspoon salt; cook for 5 minutes, stirring frequently to blend spices evenly. 6. Remove from heat, fold in 2 tablespoons chopped cilantro, and let the filling cool completely to prevent soggy dough. 7. In a blender, combine 2 cups mint leaves, 1/2 cup cilantro leaves, 1/4 cup yogurt, 1 tablespoon lemon juice, 1 seeded green chili, 1/2 teaspoon salt, and 1/4 cup cold water; blend on high for 1 minute until smooth, then refrigerate until serving. 8. Divide the rested dough into 6 equal balls; roll each into a 6-inch circle on a lightly floured surface, then cut each circle in half to form semicircles. 9. Take one semicircle, moisten the straight edge with water, and fold into a cone shape, pressing the seam to seal. 10. Fill the cone with 2 tablespoons of the cooled potato mixture, leaving a 1/4-inch border at the top. 11. Moisten the open edges with water, press firmly to seal into a triangular pocket, and crimp the edges with a fork for a decorative finish; repeat with remaining dough and filling. 12. In a deep pot, heat 4 cups vegetable oil to 350°F, verified with a kitchen thermometer for consistent frying. 13. Fry 3-4 samosas at a time for 4-5 minutes, turning occasionally, until golden brown and crisp; drain on a wire rack over paper towels. 14. Serve warm samosas immediately with the chilled mint chutney on the side.
Zesty and aromatic, these samosas boast a shatteringly crisp crust that gives way to a fluffy, warmly spiced potato filling, while the mint chutney adds a bright, tangy kick that cuts through the richness. For a creative twist, arrange them on a platter with small bowls of additional chutney or a sprinkle of chaat masala, perfect for dipping alongside a cup of masala chai.
Singaporean Chili Crab Dip
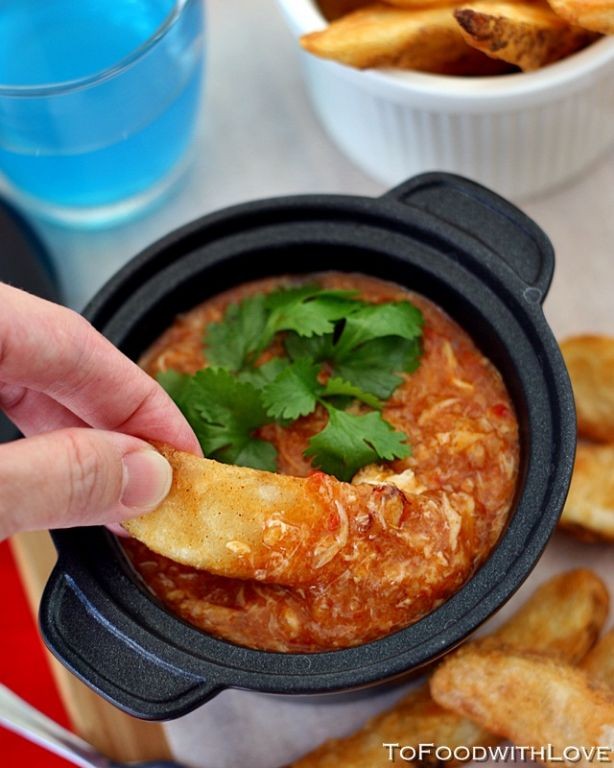
Beneath the festive glow of holiday gatherings, a singular dip emerges to captivate palates with its bold fusion of Southeast Asian flair and American comfort. Singaporean Chili Crab Dip transforms the iconic street food into a shareable masterpiece, where sweet crab meat mingles with a piquant, aromatic sauce that clings perfectly to crisp crackers or toasted bread. This elegant appetizer promises to be the conversation piece of your table, offering a sophisticated departure from traditional dips with its complex layers of flavor.
Serving: 8 | Pre Time: 15 minutes | Cooking Time: 20 minutes
Ingredients
For the base:
– 2 tablespoons vegetable oil
– 1 medium yellow onion, finely chopped
– 4 cloves garlic, minced
– 1 tablespoon fresh ginger, grated
For the sauce:
– 1/4 cup ketchup
– 2 tablespoons soy sauce
– 1 tablespoon rice vinegar
– 1 tablespoon sambal oelek (adjust for heat preference)
– 1 teaspoon granulated sugar
– 1/2 cup chicken broth
For assembly:
– 1 pound lump crab meat, picked over for shells
– 2 green onions, thinly sliced
– 1 tablespoon cornstarch mixed with 2 tablespoons water (slurry)
– 1 large egg, lightly beaten
Instructions
1. Heat vegetable oil in a large skillet over medium heat until shimmering, about 2 minutes.
2. Add chopped onion and cook, stirring frequently, until translucent and soft, 5-7 minutes.
3. Stir in minced garlic and grated ginger, cooking until fragrant, 1 minute.
4. Pour in ketchup, soy sauce, rice vinegar, sambal oelek, and sugar, stirring to combine thoroughly.
5. Add chicken broth and bring mixture to a gentle simmer.
6. Gently fold in lump crab meat, being careful not to break up large pieces.
7. Stir cornstarch slurry into the skillet and cook until sauce thickens slightly, 2-3 minutes.
8. Drizzle beaten egg in a thin stream around the skillet while stirring constantly to create silky ribbons.
9. Remove from heat and stir in sliced green onions.
10. Transfer dip to a serving bowl and serve immediately.
Lusciously creamy with tender chunks of crab, this dip delivers a perfect balance of sweet, savory, and spicy notes that develop as it rests. The glossy sauce clings beautifully to sturdy dippers like pita chips or endive leaves, while a sprinkle of extra green onions adds fresh contrast. For a stunning presentation, serve in a hollowed-out sourdough boule with the torn bread pieces for dipping, allowing guests to savor every last bit of the aromatic sauce.
Summary
Vibrant and versatile, these 18 Asian appetizers are perfect for any gathering, from game day to dinner parties. I hope you find a new favorite to wow your guests! Give a recipe a try, then let me know which one you loved most in the comments below. If you enjoyed this roundup, please share it on Pinterest to help other home cooks discover these delicious bites. Happy cooking!


