On chilly mornings when the frost painted the kitchen window, the scent of banana nut bread would drift through our old farmhouse like a warm embrace. I can still see my grandmother’s flour-dusted hands gently mashing those overripe bananas, her wooden spoon tapping a steady rhythm against the mixing bowl as she hummed hymns from her childhood. This recipe isn’t just about ingredients; it’s a thread woven through generations, connecting my hands to hers, and now, I hope, to yours.
Why This Recipe Works
- Using deeply overripe bananas with blackened skins ensures maximum natural sweetness and a moist, tender crumb that store-bought versions can’t replicate.
- The combination of butter for rich flavor and oil for lasting moisture creates a perfect balance, preventing dryness even days after baking.
- Toasting the walnuts before folding them in unlocks a deeper, nuttier aroma that permeates every bite, transforming a simple addition into the soul of the loaf.
- Allowing the batter to rest for twenty minutes before baking gives the flour time to fully hydrate, resulting in an even texture without unpleasant tunnels or gumminess.
Ingredients
- 3 cups all-purpose flour (spooned and leveled)
- 1 teaspoon baking soda
- ½ teaspoon baking powder
- 1 teaspoon fine sea salt
- 1 teaspoon ground cinnamon
- ½ teaspoon freshly grated nutmeg
- 1 cup (2 sticks) unsalted butter, softened at room temperature for 1 hour
- ½ cup vegetable oil
- 2 cups granulated sugar
- 4 large eggs, at room temperature
- 2 teaspoons pure vanilla extract
- ¼ cup buttermilk, at room temperature
- 2 ½ cups mashed very ripe bananas (about 6 medium bananas with lots of black spots)
- 1 ½ cups chopped walnuts, toasted
Equipment Needed
- Two 9×5-inch loaf pans
- Parchment paper
- Stand mixer or large mixing bowl with hand mixer
- Medium mixing bowl
- Whisk
- Rubber spatula
- Wire cooling rack
- Toothpick or cake tester
Instructions
Prepare Your Pans and Toast the Nuts
Begin by preheating your oven to 350°F, allowing it to fully reach temperature for even baking. While it warms, line your two 9×5-inch loaf pans with parchment paper, letting the edges overhang for easy removal later—a trick my grandmother learned during the Great Depression to save every precious crumb. In a dry skillet over medium-low heat, toast the 1 ½ cups of chopped walnuts for 5 to 7 minutes, stirring frequently until they become fragrant and take on a light golden hue. You’ll know they’re ready when you catch that warm, nutty scent filling your kitchen, reminiscent of autumn afternoons spent shelling pecans on the back porch. Transfer them immediately to a plate to cool completely; this stops the cooking process and prevents bitterness. Tip: For the deepest flavor, toast the walnuts in a single layer and never walk away from the skillet, as they can burn in mere seconds.
Combine the Dry Ingredients
In a medium mixing bowl, whisk together 3 cups of all-purpose flour (remember to spoon it into the measuring cup and level it off—don’t scoop directly from the bag, as that packs in too much flour), 1 teaspoon of baking soda, ½ teaspoon of baking powder, 1 teaspoon of fine sea salt, 1 teaspoon of ground cinnamon, and ½ teaspoon of freshly grated nutmeg. The cinnamon and nutmeg are my own small addition, a whisper of spice that always reminds me of Christmas mornings when Mom would sneak extra into the batter. Whisk for a full minute until every speck of leavening and spice is evenly distributed throughout the flour; this ensures your bread rises uniformly without any bitter pockets of baking soda. As you whisk, imagine the gentle sound like falling snow, a quiet moment before the joyful chaos of mixing begins.
Cream the Butter, Oil, and Sugar
In the bowl of a stand mixer fitted with the paddle attachment, or in a large bowl using a hand mixer, combine 1 cup (2 sticks) of softened unsalted butter, ½ cup of vegetable oil, and 2 cups of granulated sugar. Beat on medium speed for a full 4 to 5 minutes, until the mixture becomes exceptionally pale, fluffy, and almost whipped in texture. You should see the sugar granules nearly dissolve, and the blend will lighten to a creamy off-white color. This step is crucial—it incorporates air, which gives the bread its lovely lift and tender crumb. As it mixes, the rhythmic hum of the machine takes me back to standing on a step-stool beside Grandma, watching her strong arms work the old hand-crank beater with a determination that spoke of love poured into every rotation.
Incorporate Eggs, Vanilla, and Bananas
With the mixer on low speed, add the 4 large room-temperature eggs one at a time, beating for about 30 seconds after each addition until fully incorporated before adding the next. This patience prevents the batter from breaking or curdling. Then, mix in 2 teaspoons of pure vanilla extract and ¼ cup of room-temperature buttermilk, which adds a subtle tang that balances the sweetness. Now, reduce the speed to the lowest setting and gently fold in the 2 ½ cups of mashed very ripe bananas. They should be so soft that they practically melt into the batter, leaving small, sweet pockets throughout. Tip: For the best flavor, use bananas that are almost entirely black on the outside; their starch has fully converted to sugar, giving you natural sweetness without needing extra sugar.
Fold in Dry Ingredients and Walnuts
Turn off the mixer and remove the bowl. Using a large rubber spatula, gently fold in the dry ingredient mixture in three additions, mixing just until no streaks of flour remain—overmixing at this stage will develop the gluten and make the bread tough. Then, fold in the cooled, toasted walnuts until they are evenly distributed. Let the batter rest in the bowl for 20 minutes at room temperature; this allows the flour to hydrate fully and results in a more even, tender texture. As it rests, I often cover it with a clean kitchen towel, the same faded blue one Grandma always used, feeling the quiet anticipation of something wonderful about to emerge from the oven.
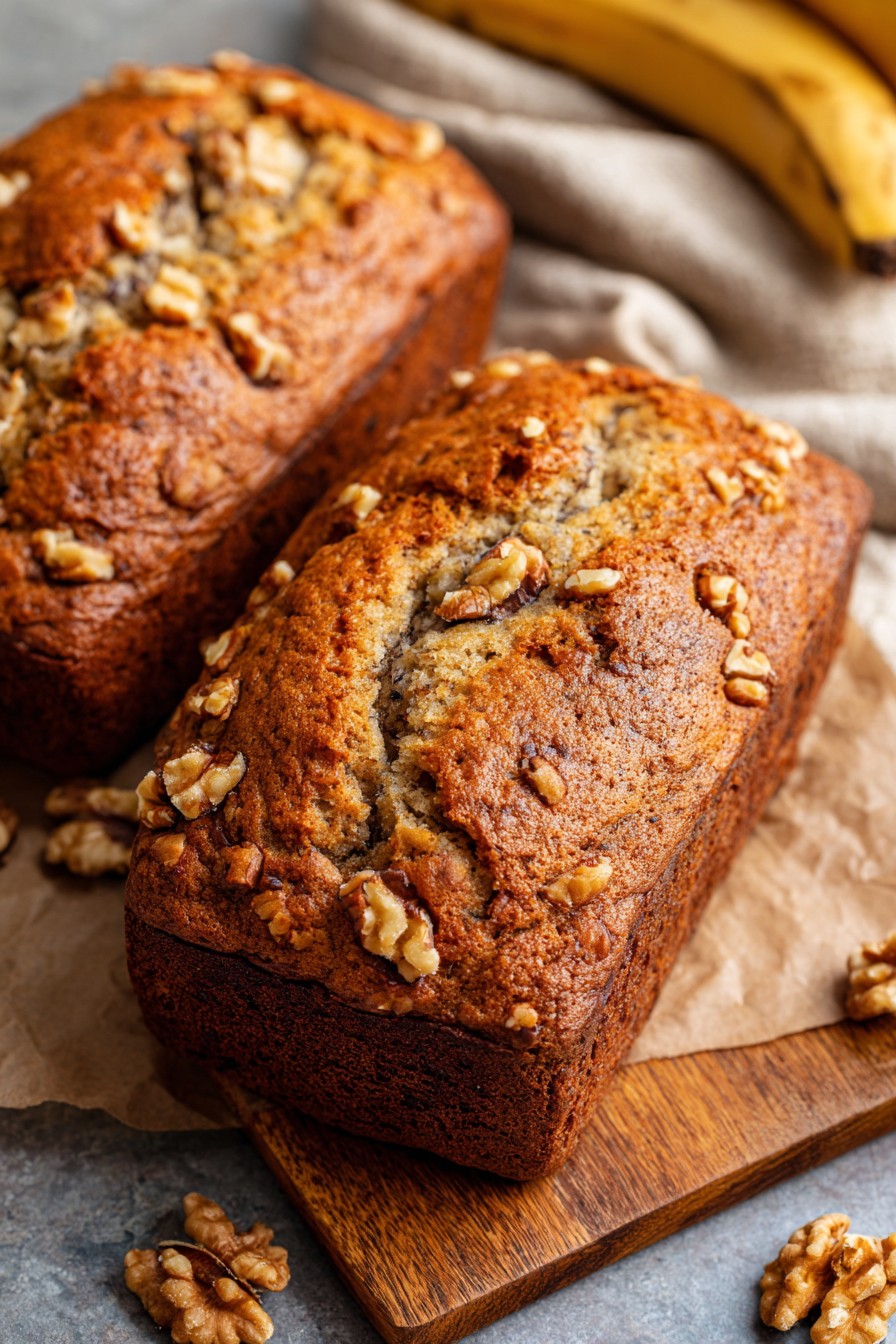
Bake to Golden Perfection
Divide the batter evenly between your two prepared loaf pans, smoothing the tops with the spatula. Place them in the preheated 350°F oven on the center rack, making sure they are not touching each other or the oven walls for proper air circulation. Bake for 60 to 70 minutes, rotating the pans halfway through. The bread is done when the tops are a deep golden brown, the edges pull away slightly from the pans, and a toothpick inserted into the center comes out clean or with a few moist crumbs—but no wet batter. Tip: If the tops begin to brown too quickly after 40 minutes, loosely tent them with aluminum foil to prevent burning while the centers finish cooking.
Cool and Serve with Love
Once baked, transfer the loaves in their pans to a wire cooling rack and let them rest for 15 minutes. Then, using the parchment overhang, carefully lift them out of the pans and place them directly on the rack to cool completely, which will take about 2 hours. This cooling period is essential; slicing too soon will cause the bread to crumble. When ready, use a serrated knife to cut thick, comforting slices. I always think of Dad sneaking a warm slice straight from the rack, his smile powdered with sugar, as Mom pretended to scold him while hiding her own grin. Serve it plain, toasted with a smear of butter, or as my kids love it—lightly warmed with a drizzle of honey.
Tips and Tricks
For an extra-moist loaf, wrap the completely cooled bread tightly in plastic wrap and let it sit overnight at room temperature before slicing; the flavors meld and the texture becomes even more tender. If your bananas aren’t ripe enough, place them on a baking sheet in a 300°F oven for 15-20 minutes until the skins blacken, then let them cool before mashing—this mimics the natural ripening process. To freeze, wrap the cooled loaf (or slices) in plastic wrap followed by aluminum foil; it will keep for up to 3 months. Thaw overnight at room temperature. For a shiny, crackly top crust, brush the batter with a simple syrup (equal parts sugar and water, heated until dissolved) before baking. And remember, baking times can vary with oven accuracy; an oven thermometer is a small investment that ensures perfect results every time.
Recipe Variations
- Chocolate Chip Bliss: Fold in 1 ½ cups of semi-sweet chocolate chips along with the walnuts for a decadent twist that turns this bread into a dessert. The melted chocolate pockets create little bursts of joy in every bite, much like the surprise cookies Grandma would hide in our lunchboxes.
- Streusel-Topped Delight: Before baking, sprinkle the batter with a mixture of ½ cup flour, ½ cup brown sugar, ¼ cup cold cubed butter, and ½ teaspoon cinnamon rubbed together until crumbly. This adds a sweet, crunchy topping that crackles with each slice, evoking memories of coffee cake on Sunday mornings.
- Dairy-Free Adaptation: Replace the butter with an equal amount of coconut oil and use a plant-based milk mixed with 1 teaspoon of lemon juice instead of buttermilk. The coconut oil lends a subtle tropical note that pairs beautifully with the bananas, a nod to simpler times when we’d make do with what we had.
- Spiced Apple Version: Reduce the bananas to 2 cups and add 1 cup of finely chopped, peeled apples and 1 teaspoon of apple pie spice to the dry ingredients. This variation tastes like autumn in a loaf, reminiscent of orchard visits and the first crisp days of fall.
- Gluten-Free Option: Substitute the all-purpose flour with a 1:1 gluten-free baking blend and add ½ teaspoon of xanthan gum to the dry ingredients. It yields a slightly denser but equally delicious bread, ensuring everyone can gather around the table, just as family should.
Frequently Asked Questions
Q: Can I use frozen bananas for this recipe?
A: Absolutely. Thaw frozen bananas completely, drain any excess liquid, and mash them. They work wonderfully and are a great way to save overripe bananas. My mom always kept a bag in the freezer for impromptu baking sessions, turning a dreary day into something sweet.
Q: Why did my bread sink in the middle after baking?
A: This usually means it needed a few more minutes in the oven or the leavening (baking soda/powder) was old. Ensure your ingredients are fresh and test with a toothpick until it comes out clean. Grandma always said patience is the secret ingredient in baking.
Q: Can I make this recipe into muffins instead of loaves?
A: Yes, divide the batter into lined muffin cups and bake at 375°F for 22-27 minutes, until a toothpick comes out clean. They make perfect portable treats, just like the ones we’d pack for picnics by the creek.
Q: How long does banana nut bread stay fresh?
A: Wrapped tightly at room temperature, it stays moist for 3-4 days. For longer storage, freeze it as described above. It never lasts that long in our house—it’s usually gone by the next morning, vanishing like childhood summers.
Q: Can I omit the nuts due to allergies?
A: Certainly, just leave them out. The bread will still be deliciously moist and flavorful. You could add an extra ½ cup of mashed banana or some oats for texture, adapting the recipe to your family’s needs, as cooks have done for generations.
Summary
This banana nut bread is more than a recipe; it’s a legacy of warmth, woven with ripe bananas, toasted walnuts, and the timeless love of family kitchens. Bake it slowly, share it generously, and let its comforting aroma create new memories for years to come.
Grandma's Banana Nut Bread
16
servings30
minutes65
minutesIngredients
Instructions
- 1 Preheat oven to 350°F. Line two 9x5-inch loaf pans with parchment paper. Toast walnuts in a dry skillet over medium-low heat for 5-7 minutes until fragrant, then cool.
- 2 In a medium bowl, whisk flour, baking soda, baking powder, salt, cinnamon, and nutmeg for 1 minute.
- 3 In a large bowl, beat butter, oil, and sugar on medium speed for 4-5 minutes until pale and fluffy.
- 4 On low speed, beat in eggs one at a time. Mix in vanilla and buttermilk. Fold in mashed bananas.
- 5 Gently fold in dry ingredients until just combined, then fold in cooled walnuts. Let batter rest 20 minutes.
- 6 Divide batter between pans. Bake 60-70 minutes at 350°F, until golden and a toothpick comes out clean. Cool in pans 15 minutes, then on a rack completely.