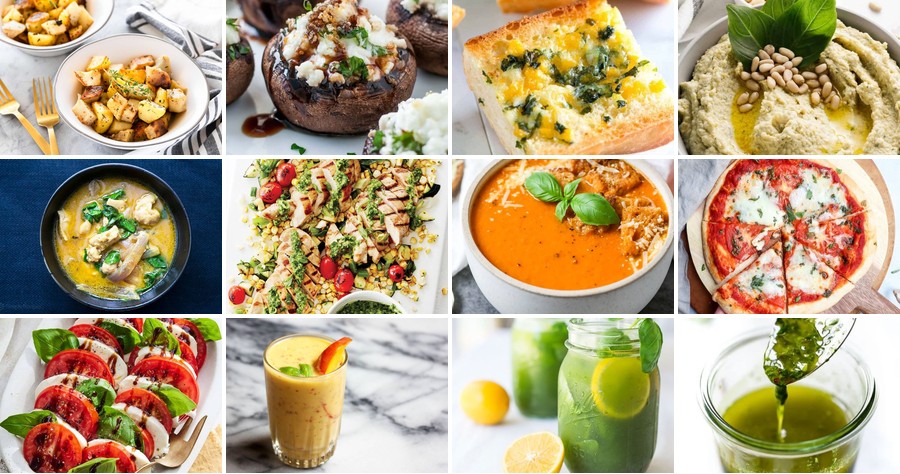
Zesty, aromatic, and wonderfully versatile—basil is the superstar herb that can transform any meal from ordinary to extraordinary. Whether you’re whipping up a quick weeknight dinner or celebrating summer’s bounty, these 20 fresh basil recipes are packed with flavor and perfect for home cooks. Get ready to fall in love with basil all over again as you explore these delicious, easy-to-make dishes!
Caprese Salad with Fresh Basil
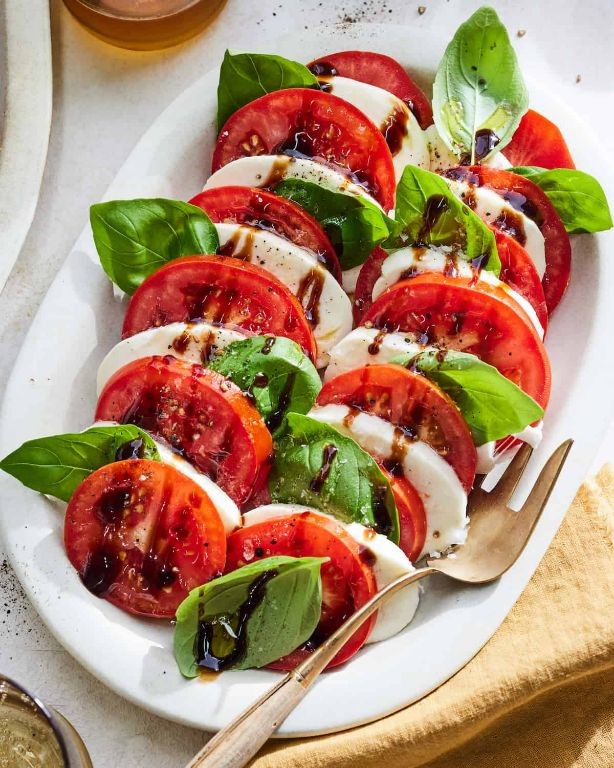
Here’s a classic Italian salad that’s as simple to make as it is beautiful to serve. Perfect for a light lunch or elegant starter, this dish celebrates the vibrant flavors of summer produce with minimal effort. Let’s walk through each step together to ensure your Caprese turns out perfectly every time.
Serving: 4 | Pre Time: 15 minutes | Cooking Time: 0 minutes
Ingredients
– 4 large ripe tomatoes (preferably heirloom for better flavor)
– 16 ounces fresh mozzarella cheese (the ball type, packed in water)
– 1 cup fresh basil leaves (plus extra for garnish)
– 3 tablespoons extra virgin olive oil (or any high-quality olive oil)
– 1 tablespoon balsamic glaze (adjust to taste)
– 1 teaspoon sea salt (flaky salt works best)
– ½ teaspoon freshly ground black pepper
Instructions
1. Wash the tomatoes under cool running water and pat them completely dry with paper towels.
2. Slice each tomato into ¼-inch thick rounds using a sharp chef’s knife for clean cuts.
3. Drain the mozzarella from its packaging liquid and pat it dry with paper towels to prevent a watery salad.
4. Slice the mozzarella into ¼-inch thick rounds that match the size of your tomato slices.
5. Arrange the tomato and mozzarella slices alternately on a large serving platter in a circular or overlapping pattern.
6. Tuck whole basil leaves between the tomato and mozzarella slices throughout the arrangement.
7. Drizzle the olive oil evenly over the entire arrangement using a spoon or oil dispenser.
8. Drizzle the balsamic glaze in a zigzag pattern across the salad for visual appeal.
9. Sprinkle the sea salt evenly over the salad, focusing on the tomato slices where it will enhance flavor.
10. Grind the black pepper directly over the salad using a pepper mill for freshest flavor.
Just before serving, let the salad sit at room temperature for 5 minutes to allow the flavors to meld. The creamy mozzarella contrasts beautifully with the juicy tomatoes, while the basil adds a fresh herbal note that ties everything together. For a creative twist, try stacking individual portions in towers or serving on toasted baguette slices as appetizers.
Tomato Basil Soup

Zesty yet comforting, this tomato basil soup transforms simple ingredients into a velvety, flavorful meal perfect for chilly evenings. Following these clear steps will yield a rich, balanced soup that’s both nourishing and satisfying, ideal for beginners seeking a foolproof recipe.
Serving: 4 | Pre Time: 10 minutes | Cooking Time: 30 minutes
Ingredients
– 2 tablespoons olive oil (or any neutral oil)
– 1 medium yellow onion, diced
– 2 cloves garlic, minced
– 1 (28-ounce) can crushed tomatoes
– 2 cups vegetable broth
– 1/4 cup fresh basil leaves, chopped (plus extra for garnish)
– 1/2 cup heavy cream (or substitute with coconut milk for a dairy-free option)
– 1 teaspoon sugar (adjust to balance acidity)
– Salt and black pepper to taste
Instructions
1. Heat olive oil in a large pot over medium heat until shimmering, about 2 minutes.
2. Add diced onion and cook, stirring occasionally, until translucent and soft, 5–7 minutes.
3. Stir in minced garlic and cook until fragrant, 30 seconds to 1 minute, to avoid burning.
4. Pour in crushed tomatoes and vegetable broth, then bring the mixture to a gentle boil.
5. Reduce heat to low, cover the pot, and simmer for 20 minutes to meld flavors.
6. Remove the pot from heat and stir in chopped basil, heavy cream, and sugar.
7. Use an immersion blender to puree the soup until completely smooth, about 2–3 minutes, or transfer to a countertop blender in batches if needed.
8. Season with salt and black pepper, then return to low heat and warm through for 5 minutes, stirring occasionally.
Velvety and aromatic, this soup boasts a silky texture with bright tomato notes softened by creamy richness. Serve it hot with a swirl of cream and fresh basil leaves, or pair with a grilled cheese sandwich for a classic, cozy meal that’s sure to impress.
Basil Lemonade
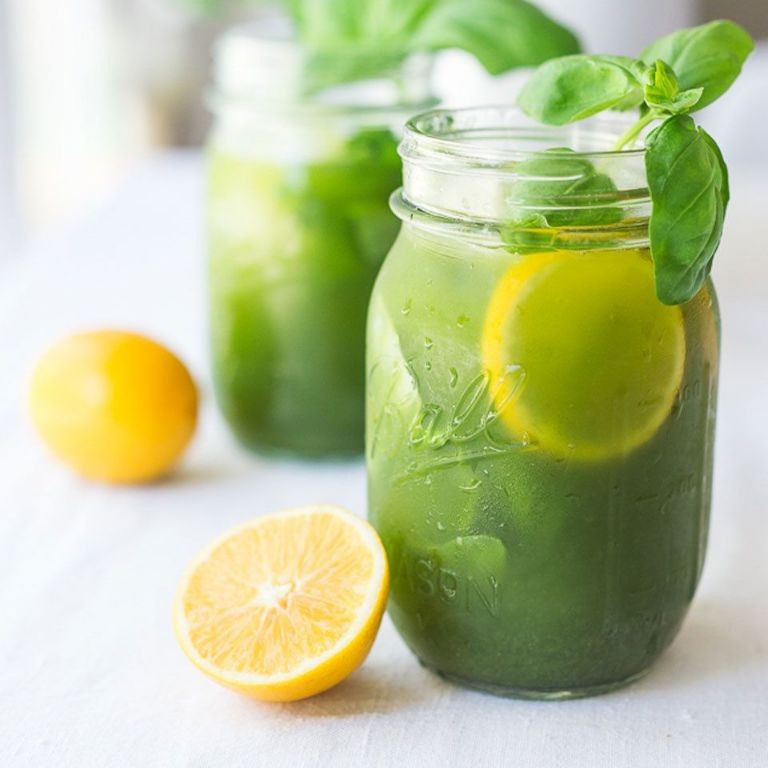
Let’s make a refreshing basil lemonade that’s perfect for any occasion, combining the bright citrus of lemons with the aromatic freshness of basil. This simple recipe requires just a few ingredients and yields a drink that’s both invigorating and easy to customize to your taste preferences. Follow these steps carefully for the best results.
Serving: 4 | Pre Time: 10 minutes | Cooking Time: 0 minutes
Ingredients
– 1 cup fresh basil leaves, packed (about 1 large bunch, washed and patted dry)
– 1 cup granulated sugar (adjust to taste for sweetness)
– 1 cup freshly squeezed lemon juice (from about 6-8 medium lemons, strained to remove seeds)
– 4 cups cold water (use filtered water for a cleaner flavor)
– Ice cubes (as needed for serving)
Instructions
1. In a small saucepan, combine 1 cup of water and 1 cup of granulated sugar over medium heat. Stir constantly with a spoon until the sugar dissolves completely, which should take about 3-5 minutes; do not let it boil to avoid crystallization. Tip: Use a light-colored saucepan to easily monitor the sugar’s dissolution.
2. Remove the saucepan from the heat and add 1 cup of packed fresh basil leaves to the hot sugar syrup. Gently press the leaves with the back of a spoon to release their oils, then let the mixture steep for 10 minutes to infuse the basil flavor.
3. Strain the basil-infused syrup through a fine-mesh sieve into a large pitcher, discarding the basil leaves to prevent bitterness. Tip: Press the leaves lightly with a spoon to extract all the flavorful syrup.
4. Add 1 cup of freshly squeezed lemon juice to the pitcher with the basil syrup, stirring well to combine evenly.
5. Pour in 3 cups of cold water into the pitcher and stir thoroughly to mix all ingredients. Tip: Taste the lemonade and adjust with more water or sugar if desired, but avoid over-diluting.
6. Fill serving glasses with ice cubes, then pour the basil lemonade over the ice. Serve immediately for the freshest taste.
Just made, this basil lemonade offers a crisp, slightly sweet base with a subtle herbal aroma from the basil, creating a balanced and thirst-quenching beverage. The texture is smooth and light, with no pulp if you strained the lemon juice properly. For a creative twist, try garnishing with extra basil leaves or a slice of lemon, or mix in a splash of sparkling water for a fizzy variation that’s perfect for summer gatherings.
Strawberry Basil Sorbet

When the summer heat hits, nothing refreshes like a homemade frozen treat, and this strawberry basil sorbet is a vibrant, herbaceous delight that’s surprisingly simple to make from scratch. We’ll walk through each stage together, from blending the fruit to freezing the mixture, ensuring you achieve that perfect scoopable texture. Let’s get started with the basics.
Serving: 6 | Pre Time: 15 minutes | Cooking Time: 0 minutes
Ingredients
– 1 pound fresh strawberries, hulled and halved (or frozen strawberries, thawed)
– ¾ cup granulated sugar
– ½ cup water
– ¼ cup fresh basil leaves, packed (plus extra for garnish, if desired)
– 2 tablespoons lemon juice, freshly squeezed (adjust to balance sweetness)
– Pinch of salt
Instructions
1. Combine ¾ cup granulated sugar and ½ cup water in a small saucepan over medium heat. Stir constantly until the sugar dissolves completely, about 3–5 minutes, to create a simple syrup; remove from heat and let it cool to room temperature for 10 minutes.
2. Place 1 pound hulled and halved strawberries, ¼ cup packed fresh basil leaves, 2 tablespoons lemon juice, and a pinch of salt in a blender or food processor. Tip: If using frozen strawberries, thaw them first to ensure smooth blending.
3. Pour the cooled simple syrup into the blender with the strawberry mixture. Blend on high speed until completely smooth and no basil flecks remain, about 1–2 minutes. Tip: Taste the mixture now and add more lemon juice if it’s too sweet for your preference.
4. Strain the blended mixture through a fine-mesh sieve into a large bowl to remove any seeds or pulp, pressing with a spatula to extract all liquid; discard the solids.
5. Cover the bowl with plastic wrap, pressing it directly onto the surface of the mixture to prevent a skin from forming. Chill in the refrigerator for at least 2 hours, or until cold to the touch.
6. Pour the chilled mixture into an ice cream maker and churn according to the manufacturer’s instructions, typically 20–25 minutes, until it thickens to a soft-serve consistency. Tip: If you don’t have an ice cream maker, pour the mixture into a shallow dish and freeze, stirring every 30 minutes for 3–4 hours to break up ice crystals.
7. Transfer the churned sorbet to an airtight container, smoothing the top with a spatula. Freeze for at least 4 hours, or until firm enough to scoop.
Vibrant and silky, this sorbet boasts a bright strawberry flavor with a subtle herbal note from the basil, creating a refreshing contrast. Serve it in chilled glasses garnished with fresh basil leaves, or pair it with a drizzle of balsamic reduction for an elegant dessert twist.
Garlic Basil Butter Shrimp
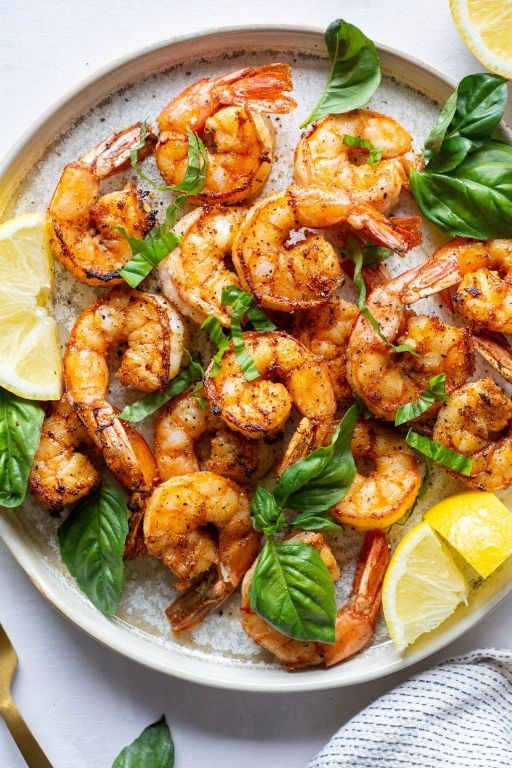
Sometimes the simplest recipes deliver the most impressive flavor, and this Garlic Basil Butter Shrimp is a perfect example. Succulent shrimp are quickly sautéed in a fragrant garlic-basil butter sauce, creating a restaurant-quality dish that comes together in under 20 minutes.
Serving: 4 | Pre Time: 10 minutes | Cooking Time: 8 minutes
Ingredients
– 1 ½ lbs large raw shrimp, peeled and deveined (thawed if frozen)
– 4 tbsp unsalted butter, divided (2 tbsp for cooking, 2 tbsp for finishing)
– 4 cloves garlic, minced (about 1 tbsp)
– ¼ cup fresh basil leaves, thinly sliced (plus extra for garnish)
– 2 tbsp olive oil (or any neutral oil)
– ½ tsp kosher salt
– ¼ tsp freshly ground black pepper
– ¼ tsp red pepper flakes (optional, for a hint of heat)
– 1 tbsp fresh lemon juice (from about ½ a lemon)
Instructions
1. Pat the 1 ½ lbs of shrimp completely dry with paper towels to ensure a good sear.
2. Season the shrimp evenly on both sides with ½ tsp kosher salt and ¼ tsp black pepper.
3. Heat a large skillet over medium-high heat for 1 minute, then add 2 tbsp olive oil.
4. Add the shrimp to the hot skillet in a single layer, cooking for 1 minute and 30 seconds per side until pink and opaque, then transfer to a plate.
5. Reduce the heat to medium-low and melt 2 tbsp of butter in the same skillet.
6. Add the 1 tbsp of minced garlic and cook for 45 seconds to 1 minute, stirring constantly, until fragrant but not browned.
7. Stir in the ¼ cup of sliced fresh basil and ¼ tsp red pepper flakes, cooking for 15 seconds to release their oils.
8. Return the cooked shrimp to the skillet and toss to coat in the garlic-basil butter.
9. Remove the skillet from the heat and stir in the remaining 2 tbsp of cold butter and 1 tbsp of fresh lemon juice until the butter melts and creates a glossy sauce.
10. Taste the sauce and adjust seasoning only if necessary, as the shrimp were pre-seasoned.
Zesty lemon brightens the rich, garlicky butter sauce that clings to each tender shrimp. Serve this immediately over pasta, creamy polenta, or with crusty bread to soak up every last drop of the flavorful sauce.
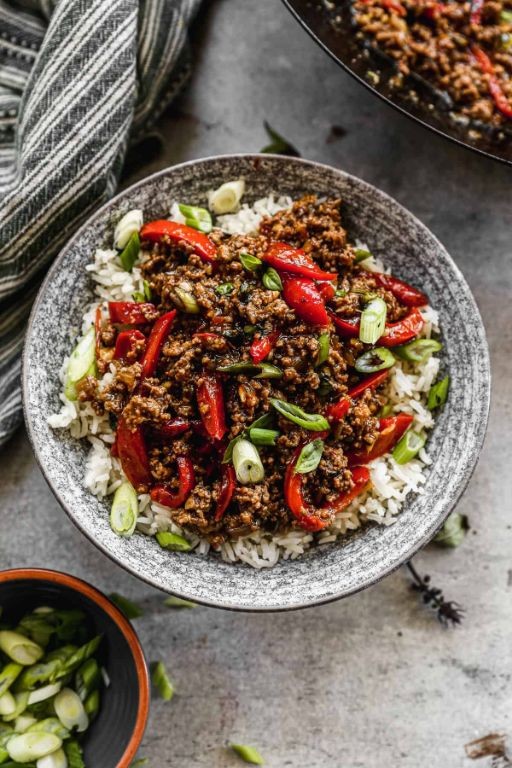
Basil Chicken Stir-Fry
Ready to whip up a quick, flavorful dinner? This Basil Chicken Stir-Fry is a perfect weeknight meal that comes together in under 30 minutes, combining tender chicken with aromatic basil in a savory sauce. Let’s get cooking step-by-step.
Serving: 4 | Pre Time: 15 minutes | Cooking Time: 10 minutes
Ingredients
- 1 lb boneless, skinless chicken breasts, cut into 1-inch pieces
- 2 tbsp soy sauce, or tamari for gluten-free
- 1 tbsp cornstarch
- 2 tbsp vegetable oil, or any neutral oil
- 3 cloves garlic, minced
- 1 red bell pepper, sliced into thin strips
- 1 cup fresh basil leaves, loosely packed
- 1/4 cup chicken broth
- 1 tbsp oyster sauce
- 1 tsp sugar
Instructions
- In a medium bowl, combine the chicken pieces, soy sauce, and cornstarch. Toss until the chicken is evenly coated and let it marinate for 10 minutes at room temperature.
- Heat 1 tablespoon of vegetable oil in a large skillet or wok over medium-high heat until it shimmers, about 1 minute.
- Add the marinated chicken to the hot skillet in a single layer. Cook without stirring for 2 minutes to allow the chicken to develop a golden-brown sear.
- Flip the chicken pieces and cook for another 2 minutes until they are cooked through and no longer pink in the center. Transfer the chicken to a clean plate and set aside.
- Add the remaining 1 tablespoon of vegetable oil to the same skillet. Add the minced garlic and cook for 30 seconds until fragrant, stirring constantly to prevent burning.
- Add the sliced red bell pepper to the skillet. Stir-fry for 2-3 minutes until the pepper is slightly softened but still crisp.
- Pour the chicken broth, oyster sauce, and sugar into the skillet. Stir to combine and bring the sauce to a simmer.
- Return the cooked chicken to the skillet. Toss everything together and cook for 1 minute to allow the chicken to absorb the sauce.
- Remove the skillet from the heat. Stir in the fresh basil leaves until they are just wilted, about 30 seconds.
Light and vibrant, this stir-fry offers tender chicken with a savory-sweet sauce, complemented by the peppery bite of fresh basil. Serve it over steamed rice or noodles for a complete meal, or try it wrapped in lettuce cups for a low-carb twist.
Margherita Pizza with Basil

Sometimes the simplest dishes are the most satisfying, and a classic Margherita Pizza with fresh basil is the perfect example. This recipe breaks down the process into easy-to-follow steps, so you can create a restaurant-quality pizza right in your own kitchen. We’ll focus on achieving that perfect balance of a crisp crust, tangy tomato sauce, and creamy mozzarella.
Serving: 4 | Pre Time: 20 minutes | Cooking Time: 15 minutes
Ingredients
- 1 lb pizza dough, store-bought or homemade (let it rest at room temperature for 30 minutes for easier stretching)
- 1/2 cup pizza sauce (use a high-quality brand or homemade for best flavor)
- 8 oz fresh mozzarella cheese, sliced into 1/4-inch rounds (drain excess liquid on paper towels)
- 1/4 cup fresh basil leaves, plus more for garnish (tear larger leaves for even distribution)
- 2 tbsp extra virgin olive oil, divided (for brushing and drizzling)
- 1/4 tsp kosher salt (adjust to taste)
- 1/4 tsp freshly ground black pepper (adjust to taste)
- All-purpose flour, for dusting (as needed to prevent sticking)
Instructions
- Preheat your oven to 500°F with a pizza stone or baking sheet placed on the middle rack for at least 30 minutes to ensure it’s fully heated.
- Lightly dust a clean work surface with all-purpose flour to prevent the dough from sticking.
- Place the 1 lb pizza dough on the floured surface and gently press it into a flat disc using your fingertips.
- Stretch the dough outward from the center, rotating it as you go, until it forms a 12-inch circle about 1/4-inch thick. Tip: Avoid over-stretching the edges to maintain a thicker crust.
- Transfer the stretched dough to a piece of parchment paper for easy handling.
- Brush the entire surface of the dough with 1 tbsp of extra virgin olive oil, leaving a 1/2-inch border around the edges.
- Spread the 1/2 cup pizza sauce evenly over the oiled dough, again leaving the border clear.
- Arrange the 8 oz sliced fresh mozzarella cheese in a single layer over the sauce.
- Season the pizza evenly with 1/4 tsp kosher salt and 1/4 tsp freshly ground black pepper.
- Carefully slide the parchment paper with the pizza onto the preheated pizza stone or baking sheet in the oven.
- Bake at 500°F for 12-15 minutes, or until the crust is golden brown and the cheese is bubbly and slightly browned. Tip: Rotate the pizza halfway through baking for even cooking.
- Remove the pizza from the oven using oven mitts and place it on a cutting board.
- Immediately top the hot pizza with 1/4 cup fresh basil leaves, tearing any large ones as you go.
- Drizzle the remaining 1 tbsp of extra virgin olive oil over the finished pizza for added flavor. Tip: Let the pizza rest for 2-3 minutes before slicing to allow the cheese to set slightly.
- Slice the pizza into 8 even pieces using a sharp knife or pizza cutter.
Baking this pizza at a high temperature yields a wonderfully crisp crust with a tender interior. The fresh basil adds a bright, aromatic note that complements the creamy mozzarella and tangy sauce perfectly. For a fun twist, try serving it with a side of balsamic glaze for dipping or top with a sprinkle of red pepper flakes for a bit of heat.
Basil Infused Olive Oil

Just as the holiday season brings warmth and flavor, this basil infused olive oil is a simple way to elevate everyday cooking with a fresh, aromatic touch. It’s a versatile staple you can make ahead and use in countless dishes, from drizzling over roasted vegetables to whisking into vinaigrettes. Let’s walk through the process step by step to ensure you get the most vibrant flavor from your herbs.
Serving: 1 cup | Pre Time: 5 minutes | Cooking Time: 5 minutes
Ingredients
– 1 cup extra-virgin olive oil (use a high-quality brand for best flavor)
– 1 cup fresh basil leaves, packed (rinsed and thoroughly dried to prevent oil spoilage)
– 1 small garlic clove, peeled and lightly smashed (optional, for added depth)
– Pinch of salt (adjust to enhance the basil’s natural taste)
Instructions
1. Gather all ingredients and ensure the basil leaves are completely dry by patting them with a clean kitchen towel or using a salad spinner.
2. Place the basil leaves and optional garlic clove in a small, heatproof glass jar or bowl.
3. Heat the olive oil in a small saucepan over low heat until it reaches 180°F, using a kitchen thermometer to monitor the temperature carefully.
4. Pour the warm oil over the basil and garlic in the jar, ensuring they are fully submerged.
5. Let the mixture steep at room temperature for 2 hours, stirring gently once halfway through to distribute the flavors evenly.
6. Strain the oil through a fine-mesh sieve into a clean glass bottle, pressing lightly on the basil with a spoon to extract all the infused oil.
7. Discard the basil and garlic solids, then seal the bottle tightly and store it in the refrigerator for up to two weeks.
Ultimate in versatility, this basil infused olive oil boasts a smooth, herbaceous texture with a bright green hue that intensifies as it chills. Drizzle it over caprese salads, blend it into pesto for an extra layer of basil flavor, or use it as a dipping oil with crusty bread to impress guests effortlessly.
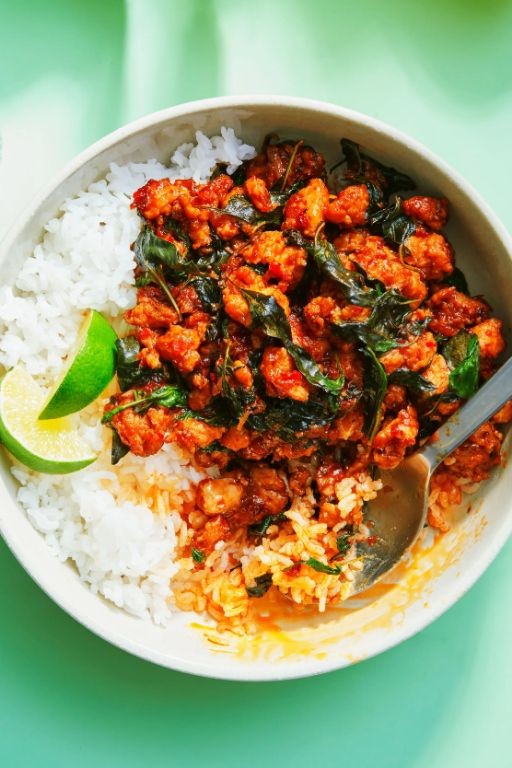
Thai Basil Beef
Here’s a simple, flavorful Thai Basil Beef that comes together in under 30 minutes, perfect for a quick weeknight dinner. This dish balances savory, sweet, and spicy notes with aromatic basil, and I’ll walk you through each step to ensure success, even if you’re new to Thai cooking.
Serving: 4 | Pre Time: 15 minutes | Cooking Time: 10 minutes
Ingredients
– 1 lb ground beef (80/20 blend for best flavor)
– 2 tbsp vegetable oil (or any neutral oil)
– 4 cloves garlic, minced
– 2 Thai chilies, thinly sliced (adjust to heat preference)
– 1 small onion, thinly sliced
– 1 red bell pepper, thinly sliced
– 2 tbsp fish sauce
– 1 tbsp soy sauce
– 1 tbsp oyster sauce
– 1 tsp sugar
– 1 cup fresh Thai basil leaves (or sweet basil if unavailable)
– Cooked jasmine rice, for serving
Instructions
1. Heat a large skillet or wok over medium-high heat until a drop of water sizzles upon contact, about 2 minutes.
2. Add 2 tbsp vegetable oil to the hot skillet and swirl to coat the surface evenly.
3. Add 1 lb ground beef to the skillet, breaking it into small pieces with a spatula.
4. Cook the beef for 4–5 minutes, stirring occasionally, until it is browned and no longer pink.
5. Push the beef to one side of the skillet and add 4 cloves minced garlic and 2 sliced Thai chilies to the empty space.
6. Sauté the garlic and chilies for 30 seconds until fragrant, being careful not to burn them.
7. Stir the beef back into the garlic and chilies to combine everything.
8. Add 1 sliced onion and 1 sliced red bell pepper to the skillet.
9. Cook the vegetables for 3–4 minutes, stirring frequently, until they are tender-crisp.
10. In a small bowl, whisk together 2 tbsp fish sauce, 1 tbsp soy sauce, 1 tbsp oyster sauce, and 1 tsp sugar until the sugar dissolves.
11. Pour the sauce mixture over the beef and vegetables in the skillet.
12. Stir everything together and cook for 1–2 minutes to let the sauce thicken slightly and coat the ingredients.
13. Remove the skillet from the heat and immediately stir in 1 cup fresh Thai basil leaves until they wilt from the residual heat.
14. Serve the Thai Basil Beef hot over cooked jasmine rice.
Crunchy bell peppers and onions contrast beautifully with the tender, savory beef, while the basil adds a fresh, peppery finish that ties it all together. For a fun twist, try serving it in lettuce wraps or topping it with a fried egg for extra richness.
Basil and Pine Nut Hummus
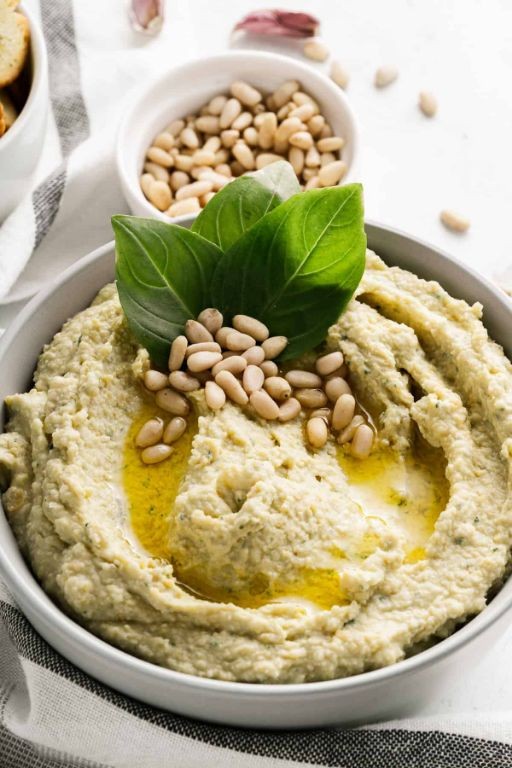
Ready to elevate your snack game with a vibrant twist on a classic dip? This basil and pine nut hummus combines creamy chickpeas with fresh herbal notes and a nutty crunch, perfect for dipping or spreading. Let’s walk through each simple step together to ensure your homemade version turns out perfectly smooth and flavorful.
Serving: 6 | Pre Time: 10 minutes | Cooking Time: 0 minutes
Ingredients
– 1 (15-ounce) can chickpeas, drained and rinsed (reserve ¼ cup liquid)
– ¼ cup tahini, stirred well if separated
– ¼ cup fresh basil leaves, packed (plus extra for garnish)
– 3 tablespoons extra-virgin olive oil, or any neutral oil
– 2 tablespoons lemon juice, freshly squeezed for best flavor
– 1 small garlic clove, minced (adjust to taste)
– 2 tablespoons pine nuts, toasted (see step 2)
– ½ teaspoon salt, adjust to taste
– ¼ teaspoon black pepper, freshly ground
Instructions
1. Toast the pine nuts in a dry skillet over medium heat for 3–4 minutes, stirring constantly until golden brown and fragrant, then set aside to cool completely.
2. In a food processor, combine the chickpeas, tahini, basil, olive oil, lemon juice, garlic, salt, and pepper.
3. Process the mixture on high speed for 1 minute, scraping down the sides with a spatula to ensure even blending.
4. Add 2 tablespoons of the reserved chickpea liquid to the food processor and process for another 30 seconds until the hummus is smooth and creamy.
5. Taste the hummus and adjust seasoning with more salt or lemon juice if desired, processing briefly to incorporate.
6. Transfer the hummus to a serving bowl and use the back of a spoon to create swirls on the surface.
7. Drizzle with an additional tablespoon of olive oil and sprinkle the toasted pine nuts and extra basil leaves over the top.
8. Serve immediately or cover and refrigerate for up to 3 days, bringing to room temperature before serving for best texture.
Buttery from the pine nuts and bright from the basil, this hummus has a luxuriously smooth texture that pairs wonderfully with crisp veggies or warm pita. For a creative twist, try spreading it on sandwiches or using it as a base for a vibrant veggie bowl—it’s versatile enough to shine in any meal.
Basil Mojito

On a hot summer day, nothing refreshes quite like a Basil Mojito—a vibrant twist on the classic cocktail that combines the herbal brightness of fresh basil with zesty lime and cooling mint. This non-alcoholic version is perfect for all ages and occasions, and with just a few simple steps, you can craft a drink that feels both sophisticated and effortlessly easy to make.
Serving: 2 | Pre Time: 10 minutes | Cooking Time: 0 minutes
Ingredients
– 1 cup fresh basil leaves, packed (or substitute with mint for a different herbal note)
– 1/4 cup fresh mint leaves, packed
– 4 tablespoons granulated sugar (adjust to taste for sweetness)
– 4 tablespoons fresh lime juice, from about 2 limes (use bottled juice in a pinch)
– 2 cups club soda, chilled
– 2 cups ice cubes
– Lime wedges, for garnish (optional)
Instructions
1. Wash the basil and mint leaves under cold running water to remove any dirt, then pat them dry gently with a paper towel to prevent diluting the drink.
2. Place the basil leaves, mint leaves, and sugar in a sturdy glass or cocktail shaker.
3. Use a muddler or the back of a spoon to firmly press and twist the leaves with the sugar for about 30 seconds, until the leaves are bruised and fragrant and the sugar starts to dissolve—this releases the essential oils for maximum flavor.
4. Add the fresh lime juice to the muddled mixture and stir well with a spoon to combine all ingredients thoroughly.
5. Divide the ice cubes evenly between two tall glasses, filling each about halfway.
6. Pour the muddled basil-mint-lime mixture evenly over the ice in each glass.
7. Slowly top each glass with 1 cup of chilled club soda, pouring down the side to preserve the bubbles and avoid overflow.
8. Stir each drink gently with a long spoon to mix the flavors without losing carbonation, which helps distribute the herbal notes evenly.
9. Garnish each glass with a lime wedge on the rim if desired, for an extra burst of citrus aroma.
10. Serve immediately while the drink is cold and fizzy for the best experience.
Light and effervescent, this Basil Mojito offers a crisp texture with a harmonious blend of sweet, tart, and herbal notes that dance on the palate. For a creative twist, try serving it over crushed ice with a sprig of extra basil as a garnish, or pair it with grilled seafood to complement its refreshing qualities.
Basil Roasted Potatoes
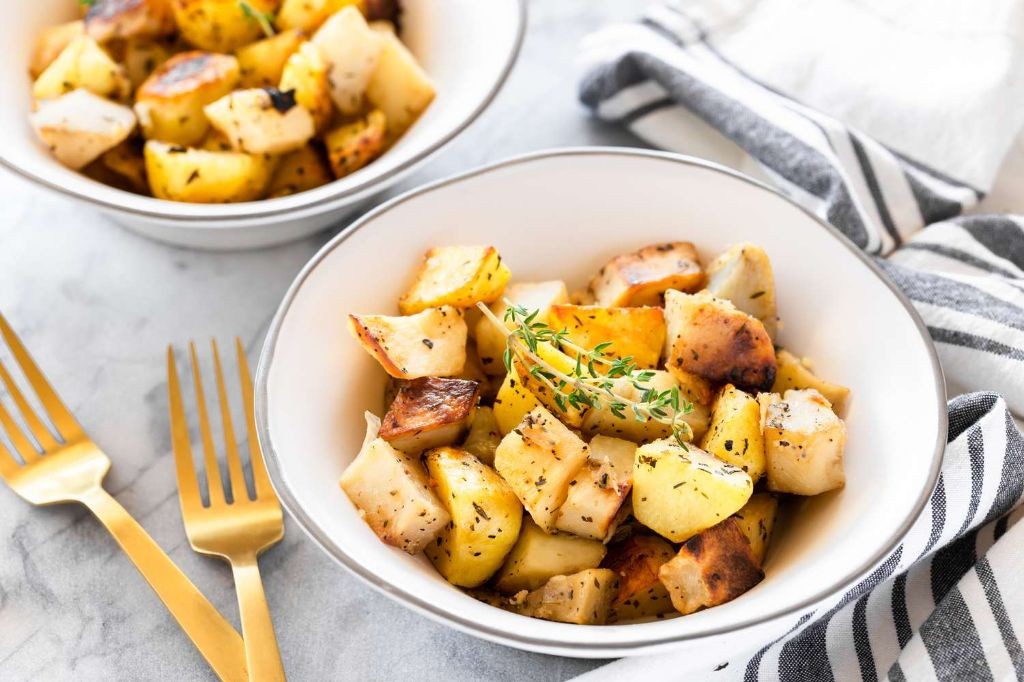
Every home cook needs a reliable side dish that’s both simple and impressive, and these basil roasted potatoes deliver exactly that. With crispy edges, tender centers, and a fragrant herb finish, they’re perfect for weeknight dinners or holiday gatherings. Let’s walk through the process step-by-step to ensure your potatoes turn out perfectly every time.
Serving: 4 | Pre Time: 10 minutes | Cooking Time: 30 minutes
Ingredients
- 2 pounds Yukon Gold potatoes, cut into 1-inch cubes (or any waxy potato variety)
- 3 tablespoons olive oil (or any neutral oil)
- 1/4 cup fresh basil leaves, finely chopped (packed for maximum flavor)
- 3 cloves garlic, minced (adjust to taste)
- 1 teaspoon kosher salt (plus more for seasoning)
- 1/2 teaspoon black pepper, freshly ground
Instructions
- Preheat your oven to 425°F (218°C) and line a large baking sheet with parchment paper for easy cleanup.
- Place the cubed potatoes in a large mixing bowl and drizzle with olive oil, tossing to coat evenly.
- Add the minced garlic, chopped basil, kosher salt, and black pepper to the bowl, then toss again until the potatoes are well-seasoned.
- Spread the potatoes in a single layer on the prepared baking sheet, ensuring they aren’t crowded to promote even browning.
- Roast in the preheated oven for 15 minutes, then remove the baking sheet and use a spatula to flip the potatoes for uniform crispiness.
- Return the baking sheet to the oven and continue roasting for another 15 minutes, or until the potatoes are golden brown and fork-tender.
- Remove the baking sheet from the oven and let the potatoes rest for 5 minutes to allow the flavors to meld before serving.
Perfectly roasted potatoes should have a crispy, golden exterior with a fluffy, tender interior that melts in your mouth. The basil infuses a fresh, aromatic note that pairs beautifully with grilled meats or as a standalone snack. For a creative twist, try sprinkling with grated Parmesan cheese right after baking or serving alongside a creamy aioli dip.
Basil and Tomato Bruschetta

Finally, a classic appetizer that’s as simple as it is impressive: basil and tomato bruschetta. Fresh, vibrant, and perfect for any gathering, this recipe walks you through each step to ensure crisp, flavorful bites every time.
Serving: 4 | Pre Time: 15 minutes | Cooking Time: 10 minutes
Ingredients
– 1 baguette, sliced into ½-inch thick pieces (about 12 slices)
– 2 large ripe tomatoes, diced (about 2 cups)
– ¼ cup fresh basil leaves, thinly sliced
– 2 cloves garlic, minced (or 1 tsp garlic powder for convenience)
– 2 tbsp extra virgin olive oil, plus more for brushing
– 1 tbsp balsamic vinegar
– ¼ tsp salt (adjust to taste)
– ⅛ tsp black pepper
Instructions
1. Preheat your oven to 400°F (200°C) and line a baking sheet with parchment paper.
2. Arrange the baguette slices in a single layer on the baking sheet.
3. Lightly brush the top of each slice with olive oil using a pastry brush or spoon.
4. Bake the slices for 8–10 minutes, or until golden brown and crisp around the edges.
5. While the bread toasts, combine the diced tomatoes, sliced basil, minced garlic, 2 tbsp olive oil, balsamic vinegar, salt, and black pepper in a medium bowl.
6. Gently stir the mixture until all ingredients are evenly coated, being careful not to crush the tomatoes.
7. Remove the toasted baguette slices from the oven and let them cool for 2–3 minutes to firm up slightly.
8. Spoon the tomato-basil mixture generously onto each toasted slice, ensuring an even distribution.
9. Serve immediately to maintain the bread’s crisp texture against the juicy topping.
Often, the contrast of the crunchy bread with the juicy, herb-infused tomatoes makes each bite a delight. For a creative twist, try adding a sprinkle of crumbled feta or a drizzle of aged balsamic reduction just before serving.
Basil Coconut Curry
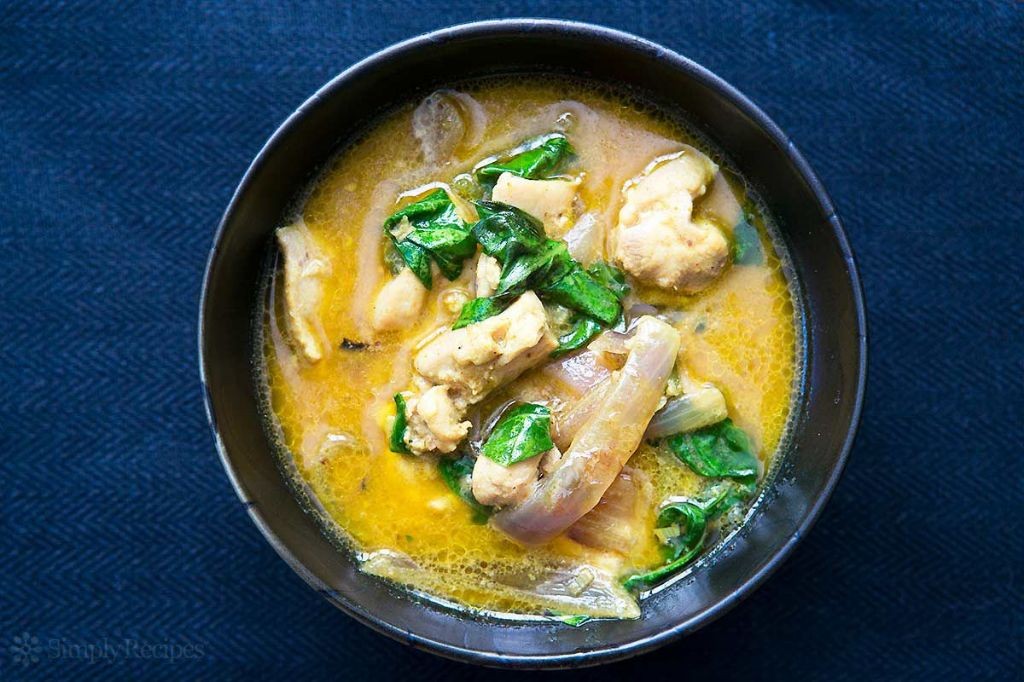
Savor the aromatic blend of fresh basil and creamy coconut in this comforting curry that transforms simple ingredients into a vibrant, satisfying meal. This recipe guides you through each stage with precision, ensuring even beginners achieve a perfectly balanced dish with layers of flavor and texture.
Serving: 4 | Pre Time: 15 minutes | Cooking Time: 25 minutes
Ingredients
– 2 tbsp vegetable oil (or any neutral oil)
– 1 medium yellow onion, finely diced
– 3 cloves garlic, minced
– 1 tbsp fresh ginger, grated
– 2 tbsp red curry paste (adjust for spiciness)
– 1 (13.5 oz) can full-fat coconut milk
– 1 cup vegetable broth
– 1 lb boneless, skinless chicken thighs, cut into 1-inch pieces (or firm tofu for a vegetarian option)
– 1 red bell pepper, sliced into thin strips
– 1 cup fresh basil leaves, loosely packed
– 1 tbsp fish sauce (or soy sauce for a vegan alternative)
– 1 tbsp lime juice
– Cooked jasmine rice for serving
Instructions
1. Heat 2 tbsp vegetable oil in a large skillet or Dutch oven over medium heat until shimmering, about 2 minutes.
2. Add 1 diced onion and cook, stirring occasionally, until softened and translucent, 5-7 minutes.
3. Stir in 3 minced garlic cloves and 1 tbsp grated ginger, cooking for 1 minute until fragrant to prevent burning.
4. Mix in 2 tbsp red curry paste, coating the aromatics evenly and toasting for 30 seconds to deepen the flavor.
5. Pour in 1 can coconut milk and 1 cup vegetable broth, stirring to combine and bring to a gentle simmer.
6. Add 1 lb chicken pieces, ensuring they are submerged, and simmer uncovered for 10 minutes until cooked through (internal temperature 165°F).
7. Incorporate 1 sliced red bell pepper and cook for 5 minutes until slightly tender but still crisp.
8. Remove from heat and stir in 1 cup basil leaves, 1 tbsp fish sauce, and 1 tbsp lime juice, letting the residual heat wilt the basil.
9. Serve immediately over cooked jasmine rice.
Oozing with creamy richness from the coconut milk, this curry boasts a velvety texture that clings to each grain of rice, while the fresh basil adds a bright, herbal finish. For a creative twist, try spooning it over roasted sweet potatoes or pairing it with naan bread to soak up every last drop of the fragrant sauce.
Basil Lime Grilled Chicken
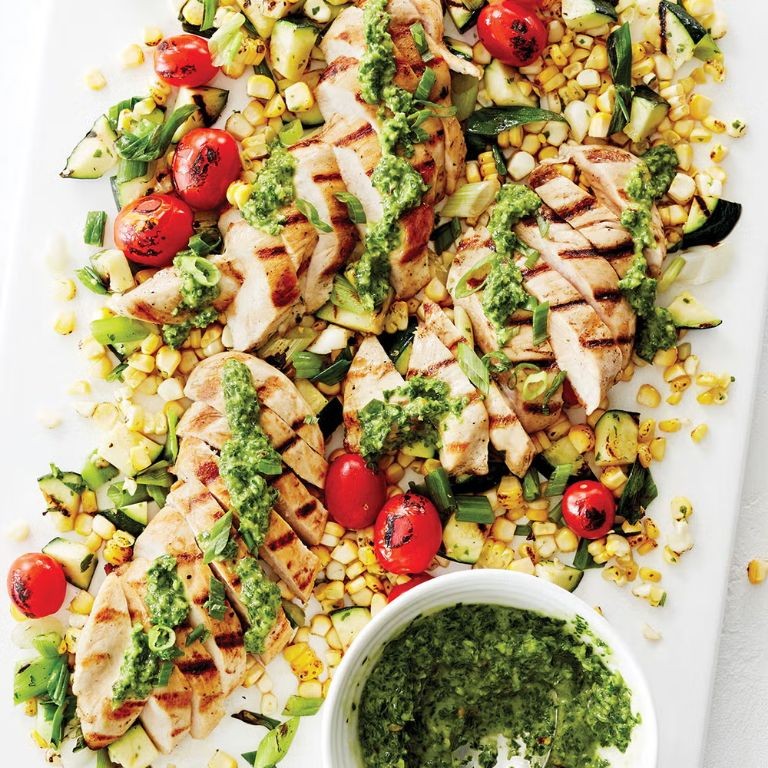
Unlock the vibrant flavors of summer any time of year with this Basil Lime Grilled Chicken. This recipe transforms simple chicken breasts into a zesty, herbaceous main course perfect for weeknight dinners or weekend gatherings, using a straightforward marinade and reliable grilling technique.
Serving: 4 | Pre Time: 15 minutes | Cooking Time: 12 minutes
Ingredients
– 4 boneless, skinless chicken breasts (about 6 oz each, pounded to even ¾-inch thickness for uniform cooking)
– ½ cup fresh basil leaves, packed (plus extra for garnish)
– ¼ cup fresh lime juice (from about 2 limes, zest one lime first)
– 3 tbsp olive oil (or any neutral oil like avocado oil)
– 2 cloves garlic, minced
– 1 tsp honey (adjust to taste for sweetness)
– ¾ tsp kosher salt
– ½ tsp freshly ground black pepper
Instructions
1. Zest one lime using a microplane or fine grater, then juice all limes to yield ¼ cup of juice.
2. In a blender or food processor, combine the basil leaves, lime juice, lime zest, olive oil, minced garlic, honey, kosher salt, and black pepper; blend on high speed for 30 seconds until smooth to create the marinade.
3. Place the chicken breasts in a large resealable plastic bag or shallow dish, and pour the marinade over them, ensuring all pieces are fully coated.
4. Seal the bag or cover the dish, and refrigerate for at least 30 minutes or up to 4 hours to allow flavors to penetrate; for best results, do not exceed 4 hours as the acid can start to break down the chicken.
5. Preheat an outdoor grill or grill pan to medium-high heat, about 400°F, and lightly oil the grates to prevent sticking.
6. Remove the chicken from the marinade, letting excess drip off, and discard the used marinade for food safety.
7. Place the chicken on the preheated grill and cook for 6 minutes without moving to develop grill marks.
8. Flip the chicken using tongs and cook for an additional 5–6 minutes, until the internal temperature reaches 165°F when checked with a meat thermometer inserted into the thickest part.
9. Transfer the grilled chicken to a clean plate, tent loosely with foil, and let it rest for 5 minutes to allow juices to redistribute.
10. Slice the chicken against the grain and garnish with extra fresh basil leaves before serving.
Tender and juicy with a bright citrus punch from the lime, this chicken boasts a beautiful char from the grill that complements the fresh basil aroma. Serve it sliced over a bed of quinoa or alongside grilled vegetables for a complete meal, or chop it up for a vibrant salad topping that highlights its herbaceous notes.
Basil and Goat Cheese Stuffed Mushrooms
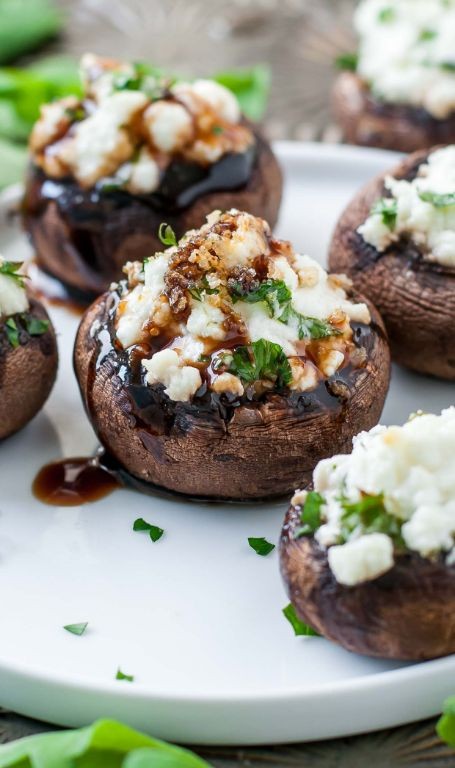
Now, let’s create a simple yet elegant appetizer that’s perfect for holiday gatherings or cozy nights in. These stuffed mushrooms combine earthy flavors with creamy tang, requiring just a few basic techniques. Follow along step-by-step for guaranteed success.
Serving: 12 | Pre Time: 15 minutes | Cooking Time: 20 minutes
Ingredients
– 12 large cremini mushrooms, stems removed (about 1.5 inches wide)
– 4 oz goat cheese, softened at room temperature
– 1/4 cup fresh basil leaves, finely chopped (or substitute with parsley)
– 2 tbsp olive oil (or any neutral oil)
– 1/4 tsp garlic powder
– 1/4 tsp black pepper
– 1/8 tsp salt
Instructions
1. Preheat your oven to 375°F and line a baking sheet with parchment paper.
2. Gently wipe each mushroom cap with a damp paper towel to remove any dirt—avoid rinsing them, as they can become soggy.
3. In a small bowl, combine the softened goat cheese, chopped basil, garlic powder, black pepper, and salt until fully mixed.
4. Spoon about 1 teaspoon of the goat cheese mixture into each mushroom cap, pressing lightly to fill it evenly without overstuffing.
5. Drizzle the olive oil over the stuffed mushrooms, ensuring each one is lightly coated to promote browning.
6. Bake the mushrooms on the middle rack for 18–20 minutes, until the cheese is slightly golden and the mushrooms are tender when pierced with a fork.
7. Remove the baking sheet from the oven and let the mushrooms cool for 5 minutes before serving to allow the flavors to meld.
Just out of the oven, these mushrooms offer a delightful contrast: the caps are tender and juicy, while the filling is creamy with a hint of herbal freshness from the basil. For a festive twist, sprinkle them with toasted pine nuts or serve alongside a light arugula salad to balance the richness.
Basil Garlic Bread

You’ve probably had garlic bread before, but this basil garlic bread takes the classic to a whole new level with fresh, fragrant basil and a perfectly crisp, golden crust. It’s a simple yet impressive side that pairs wonderfully with pasta, soups, or even stands alone as a tasty snack. Let’s walk through each step together so you can make it with confidence.
Serving: 6 | Pre Time: 10 minutes | Cooking Time: 15 minutes
Ingredients
– 1 loaf French bread (about 16 inches long, or use a baguette for smaller portions)
– ½ cup unsalted butter, softened (or use salted butter and reduce added salt)
– 4 cloves garlic, minced (about 1 tablespoon, adjust for more or less intensity)
– ¼ cup fresh basil leaves, finely chopped (packed, or substitute with 1 tablespoon dried basil if fresh isn’t available)
– ¼ teaspoon salt (omit if using salted butter)
– ¼ teaspoon black pepper (freshly ground preferred for better flavor)
– ¼ cup grated Parmesan cheese (optional, for extra richness)
Instructions
1. Preheat your oven to 375°F (190°C) and line a baking sheet with parchment paper or aluminum foil for easy cleanup.
2. Slice the French bread loaf in half lengthwise using a serrated knife to get clean cuts without squishing the bread.
3. In a small mixing bowl, combine the softened butter, minced garlic, chopped basil, salt, and black pepper; mix thoroughly with a fork or spoon until all ingredients are evenly distributed. Tip: Let the butter sit at room temperature for 30 minutes beforehand to make mixing easier.
4. Spread the butter mixture evenly over the cut sides of both bread halves, covering from edge to edge to ensure every bite is flavorful.
5. Sprinkle the grated Parmesan cheese evenly over the buttered bread halves if using, pressing it gently into the butter to help it adhere during baking.
6. Place the bread halves, buttered-side up, on the prepared baking sheet and bake in the preheated oven for 12–15 minutes, or until the edges are golden brown and the butter is bubbly. Tip: Check at the 10-minute mark to prevent burning, as oven temperatures can vary.
7. Remove the baking sheet from the oven using oven mitts and let the bread cool on the sheet for 2–3 minutes to set slightly before slicing. Tip: For extra crispiness, broil on high for 1–2 minutes at the end, but watch closely to avoid charring.
8. Slice the baked bread halves into 1-inch thick pieces with a sharp knife and serve immediately while warm.
When you pull this basil garlic bread from the oven, it’ll have a satisfying crunch on the outside with a soft, buttery interior infused with the aromatic blend of garlic and fresh basil. The optional Parmesan adds a savory depth that makes it irresistible alongside a bowl of tomato soup or as a starter for dinner parties. For a creative twist, try topping it with a sprinkle of red pepper flakes or serving it with a side of marinara sauce for dipping.
Basil Peach Smoothie
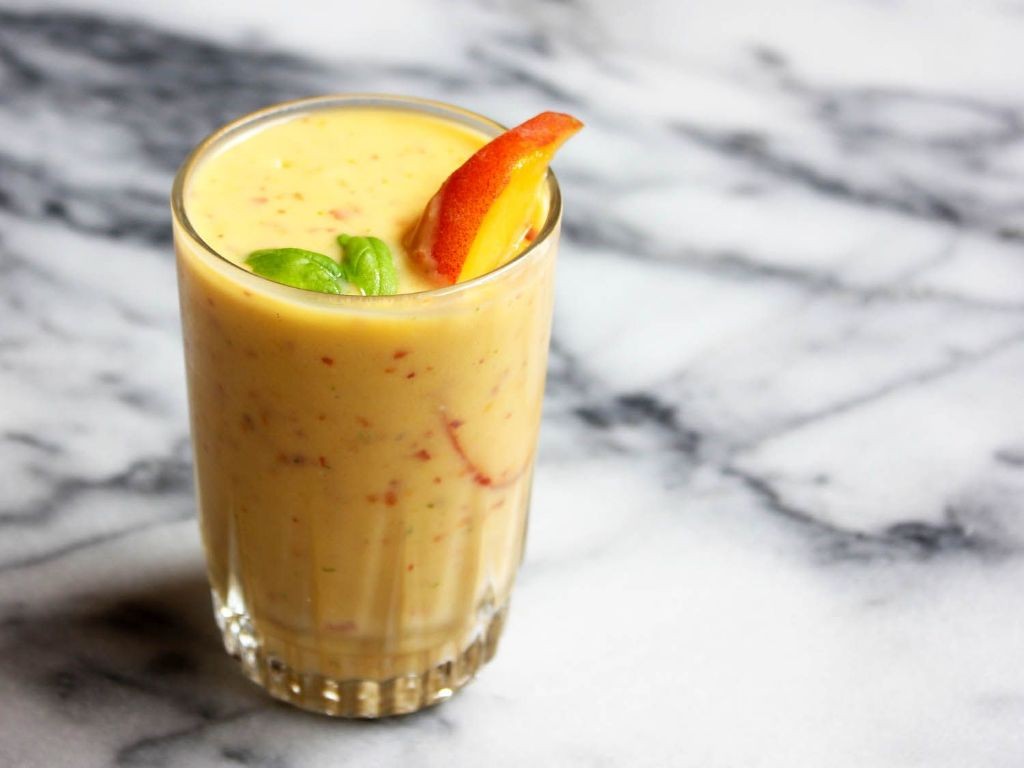
Zesty yet refreshing, this Basil Peach Smoothie is the perfect summer cooler that combines sweet fruit with aromatic herbs. You’ll be amazed at how these simple ingredients transform into a vibrant, restaurant-worthy drink in just minutes. Let’s walk through each step together to ensure your smoothie turns out perfectly creamy and flavorful every time.
Serving: 2 | Pre Time: 5 minutes | Cooking Time: 0 minutes
Ingredients
– 2 cups frozen peach slices (fresh peaches work too, but frozen yields a thicker texture)
– 1 cup plain Greek yogurt (for extra creaminess; substitute with almond milk for a dairy-free option)
– 1/4 cup fresh basil leaves (packed lightly; adjust to taste for more or less herbal flavor)
– 2 tablespoons honey (or maple syrup as a vegan alternative)
– 1 cup ice cubes (optional, use if peaches aren’t frozen to achieve a chilled consistency)
Instructions
1. Gather all ingredients and a high-speed blender to ensure a smooth, lump-free texture.
2. Add 2 cups of frozen peach slices to the blender first, as this helps break them down evenly.
3. Pour in 1 cup of plain Greek yogurt, which adds protein and a rich, creamy base to the smoothie.
4. Place 1/4 cup of fresh basil leaves into the blender; tear them slightly if large to release more flavor.
5. Drizzle 2 tablespoons of honey over the ingredients to sweeten naturally without overpowering the fruit.
6. If using, add 1 cup of ice cubes now to chill the mixture further and enhance thickness.
7. Secure the blender lid tightly and blend on high speed for 45-60 seconds, or until completely smooth with no visible chunks.
8. Stop the blender and scrape down the sides with a spatula to incorporate any unblended bits, then blend for another 15 seconds.
9. Pour the smoothie immediately into two glasses to serve fresh, as it can separate if left sitting.
This smoothie boasts a velvety texture with a delightful balance of sweet peaches and peppery basil. Try garnishing with a fresh basil leaf or a peach slice for an elegant touch, or enjoy it as a quick breakfast or post-workout refresher.
Basil and Mozzarella Stuffed Chicken
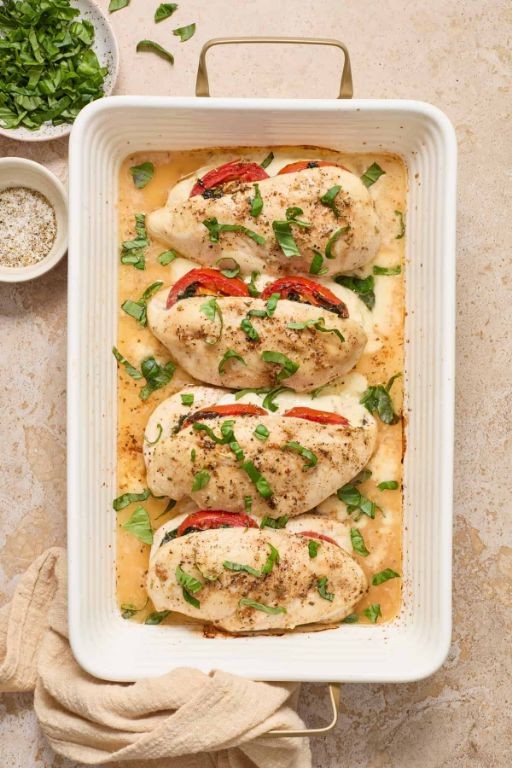
You’ve probably stared at a plain chicken breast and wondered how to make it exciting without much fuss. This basil and mozzarella stuffed chicken transforms that simple cut into a juicy, flavorful centerpiece with minimal effort, perfect for a weeknight dinner or a casual gathering.
Serving: 4 | Pre Time: 15 minutes | Cooking Time: 25 minutes
Ingredients
– 4 boneless, skinless chicken breasts (about 6 oz each)
– 1 cup shredded mozzarella cheese (low-moisture works best for less oozing)
– 1/4 cup fresh basil leaves, chopped (or 1 tbsp dried basil if fresh isn’t available)
– 2 cloves garlic, minced (adjust to taste)
– 1/2 cup all-purpose flour (for dredging)
– 2 large eggs, beaten (helps the coating stick)
– 1 cup Italian-seasoned breadcrumbs (or plain breadcrumbs with 1 tsp dried Italian herbs)
– 2 tbsp olive oil (or any neutral oil)
– 1/2 tsp salt (adjust based on cheese saltiness)
– 1/4 tsp black pepper
Instructions
1. Preheat your oven to 375°F (190°C) and line a baking sheet with parchment paper.
2. Place a chicken breast on a cutting board and use a sharp knife to slice a horizontal pocket into the thickest side, being careful not to cut all the way through.
3. In a small bowl, combine the shredded mozzarella, chopped basil, minced garlic, salt, and pepper until evenly mixed.
4. Stuff each chicken pocket with about 2 tablespoons of the cheese mixture, pressing gently to seal the edges.
5. Set up three shallow dishes: place the flour in the first, beaten eggs in the second, and breadcrumbs in the third.
6. Dredge each stuffed chicken breast first in the flour, shaking off any excess, then dip it fully into the eggs, and finally coat it evenly with the breadcrumbs, pressing lightly to adhere.
7. Heat the olive oil in a large oven-safe skillet over medium-high heat until it shimmers, about 2 minutes.
8. Add the chicken breasts to the skillet and sear for 3-4 minutes per side, until golden brown and crisp.
9. Transfer the skillet to the preheated oven and bake for 15-18 minutes, until the internal temperature reaches 165°F (74°C) when checked with a meat thermometer.
10. Remove from the oven and let the chicken rest for 5 minutes on a cutting board before slicing.
Cutting into this dish reveals a gooey, melted mozzarella center infused with aromatic basil, while the crispy breadcrumb coating adds a satisfying crunch. Serve it sliced over a bed of pasta with marinara sauce or alongside roasted vegetables for a complete meal that feels restaurant-worthy.
Summary
My goodness, what a flavorful journey! From pesto pasta to caprese salads, these 20 fresh basil recipes prove how versatile this herb can be in your kitchen. I hope you’ll try a few, leave a comment with your favorite, and share this roundup on Pinterest to spread the basil love. Happy cooking!


