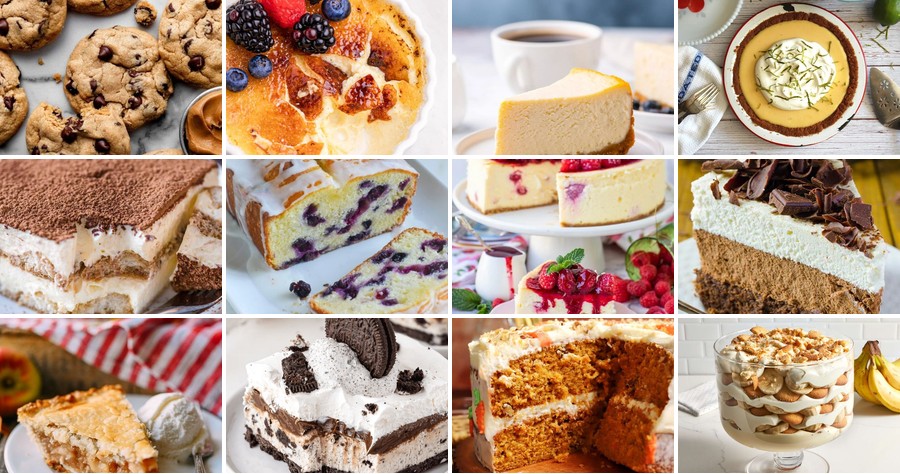
Whether you’re craving a quick chocolate fix or dreaming of a show-stopping seasonal finale, we’ve got the sweet solution. From cozy classics to modern twists, these 13 irresistible dessert recipes are guaranteed to satisfy every sweet tooth. Get ready to find your next favorite treat—let’s dive into this delicious roundup!
Homemade Tiramisu
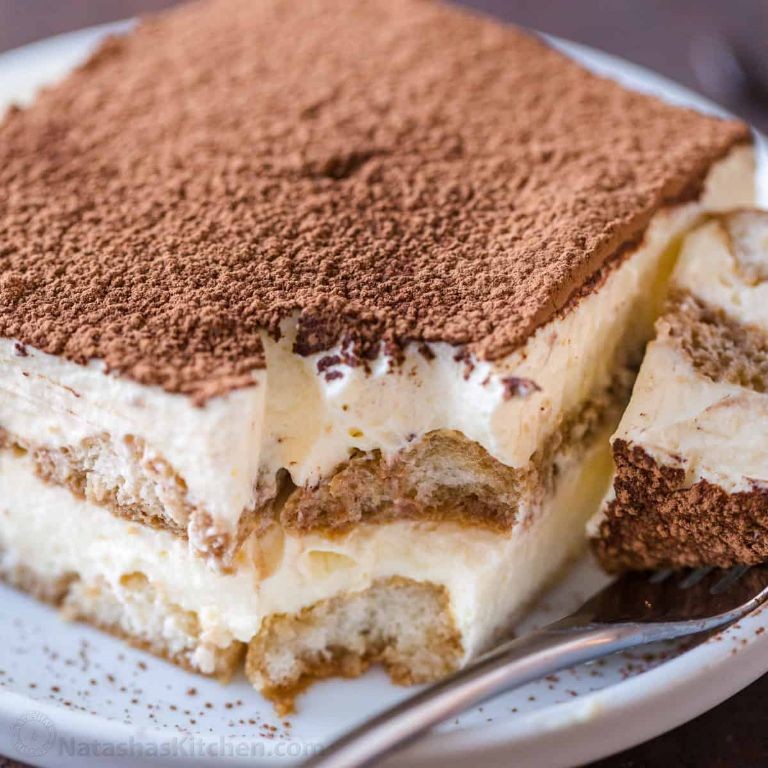
Baking this homemade tiramisu always reminds me of my first trip to Italy, where I fell in love with its creamy, coffee-soaked layers—it’s the perfect make-ahead dessert for holiday gatherings like Christmas Eve tonight. I’ve tweaked the classic recipe over the years to keep it simple yet indulgent, and I’m sharing my go-to version below, complete with all the little tricks I’ve picked up along the way.
Serving: 8 | Pre Time: 30 minutes | Cooking Time: 0 minutes
Ingredients
– 1 package of ladyfinger cookies (about 24 cookies)
– 1 and 1/2 cups of strong brewed coffee, cooled to room temperature
– 1/4 cup of coffee liqueur (like Kahlúa), or just a splash more coffee if you prefer it non-alcoholic
– 3 large eggs, separated
– 1/2 cup of granulated sugar
– 8 ounces of mascarpone cheese, softened at room temperature
– 1 cup of heavy whipping cream
– A couple of tablespoons of unsweetened cocoa powder for dusting
Instructions
1. In a small bowl, combine the brewed coffee and coffee liqueur, stirring gently until mixed—this will be your soaking liquid for the ladyfingers.
2. Separate the egg yolks from the whites into two clean, dry bowls; set the whites aside for later.
3. In a medium bowl, whisk the egg yolks with the granulated sugar until the mixture turns pale yellow and thickens slightly, about 2-3 minutes with a hand mixer on medium speed.
4. Add the softened mascarpone cheese to the yolk mixture, beating on low until just combined and smooth—be careful not to overmix to avoid a grainy texture.
5. In another bowl, whip the heavy whipping cream with a hand mixer on high speed until stiff peaks form, which should take about 3-4 minutes; tip: chill your bowl and beaters in the freezer for 10 minutes beforehand for faster whipping.
6. Gently fold the whipped cream into the mascarpone mixture using a spatula until no white streaks remain, creating a light, airy cream.
7. In a clean, dry bowl, beat the egg whites on high speed until they form stiff peaks, about 2-3 minutes; tip: ensure no yolk gets into the whites for best results.
8. Fold the beaten egg whites into the cream mixture gently to maintain its fluffiness, then set aside.
9. Quickly dip each ladyfinger into the coffee mixture for 1-2 seconds per side—just enough to moisten without making it soggy—and arrange them in a single layer in a 9×13-inch dish.
10. Spread half of the cream mixture evenly over the ladyfinger layer using a spatula.
11. Repeat with another layer of dipped ladyfingers, followed by the remaining cream mixture.
12. Cover the dish with plastic wrap and refrigerate for at least 6 hours, or ideally overnight, to let the flavors meld and the dessert set properly; tip: this resting time is key for that perfect sliceable texture.
13. Just before serving, dust the top generously with unsweetened cocoa powder using a fine-mesh sieve for an even coating.
Just imagine slicing into this tiramisu—the layers hold together beautifully, offering a balance of rich coffee notes and velvety cream that melts in your mouth. For a festive twist, I sometimes garnish it with chocolate shavings or serve it in individual glasses for a more elegant presentation at holiday dinners.
Crème Brûlée with Vanilla Bean
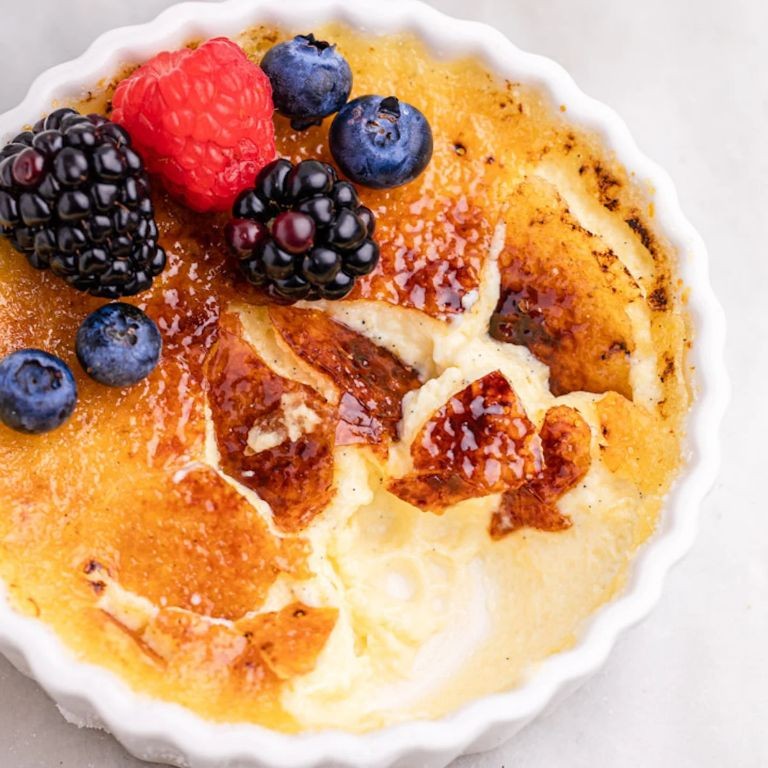
Gosh, there’s something magical about cracking through that caramelized sugar top to reveal the silky custard underneath—it’s my go‑to dessert for making any dinner feel special, and this vanilla bean version is the one I turn to when I want to impress without too much fuss. I still remember the first time I tried making it years ago, nervously watching the oven like a hawk, but now it’s become a relaxing weekend ritual I look forward to.
Serving: 6 | Pre Time: 20 minutes | Cooking Time: 40 minutes
Ingredients
– 2 cups of heavy cream (I always grab the good stuff—it makes a difference!)
– 5 large egg yolks (save the whites for an omelet tomorrow)
– ½ cup of granulated sugar, plus a little extra for that crispy top
– 1 whole vanilla bean (split and scraped—those tiny seeds are worth it)
– A tiny pinch of salt (just to balance the sweetness)
Instructions
1. Preheat your oven to 325°F and grab six 4‑ounce ramekins—I like to place them in a large baking dish for a water bath later.
2. In a medium saucepan, pour in the 2 cups of heavy cream and add the scraped seeds from the vanilla bean along with the empty pod for extra flavor.
3. Heat the cream over medium‑low heat until it just starts to simmer around the edges—you’ll see tiny bubbles form, which should take about 5 minutes (tip: don’t let it boil, or it might curdle).
4. While the cream heats, whisk together the 5 egg yolks, ½ cup of sugar, and that pinch of salt in a bowl until smooth and slightly pale.
5. Slowly pour the hot cream into the egg mixture while whisking constantly—this tempers the eggs so they don’t scramble (tip: go slow to avoid lumps).
6. Strain the mixture through a fine‑mesh sieve into a pitcher or bowl to remove the vanilla pod and any bits.
7. Divide the custard evenly among the ramekins, then carefully pour hot water into the baking dish until it reaches halfway up the sides of the ramekins.
8. Bake for 35–40 minutes until the edges are set but the centers still jiggle slightly when shaken (tip: check at 35 minutes—overbaking can make it rubbery).
9. Remove the ramekins from the water bath, let them cool to room temperature, then chill in the fridge for at least 4 hours or overnight.
10. Right before serving, sprinkle a thin, even layer of sugar over each custard and use a kitchen torch to caramelize it until golden and bubbly—hold the torch about 2 inches away and move it in circles.
But that moment when you tap the spoon and hear that satisfying crack? Pure bliss. The custard underneath is cool and creamy with those specks of vanilla bean shining through, and I love serving it with fresh berries on the side for a pop of color and tartness.
Apple Pie with Flaky Crust
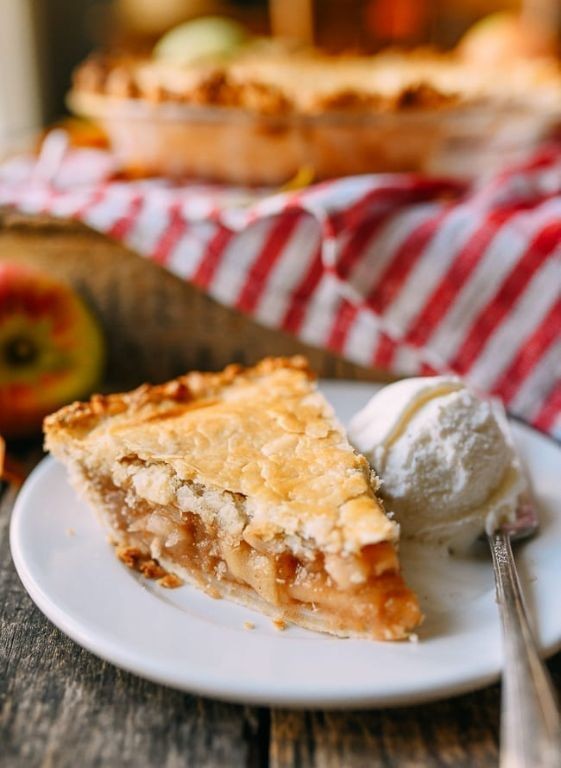
Just in time for the holidays, I’m sharing my go-to apple pie recipe that always steals the show at family gatherings. I’ve been tweaking this flaky crust for years—it’s the one my grandma taught me to make, and now it’s my turn to pass it along to you. Trust me, the aroma of cinnamon and baked apples filling your kitchen is pure comfort.
Serving: 8 | Pre Time: 30 minutes | Cooking Time: 50 minutes
Ingredients
– For the crust: 2 ½ cups of all-purpose flour, a couple of teaspoons of sugar, a pinch of salt, 1 cup of cold unsalted butter (cut into small cubes), and about ½ cup of ice water (just enough to bring it together).
– For the filling: 6 medium apples (I like a mix of Granny Smith and Honeycrisp), ¾ cup of granulated sugar, ¼ cup of all-purpose flour, 2 teaspoons of ground cinnamon, a splash of vanilla extract, and a tablespoon of lemon juice.
– For finishing: an egg (for that golden egg wash) and a sprinkle of coarse sugar.
Instructions
1. In a large bowl, whisk together 2 ½ cups of all-purpose flour, 2 teaspoons of sugar, and a pinch of salt until combined.
2. Add 1 cup of cold unsalted butter cubes to the flour mixture, and use a pastry cutter or your fingers to work it in until the mixture resembles coarse crumbs with some pea-sized butter pieces remaining.
3. Gradually drizzle in about ½ cup of ice water, 1 tablespoon at a time, mixing with a fork until the dough just comes together—be careful not to overwork it, as this keeps the crust flaky.
4. Divide the dough into two equal balls, flatten each into a disk, wrap them in plastic wrap, and chill in the refrigerator for at least 30 minutes to firm up.
5. While the dough chills, peel, core, and thinly slice 6 medium apples, and toss them in a large bowl with ¾ cup of granulated sugar, ¼ cup of all-purpose flour, 2 teaspoons of ground cinnamon, a splash of vanilla extract, and 1 tablespoon of lemon juice until evenly coated.
6. Preheat your oven to 375°F (190°C) and place a baking sheet on the lower rack to catch any drips.
7. On a lightly floured surface, roll out one dough disk into a 12-inch circle and carefully transfer it to a 9-inch pie dish, gently pressing it into the bottom and sides.
8. Pour the apple filling into the crust, mounding it slightly in the center for a domed effect.
9. Roll out the second dough disk into another 12-inch circle, place it over the filling, and trim the edges, leaving a ½-inch overhang.
10. Crimp the edges together with your fingers or a fork to seal the pie, and cut a few small slits in the top crust to allow steam to escape.
11. In a small bowl, beat one egg with a teaspoon of water, brush it evenly over the top crust, and sprinkle with coarse sugar for a sparkly finish.
12. Bake the pie on the preheated baking sheet for 45–50 minutes, or until the crust is golden brown and the filling is bubbling through the slits—if the edges brown too quickly, cover them with foil.
13. Remove the pie from the oven and let it cool on a wire rack for at least 2 hours before slicing to allow the filling to set properly.
You’ll love the contrast of the buttery, shatteringly crisp crust against the tender, spiced apples that melt in your mouth. Serve it warm with a scoop of vanilla ice cream for that classic à la mode touch, or enjoy a slice cold the next day—it’s just as delicious straight from the fridge.
Peanut Butter Chocolate Chip Cookies
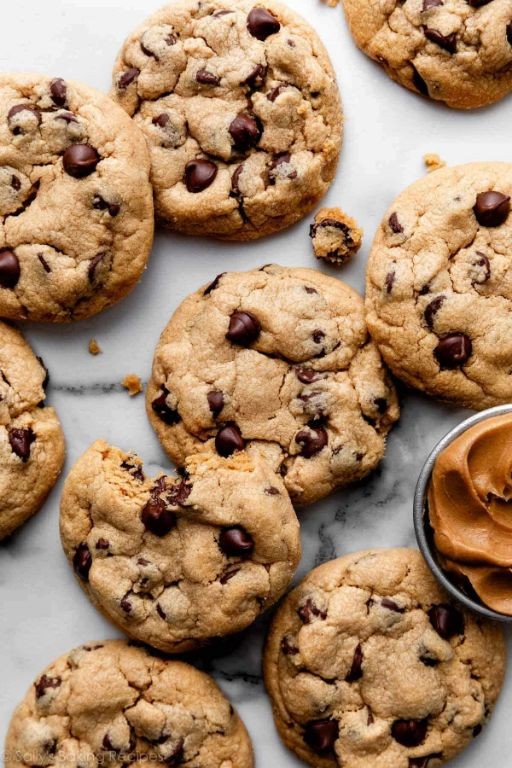
You know those days when you need a cookie that feels like a warm hug? Yesterday, after a hectic holiday shopping trip, I found myself craving something nostalgic yet indulgent—enter these peanut butter chocolate chip cookies, my go-to for instant comfort and smiles all around.
Serving: 24 | Pre Time: 15 minutes | Cooking Time: 10 minutes
Ingredients
– A cup of creamy peanut butter (I always use the natural kind for that rich flavor)
– A cup of packed light brown sugar (it adds that lovely molasses hint)
– One large egg, at room temperature (trust me, it blends better this way)
– A teaspoon of vanilla extract (a splash for that cozy aroma)
– A half teaspoon of baking soda (just enough to give them a little lift)
– A cup of semi-sweet chocolate chips (I like to toss in a couple extra for good measure)
– A pinch of salt (to balance all that sweetness)
Instructions
1. Preheat your oven to 350°F and line two baking sheets with parchment paper—this prevents sticking and makes cleanup a breeze.
2. In a large mixing bowl, combine the creamy peanut butter and packed light brown sugar, stirring until smooth and well-blended, about 2 minutes. Tip: If the peanut butter is too stiff, let it sit at room temperature for 10 minutes first.
3. Crack in the large egg and add the vanilla extract, mixing thoroughly until the batter is uniform in texture.
4. Sprinkle in the baking soda and pinch of salt, folding them in gently to avoid overmixing, which can make the cookies tough.
5. Gently fold in the semi-sweet chocolate chips until they’re evenly distributed throughout the dough.
6. Scoop tablespoon-sized portions of dough onto the prepared baking sheets, spacing them about 2 inches apart to allow for spreading.
7. Bake in the preheated oven for 9-11 minutes, or until the edges are lightly golden but the centers still look slightly soft. Tip: Rotate the sheets halfway through baking for even browning.
8. Remove from the oven and let the cookies cool on the sheets for 5 minutes before transferring to a wire rack to cool completely. Tip: They firm up as they cool, so resist the urge to move them too soon!
All done! These cookies come out with a soft, chewy center and a slightly crisp edge, packed with that irresistible peanut butter-chocolate combo. I love serving them warm with a glass of cold milk or crumbling them over vanilla ice cream for an extra-decadent treat—they’re perfect for holiday gatherings or just a cozy night in.
Molten Caramel Chocolate Brownies
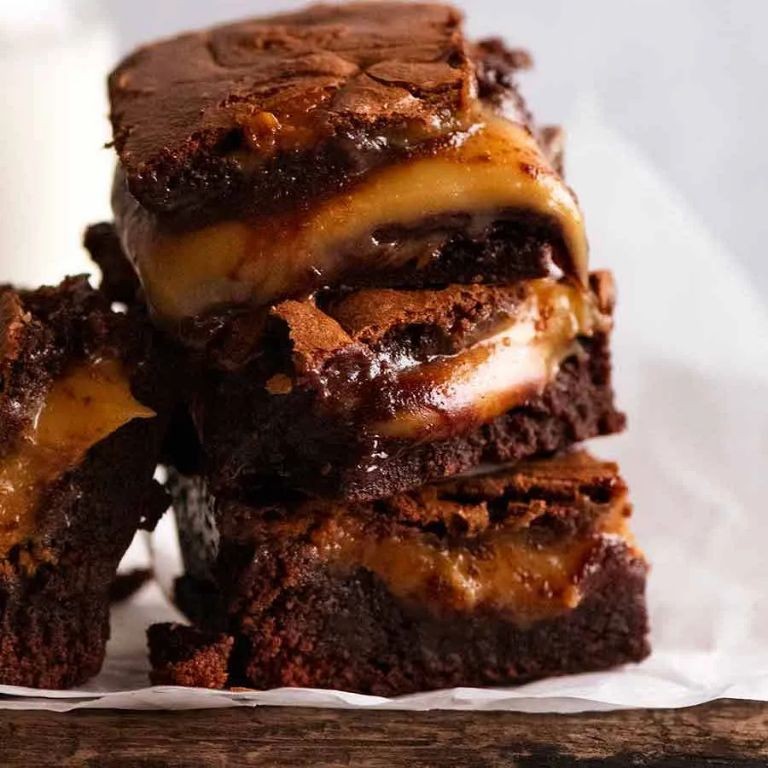
Whew, after a long day of holiday shopping, I was craving something decadent to share with friends—and these molten caramel chocolate brownies are my go-to for instant cheer. They’re the kind of treat that makes everyone gather around the kitchen, forks at the ready, because who can resist that oozy caramel center? I love how the rich chocolate pairs with that sweet, gooey surprise inside, reminding me of the brownies my grandma used to sneak me as a kid.
Serving: 9 | Pre Time: 15 minutes | Cooking Time: 25 minutes
Ingredients
– 1 cup of all-purpose flour
– ¾ cup of unsweetened cocoa powder
– A pinch of salt
– 1 cup of granulated sugar
– 2 large eggs
– ½ cup of melted unsalted butter
– A splash of vanilla extract
– 9 soft caramel candies (like the ones you’d find in a bag for Halloween!)
– A couple of tablespoons of powdered sugar for dusting
Instructions
1. Preheat your oven to 350°F and grease an 8×8-inch baking pan—I always line mine with parchment paper for easy cleanup.
2. In a medium bowl, whisk together 1 cup of all-purpose flour, ¾ cup of unsweetened cocoa powder, and a pinch of salt until well combined.
3. In a separate large bowl, beat 1 cup of granulated sugar, 2 large eggs, ½ cup of melted unsalted butter, and a splash of vanilla extract until smooth and creamy, about 2 minutes.
4. Gradually fold the dry ingredients from step 2 into the wet mixture until just incorporated—be careful not to overmix to keep the brownies fudgy.
5. Pour half of the batter into the prepared pan and spread it evenly with a spatula.
6. Place 9 soft caramel candies evenly spaced over the batter layer, pressing them down lightly so they’re nestled in.
7. Top with the remaining batter, smoothing it out to cover the caramels completely.
8. Bake in the preheated oven for 22–25 minutes, until the edges are set but the center still looks slightly soft—a toothpick inserted near the edge should come out clean, but avoid the caramel spots.
9. Let the brownies cool in the pan for at least 30 minutes; this helps the caramel set without making a mess when you cut them.
10. Once cooled, dust the top with a couple of tablespoons of powdered sugar, then slice into 9 squares using a sharp knife wiped clean between cuts for neat edges.
But these brownies are all about that molten surprise—each bite gives way to a warm, buttery caramel that contrasts perfectly with the dense, chocolatey base. I love serving them slightly warm with a scoop of vanilla ice cream, letting the cold creaminess melt into the gooey center for an irresistible dessert that disappears fast!
Pumpkin Spice Latte Cupcakes
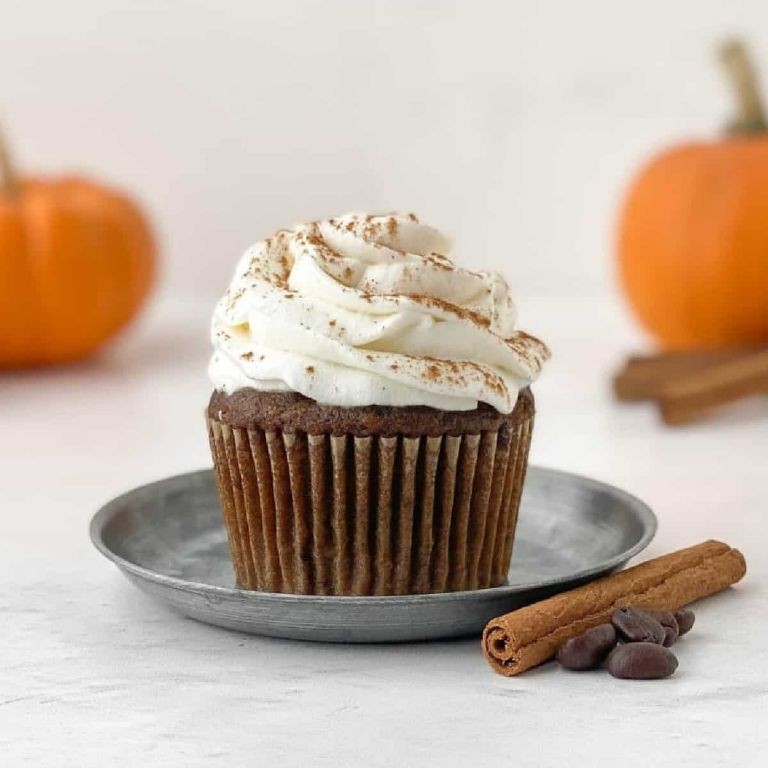
Gosh, it’s that time of year again—the leaves are turning, the air is crisp, and my coffee order permanently switches to pumpkin spice. But why limit that cozy flavor to just a drink? I’ve been tinkering in my tiny kitchen (seriously, I can barely turn around without bumping into the mixer) to capture that beloved latte in cupcake form, and I think I’ve finally nailed it. It’s the perfect treat to bake while wrapped in a sweater, with your own real PSL steaming nearby.
Serving: 12 | Pre Time: 20 minutes | Cooking Time: 18 minutes
Ingredients
– 1 and 3/4 cups of all-purpose flour (I always fluff it up in the container before scooping)
– 1 cup of granulated sugar
– 1 teaspoon of baking powder
– 1/2 teaspoon of baking soda
– A big pinch of salt
– 2 teaspoons of that magical pumpkin pie spice blend
– 2 large eggs, at room temperature (I leave them on the counter while I gather everything else)
– 1/2 cup of vegetable oil
– 3/4 cup of pumpkin puree (not pie filling!)
– 1/2 cup of strong brewed coffee, cooled (I use my leftover morning cup)
– 1 teaspoon of pure vanilla extract
– For the frosting: 8 ounces of softened cream cheese, 1/2 cup of softened unsalted butter, 3 cups of powdered sugar, 1 teaspoon of vanilla extract, and a good sprinkle of extra pumpkin pie spice for dusting
Instructions
1. Preheat your oven to 350°F and line a 12-cup muffin tin with paper liners.
2. In a large bowl, whisk together the flour, sugar, baking powder, baking soda, salt, and pumpkin pie spice until well combined.
3. In a separate medium bowl, beat the eggs lightly with a fork, then stir in the vegetable oil, pumpkin puree, cooled coffee, and vanilla extract until smooth.
4. Pour the wet ingredients into the dry ingredients and gently fold together with a spatula just until no flour streaks remain—overmixing makes cupcakes tough, so I stop as soon as it’s blended.
5. Divide the batter evenly among the prepared muffin cups, filling each about 2/3 full.
6. Bake for 16–18 minutes, or until a toothpick inserted into the center of a cupcake comes out clean. The tops will spring back lightly when touched.
7. Let the cupcakes cool in the pan for 5 minutes, then transfer them to a wire rack to cool completely before frosting—this prevents the frosting from melting, a lesson I learned the messy way!
8. While the cupcakes cool, make the frosting: In a stand mixer fitted with the paddle attachment, beat the softened cream cheese and butter on medium speed for 2 minutes until creamy and lump-free.
9. Gradually add the powdered sugar, 1 cup at a time, beating on low speed after each addition until incorporated, then add the vanilla and beat on medium-high for 1–2 minutes until fluffy.
10. Once cupcakes are fully cool, frost them generously with the cream cheese frosting using a piping bag or an offset spatula.
11. Lightly dust the frosted tops with a sprinkle of pumpkin pie spice for that signature latte look.
Just like your favorite fall beverage, these cupcakes are moist and tender with a warm spice kick, balanced by the tangy cream cheese frosting. I love serving them with an extra cup of coffee for dipping—it’s a full pumpkin spice experience in every bite!
Triple Chocolate Mousse Cake

Zipping through the holiday season, I always crave something decadent yet not overly heavy—enter this Triple Chocolate Mousse Cake, a showstopper I first made for a festive potluck where it vanished in minutes. It’s the perfect blend of rich chocolate layers with a light, airy texture that feels indulgent without weighing you down.
Serving: 12 | Pre Time: 30 minutes | Cooking Time: 45 minutes
Ingredients
– For the base: 1 and 1/2 cups of crushed chocolate wafer cookies (I use store-bought for ease), 6 tablespoons of melted unsalted butter, and a pinch of salt.
– For the mousse layers: 12 ounces of semi-sweet chocolate chips, 1 and 1/2 cups of heavy cream, 3 large eggs, 1/2 cup of granulated sugar, a splash of vanilla extract, and a couple of tablespoons of cocoa powder for dusting.
– For the ganache: 4 ounces of dark chocolate chopped up, and 1/2 cup of heavy cream.
Instructions
1. Preheat your oven to 350°F and grease a 9-inch springform pan.
2. In a medium bowl, mix the crushed chocolate wafer cookies with the melted unsalted butter and a pinch of salt until well combined.
3. Press the mixture firmly into the bottom of the prepared pan to form an even crust, then bake for 10 minutes until set. Let it cool completely on a wire rack—this prevents sogginess later.
4. In a heatproof bowl, melt the semi-sweet chocolate chips over a double boiler, stirring until smooth, then set aside to cool slightly.
5. In a large bowl, whip 1 cup of the heavy cream with an electric mixer until stiff peaks form, which should take about 3-4 minutes on medium-high speed.
6. In another bowl, beat the eggs and granulated sugar together until pale and fluffy, about 5 minutes, then fold in the melted chocolate and vanilla extract.
7. Gently fold the whipped cream into the chocolate mixture in two additions to keep it airy, then pour over the cooled crust and smooth the top.
8. Refrigerate the cake for at least 4 hours, or until fully set—overnight is best for a firmer texture.
9. For the ganache, heat the remaining 1/2 cup of heavy cream in a small saucepan until just simmering, then pour over the chopped dark chocolate in a bowl and let sit for 2 minutes before stirring until glossy.
10. Pour the ganache over the chilled cake, spreading it evenly with an offset spatula, and dust with cocoa powder for a finishing touch.
11. Let the ganache set at room temperature for about 30 minutes before slicing and serving.
You’ll love how each bite melts in your mouth with layers of creamy mousse and a crisp cookie base. Yes, this cake is a chocolate lover’s dream—serve it chilled with a dollop of whipped cream or fresh berries to cut through the richness, making it ideal for celebrations or a cozy night in.
Raspberry White Chocolate Cheesecake
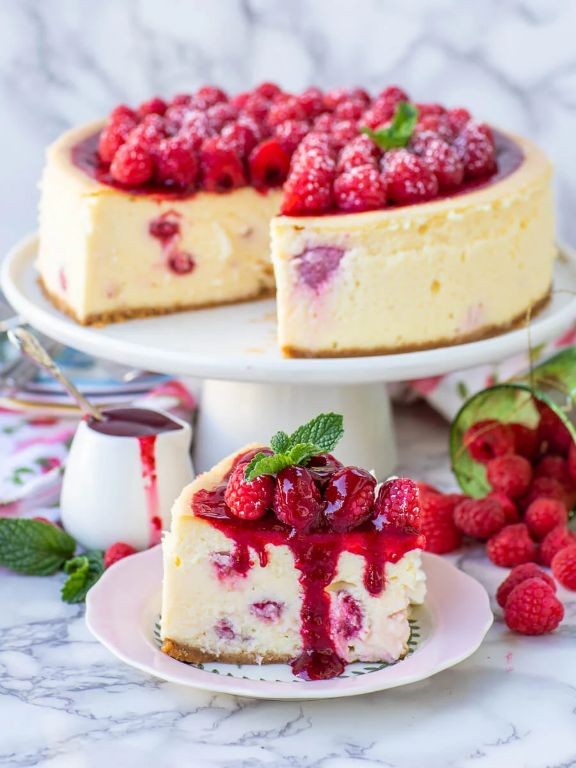
Nothing says holiday cheer like a dessert that’s both elegant and indulgent, and this Raspberry White Chocolate Cheesecake has become my go‑to for festive gatherings. I first whipped it up for a cozy Christmas Eve dinner last year, and now my family insists I make it every December—it’s that good! Trust me, even if you’re new to cheesecakes, this one’s surprisingly forgiving and always earns rave reviews.
Serving: 12 | Pre Time: 25 minutes | Cooking Time: 55 minutes
Ingredients
– About 2 cups of graham cracker crumbs (I just crush a whole sleeve!)
– A stick of unsalted butter, melted
– A ½ cup of granulated sugar, plus an extra ⅓ cup for the filling
– Three 8‑ounce blocks of cream cheese, softened to room temp
– A splash of vanilla extract (around 1 teaspoon)
– Three large eggs
– A ½ cup of heavy cream
– A 6‑ounce bag of white chocolate chips
– A cup of fresh raspberries (frozen work too, just thaw and drain them)
– A tablespoon of lemon juice
Instructions
1. Preheat your oven to 325°F and grease a 9‑inch springform pan.
2. In a medium bowl, mix the graham cracker crumbs, melted butter, and ½ cup sugar until it feels like wet sand.
3. Press the crumb mixture firmly into the bottom of the pan—I use the bottom of a glass to get it even.
4. Bake the crust for 10 minutes, then set it aside to cool. Tip: Letting it cool prevents a soggy bottom later!
5. In a large bowl, beat the cream cheese with an electric mixer on medium speed until it’s smooth and creamy, about 2 minutes.
6. Add the remaining ⅓ cup sugar and vanilla extract, and beat until fully combined.
7. Add the eggs one at a time, beating just until each is incorporated—over‑mixing can cause cracks.
8. In a microwave‑safe bowl, melt the white chocolate chips in 30‑second bursts, stirring between each, until smooth.
9. Gently fold the melted white chocolate and heavy cream into the cream cheese mixture until uniform.
10. Pour the filling over the cooled crust and smooth the top with a spatula.
11. Place the pan on a baking sheet and bake for 45–55 minutes, until the edges are set but the center still jiggles slightly. Tip: A water bath isn’t needed here, but the baking sheet catches any drips!
12. Turn off the oven, crack the door open, and let the cheesecake cool inside for 1 hour to prevent sinking.
13. Transfer it to the fridge and chill for at least 4 hours, or overnight for best results.
14. While it chills, toss the raspberries with lemon juice and mash them lightly with a fork for a quick sauce.
15. Once chilled, run a knife around the edges, release the springform, and top with the raspberry sauce. Tip: Add the sauce just before serving to keep the crust crisp!
Out of the oven, this cheesecake emerges with a velvety, rich texture that melts on your tongue, thanks to the white chocolate swirls. The tart raspberry sauce cuts through the sweetness perfectly, making each bite balanced and festive. I love serving it with extra fresh berries on the side or a drizzle of dark chocolate for a decadent twist—it’s sure to become a holiday staple in your home too!
Oreo Cookie Ice Cream Cake
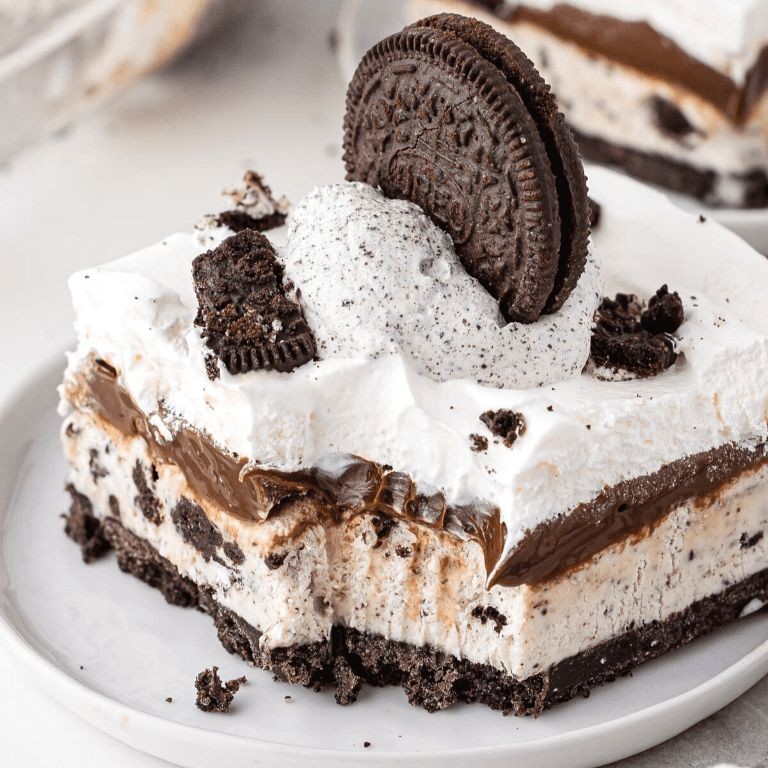
Whew, after a long week of holiday shopping, I needed a no-bake dessert that feels festive without turning my kitchen into a sauna—this Oreo ice cream cake is my go-to lifesaver. It’s the perfect make-ahead treat that always gets rave reviews at our family gatherings, and honestly, I love how the layers come together with minimal fuss.
Serving: 12 | Pre Time: 25 minutes | Cooking Time: 0 minutes
Ingredients
– A package of Oreo cookies (about 36 cookies)
– A half cup of unsalted butter, melted
– A half gallon of vanilla ice cream, softened just until spreadable
– A cup of hot fudge sauce, warmed slightly
– A tub of whipped topping (like Cool Whip), thawed
– A handful of mini chocolate chips for sprinkling on top
Instructions
1. Crush the Oreo cookies into fine crumbs using a food processor or by placing them in a zip-top bag and rolling with a rolling pin.
2. Mix the crushed Oreo crumbs with the melted butter in a medium bowl until evenly combined.
3. Press the Oreo-butter mixture firmly into the bottom of a 9-inch springform pan to form the crust, using the back of a spoon to create an even layer.
4. Spread the softened vanilla ice cream over the crust in a smooth, even layer, working quickly to prevent melting.
5. Drizzle the warmed hot fudge sauce over the ice cream layer in a zigzag pattern.
6. Spread the thawed whipped topping over the fudge sauce to cover it completely.
7. Sprinkle the mini chocolate chips evenly over the top of the whipped topping.
8. Cover the pan tightly with plastic wrap and freeze the cake for at least 6 hours, or until firm.
9. Remove the cake from the freezer about 10 minutes before serving to let it soften slightly for easier slicing.
10. Run a knife around the edge of the pan, then release the springform sides to serve.
Yes, the contrast between the crunchy Oreo base and the creamy, cold layers is pure magic—each bite delivers that classic cookies-and-cream flavor we all adore. For a fun twist, try drizzling extra fudge on individual slices or adding a sprinkle of crushed candy canes during the holidays for a festive touch.
Key Lime Pie with Graham Cracker Crust
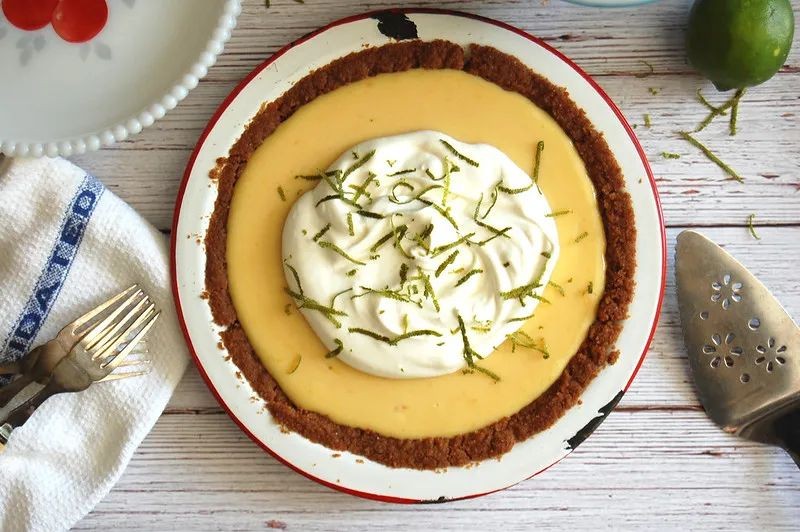
Vivid memories of Florida vacations always bring me back to this classic dessert—it’s the perfect balance of tart and sweet, and honestly, I make it year-round because it just feels like sunshine on a plate. My family actually prefers it chilled overnight, but I’ll sneak a slice as soon as it’s set because that first tangy bite is irresistible.
Serving: 8 | Pre Time: 20 minutes | Cooking Time: 15 minutes
Ingredients
– About 1 and 1/2 cups of graham cracker crumbs (I just crush a whole sleeve—it’s easier!)
– 1/3 cup of granulated sugar
– 6 tablespoons of melted unsalted butter
– 4 large egg yolks
– A 14-ounce can of sweetened condensed milk (don’t skimp—this is the magic)
– 1/2 cup of freshly squeezed key lime juice (bottled works in a pinch, but fresh gives that zing)
– A pinch of salt
– For topping: a cup of heavy whipping cream and a couple of tablespoons of powdered sugar
Instructions
1. Preheat your oven to 350°F (175°C).
2. In a medium bowl, mix the graham cracker crumbs, 1/3 cup of granulated sugar, and melted butter until it looks like wet sand.
3. Press the mixture firmly into a 9-inch pie dish, going up the sides—I use the bottom of a glass to make it even.
4. Bake the crust for 10 minutes, until it’s lightly golden and smells toasty, then let it cool completely on a wire rack.
5. In another bowl, whisk the 4 egg yolks until they’re smooth and pale yellow, about 2 minutes.
6. Gently stir in the sweetened condensed milk until fully combined.
7. Slowly pour in the key lime juice and add a pinch of salt, mixing just until the filling thickens—don’t overmix or it might get grainy.
8. Pour the filling into the cooled crust and smooth the top with a spatula.
9. Bake the pie for 15 minutes at 350°F; the center should be set but still have a slight jiggle.
10. Let the pie cool to room temperature, then refrigerate for at least 4 hours, though I prefer overnight for the best texture.
11. Just before serving, whip the heavy cream with powdered sugar until stiff peaks form, then spread or pipe it over the pie.
Enjoy every creamy, tangy bite—the crust stays crunchy against the smooth filling, and a dollop of whipped cream adds just the right sweetness. I love garnishing it with lime zest or serving it with a side of fresh berries for a pop of color.
Peach Cobbler with Cinnamon Topping
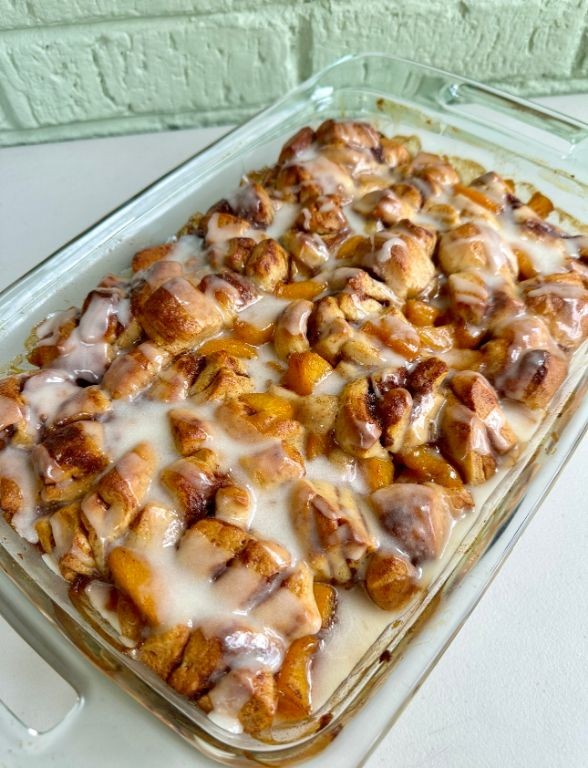
Venturing into my kitchen on a crisp December morning, I was craving a taste of summer—something warm, fruity, and comforting to share with family during the holidays. This peach cobbler with cinnamon topping is my go-to when I want to impress without stress, and it always fills the house with the most inviting aroma that reminds me of sunny afternoons at the farmers’ market. Honestly, I love how forgiving it is; even if I’m a bit distracted by holiday chaos, it turns out delicious every time.
Serving: 8 | Pre Time: 15 minutes | Cooking Time: 45 minutes
Ingredients
– A couple of 15-ounce cans of sliced peaches in syrup (drained, but save a splash of that syrup for extra flavor!)
– 1 cup of all-purpose flour
– 1 cup of granulated sugar
– 1 cup of whole milk
– 1/2 cup (1 stick) of unsalted butter
– 1 tablespoon of baking powder
– 1 teaspoon of ground cinnamon
– A pinch of salt
Instructions
1. Preheat your oven to 350°F (175°C) and grab a 9×13-inch baking dish.
2. Melt the 1/2 cup of unsalted butter in the baking dish by placing it in the preheating oven for about 5 minutes, until it’s fully liquid and bubbly—this helps create a crispy bottom layer.
3. In a medium mixing bowl, whisk together the 1 cup of all-purpose flour, 1 cup of granulated sugar, 1 tablespoon of baking powder, and a pinch of salt until well combined.
4. Pour the 1 cup of whole milk into the dry ingredients and stir gently until just mixed; a few lumps are fine to avoid overmixing, which can make the topping tough.
5. Carefully pour the batter over the melted butter in the baking dish—do not stir it in, as this allows the butter to rise up during baking for a golden crust.
6. Evenly scatter the drained sliced peaches over the batter, then drizzle with about 2 tablespoons of the reserved peach syrup for added sweetness and moisture.
7. Sprinkle the 1 teaspoon of ground cinnamon evenly over the peaches and batter for that warm, aromatic topping.
8. Bake in the preheated oven for 45 minutes, or until the top is golden brown and a toothpick inserted into the center comes out clean—if it starts browning too quickly, loosely tent it with foil.
9. Remove from the oven and let it cool for at least 10 minutes before serving to allow the juices to set slightly.
Kicking back with a warm bowl of this cobbler, I adore how the cinnamon-spiced topping crisps up while the peaches underneath stay juicy and tender, creating a perfect contrast in every bite. Serve it with a scoop of vanilla ice cream melting over the top, or for a cozy twist, try it with a dollop of whipped cream and a sprinkle of extra cinnamon—it’s like a hug in dessert form that’s sure to become a holiday favorite.
Mint Chocolate Chip Ice Cream Sandwiches
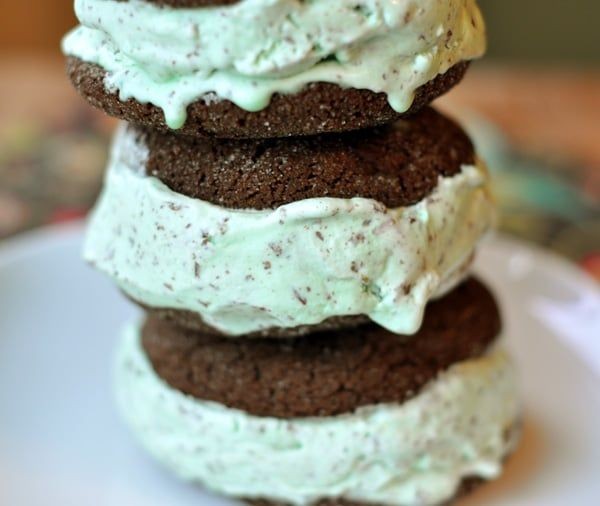
Tis the season for festive treats, and I’ve been craving something cool and minty to balance out all the holiday baking. These Mint Chocolate Chip Ice Cream Sandwiches are my go-to for a quick, crowd-pleasing dessert—they remind me of those summer days when my kids would beg for ice cream after playing outside, and I’d whip these up with whatever cookies we had on hand. Honestly, they’re so simple that I often make them on a whim when friends drop by, and they always disappear in minutes!
Serving: 8 | Pre Time: 15 minutes | Cooking Time: 10 minutes
Ingredients
– A couple of cups of all-purpose flour
– A cup of granulated sugar
– A half cup of unsalted butter, softened
– A teaspoon of vanilla extract
– A splash of milk
– A pint of mint chocolate chip ice cream
– A handful of mini chocolate chips
Instructions
1. Preheat your oven to 350°F and line a baking sheet with parchment paper.
2. In a large bowl, cream together the softened butter and granulated sugar until light and fluffy, which should take about 2-3 minutes with a hand mixer.
3. Mix in the vanilla extract and a splash of milk until just combined.
4. Gradually add the all-purpose flour, stirring until a soft dough forms—be careful not to overmix, or the cookies might turn tough.
5. Fold in the mini chocolate chips evenly throughout the dough.
6. Scoop tablespoon-sized portions of dough onto the prepared baking sheet, spacing them about 2 inches apart.
7. Bake for 10-12 minutes, or until the edges are lightly golden brown; they’ll firm up as they cool, so don’t worry if they seem soft right out of the oven.
8. Let the cookies cool completely on a wire rack for at least 30 minutes to prevent the ice cream from melting too quickly.
9. Once cooled, scoop a generous spoonful of mint chocolate chip ice cream onto the flat side of one cookie.
10. Press another cookie on top gently to form a sandwich, squeezing just enough to spread the ice cream to the edges without breaking the cookies.
11. Repeat with the remaining cookies and ice cream until all sandwiches are assembled.
12. Place the sandwiches on a tray and freeze for at least 1 hour to set firmly—this helps them hold their shape when serving.
Grab one of these sandwiches from the freezer, and you’ll love the crisp cookie texture that gives way to the creamy, refreshing mint ice cream with little bursts of chocolate. For a fun twist, I sometimes roll the edges in extra chocolate chips before freezing, or serve them with a drizzle of hot fudge for an indulgent touch that makes everyone smile.
Summary
Satisfy your sweet tooth with these 19 irresistible dessert recipes! From quick treats to show-stopping bakes, there’s something for every craving. We hope you’ll find a new favorite to whip up. Don’t forget to leave a comment telling us which recipe you loved most and share this roundup on Pinterest to spread the sweetness!


