
Just imagine the perfect birthday dinner: a table filled with delicious, celebratory dishes that make your special someone feel truly cherished. Whether you’re planning an intimate gathering or a festive feast, these 18 recipes offer everything from elegant mains to decadent desserts. Let’s explore these mouthwatering ideas to create a birthday meal that’s as memorable as the occasion itself!
Grilled Filet Mignon with Garlic Butter
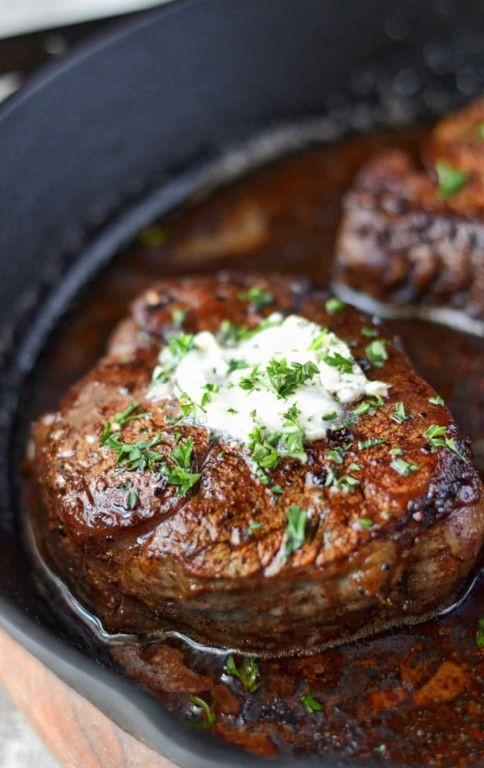
Just as the holiday season reaches its crescendo, few culinary experiences rival the timeless elegance of a perfectly grilled filet mignon. This recipe elevates the tender cut with a decadent garlic butter that melts into every savory bite, creating a restaurant-worthy centerpiece for your festive table with surprisingly straightforward technique.
Serving: 2 | Pre Time: 15 minutes | Cooking Time: 15 minutes
Ingredients
– A couple of 6-ounce filet mignon steaks, about 1½ inches thick
– A good glug of olive oil, about 2 tablespoons
– A generous pinch of kosher salt and freshly cracked black pepper
– A whole stick of unsalted butter (½ cup), softened at room temp
– 3 cloves of garlic, minced super fine
– A small handful of fresh parsley, chopped (about 2 tablespoons)
Instructions
1. Take your filet mignon steaks out of the fridge and let them sit on the counter for 30 minutes to come to room temperature—this ensures even cooking.
2. While the steaks rest, make the garlic butter: In a small bowl, mash together the softened stick of unsalted butter, the 3 cloves of minced garlic, and the chopped fresh parsley until well combined. Scoop the mixture onto a piece of plastic wrap, roll it into a log, twist the ends, and refrigerate for at least 15 minutes to firm up.
3. Preheat your grill or a heavy grill pan over high heat until it reaches 450°F. Pat the steaks completely dry with paper towels to promote a good sear.
4. Rub both sides of each steak with the 2 tablespoons of olive oil, then season liberally on all sides with the kosher salt and freshly cracked black pepper.
5. Place the steaks on the hot grill and cook, undisturbed, for 5 minutes to develop a deep brown crust.
6. Flip the steaks using tongs and cook for another 4 minutes for medium-rare (internal temperature of 130°F when checked with an instant-read thermometer). For medium, cook for 5-6 minutes per side (135°F).
7. Transfer the grilled steaks to a cutting board and immediately top each with a ½-inch thick slice of the chilled garlic butter log. Let the steaks rest, untouched, for 8 full minutes—the residual heat will melt the butter and redistribute the juices.
8. After resting, slice the steaks against the grain and serve immediately.
The resulting steak boasts a beautifully charred exterior that gives way to a melt-in-your-mouth, rosy-pink interior. That garlic butter transforms into a rich, aromatic sauce that pools deliciously with the natural juices. Try serving the sliced filet over a bed of creamy mashed potatoes or alongside roasted asparagus to soak up every last bit of that luxurious butter.
Lobster Thermidor with Creamy Sauce
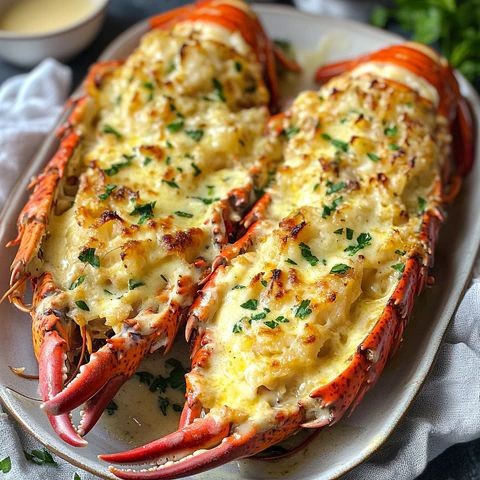
Luxuriously rich and decadently creamy, Lobster Thermidor transforms succulent lobster meat into an elegant baked dish that’s perfect for special occasions. This classic French recipe features tender lobster enveloped in a velvety, herb-infused sauce, topped with a golden, bubbling cheese crust that makes it as beautiful to behold as it is delicious to eat. It’s the ultimate showstopper for a holiday feast or an impressive dinner party centerpiece.
Serving: 4 | Pre Time: 25 minutes | Cooking Time: 30 minutes
Ingredients
– 2 cooked lobster tails, meat removed and chopped (about 1½ cups)
– 3 tablespoons of unsalted butter
– 1 small shallot, finely minced
– 2 cloves of garlic, minced
– A splash of dry white wine (about ¼ cup)
– 1 cup of heavy cream
– A couple of tablespoons of Dijon mustard
– A pinch of cayenne pepper
– A handful of fresh parsley, chopped
– ½ cup of grated Gruyère cheese
– Salt and black pepper, as needed
Instructions
1. Preheat your oven to 400°F (200°C) and lightly grease four individual ramekins or a small baking dish.
2. Melt the unsalted butter in a large skillet over medium heat until it’s foamy and fragrant, about 2 minutes.
3. Add the finely minced shallot and minced garlic to the skillet, sautéing until softened and translucent, about 3-4 minutes, stirring frequently to prevent burning.
4. Pour in the dry white wine, letting it simmer and reduce by half, which should take about 2-3 minutes, to cook off the alcohol and concentrate the flavor.
5. Stir in the heavy cream, Dijon mustard, and a pinch of cayenne pepper, bringing the mixture to a gentle simmer over medium-low heat for 5 minutes until it thickens slightly, stirring occasionally to avoid scorching.
6. Fold in the chopped lobster meat and half of the chopped fresh parsley, cooking for another 2-3 minutes just to warm the lobster through, then season with salt and black pepper to your liking.
7. Divide the lobster mixture evenly among the prepared ramekins or spread it into the baking dish, packing it gently without overfilling.
8. Sprinkle the grated Gruyère cheese evenly over the top of each portion, creating a thin, even layer that will melt into a golden crust.
9. Bake in the preheated oven for 10-12 minutes, or until the cheese is bubbly and lightly browned on the edges, watching closely to prevent burning.
10. Remove from the oven and let it rest for 5 minutes before serving to allow the sauce to set slightly, garnishing with the remaining chopped parsley for a fresh touch.
For a truly indulgent experience, this Lobster Thermidor offers a luscious, creamy texture that contrasts beautifully with the tender, sweet lobster chunks, while the Gruyère adds a nutty, savory depth. Serve it straight from the ramekins for an elegant individual presentation, or pair it with a crisp green salad and crusty bread to soak up every last bit of the rich sauce.
Roasted Rosemary Lamb Chops
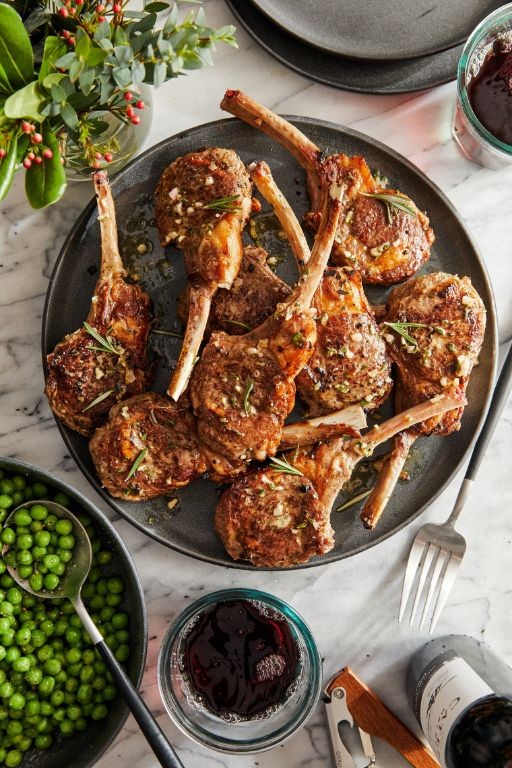
Here’s a recipe that transforms humble lamb chops into a show-stopping centerpiece worthy of any holiday table or special weeknight dinner. The key lies in a simple, aromatic marinade and a hot oven, which work in tandem to create a beautifully caramelized crust while keeping the interior succulent and tender. It’s an effortless way to achieve restaurant-quality results with minimal fuss.
Serving: 4 | Pre Time: 15 minutes | Cooking Time: 15 minutes
Ingredients
– 8 lamb loin chops, about 1-inch thick
– A good glug of extra virgin olive oil (about 3 tablespoons)
– 3 fresh rosemary sprigs, leaves finely chopped
– 4 garlic cloves, minced
– The zest and juice from 1 large lemon
– A generous pinch of kosher salt and freshly cracked black pepper
Instructions
1. Pat the 8 lamb chops completely dry with paper towels to ensure a good sear.
2. In a large bowl, whisk together the 3 tablespoons of olive oil, chopped rosemary from 3 sprigs, 4 minced garlic cloves, the zest and juice of 1 lemon, 1 teaspoon of kosher salt, and ½ teaspoon of black pepper.
3. Add the dried lamb chops to the bowl and toss thoroughly, ensuring each chop is well-coated with the marinade. Let them sit at room temperature for 10 minutes to allow the flavors to penetrate.
4. While the chops marinate, position a rack in the upper third of your oven and preheat it to 425°F.
5. Heat a large, oven-safe skillet (like cast iron) over medium-high heat for 2 minutes until very hot.
6. Working in batches if necessary to avoid crowding, place the lamb chops in the hot, dry skillet. Sear them without moving for 2-3 minutes, until a deep golden-brown crust forms on the bottom.
7. Flip each chop and immediately transfer the entire skillet to the preheated oven.
8. Roast the chops at 425°F for 6-8 minutes for medium-rare (an internal temperature of 135°F) or 8-10 minutes for medium (145°F).
9. Remove the skillet from the oven using an oven mitt, as the handle will be extremely hot.
10. Transfer the lamb chops to a clean plate or cutting board and let them rest, uncovered, for 5 full minutes before serving to allow the juices to redistribute.
By letting the chops rest, you ensure every bite is juicy. The high-heat roast after the sear locks in those incredible flavors from the garlic and rosemary. The final result is a chop with a crisp, herb-flecked exterior that gives way to a perfectly pink, buttery-tender interior. Brighten the rich lamb by serving it over a bed of creamy polenta or alongside roasted root vegetables, which will happily soak up any savory pan juices.
Truffle Mushroom Risotto
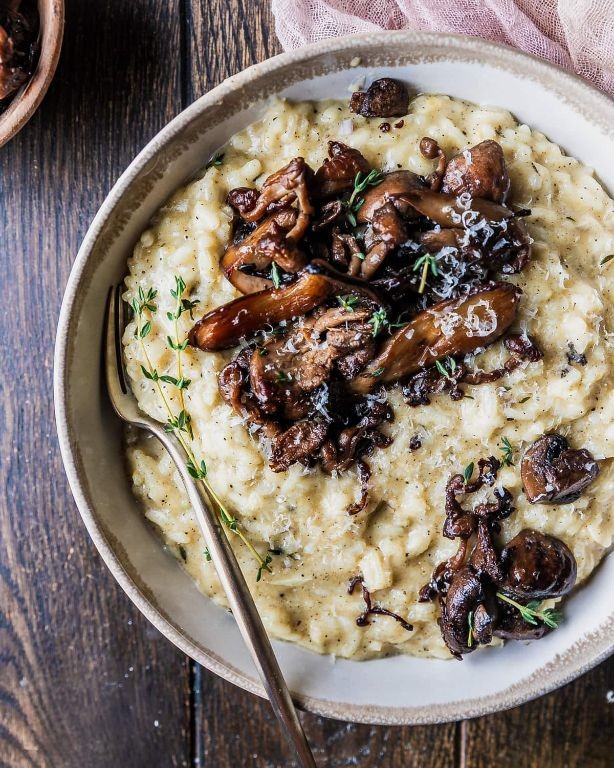
Delightfully creamy and earthy, this truffle mushroom risotto transforms humble Arborio rice into an elegant, restaurant-worthy dish perfect for a special occasion. Drizzled with truffle oil and finished with a generous heap of Parmesan, it’s a comforting yet sophisticated centerpiece that feels both indulgent and deeply satisfying. The key lies in patient stirring, which coaxes out the rice’s natural starches for that signature velvety texture.
Serving: 4 | Pre Time: 15 minutes | Cooking Time: 30 minutes
Ingredients
– 1 ½ cups of Arborio rice
– 8 ounces of cremini mushrooms, sliced
– 1 small yellow onion, finely chopped
– 4 cups of low-sodium chicken or vegetable broth, kept warm
– ½ cup of dry white wine
– 3 tablespoons of unsalted butter
– 2 tablespoons of olive oil
– ½ cup of freshly grated Parmesan cheese, plus extra for serving
– 2 tablespoons of truffle oil
– A couple of cloves of garlic, minced
– A splash of heavy cream (optional, for extra richness)
– Salt and freshly ground black pepper
Instructions
1. Heat the olive oil and 1 tablespoon of butter in a large, heavy-bottomed pot or Dutch oven over medium heat.
2. Add the chopped onion and cook, stirring occasionally, until translucent and soft, about 5 minutes.
3. Stir in the minced garlic and cook for 1 minute until fragrant.
4. Add the sliced mushrooms and cook, stirring occasionally, until they have released their liquid and turned golden brown, about 8-10 minutes. (Tip: Don’t crowd the mushrooms; cook them in batches if your pot is small to ensure proper browning.)
5. Add the Arborio rice to the pot and toast it, stirring constantly, for 2 minutes until the grains are lightly golden and coated in the oils.
6. Pour in the white wine and cook, stirring, until the liquid is fully absorbed, about 2 minutes.
7. Begin adding the warm broth, one ladleful (about ½ cup) at a time, stirring constantly and allowing each addition to be nearly fully absorbed before adding the next. (Tip: Keep the broth simmering in a separate saucepan; adding it warm prevents the rice from cooling and cooking unevenly.)
8. Continue this process of adding broth and stirring for 18-22 minutes. The risotto is ready when the rice is al dente—tender with a slight bite—and the mixture is creamy but not soupy.
9. Remove the pot from the heat and stir in the remaining 2 tablespoons of butter, the grated Parmesan cheese, and the truffle oil until fully incorporated and creamy.
10. For an extra luxurious finish, stir in a splash of heavy cream if using.
11. Season with salt and freshly ground black pepper to taste.
This risotto should be luxuriously creamy, with each grain of rice distinct yet bound in a velvety sauce. The earthy mushrooms and pungent truffle oil create a deeply savory, aromatic flavor profile that’s beautifully balanced by the salty, nutty Parmesan. Try serving it immediately in shallow bowls, garnished with an extra drizzle of truffle oil, a sprinkle of Parmesan, and perhaps a few fresh thyme leaves for a pop of color and freshness.
Honey Glazed Salmon with Asparagus
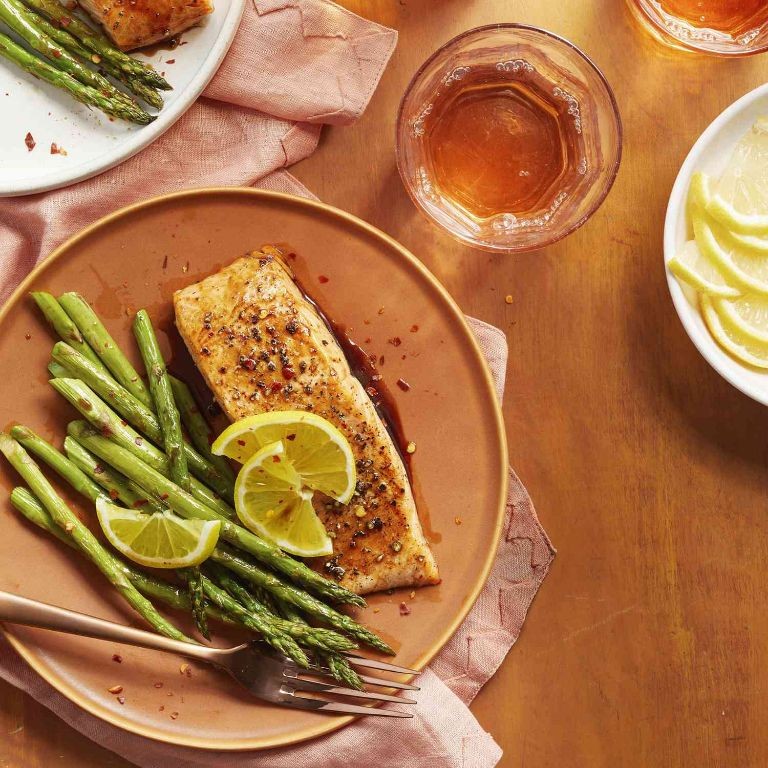
On a crisp winter evening, few dishes offer the elegant simplicity and vibrant flavors of honey-glazed salmon paired with tender asparagus. This restaurant-worthy meal comes together with minimal effort, transforming humble ingredients into a sophisticated centerpiece that’s perfect for both weeknight dinners and holiday gatherings. The sweet-savory glaze caramelizes beautifully on the flaky fish, while the asparagus roasts to crisp-tender perfection, creating a harmonious balance of textures and tastes.
Serving: 4 | Pre Time: 10 minutes | Cooking Time: 15 minutes
Ingredients
– Four 6-ounce salmon fillets, skin-on or skinless
– A couple of bunches of fresh asparagus, tough ends trimmed
– A generous ¼ cup of honey
– Two tablespoons of soy sauce
– A tablespoon of olive oil
– A squeeze of fresh lemon juice (about 1 tablespoon)
– A couple of minced garlic cloves
– A pinch of salt and freshly ground black pepper
Instructions
1. Preheat your oven to 400°F and line a large baking sheet with parchment paper for easy cleanup.
2. In a small bowl, whisk together the honey, soy sauce, olive oil, lemon juice, and minced garlic until fully combined to create the glaze.
3. Pat the salmon fillets completely dry with paper towels—this helps the glaze adhere better and promotes a beautiful sear.
4. Arrange the trimmed asparagus in a single layer on one half of the prepared baking sheet, leaving space for the salmon.
5. Drizzle the asparagus lightly with a teaspoon of olive oil and season with a pinch of salt and pepper, tossing to coat evenly.
6. Place the salmon fillets on the empty half of the baking sheet, skin-side down if using skin-on fillets.
7. Spoon half of the honey glaze evenly over the top of each salmon fillet, reserving the remaining glaze for later.
8. Roast in the preheated oven for 12–15 minutes, or until the salmon flakes easily with a fork and the asparagus is tender-crisp. Tip: For extra caramelization, broil for the final 1–2 minutes, watching closely to prevent burning.
9. While the salmon and asparagus roast, gently warm the reserved glaze in a small saucepan over low heat for 1–2 minutes until slightly thickened.
10. Remove the baking sheet from the oven and immediately brush the warm glaze over the salmon for a glossy finish. Tip: Let the salmon rest for 3 minutes before serving to allow the juices to redistribute, keeping it moist.
11. Serve the salmon and asparagus directly from the baking sheet or transfer to plates. Tip: For a vibrant presentation, garnish with lemon wedges and a sprinkle of fresh herbs like chopped parsley or dill.
You’ll love how the sticky-sweet glaze forms a delicate crust on the salmon, contrasting with its buttery, flaky interior. The asparagus retains a slight crunch, offering a refreshing counterpoint to the rich fish. Consider serving this over a bed of fluffy quinoa or alongside roasted baby potatoes for a complete, visually stunning meal that’s as delightful to eat as it is to prepare.
Garlic and Herb Prime Rib

Revered as the crown jewel of holiday feasts, a perfectly roasted Garlic and Herb Prime Rib commands attention with its majestic presence and intoxicating aroma. This centerpiece promises a succulent, tender interior encased in a beautifully caramelized crust, infused with the earthy notes of fresh herbs and the pungent warmth of garlic—a true celebration of flavor that transforms any gathering into a memorable occasion.
Serving: 8 | Pre Time: 20 minutes | Cooking Time: 120 minutes
Ingredients
– A 7-pound prime rib roast, bone-in for extra flavor
– A whole head of garlic, cloves separated and peeled
– A couple of fresh rosemary sprigs
– A couple of fresh thyme sprigs
– A quarter cup of olive oil
– Two tablespoons of kosher salt
– One tablespoon of freshly cracked black pepper
Instructions
1. Preheat your oven to 450°F and position a rack in the lower third.
2. Pat the prime rib roast completely dry with paper towels to ensure a crisp crust.
3. In a small bowl, mash the peeled garlic cloves into a coarse paste with the back of a knife.
4. Finely chop the rosemary and thyme leaves, discarding the tough stems.
5. Combine the garlic paste, chopped herbs, olive oil, salt, and pepper in the bowl, mixing into a thick paste.
6. Rub the herb paste evenly over the entire surface of the roast, coating all sides generously.
7. Place the roast, bone-side down, in a large roasting pan fitted with a rack.
8. Insert an oven-safe meat thermometer into the thickest part of the roast, avoiding the bone.
9. Roast at 450°F for 20 minutes to sear the exterior and develop a flavorful crust.
10. Reduce the oven temperature to 325°F without opening the door to maintain heat.
11. Continue roasting until the thermometer reads 120°F for medium-rare, about 1 hour and 40 minutes more.
12. Transfer the roast to a cutting board and tent loosely with aluminum foil.
13. Let the meat rest for exactly 20 minutes; the internal temperature will rise to 130°F as it rests.
14. Carve the roast against the grain into thick, elegant slices for serving.
Let each slice reveal a rosy, juicy interior that melts with buttery tenderness, contrasting with the savory, crackling herb crust. For a stunning presentation, arrange the slices on a platter with the roasted bones alongside, and drizzle with the pan juices reduced with a splash of red wine for an extra layer of depth.
Creamy Tuscan Chicken with Sun-Dried Tomatoes

On a crisp winter evening, few dishes offer the comforting elegance of Creamy Tuscan Chicken with Sun-Dried Tomatoes. This one-pan wonder transforms simple ingredients into a luxurious meal that’s perfect for both weeknight dinners and special occasions, delivering rich flavors with minimal effort.
Serving: 4 | Pre Time: 15 minutes | Cooking Time: 25 minutes
Ingredients
– 4 boneless, skinless chicken breasts
– A couple of tablespoons of olive oil
– A pinch of salt and black pepper
– 4 cloves of garlic, minced
– 1 cup of sun-dried tomatoes in oil, drained and chopped
– A splash of dry white wine (about ½ cup)
– 1 cup of heavy cream
– A handful of fresh spinach (about 2 cups)
– ½ cup of grated Parmesan cheese
– A sprinkle of dried Italian herbs
Instructions
1. Pat the chicken breasts dry with paper towels, then season both sides evenly with salt and black pepper.
2. Heat olive oil in a large skillet over medium-high heat until shimmering, about 2 minutes.
3. Add the chicken breasts to the skillet and cook for 5-7 minutes per side, until golden brown and the internal temperature reaches 165°F on a meat thermometer.
4. Transfer the cooked chicken to a plate and cover loosely with foil to keep warm.
5. In the same skillet, reduce the heat to medium and add the minced garlic, sautéing for 1 minute until fragrant.
6. Stir in the chopped sun-dried tomatoes and cook for another 2 minutes to soften them slightly.
7. Pour in the dry white wine, scraping up any browned bits from the bottom of the skillet with a wooden spoon, and let it simmer for 3 minutes until reduced by half.
8. Reduce the heat to low and slowly pour in the heavy cream, stirring constantly to combine.
9. Add the fresh spinach and cook for 2-3 minutes, just until wilted, stirring occasionally.
10. Sprinkle in the grated Parmesan cheese and dried Italian herbs, stirring until the cheese is melted and the sauce is smooth, about 2 minutes.
11. Return the chicken breasts to the skillet, spooning the creamy sauce over them, and let everything heat through for 3-4 minutes.
12. Remove from heat and let rest for 5 minutes before serving.
Velvety and rich, this dish boasts a creamy texture that clings to tender chicken, with bursts of tangy sun-dried tomatoes and earthy spinach. Serve it over a bed of al dente pasta or with crusty bread to soak up every last drop of sauce, making it a hearty centerpiece for any gathering.
Baked Lobster Tails with Drawn Butter
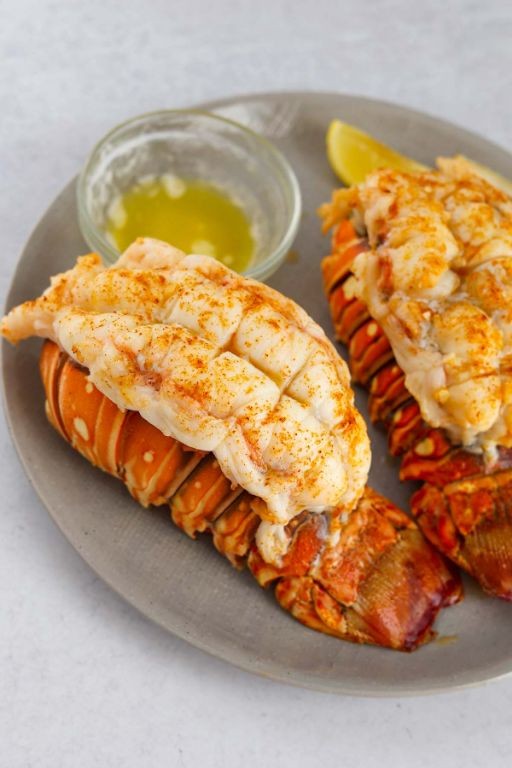
Luxurious yet surprisingly approachable, baked lobster tails with drawn butter transform a special occasion staple into an elegant weeknight treat. Picture succulent, sweet meat gently cooked in its shell, then dipped in golden, clarified butter—a dish that feels restaurant-worthy but requires minimal fuss. Perfect for holiday gatherings or an impromptu date night, this recipe delivers impressive results with straightforward techniques.
Serving: 2 | Pre Time: 15 minutes | Cooking Time: 15 minutes
Ingredients
– A couple of fresh lobster tails (about 6-8 ounces each)
– A good glug of olive oil, about 2 tablespoons
– A pinch of kosher salt
– A few cracks of black pepper
– A small pat of unsalted butter, about 4 tablespoons
– A lemon, cut into wedges for serving
Instructions
1. Preheat your oven to 425°F and line a baking sheet with parchment paper.
2. Using kitchen shears, carefully cut through the top shell of each lobster tail lengthwise, stopping at the tail fin.
3. Gently pull the meat upward through the slit, leaving it attached at the base, and rest it on top of the shell.
4. Brush the exposed lobster meat evenly with olive oil, then season with kosher salt and black pepper.
5. Place the prepared tails on the baking sheet and bake for 12-15 minutes, until the meat is opaque and registers 145°F on an instant-read thermometer.
6. While the lobster bakes, melt the unsalted butter in a small saucepan over low heat, letting it simmer gently for 3-4 minutes until the milk solids separate and sink.
7. Carefully skim off any foam from the top of the butter with a spoon, then pour the clear drawn butter into a small serving bowl, discarding the solids at the bottom.
8. Remove the lobster from the oven and let it rest for 2-3 minutes before serving.
9. Serve the baked lobster tails immediately with the drawn butter and lemon wedges on the side.
Allowing the lobster to rest ensures the juices redistribute, yielding tender, moist meat that flakes easily with a fork. The drawn butter adds a rich, nutty depth that complements the natural sweetness of the lobster, while a squeeze of lemon brightens each bite. For a festive twist, sprinkle the tails with fresh chopped parsley or serve over a bed of garlicky sautéed spinach to soak up every last drop of butter.
Parmesan Crusted Pork Chops
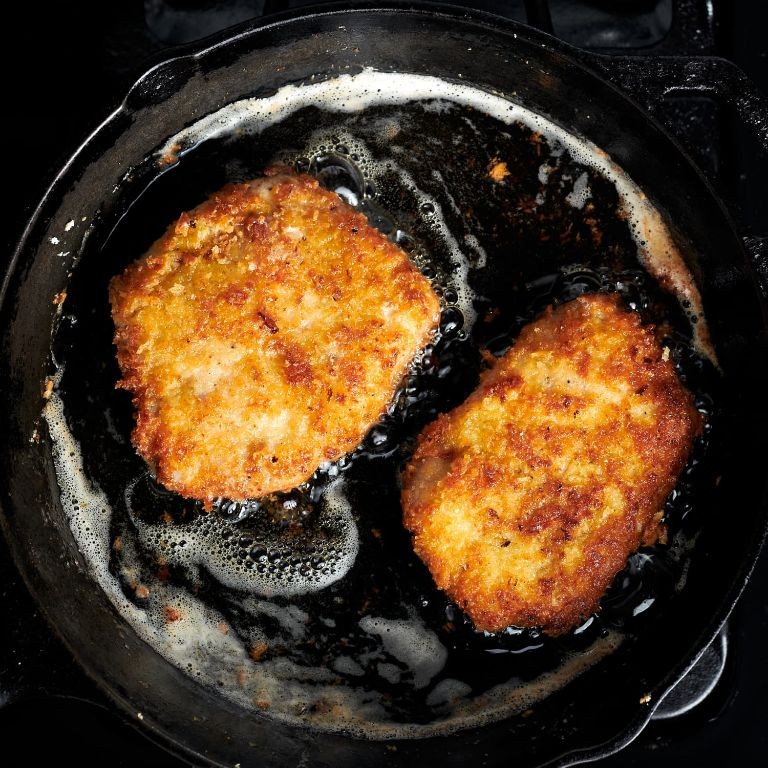
Venturing into the realm of weeknight elegance, these Parmesan Crusted Pork Chops transform a humble cut into a restaurant-worthy centerpiece. A golden, savory crust gives way to juicy, perfectly cooked meat, offering a symphony of textures and flavors that feels both indulgent and comforting.
Serving: 4 | Pre Time: 15 minutes | Cooking Time: 20 minutes
Ingredients
– 4 boneless pork chops, about 1-inch thick
– A good glug of olive oil, for the pan
– A couple of large eggs
– A splash of milk
– About a cup of all-purpose flour
– A cup of finely grated Parmesan cheese
– A cup of panko breadcrumbs
– A teaspoon of garlic powder
– A teaspoon of dried oregano
– A good pinch of kosher salt and freshly ground black pepper
Instructions
1. Preheat your oven to 400°F (200°C) and line a rimmed baking sheet with parchment paper.
2. Pat the pork chops completely dry with paper towels—this is key for the crust to adhere properly.
3. In a shallow dish, whisk together the eggs and milk until smooth.
4. Place the flour in a second shallow dish and season it with half of the salt and pepper.
5. In a third dish, combine the Parmesan, panko, garlic powder, oregano, and the remaining salt and pepper.
6. Working with one chop at a time, dredge it thoroughly in the seasoned flour, shaking off any excess.
7. Dip the floured chop into the egg mixture, letting any extra drip back into the dish.
8. Press the chop firmly into the Parmesan-panko mixture, coating all sides evenly and patting to help the crust adhere.
9. Place the breaded chop on the prepared baking sheet and repeat with the remaining chops.
10. Heat the olive oil in a large, oven-safe skillet over medium-high heat until it shimmers, about 2 minutes.
11. Carefully add the pork chops to the hot skillet and sear until the crust is deeply golden brown, about 3-4 minutes per side.
12. Transfer the entire skillet to the preheated oven and bake until the pork chops reach an internal temperature of 145°F (63°C), about 8-10 minutes.
13. Remove the skillet from the oven and let the chops rest on a cutting board for 5 minutes before serving—this allows the juices to redistribute for maximum tenderness.
Beyond the initial crisp, the interior remains remarkably moist and flavorful, a testament to the quick sear and gentle oven finish. The Parmesan crust offers a delightful, salty crunch that complements the savory pork beautifully, making these chops ideal alongside a bright arugula salad or creamy mashed potatoes for a complete, satisfying meal.
Herbed Roast Turkey with Cranberry Sauce
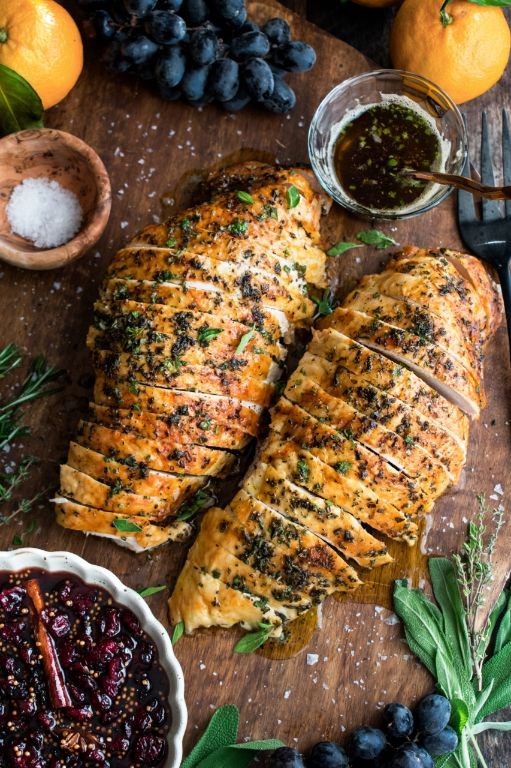
Meticulously seasoned and roasted to golden perfection, this herbed turkey with cranberry sauce transforms holiday gatherings into memorable feasts. The aromatic blend of fresh herbs infuses the bird with earthy depth, while the vibrant cranberry sauce adds a tangy-sweet counterpoint that cuts through the richness. It’s a centerpiece that balances tradition with a touch of culinary refinement, promising to delight both the cook and their guests.
Serving: 8 | Pre Time: 30 minutes | Cooking Time: 3 hours
Ingredients
– A 12-pound whole turkey, thawed if frozen
– A generous ¼ cup of olive oil
– A couple of tablespoons of fresh rosemary, finely chopped
– A couple of tablespoons of fresh thyme, finely chopped
– A couple of tablespoons of fresh sage, finely chopped
– A tablespoon of kosher salt
– A teaspoon of freshly ground black pepper
– A 12-ounce bag of fresh cranberries
– A cup of granulated sugar
– A splash of orange juice (about ½ cup)
– A cup of water
Instructions
1. Preheat your oven to 325°F and position a rack in the lower third.
2. Pat the turkey completely dry inside and out with paper towels—this ensures crisp skin.
3. In a small bowl, mix the olive oil, rosemary, thyme, sage, salt, and pepper into a paste.
4. Rub the herb paste evenly all over the turkey, including under the skin on the breast for maximum flavor.
5. Place the turkey breast-side up on a rack in a roasting pan and tent loosely with foil.
6. Roast for 2 hours, then remove the foil and continue roasting until the internal temperature reaches 165°F in the thickest part of the thigh, about 1 more hour.
7. While the turkey roasts, combine the cranberries, sugar, orange juice, and water in a medium saucepan.
8. Bring to a boil over medium-high heat, then reduce to a simmer, stirring occasionally until the cranberries burst and the sauce thickens, about 15-20 minutes.
9. Let the turkey rest for 30 minutes before carving to allow the juices to redistribute.
10. Serve the carved turkey with the warm cranberry sauce on the side.
Delightfully tender and aromatic, the turkey boasts a crisp, herb-infused skin that gives way to juicy, flavorful meat. The cranberry sauce, with its bright acidity and subtle sweetness, complements each bite perfectly. For a creative twist, serve slices over a bed of wild rice or alongside roasted root vegetables to soak up the savory pan juices.
Duck à l’Orange with Citrus Glaze

Wrapped in the warmth of holiday tradition yet bright with contemporary flair, Duck à l’Orange with Citrus Glaze transforms a classic French preparation into a stunning centerpiece for any festive table. The rich, succulent duck is perfectly balanced by a glossy, bittersweet glaze, creating a symphony of flavors that is both comforting and elegantly complex. This recipe demystifies the process, guiding you to a restaurant-worthy result with approachable steps and clever tips.
Serving: 4 | Pre Time: 25 minutes | Cooking Time: 90 minutes
Ingredients
– A whole duck, about 5 to 6 pounds
– A good glug of olive oil
– A couple of teaspoons of kosher salt
– A few cracks of fresh black pepper
– A cup of fresh orange juice
– A quarter cup of fresh lemon juice
– A third of a cup of granulated sugar
– A splash of white wine vinegar
– A tablespoon of unsalted butter
– A sprig of fresh thyme
Instructions
1. Preheat your oven to 325°F (163°C).
2. Pat the whole duck completely dry inside and out with paper towels—this is crucial for crispy skin.
3. Rub the duck all over with the olive oil, then season generously inside and out with the kosher salt and fresh black pepper.
4. Place the duck, breast-side up, on a rack set inside a roasting pan.
5. Roast the duck in the preheated oven for 1 hour and 30 minutes, or until a meat thermometer inserted into the thickest part of the thigh reads 165°F (74°C).
6. While the duck roasts, make the glaze: Combine the fresh orange juice, fresh lemon juice, granulated sugar, and white wine vinegar in a small saucepan over medium heat.
7. Bring the mixture to a simmer, stirring occasionally until the sugar dissolves completely.
8. Reduce the heat to medium-low and let the mixture simmer gently for 15 to 20 minutes, until it thickens to a syrupy consistency that coats the back of a spoon.
9. Remove the glaze from the heat and whisk in the unsalted butter and the sprig of fresh thyme until the butter melts and the sauce is glossy.
10. Once the duck is cooked, carefully transfer it to a cutting board and let it rest for 15 minutes to allow the juices to redistribute.
11. Discard the thyme sprig from the glaze.
12. Carve the duck and serve it drizzled generously with the warm citrus glaze.
The finished dish boasts crackling, golden skin giving way to incredibly tender, flavorful meat, all elevated by the glaze’s vibrant sweet-tart punch. For a beautiful presentation, arrange the carved duck over a bed of wild rice pilaf or roasted root vegetables, allowing the glossy sauce to pool enticingly around it.
Pan-Seared Ribeye with Chimichurri

Revered for its luxurious marbling and robust flavor, a perfectly seared ribeye steak crowned with vibrant chimichurri sauce transforms an ordinary evening into a celebratory feast. This Argentine-inspired pairing balances the steak’s rich, savory notes with the sauce’s bright, herbaceous freshness. With just a few quality ingredients and proper technique, you can create this restaurant-worthy dish at home.
Serving: 2 | Pre Time: 15 minutes | Cooking Time: 15 minutes
Ingredients
– 2 ribeye steaks, about 1½ inches thick
– A generous pinch of kosher salt
– A couple of cracks of freshly ground black pepper
– 2 tablespoons of olive oil
– A big handful of fresh parsley leaves
– A small handful of fresh cilantro leaves
– 3 cloves of garlic, peeled
– A splash of red wine vinegar
– ¼ cup of extra virgin olive oil
– A pinch of red pepper flakes
Instructions
1. Pat the ribeye steaks completely dry with paper towels to ensure a proper sear.
2. Season both sides of the steaks generously with kosher salt and freshly ground black pepper.
3. Let the seasoned steaks rest at room temperature for 30 minutes to promote even cooking.
4. While the steaks rest, make the chimichurri by finely chopping the parsley, cilantro, and garlic together.
5. Transfer the chopped herbs and garlic to a small bowl and stir in the red wine vinegar, ¼ cup of extra virgin olive oil, and a pinch of red pepper flakes. Set aside.
6. Heat 2 tablespoons of olive oil in a heavy-bottomed skillet, like cast iron, over medium-high heat until it shimmers, about 2 minutes.
7. Carefully place the steaks in the hot skillet and cook without moving them for 4-5 minutes to develop a deep golden-brown crust.
8. Flip the steaks using tongs and cook for another 4-5 minutes for medium-rare, or until an instant-read thermometer inserted into the thickest part reads 130°F.
9. Transfer the cooked steaks to a cutting board and let them rest for 10 minutes to allow the juices to redistribute.
10. Slice the steaks against the grain and serve immediately, topped with the prepared chimichurri sauce.
Delightfully, the resting period yields a steak that is exceptionally juicy and tender, while the chimichurri’s sharp acidity cuts beautifully through the richness. For a complete meal, serve alongside crispy roasted potatoes or a simple arugula salad to complement the bold flavors.
Surf and Turf with Grilled Steak and Lobster
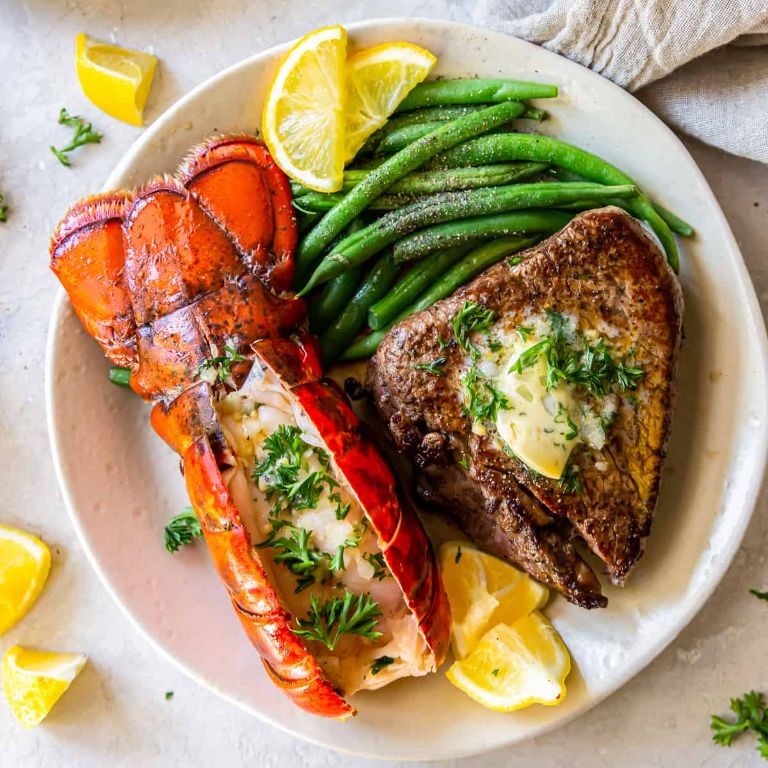
Unveiling the ultimate celebration of land and sea, this surf and turf masterpiece elevates the classic pairing of grilled steak and lobster into a symphony of flavors. Perfect for special occasions or when you simply crave restaurant-quality indulgence at home, it transforms premium ingredients into a showstopping meal that’s surprisingly straightforward to prepare. With a few key techniques, you’ll achieve a perfectly charred, juicy steak alongside sweet, tender lobster tails that will impress any guest.
Serving: 2 | Pre Time: 20 minutes | Cooking Time: 25 minutes
Ingredients
– A couple of 8-ounce ribeye steaks, about 1-inch thick
– Two 6-ounce lobster tails, thawed if frozen
– A generous drizzle of olive oil, about 2 tablespoons
– A big pinch of kosher salt
– A few cracks of freshly ground black pepper
– A couple of cloves of garlic, minced
– A tablespoon of unsalted butter
– A splash of fresh lemon juice, about 1 tablespoon
– A small handful of chopped fresh parsley
Instructions
1. Pat the ribeye steaks and lobster tails completely dry with paper towels to ensure a good sear.
2. Brush both sides of the steaks and the lobster meat with olive oil.
3. Season the steaks liberally on all sides with kosher salt and freshly ground black pepper.
4. Preheat your grill or a grill pan over medium-high heat until it reaches 450°F.
5. Place the steaks on the hot grill and cook undisturbed for 4 minutes to develop a deep crust.
6. Flip the steaks and cook for another 4 minutes for medium-rare, or until an instant-read thermometer inserted into the thickest part reads 130°F.
7. Transfer the cooked steaks to a plate, tent loosely with foil, and let them rest for 10 minutes—this allows the juices to redistribute for maximum tenderness.
8. While the steaks rest, place the lobster tails on the grill, meat-side down, and cook for 5 minutes until lightly charred.
9. Flip the lobster tails, shell-side down, and continue cooking for 4-5 minutes until the meat is opaque and firm to the touch.
10. In a small saucepan over low heat, melt the unsalted butter with the minced garlic, cooking for 1 minute until fragrant but not browned.
11. Remove the garlic butter from the heat and stir in the fresh lemon juice and chopped parsley.
12. Drizzle the warm garlic butter sauce over the rested steaks and grilled lobster tails just before serving.
13. Slice the steaks against the grain to ensure each bite is tender, and serve immediately alongside the lobster.
What emerges is a textural delight: the steak offers a robust, charred crust giving way to a juicy, pink interior, while the lobster provides a sweet, delicate contrast. The garlic butter sauce ties everything together with its rich, aromatic notes, making each forkful irresistible. For a creative twist, serve this surf and turf over a bed of creamy parmesan polenta or alongside crispy roasted potatoes to soak up every last drop of that glorious sauce.
Summary
Kick off your celebration with these 18 delicious birthday dinner recipes! From cozy classics to impressive feasts, there’s something special for every taste. We hope you find a new favorite to make your next celebration unforgettable. Give a recipe a try, then let us know which one you loved in the comments below—and don’t forget to share this roundup on Pinterest to spread the joy!


