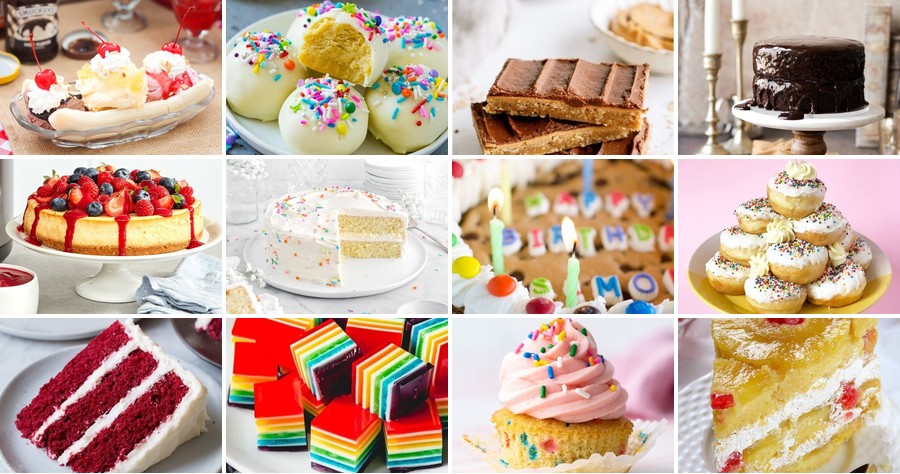
Tired of the same old birthday cake? Whether you’re planning a grand celebration or an intimate gathering, these 18 delicious birthday recipes will make your sweet celebration unforgettable. From show-stopping cakes to delightful treats everyone will love, we’ve got something special for every taste. Let’s dive into these mouthwatering ideas that promise to add extra joy to your birthday festivities!
Funfetti Cupcakes with Rainbow Sprinkles

Brimming with whimsical charm and celebratory flair, these Funfetti Cupcakes with Rainbow Sprinkles transform a classic vanilla batter into a canvas of pure joy. Their tender crumb, speckled with vibrant color, promises a delightful treat that’s as visually enchanting as it is delicious, perfect for birthdays, holidays, or simply brightening an ordinary day.
Serving: 12 | Pre Time: 20 minutes | Cooking Time: 18 minutes
Ingredients
– 1 ½ cups all-purpose flour, spooned and leveled for accuracy
– 1 ½ tsp baking powder
– ¼ tsp salt
– ½ cup unsalted butter, softened to room temperature
– 1 cup granulated sugar
– 2 large eggs, at room temperature
– 2 tsp pure vanilla extract
– ½ cup whole milk, at room temperature
– ⅓ cup rainbow sprinkles (jimmies style, not nonpareils, to prevent bleeding)
– 8 oz cream cheese, softened to room temperature
– ¼ cup unsalted butter, softened to room temperature
– 2 cups powdered sugar, sifted to avoid lumps
– 1 tsp pure vanilla extract
– Additional rainbow sprinkles for decorating
Instructions
1. Preheat your oven to 350°F (175°C) and line a 12-cup muffin tin with paper liners.
2. In a medium bowl, whisk together 1 ½ cups all-purpose flour, 1 ½ tsp baking powder, and ¼ tsp salt until fully combined; set aside.
3. In a large bowl, use an electric mixer on medium speed to beat ½ cup softened butter and 1 cup granulated sugar together for 2-3 minutes until light and fluffy, which incorporates air for a tender texture.
4. Add 2 large eggs one at a time to the butter mixture, beating well after each addition until fully incorporated.
5. Mix in 2 tsp vanilla extract until just combined.
6. With the mixer on low speed, alternate adding the dry flour mixture and ½ cup milk to the wet ingredients, beginning and ending with the flour, and mix until a smooth batter forms; do not overmix to avoid toughness.
7. Gently fold ⅓ cup rainbow sprinkles into the batter using a spatula until evenly distributed.
8. Divide the batter evenly among the 12 prepared muffin cups, filling each about two-thirds full to allow for rising.
9. Bake in the preheated oven for 16-18 minutes, or until a toothpick inserted into the center of a cupcake comes out clean with no wet batter.
10. Transfer the cupcakes from the tin to a wire rack and let them cool completely for about 1 hour before frosting to prevent melting.
11. For the frosting, in a clean large bowl, beat 8 oz softened cream cheese and ¼ cup softened butter with an electric mixer on medium speed for 2 minutes until smooth and creamy.
12. Gradually add 2 cups sifted powdered sugar to the cream cheese mixture on low speed, then increase to medium and beat for 1-2 minutes until fluffy and well combined.
13. Mix in 1 tsp vanilla extract until fully incorporated.
14. Frost the cooled cupcakes generously with the cream cheese frosting using a piping bag or offset spatula.
15. Immediately decorate the frosted cupcakes with additional rainbow sprinkles before the frosting sets to ensure they adhere well.
Achieving a perfect balance, these cupcakes offer a moist, vanilla-scented crumb that yields gently to each bite, punctuated by the subtle crunch of sprinkles. The tangy cream cheese frosting provides a creamy contrast, making them ideal for stacking on a festive tiered stand or gifting in colorful boxes to spread cheer.
Homemade Birthday Cookies with Icing Decorations
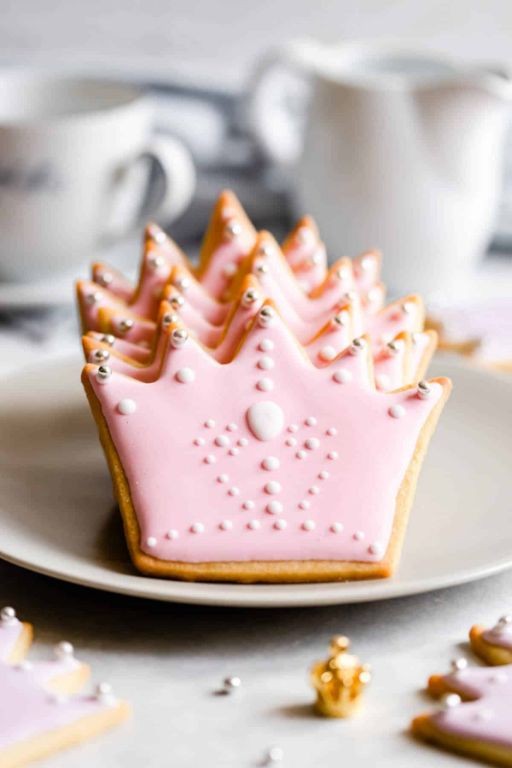
Radiant with festive charm, these Homemade Birthday Cookies with Icing Decorations transform a simple celebration into a memorable, personalized treat. Crafted from a buttery, tender dough and adorned with vibrant royal icing, each cookie becomes a canvas for creativity, perfect for marking special occasions with a touch of handmade elegance. Their delightful sweetness and customizable designs make them a joyful centerpiece for any birthday gathering, inviting both novice and experienced bakers to partake in the art of edible decoration.
Serving: 24 cookies | Pre Time: 30 minutes | Cooking Time: 12 minutes
Ingredients
– 2 1/4 cups all-purpose flour, plus extra for dusting
– 1 cup unsalted butter, softened to room temperature (about 68°F)
– 3/4 cup granulated sugar
– 1 large egg, at room temperature for easier mixing
– 2 teaspoons pure vanilla extract
– 1/2 teaspoon salt
– 4 cups powdered sugar, sifted to remove lumps
– 3 tablespoons meringue powder, for stable icing
– 1/2 cup water, divided for icing consistency
– Gel food coloring in assorted colors, for vibrant decorations (avoid liquid types to prevent thinning)
Instructions
1. In a large mixing bowl, cream together the softened butter and granulated sugar using an electric mixer on medium speed for 3-4 minutes, until light and fluffy to ensure a tender cookie texture.
2. Add the egg and vanilla extract to the butter mixture, beating on low speed just until fully incorporated, about 1 minute, to avoid overmixing.
3. In a separate bowl, whisk together the flour and salt to distribute evenly, then gradually add to the wet ingredients, mixing on low speed until a soft dough forms without overworking it.
4. Divide the dough into two equal portions, shape each into a disk, wrap tightly in plastic wrap, and refrigerate for at least 1 hour to firm up for easier rolling.
5. Preheat your oven to 350°F and line two baking sheets with parchment paper to prevent sticking.
6. On a lightly floured surface, roll out one dough disk to 1/4-inch thickness, using a ruler for precision if desired, then cut into shapes with cookie cutters.
7. Place the cut cookies onto the prepared baking sheets, spacing them about 1 inch apart to allow for slight spreading, and bake for 10-12 minutes, until the edges are lightly golden.
8. Transfer the baked cookies to a wire rack to cool completely for at least 30 minutes before icing to prevent melting.
9. For the icing, combine the powdered sugar, meringue powder, and 1/4 cup water in a clean bowl, beating on low speed for 2 minutes, then increase to high for 5-7 minutes until stiff peaks form.
10. Divide the icing into smaller bowls and tint with gel food coloring as desired, adding water a teaspoon at a time to reach piping or flooding consistency for detailed designs.
11. Pipe outlines or flood the cooled cookies with the colored icing using piping bags or squeeze bottles, allowing each layer to set for 15-20 minutes before adding additional decorations.
12. Let the iced cookies dry undisturbed at room temperature for 4-6 hours, or overnight, until the icing hardens completely for a smooth finish.
Perfectly crisp yet tender, these cookies offer a buttery base that complements the sweet, glossy icing, creating a delightful contrast in textures. Their vibrant colors and intricate designs make them ideal for stacking on a decorative platter or packaging as personalized gifts, adding a festive flair to any birthday celebration with every bite.
Oreo Ice Cream Cake with Whipped Topping
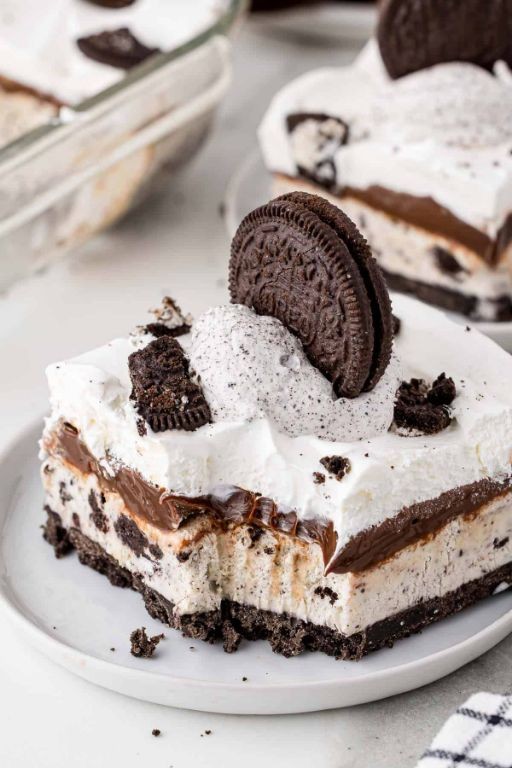
Crafted for festive gatherings and cozy celebrations, this Oreo Ice Cream Cake with Whipped Topping transforms simple ingredients into an elegant, crowd-pleasing dessert that balances rich chocolate notes with a light, creamy finish. Combining the nostalgic crunch of Oreos with velvety ice cream, it’s an effortless showstopper perfect for holiday tables or summer soirées.
Serving: 12 | Pre Time: 25 minutes | Cooking Time: 0 minutes
Ingredients
– 24 Oreo cookies, crushed into fine crumbs (reserve 2 tbsp for garnish)
– 1/4 cup unsalted butter, melted (cooled slightly to avoid melting ice cream)
– 1/2 gallon vanilla ice cream, softened at room temperature for 10–15 minutes
– 8 oz whipped topping, thawed in the refrigerator (such as Cool Whip)
– 1/4 cup chocolate syrup, for drizzling (adjust amount for desired sweetness)
Instructions
1. In a medium bowl, combine 22 Oreo cookie crumbs with melted butter until the mixture resembles wet sand.
2. Press the crumb mixture firmly into the bottom of a 9-inch springform pan to form an even crust layer.
3. Spread the softened vanilla ice cream evenly over the crust using a spatula, smoothing the top to eliminate air pockets.
4. Freeze the cake for 2 hours or until the ice cream layer is solid to the touch.
5. Gently fold the whipped topping into the remaining 2 tbsp of Oreo crumbs until just combined, being careful not to deflate the mixture.
6. Spread the whipped topping mixture over the frozen ice cream layer, creating decorative swirls with the spatula.
7. Drizzle chocolate syrup in a zigzag pattern across the top for a polished finish.
8. Freeze the assembled cake for at least 4 hours or overnight until completely set.
9. Before serving, run a warm knife around the pan’s edges and release the springform to unmold the cake cleanly.
Decadently layered, this cake offers a satisfying contrast between the crisp Oreo base and the smooth, airy whipped topping. Serve it sliced with extra chocolate syrup or crumbled cookies for added texture, making it a versatile centerpiece that delights both chocolate lovers and those seeking a refreshing treat.
Strawberry Shortcake Trifle
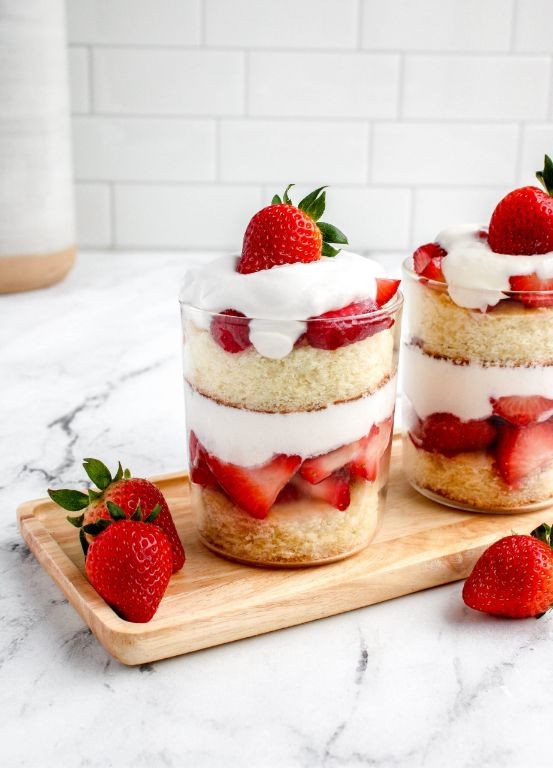
Vibrant layers of tender cake, macerated strawberries, and cloud-like whipped cream come together in this Strawberry Shortcake Trifle, a stunning dessert that transforms classic summer flavors into an elegant, shareable centerpiece. This deconstructed version offers all the nostalgic charm of the original with a sophisticated presentation perfect for entertaining, where each spoonful delivers a harmonious balance of sweet berries and rich cream.
Serving: 8 | Pre Time: 25 minutes | Cooking Time: 30 minutes
Ingredients
– 1 pound fresh strawberries, hulled and sliced (about 4 cups)
– 1/4 cup granulated sugar
– 1 tablespoon fresh lemon juice
– 1 1/2 cups all-purpose flour
– 1 1/2 teaspoons baking powder
– 1/4 teaspoon salt
– 1/2 cup unsalted butter, softened to room temperature
– 3/4 cup granulated sugar
– 2 large eggs, at room temperature
– 1 teaspoon pure vanilla extract
– 1/2 cup whole milk, at room temperature
– 2 cups heavy whipping cream, chilled
– 1/4 cup powdered sugar
– 1 teaspoon pure vanilla extract
Instructions
1. Combine strawberries, 1/4 cup granulated sugar, and lemon juice in a medium bowl; toss gently and let macerate at room temperature for 30 minutes until juicy, stirring once halfway through.
2. Preheat oven to 350°F and grease an 8-inch round cake pan, then line the bottom with parchment paper for easy removal.
3. Whisk flour, baking powder, and salt in a medium bowl until fully combined.
4. Beat softened butter and 3/4 cup granulated sugar in a large bowl with an electric mixer on medium-high speed for 3 minutes until light and fluffy.
5. Add eggs one at a time to the butter mixture, beating well after each addition until fully incorporated, then mix in 1 teaspoon vanilla extract.
6. Alternate adding the flour mixture and milk to the butter mixture in three additions, beginning and ending with flour, mixing on low speed just until combined after each addition; avoid overmixing to keep the cake tender.
7. Pour batter into the prepared pan and smooth the top with a spatula.
8. Bake at 350°F for 28–30 minutes until a toothpick inserted into the center comes out clean and the top is golden brown.
9. Cool cake in the pan on a wire rack for 10 minutes, then invert onto the rack, remove parchment, and cool completely to prevent sogginess in the trifle.
10. Cut cooled cake into 1-inch cubes using a serrated knife for clean edges.
11. Beat chilled heavy cream, powdered sugar, and 1 teaspoon vanilla extract in a large bowl with an electric mixer on medium-high speed for 2–3 minutes until stiff peaks form.
12. Assemble trifle in a large glass bowl: layer half the cake cubes, half the macerated strawberries with their juices, and half the whipped cream; repeat layers, ending with whipped cream.
13. Cover and refrigerate for at least 1 hour before serving to allow flavors to meld.
Just as delightful to behold as it is to savor, this trifle boasts a textural symphony of soft cake, juicy berries, and airy cream that melds into pure indulgence. For a festive touch, garnish with fresh mint leaves or extra strawberry slices just before serving, making it a versatile dessert that shines at brunches, potlucks, or intimate dinners alike.
Birthday Cake Pop Bites

Picture this: a bite-sized celebration that captures the nostalgic joy of a classic birthday cake, transformed into elegant, hand-held treats perfect for any festive gathering. These Birthday Cake Pop Bites combine moist, tender cake with a creamy frosting center, all enrobed in a smooth, colorful candy coating for a delightful textural contrast. They’re a whimsical yet sophisticated addition to dessert tables, offering a playful twist on tradition that’s sure to delight guests of all ages.
Serving: 24 | Pre Time: 30 minutes | Cooking Time: 25 minutes
Ingredients
– 1 box (15.25 oz) vanilla cake mix, plus ingredients listed on box (typically 3 large eggs, ½ cup vegetable oil or any neutral oil, and 1 cup water)
– ½ cup vanilla frosting, store-bought or homemade, chilled for easier handling
– 12 oz vanilla candy melts or white chocolate chips, for a smooth coating
– 2 tbsp vegetable shortening, to thin the coating if needed for a glossy finish
– Sprinkles or edible glitter, for decorating immediately after dipping
– 24 lollipop sticks, 4-inch length, for easy handling
Instructions
1. Preheat your oven to 350°F and grease a 9×13-inch baking pan lightly with non-stick spray or butter.
2. Prepare the cake mix according to package directions, combining it with the eggs, oil, and water in a large bowl until smooth, about 2 minutes on medium speed.
3. Pour the batter into the prepared pan and bake for 22–25 minutes, or until a toothpick inserted into the center comes out clean with no wet crumbs.
4. Allow the cake to cool completely in the pan on a wire rack for at least 1 hour to prevent crumbling when handled.
5. Crumble the cooled cake into fine crumbs in a large bowl using your hands or a fork, ensuring no large chunks remain.
6. Add the chilled vanilla frosting to the cake crumbs and mix thoroughly with a spatula until the mixture holds together when pressed, adding more frosting sparingly if too dry.
7. Roll the mixture into 24 uniform balls, each about 1-inch in diameter, and place them on a parchment-lined baking sheet.
8. Insert a lollipop stick about halfway into each ball, then freeze the balls for 15 minutes to firm up, which helps prevent cracking during coating.
9. Melt the vanilla candy melts in a microwave-safe bowl in 30-second intervals, stirring between each, until smooth and fluid, about 2 minutes total.
10. If the coating is too thick, stir in vegetable shortening 1 teaspoon at a time until it reaches a dipping consistency that coats the back of a spoon.
11. Dip each chilled cake ball into the melted coating, swirling gently to cover completely, and let excess drip off by tapping the stick lightly on the bowl’s edge.
12. Immediately decorate with sprinkles or edible glitter before the coating sets, as they won’t adhere once hardened.
13. Stand the dipped pops upright in a styrofoam block or cake pop holder and allow them to set at room temperature for 30 minutes until firm.
These bites offer a delightful crunch from the candy shell that gives way to a soft, cakey interior with a hint of creamy frosting. Their vibrant, sprinkle-adorned appearance makes them a festive centerpiece, or try serving them alongside a drizzle of chocolate sauce for an extra indulgent touch.
Lemon Blueberry Birthday Tart
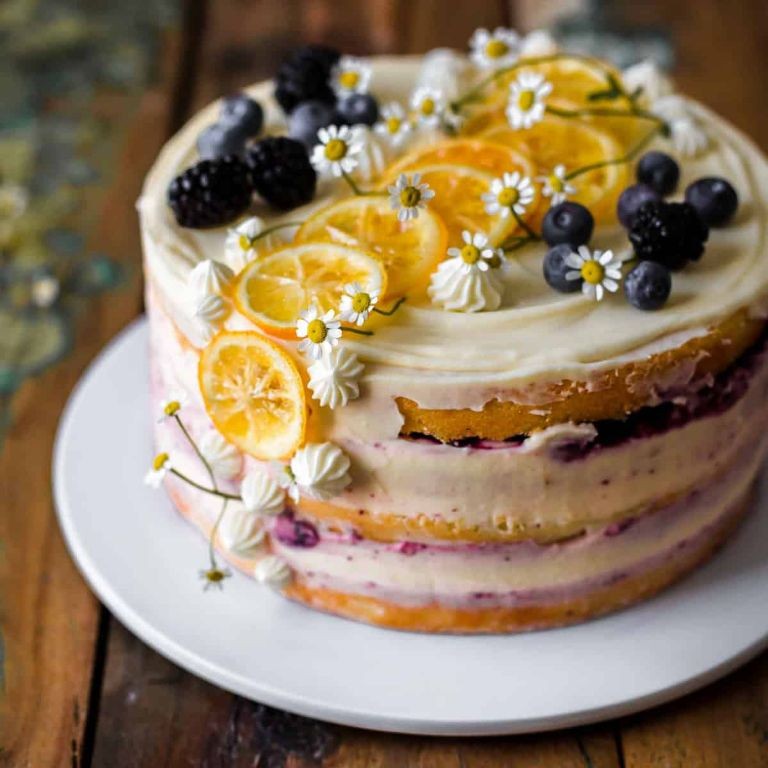
On a crisp winter afternoon, when the desire for something both celebratory and comforting arises, this Lemon Blueberry Birthday Tart emerges as the perfect centerpiece—a vibrant medley of zesty citrus and sweet berries cradled in a buttery, crumbly crust that feels both elegant and delightfully indulgent. It’s a dessert that transforms simple ingredients into a showstopping treat, ideal for marking special moments or brightening an ordinary day with its sunny flavors and stunning visual appeal.
Serving: 8 | Pre Time: 25 minutes | Cooking Time: 35 minutes
Ingredients
– 1 ½ cups all-purpose flour (spooned and leveled for accuracy)
– ½ cup unsalted butter, cold and cubed (keeps the crust flaky)
– ¼ cup granulated sugar
– 1 large egg yolk
– 1 tablespoon ice water (add more if dough is too dry)
– 1 cup fresh blueberries (frozen can be used if thawed and patted dry)
– ½ cup lemon curd (store-bought or homemade for a tangy kick)
– ¼ cup powdered sugar (for dusting, optional)
– 1 teaspoon lemon zest (from about 1 lemon, adds bright aroma)
Instructions
1. Preheat your oven to 375°F (190°C) and lightly grease a 9-inch tart pan with removable bottom.
2. In a food processor, pulse the all-purpose flour, cold cubed unsalted butter, and granulated sugar until the mixture resembles coarse crumbs.
3. Add the large egg yolk and 1 tablespoon ice water to the processor, pulsing just until the dough begins to clump together; avoid overmixing to prevent a tough crust.
4. Turn the dough out onto a lightly floured surface and gently press it into a disk, then roll it out to a ¼-inch thickness, about 11 inches in diameter.
5. Carefully transfer the rolled dough to the prepared tart pan, pressing it into the edges and trimming any excess; chill the crust in the refrigerator for 15 minutes to reduce shrinkage during baking.
6. Line the chilled crust with parchment paper and fill with pie weights or dried beans, then blind bake at 375°F for 15 minutes until the edges are lightly golden.
7. Remove the parchment and weights, then spread ½ cup lemon curd evenly over the bottom of the crust, using the back of a spoon for a smooth layer.
8. Scatter 1 cup fresh blueberries over the lemon curd, pressing them gently into the surface for an even distribution.
9. Return the tart to the oven and bake at 375°F for an additional 20 minutes, or until the blueberries are soft and the crust is deep golden brown.
10. Let the tart cool completely in the pan on a wire rack, then sprinkle with 1 teaspoon lemon zest and dust with ¼ cup powdered sugar if desired before serving.
Soft and crumbly with a hint of sweetness, the buttery crust provides a perfect contrast to the tart lemon curd and juicy blueberries that burst with flavor in every bite. Serve it slightly warm with a dollop of whipped cream or a scoop of vanilla ice cream to enhance its festive appeal, making it a memorable dessert for birthdays or any gathering.
Caramel Apple Birthday Pie
Visions of festive celebrations come to life with this Caramel Apple Birthday Pie, a decadent twist on a classic dessert that marries the nostalgic sweetness of caramel-coated apples with the celebratory charm of a birthday treat. Its golden, flaky crust encases a warmly spiced apple filling, elevated by a rich, buttery caramel that promises to be the centerpiece of any special occasion. This elegant creation transforms simple ingredients into a show-stopping dessert worthy of marking life’s sweetest moments.
Serving: 8 | Pre Time: 30 minutes | Cooking Time: 55 minutes
Ingredients
– 1 store-bought pie crust (or homemade, chilled for best results)
– 6 medium Granny Smith apples, peeled and thinly sliced (about 6 cups)
– 1 cup granulated sugar
– 1/4 cup all-purpose flour
– 1 tsp ground cinnamon
– 1/4 tsp ground nutmeg
– 1/4 cup unsalted butter, cubed
– 1/2 cup heavy cream
– 1 tsp vanilla extract
– 1 large egg, beaten (for egg wash)
– 1 tbsp coarse sugar (for sprinkling)
Instructions
1. Preheat your oven to 375°F (190°C) and place a baking sheet on the lower rack to catch any drips.
2. Roll out the pie crust and gently press it into a 9-inch pie dish, trimming any excess edges with a sharp knife.
3. In a large bowl, combine the sliced apples, granulated sugar, flour, cinnamon, and nutmeg, tossing until the apples are evenly coated.
4. Transfer the apple mixture into the pie crust, arranging it in an even layer, and dot the top with the cubed butter.
5. In a small saucepan over medium heat, warm the heavy cream until it just begins to simmer, then remove from heat and stir in the vanilla extract.
6. Slowly pour the warm cream mixture over the apples in the pie, allowing it to seep into the layers for added moisture.
7. Brush the edges of the pie crust with the beaten egg wash and sprinkle the coarse sugar over the top for a sparkling finish.
8. Bake the pie on the preheated baking sheet for 50-55 minutes, or until the crust is golden brown and the filling is bubbling.
9. Remove the pie from the oven and let it cool completely on a wire rack for at least 2 hours to set the filling properly.
Dazzling in both appearance and taste, this pie boasts a tender, flaky crust that gives way to a luscious, caramel-infused apple filling with hints of warm spice. Serve it slightly warm with a scoop of vanilla ice cream to contrast the rich sweetness, or garnish with whipped cream and a drizzle of extra caramel for an indulgent birthday celebration that delights all senses.
Chocolate Chip Cookie Cake with Candles
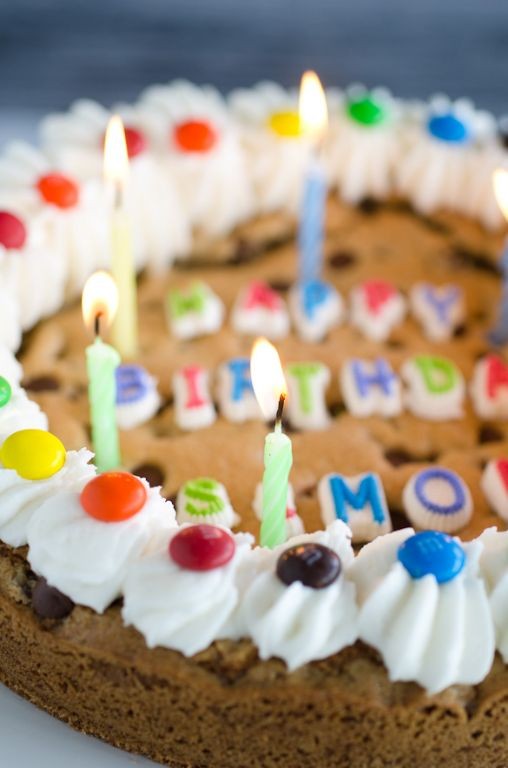
Crafted for celebrations both grand and intimate, this Chocolate Chip Cookie Cake with Candles transforms the classic cookie into a showstopping dessert that’s as delightful to behold as it is to devour. Imagine a giant, soft-baked cookie, studded with melty chocolate chips and crowned with festive candles, offering a nostalgic yet elegant centerpiece for any gathering.
Serving: 8 | Pre Time: 15 minutes | Cooking Time: 25 minutes
Ingredients
– 1 cup (2 sticks) unsalted butter, softened to room temperature (for easy creaming)
– ¾ cup granulated sugar
– ¾ cup packed light brown sugar
– 2 large eggs, at room temperature
– 2 teaspoons pure vanilla extract
– 2 ¼ cups all-purpose flour, spooned and leveled (for accuracy)
– 1 teaspoon baking soda
– 1 teaspoon fine sea salt
– 2 cups semi-sweet chocolate chips (or a mix with milk chocolate)
– Non-stick cooking spray, for the pan
Instructions
1. Preheat your oven to 350°F (175°C) and generously spray a 9-inch round cake pan with non-stick cooking spray, ensuring full coverage to prevent sticking.
2. In a large mixing bowl, use an electric mixer on medium speed to cream the softened unsalted butter, granulated sugar, and packed light brown sugar together for 2-3 minutes until light and fluffy, which incorporates air for a tender texture.
3. Add the 2 large eggs one at a time, beating well after each addition until fully incorporated, then mix in the 2 teaspoons pure vanilla extract.
4. In a separate medium bowl, whisk together the 2 ¼ cups all-purpose flour, 1 teaspoon baking soda, and 1 teaspoon fine sea salt to ensure even distribution of leavening agents.
5. Gradually add the dry flour mixture to the wet butter mixture, mixing on low speed just until combined and no flour streaks remain, being careful not to overmix to avoid a tough cake.
6. Use a spatula to fold in the 2 cups semi-sweet chocolate chips until evenly distributed throughout the dough.
7. Transfer the dough to the prepared 9-inch round cake pan, pressing it into an even layer with your hands or the back of a spoon.
8. Bake in the preheated 350°F (175°C) oven for 22-25 minutes, or until the edges are golden brown and the center is set but still slightly soft to the touch, as it will firm up while cooling.
9. Remove the pan from the oven and let the cookie cake cool completely in the pan on a wire rack for at least 1 hour to set properly before removing.
10. Once cooled, gently run a knife around the edges and invert the pan to release the cookie cake onto a serving plate.
Buttery and rich, this cookie cake boasts a chewy interior with crisp edges, punctuated by pockets of molten chocolate that melt in the mouth. For a festive touch, insert candles before serving, or slice it warm and top with a scoop of vanilla ice cream for an indulgent twist that delights every palate.
Rainbow Layered Jello Dessert

Crafted with vibrant hues and a silky texture, this Rainbow Layered Jello Dessert is a stunning centerpiece that transforms simple ingredients into a visually captivating treat. Each translucent layer offers a delicate, fruity flavor, creating a dessert that’s as delightful to eat as it is to behold. Perfect for celebrations or a whimsical family gathering, it brings a touch of elegance to any table.
Serving: 12 | Pre Time: 30 minutes | Cooking Time: 0 minutes
Ingredients
– 6 (3 oz) boxes of flavored gelatin (e.g., strawberry, orange, lemon, lime, blue raspberry, grape), using one box per layer
– 4 envelopes unflavored gelatin powder, for added firmness
– 4 cups boiling water, divided for dissolving each gelatin layer
– 4 cups cold water, divided for cooling each gelatin layer
– 1 (14 oz) can sweetened condensed milk, for a creamy white layer
– 1 cup heavy cream, whipped to soft peaks for garnish (optional)
Instructions
1. Lightly grease a 9×13-inch glass baking dish with cooking spray to prevent sticking.
2. In a medium bowl, combine 1 box of flavored gelatin with 2/3 cup boiling water, stirring vigorously for 2 minutes until fully dissolved.
3. Stir in 2/3 cup cold water into the dissolved gelatin mixture until well combined.
4. Pour the gelatin mixture into the prepared dish, tilting to spread evenly, and refrigerate for 20–25 minutes until set to a firm, jiggly texture.
5. Repeat steps 2–4 with the remaining flavored gelatin boxes, using a different color for each layer and refrigerating between additions.
6. For the white layer, sprinkle 2 envelopes of unflavored gelatin over 1 cup cold water in a bowl and let sit for 5 minutes to bloom.
7. Add 1 cup boiling water to the bloomed gelatin, stirring for 2 minutes until clear and dissolved.
8. Whisk in the sweetened condensed milk until smooth, then pour over the set colored layers and refrigerate for 30 minutes until firm.
9. Repeat steps 6–8 with the remaining unflavored gelatin and liquids for a second white layer, refrigerating for 30 minutes more.
10. To serve, run a knife around the edges of the dish and dip the bottom in warm water for 10 seconds to loosen.
11. Invert onto a serving platter and slice into squares using a sharp knife wiped clean between cuts for neat edges.
12. Garnish with whipped cream if desired, serving immediately or chilled.
Yielding a dessert with a smooth, quivering texture and a playful burst of fruity flavors, each bite offers a cool, refreshing experience. The creamy white layers provide a subtle richness that balances the vibrant colors, making it ideal for slicing into elegant portions or layering in individual glasses for a personalized touch.
Tiramisu Birthday Parfait
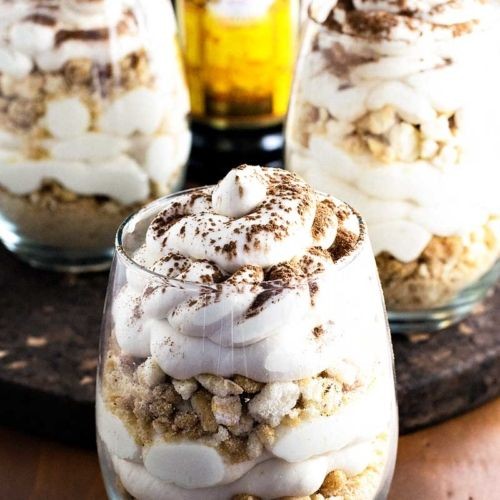
Venturing beyond the classic Italian dessert, this Tiramisu Birthday Parfait layers espresso-soaked ladyfingers with mascarpone cream in individual glasses for an elegant, celebratory treat. It captures the beloved coffee and cocoa flavors in a portable format perfect for parties, requiring no baking and minimal fuss. The result is a sophisticated yet approachable dessert that feels special enough for any birthday gathering.
Serving: 6 | Pre Time: 25 minutes | Cooking Time: 0 minutes
Ingredients
– 1 cup strong brewed espresso, cooled to room temperature (or instant espresso dissolved in water)
– 2 tablespoons coffee liqueur, optional for a boozy kick
– 24 ladyfinger cookies (about 6 ounces)
– 8 ounces mascarpone cheese, softened at room temperature for 30 minutes
– 1 cup heavy cream, cold
– 1/2 cup granulated sugar
– 1 teaspoon pure vanilla extract
– 2 tablespoons unsweetened cocoa powder, for dusting
Instructions
1. Brew 1 cup of strong espresso using your preferred method and let it cool completely to room temperature in a shallow bowl, about 15 minutes; if using instant espresso, dissolve 2 tablespoons in 1 cup of hot water first, then cool.
2. Stir 2 tablespoons of coffee liqueur into the cooled espresso, if using, to enhance the flavor.
3. In a large mixing bowl, combine 8 ounces of softened mascarpone cheese, 1/2 cup granulated sugar, and 1 teaspoon vanilla extract; beat with an electric mixer on medium speed until smooth and creamy, about 2 minutes, scraping down the sides as needed.
4. In a separate chilled bowl, pour 1 cup of cold heavy cream; whip with the mixer on high speed until stiff peaks form, about 3-4 minutes, being careful not to over-whip to avoid curdling.
5. Gently fold the whipped cream into the mascarpone mixture using a spatula until fully incorporated and no streaks remain, creating a light and airy cream.
6. Quickly dip 24 ladyfinger cookies, one at a time, into the espresso mixture for 1-2 seconds per side to moisten without becoming soggy, then place them in a single layer at the bottom of six serving glasses or jars.
7. Spoon or pipe half of the mascarpone cream evenly over the ladyfingers in each glass, smoothing the top with the back of a spoon.
8. Repeat the dipping process with the remaining ladyfingers and layer them over the cream in the glasses.
9. Top with the remaining mascarpone cream, spreading it smoothly to cover the ladyfingers completely.
10. Sift 2 tablespoons of unsweetened cocoa powder evenly over the tops of the parfaits using a fine-mesh sieve for a delicate, dusted finish.
11. Cover the glasses with plastic wrap and refrigerate for at least 4 hours, or ideally overnight, to allow the flavors to meld and the texture to set firmly.
Firm yet yielding, each spoonful offers a harmonious blend of bitter espresso, sweet cream, and rich cocoa that deepens over time. For a festive twist, garnish with chocolate shavings or a candle before serving, making it a standout centerpiece that delights both the eyes and palate.
Peanut Butter Chocolate Birthday Bars
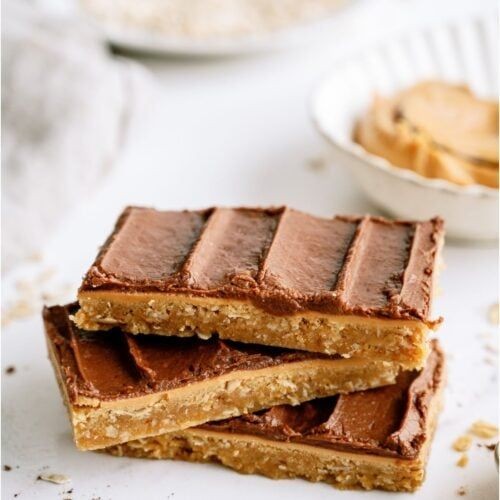
Kicking off the holiday season with a decadent treat that doubles as a festive celebration, these Peanut Butter Chocolate Birthday Bars blend creamy indulgence with a satisfying crunch. Imagine layers of rich chocolate and velvety peanut butter coming together in a no-bake masterpiece, perfect for gifting or savoring with loved ones during cozy gatherings. Their irresistible allure lies in the harmonious balance of sweet and salty notes, making them an instant crowd-pleaser for any occasion.
Serving: 16 | Pre Time: 20 minutes | Cooking Time: 0 minutes
Ingredients
– 2 cups graham cracker crumbs (about 16 whole crackers, crushed finely)
– 1/2 cup unsalted butter, melted (cool slightly to avoid melting chocolate too quickly)
– 1 cup creamy peanut butter (use natural for a looser texture or processed for firmer bars)
– 1/2 cup powdered sugar (sift to prevent lumps in the filling)
– 1 teaspoon vanilla extract (pure vanilla enhances the chocolate flavor)
– 1 1/2 cups semi-sweet chocolate chips (high-quality chips ensure smooth melting)
– 1 tablespoon coconut oil (or any neutral oil, to thin the chocolate for easy spreading)
– 1/4 cup chopped peanuts (for garnish, toasted lightly for extra crunch)
Instructions
1. Line an 8×8-inch baking pan with parchment paper, leaving overhang on two sides for easy removal.
2. In a medium bowl, combine graham cracker crumbs and melted butter, stirring until the mixture resembles wet sand and holds together when pressed.
3. Press the crumb mixture firmly into the prepared pan using the bottom of a measuring cup to create an even, compact base layer.
4. Chill the crust in the refrigerator for 10 minutes to set while preparing the filling.
5. In another bowl, mix peanut butter, powdered sugar, and vanilla extract until smooth and fully incorporated, about 2 minutes with a spatula.
6. Spread the peanut butter mixture evenly over the chilled crust, smoothing the top with an offset spatula for a uniform layer.
7. Return the pan to the refrigerator and chill for 15 minutes to firm up the peanut butter layer before adding chocolate.
8. In a microwave-safe bowl, combine chocolate chips and coconut oil, microwaving in 30-second intervals, stirring between each, until melted and glossy, about 1-2 minutes total.
9. Pour the melted chocolate over the peanut butter layer, tilting the pan gently to spread it to the edges with a spatula.
10. Immediately sprinkle chopped peanuts evenly over the chocolate before it sets to create a decorative, textured topping.
11. Chill the bars in the refrigerator for at least 2 hours, or until the chocolate is completely firm and no longer tacky to the touch.
12. Use the parchment overhang to lift the bars from the pan, then cut into 16 squares with a sharp knife wiped clean between cuts for neat edges.
With each bite, these bars offer a delightful contrast: a crisp graham cracker base gives way to a creamy peanut butter center, all enveloped in a smooth chocolate shell that melts luxuriously on the tongue. Serve them chilled for a firm texture that softens slightly at room temperature, or crumble over vanilla ice cream for an indulgent dessert twist that highlights their rich, nutty essence.
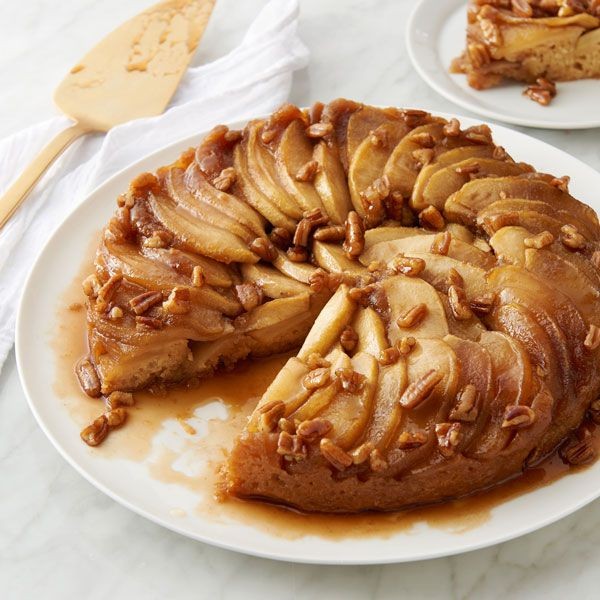
Pineapple Upside-Down Birthday Cake
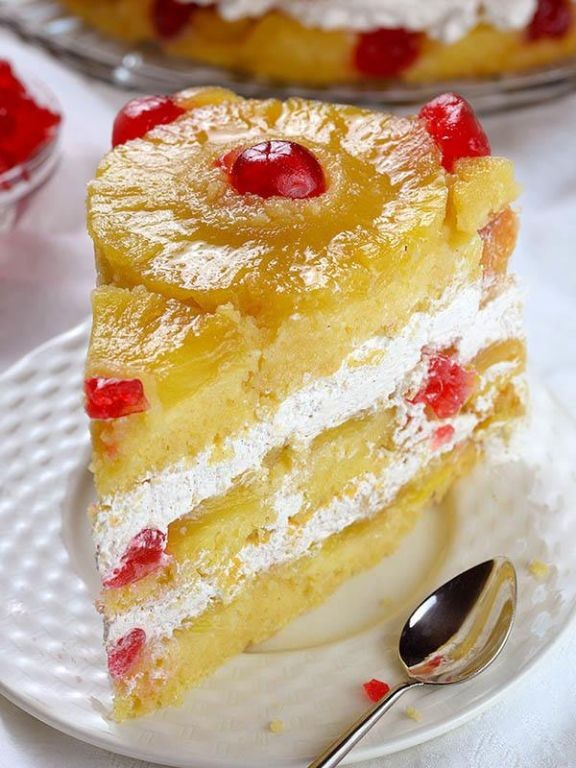
Radiant and nostalgic, this pineapple upside-down birthday cake transforms a classic dessert into a celebratory centerpiece. With caramelized pineapple rings and maraschino cherries nestled in a buttery brown sugar glaze, it’s crowned by a tender, golden cake that bakes directly atop the fruit. The result is a stunning, inverted masterpiece that’s as delightful to present as it is to savor.
Serving: 8 | Pre Time: 20 minutes | Cooking Time: 45 minutes
Ingredients
– 1/2 cup unsalted butter, softened (plus extra for greasing)
– 1 cup packed light brown sugar
– 1 (20-ounce) can pineapple rings in juice, drained (reserve 1/4 cup juice)
– 8 maraschino cherries, drained
– 1 1/2 cups all-purpose flour, spooned and leveled
– 1 teaspoon baking powder
– 1/4 teaspoon salt
– 3/4 cup granulated sugar
– 2 large eggs, at room temperature
– 1/2 cup whole milk, at room temperature
– 1 teaspoon pure vanilla extract
Instructions
1. Preheat your oven to 350°F. Generously grease a 9-inch round cake pan with butter, ensuring all sides are coated to prevent sticking.
2. In a small saucepan over medium heat, melt 1/4 cup of the butter. Stir in the brown sugar and cook for 2–3 minutes until the mixture is smooth and bubbly, then immediately pour it into the prepared pan, spreading evenly.
3. Arrange the pineapple rings in a single layer over the brown sugar mixture, placing one cherry in the center of each ring.
4. In a medium bowl, whisk together the flour, baking powder, and salt until fully combined for an even rise.
5. In a large bowl, using an electric mixer on medium speed, beat the remaining 1/4 cup butter with the granulated sugar for 3–4 minutes until light and fluffy.
6. Add the eggs one at a time to the butter mixture, beating well after each addition until fully incorporated.
7. Gradually mix in the flour mixture and milk alternately, beginning and ending with the flour, to avoid overmixing the batter.
8. Stir in the vanilla extract and reserved pineapple juice until the batter is smooth and uniform.
9. Carefully pour the batter over the arranged fruit in the pan, spreading it evenly with a spatula to cover completely.
10. Bake for 40–45 minutes, or until a toothpick inserted into the center of the cake comes out clean with no wet batter.
11. Let the cake cool in the pan on a wire rack for exactly 10 minutes to allow the caramel to set slightly without hardening.
12. Run a knife around the edges of the pan to loosen the cake, then invert it onto a serving plate, tapping the bottom gently if needed to release.
13. Allow the cake to cool completely before slicing to maintain clean layers.
Moist and buttery, this cake boasts a caramel-soaked crumb that contrasts beautifully with the juicy pineapple and sweet cherries. Serve it warm with a dollop of whipped cream or a scoop of vanilla ice cream to highlight its rich, tropical flavors, making it a festive treat for any birthday gathering.
Mini Birthday Cake Donuts
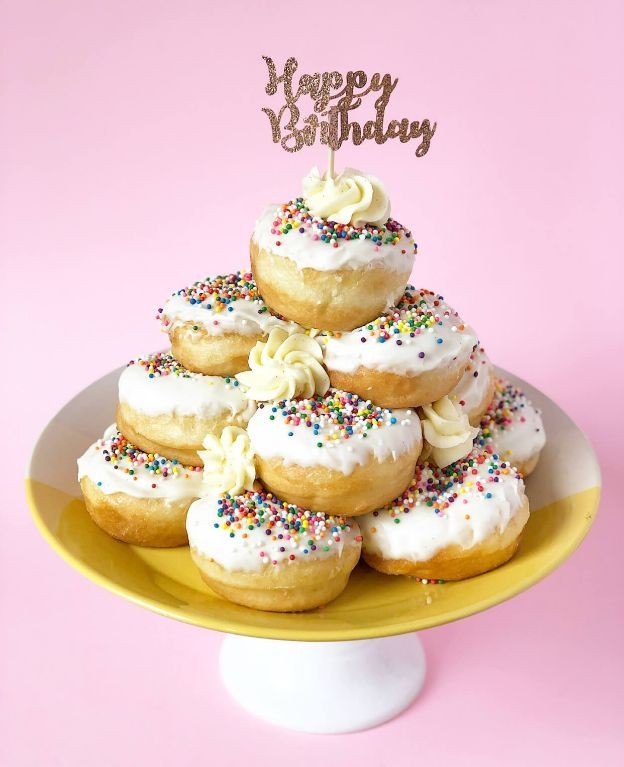
Luxuriously small yet grand in flavor, these Mini Birthday Cake Donuts transform a classic celebration dessert into a handheld delight. Perfect for parties or a sweet afternoon treat, they capture the nostalgic essence of birthday cake in every bite, with a tender crumb and playful sprinkles that promise joy in miniature form.
Serving: 12 | Pre Time: 15 minutes | Cooking Time: 10 minutes
Ingredients
– 1 cup all-purpose flour, sifted for a lighter texture
– 1/3 cup granulated sugar
– 1 tsp baking powder
– 1/4 tsp salt
– 1/2 cup whole milk, at room temperature
– 1 large egg, lightly beaten
– 2 tbsp unsalted butter, melted and cooled slightly
– 1 tsp vanilla extract
– 1/4 cup rainbow sprinkles, plus extra for topping
– 1 cup powdered sugar, for glaze
– 2-3 tbsp whole milk, for glaze consistency
– Vegetable oil, for frying (about 2 cups, or enough to fill a pot 2 inches deep)
Instructions
1. In a medium bowl, whisk together the flour, granulated sugar, baking powder, and salt until fully combined.
2. In a separate bowl, mix the milk, egg, melted butter, and vanilla extract until smooth.
3. Pour the wet ingredients into the dry ingredients and stir gently until just incorporated, being careful not to overmix to avoid tough donuts.
4. Fold in the 1/4 cup of rainbow sprinkles evenly throughout the batter.
5. Heat the vegetable oil in a heavy-bottomed pot over medium heat to 350°F, using a candy thermometer for accuracy to ensure even frying.
6. While the oil heats, spoon the batter into a piping bag or a resealable plastic bag with a corner snipped off for easy portioning.
7. Pipe small, 1-inch circles of batter directly into the hot oil, working in batches of 3-4 to avoid overcrowding the pot.
8. Fry the donuts for 1-2 minutes per side, flipping once with a slotted spoon when golden brown, until they puff up and are cooked through.
9. Remove the donuts from the oil and drain on a wire rack set over a baking sheet to keep them crisp, repeating until all batter is used.
10. In a small bowl, whisk the powdered sugar with 2 tablespoons of milk to make a smooth glaze, adding more milk as needed until it reaches a drizzle-able consistency.
11. Dip the top of each cooled donut into the glaze, then immediately sprinkle with extra rainbow sprinkles before the glaze sets for a festive finish.
12. Let the glaze harden for 5-10 minutes before serving.
Fluffy and tender, these donuts boast a cake-like interior with a delicate crunch from the glaze, bursting with vanilla sweetness and colorful confetti. Serve them stacked on a tiered stand for a whimsical party display, or pair with a cold glass of milk for a nostalgic treat that feels like a celebration in every bite.
Banana Split Birthday Sundae

This decadent dessert transforms the classic banana split into a celebratory sundae, layering creamy components with caramelized bananas for a sophisticated yet nostalgic treat. The combination of warm, buttery bananas and cool ice cream creates a delightful contrast that feels both indulgent and special, perfect for marking a milestone or simply elevating an ordinary evening. Its elegant presentation belies the straightforward preparation, making it an impressive finale that requires minimal effort.
Serving: 4 | Pre Time: 15 minutes | Cooking Time: 10 minutes
Ingredients
– 4 ripe bananas, sliced lengthwise (choose bananas with some brown spots for natural sweetness)
– 2 tbsp unsalted butter (or coconut oil for a dairy-free option)
– 1/4 cup light brown sugar, packed (adjust slightly for desired caramelization)
– 1/2 tsp vanilla extract (use pure vanilla for best flavor)
– 1 pint vanilla ice cream (high-quality ice cream recommended)
– 1/2 cup hot fudge sauce, warmed (store-bought or homemade)
– 1/2 cup whipped cream (freshly whipped or canned)
– 1/4 cup chopped toasted pecans (walnuts or almonds work as substitutes)
– 4 maraschino cherries, for garnish (optional, but adds classic flair)
Instructions
1. Preheat a large non-stick skillet over medium heat for 2 minutes until evenly warm.
2. Melt the unsalted butter in the skillet, swirling to coat the surface completely.
3. Arrange the sliced bananas in the skillet in a single layer, cut-side down, to ensure even browning.
4. Sprinkle the light brown sugar evenly over the bananas, allowing it to dissolve into the butter.
5. Cook the bananas for 3-4 minutes without moving them, until the sugar caramelizes and forms a golden-brown crust.
6. Flip the bananas carefully using a spatula and cook for an additional 2 minutes on the other side until softened.
7. Remove the skillet from heat and stir in the vanilla extract, coating the bananas evenly.
8. Scoop the vanilla ice cream into four serving bowls, dividing it equally among them.
9. Top each bowl with the warm caramelized bananas, arranging them over the ice cream.
10. Drizzle the warmed hot fudge sauce over the bananas and ice cream in each bowl.
11. Spoon the whipped cream generously over the sundaes, covering the fudge layer.
12. Sprinkle the chopped toasted pecans evenly over the whipped cream for a crunchy texture.
13. Place one maraschino cherry on top of each sundae as a final garnish.
14. Serve immediately while the bananas are still warm and the ice cream is firm.
Perfectly balanced, this sundae offers a luscious interplay of temperatures and textures, from the gooey caramelized bananas to the crisp pecans. The rich hot fudge melds with the creamy ice cream, creating a sauce-like consistency that enhances every bite. For a creative twist, serve it in chilled martini glasses or alongside shortbread cookies for added crunch.
Summary
Joyful baking and cooking await with these 18 delicious birthday recipes! From showstopping cakes to delightful treats, there’s something sweet for every celebration. We hope you find a new favorite to make your next birthday extra special. Give one a try, leave a comment telling us which recipe you loved, and don’t forget to share this roundup on Pinterest to spread the sweetness!