Are you ready to transform your blender from a smoothie machine into a creamy culinary powerhouse? Whether you’re craving velvety soups, dreamy dips, or decadent desserts, these 20 blender recipes are about to become your new kitchen obsession. Get ready to blend your way to deliciousness—let’s dive into these irresistible creations perfect for any smooth lover!
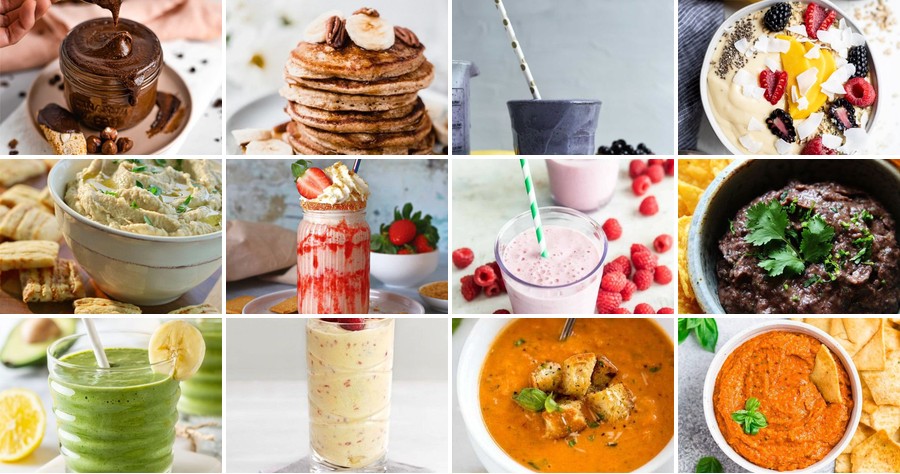
Peanut Butter Chocolate Protein Shake
Craving a creamy, protein-packed treat that tastes like dessert but fuels your body? This peanut butter chocolate protein shake comes together in minutes with simple ingredients you likely already have on hand, making it the perfect post-workout recovery drink or satisfying afternoon snack. Let’s walk through each step methodically to ensure a perfectly smooth and delicious result every time.
Serving: 1 | Pre Time: 5 minutes | Cooking Time: 0 minutes
Ingredients
– 1 cup unsweetened almond milk
– 1 scoop chocolate protein powder
– 2 tablespoons creamy peanut butter
– 1/2 medium banana
– 1 cup ice cubes
– 1 tablespoon unsweetened cocoa powder
Instructions
1. Add 1 cup of unsweetened almond milk to a high-speed blender.
2. Measure and add 1 scoop of chocolate protein powder directly into the blender with the almond milk.
3. Spoon 2 tablespoons of creamy peanut butter into the blender; for easier blending and to prevent sticking, lightly spray the measuring spoon with cooking spray first.
4. Peel and slice 1/2 of a medium banana, then add the slices to the blender.
5. Pour 1 cup of ice cubes into the blender to ensure the shake becomes thick and frosty.
6. Add 1 tablespoon of unsweetened cocoa powder for an extra rich chocolate flavor.
7. Securely fasten the blender lid and blend on high speed for 45-60 seconds, or until the mixture is completely smooth with no visible ice chunks.
8. Stop the blender and check the consistency by tilting the pitcher; if it’s too thick, add an additional 1 tablespoon of almond milk and blend for 10 more seconds.
9. Pour the shake immediately into a tall glass to enjoy its coldest, creamiest texture.
10. For a decorative touch, drizzle a small amount of extra peanut butter on the inside of the glass before pouring, which will create appealing streaks as you drink.
Whipped to velvety perfection, this shake boasts a thick, milkshake-like consistency with a deep chocolate flavor balanced by the salty-sweet richness of peanut butter. Serve it immediately for the best texture, or for a fun twist, freeze it for 30 minutes to enjoy as a spoonable, frosty mousse.
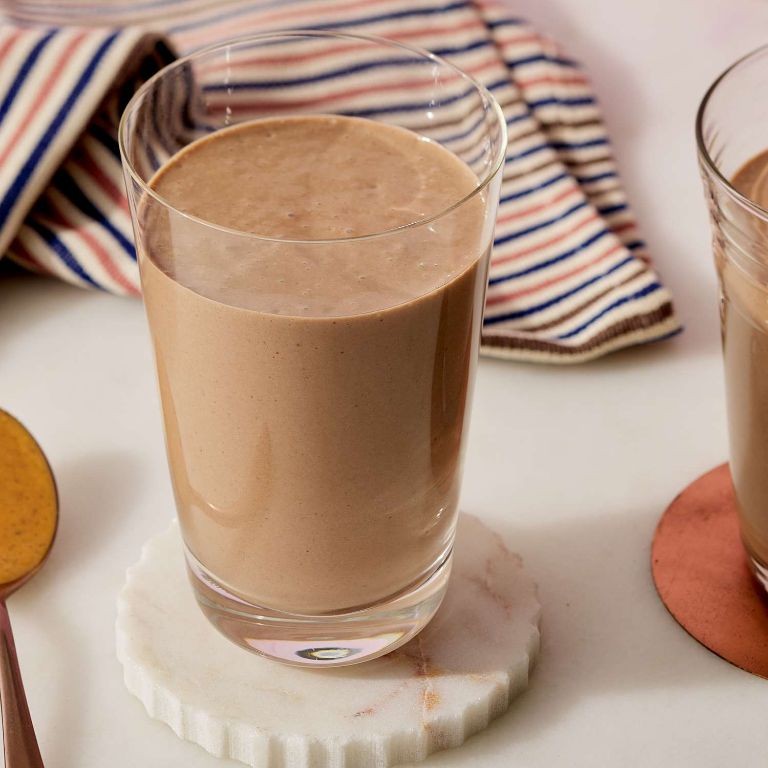
Strawberry Cheesecake Milkshake
Ever find yourself craving the creamy indulgence of cheesecake but wanting something you can sip through a straw? This strawberry cheesecake milkshake blends the classic dessert into a frosty, drinkable treat that’s surprisingly simple to make at home. Let’s walk through the process together, step by step, so you can enjoy this delightful fusion of flavors in just minutes.
Serving: 2 | Pre Time: 5 minutes | Cooking Time: 0 minutes
Ingredients
– 2 cups vanilla ice cream
– 1 cup fresh strawberries, hulled
– 4 oz cream cheese, softened to room temperature
– 1/2 cup whole milk
– 1/4 cup graham cracker crumbs
– 2 tbsp strawberry syrup
– Whipped cream for garnish
Instructions
1. Place the softened cream cheese in a blender to ensure it blends smoothly without lumps.
2. Add the vanilla ice cream, fresh strawberries, whole milk, and strawberry syrup to the blender.
3. Blend the mixture on high speed for 30-45 seconds until it is completely smooth and no strawberry chunks remain.
4. Divide the blended milkshake evenly between two tall glasses.
5. Top each milkshake with a generous dollop of whipped cream for a creamy finish.
6. Sprinkle 2 tablespoons of graham cracker crumbs evenly over the whipped cream on each milkshake to mimic a cheesecake crust.
7. Serve immediately with a straw and a long spoon for scooping up the garnishes.
Rich and velvety, this milkshake delivers a perfect balance of sweet strawberries and tangy cream cheese, with the graham cracker crumbs adding a satisfying crunch. For a fun twist, try rimming the glasses with extra crumbs or adding a drizzle of chocolate syrup on top before serving.
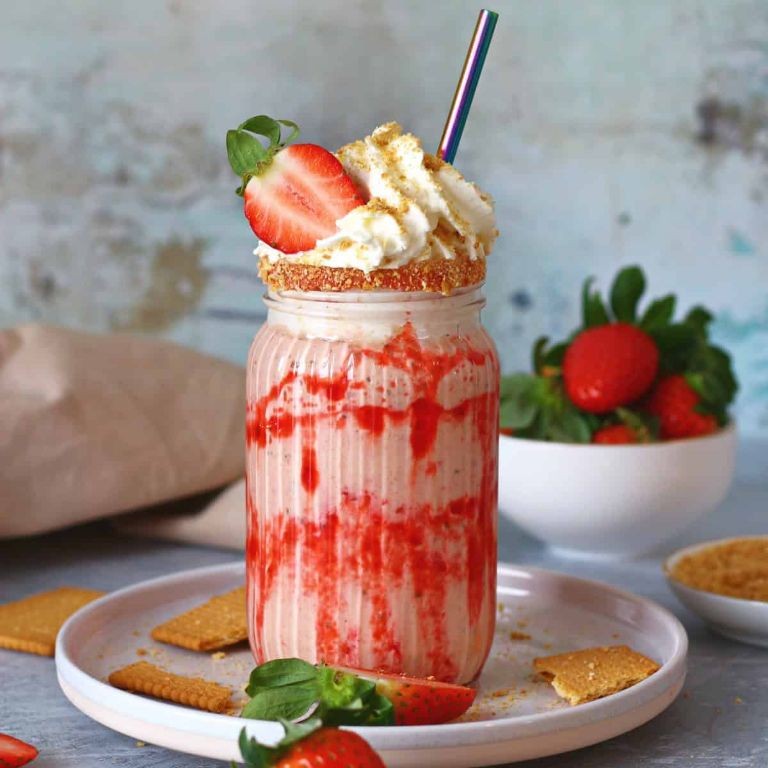
Garlic Parmesan Hummus
Just in time for holiday gatherings, this creamy Garlic Parmesan Hummus is a simple upgrade to your classic dip. Join me as we walk through each step methodically to create this savory spread that’s sure to impress your guests.
Serving: 6 | Pre Time: 10 minutes | Cooking Time: 0 minutes
Ingredients
– 2 (15-ounce) cans chickpeas, drained and rinsed
– 1/4 cup tahini
– 1/4 cup fresh lemon juice
– 1/4 cup extra-virgin olive oil
– 4 cloves garlic, minced
– 1/2 cup grated Parmesan cheese
– 1/2 teaspoon salt
– 1/4 teaspoon black pepper
– 2 tablespoons water
Instructions
1. Place the drained and rinsed chickpeas into a food processor or high-speed blender.
2. Add the tahini, fresh lemon juice, and extra-virgin olive oil to the food processor.
3. Add the minced garlic, grated Parmesan cheese, salt, and black pepper to the mixture.
4. Secure the lid on the food processor and blend on high speed for 1 minute to combine the ingredients roughly.
5. Stop the food processor and scrape down the sides with a spatula to ensure all ingredients are incorporated evenly.
6. Add the 2 tablespoons of water to the food processor to help achieve a smoother consistency.
7. Blend the mixture on high speed for 2–3 minutes until completely smooth and creamy, with no visible chunks.
8. Taste the hummus and adjust the salt or lemon juice if needed, but avoid over-blending as it can make the texture too thin.
9. Transfer the hummus to a serving bowl using a spatula, scraping out all the contents from the food processor.
10. Drizzle a small amount of extra-virgin olive oil over the top of the hummus for a glossy finish.
11. Garnish with an extra sprinkle of grated Parmesan cheese and a pinch of black pepper if desired.
Buttery and rich from the Parmesan, this hummus has a velvety texture that spreads effortlessly on crackers or veggies. Its bold garlic flavor mellows beautifully as it chills, making it perfect for prepping ahead—try serving it with warm pita bread or as a savory layer in a holiday appetizer platter.
Spinach Artichoke Dip
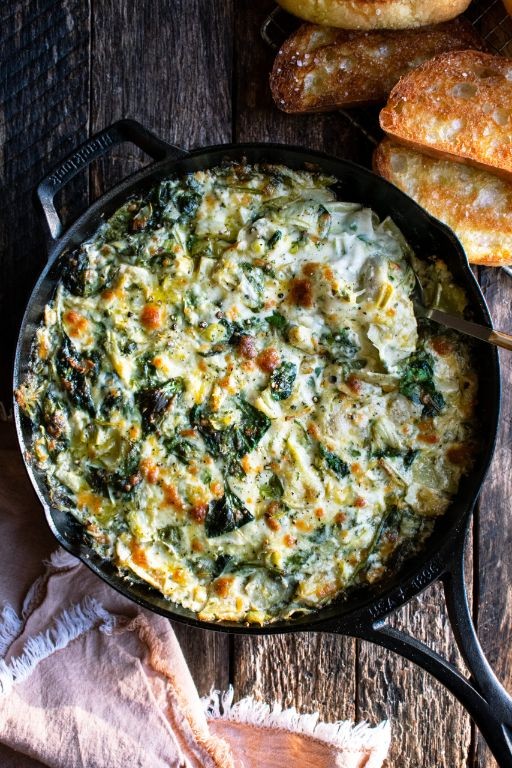
You’ve likely encountered spinach artichoke dip at parties or restaurants, but making it at home lets you control the ingredients and achieve that perfect creamy, cheesy texture. This methodical recipe walks you through each step so even a beginner can create a crowd-pleasing appetizer.
Serving: 8 | Pre Time: 15 minutes | Cooking Time: 25 minutes
Ingredients
– 1 tablespoon olive oil
– 1 small yellow onion, finely chopped
– 3 cloves garlic, minced
– 10 ounces frozen chopped spinach, thawed and squeezed dry
– 14 ounces canned artichoke hearts, drained and chopped
– 8 ounces cream cheese, softened
– 1 cup sour cream
– 1 cup mayonnaise
– 1 cup shredded mozzarella cheese
– 1/2 cup grated Parmesan cheese
– 1/2 teaspoon salt
– 1/4 teaspoon black pepper
Instructions
1. Preheat your oven to 375°F (190°C) and lightly grease a 2-quart baking dish.
2. Heat 1 tablespoon olive oil in a large skillet over medium heat until shimmering, about 2 minutes.
3. Add 1 small yellow onion, finely chopped, and cook until translucent, about 5 minutes, stirring occasionally.
4. Stir in 3 cloves garlic, minced, and cook for 1 minute until fragrant.
5. Add 10 ounces frozen chopped spinach, thawed and squeezed dry, and 14 ounces canned artichoke hearts, drained and chopped, cooking for 3 minutes to remove excess moisture.
6. Tip: Squeezing the spinach thoroughly prevents a watery dip.
7. Reduce heat to low and add 8 ounces cream cheese, softened, stirring until fully melted and combined, about 2 minutes.
8. Remove the skillet from heat and stir in 1 cup sour cream, 1 cup mayonnaise, 1 cup shredded mozzarella cheese, 1/2 cup grated Parmesan cheese, 1/2 teaspoon salt, and 1/4 teaspoon black pepper until uniform.
9. Tip: Softening the cream cheese beforehand ensures a smoother mixture without lumps.
10. Transfer the mixture to the prepared baking dish and spread it evenly with a spatula.
11. Bake at 375°F (190°C) for 20–25 minutes, until the edges are bubbly and the top is golden brown.
12. Tip: Check at 20 minutes; if the top isn’t browned, broil for 1–2 minutes, watching closely to avoid burning.
13. Let the dip cool for 5 minutes before serving.
Let this dip rest briefly to thicken slightly, yielding a rich, creamy texture with a tangy kick from the artichokes and cheeses. Serve it warm with tortilla chips or sliced baguette for dipping, or spread it on crackers for a quick snack.
Pumpkin Spice Latte Smoothie
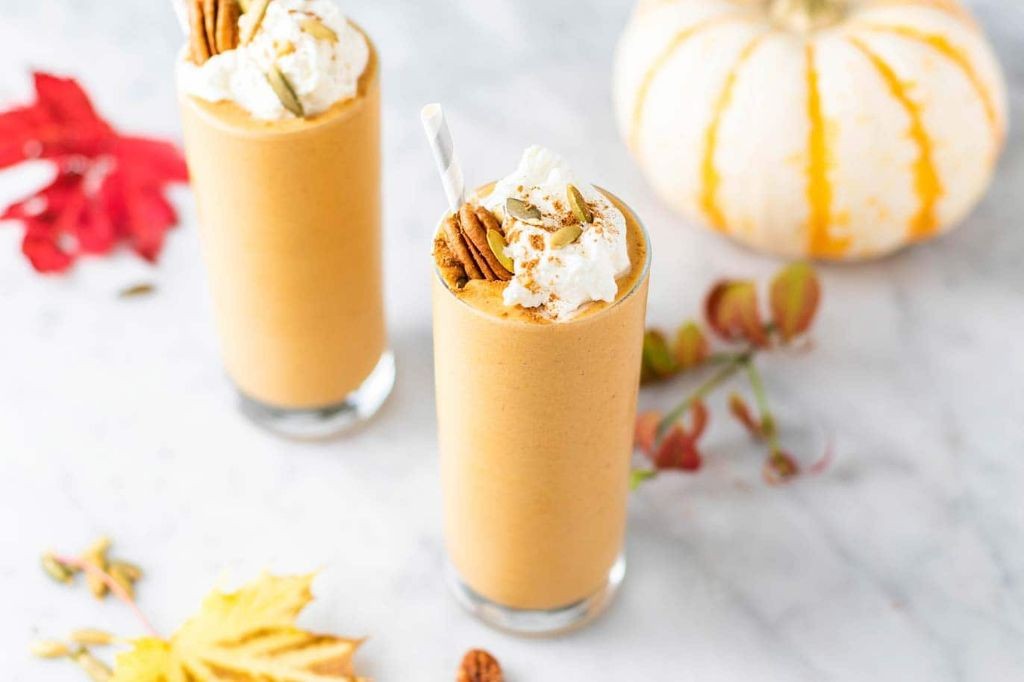
Discovering a new way to enjoy seasonal flavors can be as simple as blending a few pantry staples. During the holiday rush, this Pumpkin Spice Latte Smoothie offers a quick, festive treat that captures the essence of a coffee shop favorite in a healthier, sippable form. Let’s walk through the process together, step-by-step, to ensure your smoothie turns out perfectly creamy and spiced every time.
Serving: 2 | Pre Time: 5 minutes | Cooking Time: 0 minutes
Ingredients
- 1 cup pumpkin puree
- 1 cup unsweetened almond milk
- 1/2 cup plain Greek yogurt
- 2 tbsp maple syrup
- 1 tsp pumpkin pie spice
- 1/2 tsp vanilla extract
- 1 cup ice cubes
- 1/2 cup cold brew coffee concentrate
Instructions
- Measure 1 cup of pumpkin puree and add it to a high-speed blender.
- Pour 1 cup of unsweetened almond milk into the blender with the pumpkin puree.
- Add 1/2 cup of plain Greek yogurt to the blender for creaminess.
- Measure 2 tablespoons of maple syrup and incorporate it into the mixture.
- Sprinkle 1 teaspoon of pumpkin pie spice evenly over the other ingredients.
- Add 1/2 teaspoon of vanilla extract to enhance the flavor profile.
- Place 1 cup of ice cubes into the blender to chill the smoothie.
- Pour 1/2 cup of cold brew coffee concentrate into the blender for a caffeine kick.
- Secure the blender lid tightly to prevent any spills during blending.
- Blend the mixture on high speed for 45 to 60 seconds, until it is completely smooth and no ice chunks remain.
- Stop the blender and check the consistency by dipping a spoon into the mixture; if it’s too thick, add 1 tablespoon of almond milk and blend for 10 more seconds.
- Divide the smoothie evenly between two glasses, pouring slowly to avoid splashing.
Luxuriously smooth and warmly spiced, this smoothie boasts a velvety texture from the Greek yogurt and a rich autumnal flavor balanced by the subtle bitterness of coffee. For a festive touch, sprinkle a pinch of pumpkin pie spice on top or serve it in a chilled mason jar with a cinnamon stick stirrer.
Creamy Cauliflower Soup
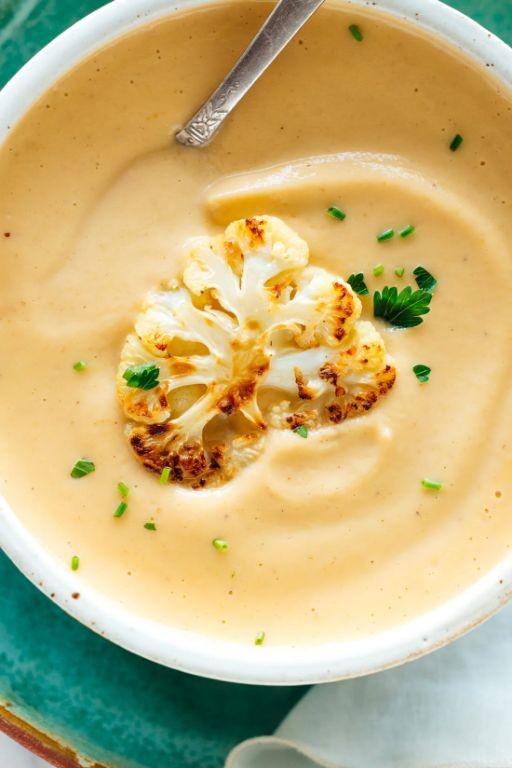
Savoring a warm bowl of creamy cauliflower soup is the perfect way to embrace a cozy evening, especially during the holiday season. This simple recipe transforms humble cauliflower into a velvety, comforting dish that requires minimal effort but delivers maximum flavor. Let’s walk through each step together to ensure your soup turns out perfectly smooth and delicious.
Serving: 4 | Pre Time: 10 minutes | Cooking Time: 30 minutes
Ingredients
– 1 large head cauliflower, cut into florets
– 1 medium yellow onion, diced
– 2 cloves garlic, minced
– 4 cups vegetable broth
– 1 cup heavy cream
– 2 tablespoons unsalted butter
– 2 tablespoons olive oil
– 1 teaspoon salt
– 1/2 teaspoon black pepper
– 1/4 teaspoon ground nutmeg
Instructions
1. Heat 2 tablespoons of olive oil in a large pot over medium heat until it shimmers, about 1 minute.
2. Add 1 diced yellow onion and cook, stirring frequently, until translucent and soft, approximately 5-7 minutes.
3. Stir in 2 minced garlic cloves and cook for 1 minute until fragrant, being careful not to let them brown.
4. Add 1 head of cauliflower florets to the pot, along with 4 cups of vegetable broth, 1 teaspoon salt, and 1/2 teaspoon black pepper.
5. Bring the mixture to a boil over high heat, then reduce to a simmer and cover the pot.
6. Simmer for 20-25 minutes, or until the cauliflower is tender enough to easily pierce with a fork.
7. Remove the pot from heat and use an immersion blender to puree the soup until completely smooth, about 2-3 minutes; for a silkier texture, you can transfer it to a countertop blender in batches.
8. Return the pureed soup to low heat and stir in 1 cup of heavy cream, 2 tablespoons of unsalted butter, and 1/4 teaspoon ground nutmeg.
9. Heat the soup gently for 5 minutes, stirring occasionally, until warmed through but not boiling.
10. Ladle the soup into bowls and serve immediately. Enjoy the rich, velvety texture with subtle nutty notes from the cauliflower, enhanced by the creaminess of the heavy cream. For a creative twist, top it with crispy croutons or a drizzle of truffle oil to add an elegant touch to this comforting classic.
Matcha Green Tea Smoothie

Ready to blend a vibrant, energizing treat that’s perfect for any time of day? This Matcha Green Tea Smoothie combines earthy matcha with creamy banana and a hint of sweetness for a refreshing, nutrient-packed drink. Let’s walk through each step together to ensure your smoothie turns out perfectly smooth and flavorful every time.
Serving: 1 | Pre Time: 5 minutes | Cooking Time: 0 minutes
Ingredients
– 1 cup unsweetened almond milk
– 1 ripe banana, peeled and sliced
– 1 tsp matcha green tea powder
– 1 tbsp honey
– 1/2 cup ice cubes
Instructions
1. Measure 1 cup of unsweetened almond milk and pour it into a high-speed blender.
2. Add 1 ripe banana, peeled and sliced, to the blender with the almond milk.
3. Spoon 1 tsp of matcha green tea powder into the blender, ensuring it’s fully incorporated with the liquid to avoid clumps.
4. Drizzle 1 tbsp of honey over the ingredients in the blender for natural sweetness.
5. Place 1/2 cup of ice cubes into the blender on top of the other ingredients.
6. Secure the blender lid tightly and blend on high speed for 45-60 seconds, or until the mixture is completely smooth and no ice chunks remain.
7. Pour the smoothie immediately into a tall glass to serve.
Delightfully creamy with a subtle earthy undertone from the matcha, this smoothie offers a velvety texture that’s both refreshing and satisfying. For a creative twist, try garnishing it with a sprinkle of extra matcha powder or a few banana slices on top to enhance its visual appeal and flavor profile.
Chocolate Hazelnut Spread
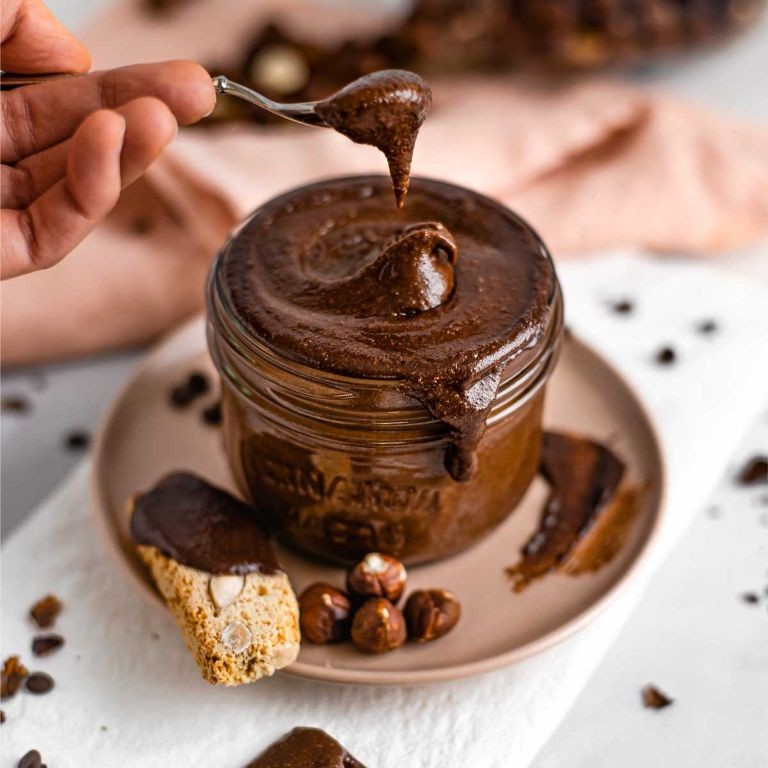
Ready to elevate your breakfasts and desserts? This homemade chocolate hazelnut spread is surprisingly simple to make and far superior to store-bought versions, requiring just a handful of pantry staples and a bit of patience. Let’s walk through the process methodically to ensure a smooth, decadent result every time.
Serving: 1.5 cups | Pre Time: 10 minutes | Cooking Time: 15 minutes
Ingredients
– 2 cups raw hazelnuts
– 1/4 cup granulated sugar
– 1/4 cup unsweetened cocoa powder
– 1/4 cup powdered sugar
– 1/4 teaspoon salt
– 1/4 cup vegetable oil
– 1 teaspoon vanilla extract
Instructions
1. Preheat your oven to 350°F and line a baking sheet with parchment paper.
2. Spread 2 cups of raw hazelnuts in a single layer on the prepared baking sheet.
3. Roast the hazelnuts in the preheated oven for 10-12 minutes, until the skins darken and become fragrant.
4. Tip: Wrap the warm hazelnuts in a clean kitchen towel and rub vigorously for 30 seconds to remove most of the skins—this reduces bitterness.
5. Transfer the skinned hazelnuts to a high-powered food processor.
6. Process the hazelnuts on high speed for 8-10 minutes, scraping down the sides every 2 minutes, until a smooth, liquid nut butter forms.
7. Tip: Be patient during this step; the mixture will go from coarse to creamy as the oils release.
8. Add 1/4 cup granulated sugar, 1/4 cup unsweetened cocoa powder, 1/4 cup powdered sugar, and 1/4 teaspoon salt to the food processor.
9. Process the mixture on high for 2 minutes until fully combined and smooth.
10. With the processor running on low, slowly drizzle in 1/4 cup vegetable oil through the feed tube.
11. Add 1 teaspoon vanilla extract and process for 1 final minute until glossy and uniform.
12. Tip: For a thinner consistency, add more oil 1 tablespoon at a time until desired texture is reached.
13. Transfer the spread to a clean, airtight jar and let it cool completely at room temperature for 1 hour before sealing.
Buttery and rich with deep roasted hazelnut flavor, this spread has a luxuriously smooth texture that’s perfect for swirling into yogurt or spreading on warm toast. Its intense chocolate notes make it an excellent filling for crepes or a decadent dip for fresh fruit, storing beautifully in the refrigerator for up to two weeks.
Vanilla Chia Pudding
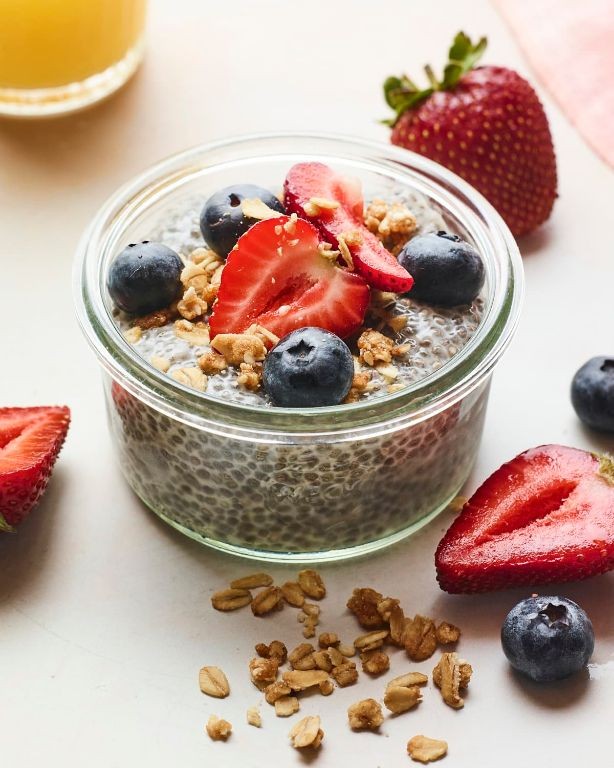
Understanding how to make a simple yet satisfying breakfast or snack can transform your morning routine, and vanilla chia pudding is a perfect place to start. This no-cook recipe requires minimal effort and yields a creamy, nutritious result that you can customize endlessly.
Serving: 4 | Pre Time: 5 minutes | Cooking Time: 0 minutes
Ingredients
– 1/2 cup chia seeds
– 2 cups milk
– 1/4 cup maple syrup
– 1 tsp vanilla extract
– 1/4 tsp salt
Instructions
1. Measure 1/2 cup of chia seeds into a medium mixing bowl.
2. Pour 2 cups of milk over the chia seeds in the bowl.
3. Add 1/4 cup of maple syrup to the bowl.
4. Measure and add 1 tsp of vanilla extract to the mixture.
5. Sprinkle 1/4 tsp of salt into the bowl.
6. Whisk all ingredients together vigorously for 30 seconds to prevent clumping.
7. Let the mixture sit undisturbed for 5 minutes.
8. Whisk the mixture again for 15 seconds to break up any clumps that formed.
9. Cover the bowl tightly with plastic wrap or a lid.
10. Place the covered bowl in the refrigerator for at least 4 hours, or preferably overnight for 8 hours.
11. Remove the bowl from the refrigerator after the chilling time.
12. Stir the pudding thoroughly to achieve a uniform, creamy consistency.
13. Divide the pudding evenly among four serving bowls or jars.
Just like that, you have a versatile pudding with a delightfully thick, tapioca-like texture from the chia seeds and a sweet, aromatic vanilla flavor. For a creative twist, layer it with fresh berries and granola in a parfait glass, or drizzle it with a tablespoon of almond butter for added richness.
Roasted Red Pepper Dip

Brimming with smoky sweetness and vibrant color, this Roasted Red Pepper Dip is a simple yet impressive appetizer that comes together in minutes. By roasting the peppers yourself, you unlock a deeper, caramelized flavor that elevates the entire dish, making it perfect for holiday gatherings or casual snacking.
Serving: 6 | Pre Time: 10 minutes | Cooking Time: 25 minutes
Ingredients
– 2 large red bell peppers
– 1/2 cup raw walnuts
– 1/4 cup extra virgin olive oil
– 2 tbsp fresh lemon juice
– 1 garlic clove
– 1/2 tsp smoked paprika
– 1/4 tsp salt
– 1/4 tsp black pepper
Instructions
1. Preheat your oven to 425°F and line a baking sheet with aluminum foil.
2. Cut the 2 large red bell peppers in half lengthwise; remove and discard the stems, seeds, and white membranes.
3. Place the pepper halves cut-side down on the prepared baking sheet and roast for 20-25 minutes, until the skins are completely blackened and blistered.
4. Transfer the roasted peppers to a medium bowl, cover tightly with plastic wrap, and let steam for 10 minutes—this makes peeling effortless.
5. While the peppers steam, spread the 1/2 cup raw walnuts in a single layer on a separate baking sheet and toast in the 425°F oven for 5-7 minutes, until fragrant and lightly golden.
6. Peel the blackened skins off the steamed peppers and discard them; roughly chop the peeled pepper flesh.
7. In a food processor, combine the chopped roasted peppers, toasted walnuts, 1/4 cup extra virgin olive oil, 2 tbsp fresh lemon juice, 1 garlic clove, 1/2 tsp smoked paprika, 1/4 tsp salt, and 1/4 tsp black pepper.
8. Process the mixture on high speed for 60-90 seconds, pausing to scrape down the sides with a spatula, until completely smooth and creamy.
9. Taste the dip and adjust seasoning if necessary, then transfer to a serving bowl.
10. Cover and refrigerate the dip for at least 30 minutes to allow the flavors to meld before serving.
Vividly smooth with a subtle crunch from the walnuts, this dip boasts a balanced smoky-sweet flavor from the roasted peppers and paprika. Serve it chilled with pita chips or fresh vegetable crudités for a colorful spread, or use it as a vibrant sandwich spread to add a burst of flavor to your lunch.
Banana Oat Pancake Batter

Finally, let’s create a fuss-free breakfast that transforms overripe bananas into fluffy, wholesome pancakes. This banana oat pancake batter comes together in minutes with pantry staples, offering a naturally sweet foundation that’s perfect for lazy weekend mornings or quick weekday fuel. Follow these methodical steps to master the technique from bowl to plate.
Serving: 4 | Pre Time: 10 minutes | Cooking Time: 15 minutes
Ingredients
– 2 medium ripe bananas
– 1 cup old-fashioned rolled oats
– 2 large eggs
– 1/2 cup milk
– 1 tablespoon maple syrup
– 1 teaspoon baking powder
– 1/2 teaspoon ground cinnamon
– 1/4 teaspoon salt
– 1 tablespoon unsalted butter
Instructions
1. Place 2 medium ripe bananas in a medium mixing bowl and mash them thoroughly with a fork until no large chunks remain.
2. Add 1 cup old-fashioned rolled oats, 2 large eggs, 1/2 cup milk, 1 tablespoon maple syrup, 1 teaspoon baking powder, 1/2 teaspoon ground cinnamon, and 1/4 teaspoon salt to the bowl with the mashed bananas.
3. Whisk all ingredients together vigorously for about 1 minute until the batter is mostly smooth, with only small oat flecks visible.
4. Let the batter rest at room temperature for 5 minutes to allow the oats to soften slightly, which helps create a more cohesive texture.
5. Heat a large nonstick skillet or griddle over medium heat (approximately 350°F) and melt 1/2 tablespoon of unsalted butter, swirling to coat the surface evenly.
6. Pour 1/4-cup portions of batter onto the hot skillet, leaving about 2 inches between pancakes to prevent sticking.
7. Cook the pancakes for 2–3 minutes until the edges look set and small bubbles form across the surface.
8. Carefully flip each pancake with a thin spatula and cook for an additional 1–2 minutes until the underside is golden brown.
9. Transfer the cooked pancakes to a plate and repeat steps 5–8 with the remaining batter, adding the remaining 1/2 tablespoon of butter to the skillet as needed.
10. Serve the pancakes immediately while warm. Tip: For extra fluffiness, avoid pressing down on the pancakes after flipping—let them rise naturally.
These pancakes emerge with a tender, slightly dense crumb from the oats and a subtle sweetness from the bananas. The cinnamon adds a warm note that pairs beautifully with a drizzle of maple syrup or a dollop of Greek yogurt. Try stacking them with sliced bananas and a sprinkle of toasted walnuts for added crunch, or fold fresh blueberries into the batter before cooking for a burst of fruity flavor.
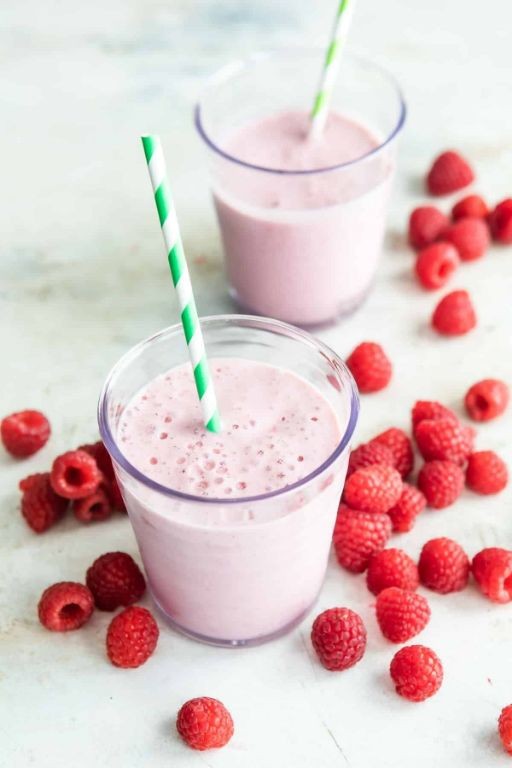
Peach Melba Smoothie

Ready to blend a taste of summer nostalgia? This Peach Melba Smoothie transforms the classic dessert into a refreshing drink that’s both simple and satisfying. Let’s walk through each step together to ensure your smoothie turns out perfectly creamy and flavorful every time.
Serving: 2 | Pre Time: 10 minutes | Cooking Time: 0 minutes
Ingredients
– 2 cups frozen peach slices
– 1 cup frozen raspberries
– 1 cup plain Greek yogurt
– 1 cup milk
– 2 tablespoons honey
– 1 teaspoon vanilla extract
Instructions
1. Place 2 cups frozen peach slices and 1 cup frozen raspberries into a high-speed blender.
2. Add 1 cup plain Greek yogurt, 1 cup milk, 2 tablespoons honey, and 1 teaspoon vanilla extract to the blender.
3. Secure the blender lid tightly to prevent any spills during blending.
4. Start blending on low speed for 10 seconds to break down the larger frozen pieces.
5. Increase the speed to high and blend for 45-60 seconds, or until the mixture is completely smooth with no visible fruit chunks.
6. Stop the blender and use a spatula to scrape down the sides, ensuring all ingredients are fully incorporated.
7. Blend again on high for an additional 15 seconds to achieve a uniformly creamy texture.
8. Pour the smoothie evenly into two glasses, dividing it equally between them.
9. Serve immediately for the best consistency and flavor.
Keep this smoothie thick and frosty by using all frozen fruit—it eliminates the need for ice, which can water down the drink. The result is a velvety, pink-orange blend with the sweet tang of peaches and raspberries, balanced by the creamy yogurt. For a fun twist, garnish with a fresh raspberry or a peach slice on the rim, or enjoy it as a quick breakfast or afternoon pick-me-up.
Creamy Cashew Alfredo Sauce
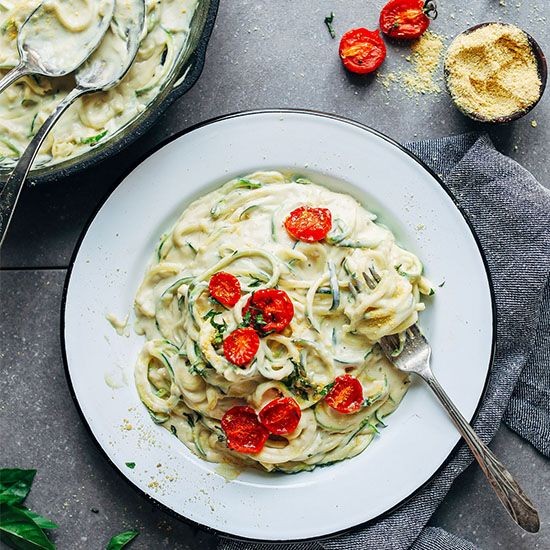
Crafting a rich, dairy-free Alfredo sauce is simpler than you might think, and this creamy cashew version delivers all the velvety texture and savory flavor you crave without any cream. By soaking raw cashews and blending them with savory ingredients, you’ll create a luscious sauce that clings perfectly to pasta. Let’s walk through each step methodically to ensure your success, even if you’re new to plant-based cooking.
Serving: 4 | Pre Time: 10 minutes | Cooking Time: 15 minutes
Ingredients
– 1 cup raw cashews
– 1 1/2 cups water
– 2 cloves garlic
– 2 tbsp nutritional yeast
– 1 tbsp lemon juice
– 1 tsp salt
– 1/2 tsp black pepper
– 1/4 tsp nutmeg
– 12 oz fettuccine pasta
– 2 tbsp olive oil
– 1/4 cup chopped fresh parsley
Instructions
1. Place 1 cup raw cashews in a bowl, cover with 1 1/2 cups water, and soak for at least 4 hours or overnight to soften them for blending; for a quicker option, pour boiling water over the cashews and soak for 30 minutes.
2. Drain the soaked cashews and discard the soaking water.
3. Combine the drained cashews, 2 cloves garlic, 2 tbsp nutritional yeast, 1 tbsp lemon juice, 1 tsp salt, 1/2 tsp black pepper, and 1/4 tsp nutmeg in a high-speed blender.
4. Add 1 cup fresh water to the blender and blend on high speed for 2-3 minutes until completely smooth and creamy, scraping down the sides as needed to ensure no lumps remain.
5. Bring a large pot of salted water to a boil over high heat, then add 12 oz fettuccine pasta and cook according to package instructions, usually 8-10 minutes, until al dente.
6. Drain the cooked pasta, reserving 1/2 cup of the pasta water, and return the pasta to the pot.
7. Heat 2 tbsp olive oil in a saucepan over medium heat, then pour in the blended cashew sauce and warm it for 3-4 minutes, stirring constantly, until it thickens slightly and bubbles gently.
8. Tip: If the sauce seems too thick, gradually stir in the reserved pasta water, 1 tbsp at a time, until it reaches your desired consistency.
9. Pour the warmed sauce over the drained pasta in the pot and toss thoroughly to coat every strand evenly.
10. Stir in 1/4 cup chopped fresh parsley just before serving to add a fresh, herbal note.
11. Serve immediately while hot, garnished with extra parsley if desired.
Silky and indulgent, this sauce boasts a nutty depth from the cashews balanced by the tang of lemon and umami from nutritional yeast. For a creative twist, try tossing it with roasted vegetables like broccoli or mushrooms, or use it as a creamy base for a vegan lasagna—it’s versatile enough to elevate any dish with its rich, comforting flavor.
Raspberry Yogurt Parfait Smoothie
Zipping through the holiday rush, I’m craving something bright, creamy, and effortless—a Raspberry Yogurt Parfait Smoothie that layers fruity tang with velvety texture, perfect for a quick breakfast or refreshing snack. This no-cook blend comes together in minutes, transforming simple ingredients into a satisfying treat that feels both indulgent and wholesome. Let’s walk through each step methodically to ensure your smoothie turns out perfectly balanced and delightfully thick every time.
Serving: 2 | Pre Time: 5 minutes | Cooking Time: 0 minutes
Ingredients
– 2 cups frozen raspberries
– 1 cup plain Greek yogurt
– 1/2 cup milk
– 2 tbsp honey
– 1/2 tsp vanilla extract
– 1/4 cup granola
Instructions
1. Add 2 cups frozen raspberries to a high-speed blender.
2. Pour in 1 cup plain Greek yogurt for a protein-rich, creamy base.
3. Measure and add 1/2 cup milk to help the ingredients blend smoothly.
4. Drizzle 2 tbsp honey into the blender to sweeten the mixture naturally.
5. Incorporate 1/2 tsp vanilla extract to enhance the overall flavor profile.
6. Secure the blender lid tightly to prevent any spills during blending.
7. Blend the mixture on high speed for 45–60 seconds, or until completely smooth and no fruit chunks remain.
8. Pause blending and scrape down the sides of the blender with a spatula if ingredients stick, ensuring even consistency.
9. Blend again for 10–15 seconds to fully incorporate any scraped-down bits.
10. Pour the smoothie evenly into two serving glasses, filling each about three-quarters full.
11. Sprinkle 1/4 cup granola evenly over the top of both smoothies for a crunchy texture contrast.
12. Serve immediately to enjoy the optimal thickness and temperature.
Here, the smoothie boasts a lusciously thick, spoonable texture from the frozen raspberries and Greek yogurt, with a vibrant pink hue and a tangy-sweet flavor that’s brightened by the vanilla. For a creative twist, layer it in a tall glass with extra granola and fresh raspberries between pours, making each sip a delightful mix of creamy and crunchy elements.
Spicy Black Bean Dip
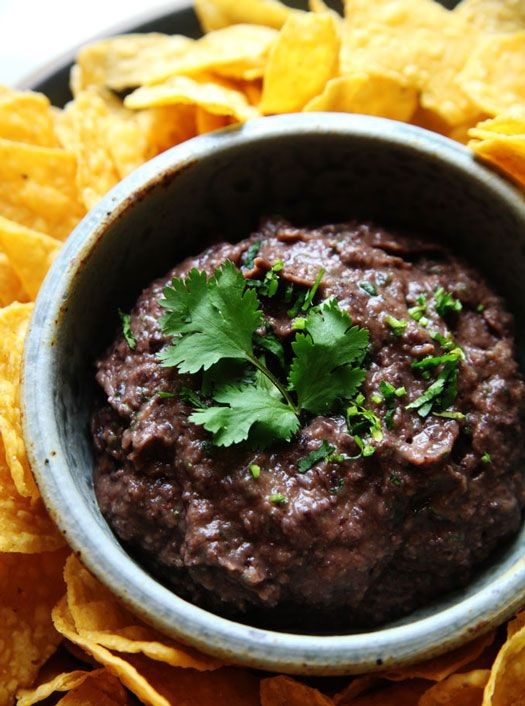
Now, let’s make a zesty Spicy Black Bean Dip that’s perfect for gatherings or a quick snack. This recipe walks you through each stage methodically, ensuring even beginners can achieve a flavorful, creamy result with just a few simple steps.
Serving: 6 | Pre Time: 10 minutes | Cooking Time: 15 minutes
Ingredients
– 2 (15-ounce) cans black beans, drained and rinsed
– 1 cup sour cream
– 1/2 cup mayonnaise
– 1/4 cup fresh lime juice
– 2 cloves garlic, minced
– 1 jalapeño pepper, seeded and finely chopped
– 1 teaspoon ground cumin
– 1/2 teaspoon smoked paprika
– 1/4 teaspoon cayenne pepper
– 1/2 teaspoon salt
– 2 tablespoons chopped fresh cilantro
– Tortilla chips for serving
Instructions
1. Preheat your oven to 350°F (175°C) to prepare for baking the dip later.
2. In a large mixing bowl, combine the drained and rinsed black beans, sour cream, and mayonnaise, stirring gently with a spoon until evenly mixed.
3. Add the fresh lime juice, minced garlic, and finely chopped jalapeño pepper to the bowl, ensuring all ingredients are well incorporated.
4. Sprinkle in the ground cumin, smoked paprika, cayenne pepper, and salt, stirring continuously to distribute the spices uniformly throughout the mixture.
5. Transfer the combined mixture to an oven-safe baking dish, spreading it out evenly with a spatula to create a smooth surface.
6. Bake the dip in the preheated oven at 350°F (175°C) for 15 minutes, or until the edges are bubbly and the top is lightly golden.
7. Remove the baking dish from the oven using oven mitts, and let it cool on a heat-resistant surface for 5 minutes to set slightly.
8. Stir in the chopped fresh cilantro just before serving to maintain its vibrant color and fresh flavor.
9. Serve the dip warm with tortilla chips on the side for dipping.
Zesty and creamy, this dip boasts a smooth texture with a subtle kick from the spices, making it ideal for pairing with crunchy vegetables or spreading on tacos. For a creative twist, try layering it in a jar with avocado slices and a dollop of Greek yogurt for a portable snack.
Summary
Ready to blend up something delicious? This roundup proves creamy doesn’t mean complicated. From dreamy soups to luscious dips, these blender recipes are your ticket to easy, satisfying meals. We’d love to hear which one becomes your new favorite—drop a comment below! If you enjoyed these ideas, please share this article on Pinterest to spread the blending love. Happy cooking!


