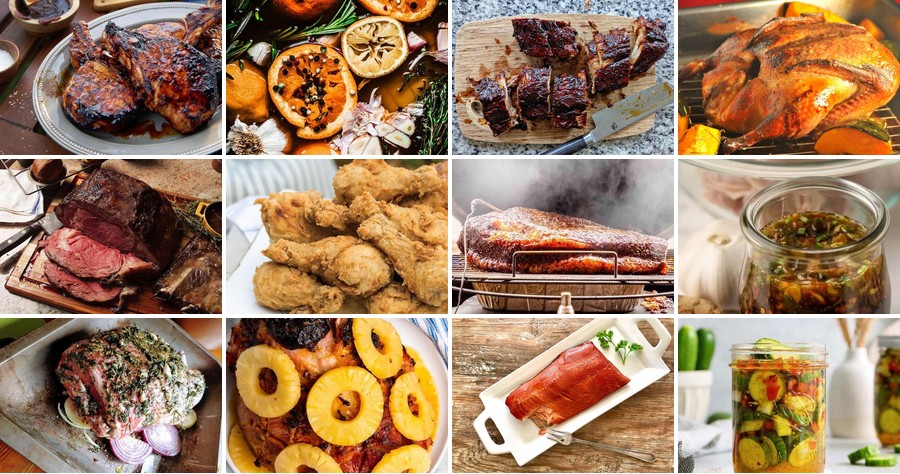
Haven’t you ever wondered how chefs achieve that mouthwatering depth of flavor in their dishes? The secret often lies in a simple yet transformative technique: brining. From juicy roasted chicken to tender pork chops, these 20 savory brine recipes will elevate your home cooking with minimal effort. Get ready to unlock a world of flavor—your taste buds are in for a treat!
Classic Turkey Brine with Herbs and Citrus
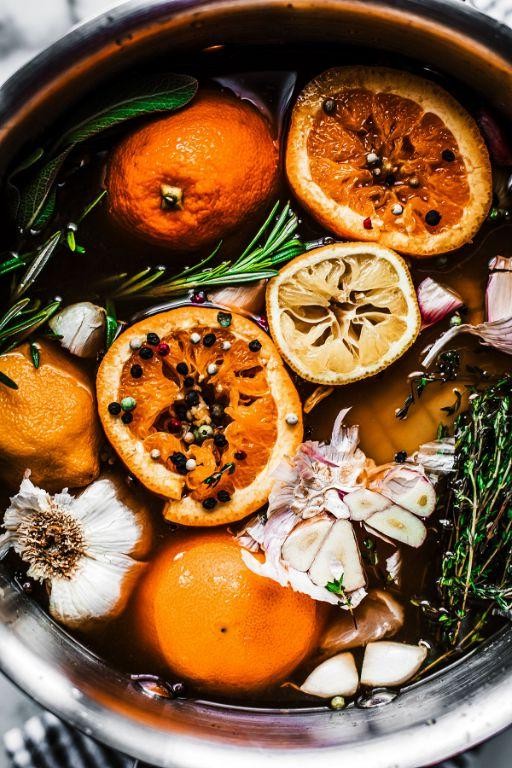
Tired of serving up a turkey that’s drier than a desert cactus? Transform your holiday bird into a juicy, flavor-packed masterpiece with this classic brine. It’s the secret handshake of Thanksgiving success, turning potential poultry panic into pure, herby-citrus bliss.
Serving: 12 | Pre Time: 20 minutes | Cooking Time: 240 minutes
Ingredients
– 1 gallon cold filtered water
– 1 cup Diamond Crystal kosher salt
– ½ cup granulated sugar
– 2 whole organic navel oranges, sliced into ¼-inch rounds
– 1 whole organic lemon, sliced into ¼-inch rounds
– 6 fresh bay leaves
– 1 bunch fresh thyme sprigs
– 1 bunch fresh rosemary sprigs
– 1 tablespoon whole black peppercorns
– 1 (12-14 pound) pasture-raised turkey, giblets removed
Instructions
1. In a large, non-reactive stockpot, combine 1 gallon cold filtered water, 1 cup Diamond Crystal kosher salt, and ½ cup granulated sugar.
2. Heat the mixture over medium-high heat, stirring constantly with a whisk until the salt and sugar fully dissolve, about 5 minutes. Tip: Avoid boiling to prevent a cloudy brine.
3. Remove the pot from the heat and immediately add 2 whole organic navel oranges (sliced), 1 whole organic lemon (sliced), 6 fresh bay leaves, 1 bunch fresh thyme sprigs, 1 bunch fresh rosemary sprigs, and 1 tablespoon whole black peppercorns.
4. Stir the brine gently to combine the herbs and citrus, then let it cool completely to room temperature, about 1 hour. Tip: Speed cooling by placing the pot in an ice bath.
5. Once cooled, submerge 1 (12-14 pound) pasture-raised turkey (giblets removed) breast-side down in the brine, ensuring it is fully covered.
6. Cover the pot and refrigerate for 12-24 hours, turning the turkey once halfway through for even flavor distribution.
7. After brining, remove the turkey from the liquid and pat it completely dry with paper towels, inside and out. Tip: Drying ensures crispy skin during roasting.
8. Discard the brine and proceed with your preferred roasting recipe, adjusting cooking time as the brined turkey may cook slightly faster.
Brined to perfection, this turkey emerges with a succulent, tender texture and a bright, aromatic flavor profile from the citrus and herbs. Serve it sliced over a bed of wild rice pilaf or shred the leftovers for a next-day citrus-herb turkey salad that’s anything but boring.
Spicy Pickle Brine for Crisp Vegetables
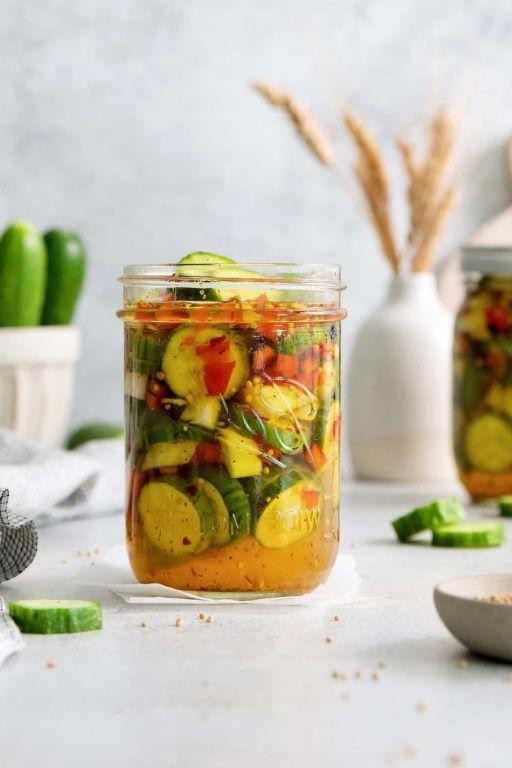
Ready to rescue those sad, forgotten veggies from the crisper drawer’s abyss? This zippy, tongue-tingling brine is your secret weapon, transforming the mundane into a crunchy, crave-worthy snack that’s basically a party in a jar. It’s the ultimate fridge-sidekick for when you need a quick, punchy pickle fix without the weeks-long wait.
Serving: 1 quart jar | Pre Time: 15 minutes | Cooking Time: 5 minutes
Ingredients
– 1 cup filtered water
– 1 cup distilled white vinegar (5% acidity)
– 1 tablespoon fine sea salt
– 1 tablespoon granulated sugar
– 2 teaspoons whole black peppercorns
– 1 teaspoon coriander seeds, lightly crushed
– 1 teaspoon mustard seeds
– ½ teaspoon red pepper flakes
– 2 medium garlic cloves, thinly sliced
– 1 pound assorted crisp vegetables (such as Persian cucumbers, rainbow radishes, and carrots), cut into uniform batons
Instructions
1. Combine 1 cup filtered water, 1 cup distilled white vinegar, 1 tablespoon fine sea salt, and 1 tablespoon granulated sugar in a small saucepan.
2. Place the saucepan over medium-high heat and bring the mixture to a simmer, stirring occasionally until the salt and sugar fully dissolve, about 3 minutes.
3. Remove the saucepan from the heat and immediately stir in 2 teaspoons whole black peppercorns, 1 teaspoon lightly crushed coriander seeds, 1 teaspoon mustard seeds, and ½ teaspoon red pepper flakes.
4. Allow the brine to cool to room temperature, approximately 20 minutes, to preserve the vegetables’ crisp texture.
5. While the brine cools, tightly pack 1 pound of assorted crisp vegetable batons and 2 thinly sliced garlic cloves into a clean 1-quart glass jar.
6. Pour the cooled brine over the vegetables until they are completely submerged, leaving ½ inch of headspace at the top of the jar.
7. Seal the jar with an airtight lid and refrigerate for a minimum of 24 hours before serving to allow the flavors to fully develop.
That tangy, garlicky brine works its magic, giving the veggies a satisfying snap and a slow-building heat that dances on the palate. Tuck these pickles into grain bowls for a bright contrast, or simply grab a fork and enjoy them straight from the jar as the ultimate crunchy, low-effort snack.
Apple Cider Brine for Juicy Pork Chops
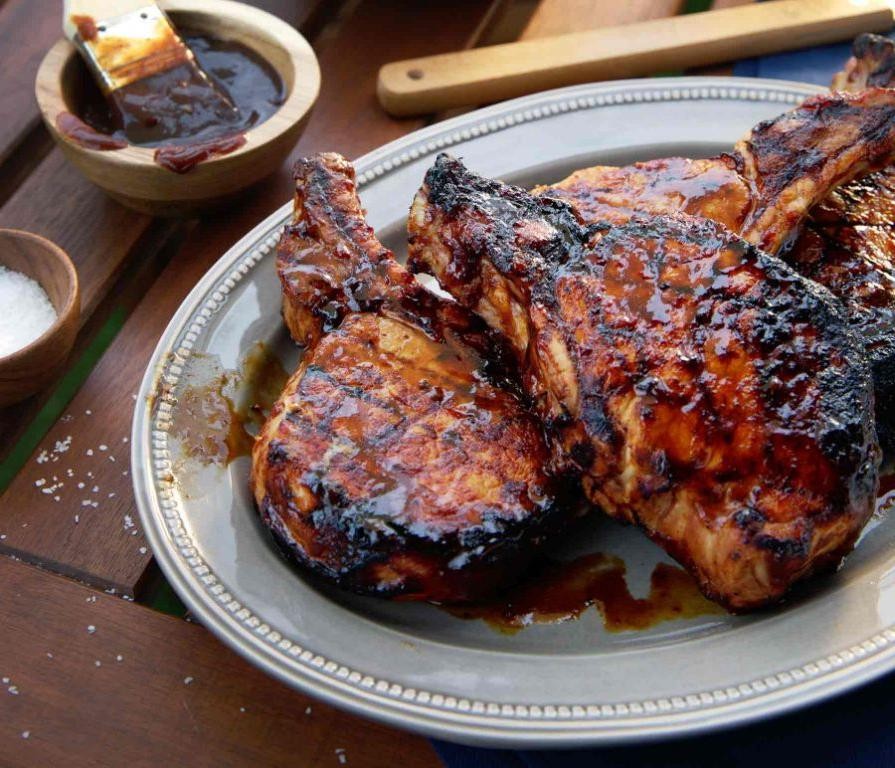
Unbelievably juicy pork chops aren’t just a holiday miracle—they’re a year-round possibility with this apple cider brine that transforms even the most stubborn cut into a tender, flavor-packed masterpiece. Forget dry, disappointing chops forever; this brine is your secret weapon for pork that practically melts in your mouth.
Serving: 4 | Pre Time: 15 minutes (plus 4-24 hours brining) | Cooking Time: 12 minutes
Ingredients
– 4 bone-in, heritage-breed pork chops, 1-inch thick
– 4 cups unfiltered apple cider
– 1/4 cup kosher salt
– 2 tablespoons pure maple syrup
– 2 tablespoons whole black peppercorns, lightly crushed
– 4 fresh rosemary sprigs
– 2 tablespoons extra-virgin olive oil
– 1 teaspoon freshly ground black pepper
Instructions
1. In a large saucepan, combine 4 cups unfiltered apple cider, 1/4 cup kosher salt, 2 tablespoons pure maple syrup, 2 tablespoons lightly crushed whole black peppercorns, and 4 fresh rosemary sprigs.
2. Heat the mixture over medium heat, stirring constantly with a whisk, until the salt completely dissolves, about 3-4 minutes—do not let it boil.
3. Remove the saucepan from heat and pour the brine into a large, non-reactive bowl or container; let it cool to room temperature, about 30 minutes, then refrigerate until chilled to 40°F, approximately 1 hour.
4. Tip: For faster chilling, place the bowl in an ice bath and stir occasionally.
5. Submerge 4 bone-in, heritage-breed pork chops in the chilled brine, ensuring they are fully covered; cover the container and refrigerate for 4 to 24 hours.
6. Tip: Brine for at least 4 hours for noticeable juiciness, but overnight (up to 24 hours) yields the most tender results without over-salting.
7. Remove the pork chops from the brine and pat them completely dry with paper towels—this step is crucial for achieving a proper sear.
8. Discard the used brine and let the pork chops rest at room temperature for 30 minutes to ensure even cooking.
9. Preheat a cast-iron skillet over medium-high heat until it reaches 375°F, about 5 minutes.
10. Brush both sides of each pork chop with 2 tablespoons extra-virgin olive oil and season evenly with 1 teaspoon freshly ground black pepper.
11. Place the pork chops in the preheated skillet and sear without moving for 4 minutes, until a golden-brown crust forms.
12. Flip each pork chop using tongs and sear the other side for 4 minutes.
13. Reduce the heat to medium and continue cooking, flipping every 2 minutes, until the internal temperature reaches 145°F when measured with an instant-read thermometer inserted into the thickest part, about 4 more minutes.
14. Tip: Avoid overcooking by checking the temperature early—pork chops carry over cook by 5°F after removal from heat.
15. Transfer the pork chops to a cutting board and let them rest for 5 minutes before serving.
16. Carve into these beauties to reveal a succulent interior that’s infused with sweet-tart apple notes and herbal rosemary whispers. The brine locks in moisture so effectively that each bite delivers a juicy burst, making these chops perfect for pairing with roasted root vegetables or a crisp autumn salad for a meal that feels both rustic and refined.
Garlic and Herb Brine for Roast Chicken
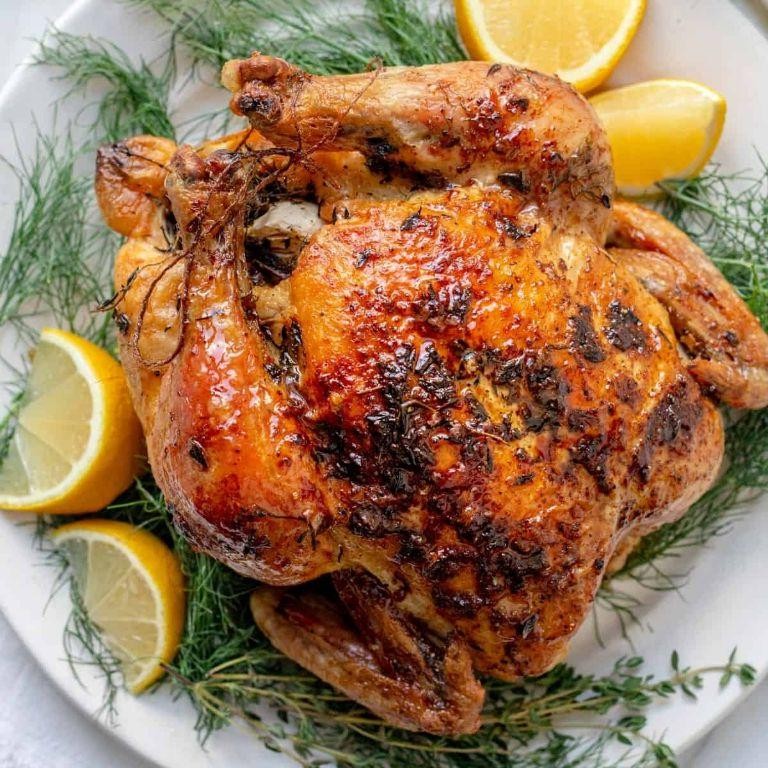
Kick your roast chicken from ‘meh’ to ‘magnificent’ with this garlic and herb brine that’s basically a spa day for poultry. It’s the secret handshake to juicy, flavor-packed meat that’ll have everyone asking for your not-so-secret recipe.
Serving: 4 | Pre Time: 15 minutes | Cooking Time: 90 minutes
Ingredients
– 1 gallon cold filtered water
– 1 cup Diamond Crystal kosher salt
– ½ cup granulated sugar
– 1 head of garlic, cloves separated and smashed
– 4 sprigs fresh rosemary
– 6 sprigs fresh thyme
– 2 tablespoons whole black peppercorns
– 1 whole (4-5 lb) air-chilled chicken
– 2 tablespoons extra-virgin olive oil
Instructions
1. In a large stockpot, combine 1 gallon cold filtered water, 1 cup Diamond Crystal kosher salt, and ½ cup granulated sugar.
2. Heat the mixture over medium heat, stirring constantly, just until the salt and sugar fully dissolve, about 3-4 minutes; do not let it boil.
3. Immediately remove the pot from the heat and stir in 1 head of smashed garlic cloves, 4 sprigs fresh rosemary, 6 sprigs fresh thyme, and 2 tablespoons whole black peppercorns.
4. Allow the brine to cool completely to room temperature, then refrigerate until it reaches 40°F, about 1 hour. (Tip: Speed up cooling by placing the pot in an ice bath.)
5. While the brine chills, pat the 1 whole air-chilled chicken completely dry with paper towels, including the cavity.
6. Submerge the dried chicken fully in the chilled brine, ensuring it is covered by the liquid.
7. Refrigerate the brining chicken for 12-24 hours, no longer, to prevent the meat from becoming overly salty.
8. Remove the chicken from the brine and discard the brine; rinse the chicken briefly under cold running water.
9. Pat the chicken thoroughly dry again with fresh paper towels, inside and out. (Tip: A very dry skin is crucial for crispy roasting.)
10. Place the chicken on a wire rack set inside a rimmed baking sheet and let it air-dry, uncovered, in the refrigerator for at least 4 hours or up to overnight.
11. Preheat your oven to 425°F and position a rack in the lower third.
12. Rub the entire exterior of the chicken with 2 tablespoons extra-virgin olive oil, coating it evenly.
13. Truss the chicken with kitchen twine to promote even cooking.
14. Roast the chicken on the wire rack at 425°F for 15 minutes to jumpstart browning.
15. Reduce the oven temperature to 350°F and continue roasting until the internal temperature at the thickest part of the thigh reaches 165°F, about 60-75 minutes. (Tip: For the most accurate reading, use an instant-read thermometer.)
16. Transfer the chicken to a carving board, tent loosely with foil, and let it rest for 20 minutes before carving.
Remember, the brine works its magic by seasoning the meat from the inside out, resulting in exceptionally moist and tender flesh with a subtle, savory perfume of garlic and herbs. Roast some root vegetables in the rendered drippings for a complete, show-stopping meal that celebrates simplicity and depth of flavor.
Smoky Maple Brine for Grilled Salmon
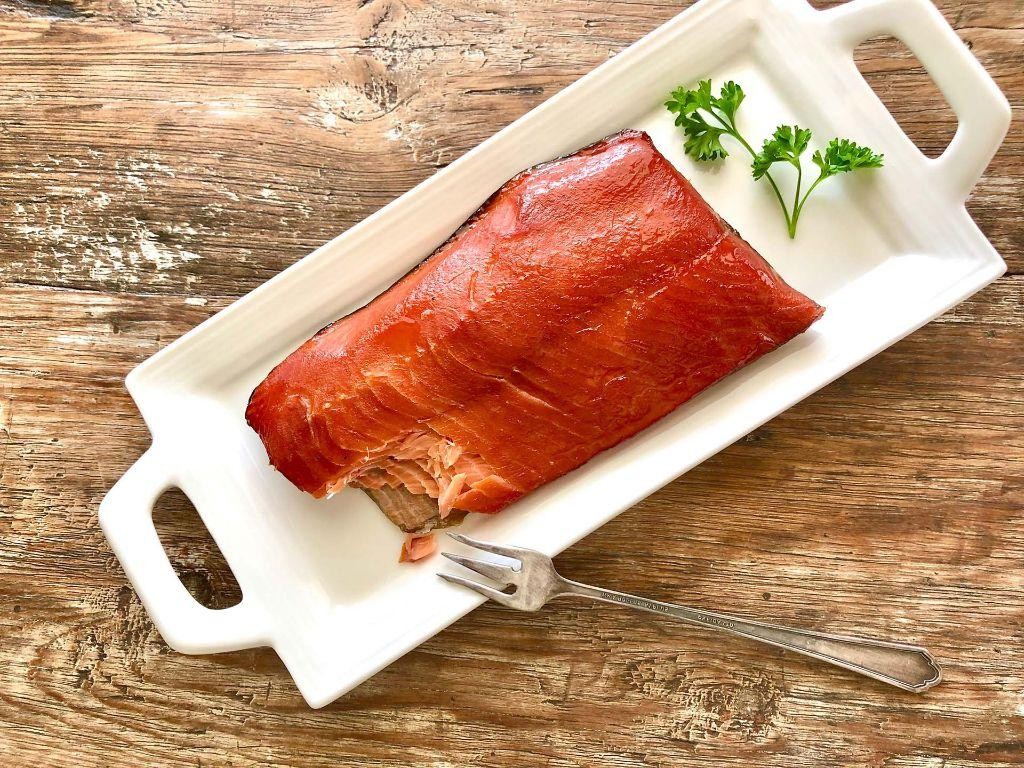
Brace yourselves, salmon lovers—this isn’t your average weeknight grill job. We’re diving into a smoky, sweet, and utterly irresistible brine that’ll have your fish flaking apart with juicy, flavor-packed abandon. Consider it the ultimate holiday (or Tuesday) treat for your taste buds.
Serving: 4 | Pre Time: 15 minutes | Cooking Time: 12 minutes
Ingredients
– 4 (6-ounce) skin-on wild-caught salmon fillets
– 1 cup pure maple syrup
– ½ cup kosher salt
– 2 tbsp smoked paprika
– 1 tbsp freshly cracked black pepper
– 2 cups cold filtered water
– 1 tbsp extra-virgin olive oil
– 1 lemon, thinly sliced into rounds
Instructions
1. In a large non-reactive bowl, whisk together the pure maple syrup, kosher salt, smoked paprika, and freshly cracked black pepper until fully dissolved.
2. Gradually pour in the cold filtered water while whisking vigorously to create a homogeneous brine solution.
3. Submerge the 4 skin-on wild-caught salmon fillets completely in the brine, ensuring they are fully covered. Refrigerate for exactly 45 minutes—no longer, or the texture may become overly firm.
4. Remove the salmon from the brine and pat each fillet thoroughly dry with paper towels; this step is crucial for achieving a crisp skin during grilling.
5. Preheat a gas or charcoal grill to 425°F, ensuring the grates are clean and lightly oiled to prevent sticking.
6. Brush both sides of each salmon fillet lightly with extra-virgin olive oil, then place them skin-side down on the preheated grill.
7. Grill for 6 minutes without moving the fillets to allow the skin to crisp and release easily from the grates.
8. Carefully flip each fillet using a fish spatula and grill for an additional 4–5 minutes, until the internal temperature reaches 125°F for medium-rare or 135°F for medium.
9. Transfer the grilled salmon to a serving platter and immediately top with the thinly sliced lemon rounds, allowing the residual heat to gently warm them.
Zesty and luxurious, this salmon emerges with a perfectly caramelized exterior that gives way to tender, flaky flesh infused with smoky-sweet notes. Serve it atop a bed of herbed quinoa or alongside grilled asparagus for a vibrant, restaurant-worthy plate that’ll have everyone asking for seconds.
Beer Brine for Succulent Bratwurst
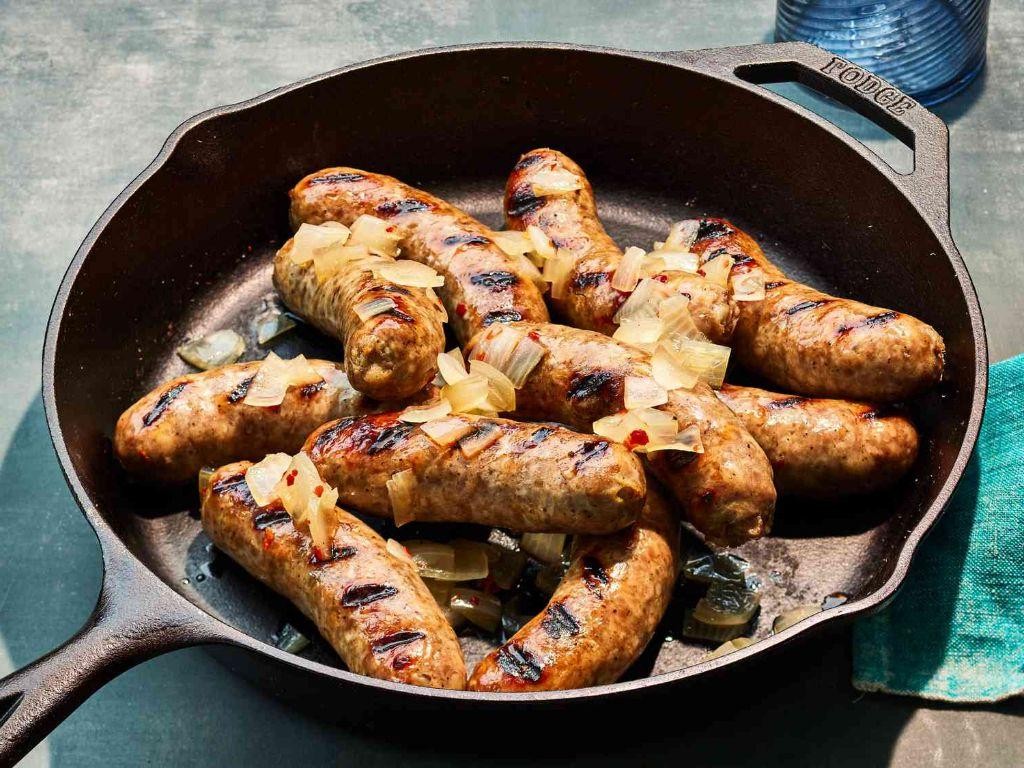
Tired of bratwurst that’s drier than a desert? This beer brine is your juicy, flavor-packed salvation—it’s the secret handshake to the most succulent sausages you’ll ever grill, turning ordinary links into legendary bites with a hoppy, savory hug.
Serving: 6 | Pre Time: 15 minutes | Cooking Time: 25 minutes
Ingredients
– 2 cups lager-style beer
– 1 cup cold water
– ¼ cup kosher salt
– 2 tbsp granulated sugar
– 1 tbsp whole black peppercorns
– 2 bay leaves
– 1 tsp coriander seeds, lightly crushed
– 6 fresh bratwurst links
Instructions
1. In a medium saucepan, combine 2 cups lager-style beer, 1 cup cold water, ¼ cup kosher salt, 2 tbsp granulated sugar, 1 tbsp whole black peppercorns, 2 bay leaves, and 1 tsp lightly crushed coriander seeds.
2. Heat the mixture over medium heat, stirring occasionally, until the salt and sugar dissolve completely, about 3–5 minutes; do not let it boil to preserve the beer’s delicate flavors.
3. Remove the saucepan from heat and let the brine cool to room temperature, approximately 20 minutes, then transfer it to a large, non-reactive bowl or resealable plastic bag.
4. Submerge 6 fresh bratwurst links fully in the cooled brine, ensuring they are covered; if using a bag, press out excess air before sealing.
5. Refrigerate the bratwurst in the brine for at least 4 hours or up to 12 hours for maximum flavor penetration, turning the links once halfway through for even brining.
6. Preheat a grill or grill pan to medium-high heat, about 400°F, and lightly oil the grates to prevent sticking.
7. Remove the bratwurst from the brine, pat them dry with paper towels to promote better browning, and discard the remaining brine.
8. Grill the bratwurst for 20–25 minutes, turning every 5 minutes, until they reach an internal temperature of 160°F and develop a golden-brown, slightly charred exterior.
9. Let the bratwurst rest off the heat for 5 minutes before serving to allow the juices to redistribute evenly.
Unbelievably tender and bursting with savory, malty notes from the beer brine, these bratwurst boast a juicy interior that pairs perfectly with a crisp snap on the outside. Serve them nestled in toasted brioche buns with a smear of whole-grain mustard and a tangy sauerkraut for a gourmet twist, or slice them over a warm potato salad to soak up every drop of flavor.
Lemon Pepper Brine for Tender Shrimp
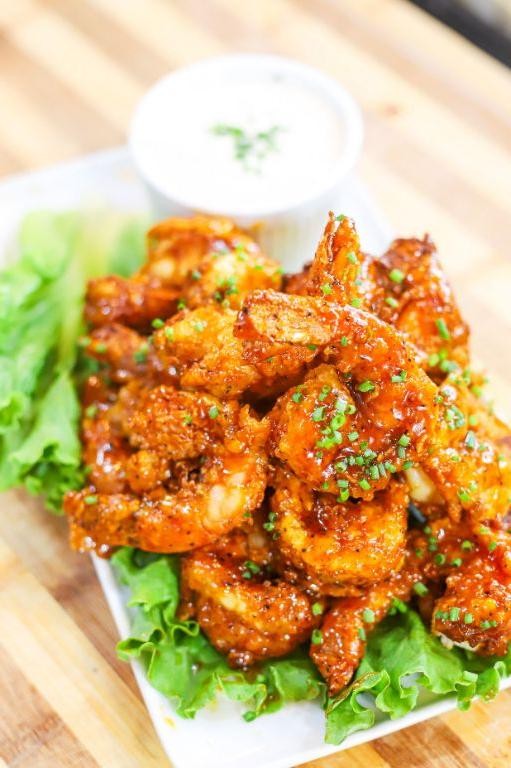
Gather ’round, seafood lovers, because we’re about to transform your shrimp from rubbery to ridiculously tender with a zesty, peppery bath that’s basically a spa day for crustaceans. This lemon pepper brine is the secret weapon you never knew you needed, delivering juicy, flavorful bites that’ll make you the hero of any taco night, pasta party, or solo fridge-raid session.
Serving: 4 | Pre Time: 15 minutes | Cooking Time: 5 minutes
Ingredients
– 1 pound large raw shrimp, peeled and deveined, tails on
– 4 cups cold filtered water
– ¼ cup fine sea salt
– ¼ cup granulated sugar
– 2 tablespoons whole black peppercorns, lightly crushed
– 3 large organic lemons, zested and juiced
– 2 tablespoons extra-virgin olive oil
– 2 cloves fresh garlic, finely minced
– 1 teaspoon smoked paprika
Instructions
1. In a large non-reactive bowl, combine the cold filtered water, fine sea salt, and granulated sugar. Whisk vigorously for 1 full minute until the salt and sugar are completely dissolved.
2. Add the lightly crushed whole black peppercorns, the zest and juice from the three organic lemons, and the finely minced fresh garlic to the brine solution. Stir to incorporate.
3. Submerge the peeled and deveined raw shrimp completely in the brine mixture. Cover the bowl tightly with plastic wrap and refrigerate for exactly 30 minutes—no longer, or the texture can become mushy.
4. While the shrimp brines, pat the shrimp completely dry with paper towels after removing them from the brine; this is crucial for achieving a perfect sear.
5. Heat the extra-virgin olive oil in a large cast-iron skillet over medium-high heat until it shimmers, about 2 minutes.
6. Add the dried shrimp to the hot skillet in a single layer, ensuring they are not crowded. Sear for 1 minute and 30 seconds per side, until the flesh turns opaque and the edges develop a light golden-brown crust.
7. During the last 30 seconds of cooking, sprinkle the smoked paprika evenly over the shrimp in the skillet and toss to coat.
8. Immediately transfer the cooked shrimp to a clean plate to prevent carryover cooking.
Unbelievably succulent, these shrimp boast a firm-yet-tender bite with a vibrant, tangy punch from the lemon and a warm, aromatic heat from the pepper. Serve them piled high over creamy grits, tossed into a fresh citrus salad, or simply skewered with a zesty aioli for dipping—their versatility is as impressive as their flavor.
Honey Mustard Brine for Roasted Duck
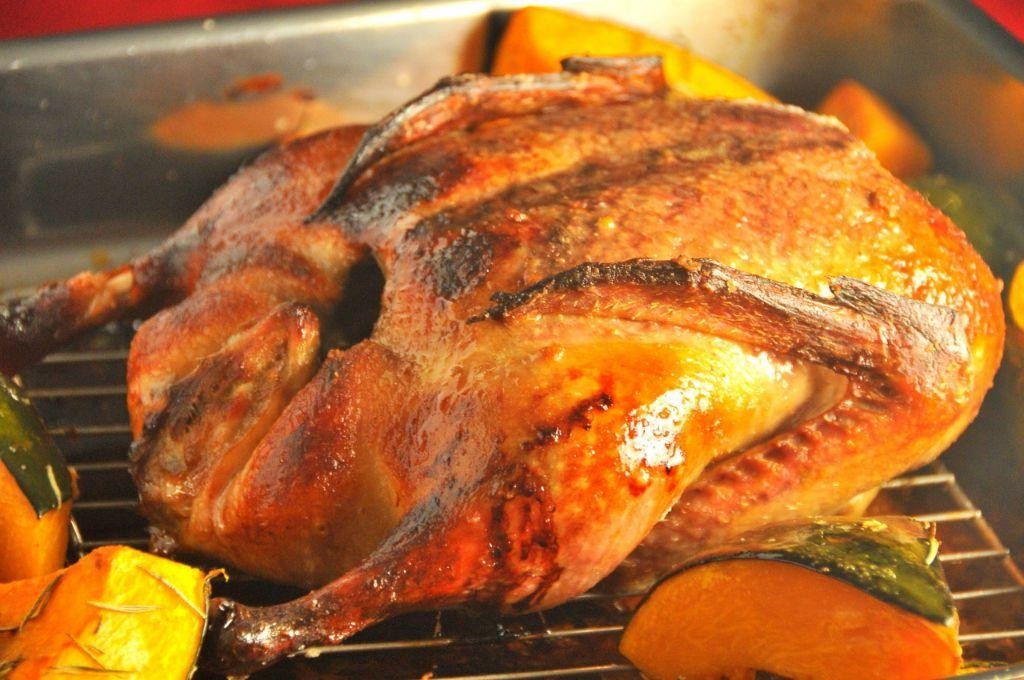
Now, let’s be real—roasting a duck can feel like a high-stakes culinary heist, but with this honey mustard brine, you’re basically giving your bird a spa day before its grand, crispy debut. It’s the secret handshake between sweet, tangy, and succulent that’ll have your guests wondering if you secretly trained under a French chef (we won’t tell!).
Serving: 4 | Pre Time: 30 minutes | Cooking Time: 90 minutes
Ingredients
– 1 whole duck (5-6 lbs), patted dry
– 4 cups cold water
– ½ cup honey
– ¼ cup Dijon mustard
– ¼ cup kosher salt
– 2 tbsp whole black peppercorns
– 4 sprigs fresh thyme
– 2 bay leaves
– 1 tbsp unsalted butter, melted
Instructions
1. In a large pot, combine 4 cups cold water, ½ cup honey, ¼ cup Dijon mustard, ¼ cup kosher salt, 2 tbsp whole black peppercorns, 4 sprigs fresh thyme, and 2 bay leaves. Bring to a simmer over medium-high heat, stirring until the salt dissolves completely, about 5 minutes.
2. Remove the pot from heat and let the brine cool to room temperature, then refrigerate until chilled to 40°F, approximately 1 hour—this prevents bacterial growth and ensures food safety.
3. Submerge 1 whole duck, patted dry, in the chilled brine, ensuring it’s fully covered. Refrigerate for 12-24 hours, turning once halfway through for even flavor penetration.
4. Remove the duck from the brine and rinse thoroughly under cold water to remove excess salt, then pat dry with paper towels until the skin is completely moisture-free—this is crucial for achieving crispy skin during roasting.
5. Preheat the oven to 425°F and place the duck on a rack in a roasting pan, breast-side up. Brush the skin evenly with 1 tbsp unsalted butter, melted, to promote browning and add richness.
6. Roast the duck at 425°F for 30 minutes to crisp the skin, then reduce the temperature to 350°F and continue roasting until the internal temperature reaches 165°F at the thickest part of the thigh, about 60 minutes more.
7. Let the duck rest for 15 minutes before carving to allow the juices to redistribute, ensuring moist, tender meat. Tip: Use a sharp knife to slice against the grain for cleaner cuts.
Absolutely divine! The brine infuses the duck with a subtle sweetness from the honey and a piquant kick from the mustard, resulting in juicy, flavorful meat beneath a crackling, golden-brown skin. Serve it sliced over a bed of wild rice pilaf or alongside roasted root vegetables for a show-stopping centerpiece that’s as impressive as it is delicious.
Asian-Inspired Soy and Ginger Brine
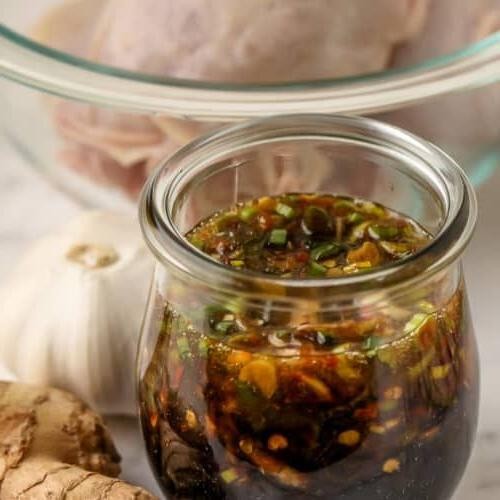
Picture this: you’re staring at a bland piece of chicken or tofu, and it’s giving you the culinary equivalent of a shrug. That’s where our flavor-packed, umami-bomb of a brine swoops in to save dinner from the doldrums. This Asian-inspired soy and ginger brine is the secret handshake to juicy, deeply seasoned perfection, turning your protein from ‘meh’ to magnificent with minimal fuss.
Serving: 4 | Pre Time: 10 minutes | Cooking Time: 0 minutes
Ingredients
- 1 cup low-sodium soy sauce
- 1/2 cup mirin
- 1/4 cup unseasoned rice vinegar
- 1/4 cup granulated sugar
- 3 tablespoons fresh ginger, finely grated
- 4 cloves garlic, smashed
- 2 whole star anise pods
- 1 teaspoon whole black peppercorns
- 4 cups cold water
- 1.5 pounds boneless, skinless chicken thighs or extra-firm tofu block
Instructions
- Combine 1 cup low-sodium soy sauce, 1/2 cup mirin, 1/4 cup unseasoned rice vinegar, and 1/4 cup granulated sugar in a medium saucepan over medium heat.
- Stir the mixture constantly with a whisk until the sugar is fully dissolved, about 2-3 minutes. Tip: Avoid boiling to preserve the delicate flavors of the mirin.
- Remove the saucepan from the heat and immediately add 3 tablespoons finely grated fresh ginger, 4 smashed garlic cloves, 2 whole star anise pods, and 1 teaspoon whole black peppercorns.
- Allow the aromatics to steep in the hot liquid for 5 minutes to infuse their flavors.
- Pour the infused liquid into a large, non-reactive bowl or container and stir in 4 cups of cold water. Tip: Using a non-reactive container like glass or stainless steel prevents metallic flavors.
- Submerge 1.5 pounds of boneless, skinless chicken thighs or one extra-firm tofu block completely in the brine liquid.
- Cover the container tightly and refrigerate for exactly 4 hours for chicken or 2 hours for tofu. Tip: Do not exceed this time for chicken, as the salt can begin to cure the texture.
- Remove the protein from the brine and pat it completely dry with paper towels before proceeding with your preferred cooking method (e.g., grilling, baking, or pan-searing).
But beyond the brine, you’re left with protein that’s impossibly juicy and threaded with savory-sweet notes, a hint of ginger warmth, and the subtle licorice whisper of star anise. Serve the grilled chicken sliced over a crisp salad, or cube the seared tofu and toss it into a vibrant stir-fry—this brine builds a flavor foundation so good, it makes everything else you add taste like a genius decision.
Bourbon Brown Sugar Brine for Ribs

Hear ye, hear ye, rib enthusiasts and backyard pitmasters! If you’ve ever dreamed of ribs so tender they practically wave a white flag of surrender, you’ve landed in the right brine. This bourbon-kissed, sugar-spiked elixir is your secret weapon for the most succulent, flavor-packed ribs of your grilling career.
Serving: 4 | Pre Time: 15 minutes | Cooking Time: 240 minutes
Ingredients
– 4 cups cold filtered water
– 1/2 cup bourbon whiskey
– 1/4 cup dark brown sugar, firmly packed
– 1/4 cup kosher salt
– 2 tablespoons whole black peppercorns, lightly crushed
– 2 tablespoons apple cider vinegar
– 1 tablespoon whole coriander seeds
– 2 bay leaves
– 1 rack St. Louis-style pork ribs (approximately 3 pounds)
Instructions
1. In a large, non-reactive stockpot, combine 4 cups of cold filtered water, 1/2 cup of bourbon whiskey, 1/4 cup of firmly packed dark brown sugar, and 1/4 cup of kosher salt.
2. Place the stockpot over medium-high heat and whisk the mixture continuously until the sugar and salt are fully dissolved, approximately 3-4 minutes; do not allow the liquid to boil.
3. Remove the pot from the heat and immediately stir in 2 tablespoons of apple cider vinegar, 2 tablespoons of lightly crushed whole black peppercorns, 1 tablespoon of whole coriander seeds, and 2 bay leaves.
4. Transfer the brine to a large, food-safe container and refrigerate, uncovered, until it is completely chilled to 40°F, about 1 hour. Tip: Chilling the brine before adding the meat prevents bacterial growth and ensures food safety.
5. While the brine chills, prepare 1 rack of St. Louis-style pork ribs by removing the membrane from the bone side of the rack for better flavor penetration.
6. Once the brine reaches 40°F, submerge the prepared rack of ribs completely in the liquid, ensuring no part is exposed to air.
7. Cover the container securely and refrigerate the ribs for exactly 12 hours to brine. Tip: For optimal results, do not exceed 12 hours, as over-brining can lead to a overly salty, cured texture.
8. After 12 hours, remove the ribs from the brine and rinse them thoroughly under cold running water for 1 minute to remove excess surface salt.
9. Pat the ribs completely dry with paper towels, then allow them to rest, uncovered, on a wire rack in the refrigerator for 1 hour to form a pellicle, or sticky surface layer, which helps smoke adhere during cooking. Tip: This drying step is crucial for achieving a beautiful bark and preventing the ribs from steaming.
10. Cook the ribs according to your preferred smoking or grilling method until the internal temperature reaches 195°F and the meat easily pulls away from the bone, approximately 3-4 hours at 225°F.
Now, behold your masterpiece. The ribs will boast a deep mahogany bark with an intoxicating aroma of caramelized sugar and warm spice. Each bite delivers a perfect harmony of savory pork, subtle whiskey warmth, and a sweet, complex crust that shatters satisfyingly. Serve them piled high on a rustic platter with tangy pickled vegetables to cut through the richness, or shred the meat for an epic bourbon-brined pulled pork sandwich.
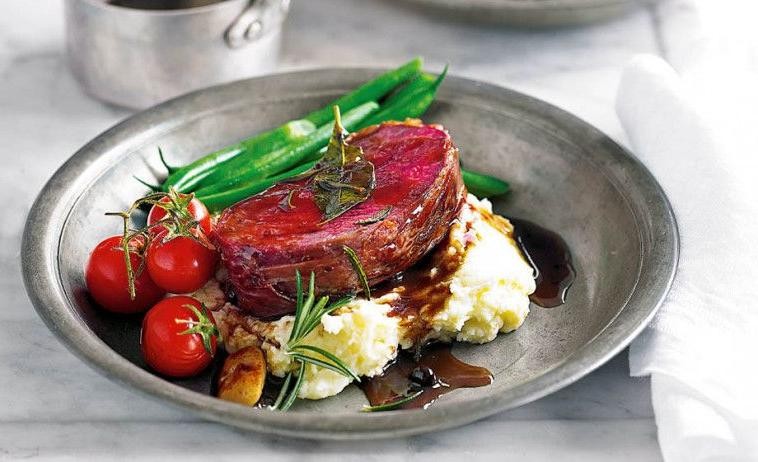
Rosemary and Thyme Brine for Lamb

Miraculously, we’ve found a way to make lamb even more irresistible—enter this herbaceous, flavor-packing brine that’s basically a spa day for your roast. Picture your lamb emerging juicy, tender, and infused with aromatic goodness, all thanks to a simple soak that feels like culinary magic. Trust me, this brine is the secret handshake to holiday dinner glory.
Serving: 6 | Pre Time: 15 minutes | Cooking Time: 0 minutes
Ingredients
– 4 cups filtered water
– 1/4 cup kosher salt
– 2 tbsp granulated sugar
– 4 sprigs fresh rosemary, bruised
– 6 sprigs fresh thyme, bruised
– 3 cloves garlic, smashed
– 1 tbsp whole black peppercorns
– 1 tbsp coriander seeds, toasted
– 1 bay leaf
– 1 (4-5 lb) bone-in leg of lamb, trimmed
Instructions
1. In a large stockpot, combine 4 cups filtered water, 1/4 cup kosher salt, and 2 tbsp granulated sugar over medium-high heat.
2. Whisk continuously until the salt and sugar fully dissolve, about 2–3 minutes, then remove from heat.
3. Add 4 sprigs fresh rosemary, bruised, 6 sprigs fresh thyme, bruised, 3 cloves garlic, smashed, 1 tbsp whole black peppercorns, 1 tbsp coriander seeds, toasted, and 1 bay leaf to the pot.
4. Stir the mixture gently to release the aromatic oils from the herbs and spices.
5. Allow the brine to cool completely to room temperature, approximately 30 minutes, to prevent cooking the lamb prematurely.
6. Place 1 (4-5 lb) bone-in leg of lamb, trimmed, in a non-reactive container or large resealable bag.
7. Pour the cooled brine over the lamb, ensuring it is fully submerged; if needed, weigh it down with a plate.
8. Seal the container or bag and refrigerate for 12–24 hours, flipping the lamb once halfway through for even seasoning.
9. Remove the lamb from the brine and pat it dry thoroughly with paper towels before proceeding with your preferred cooking method.
10. Discard the used brine and aromatics after removing the lamb.
Perfectly brined, the lamb roasts up with a succulent, melt-in-your-mouth texture and a savory depth enhanced by herbal notes. Pair it with roasted root vegetables or a bright mint chimichurri for a festive twist that’ll have everyone asking for seconds.
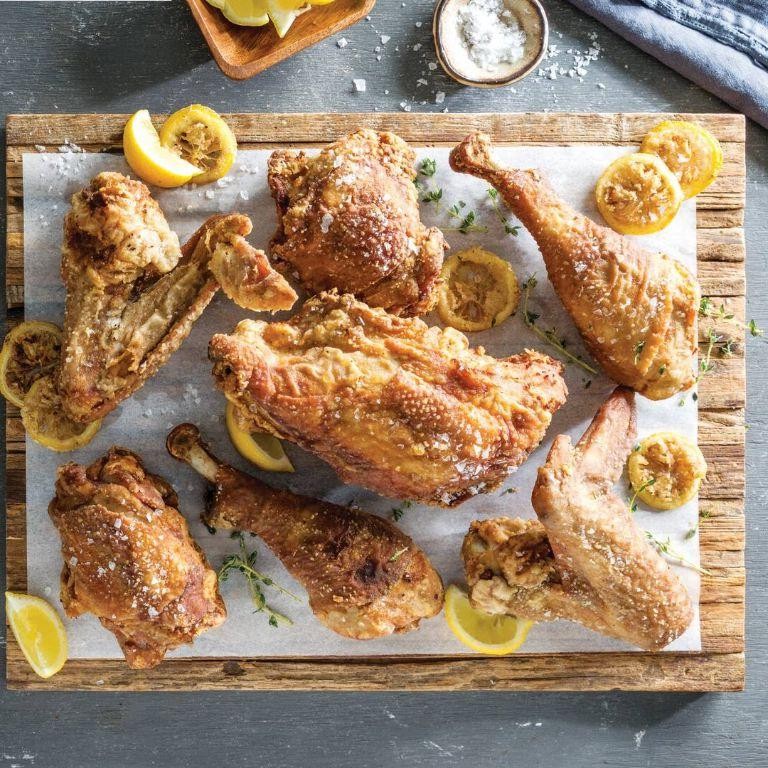
Spicy Cajun Brine for Fried Chicken
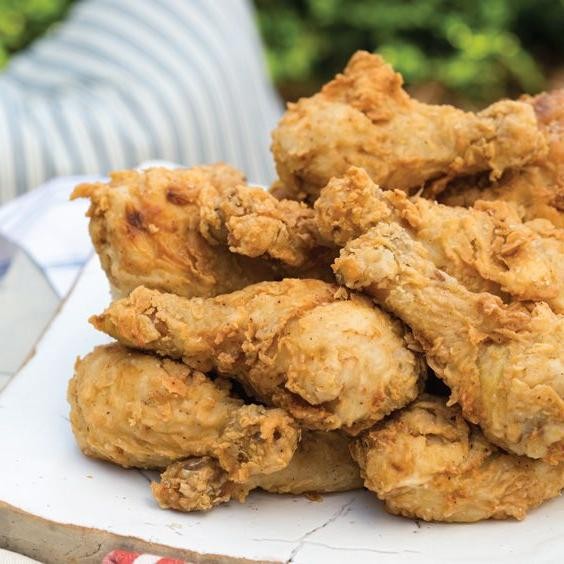
Ready to transform your fried chicken from a mere mortal meal into a legendary, lip-tingling masterpiece? This Spicy Cajun Brine is the secret weapon you never knew you needed, a magical potion that infuses every juicy bite with a fiery, flavor-packed punch that’ll have your taste buds doing a celebratory jig.
Serving: 4 | Pre Time: 15 minutes (plus 4-12 hours brining) | Cooking Time: 20 minutes
Ingredients
– 4 cups cold filtered water
– 1/4 cup fine sea salt
– 1/4 cup granulated sugar
– 2 tbsp smoked paprika
– 1 tbsp garlic powder
– 1 tbsp onion powder
– 1 tbsp dried oregano
– 2 tsp cayenne pepper
– 1 tsp freshly ground black pepper
– 1 tsp dried thyme
– 1/2 tsp celery seed
– 4 lbs bone-in, skin-on chicken pieces (thighs and drumsticks recommended)
– 2 cups all-purpose flour
– 1 tbsp baking powder
– 2 large pasture-raised eggs, lightly beaten
– 1 cup buttermilk
– 4 cups peanut oil, for frying
Instructions
1. In a large non-reactive pot or bowl, combine 4 cups cold filtered water, 1/4 cup fine sea salt, and 1/4 cup granulated sugar. Whisk vigorously until the salt and sugar are completely dissolved.
2. Whisk in 2 tbsp smoked paprika, 1 tbsp garlic powder, 1 tbsp onion powder, 1 tbsp dried oregano, 2 tsp cayenne pepper, 1 tsp freshly ground black pepper, 1 tsp dried thyme, and 1/2 tsp celery seed until a uniform, deeply colored brine forms.
3. Submerge 4 lbs of bone-in, skin-on chicken pieces completely in the brine. Cover the container and refrigerate for a minimum of 4 hours, ideally 8-12 hours for maximum flavor penetration.
4. Remove the chicken from the brine and pat each piece completely dry with paper towels. (Tip: This is crucial for achieving a crisp crust; any surface moisture will cause the oil to splatter and steam the coating.)
5. In a shallow dish, whisk together 2 cups all-purpose flour and 1 tbsp baking powder.
6. In a separate shallow dish, whisk together 2 large pasture-raised eggs, lightly beaten, and 1 cup buttermilk until fully combined.
7. Dredge each dried chicken piece first in the flour mixture, coating thoroughly, then dip into the buttermilk-egg wash, allowing excess to drip off.
8. Dredge the chicken a second time in the flour mixture, pressing gently to form a craggy, shaggy coating on all sides. (Tip: Let the coated chicken rest on a wire rack for 10 minutes; this helps the coating adhere and fry up extra crunchy.)
9. In a large, heavy-bottomed Dutch oven or deep fryer, heat 4 cups of peanut oil to 350°F, using a deep-fry thermometer for accuracy.
10. Carefully lower 3-4 pieces of chicken into the hot oil using tongs, ensuring they are not crowded. Fry for 12-14 minutes, turning occasionally, until the exterior is a deep, golden brown and an instant-read thermometer inserted into the thickest part of a thigh registers 165°F.
11. Transfer the fried chicken to a wire rack set over a sheet pan to drain. (Tip: Never drain on paper towels, as this traps steam and softens your perfect crust.)
12. Repeat the frying process with the remaining chicken pieces, allowing the oil to return to 350°F between batches.
Forget everything you thought you knew about fried chicken. The brine works its magic, creating meat that’s impossibly juicy and seasoned to the bone, while the double-dredged crust shatters with a fiery, aromatic crunch. Serve it piled high on a platter with cooling buttermilk biscuits and pickled vegetables for the ultimate spicy-savory contrast.
Citrus and Fennel Brine for Whole Fish
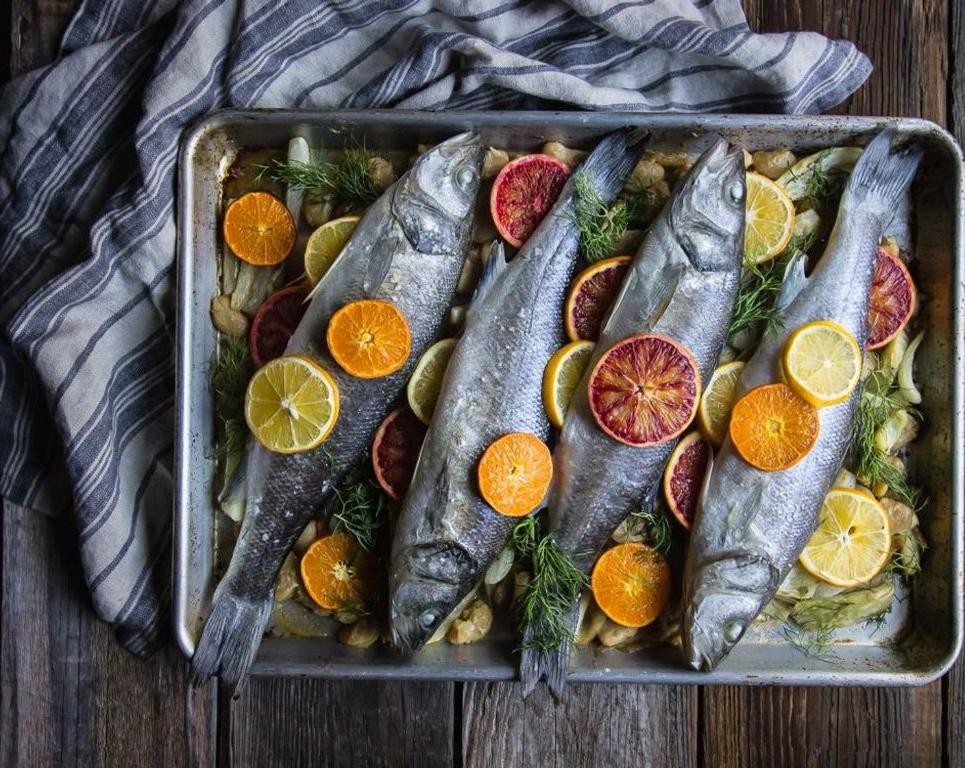
Let’s be real—most of us have stared down a whole fish with the same enthusiasm as a Monday morning meeting. But fear not, because this citrus and fennel brine is about to turn that fish into the life of the party, with a flavor so bright and aromatic it’ll make your taste buds do a happy dance. Think of it as a spa day for your seafood, where zesty citrus and licorice-like fennel work their magic to keep every bite juicy, tender, and utterly irresistible.
Serving: 4 | Pre Time: 30 minutes | Cooking Time: 20 minutes
Ingredients
- 1 whole branzino (about 1.5 pounds), scaled and gutted
- 2 cups filtered water
- 1/4 cup kosher salt
- 1/4 cup granulated sugar
- 1 medium fennel bulb, thinly sliced
- Zest and juice of 1 large orange
- Zest and juice of 1 lemon
- 2 tablespoons extra-virgin olive oil
- 1 teaspoon whole black peppercorns
- 2 fresh thyme sprigs
Instructions
- In a large non-reactive bowl, combine the filtered water, kosher salt, and granulated sugar, whisking vigorously until fully dissolved to create the brine base.
- Add the thinly sliced fennel bulb, orange zest and juice, lemon zest and juice, extra-virgin olive oil, whole black peppercorns, and fresh thyme sprigs to the brine, stirring gently to incorporate all ingredients.
- Submerge the whole branzino completely in the brine mixture, ensuring it is covered; if needed, place a small plate on top to weigh it down.
- Refrigerate the brined fish for exactly 25 minutes to infuse flavors without over-salting—this timing is key for perfect texture.
- Remove the fish from the brine and pat it dry thoroughly with paper towels, discarding the brine mixture.
- Preheat your oven to 400°F and line a baking sheet with parchment paper.
- Place the dried fish on the prepared baking sheet and roast in the preheated oven for 18–20 minutes, until the skin is crispy and the flesh flakes easily with a fork.
- Let the fish rest for 5 minutes before serving to allow juices to redistribute, ensuring maximum moisture in every bite.
So, what’s the final verdict? This brine transforms the fish into a masterpiece of tender, flaky perfection, with a subtle sweetness from the fennel and a zesty kick from the citrus that sings on the palate. Serve it over a bed of wild rice pilaf or alongside roasted baby potatoes for a meal that’s as elegant as it is effortless, and watch even the pickiest eaters come back for seconds.
Sweet Tea Brine for Southern Fried Turkey
Gather ’round, y’all, because we’re about to turn your Thanksgiving turkey from a potential dry disaster into the undisputed, juicy champion of the holiday table. This sweet tea brine is the Southern secret weapon that infuses every bite with a whisper of sweetness and a whole lot of personality, ensuring your bird is so flavorful it might just start telling tall tales.
Serving: 12 | Pre Time: 1440 minutes | Cooking Time: 180 minutes
Ingredients
– 2 gallons cold filtered water
– 4 family-size black tea bags
– 2 cups granulated sugar
– 1 cup Diamond Crystal kosher salt
– 1 head of garlic, cloves smashed and peeled
– 2 large lemons, thinly sliced
– 1 large yellow onion, thinly sliced
– 4 fresh bay leaves
– 2 tablespoons whole black peppercorns
– 1 tablespoon whole allspice berries
– 1 (12-14 pound) fresh or thawed turkey, giblets removed
– 4 quarts peanut oil, for frying
– 2 tablespoons fine sea salt
– 1 tablespoon freshly cracked black pepper
Instructions
1. In a large stockpot, combine 1 gallon of the cold filtered water and the 4 family-size black tea bags.
2. Bring the mixture to a rolling boil over high heat, then immediately remove the pot from the heat.
3. Steep the tea bags for 10 minutes, then discard them.
4. While the tea is hot, whisk in the 2 cups of granulated sugar and 1 cup of Diamond Crystal kosher salt until fully dissolved.
5. Stir in the remaining 1 gallon of cold filtered water to rapidly cool the brine.
6. Add the smashed garlic cloves, sliced lemons, sliced onion, fresh bay leaves, whole black peppercorns, and whole allspice berries to the pot.
7. Submerge the 12-14 pound turkey, breast-side down, in the cooled brine liquid.
8. Tip: Ensure the turkey is fully covered; weigh it down with a plate if necessary to prevent floating.
9. Cover the pot and refrigerate for exactly 24 hours.
10. Remove the turkey from the brine and pat it completely dry, inside and out, with paper towels.
11. Tip: This is a critical step for safe frying and crispy skin; let the turkey air-dry on a rack for 1 hour at room temperature.
12. In a small bowl, combine the 2 tablespoons of fine sea salt and 1 tablespoon of freshly cracked black pepper.
13. Season the entire exterior and interior cavity of the dry turkey generously with the salt and pepper mixture.
14. In a large outdoor turkey fryer, heat 4 quarts of peanut oil to 350°F, using a deep-fry thermometer to monitor the temperature.
15. Slowly and carefully lower the seasoned turkey into the hot oil, breast-side up.
16. Tip: Maintain the oil temperature between 325°F and 350°F throughout cooking, adjusting the heat as needed.
17. Fry the turkey for 3 minutes per pound (approximately 36-42 minutes for a 12-14 lb bird).
18. Carefully remove the turkey from the oil and transfer it to a wire rack set over a sheet pan.
19. Let the turkey rest, uncovered, for 30 minutes before carving.
Absolutely transformative, this method yields turkey with impossibly crisp, mahogany-hued skin that shatters to reveal succulent, deeply seasoned meat infused with subtle citrus and spice. Serve it proudly as the centerpiece, letting the pan drippings mingle with creamy mashed potatoes for a truly legendary gravy.
Smoked Paprika Brine for Cornish Hens
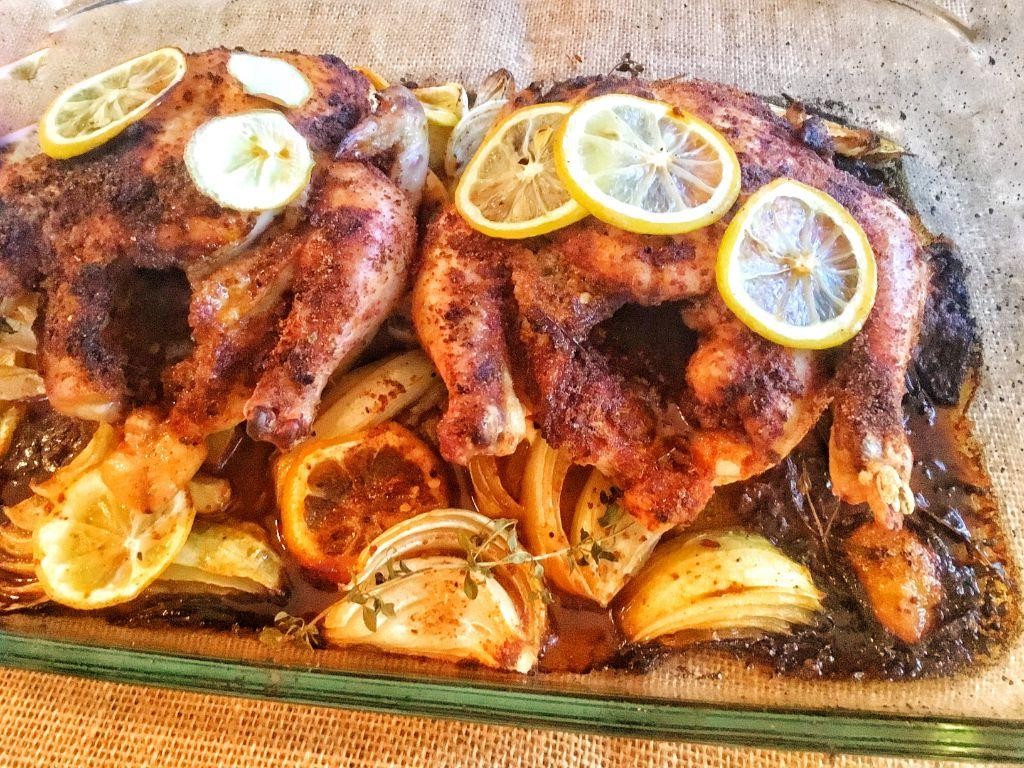
Nervous about dry poultry? Never fear, because this smoked paprika brine is about to become your new secret weapon for the juiciest, most flavor-packed Cornish hens you’ve ever had. It’s a simple soak that works culinary magic, turning humble birds into the star of your holiday table with minimal effort and maximum deliciousness. Get ready to brine and dine!
Serving: 4 | Pre Time: 15 minutes (plus 12-24 hours brining) | Cooking Time: 60 minutes
Ingredients
– 4 quarts cold filtered water
– 1 cup Diamond Crystal kosher salt
– 1/2 cup granulated sugar
– 1/4 cup smoked paprika (Pimentón de la Vera)
– 6 cloves garlic, crushed
– 2 sprigs fresh rosemary
– 2 sprigs fresh thyme
– 1 tablespoon whole black peppercorns
– 2 bay leaves
– 4 (1.5-pound) Cornish game hens, giblets removed
– 2 tablespoons extra-virgin olive oil
– 1 teaspoon freshly cracked black pepper
Instructions
1. In a large, non-reactive stockpot, combine 4 quarts cold filtered water, 1 cup Diamond Crystal kosher salt, and 1/2 cup granulated sugar. Heat over medium-high, stirring constantly, just until the salt and sugar are fully dissolved, about 3-4 minutes; do not let it boil. Tip: Dissolving the solids in warm water first ensures an even brine.
2. Immediately remove the pot from heat and stir in 1/4 cup smoked paprika, 6 crushed garlic cloves, 2 sprigs fresh rosemary, 2 sprigs fresh thyme, 1 tablespoon whole black peppercorns, and 2 bay leaves.
3. Allow the brine to cool completely to room temperature, then refrigerate until it is thoroughly chilled, at least 2 hours.
4. Submerge 4 Cornish game hens (giblets removed) in the chilled brine, ensuring they are fully covered. Refrigerate for 12 to 24 hours. Tip: Brining for the full 24 hours yields the most tender, flavorful meat.
5. Preheat your oven to 425°F (218°C) and position a rack in the center. Remove the hens from the brine, discarding the liquid, and pat them completely dry with paper towels. Tip: Drying the skin is crucial for achieving a crisp, golden finish.
6. Place the hens breast-side up on a wire rack set inside a rimmed baking sheet. Rub the skin of each hen evenly with 2 tablespoons of extra-virgin olive oil and season all over with 1 teaspoon of freshly cracked black pepper.
7. Roast the hens at 425°F for 20 minutes, then reduce the oven temperature to 375°F (190°C) and continue roasting until the internal temperature at the thickest part of the thigh registers 165°F (74°C) and the skin is deeply golden and crisp, about 40-45 minutes more.
8. Transfer the hens to a clean cutting board, tent loosely with foil, and let them rest for 10 minutes before serving.
Kick back and admire your masterpiece: the hens will boast a stunning mahogany-hued, crackling-crisp skin that gives way to impossibly juicy, deeply seasoned meat with a warm, smoky essence from the paprika. Serve them whole for a dramatic presentation, or use kitchen shears to spatchcock them for easier sharing—either way, be prepared for requests for the recipe.
Dill and Vinegar Brine for Pickled Eggs
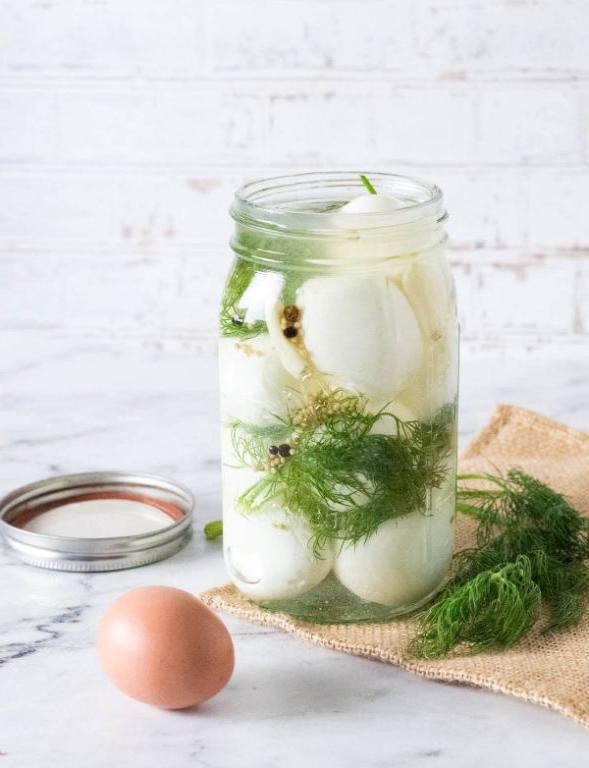
Aren’t you tired of those bland, boring pickled eggs that taste like they’ve been marinating in regret? Let’s kick things up a notch with a dill and vinegar brine that packs a punch of flavor and personality—perfect for your next gathering or a solo snack attack that says, “I have sophisticated taste buds.”
Serving: 12 | Pre Time: 15 minutes | Cooking Time: 0 minutes
Ingredients
– 12 large pasture-raised eggs, hard-boiled and peeled
– 2 cups distilled white vinegar
– 1 cup filtered water
– 3 tablespoons granulated sugar
– 2 tablespoons kosher salt
– 4 cloves garlic, smashed
– 1 tablespoon whole black peppercorns
– 1 tablespoon mustard seeds
– 1 large bunch fresh dill, roughly chopped
– 1 teaspoon red pepper flakes
Instructions
1. Place the hard-boiled and peeled pasture-raised eggs into a clean, large glass jar with a tight-fitting lid.
2. In a medium saucepan over medium-high heat, combine the distilled white vinegar, filtered water, granulated sugar, and kosher salt.
3. Bring the mixture to a gentle simmer, stirring occasionally with a wooden spoon until the sugar and salt fully dissolve, about 3-5 minutes.
4. Remove the saucepan from the heat and immediately add the smashed garlic cloves, whole black peppercorns, mustard seeds, roughly chopped fresh dill, and red pepper flakes to the hot brine.
5. Allow the brine to cool to room temperature, approximately 30 minutes, to preserve the fresh flavors of the herbs and spices.
6. Carefully pour the cooled brine over the eggs in the jar, ensuring they are completely submerged; use a clean spoon to press down any floating ingredients.
7. Seal the jar tightly and refrigerate it for at least 48 hours before serving to allow the flavors to fully penetrate the eggs.
8. For optimal results, gently shake the jar once daily to redistribute the brine and spices evenly around the eggs.
Wow, these pickled eggs emerge with a firm yet tender texture and a vibrant tang from the vinegar, balanced by the aromatic dill and a subtle kick of heat. Serve them sliced on a charcuterie board for a pop of color or chop them into a potato salad to elevate your picnic game—they’re sure to be the star of any spread!
Coffee and Molasses Brine for Brisket
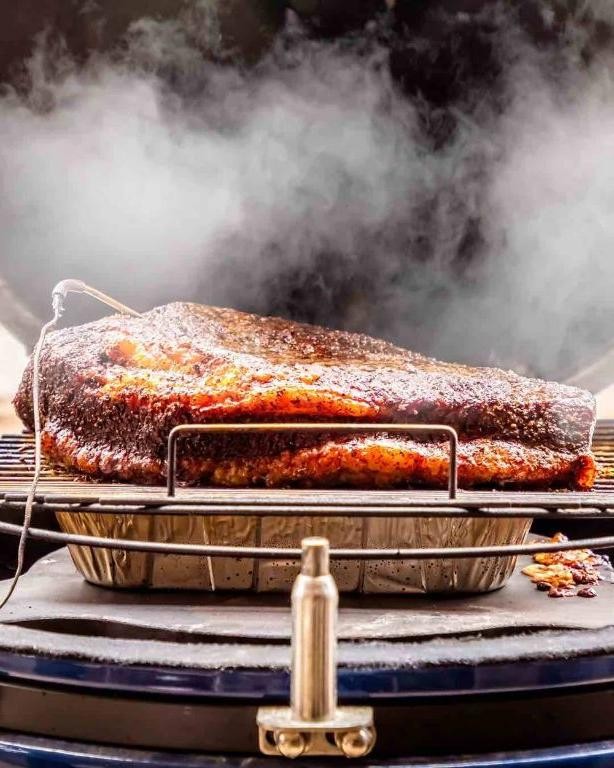
Gather ’round, barbecue enthusiasts and coffee addicts—because we’re about to merge your two great loves into one show-stopping brisket brine that’ll have your taste buds doing a happy dance. This coffee and molasses brine isn’t just a marinade; it’s a flavor-packed, tenderizing powerhouse that turns a humble brisket into a smoky, sweet, and deeply savory masterpiece. Trust me, your smoker (and your guests) will thank you for this bold, caffeinated twist on a classic.
Serving: 8 | Pre Time: 15 minutes | Cooking Time: 12 hours
Ingredients
– 4 cups freshly brewed strong coffee, cooled to room temperature
– 1 cup robust molasses
– ½ cup kosher salt
– ¼ cup dark brown sugar, firmly packed
– 2 tbsp whole black peppercorns, lightly crushed
– 4 cloves garlic, finely minced
– 1 tbsp whole coriander seeds
– 1 (5–6 lb) whole beef brisket, trimmed of excess fat
Instructions
1. In a large non-reactive bowl, combine the freshly brewed strong coffee, robust molasses, kosher salt, and dark brown sugar, whisking vigorously until the salt and sugar are fully dissolved.
2. Add the lightly crushed whole black peppercorns, finely minced garlic cloves, and whole coriander seeds to the mixture, stirring to incorporate evenly.
3. Place the trimmed whole beef brisket into a large food-safe container or resealable plastic bag, ensuring it lies flat.
4. Pour the coffee and molasses brine over the brisket, making sure the liquid completely submerges the meat.
5. Seal the container or bag tightly, removing as much air as possible to maximize contact with the brine.
6. Refrigerate the brisket in the brine for exactly 12 hours, flipping it once halfway through to ensure even absorption—this step is crucial for balanced flavor penetration.
7. After brining, remove the brisket from the liquid and pat it dry thoroughly with paper towels to promote a better bark formation during smoking.
8. Discard the used brine immediately, as it is not safe for reuse due to raw meat contact.
9. Preheat your smoker to 225°F, using hardwood like oak or hickory for a complementary smoky note.
10. Place the brisket directly on the smoker grate, fat-side up, and smoke until the internal temperature reaches 203°F, which typically takes 10–12 hours—use a digital meat thermometer for accuracy, avoiding guesswork.
11. Once done, wrap the brisket in butcher paper and let it rest in a warm place for 1 hour to allow the juices to redistribute, preventing dryness when sliced.
Perfectly brined and smoked, this brisket emerges with a tender, melt-in-your-mouth texture and a complex flavor profile where the coffee’s bitterness elegantly balances the molasses’ sweetness. Serve it sliced against the grain with a side of tangy coleslaw or pile it high on toasted brioche buns for an unforgettable sandwich experience.
Juniper Berry Brine for Venison
Venturing into the wild world of game meat? Let’s talk about the secret weapon that transforms tough, gamey venison into a succulent, flavor-packed masterpiece—a juniper berry brine that’s so good, it might just make your deer-in-headlights look turn into a chef’s confident grin.
Serving: 4 | Pre Time: 15 minutes | Cooking Time: 0 minutes
Ingredients
– 4 cups cold filtered water
– 1/4 cup kosher salt
– 2 tbsp granulated sugar
– 1 tbsp whole black peppercorns, lightly crushed
– 2 tbsp dried juniper berries, gently bruised
– 3 sprigs fresh rosemary
– 2 bay leaves
– 1/2 cup apple cider vinegar
Instructions
1. In a large non-reactive pot, combine 4 cups cold filtered water, 1/4 cup kosher salt, and 2 tbsp granulated sugar over medium heat, stirring constantly until the salt and sugar fully dissolve, about 3–4 minutes.
2. Remove the pot from the heat and add 1 tbsp whole black peppercorns, lightly crushed, 2 tbsp dried juniper berries, gently bruised, 3 sprigs fresh rosemary, and 2 bay leaves, allowing the aromatics to steep for 5 minutes to infuse the brine.
3. Stir in 1/2 cup apple cider vinegar to balance the brine’s acidity, then transfer the mixture to a large, food-safe container and let it cool completely to room temperature, about 20–30 minutes.
4. Submerge 2 lbs of venison roast, trimmed of excess silver skin, in the cooled brine, ensuring it is fully covered; if needed, weigh it down with a plate to keep it immersed.
5. Cover the container tightly and refrigerate for 12–24 hours, flipping the venison once halfway through to ensure even brining—this slow soak tenderizes the meat and locks in moisture.
6. Remove the venison from the brine, rinse it briefly under cold running water to remove excess salt, and pat it dry thoroughly with paper towels before proceeding to your preferred cooking method, such as roasting or grilling.
7. Discard the used brine immediately after removing the meat to prevent bacterial growth, and clean the container thoroughly with hot, soapy water.
Witness the magic unfold as this brine works its wonders: the venison emerges incredibly tender, with a subtle piney note from the juniper berries that cuts through the gaminess, while the rosemary and vinegar add a bright, herbaceous depth. Serve it sliced thin over creamy polenta or alongside roasted root vegetables for a rustic feast that’ll have everyone asking for your wild-game secrets.
Pineapple and Coconut Brine for Ham
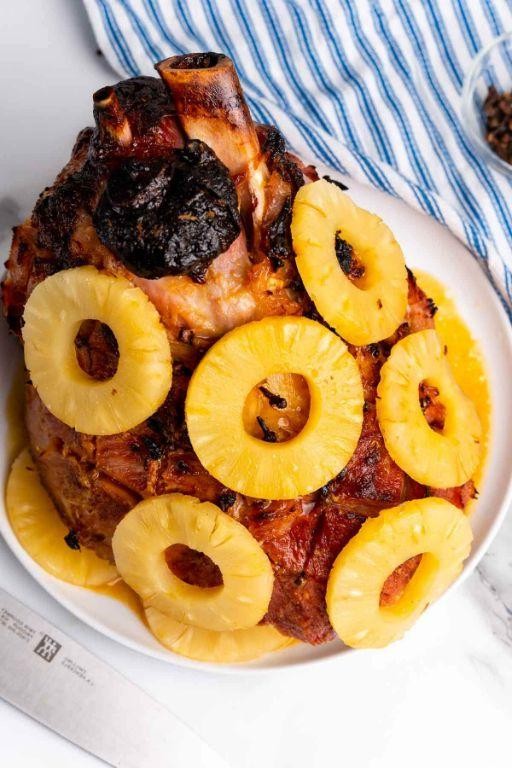
Wondering how to elevate your holiday ham from ho-hum to holy-cow? Welcome to the tropical twist that’ll have your taste buds doing the hula—a pineapple and coconut brine that infuses every savory slice with sweet, tangy, and utterly irresistible flavor. It’s like a vacation for your main course, minus the sunscreen.
Serving: 12 | Pre Time: 20 minutes | Cooking Time: 0 minutes (plus 24-48 hours brining)
Ingredients
– 1 gallon cold filtered water
– 1 cup granulated sugar
– ¾ cup Diamond Crystal kosher salt
– 2 cups unsweetened pineapple juice
– 1 (13.5-ounce) can full-fat coconut milk
– 1 fresh pineapple, peeled, cored, and cut into 1-inch chunks
– 1 tablespoon whole black peppercorns
– 4 whole cloves
– 2 bay leaves
– 1 (8-10 pound) bone-in, skin-on ham
Instructions
1. In a large stockpot over medium-high heat, combine the cold filtered water, granulated sugar, and Diamond Crystal kosher salt. Whisk continuously until the sugar and salt are fully dissolved, about 3-4 minutes, then immediately remove from heat. Tip: Dissolving the solids in cold water first prevents a grainy brine.
2. Stir in the unsweetened pineapple juice and full-fat coconut milk until the mixture is homogenous and slightly creamy.
3. Add the fresh pineapple chunks, whole black peppercorns, whole cloves, and bay leaves to the pot, gently submerging them.
4. Allow the brine to cool completely to room temperature, approximately 1 hour. Tip: For faster cooling, place the pot in an ice bath and stir occasionally.
5. Place the bone-in, skin-on ham in a food-safe container or brining bag large enough to hold it and the liquid.
6. Pour the cooled brine over the ham, ensuring it is fully submerged. If needed, weigh it down with a plate.
7. Seal the container or bag and refrigerate for 24-48 hours. Tip: Brining for the full 48 hours maximizes flavor penetration for a more succulent result.
8. After brining, remove the ham from the liquid, discard the brine, and pat the ham dry thoroughly with paper towels before proceeding with your preferred cooking method as directed on its packaging.
Perfectly brined, the ham emerges with a juicy, tender texture that contrasts delightfully with a crisp, glazed exterior. The flavor profile is a sophisticated dance of savory pork, bright pineapple acidity, and a subtle, creamy coconut undertone. For a show-stopping presentation, garnish the serving platter with fresh pineapple rings and toasted coconut flakes.
Red Wine and Herb Brine for Prime Rib
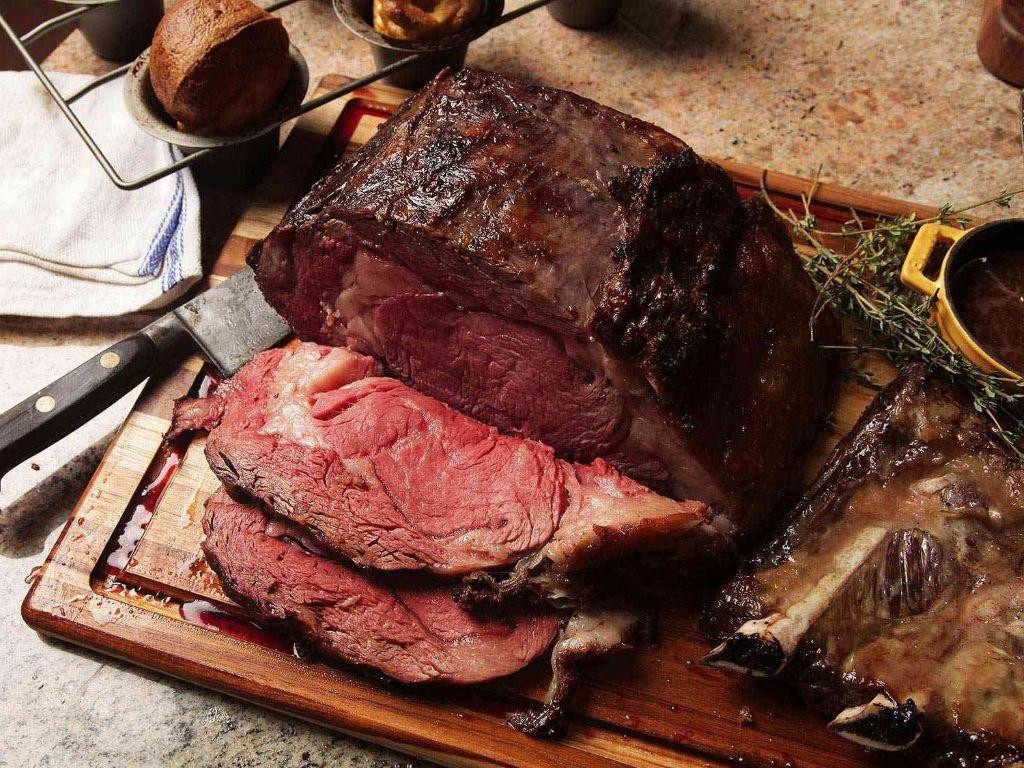
Ever wondered how to make a prime rib so tender it practically whispers sweet nothings to your taste buds? Enter the red wine and herb brine—your secret weapon for a holiday roast that’s juicy, flavorful, and guaranteed to steal the show. Think of it as a spa day for your beef, where it soaks up all the good stuff before hitting the oven.
Serving: 8 | Pre Time: 30 minutes | Cooking Time: 180 minutes
Ingredients
- 1 (8-pound) prime rib roast, bone-in
- 2 quarts cold filtered water
- 1 cup dry red wine (such as Cabernet Sauvignon)
- 1 cup kosher salt
- 1/2 cup granulated sugar
- 4 sprigs fresh rosemary
- 4 sprigs fresh thyme
- 2 bay leaves
- 1 tablespoon whole black peppercorns
- 4 cloves garlic, smashed
- 1 tablespoon extra-virgin olive oil
- 1 teaspoon freshly ground black pepper
Instructions
- In a large stockpot, combine the cold filtered water, dry red wine, kosher salt, and granulated sugar.
- Place the stockpot over medium-high heat and stir continuously until the salt and sugar dissolve completely, about 5 minutes.
- Remove the stockpot from the heat and add the fresh rosemary sprigs, fresh thyme sprigs, bay leaves, whole black peppercorns, and smashed garlic cloves.
- Allow the brine to cool to room temperature, then refrigerate it until chilled to 40°F, approximately 1 hour. Tip: Chilling the brine prevents bacterial growth and ensures food safety.
- Place the bone-in prime rib roast in a non-reactive container large enough to hold it and the brine.
- Pour the chilled brine over the roast, ensuring it is fully submerged; if needed, weigh it down with a plate.
- Cover the container and refrigerate for 24 hours to brine, turning the roast once halfway through. Tip: Brining for a full day maximizes flavor penetration and tenderness.
- Remove the roast from the brine and pat it dry thoroughly with paper towels.
- Discard the brine and aromatics, then let the roast sit at room temperature for 1 hour to take the chill off.
- Preheat your oven to 450°F and position a rack in the lower third.
- Rub the roast all over with extra-virgin olive oil and season generously with freshly ground black pepper.
- Place the roast, fat-side up, on a rack set inside a roasting pan and insert a probe thermometer into the thickest part, avoiding bone.
- Roast at 450°F for 20 minutes to sear the exterior, then reduce the oven temperature to 325°F.
- Continue roasting until the internal temperature reaches 120°F for medium-rare, about 2 hours and 40 minutes total. Tip: Use a thermometer for precision, as carryover cooking will raise the temperature by 5-10°F during resting.
- Transfer the roast to a cutting board, tent loosely with foil, and let it rest for 30 minutes before carving against the grain.
Kick back and savor the results: this brine yields a prime rib with a succulent, melt-in-your-mouth texture and deep, herbaceous notes from the wine and aromatics. The exterior forms a savory crust that contrasts beautifully with the pink, juicy interior—serve it sliced thick with a side of horseradish cream or au jus for dipping, and watch it disappear faster than holiday cookies.
Summary
Gathering these 20 savory brine recipes unlocks a world of flavor for your meals. From juicy meats to crisp veggies, each brine adds that special touch. I hope you’ll try a few, leave a comment with your favorite, and share your brining adventures by pinning this article on Pinterest. Happy cooking!


