Bursting with sweet-tart flavor, canned cherries are your secret weapon for effortless meals that impress. Whether you’re craving cozy desserts, quick weeknight dinners, or festive party treats, these versatile gems transform simple ingredients into something special. Dive into our roundup of 13 delicious recipes—from savory glazes to decadent bakes—and discover how this pantry staple can brighten any occasion with minimal fuss.
Cherry Cream Cheese Danish

There’s something about a warm, flaky pastry that just feels like a holiday morning, and this Cherry Cream Cheese Danish is my go‑whenever treat—whether I’m hosting brunch or just craving a sweet, cozy bake. I love how the tangy cream cheese balances the bright cherry filling, and it’s easier to pull together than you might think, especially if you keep a sheet of puff pastry in the freezer like I do.
Serving: 8 | Pre Time: 20 minutes | Cooking Time: 25 minutes
Ingredients
– 1 sheet frozen puff pastry, thawed but still cold
– 4 ounces full‑fat cream cheese, softened to room temperature
– ¼ cup granulated sugar
– 1 large farm‑fresh egg, separated
– 1 teaspoon pure vanilla extract
– ½ cup cherry pie filling, with plump, glossy cherries
– 1 tablespoon whole milk
– 2 tablespoons coarse sparkling sugar, for sprinkling
Instructions
1. Preheat your oven to 400°F and line a baking sheet with parchment paper.
2. Unfold the thawed puff pastry sheet onto a lightly floured surface and roll it gently with a rolling pin to smooth any seams—this helps prevent uneven rising.
3. In a medium bowl, beat the softened cream cheese, granulated sugar, egg yolk, and pure vanilla extract with a hand mixer on medium speed until completely smooth and creamy, about 2 minutes.
4. Spread the cream cheese mixture evenly over the puff pastry, leaving a 1‑inch border on all sides.
5. Spoon the cherry pie filling in dollops over the cream cheese layer, distributing the plump cherries evenly.
6. Fold the pastry edges up and over the filling, pressing lightly to create a rustic border that holds everything in.
7. In a small bowl, whisk the egg white with the whole milk until frothy, then brush this wash generously over the exposed pastry edges—this gives the crust a beautiful golden shine.
8. Sprinkle the coarse sparkling sugar liberally over the brushed edges for a sweet, crunchy finish.
9. Bake on the center rack for 22–25 minutes, until the pastry is puffed and deep golden brown and the filling is bubbly at the edges.
10. Let the danish cool on the baking sheet for at least 15 minutes before slicing; this allows the cream cheese to set so it doesn’t ooze out.
11. Use a sharp serrated knife to cut into 8 squares, wiping the blade between cuts for clean edges.
Rustic and inviting, this danish bakes up with a shatteringly crisp pastry that gives way to a creamy, tangy center dotted with juicy cherries. I love serving it slightly warm with a dusting of powdered sugar or a drizzle of vanilla glaze, and it’s just as delicious the next day with a cup of strong coffee.
Cherry Cobbler with Canned Cherries
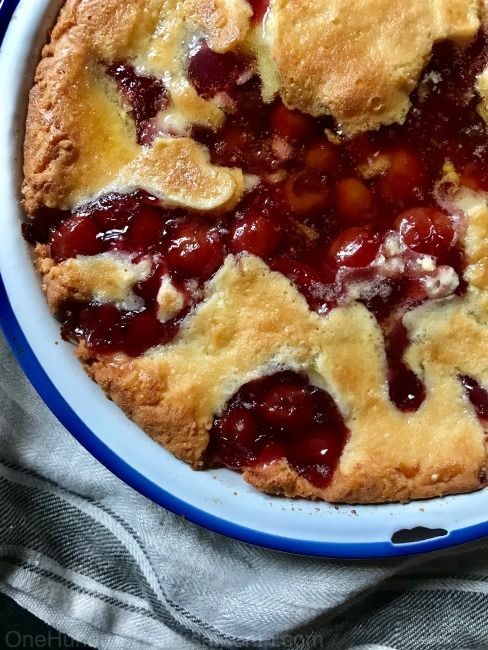
Remember those lazy summer afternoons when you’d raid the pantry for something sweet? I’ve been there—and that’s exactly how this cozy cherry cobbler came to be. Using canned cherries means you can whip up this comforting dessert any time of year, no pitting required, and it’s become my go‑to for impromptu gatherings or a quiet night in.
Serving: 6 | Pre Time: 15 minutes | Cooking Time: 45 minutes
Ingredients
– 2 (15‑ounce) cans of sweet, syrupy canned cherries (not drained)
– 1 cup of granulated white sugar
– 1 cup of all‑purpose flour
– 1 teaspoon of baking powder
– 1 cup of whole milk
– ½ cup (1 stick) of unsalted butter
– 1 teaspoon of pure vanilla extract
– A pinch of fine sea salt
– 1 tablespoon of coarse turbinado sugar for sprinkling
Instructions
1. Preheat your oven to 375°F and place a 9‑inch round baking dish inside to warm as the oven heats—this helps the butter melt evenly and prevents a soggy bottom.
2. In a medium bowl, whisk together 1 cup of all‑purpose flour, 1 teaspoon of baking powder, and a pinch of fine sea salt until well combined.
3. Add 1 cup of whole milk and 1 teaspoon of pure vanilla extract to the dry ingredients, stirring gently with a spatula until just incorporated; avoid overmixing to keep the topping tender.
4. Carefully remove the hot baking dish from the oven using oven mitts, and place ½ cup (1 stick) of unsalted butter in it, swirling until fully melted and coating the bottom.
5. Pour the batter directly over the melted butter in the baking dish—do not stir, as the butter will rise to create a crispy crust.
6. Evenly spoon 2 cans of sweet, syrupy canned cherries (with their juice) over the batter, distributing them without mixing.
7. Sprinkle 1 cup of granulated white sugar evenly over the cherries, followed by 1 tablespoon of coarse turbinado sugar for a sparkling, crunchy top.
8. Bake at 375°F for 40–45 minutes, until the topping is golden brown and a toothpick inserted into the center comes out clean—if it browns too quickly, tent it loosely with foil.
9. Let the cobbler cool on a wire rack for at least 15 minutes before serving to allow the juices to thicken slightly.
Buttery and bubbling, this cobbler emerges with a tender, cake‑like topping that soaks up the tart‑sweet cherry syrup. I love it warm with a scoop of vanilla ice cream melting into the crevices, or even cold the next day for breakfast—it’s that versatile and delicious.
Cherry Cheesecake Parfaits
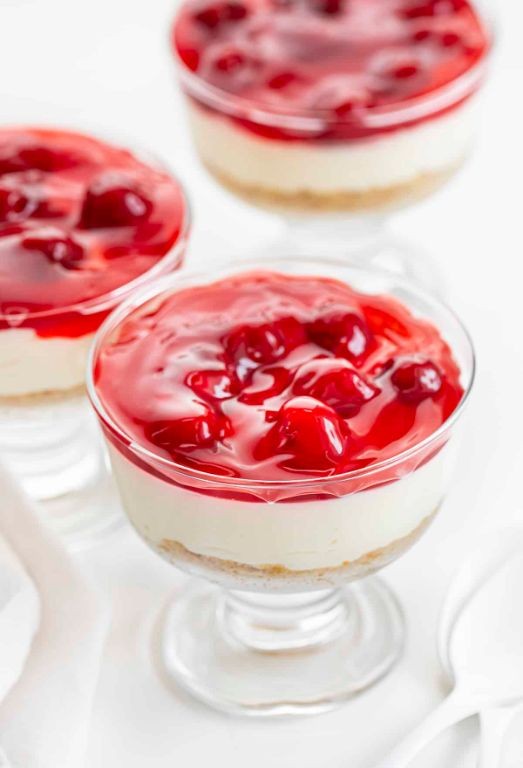
Just when I thought holiday desserts couldn’t get any better, I discovered these Cherry Cheesecake Parfaits while cleaning out my grandmother’s recipe box last December. They’re the perfect make-ahead treat that lets you enjoy the festivities instead of being stuck in the kitchen all day.
Serving: 6 | Pre Time: 20 minutes | Cooking Time: 0 minutes
Ingredients
– 1 ½ cups crushed graham crackers (about 12 whole sheets)
– ¼ cup melted unsalted butter
– 8 ounces softened cream cheese
– 1 cup powdered sugar
– 1 teaspoon pure vanilla extract
– 1 cup heavy whipping cream
– 1 can (21 ounces) cherry pie filling with plump, juicy cherries
– Fresh mint leaves for garnish
Instructions
1. Combine 1 ½ cups crushed graham crackers with ¼ cup melted unsalted butter in a medium bowl until the mixture resembles wet sand.
2. Divide the graham cracker mixture evenly among 6 parfait glasses, pressing gently to create a firm base layer.
3. In a large mixing bowl, beat 8 ounces softened cream cheese with an electric mixer on medium speed for 1 minute until smooth and creamy.
4. Add 1 cup powdered sugar and 1 teaspoon pure vanilla extract to the cream cheese, then beat for another 2 minutes until fully incorporated and fluffy.
5. In a separate chilled bowl, whip 1 cup heavy whipping cream with clean beaters on high speed for 3-4 minutes until stiff peaks form.
6. Gently fold the whipped cream into the cream cheese mixture using a rubber spatula until no white streaks remain, being careful not to deflate the mixture.
7. Spoon half of the cream cheese filling over the graham cracker layer in each glass, creating an even second layer.
8. Top the cream cheese layer with 2-3 tablespoons of cherry pie filling from the can, making sure to include both the plump, juicy cherries and some of the glossy sauce.
9. Repeat layers with the remaining cream cheese filling and cherry pie filling, ending with cherries on top.
10. Refrigerate the parfaits for at least 2 hours to allow the flavors to meld and the layers to set properly.
11. Garnish each parfait with fresh mint leaves just before serving.
Ultimate dessert perfection! The creamy cheesecake layer contrasts beautifully with the crunchy graham cracker base, while the tart cherry filling cuts through the richness. I love serving these in clear glasses to show off the gorgeous layers, and they’re even better when made the night before for stress-free entertaining.
Cherry Oatmeal Breakfast Bake
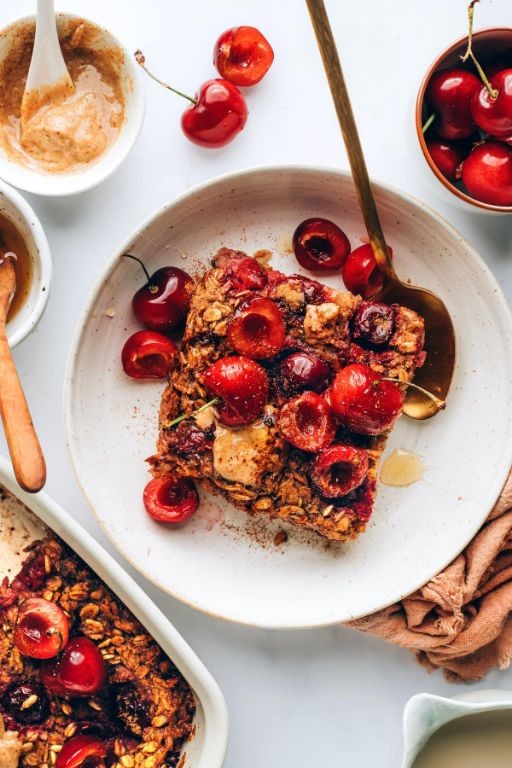
Every time I wake up to a chilly morning, I crave something warm and comforting that doesn’t keep me tied to the stove. This Cherry Oatmeal Breakfast Bake has become my go‑make‑ahead solution—it’s like a cozy hug in a dish, and I love that I can prep it the night before and just pop it in the oven while I brew my coffee.
Serving: 6 | Pre Time: 15 minutes | Cooking Time: 45 minutes
Ingredients
– 2 cups old-fashioned rolled oats
– 1 cup sweet, plump dried cherries
– 1/3 cup rich, dark brown sugar
– 1 teaspoon fragrant ground cinnamon
– 1/2 teaspoon fine sea salt
– 2 large farm-fresh eggs
– 2 cups creamy whole milk
– 1 teaspoon pure vanilla extract
– 3 tablespoons cold, unsalted butter, cut into small cubes
– 1/4 cup crunchy sliced almonds
Instructions
1. Preheat your oven to 350°F and lightly grease an 8×8-inch baking dish with butter or non-stick spray.
2. In a large mixing bowl, combine the old-fashioned rolled oats, sweet dried cherries, dark brown sugar, ground cinnamon, and fine sea salt.
3. In a separate bowl, whisk together the farm-fresh eggs, creamy whole milk, and pure vanilla extract until fully blended.
4. Pour the wet mixture over the oat mixture and stir gently until everything is evenly moistened. Tip: Let it sit for 5 minutes so the oats start to absorb the liquid—this prevents a soggy bottom.
5. Transfer the mixture to the prepared baking dish and spread it into an even layer.
6. Scatter the cold, cubed butter evenly over the top of the oat mixture.
7. Sprinkle the crunchy sliced almonds over the butter-topped bake.
8. Bake in the preheated oven for 45 minutes, or until the top is golden brown and the center is set. Tip: Check at 40 minutes—if the almonds are browning too quickly, loosely tent the dish with foil.
9. Remove the bake from the oven and let it cool on a wire rack for at least 10 minutes before serving. Tip: This resting time allows the bake to firm up slightly, making it easier to slice.
10. Slice into squares and serve warm. Naturally, this bake emerges from the oven with a delightfully crisp, buttery top that gives way to a soft, creamy interior studded with juicy cherries. The almonds add a lovely crunch, and the cinnamon warms every bite—it’s fantastic drizzled with a little extra milk or a dollop of Greek yogurt for a protein boost.
Cherry Vanilla Jam
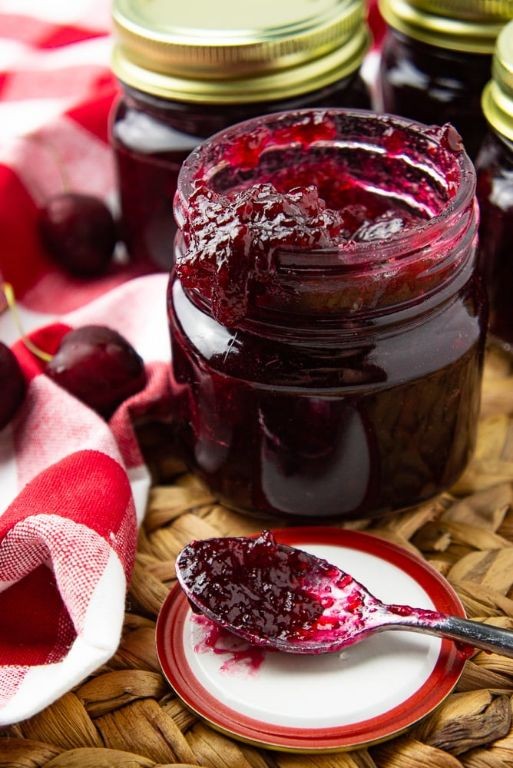
Savoring the sweet-tart flavor of cherries with the warm, comforting aroma of vanilla is one of my favorite holiday traditions—this cherry vanilla jam is my go-to gift for neighbors and friends every December. I love making big batches on chilly afternoons while Christmas music plays in the background, and the scent fills my kitchen with pure joy. It’s surprisingly simple to whip up, and the result is a vibrant, jewel-toned spread that feels both festive and homemade.
Serving: 4 cups | Pre Time: 15 minutes | Cooking Time: 25 minutes
Ingredients
– 2 pounds fresh, ripe sweet cherries, pitted and halved
– 1 cup granulated sugar
– 1 tablespoon freshly squeezed lemon juice
– 1 vanilla bean, split lengthwise and seeds scraped
– 1/4 teaspoon fine sea salt
Instructions
1. In a large, heavy-bottomed pot, combine 2 pounds of fresh, ripe sweet cherries (pitted and halved), 1 cup of granulated sugar, 1 tablespoon of freshly squeezed lemon juice, the seeds from 1 split vanilla bean, and 1/4 teaspoon of fine sea salt.
2. Stir the mixture gently with a wooden spoon until the sugar begins to dissolve and coats the cherries evenly.
3. Place the pot over medium-high heat and bring the mixture to a rolling boil, stirring occasionally to prevent sticking.
4. Once boiling, reduce the heat to medium-low and let it simmer for 20–25 minutes, stirring every 5 minutes to ensure even cooking.
5. As it simmers, use a spoon to skim off any foam that rises to the surface for a clearer jam.
6. After 20 minutes, test the jam’s consistency by placing a small spoonful on a chilled plate—if it wrinkles when pushed with your finger, it’s ready.
7. Remove the pot from the heat and let the jam cool in the pot for 10 minutes, stirring occasionally to release steam.
8. While still warm, carefully ladle the jam into sterilized glass jars, leaving 1/4 inch of headspace at the top.
9. Seal the jars tightly and let them cool completely at room temperature before storing in the refrigerator.
10. For longer preservation, process the sealed jars in a boiling water bath for 10 minutes, then let them cool undisturbed overnight.
Perfectly spreadable with a glossy, deep-red hue, this jam balances the bright acidity of cherries with the creamy sweetness of vanilla. I love it swirled into morning yogurt, dolloped on warm biscuits, or even as a filling for thumbprint cookies—it’s a versatile treat that captures the essence of the season in every jar.
Cherry Pecan Bread
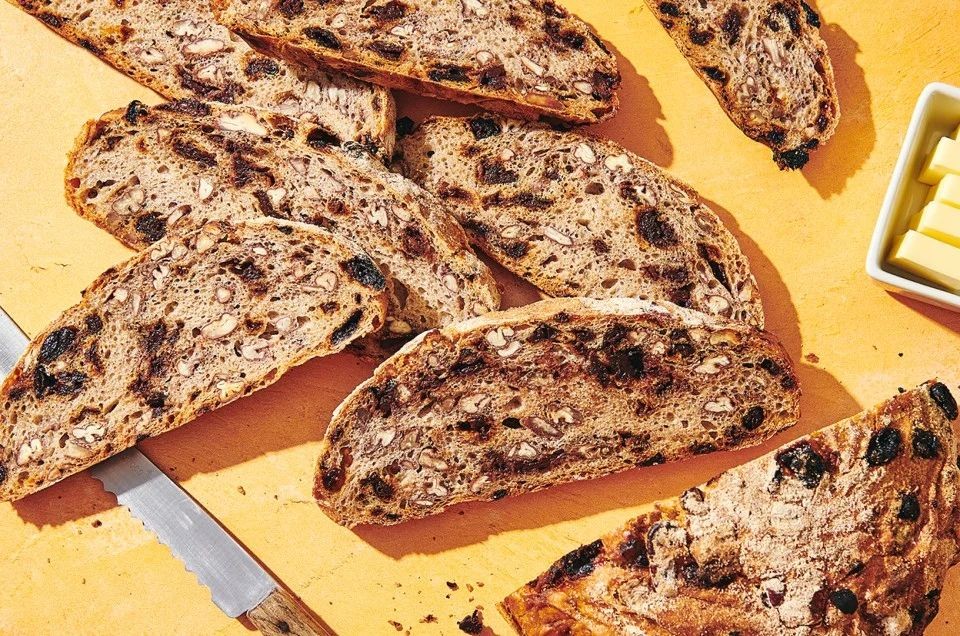
Kind of like a cozy holiday hug in loaf form, this Cherry Pecan Bread is my go-to when I want my kitchen to smell like a festive bakery. I first made it for a snowy Christmas Eve years ago, and now it’s a non-negotiable part of my December baking marathon—trust me, your family will beg for the recipe.
Serving: 8 | Pre Time: 15 minutes | Cooking Time: 60 minutes
Ingredients
– 2 cups of all-purpose flour, sifted for a light crumb
– 1 cup of granulated white sugar, for balanced sweetness
– 1 teaspoon of baking powder, to ensure a perfect rise
– ½ teaspoon of fine sea salt, to enhance the flavors
– 2 large farm-fresh eggs, at room temperature for easy mixing
– ½ cup of unsalted butter, melted and slightly cooled
– 1 cup of buttermilk, for a tender, moist texture
– 1 teaspoon of pure vanilla extract, for a warm aroma
– 1 cup of dried tart cherries, plumped in warm water for 10 minutes and drained
– 1 cup of chopped pecans, toasted to bring out their nutty richness
Instructions
1. Preheat your oven to 350°F (175°C) and generously grease a 9×5-inch loaf pan with butter or non-stick spray.
2. In a large mixing bowl, whisk together the sifted all-purpose flour, granulated white sugar, baking powder, and fine sea salt until fully combined.
3. In a separate medium bowl, beat the farm-fresh eggs with a hand mixer on medium speed for about 30 seconds until frothy.
4. Add the melted unsalted butter, buttermilk, and pure vanilla extract to the eggs, and mix on low speed just until smooth, about 1 minute.
5. Pour the wet ingredients into the dry ingredients, and fold gently with a spatula until no flour streaks remain—overmixing can lead to a tough loaf, so stop as soon as it’s incorporated.
6. Gently fold in the plumped dried tart cherries and toasted chopped pecans until evenly distributed throughout the batter.
7. Transfer the batter to the prepared loaf pan, spreading it evenly with the spatula to create a level top.
8. Bake in the preheated oven for 55 to 60 minutes, or until a toothpick inserted into the center comes out clean with just a few moist crumbs—this visual cue ensures it’s perfectly baked without being dry.
9. Remove the pan from the oven and let the bread cool in the pan on a wire rack for 15 minutes to set.
10. Carefully turn the bread out onto the wire rack and allow it to cool completely for at least 1 hour before slicing to prevent crumbling.
Absolutely divine when sliced thick and slathered with creamy butter, this bread boasts a tender, moist crumb dotted with juicy cherries and crunchy pecans. For a festive twist, I love toasting a slice and drizzling it with honey or serving it alongside a sharp cheddar cheese—it’s the ultimate sweet-and-savory treat that disappears fast!
Cherry Yogurt Smoothie
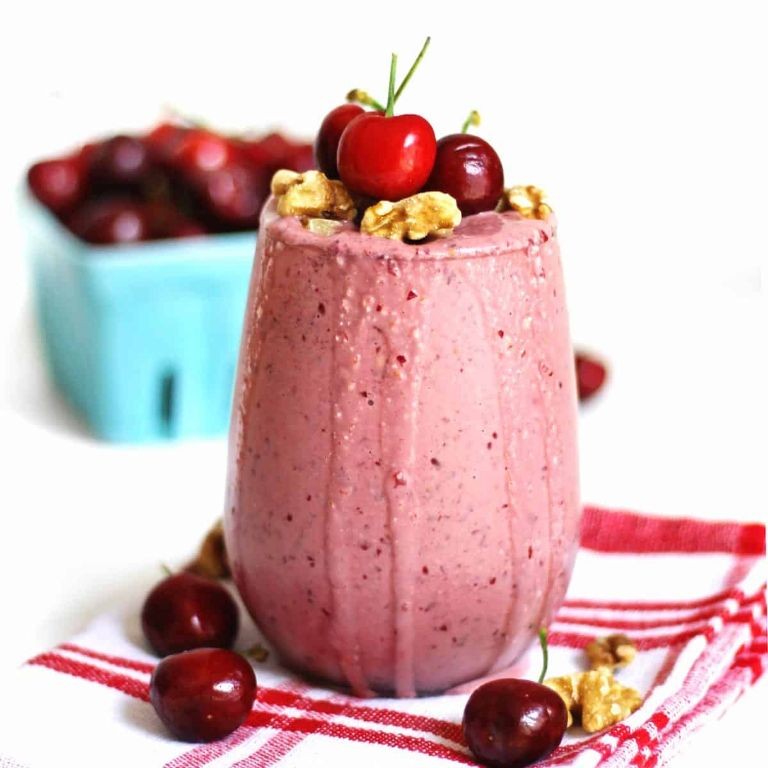
Gathering around the kitchen counter on a busy morning, I’ve found that a Cherry Yogurt Smoothie is my go-to for a quick, refreshing boost—it’s like a little burst of sunshine in a glass, especially when I’m rushing to get the kids out the door. Serving: 2 | Pre Time: 5 minutes | Cooking Time: 0 minutes
Ingredients
– 2 cups of frozen sweet cherries
– 1 cup of creamy plain Greek yogurt
– 1/2 cup of cold almond milk
– 1 tablespoon of pure maple syrup
– 1/2 teaspoon of pure vanilla extract
Instructions
1. Place 2 cups of frozen sweet cherries into a high-speed blender.
2. Add 1 cup of creamy plain Greek yogurt to the blender.
3. Pour in 1/2 cup of cold almond milk.
4. Measure and add 1 tablespoon of pure maple syrup.
5. Include 1/2 teaspoon of pure vanilla extract.
6. Securely attach the blender lid.
7. Blend the mixture on high speed for 45–60 seconds, until completely smooth and no cherry chunks remain. Tip: If the smoothie is too thick, add an extra tablespoon of almond milk and blend for 10 more seconds.
8. Stop the blender and check the consistency by tilting the pitcher; it should pour easily without lumps.
9. Pour the smoothie evenly into two chilled glasses. Tip: For a frosty touch, chill the glasses in the freezer for 5 minutes beforehand.
10. Serve immediately. Tip: Garnish with a fresh cherry on the rim for a festive look.
Perfectly creamy with a vibrant pink hue, this smoothie has a delightful balance of tart cherries and subtle sweetness from the maple syrup. I love sipping it through a reusable straw or pairing it with a handful of almonds for a satisfying snack—it’s a simple pleasure that always brightens my day.
Cherry Almond Granola
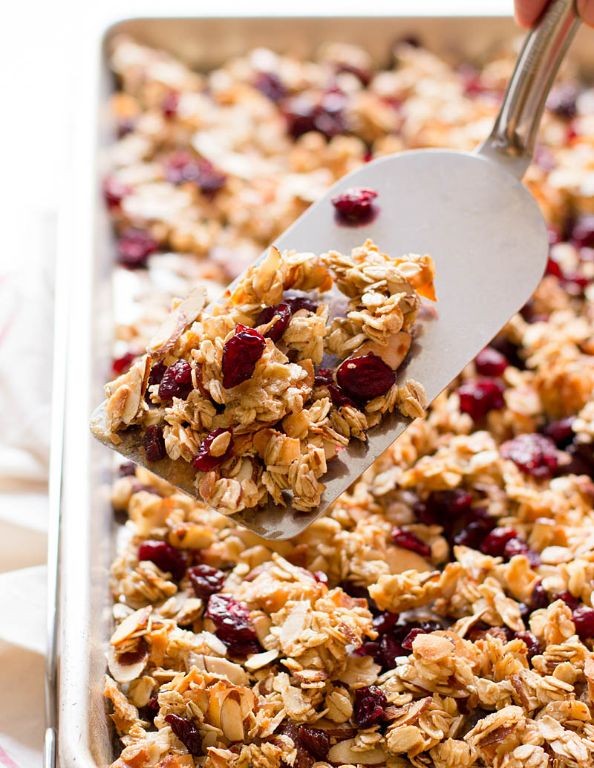
Perfect for those cozy winter mornings when you want something homemade but don’t want to spend hours in the kitchen, this Cherry Almond Granola has become my go-to breakfast ritual. I started making it years ago after a holiday trip where I tasted something similar at a little bakery, and now the smell of it toasting in the oven instantly feels like a warm hug.
Serving: 8 | Pre Time: 10 minutes | Cooking Time: 25 minutes
Ingredients
– 3 cups old-fashioned rolled oats (the hearty, thick-cut kind)
– 1 cup raw sliced almonds, with their skins on for extra texture
– 1/2 cup pure maple syrup, preferably the dark, robust grade A variety
– 1/4 cup rich extra virgin coconut oil, melted until perfectly liquid
– 1 teaspoon pure vanilla extract, with its warm, fragrant aroma
– 1/2 teaspoon fine sea salt
– 1 cup dried tart cherries, plump and slightly chewy
Instructions
1. Preheat your oven to 325°F and line a large, rimmed baking sheet with parchment paper.
2. In a large mixing bowl, combine the 3 cups of old-fashioned rolled oats and 1 cup of raw sliced almonds.
3. In a separate small bowl, whisk together the 1/2 cup of pure maple syrup, 1/4 cup of melted extra virgin coconut oil, 1 teaspoon of pure vanilla extract, and 1/2 teaspoon of fine sea salt until fully emulsified. Tip: Whisk vigorously for about 30 seconds to ensure the oil doesn’t separate—this helps the granola clump together beautifully.
4. Pour the wet mixture over the oat and almond mixture, and use a spatula to fold and stir until every oat and almond is evenly coated.
5. Spread the mixture onto the prepared baking sheet in a single, even layer, pressing it down slightly with the back of the spatula. Tip: Don’t overcrowd the pan; if needed, use two sheets to allow proper air circulation for even crisping.
6. Bake in the preheated oven at 325°F for 20 minutes, then remove the tray and gently stir the granola with a spatula to promote even browning.
7. Return the tray to the oven and bake for an additional 5 minutes, or until the granola is golden brown and fragrant. Tip: Watch closely during the last few minutes to prevent burning—the edges can darken quickly.
8. Remove the baking sheet from the oven and immediately sprinkle the 1 cup of dried tart cherries evenly over the hot granola, gently pressing them in so they adhere as it cools.
9. Let the granola cool completely on the baking sheet for at least 1 hour to crisp up before breaking it into clusters.
Really, the magic happens as it cools—those clusters become irresistibly crunchy with a hint of chewiness from the cherries. I love how the tart cherries cut through the sweetness, and serving it over thick Greek yogurt with a drizzle of honey makes for the most satisfying breakfast bowl.
Cherry Ice Cream Topping
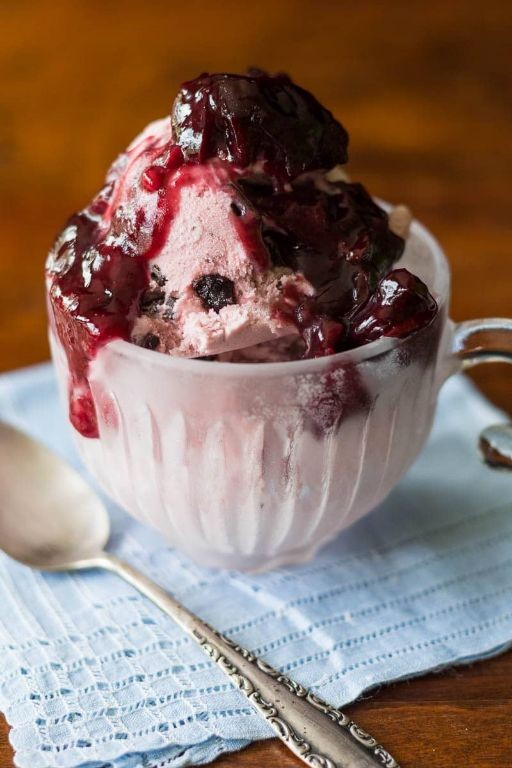
Yesterday, while rummaging through my freezer for holiday leftovers, I stumbled upon a forgotten bag of sweet cherries from last summer’s farmer’s market haul—and inspiration struck. This cherry ice cream topping is my go-to solution for transforming simple desserts into something spectacular, and it’s so easy to whip up that I often make a double batch to gift to neighbors during festive gatherings. Trust me, once you taste this glossy, ruby-red sauce drizzled over vanilla ice cream, you’ll never go back to store-bought again.
Serving: 4 | Pre Time: 5 minutes | Cooking Time: 15 minutes
Ingredients
– 2 cups pitted sweet cherries, fresh or frozen
– 1/2 cup granulated sugar
– 1/4 cup water
– 1 tablespoon freshly squeezed lemon juice
– 1 teaspoon pure vanilla extract
– 1/8 teaspoon fine sea salt
Instructions
1. In a medium saucepan, combine 2 cups pitted sweet cherries, 1/2 cup granulated sugar, and 1/4 cup water over medium heat.
2. Stir the mixture gently with a wooden spoon until the sugar dissolves completely, which should take about 3–4 minutes.
3. Increase the heat to medium-high and bring the mixture to a gentle boil, then reduce it to a simmer for 10 minutes, stirring occasionally to prevent sticking.
4. As the cherries soften and release their juices, use a potato masher to gently crush them into a chunky consistency—this creates a lovely texture without needing a blender.
5. Stir in 1 tablespoon freshly squeezed lemon juice, 1 teaspoon pure vanilla extract, and 1/8 teaspoon fine sea salt, cooking for an additional 2 minutes to meld the flavors.
6. Remove the saucepan from the heat and let the topping cool for 5 minutes; it will thicken slightly as it sits, so don’t worry if it seems thin at first.
7. Transfer the warm topping to a glass jar or bowl, and allow it to cool completely at room temperature for about 30 minutes before serving or refrigerating.
The result is a luscious, jammy topping with bursts of cherry flavor that pairs beautifully with creamy ice cream—try it swirled into cheesecake or spooned over pancakes for a decadent twist.
Cherry Glazed Pork Chops
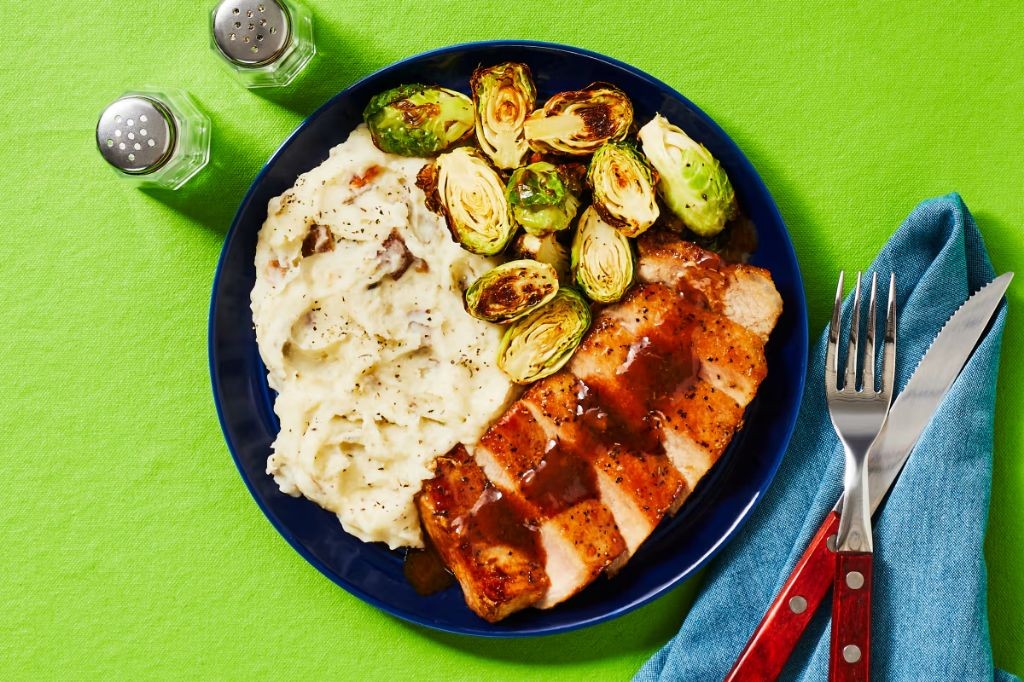
Holiday cooking always brings back memories of my grandmother’s kitchen, and these Cherry Glazed Pork Chops are my festive twist on a classic. I love how the sweet-tart glaze caramelizes into a sticky, glossy finish that makes even a weeknight dinner feel special—plus, it’s a surefire way to impress guests without spending hours at the stove.
Serving: 4 | Pre Time: 10 minutes | Cooking Time: 20 minutes
Ingredients
– 4 bone-in pork chops, about 1-inch thick
– 1 cup tart cherry preserves
– 2 tablespoons apple cider vinegar
– 1 tablespoon Dijon mustard
– 2 cloves garlic, minced
– 1 teaspoon fresh rosemary, finely chopped
– 1/2 teaspoon kosher salt
– 1/4 teaspoon freshly ground black pepper
– 1 tablespoon extra virgin olive oil
Instructions
1. Pat the pork chops completely dry with paper towels to ensure a good sear.
2. Season both sides of the pork chops evenly with kosher salt and freshly ground black pepper.
3. Heat extra virgin olive oil in a large skillet over medium-high heat until it shimmers, about 2 minutes.
4. Place the pork chops in the skillet and sear for 4–5 minutes per side until deeply golden brown.
5. Transfer the pork chops to a plate and reduce the heat to medium.
6. In the same skillet, add minced garlic and sauté for 30 seconds until fragrant.
7. Stir in tart cherry preserves, apple cider vinegar, Dijon mustard, and fresh rosemary until combined.
8. Simmer the glaze for 3–4 minutes, stirring occasionally, until it thickens slightly.
9. Return the pork chops to the skillet, spooning the glaze over them to coat evenly.
10. Cook for an additional 3–4 minutes, flipping once, until the pork reaches an internal temperature of 145°F on an instant-read thermometer.
11. Remove from heat and let the pork chops rest for 5 minutes before serving.
My favorite part is how the glaze forms a lacquered crust that crackles slightly with each bite, while the pork stays incredibly juicy inside. Serve these chops over creamy mashed potatoes to soak up every drop of that vibrant cherry sauce, or slice them thin for a stunning holiday platter—either way, they disappear fast!
Cherry Balsamic Chicken
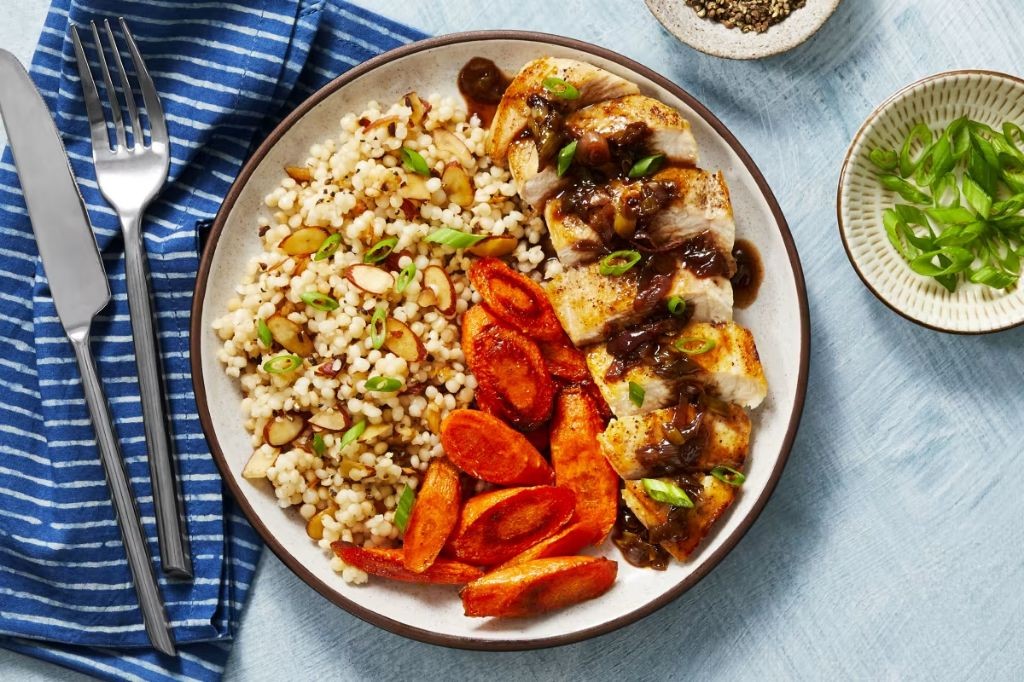
Venturing into my kitchen on this chilly December afternoon, I was craving something that felt both festive and comforting—a dish that could bridge holiday elegance with weeknight ease. This Cherry Balsamic Chicken is exactly that: a sweet-tart symphony that’s become my go-to for impressing guests without spending hours at the stove. I love how the cherries bubble into a glossy sauce, reminding me of the jar of homemade preserves my grandma always kept on hand.
Serving: 4 | Pre Time: 15 minutes | Cooking Time: 25 minutes
Ingredients
– 4 boneless, skinless chicken breasts, patted dry with paper towels
– 1 tablespoon rich extra virgin olive oil
– 1 cup fresh or frozen dark sweet cherries, pitted and halved
– 1/3 cup aged balsamic vinegar, with its deep, complex flavor
– 2 tablespoons pure maple syrup, for a natural sweetness
– 2 cloves garlic, minced to a fragrant paste
– 1 teaspoon finely ground black pepper
– 1/2 teaspoon coarse sea salt
– 1/4 cup low-sodium chicken broth, to deglaze the pan
– Fresh thyme sprigs, for a herbal garnish
Instructions
1. Season both sides of the chicken breasts evenly with the coarse sea salt and finely ground black pepper.
2. Heat the rich extra virgin olive oil in a large skillet over medium-high heat until it shimmers, about 2 minutes.
3. Add the chicken breasts to the skillet and cook for 6-7 minutes per side, until golden brown and the internal temperature reaches 165°F on an instant-read thermometer.
4. Transfer the cooked chicken to a plate and tent loosely with aluminum foil to keep warm.
5. Reduce the heat to medium and add the minced garlic to the same skillet, sautéing for 30 seconds until fragrant.
6. Pour in the low-sodium chicken broth to deglaze the pan, scraping up any browned bits with a wooden spoon for extra flavor.
7. Stir in the pitted and halved dark sweet cherries, aged balsamic vinegar, and pure maple syrup.
8. Simmer the sauce for 8-10 minutes, stirring occasionally, until it thickens slightly and coats the back of a spoon.
9. Return the chicken breasts to the skillet, spooning the cherry balsamic sauce over them to coat evenly.
10. Cook for an additional 2-3 minutes to reheat the chicken thoroughly.
11. Garnish with fresh thyme sprigs before serving.
My favorite part is how the sauce clings to each bite, offering a sticky-sweet glaze that contrasts beautifully with the tender, juicy chicken. For a creative twist, I’ll sometimes slice the chicken and serve it over creamy polenta or a bed of wild rice to soak up every last drop of that vibrant cherry balsamic goodness.
Cherry Spinach Salad with Feta
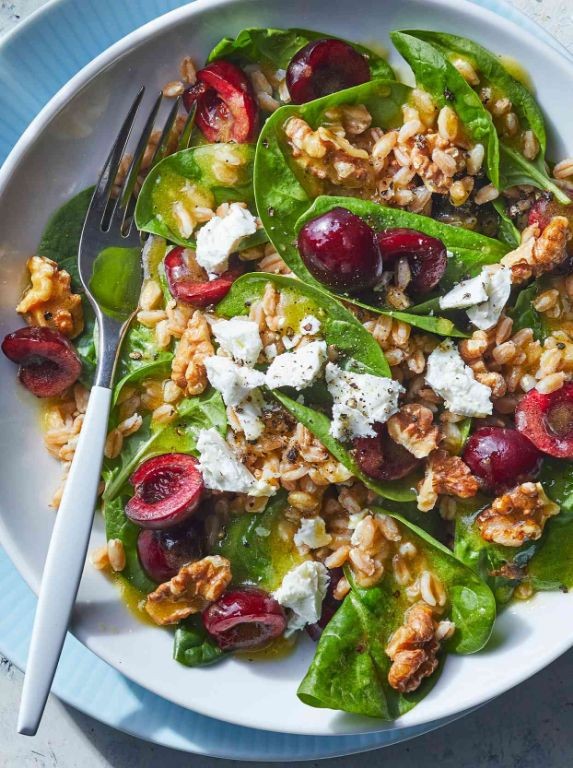
Unbelievably, this Cherry Spinach Salad with Feta has become my go-to for last-minute holiday gatherings—it’s the dish I always get asked to bring, and honestly, I love how effortlessly it comes together. I first stumbled upon the combination during a summer picnic, where the sweet-tart cherries against the salty feta felt like a revelation, and now, even in December, I crave that bright, festive balance. It’s a no-cook wonder that lets you focus on the fun parts of hosting, like actually enjoying your guests.
Serving: 4 | Pre Time: 15 minutes | Cooking Time: 0 minutes
Ingredients
– 5 ounces of fresh baby spinach leaves, washed and thoroughly dried
– 1 cup of sweet dark cherries, pitted and halved
– 1/2 cup of crumbled creamy feta cheese
– 1/4 cup of toasted slivered almonds
– 2 tablespoons of rich extra virgin olive oil
– 1 tablespoon of tangy balsamic vinegar
– 1/2 teaspoon of finely ground black pepper
– 1/4 teaspoon of flaky sea salt
Instructions
1. Place 5 ounces of fresh baby spinach leaves in a large mixing bowl, ensuring they are completely dry to prevent a soggy salad—this is my top tip for keeping it crisp.
2. Add 1 cup of sweet dark cherries, halved, and 1/2 cup of crumbled creamy feta cheese to the bowl.
3. Sprinkle 1/4 cup of toasted slivered almonds over the mixture for a nutty crunch.
4. In a small separate bowl, whisk together 2 tablespoons of rich extra virgin olive oil and 1 tablespoon of tangy balsamic vinegar until emulsified, which takes about 30 seconds for a smooth dressing.
5. Drizzle the dressing evenly over the salad ingredients in the large bowl.
6. Season with 1/2 teaspoon of finely ground black pepper and 1/4 teaspoon of flaky sea salt, tossing gently to coat everything without bruising the spinach—another key tip for texture.
7. Serve immediately on chilled plates to keep it refreshing, or let it sit for 5 minutes to allow the flavors to meld slightly, which I find enhances the taste.
This salad delivers a delightful contrast: the juicy cherries pop with sweetness against the salty feta, while the almonds add a satisfying crunch. For a creative twist, I sometimes serve it alongside grilled chicken or as a topping for crostini at parties—it’s versatile enough to shine on its own or complement other dishes beautifully.
Cherry BBQ Sauce for Ribs
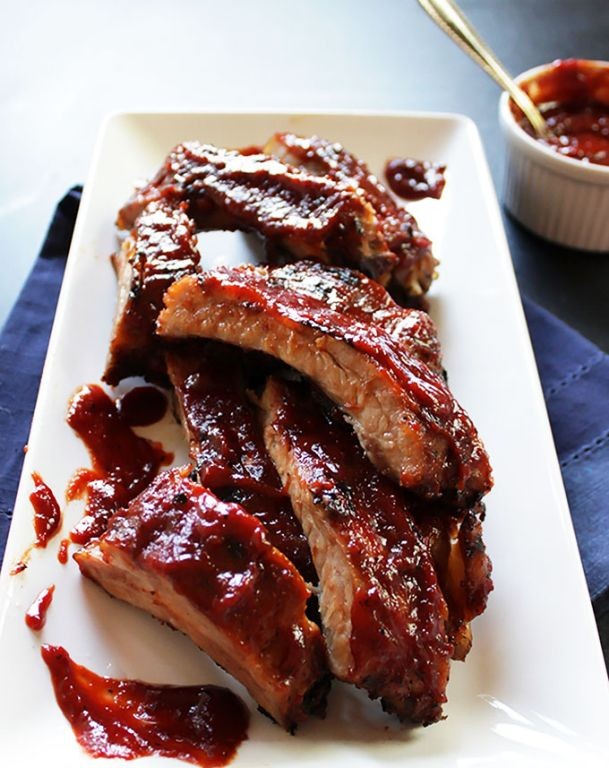
Unbelievably, the secret to my most-requested ribs isn’t some complex rub or special wood—it’s this sweet-tart cherry BBQ sauce that always steals the show at summer cookouts. I started making it years ago when my cherry tree had a bumper crop, and now my family won’t let me grill without it. It’s the perfect balance of fruity brightness and smoky depth that clings to every rib.
Serving: 4 | Pre Time: 10 minutes | Cooking Time: 25 minutes
Ingredients
– 1 cup pitted fresh sweet cherries, roughly chopped
– 1/2 cup high-quality ketchup
– 1/4 cup pure maple syrup
– 2 tablespoons apple cider vinegar with the mother
– 1 tablespoon Worcestershire sauce
– 2 cloves fresh garlic, minced
– 1 teaspoon smoked paprika
– 1/2 teaspoon fine sea salt
– 1/4 teaspoon freshly cracked black pepper
– 1 tablespoon unsalted butter
Instructions
1. In a medium saucepan over medium heat, melt 1 tablespoon of unsalted butter until it foams slightly.
2. Add 2 cloves of minced fresh garlic and sauté for exactly 1 minute, until fragrant but not browned.
3. Stir in 1 cup of roughly chopped pitted sweet cherries and cook for 5 minutes, until they soften and release their juices.
4. Pour in 1/2 cup of high-quality ketchup, 1/4 cup of pure maple syrup, 2 tablespoons of apple cider vinegar, and 1 tablespoon of Worcestershire sauce.
5. Whisk in 1 teaspoon of smoked paprika, 1/2 teaspoon of fine sea salt, and 1/4 teaspoon of freshly cracked black pepper until fully combined.
6. Reduce the heat to low and simmer the sauce uncovered for 15 minutes, stirring occasionally to prevent sticking.
7. Remove the saucepan from the heat and let the sauce cool for 10 minutes to thicken slightly.
8. Use an immersion blender to puree the sauce directly in the pan until completely smooth, about 1 minute.
9. Brush the sauce generously over your pre-cooked ribs during the last 10 minutes of grilling at 300°F, applying two thin coats.
10. Serve the ribs immediately with extra sauce on the side for dipping.
Perfectly glossy and packed with flavor, this sauce has a velvety texture that caramelizes beautifully on the grill. I love how the cherry sweetness plays off the smoky paprika, creating a complex glaze that’s irresistible straight from the jar. Try it drizzled over grilled chicken or stirred into baked beans for a fruity twist.
Summary
Ultimately, this collection unlocks the sweet potential of canned cherries, offering easy, versatile recipes for every home cook. We hope you find inspiration to create something delicious! Please try a recipe, leave a comment with your favorite, and share this roundup on Pinterest to spread the cherry love. Happy baking and cooking!