
Craving a delicious meal but short on time? You’re not alone! We’ve gathered 20 easy canned food recipes perfect for those busy weeknights when you need something quick, satisfying, and budget-friendly. From hearty soups to comforting casseroles, these ideas will transform your pantry staples into mouthwatering dinners. Let’s dive in and discover how simple ingredients can create amazing meals!
Tuna Casserole with Creamy Mushroom Sauce

Under the soft glow of the kitchen light, there’s a quiet comfort in preparing a meal that feels like a warm embrace, a simple casserole that transforms humble ingredients into something deeply satisfying on a chilly evening.
Serving: 6 | Pre Time: 15 minutes | Cooking Time: 40 minutes
Ingredients
– 12 oz egg noodles
– 2 tbsp unsalted butter
– 1 medium yellow onion, diced
– 8 oz cremini mushrooms, sliced
– 2 cloves garlic, minced
– 3 tbsp all-purpose flour
– 2 cups whole milk
– 1 cup chicken broth
– 1 tsp dried thyme
– 1/2 tsp kosher salt
– 1/4 tsp black pepper
– 2 (5 oz) cans tuna in water, drained
– 1 cup frozen peas
– 1 cup shredded cheddar cheese
– 1/2 cup panko breadcrumbs
Instructions
1. Preheat your oven to 375°F and lightly grease a 9×13-inch baking dish.
2. Bring a large pot of salted water to a rolling boil and cook the egg noodles for 6 minutes until al dente, then drain and set aside.
3. In a large skillet over medium heat, melt the unsalted butter until it foams slightly.
4. Add the diced yellow onion and cook for 5 minutes, stirring occasionally, until translucent and fragrant.
5. Add the sliced cremini mushrooms and cook for 8 minutes until they release their moisture and turn golden brown.
6. Stir in the minced garlic and cook for 1 minute until aromatic, being careful not to let it burn.
7. Sprinkle the all-purpose flour over the mushroom mixture and cook for 2 minutes, stirring constantly to form a light roux.
8. Gradually whisk in the whole milk and chicken broth until the sauce is smooth and begins to thicken, about 5 minutes.
9. Add the dried thyme, kosher salt, and black pepper, then simmer the sauce for 3 minutes until it coats the back of a spoon.
10. Remove the skillet from heat and gently fold in the drained tuna, frozen peas, and cooked egg noodles until evenly combined.
11. Transfer the mixture to the prepared baking dish and spread it into an even layer.
12. In a small bowl, mix the shredded cheddar cheese and panko breadcrumbs, then sprinkle evenly over the casserole.
13. Bake at 375°F for 25 minutes until the topping is golden brown and the sauce bubbles at the edges.
14. Let the casserole rest for 10 minutes on a wire rack before serving to allow the flavors to meld and the sauce to set slightly.
Just out of the oven, it offers a creamy, velvety texture with tender noodles and savory mushrooms, balanced by the bright pops of peas and the rich, flaky tuna. The crispy panko topping adds a delightful crunch that contrasts the soft interior, making each bite a cozy blend of comfort and subtle elegance. For a creative twist, serve it alongside a simple arugula salad dressed with lemon vinaigrette to cut through the richness.
Canned Corn and Chicken Chowder

Here in the quiet kitchen, as winter settles in, I find myself reaching for simple comforts. This chowder, born from humble pantry staples, wraps you in warmth with every spoonful, its creamy texture and sweet corn notes feeling like a gentle embrace on a cold evening.
Serving: 4 | Pre Time: 10 minutes | Cooking Time: 25 minutes
Ingredients
– 2 tbsp unsalted butter
– 1 medium yellow onion, finely diced
– 2 cloves garlic, minced
– 1 lb boneless, skinless chicken breasts, cut into 1/2-inch cubes
– 1/4 cup all-purpose flour
– 4 cups low-sodium chicken broth
– 2 (15 oz) cans whole kernel corn, drained
– 1 cup heavy cream
– 1 tsp dried thyme
– 1/2 tsp smoked paprika
– Salt and black pepper
Instructions
1. Melt 2 tbsp unsalted butter in a large pot or Dutch oven over medium heat.
2. Add 1 finely diced medium yellow onion and cook for 5 minutes, stirring occasionally, until translucent and softened.
3. Stir in 2 minced garlic cloves and cook for 1 minute until fragrant.
4. Add 1 lb cubed chicken breasts to the pot and cook for 6-8 minutes, stirring occasionally, until the chicken is no longer pink on the outside. Tip: For more flavor, season the chicken lightly with salt and pepper before adding it to the pot.
5. Sprinkle 1/4 cup all-purpose flour over the chicken and onion mixture and stir continuously for 2 minutes to cook out the raw flour taste.
6. Gradually pour in 4 cups low-sodium chicken broth while whisking constantly to prevent lumps from forming.
7. Bring the mixture to a gentle boil, then reduce the heat to medium-low and simmer uncovered for 10 minutes, stirring occasionally.
8. Stir in 2 drained cans of whole kernel corn, 1 cup heavy cream, 1 tsp dried thyme, and 1/2 tsp smoked paprika. Tip: For a richer flavor, you can substitute half the broth with whole milk, but add it after simmering to prevent curdling.
9. Simmer the chowder for an additional 5 minutes, stirring occasionally, until heated through and slightly thickened. Tip: If the chowder thickens too much, thin it with a splash of extra broth or water until it reaches your desired consistency.
10. Season the chowder with salt and black pepper to taste, then remove from heat.
Filling and comforting, this chowder boasts a velvety, creamy base with tender chicken and pops of sweet corn in every bite. The subtle smokiness from the paprika adds depth, making it perfect served in deep bowls with crusty bread for dipping, or topped with crispy bacon bits for extra texture.
Beef Stew with Canned Potatoes and Carrots
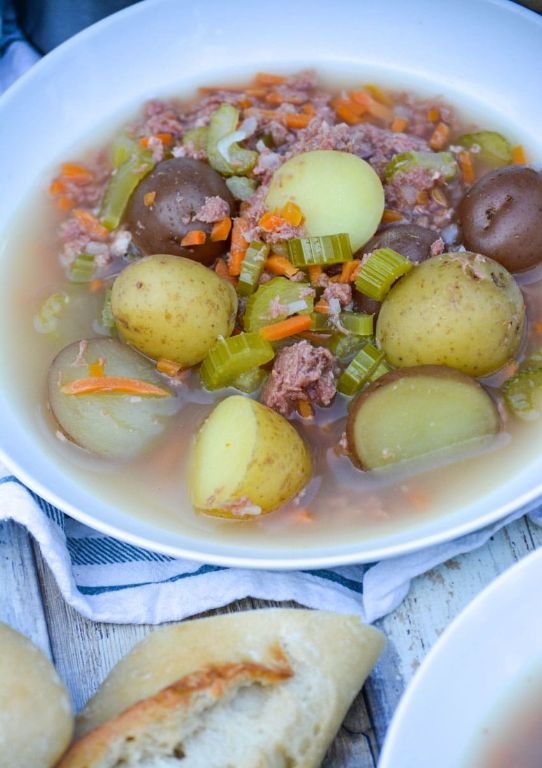
Perhaps it’s the quiet of a December evening that makes a simple stew feel like such a profound comfort. The gentle simmer of beef and vegetables transforms the kitchen into a haven, a slow ritual that rewards patience with deep, savory warmth.
Serving: 6 | Pre Time: 20 minutes | Cooking Time: 2 hours 30 minutes
Ingredients
– 2 lbs beef chuck, cut into 1-inch cubes
– 2 tbsp olive oil
– 1 large yellow onion, diced
– 4 cloves garlic, minced
– 4 cups beef broth
– 1 (14.5 oz) can diced tomatoes
– 2 tbsp tomato paste
– 1 tsp dried thyme
– 2 bay leaves
– 1 (15 oz) can whole potatoes, drained and halved
– 1 (15 oz) can sliced carrots, drained
– Salt and black pepper
Instructions
1. Pat the beef chuck cubes completely dry with paper towels to ensure a proper sear.
2. Heat 1 tablespoon of olive oil in a large Dutch oven over medium-high heat until shimmering, about 2 minutes.
3. Season the beef generously with salt and pepper.
4. Sear the beef in a single layer, without crowding, for 4-5 minutes per side until deeply browned; work in batches if necessary.
5. Transfer all seared beef to a clean plate.
6. Reduce the heat to medium and add the remaining 1 tablespoon of olive oil to the pot.
7. Add the diced yellow onion and cook, stirring occasionally, for 6-8 minutes until softened and translucent.
8. Add the minced garlic and cook for 1 minute until fragrant.
9. Stir in the tomato paste and cook for 1 minute to deepen its flavor.
10. Pour in the beef broth, using a wooden spoon to scrape up any browned bits from the bottom of the pot.
11. Add the canned diced tomatoes, dried thyme, and bay leaves.
12. Return the seared beef and any accumulated juices to the pot.
13. Bring the mixture to a gentle boil, then immediately reduce the heat to low.
14. Cover the pot and simmer for 2 hours, stirring once halfway through, until the beef is fork-tender.
15. Gently stir in the drained, halved canned potatoes and drained canned carrots.
16. Cover and simmer for an additional 20-25 minutes until the vegetables are heated through and tender.
17. Taste the stew and adjust seasoning with additional salt and pepper as needed.
18. Remove and discard the bay leaves before serving.
Kindly, the tender beef falls apart at the slightest nudge of a spoon, while the potatoes and carrots soak up the rich, tomato-infused broth. This stew’s heartiness begs to be served in a deep bowl, perhaps with a thick slice of crusty bread for dipping into every last savory drop.
Classic Canned Bean Chili

Remembering those quiet winter evenings when the world outside slows to a hush, I find myself drawn to the simple comfort of a pot simmering on the stove. This classic chili, built from humble canned beans, is a gentle reminder that warmth and satisfaction often come from the most straightforward of places.
Serving: 6 | Pre Time: 10 minutes | Cooking Time: 25 minutes
Ingredients
– 1 tablespoon olive oil
– 1 medium yellow onion, diced
– 2 cloves garlic, minced
– 1 pound ground beef (85% lean)
– 2 tablespoons chili powder
– 1 teaspoon ground cumin
– 1/2 teaspoon smoked paprika
– 1 (15-ounce) can kidney beans, drained and rinsed
– 1 (15-ounce) can pinto beans, drained and rinsed
– 1 (15-ounce) can diced tomatoes
– 2 cups beef broth
– 1/2 teaspoon salt
– 1/4 teaspoon black pepper
Instructions
1. Heat 1 tablespoon of olive oil in a large Dutch oven or heavy-bottomed pot over medium heat for 1 minute.
2. Add 1 diced medium yellow onion and cook, stirring occasionally, for 5 minutes until the pieces become translucent and soft.
3. Stir in 2 minced cloves of garlic and cook for 1 minute, just until fragrant.
4. Add 1 pound of ground beef to the pot, breaking it apart with a wooden spoon. Cook for 6-8 minutes until the meat is fully browned and no pink remains.
5. Sprinkle 2 tablespoons of chili powder, 1 teaspoon of ground cumin, and 1/2 teaspoon of smoked paprika over the beef. Stir constantly for 1 minute to toast the spices, which deepens their flavor.
6. Pour in 1 can of drained and rinsed kidney beans, 1 can of drained and rinsed pinto beans, and 1 can of diced tomatoes with their juices.
7. Add 2 cups of beef broth, 1/2 teaspoon of salt, and 1/4 teaspoon of black pepper. Stir all ingredients until fully combined.
8. Bring the chili to a gentle boil, then immediately reduce the heat to low. Cover the pot with a lid, leaving it slightly ajar to allow steam to escape.
9. Simmer the chili for 15 minutes, stirring once halfway through, to let the flavors meld together.
10. After 15 minutes, remove the pot from the heat. Let the chili rest, uncovered, for 5 minutes before serving; this allows it to thicken slightly.
The texture settles into a hearty, spoon-coating consistency where the beans remain tender but intact. This chili carries a deep, smoky warmth from the paprika, balanced by the savory richness of the broth. Try serving it over a baked potato or with a handful of crushed tortilla chips stirred in at the last moment for a satisfying crunch.
Sardine Pasta with Garlic and Olive Oil

Dusk settles softly outside my kitchen window, a quiet moment to stir together a simple, nourishing meal from pantry staples. This Sardine Pasta with Garlic and Olive Oil is a humble, quick dish that feels like a warm embrace after a long day, its flavors both bold and comforting in their simplicity.
Serving: 2 | Pre Time: 5 minutes | Cooking Time: 15 minutes
Ingredients
– 6 ounces dried spaghetti
– 3 tablespoons extra-virgin olive oil, divided
– 4 cloves garlic, thinly sliced
– 1 (3.75-ounce) can sardines in olive oil, drained and roughly chopped
– ¼ teaspoon red pepper flakes
– 2 tablespoons fresh parsley, finely chopped
– ½ teaspoon kosher salt
Instructions
1. Bring a large pot of salted water to a rolling boil over high heat.
2. Add 6 ounces of dried spaghetti to the boiling water and cook for 9–11 minutes, stirring occasionally, until al dente (tender but firm to the bite).
3. While the pasta cooks, heat 2 tablespoons of extra-virgin olive oil in a large skillet over medium-low heat.
4. Add 4 thinly sliced garlic cloves to the skillet and cook for 2–3 minutes, stirring frequently, until fragrant and lightly golden but not browned.
5. Stir in 1 can of drained, chopped sardines and ¼ teaspoon of red pepper flakes, cooking for 1 minute to warm through and infuse the oil.
6. Reserve ½ cup of the starchy pasta cooking water, then drain the cooked spaghetti.
7. Add the drained spaghetti to the skillet with the sardine mixture, tossing to coat evenly.
8. Pour in the reserved pasta water gradually, about 2 tablespoons at a time, tossing continuously until the sauce emulsifies and clings to the pasta, using only as much as needed for a silky consistency.
9. Remove the skillet from the heat and stir in 2 tablespoons of chopped fresh parsley, ½ teaspoon of kosher salt, and the remaining 1 tablespoon of extra-virgin olive oil.
10. Divide the pasta between two bowls and serve immediately.
This dish yields a wonderfully textured bite—the spaghetti is slick with savory oil, punctuated by tender flakes of sardine and the gentle heat of pepper flakes. The garlic infuses every strand with a mellow sweetness, while the parsley adds a fresh, bright finish. Try it with a sprinkle of toasted breadcrumbs for a delightful crunch, or enjoy it as is, letting its rustic charm shine in the quiet of the evening.
Canned Chicken Enchiladas with Green Sauce

Kindly, as the evening light fades, I find myself reaching for simple comforts, the kind that transform humble ingredients into something quietly nourishing. This dish, born from a pantry staple, wraps familiar flavors in a gentle embrace, perfect for a reflective weeknight.
Serving: 4 | Pre Time: 15 minutes | Cooking Time: 25 minutes
Ingredients
– 2 (12.5 oz) cans cooked chicken, drained
– 1 (10 oz) can green enchilada sauce
– 8 (6-inch) corn tortillas
– 1 cup shredded Monterey Jack cheese
– 1/2 cup sour cream
– 1/4 cup chopped fresh cilantro
– 1 tablespoon vegetable oil
– 1/2 teaspoon ground cumin
– 1/4 teaspoon garlic powder
– 1/4 teaspoon salt
Instructions
1. Preheat your oven to 375°F (190°C).
2. In a medium bowl, combine the drained canned chicken, 1/2 cup of the green enchilada sauce, 1/2 cup of the shredded Monterey Jack cheese, the sour cream, the ground cumin, the garlic powder, and the salt.
3. Warm the corn tortillas one at a time in a dry skillet over medium heat for about 15 seconds per side to make them pliable.
4. Spoon approximately 1/3 cup of the chicken mixture onto the center of each warmed tortilla.
5. Roll each tortilla tightly around the filling and place it seam-side down in a 9×13-inch baking dish.
6. Pour the remaining green enchilada sauce evenly over the top of the assembled enchiladas.
7. Sprinkle the remaining 1/2 cup of shredded Monterey Jack cheese evenly over the sauce.
8. Cover the baking dish tightly with aluminum foil and bake in the preheated oven for 20 minutes.
9. Remove the foil and continue baking for 5 minutes, or until the cheese is fully melted and bubbly.
10. Remove the baking dish from the oven and let the enchiladas rest for 5 minutes.
11. Drizzle the vegetable oil over the enchiladas.
12. Garnish the finished enchiladas with the chopped fresh cilantro before serving.
Mostly, these enchiladas emerge tender and comforting, the corn tortillas softening into the tangy, herbaceous green sauce. The shredded chicken filling remains moist, offering a subtle savory depth against the creamy, melted cheese. For a bright contrast, serve them alongside a simple salad of crisp romaine or with extra lime wedges for squeezing.
Vegetable Soup with Canned Tomatoes and Beans

Tonight, as the winter chill settles outside my window, I find myself craving something simple yet deeply nourishing—a humble pot of vegetable soup that feels like a warm embrace. This version, built from pantry staples like canned tomatoes and beans, comes together with minimal effort but offers maximum comfort, perfect for a quiet evening when you want to feed both body and soul.
Serving: 4 | Pre Time: 15 minutes | Cooking Time: 30 minutes
Ingredients
– 2 tbsp olive oil
– 1 medium yellow onion, diced
– 2 cloves garlic, minced
– 2 medium carrots, peeled and sliced into ¼-inch rounds
– 2 stalks celery, sliced into ¼-inch pieces
– 1 (14.5 oz) can diced tomatoes, undrained
– 4 cups vegetable broth
– 1 (15 oz) can cannellini beans, rinsed and drained
– 1 tsp dried oregano
– ½ tsp salt
– ¼ tsp black pepper
– 2 cups fresh spinach
Instructions
1. Heat 2 tbsp olive oil in a large pot over medium heat until it shimmers lightly.
2. Add 1 diced yellow onion and cook for 5 minutes, stirring occasionally, until translucent and fragrant.
3. Stir in 2 minced garlic cloves and cook for 1 minute, just until aromatic to avoid burning.
4. Add 2 sliced carrots and 2 sliced celery stalks, cooking for 5 minutes to soften slightly.
5. Pour in 1 can diced tomatoes with their juices and 4 cups vegetable broth, scraping the bottom of the pot to release any browned bits for deeper flavor.
6. Stir in 1 can rinsed cannellini beans, 1 tsp dried oregano, ½ tsp salt, and ¼ tsp black pepper.
7. Bring the soup to a gentle boil, then reduce heat to low, cover, and simmer for 20 minutes until the vegetables are tender.
8. Turn off the heat and stir in 2 cups fresh spinach, letting it wilt for 2 minutes in the residual warmth to preserve its vibrant color.
Just ladle this soup into bowls, where the tender vegetables and creamy beans swim in a tomato-rich broth that’s both light and satisfying. The spinach adds a fresh, earthy note, making it ideal with a slice of crusty bread for dipping or topped with a sprinkle of grated Parmesan for a savory finish.
Pineapple-Glazed Spam Sliders
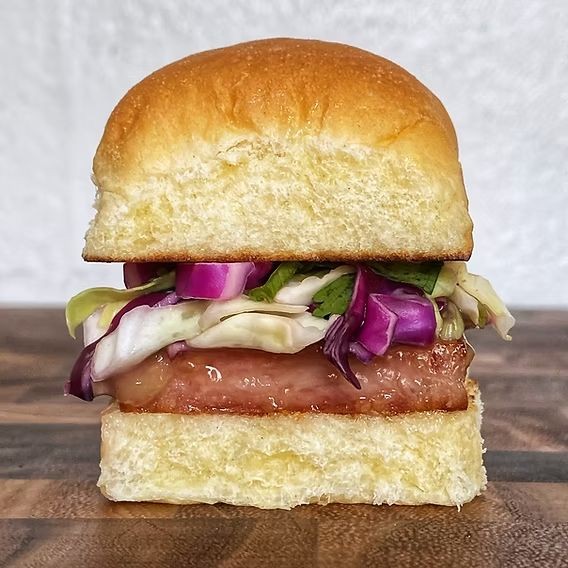
Beneath the quiet hum of the kitchen light, there’s a certain comfort in revisiting the simple, familiar things—like the humble can waiting in the pantry, transformed with just a touch of sweetness and heat into something quietly celebratory. These little sliders, with their sticky-sweet glaze and savory heart, are a small, satisfying nod to making the most of what you have on hand.
Serving: 8 sliders | Pre Time: 10 minutes | Cooking Time: 15 minutes
Ingredients
– 1 (12 oz) can Spam, sliced into 8 equal pieces
– 8 slider buns
– 1/2 cup pineapple juice
– 1/4 cup packed brown sugar
– 2 tbsp soy sauce
– 1 tbsp ketchup
– 1 tsp cornstarch
– 1 tbsp water
– 1 tbsp vegetable oil
Instructions
1. In a small saucepan over medium heat, combine 1/2 cup pineapple juice, 1/4 cup packed brown sugar, 2 tbsp soy sauce, and 1 tbsp ketchup, stirring until the sugar dissolves completely.
2. Bring the mixture to a gentle simmer, then reduce heat to low and let it cook undisturbed for 5 minutes to allow the flavors to meld.
3. In a separate small bowl, make a slurry by whisking together 1 tsp cornstarch and 1 tbsp water until no lumps remain.
4. While stirring the simmering glaze constantly, slowly drizzle in the cornstarch slurry to prevent clumping.
5. Continue cooking the glaze for 2 more minutes, stirring frequently, until it thickens to a syrup-like consistency that coats the back of a spoon; then remove it from the heat and set aside.
6. Heat 1 tbsp vegetable oil in a large non-stick skillet over medium-high heat until it shimmers, about 1 minute.
7. Carefully add the 8 slices of Spam to the hot skillet in a single layer, ensuring they don’t touch for even browning.
8. Pan-fry the Spam slices for 3-4 minutes per side, or until they develop a deep golden-brown crust and crisp edges.
9. Reduce the skillet heat to low and brush the top of each Spam slice generously with the prepared pineapple glaze using a pastry brush.
10. Flip each slice, brush the other side with more glaze, and cook for 1 additional minute to caramelize the glaze slightly.
11. Toast the 8 slider buns lightly in a toaster or under a broiler for 1-2 minutes until just warm and crisp at the edges.
12. Place one glazed Spam slice on the bottom half of each toasted bun, then top with the bun lid to assemble the sliders.
Now, these sliders offer a delightful contrast—the crisp, salty meat gives way to a sticky, sweet-tart glaze that clings to every bite. For a playful twist, serve them with a side of quick-pickled onions or a dollop of spicy mayo to cut through the richness, making each small sandwich feel like a tiny, complete feast.
Creamy Tuna Mac and Cheese

As the winter evening settles in, I find myself craving something both comforting and nostalgic, a dish that feels like a warm hug after a long day. This creamy tuna mac and cheese brings together familiar pantry staples in a way that’s simple yet deeply satisfying, perfect for a quiet dinner at home.
Serving: 4 | Pre Time: 10 minutes | Cooking Time: 25 minutes
Ingredients
– 8 ounces elbow macaroni
– 2 tablespoons unsalted butter
– 2 tablespoons all-purpose flour
– 2 cups whole milk
– 2 cups shredded sharp cheddar cheese
– 1 (5-ounce) can tuna in water, drained
– 1/2 teaspoon salt
– 1/4 teaspoon black pepper
– 1/4 teaspoon garlic powder
Instructions
1. Bring a large pot of salted water to a boil over high heat.
2. Add the elbow macaroni to the boiling water and cook for 8 minutes, stirring occasionally to prevent sticking.
3. Drain the macaroni in a colander and set it aside, reserving 1/4 cup of the pasta water for later use.
4. In the same pot, melt the unsalted butter over medium heat until it bubbles slightly.
5. Whisk in the all-purpose flour and cook for 1 minute to form a roux, stirring constantly to avoid burning.
6. Gradually pour in the whole milk while whisking continuously to create a smooth sauce.
7. Cook the sauce for 5 minutes, or until it thickens enough to coat the back of a spoon.
8. Reduce the heat to low and stir in the shredded sharp cheddar cheese until fully melted and creamy.
9. Fold in the drained tuna, salt, black pepper, and garlic powder, mixing gently to combine.
10. Add the cooked macaroni and reserved pasta water to the sauce, stirring until everything is evenly coated and heated through.
11. Remove the pot from the heat and let it sit for 2 minutes to allow the flavors to meld.
12. Serve immediately while warm.
Ultimately, this dish offers a velvety texture with pockets of tender tuna, balanced by the sharpness of cheddar and a hint of garlic. For a creative twist, top it with buttery breadcrumbs or serve alongside a crisp green salad to cut through the richness, making each bite feel both indulgent and wholesome.
Canned Clam Linguine in White Wine Sauce
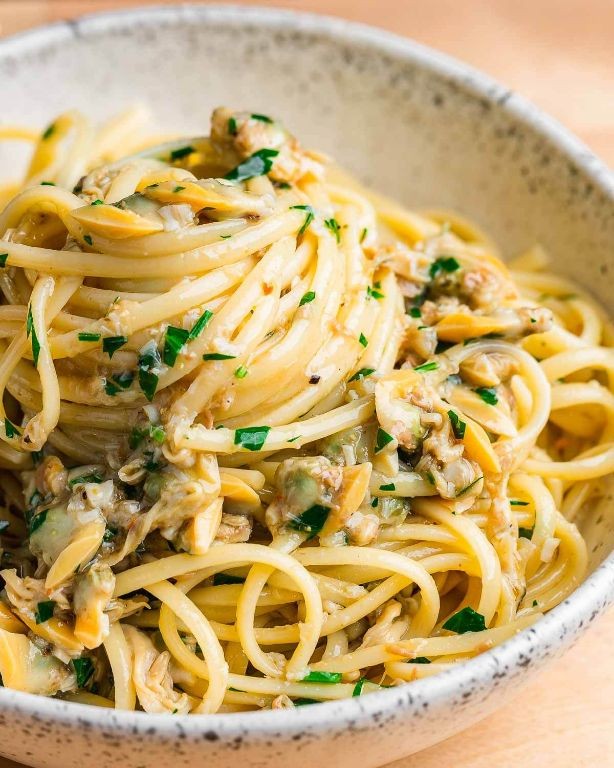
Years ago, on a quiet winter evening much like this one, I discovered the humble comfort of a pantry-friendly pasta dish that felt both elegant and effortless. There’s something deeply soothing about the gentle simmer of wine and garlic, a simple ritual that transforms basic ingredients into a warm, inviting meal. Tonight, let’s revisit that cozy staple with a few thoughtful touches to make it truly shine.
Serving: 4 | Pre Time: 10 minutes | Cooking Time: 20 minutes
Ingredients
– 12 ounces linguine
– 2 tablespoons unsalted butter
– 4 cloves garlic, minced
– 1/2 cup dry white wine
– 2 (6.5-ounce) cans chopped clams, drained (reserve 1/2 cup clam juice)
– 1/2 cup heavy cream
– 1/4 cup grated Parmesan cheese
– 2 tablespoons fresh parsley, chopped
– 1/4 teaspoon red pepper flakes
– Salt, as needed
Instructions
1. Bring a large pot of salted water to a boil over high heat.
2. Add the linguine and cook according to package directions until al dente, about 9–11 minutes, stirring occasionally to prevent sticking.
3. While the pasta cooks, melt the butter in a large skillet over medium heat.
4. Add the minced garlic and sauté for 1–2 minutes until fragrant but not browned, stirring constantly to avoid burning.
5. Pour in the white wine and let it simmer for 3–4 minutes until reduced by half, which will concentrate the flavor.
6. Stir in the reserved clam juice and heavy cream, then bring the mixture to a gentle simmer over medium-low heat.
7. Add the drained clams and red pepper flakes, cooking for 2–3 minutes just until the clams are heated through—overcooking can make them rubbery.
8. Drain the cooked linguine, reserving 1/4 cup of pasta water, and add the pasta directly to the skillet.
9. Toss everything together, adding the reserved pasta water a little at a time if the sauce seems too thick, until the linguine is evenly coated.
10. Remove the skillet from the heat and stir in the Parmesan cheese and chopped parsley until well combined.
11. Taste and add salt only if needed, as the clams and cheese already provide salinity.
Zesty yet mellow, this linguine balances briny clams with a velvety, wine-infused cream sauce that clings to each strand. The subtle heat from red pepper flakes lingers pleasantly, while fresh parsley adds a bright finish. For a creative twist, serve it alongside a crisp green salad or crusty bread to soak up every last drop of sauce.
Quick Canned Salmon Patties with Dill

Fumbling through the pantry on a quiet evening, I found a can of salmon waiting to be transformed into something comforting and quick. These patties come together with a gentle hand and the bright, herby note of fresh dill, offering a simple satisfaction that feels both nourishing and effortless. It’s the kind of meal that turns a humble ingredient into a little moment of warmth, perfect for when time feels slow but hunger calls.
Serving: 4 | Pre Time: 10 minutes | Cooking Time: 10 minutes
Ingredients
– 1 (14.75 oz) can salmon, drained and flaked
– 1 large egg, lightly beaten
– 1/4 cup plain breadcrumbs
– 2 tbsp fresh dill, finely chopped
– 1 tbsp mayonnaise
– 1 tsp Dijon mustard
– 1/4 tsp garlic powder
– 1/4 tsp black pepper
– 2 tbsp olive oil
Instructions
1. In a medium bowl, combine the drained and flaked salmon, lightly beaten egg, plain breadcrumbs, finely chopped fresh dill, mayonnaise, Dijon mustard, garlic powder, and black pepper.
2. Gently mix the ingredients with a fork until just combined, being careful not to overwork the mixture to keep the patties tender.
3. Divide the mixture into 4 equal portions and shape each into a 1/2-inch thick patty with your hands.
4. Heat the olive oil in a large non-stick skillet over medium heat until it shimmers, about 2 minutes.
5. Place the patties in the skillet, leaving space between them, and cook for 4-5 minutes until the bottoms are golden brown and crisp.
6. Flip the patties using a spatula and cook for another 4-5 minutes until the other side is golden brown and the internal temperature reaches 145°F.
7. Transfer the patties to a paper towel-lined plate to drain any excess oil. Very gently, these patties emerge with a crisp exterior that gives way to a moist, flaky interior, infused with the fresh, aromatic lift of dill. Try serving them atop a bed of mixed greens with a squeeze of lemon or tucked into soft buns for a quick sandwich that feels both rustic and refined.
Canned Tomato and Basil Bruschetta

Venturing into the kitchen on a quiet evening, I find comfort in the simplicity of pantry staples transforming into something vibrant and shared. This canned tomato and basil bruschetta feels like a gentle pause, a way to savor the last light of the day with a humble, honest bite. It’s a reminder that the most satisfying moments often come from the simplest of assemblies.
Serving: 4 | Pre Time: 15 minutes | Cooking Time: 10 minutes
Ingredients
– 1 (14.5-ounce) can diced tomatoes, drained
– 1/4 cup fresh basil leaves, thinly sliced
– 2 tablespoons extra-virgin olive oil
– 1 tablespoon balsamic vinegar
– 1/2 teaspoon kosher salt
– 1/4 teaspoon black pepper
– 1 baguette, sliced into 1/2-inch thick pieces
– 1 garlic clove, peeled
Instructions
1. Preheat your oven to 375°F (190°C) and line a baking sheet with parchment paper.
2. Arrange the baguette slices in a single layer on the prepared baking sheet.
3. Toast the bread in the preheated oven for 8–10 minutes, or until the edges are golden brown and crisp.
4. While the bread toasts, place the drained canned tomatoes in a medium mixing bowl.
5. Add the sliced fresh basil, extra-virgin olive oil, balsamic vinegar, kosher salt, and black pepper to the bowl with the tomatoes.
6. Gently stir all ingredients together until just combined, being careful not to crush the tomatoes too much.
7. Remove the toasted baguette slices from the oven and let them cool for 2 minutes on the baking sheet.
8. Rub the cut side of the peeled garlic clove lightly over the top of each warm toast to infuse a subtle garlic flavor.
9. Spoon the tomato and basil mixture evenly onto each garlic-rubbed toast, allowing any excess liquid to drain slightly before topping.
10. Serve the bruschetta immediately while the toasts are still warm and crisp.
The bruschetta offers a delightful contrast: the crisp, garlic-scented toast against the juicy, bright tomatoes and fragrant basil. For a creative twist, try drizzling with a touch of honey or serving alongside creamy burrata for a richer experience.
Hearty Lentil Soup with Canned Ham

Gently, as the evening light fades on a quiet December day, I find myself drawn to the simple comfort of the stove. This soup, with its humble canned ham and earthy lentils, feels like a warm embrace against the winter chill, a reminder that nourishment often comes from the most straightforward of places.
Serving: 6 | Pre Time: 15 minutes | Cooking Time: 45 minutes
Ingredients
– 2 tablespoons olive oil
– 1 medium yellow onion, diced
– 2 medium carrots, diced
– 2 celery stalks, diced
– 3 cloves garlic, minced
– 1 cup brown lentils, rinsed
– 6 cups low-sodium vegetable broth
– 1 (12-ounce) can cooked ham, diced
– 1 teaspoon dried thyme
– 1 bay leaf
– 1/2 teaspoon black pepper
– 1 tablespoon apple cider vinegar
Instructions
1. Heat 2 tablespoons of olive oil in a large Dutch oven or heavy-bottomed pot over medium heat for 1 minute until shimmering.
2. Add 1 diced yellow onion, 2 diced carrots, and 2 diced celery stalks to the pot, stirring to coat in the oil.
3. Cook the vegetables for 8-10 minutes, stirring occasionally, until the onion is translucent and the carrots begin to soften at the edges.
4. Stir in 3 minced garlic cloves and cook for 1 minute until fragrant, being careful not to let the garlic brown.
5. Add 1 cup of rinsed brown lentils, 6 cups of low-sodium vegetable broth, 1 teaspoon of dried thyme, 1 bay leaf, and 1/2 teaspoon of black pepper to the pot.
6. Increase the heat to high and bring the mixture to a boil, which should take about 5-7 minutes.
7. Once boiling, immediately reduce the heat to low, cover the pot with a lid, and simmer for 25 minutes.
8. After 25 minutes, stir in the diced ham from the 12-ounce can and continue simmering, covered, for an additional 15 minutes.
9. Remove the pot from the heat and discard the bay leaf.
10. Stir in 1 tablespoon of apple cider vinegar just before serving to brighten the flavors.
Each spoonful offers a tender bite of lentil alongside the savory, salty ham, creating a deeply satisfying broth. Enjoy it with a thick slice of crusty bread for dipping, or let it sit overnight—the flavors meld beautifully, making the next day’s bowl even more comforting.
Sausage and Canned Potato Hash
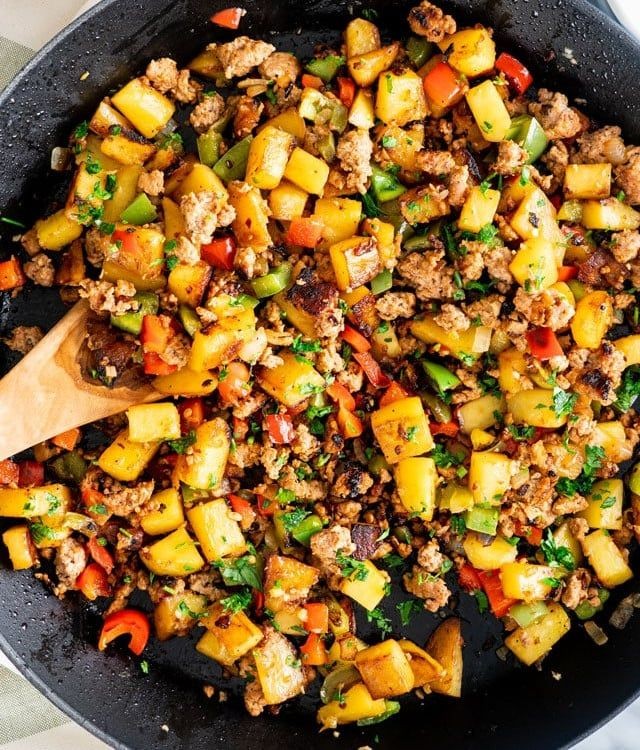
Dusk settles in, and the kitchen calls for something simple yet deeply satisfying, a humble meal that feels like a warm embrace after a long day. This hash, born from pantry staples and a quiet evening, transforms the ordinary into a comforting, savory dish that requires little fuss but delivers so much heart.
Serving: 4 | Pre Time: 10 minutes | Cooking Time: 25 minutes
Ingredients
– 1 tbsp olive oil
– 1 lb pork breakfast sausage, casings removed
– 1 medium yellow onion, diced
– 1 green bell pepper, diced
– 2 (15 oz) cans whole potatoes, drained and diced
– 1 tsp smoked paprika
– 1/2 tsp garlic powder
– 1/2 tsp dried thyme
– 1/4 tsp black pepper
– 4 large eggs
– 2 tbsp chopped fresh parsley
Instructions
1. Heat 1 tbsp olive oil in a large skillet over medium-high heat until it shimmers, about 1 minute.
2. Add 1 lb pork breakfast sausage to the skillet, breaking it into small crumbles with a wooden spoon.
3. Cook the sausage for 6–8 minutes, stirring occasionally, until it is browned and no longer pink.
4. Add 1 diced yellow onion and 1 diced green bell pepper to the skillet with the sausage.
5. Sauté the vegetables for 5–7 minutes, stirring frequently, until the onion is translucent and the pepper is tender.
6. Stir in 2 cans of diced potatoes, 1 tsp smoked paprika, 1/2 tsp garlic powder, 1/2 tsp dried thyme, and 1/4 tsp black pepper until evenly combined.
7. Press the hash mixture down gently with the back of a spoon to create an even layer in the skillet.
8. Cook undisturbed for 4–5 minutes to allow a golden crust to form on the bottom.
9. Flip sections of the hash with a spatula and cook for another 4–5 minutes until crispy throughout.
10. Create 4 small wells in the hash with the back of a spoon.
11. Crack 1 large egg into each well, being careful not to break the yolks.
12. Cover the skillet and cook over medium-low heat for 5–7 minutes, or until the egg whites are fully set and the yolks reach your desired consistency.
13. Remove the skillet from heat and sprinkle 2 tbsp chopped fresh parsley over the top.
14. Serve immediately directly from the skillet.
Perfectly crispy potatoes mingle with savory sausage and sweet peppers, creating a texture that is both hearty and comforting. The runny egg yolks blend into the hash, adding a rich, silky sauce that ties everything together. For a creative twist, spoon it over toasted sourdough or top with a dollop of spicy salsa to brighten the deep, smoky flavors.
Spinach and Canned Artichoke Dip

Musing on the quiet moments before a gathering, I find myself drawn to the simplicity of a warm, communal dip—a blend of earthy spinach and briny artichokes, melded with creamy cheeses, that feels both nostalgic and comforting, like a soft blanket on a chilly evening.
Serving: 8 | Pre Time: 15 minutes | Cooking Time: 25 minutes
Ingredients
– 1 tablespoon olive oil
– 1 small yellow onion, finely chopped
– 2 cloves garlic, minced
– 10 ounces fresh spinach, roughly chopped
– 1 (14-ounce) can artichoke hearts, drained and chopped
– 8 ounces cream cheese, softened
– 1 cup mayonnaise
– 1 cup grated Parmesan cheese
– 1/2 cup shredded mozzarella cheese
– 1/4 teaspoon black pepper
– 1/4 teaspoon salt
Instructions
1. Preheat your oven to 375°F and lightly grease a 9-inch baking dish with olive oil or non-stick spray.
2. Heat 1 tablespoon olive oil in a large skillet over medium heat until shimmering, about 1 minute.
3. Add the finely chopped yellow onion and cook, stirring occasionally, until translucent and soft, about 5 minutes.
4. Stir in the minced garlic and cook for 30 seconds until fragrant, being careful not to let it burn.
5. Add the roughly chopped spinach to the skillet and cook, stirring frequently, until wilted and most of the liquid has evaporated, about 3–4 minutes.
6. Transfer the spinach mixture to a large mixing bowl and let it cool for 2 minutes to prevent curdling the dairy.
7. To the bowl, add the chopped artichoke hearts, softened cream cheese, mayonnaise, grated Parmesan cheese, shredded mozzarella cheese, black pepper, and salt.
8. Gently fold all ingredients together until evenly combined, avoiding overmixing to keep the texture light.
9. Spoon the mixture into the prepared baking dish and spread it into an even layer with a spatula.
10. Bake in the preheated oven for 20–25 minutes, or until the top is golden brown and the edges are bubbling slightly.
11. Remove from the oven and let the dip rest for 5 minutes before serving to allow it to set for easier scooping.
As you scoop into this dip, notice its creamy yet chunky texture, with the spinach offering a tender bite and the artichokes providing a subtle tang. The flavors deepen as it cools slightly, making it perfect for pairing with crusty bread or crisp vegetable sticks for a cozy, shareable treat.
Canned Peach Cobbler with Cinnamon
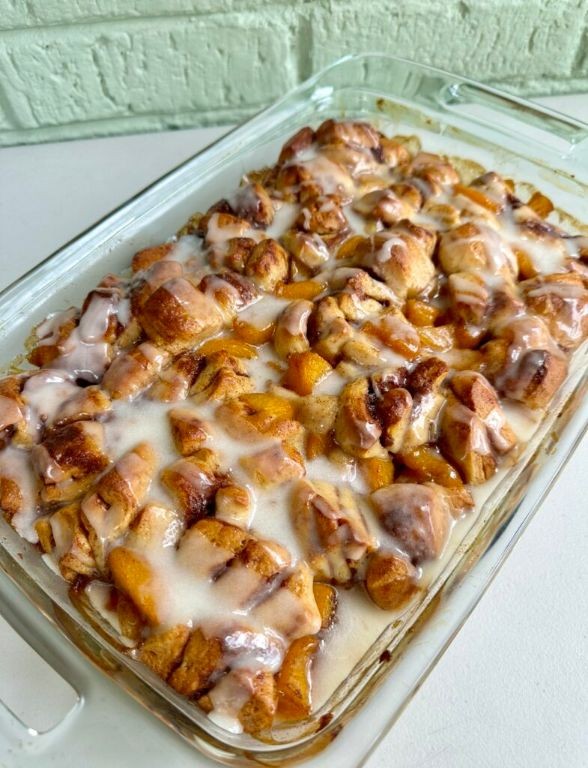
Kindly, as the winter evening settles outside my window, I find myself drawn to the simple comfort of a warm dessert, one that transforms humble canned peaches into something nostalgic and sweetly spiced. This cobbler, with its tender cinnamon-kissed fruit and golden biscuit topping, feels like a quiet celebration of pantry staples, perfect for sharing on a chilly night or savoring alone with a cup of tea.
Serving: 6 | Pre Time: 15 minutes | Cooking Time: 45 minutes
Ingredients
– 2 (15-ounce) cans sliced peaches in syrup
– 1/2 cup granulated sugar
– 1 teaspoon ground cinnamon
– 1 tablespoon cornstarch
– 1 cup all-purpose flour
– 1/4 cup granulated sugar
– 1 1/2 teaspoons baking powder
– 1/4 teaspoon salt
– 1/2 cup whole milk
– 1/4 cup unsalted butter, melted
– 1 teaspoon vanilla extract
Instructions
1. Preheat your oven to 375°F and lightly grease an 8×8-inch baking dish.
2. Drain the canned peaches, reserving 1/2 cup of the syrup in a medium bowl.
3. Add the 1/2 cup granulated sugar, ground cinnamon, and cornstarch to the reserved syrup, whisking until smooth to prevent lumps.
4. Gently fold in the drained peaches until evenly coated, then pour the mixture into the prepared baking dish.
5. In a separate bowl, combine the all-purpose flour, 1/4 cup granulated sugar, baking powder, and salt, whisking to aerate the dry ingredients for a lighter topping.
6. Pour the whole milk, melted unsalted butter, and vanilla extract into the dry mixture, stirring just until a thick batter forms without overmixing.
7. Drop spoonfuls of the batter evenly over the peach filling, leaving small gaps for steam to escape during baking.
8. Bake at 375°F for 40-45 minutes, until the topping is golden brown and a toothpick inserted into it comes out clean.
9. Remove from the oven and let the cobbler cool on a wire rack for 15 minutes before serving to allow the filling to thicken slightly.
Remarkably, this cobbler emerges with a crisp, buttery crust that gives way to a soft, jammy peach filling, each bite infused with the warm hint of cinnamon. Serve it warm with a scoop of vanilla ice cream for a delightful contrast, or enjoy it the next day when the flavors have melded into an even richer, comforting treat.
Green Bean Casserole with Canned Mushrooms
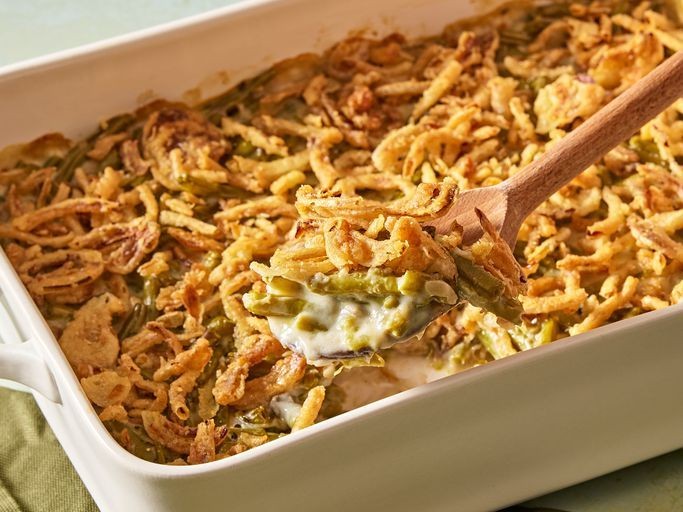
Years have a way of folding back on themselves, especially in the kitchen, where the simplest of dishes can hold entire seasons within their warmth. This green bean casserole, with its humble canned mushrooms, is one of those quiet comforts that feels less like a recipe and more like a memory being gently reheated, a soft exhale at the end of a long day.
Serving: 6 | Pre Time: 15 minutes | Cooking Time: 30 minutes
Ingredients
– 1 1/2 lbs fresh green beans, trimmed and cut into 2-inch pieces
– 2 (10.5 oz) cans condensed cream of mushroom soup
– 1 cup milk
– 1 tsp black pepper
– 1/2 tsp garlic powder
– 2 (4 oz) cans sliced mushrooms, drained
– 1 (6 oz) can French fried onions
Instructions
1. Preheat your oven to 350°F and lightly grease a 9×13-inch baking dish.
2. Bring a large pot of salted water to a rolling boil over high heat.
3. Add the green beans to the boiling water and blanch for 5 minutes, just until they turn bright green and slightly tender—this preserves their crisp texture and vibrant color.
4. Drain the green beans immediately in a colander and rinse under cold running water to stop the cooking process; set aside.
5. In a large mixing bowl, whisk together the condensed cream of mushroom soup, milk, black pepper, and garlic powder until completely smooth and well combined.
6. Gently fold in the blanched green beans and drained canned mushrooms until evenly coated with the soup mixture.
7. Transfer the mixture to the prepared baking dish, spreading it into an even layer with a spatula.
8. Bake uncovered in the preheated oven for 25 minutes, until the edges are bubbly and the center is heated through.
9. Carefully remove the dish from the oven and evenly sprinkle the French fried onions over the top.
10. Return the dish to the oven and bake for an additional 5 minutes, just until the onions are golden and crispy—watch closely to prevent burning.
11. Remove from the oven and let it rest for 5 minutes before serving to allow the flavors to settle.
Softened green beans nestle in a creamy, savory sauce, punctuated by the earthy notes of mushrooms and the satisfying crunch of golden onions. Serve it straight from the dish with a simple roasted chicken, or spoon it over toasted bread for a cozy, open-faced sandwich that turns leftovers into something new.
Instant Canned Fruit Salad with Yogurt Dressing

Beneath the soft glow of the kitchen light, there’s a quiet comfort in creating something simple and sweet, a small ritual that requires little more than opening a few jars and stirring a gentle dressing. It’s the kind of effortless assembly that feels like a pause, a moment to gather sweetness from the pantry and transform it into a bright, shared bowl. This fruit salad, with its creamy yogurt dressing, is a testament to the joy found in uncomplicated things, ready in mere minutes to bring a touch of light to any table.
Serving: 4 | Pre Time: 10 minutes | Cooking Time: 0 minutes
Ingredients
– 1 (15-ounce) can peach slices in light syrup, drained
– 1 (15-ounce) can pear halves in light syrup, drained
– 1 (20-ounce) can pineapple chunks in juice, drained
– 1 (11-ounce) can mandarin orange segments, drained
– 1 cup plain whole-milk Greek yogurt
– 2 tablespoons honey
– 1 teaspoon pure vanilla extract
– 1/4 teaspoon ground cinnamon
Instructions
1. Open all four cans of fruit and pour the contents into a colander set over the sink to drain completely for 3 minutes, gently shaking the colander once to remove excess liquid.
2. Transfer the drained peach slices, pear halves, pineapple chunks, and mandarin orange segments to a large mixing bowl.
3. In a separate small bowl, combine 1 cup of plain whole-milk Greek yogurt, 2 tablespoons of honey, 1 teaspoon of pure vanilla extract, and 1/4 teaspoon of ground cinnamon.
4. Whisk the yogurt mixture vigorously for 30 seconds until it is completely smooth and all ingredients are fully incorporated, with no streaks of honey visible.
5. Pour the yogurt dressing over the fruit in the large mixing bowl.
6. Using a large rubber spatula, fold the dressing into the fruit with gentle, lifting motions for about 1 minute until every piece is evenly coated, being careful not to crush the softer fruits.
7. Cover the bowl tightly with plastic wrap and refrigerate the salad for at least 15 minutes to allow the flavors to meld and the salad to chill to 40°F.
8. After chilling, give the salad one final gentle stir with the spatula before serving.
Vivid and refreshing, the salad offers a delightful contrast between the soft, yielding peaches and pears and the firmer bite of the pineapple, all brought together by the lush, tangy-sweet dressing. For a creative twist, serve it scooped into hollowed-out orange halves or topped with a sprinkle of toasted coconut for added texture.
Summary
Versatile and convenient, these 20 canned food recipes prove that quick meals can be delicious and satisfying. We hope this roundup inspires your next easy dinner or lunch. Give a recipe a try, leave a comment to tell us your favorite, and don’t forget to share this article on Pinterest to help other home cooks!


