
Busy weeknights don’t have to mean boring dinners! We’re diving into the pantry to transform humble canned veggies into 18 surprisingly delicious, quick meals. From cozy soups to vibrant sides, these recipes are all about convenience without sacrificing flavor. Let’s get cooking—your new favorite easy dinner is just a can opener away.
Creamy canned corn chowder

Sometimes the simplest pantry staples can transform into the coziest meal, especially on a quiet winter afternoon like this one. Sitting here with a warm mug, I’m reminded how a few humble cans of corn can become a velvety, comforting chowder that feels like a gentle hug in a bowl—perfect for those moments when you need something soothing without much fuss.
Serving: 4 | Pre Time: 10 minutes | Cooking Time: 25 minutes
Ingredients
– 4 tablespoons of unsalted butter
– 1 medium yellow onion, diced small
– 2 cloves of garlic, minced
– 1/4 cup of all-purpose flour
– 4 cups of low-sodium chicken broth
– 2 (15-ounce) cans of cream-style corn
– 1 (15-ounce) can of whole kernel corn, drained
– 1 cup of heavy cream
– 1 teaspoon of dried thyme
– 1/2 teaspoon of smoked paprika
– A couple of bay leaves
– Salt and freshly ground black pepper, as needed
– A splash of olive oil for sautéing
Instructions
1. Heat a large pot over medium heat and add a splash of olive oil with 2 tablespoons of unsalted butter.
2. Add the diced onion and cook for 5-7 minutes, stirring occasionally, until it turns soft and translucent.
3. Stir in the minced garlic and cook for 1 minute more, just until fragrant.
4. Sprinkle the all-purpose flour over the onion mixture and cook for 2 minutes, stirring constantly to form a roux and prevent lumps.
5. Gradually pour in the low-sodium chicken broth while whisking continuously to combine smoothly.
6. Add the cream-style corn, drained whole kernel corn, dried thyme, smoked paprika, and bay leaves to the pot.
7. Bring the mixture to a gentle simmer over medium heat, then reduce to low and let it cook uncovered for 15 minutes, stirring occasionally.
8. Stir in the heavy cream and remaining 2 tablespoons of unsalted butter until fully melted and incorporated.
9. Season with salt and freshly ground black pepper to your liking, then remove the bay leaves before serving.
10. Ladle the chowder into bowls while hot.
On chilly evenings, this chowder develops a rich, creamy texture that’s punctuated by sweet corn kernels, offering a subtle smokiness from the paprika. I love topping it with crispy bacon bits or a sprinkle of fresh chives for an extra layer of flavor that makes it feel special yet effortless.
Spicy canned green bean stir-fry
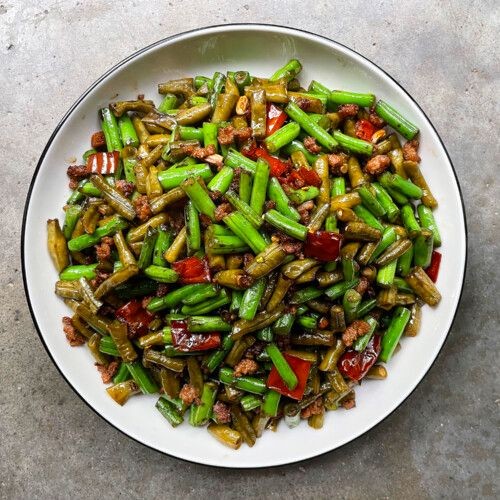
Dipping into the quiet of the kitchen, I find comfort in the simple alchemy of pantry staples. This spicy canned green bean stir-fry is a humble, warming dish born from a need for something quick yet deeply satisfying, a little spark to brighten a quiet evening.
Serving: 2 | Pre Time: 5 minutes | Cooking Time: 10 minutes
Ingredients
– A couple of 15-ounce cans of green beans, drained well
– A good glug of vegetable oil, about 2 tablespoons
– 3 cloves of garlic, minced
– A 1-inch piece of fresh ginger, grated
– A couple of tablespoons of soy sauce
– A splash of rice vinegar, about 1 tablespoon
– A teaspoon of toasted sesame oil
– A half teaspoon of red pepper flakes, or a bit more if you like the heat
– A pinch of sugar, just to balance
– A sprinkle of sesame seeds for finishing
Instructions
1. Heat the vegetable oil in a large skillet or wok over medium-high heat until it shimmers, about 1 minute.
2. Add the minced garlic and grated ginger to the hot oil, stirring constantly for just 30 seconds until fragrant—be careful not to let it burn.
3. Tip in the well-drained canned green beans, spreading them in an even layer. Let them cook undisturbed for 2 minutes to get a slight char on one side.
4. Give the beans a gentle stir, then pour in the soy sauce, rice vinegar, toasted sesame oil, red pepper flakes, and pinch of sugar.
5. Toss everything together until the beans are evenly coated in the sauce, cooking for another 3-4 minutes until the liquid reduces slightly and the beans are heated through.
6. Remove the skillet from the heat and sprinkle the sesame seeds over the top.
Fresh from the pan, the beans carry a tender-crisp bite, their mild flavor transformed by the garlicky, gingery heat and that savory-sweet glaze. I love it piled over a bowl of steamed rice, where the sauce mingles beautifully, or tucked into a warm tortilla for an unexpected, spicy wrap.
Cheesy canned carrot casserole

Holding this warm baking dish in my hands on a quiet afternoon, I find myself thinking about how the simplest ingredients can transform into something comforting. This cheesy canned carrot casserole is one of those humble dishes that feels like a gentle hug, perfect for when you need a little warmth without much fuss. It’s a reminder that sometimes, the most satisfying meals come from pantry staples we might overlook.
Serving: 6 | Pre Time: 15 minutes | Cooking Time: 35 minutes
Ingredients
– A couple of 15-ounce cans of sliced carrots, drained well
– A cup of shredded sharp cheddar cheese
– Half a cup of crushed buttery crackers (like Ritz)
– A quarter cup of whole milk
– Two tablespoons of unsalted butter, melted
– A splash of Worcestershire sauce
– A pinch of salt and black pepper
Instructions
1. Preheat your oven to 350°F and lightly grease an 8×8-inch baking dish with butter or cooking spray.
2. In a large mixing bowl, combine the drained canned carrots, shredded cheddar cheese, whole milk, melted butter, Worcestershire sauce, salt, and black pepper. Gently stir until everything is evenly mixed—tip: don’t overmix to keep the carrots from getting mushy.
3. Transfer the carrot mixture to the prepared baking dish, spreading it out into an even layer with a spatula.
4. Sprinkle the crushed buttery crackers evenly over the top of the carrot mixture, pressing them down lightly with your fingers to help them adhere.
5. Place the baking dish in the preheated oven and bake for 30–35 minutes, or until the edges are bubbling and the top is golden brown—tip: check at 30 minutes to avoid over-browning.
6. Remove the casserole from the oven and let it rest on a wire rack for 5–10 minutes before serving—tip: this resting time allows the flavors to meld and makes it easier to slice.
Soft and creamy with a hint of tang from the cheese, this casserole has a tender texture that pairs beautifully with the crunchy cracker topping. Serve it alongside a simple green salad for a cozy weeknight dinner, or spoon it over toast for a hearty breakfast twist—it’s versatile enough to brighten any meal.
Garlic butter canned peas

Often, the simplest dishes are the ones that feel most like home, the quiet comfort found not in elaborate preparations but in the gentle transformation of humble ingredients. On a quiet afternoon like this, with the light fading softly through the kitchen window, there’s a particular solace in turning a simple can of peas into something warm and fragrant. It’s a small, almost meditative act of care, a reminder that nourishment doesn’t always require grand gestures.
Serving: 4 | Pre Time: 5 minutes | Cooking Time: 10 minutes
Ingredients
– A couple of tablespoons of unsalted butter
– A few cloves of garlic, minced (about 3 or 4)
– A 15-ounce can of sweet peas, drained
– A generous pinch of kosher salt
– A smaller pinch of freshly cracked black pepper
– A splash of water or vegetable broth
Instructions
1. Place a medium saucepan on the stove over low heat.
2. Add the unsalted butter to the saucepan and let it melt slowly, which should take about 1 minute. Tip: Using low heat prevents the butter from browning too quickly and allows the garlic flavor to infuse gently.
3. Once the butter is fully melted and foamy, add the minced garlic to the saucepan.
4. Cook the garlic in the butter, stirring constantly with a wooden spoon, for exactly 1 minute or until it becomes fragrant. Tip: Keep a close eye here; garlic can burn in seconds, turning bitter, so stir it continuously.
5. Pour the drained canned peas into the saucepan with the garlic butter.
6. Add the generous pinch of kosher salt and the smaller pinch of freshly cracked black pepper to the peas.
7. Pour in a splash of water or vegetable broth, just enough to create a little steam, about 2 tablespoons.
8. Increase the heat to medium and cook the peas, stirring occasionally, for 5 to 7 minutes until they are heated through and have absorbed some of the butter. Tip: The liquid will mostly evaporate, leaving the peas coated in the flavorful butter without becoming soggy.
9. Remove the saucepan from the heat immediately.
10. Transfer the garlic butter canned peas to a serving bowl using a slotted spoon or simply pour them out.
Gently, these peas settle into a tender, almost creamy texture, each bite infused with the mellow sweetness of the vegetable and the rich, aromatic punch of garlic. Their flavor is quietly robust, making them a perfect side to simply grilled chicken or stirred into a bowl of buttery pasta for a quick, comforting meal. On a plate, they glisten with that golden butter, a small, humble dish that feels like a warm embrace.
Quick canned tomato soup

Holding a warm mug in my hands on this quiet December afternoon, I find myself reaching for the simplest of comforts—a soup that whispers of home without demanding hours at the stove. It’s the kind of recipe that feels less like cooking and more like a gentle ritual, transforming humble pantry staples into something quietly nourishing.
Serving: 4 | Pre Time: 5 minutes | Cooking Time: 15 minutes
Ingredients
– a couple of tablespoons of olive oil
– one medium yellow onion, roughly chopped
– two cloves of garlic, minced
– a 28-ounce can of whole peeled tomatoes, with their juices
– two cups of vegetable broth
– a splash of heavy cream or half-and-half
– a pinch of sugar
– salt and freshly ground black pepper
Instructions
1. Heat the olive oil in a large pot over medium heat until it shimmers lightly.
2. Add the chopped onion and cook, stirring occasionally, for about 5 minutes until it turns soft and translucent—this slow cooking builds a sweet base without browning.
3. Stir in the minced garlic and cook for just 30 seconds until fragrant, being careful not to let it burn, which can make it bitter.
4. Pour in the entire can of whole peeled tomatoes with their juices, using a wooden spoon to gently break them up in the pot.
5. Add the vegetable broth and bring the mixture to a gentle simmer over medium-high heat.
6. Reduce the heat to low, cover the pot partially, and let it simmer for 10 minutes to allow the flavors to meld together.
7. Carefully transfer the soup to a blender and blend on high speed until completely smooth, or use an immersion blender directly in the pot for easier cleanup.
8. Return the blended soup to the pot over low heat and stir in the heavy cream or half-and-half until just incorporated.
9. Add the pinch of sugar to balance the tomatoes’ acidity, then season with salt and freshly ground black pepper, tasting as you go to adjust.
10. Ladle the soup into bowls and serve immediately.
Gently silky with a velvety texture that clings to the spoon, this soup carries the bright, tangy notes of tomatoes softened by a hint of cream. For a cozy twist, try topping it with a drizzle of olive oil and a sprinkle of fresh herbs, or pair it with a grilled cheese sandwich for that classic, comforting bite.
Savory canned mixed vegetable curry

Musing on this quiet December afternoon, with the winter light fading early outside my kitchen window, I find myself craving something comforting yet effortless—a dish that transforms humble pantry staples into a warm, aromatic embrace. This savory canned mixed vegetable curry is exactly that kind of kitchen alchemy, where a few simple ingredients simmer together into something deeply satisfying, perfect for a cozy evening in.
Serving: 4 | Pre Time: 10 minutes | Cooking Time: 25 minutes
Ingredients
– A couple of tablespoons of olive oil
– One medium yellow onion, finely chopped
– Three cloves of garlic, minced
– A tablespoon of fresh ginger, grated
– A tablespoon of curry powder
– A teaspoon of ground cumin
– A 15-ounce can of diced tomatoes
– Two 15-ounce cans of mixed vegetables, drained and rinsed
– A 13.5-ounce can of coconut milk
– A splash of water, about a quarter cup
– A pinch of salt
Instructions
1. Heat a couple of tablespoons of olive oil in a large pot over medium heat until it shimmers slightly.
2. Add one finely chopped medium yellow onion and cook for about 5 minutes, stirring occasionally, until it turns soft and translucent.
3. Stir in three minced cloves of garlic and a tablespoon of grated fresh ginger, cooking for 1 minute until fragrant—be careful not to let it burn, as this can make the curry bitter.
4. Sprinkle in a tablespoon of curry powder and a teaspoon of ground cumin, toasting the spices for 30 seconds to release their oils and deepen the flavor.
5. Pour in a 15-ounce can of diced tomatoes with their juices, scraping the bottom of the pot to lift any browned bits, which adds a rich base note.
6. Add two drained and rinsed 15-ounce cans of mixed vegetables, stirring to coat them in the tomato-spice mixture.
7. Pour in a 13.5-ounce can of coconut milk and a splash of water, about a quarter cup, to thin the sauce slightly.
8. Bring the curry to a gentle simmer, then reduce the heat to low, cover the pot, and let it cook for 15 minutes, stirring halfway through to prevent sticking.
9. After 15 minutes, uncover the pot and simmer for an additional 5 minutes to thicken the sauce to a creamy consistency—if it seems too thick, add another splash of water.
10. Season with a pinch of salt, taste and adjust as needed, then remove from heat.
Earthy and velvety, this curry melds the tender vegetables with a creamy coconut broth that’s subtly spiced, offering a comforting texture that’s neither too thick nor too thin. Serve it over a bed of fluffy rice or with warm naan for dipping, and consider garnishing with fresh cilantro or a squeeze of lime to brighten the flavors on a chilly evening.
Roasted canned asparagus with parmesan
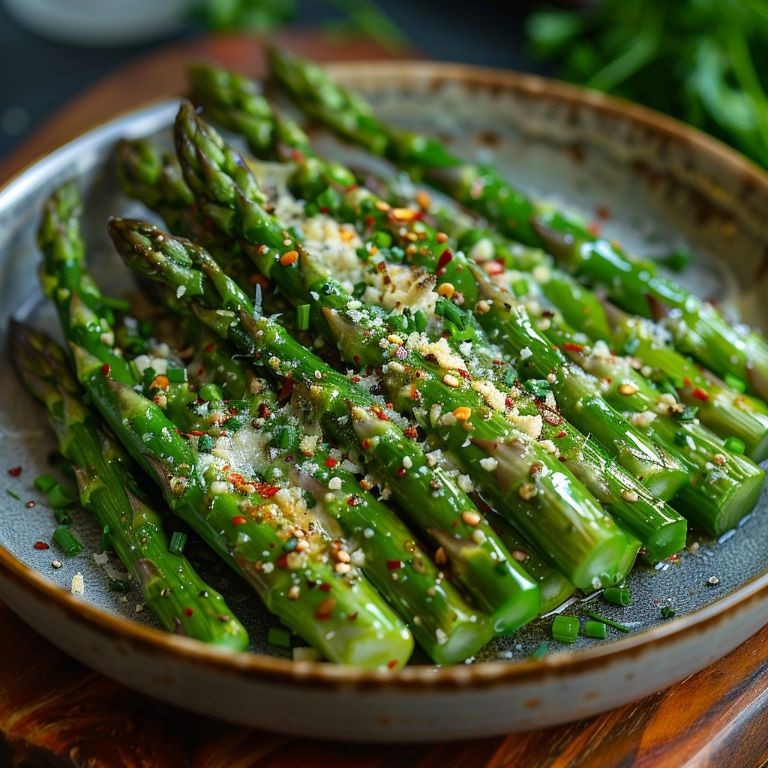
Just when I thought canned vegetables were destined for quick salads or emergency sides, I discovered this quiet transformation. Roasting turns those soft, preserved spears into something caramelized and deeply savory, especially with a generous blanket of parmesan. It’s a humble reminder that simple ingredients can surprise you.
Serving: 4 | Pre Time: 5 minutes | Cooking Time: 15 minutes
Ingredients
– A 14.5-ounce can of asparagus spears, drained and patted dry
– A couple of tablespoons of olive oil
– A generous sprinkle of grated parmesan cheese (about ¼ cup)
– A pinch of salt
– A pinch of black pepper
Instructions
1. Preheat your oven to 425°F and line a baking sheet with parchment paper for easy cleanup.
2. Arrange the drained asparagus spears in a single layer on the baking sheet, leaving a little space between them so they roast evenly instead of steaming.
3. Drizzle the olive oil evenly over the asparagus, then use your hands to gently toss them, ensuring each spear is lightly coated.
4. Sprinkle the salt and black pepper evenly across the asparagus.
5. Roast in the preheated oven for 10 minutes, until the edges start to look slightly golden and dry.
6. Remove the baking sheet from the oven and evenly sprinkle the grated parmesan cheese over the asparagus.
7. Return the baking sheet to the oven and roast for another 5 minutes, or until the cheese is melted and has light golden spots.
8. Let the asparagus cool on the baking sheet for 2-3 minutes before serving to allow the cheese to set slightly.
For such a simple process, the results feel quietly luxurious. The asparagus softens further while gaining crispy, cheesy edges, and the parmesan adds a salty, nutty depth that makes it hard to stop at just one serving. Try it alongside a creamy pasta or as a topping for crusty bread—it turns an ordinary meal into something gently special.
Canned spinach and artichoke dip

Gently, on this quiet afternoon, I find myself reaching for the familiar comfort of pantry staples, the kind that transform into something warm and welcoming with just a little care. It’s a simple act of turning canned greens into a creamy, savory dip that feels both nostalgic and perfectly suited for a cozy gathering or a solitary treat.
Serving: 6 | Pre Time: 10 minutes | Cooking Time: 25 minutes
Ingredients
– One 14-ounce can of artichoke hearts, drained and chopped
– One 14.5-ounce can of spinach, thoroughly drained and squeezed dry
– 8 ounces of cream cheese, softened at room temperature
– 1/2 cup of mayonnaise
– 1/2 cup of grated Parmesan cheese
– 1/2 cup of shredded mozzarella cheese
– 2 cloves of garlic, minced
– A splash of lemon juice, about 1 tablespoon
– A pinch of salt and a couple of cracks of black pepper
Instructions
1. Preheat your oven to 375°F (190°C) to ensure it’s ready for baking.
2. In a large mixing bowl, combine the softened cream cheese, mayonnaise, and minced garlic, stirring until smooth and well-blended. Tip: Letting the cream cheese sit out for 30 minutes beforehand makes mixing easier and prevents lumps.
3. Add the drained and chopped artichoke hearts and the squeezed-dry spinach to the bowl, folding them gently into the creamy mixture.
4. Stir in the grated Parmesan cheese, shredded mozzarella cheese, lemon juice, salt, and black pepper until everything is evenly distributed.
5. Transfer the mixture to a greased 8×8-inch baking dish or a similar oven-safe dish, spreading it out into an even layer. Tip: Lightly greasing the dish with butter or oil helps prevent sticking and makes cleanup simpler.
6. Place the dish in the preheated oven and bake for 20-25 minutes, or until the edges are bubbly and the top turns a light golden brown. Tip: Check at the 20-minute mark—if it’s not browning yet, you can broil it for 1-2 minutes at the end, but watch closely to avoid burning.
7. Remove the dip from the oven and let it cool for 5-10 minutes before serving to allow it to set slightly.
Now, this dip emerges from the oven with a creamy, velvety texture that clings to crackers or veggie sticks, while the artichokes and spinach offer a tender bite amidst the rich, cheesy base. For a creative twist, try scooping it warm into hollowed-out bread bowls or drizzling it with a bit of olive oil and extra Parmesan before digging in.
Sweet and sour canned beets
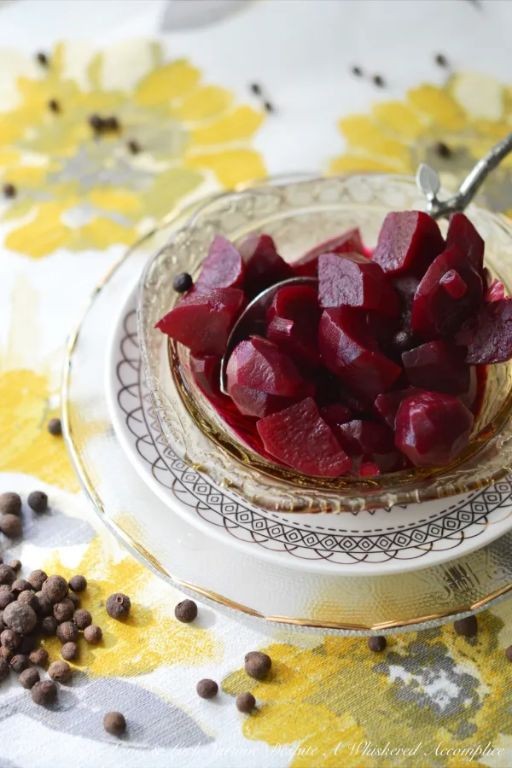
Zigzagging through my pantry this afternoon, I found a forgotten jar of beets, their ruby hue catching the December light. Sometimes the simplest ingredients hold the most comfort, waiting patiently for a little transformation. Let’s turn these canned beets into something gently sweet and tangy, a quiet kitchen project for a reflective day.
Serving: 4 | Pre Time: 5 minutes | Cooking Time: 15 minutes
Ingredients
– One 15-ounce can of whole beets, drained but with a splash of that liquid saved
– A quarter cup of apple cider vinegar
– Two tablespoons of brown sugar, packed softly
– One tablespoon of unsalted butter
– A pinch of salt, just to whisper
– A couple of whole cloves, if you have them tucked away
Instructions
1. Drain the can of beets over a small bowl, reserving about two tablespoons of the beet liquid.
2. In a medium saucepan, melt the tablespoon of unsalted butter over medium-low heat.
3. Add the drained beets to the saucepan and cook them for 3 minutes, stirring gently to coat them in the butter.
4. Pour in the quarter cup of apple cider vinegar and the reserved beet liquid, then sprinkle in the two tablespoons of brown sugar and the pinch of salt.
5. If using, drop in the couple of whole cloves for a warm, spiced note.
6. Increase the heat to medium and bring the mixture to a simmer, which should take about 2 minutes.
7. Reduce the heat to low and let it simmer uncovered for 10 minutes, stirring occasionally, until the liquid reduces to a glossy syrup that coats the back of a spoon.
8. Remove the saucepan from the heat and discard the whole cloves if you added them.
9. Let the beets cool in the pan for 5 minutes before serving to allow the flavors to settle.
My favorite part is the glossy sheen they take on, tender yet holding their shape with a gentle bite. The flavor balances that earthy beet sweetness with a bright vinegar tang, perfect spooned warm over a bed of greens or alongside a simple roast. Maybe even try them chilled tomorrow, their vibrancy deepening overnight in the fridge.
Herbed canned green beans with almonds
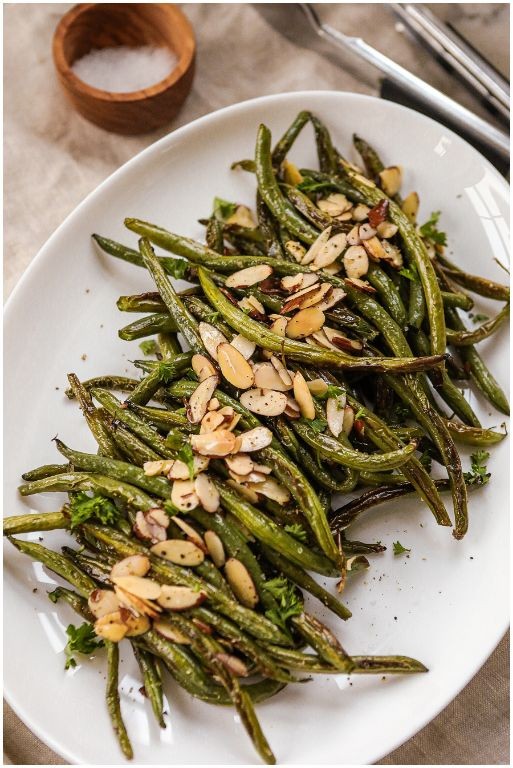
Often, the simplest meals are the ones that feel most like home, especially on a quiet afternoon when you want something comforting without much fuss. Opening a can of green beans might seem humble, but with a few thoughtful additions, they transform into a warm, herby side dish that’s perfect for sharing or savoring alone.
Serving: 4 | Pre Time: 5 minutes | Cooking Time: 10 minutes
Ingredients
– Two 14.5-ounce cans of green beans, drained but with a splash of that liquid saved
– A couple of tablespoons of olive oil
– A small handful of sliced almonds, about 1/4 cup
– A few sprigs of fresh thyme, leaves stripped (or a teaspoon of dried if that’s what you have)
– A pinch of salt and a few cracks of black pepper
Instructions
1. Heat the olive oil in a large skillet over medium heat for about 1 minute, until it shimmers lightly.
2. Add the sliced almonds to the skillet and toast them for 2-3 minutes, stirring frequently, until they turn golden brown and fragrant—watch closely to avoid burning.
3. Tip in the drained green beans and the saved splash of can liquid, stirring to coat everything in the oil.
4. Sprinkle the thyme leaves, salt, and pepper over the beans, then reduce the heat to medium-low.
5. Let the mixture simmer gently for 5-7 minutes, stirring occasionally, until the beans are heated through and the liquid has mostly evaporated, leaving them glossy.
6. Taste and adjust the seasoning with another pinch of salt if needed, remembering that canned beans can vary in saltiness.
7. Remove the skillet from the heat and let it sit for a minute to allow the flavors to meld before serving.
Mellow and tender, the beans soak up the herbal notes from the thyme, while the almonds add a delightful crunch that contrasts beautifully. Serve it warm alongside roasted chicken or spoon it over a bed of fluffy rice for a simple, satisfying meal that feels both nostalgic and fresh.
Canned vegetable pot pie

Musing on the quiet comfort of a winter afternoon, I find myself reaching for the simplest of pantry staples—a humble collection of canned vegetables that, with a bit of warmth and care, transforms into a cozy, nostalgic pot pie. It’s the kind of meal that feels like a gentle hug, perfect for those days when you crave something hearty without the fuss.
Serving: 6 | Pre Time: 15 minutes | Cooking Time: 35 minutes
Ingredients
– a couple of cans of mixed vegetables (like peas, carrots, and corn), drained
– a can of cream of mushroom soup
– about a cup of vegetable broth
– a splash of milk
– a tablespoon of butter
– a pinch of salt and pepper
– a store-bought pie crust, thawed if frozen
Instructions
1. Preheat your oven to 375°F.
2. In a medium saucepan over medium heat, melt the tablespoon of butter until it’s just bubbly.
3. Add the drained canned vegetables to the saucepan and stir them gently for about 3 minutes, just until they’re warmed through—this helps release their flavors. Tip: Don’t overcook them here, as they’ll soften more in the oven.
4. Pour in the can of cream of mushroom soup, the cup of vegetable broth, and the splash of milk, stirring everything together until it’s smooth and well-combined.
5. Let the mixture simmer on low heat for 5 minutes, stirring occasionally, until it thickens slightly and bubbles at the edges. Tip: If it seems too thick, add a bit more broth; too thin, let it simmer a minute longer.
6. Season with a pinch of salt and pepper, then remove the saucepan from the heat.
7. Transfer the vegetable mixture into a 9-inch pie dish, spreading it out evenly.
8. Carefully place the store-bought pie crust over the top, trimming any excess dough from the edges and crimping them with your fingers to seal. Tip: Cut a few small slits in the center of the crust to let steam escape during baking.
9. Bake in the preheated oven for 25-30 minutes, or until the crust is golden brown and the filling is bubbling visibly through the slits.
10. Let the pot pie cool for 10 minutes before serving to allow the filling to set.
Lingering over each bite, you’ll notice the flaky crust giving way to a creamy, savory filling where the vegetables retain a subtle bite. Serve it with a side of crisp salad or enjoy it straight from the dish, letting the warmth seep into your bones on a chilly evening.
Tangy canned three-bean salad
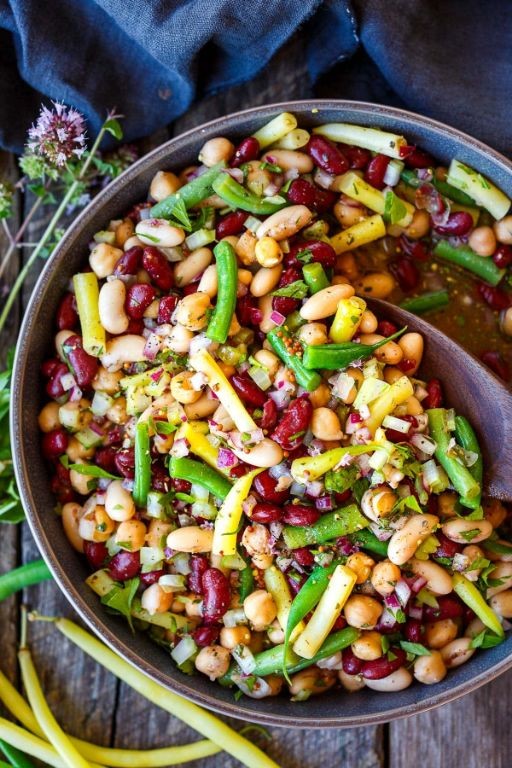
Remembering the quiet hum of my grandmother’s kitchen, where time seemed to slow and simple ingredients transformed into something greater than their parts, I find myself reaching for those same pantry staples today. This salad is a gentle reminder that nourishment often comes from the most humble beginnings, a quiet celebration of what we already have on hand.
Serving: 6 | Pre Time: 15 minutes | Cooking Time: 0 minutes
Ingredients
– A 15-ounce can of chickpeas, drained and rinsed
– A 15-ounce can of kidney beans, drained and rinsed
– A 15-ounce can of green beans, drained
– Half a red onion, sliced as thin as you can manage
– A couple of stalks of celery, chopped small
– A quarter cup of good olive oil
– A third cup of apple cider vinegar
– Two tablespoons of granulated sugar
– A teaspoon of salt
– A good crack of black pepper
Instructions
1. In a large mixing bowl, combine the drained and rinsed chickpeas, kidney beans, and green beans.
2. Add the thinly sliced red onion and the chopped celery to the bowl with the beans.
3. In a separate small bowl or a measuring cup, whisk together the olive oil and apple cider vinegar until they look slightly creamy and combined.
4. Whisk the granulated sugar and the teaspoon of salt directly into the oil and vinegar mixture until the sugar granules are completely dissolved—this is key to avoiding a gritty texture.
5. Pour the dressing over the bean and vegetable mixture in the large bowl.
6. Using a large spoon or spatula, gently toss everything together until every bean and vegetable piece is lightly coated with the dressing.
7. Season the entire salad with a generous amount of freshly cracked black pepper and give it one more gentle toss to distribute the pepper.
8. Cover the bowl tightly with plastic wrap or transfer the salad to an airtight container and place it in the refrigerator for at least 4 hours, though letting it sit overnight allows the flavors to marry and deepen beautifully.
9. Just before serving, give the salad one final gentle stir from the bottom up to redistribute any dressing that may have settled.
For the best texture, let the salad come to room temperature for about 20 minutes before serving—the beans will be more tender and the flavors more pronounced. This salad holds up wonderfully, its tangy bite mellowing into a sweet-and-sour harmony the longer it sits, making it perfect for preparing ahead. Try serving it over a bed of crisp romaine lettuce for a heartier meal, or spoon it alongside grilled chicken for a simple, satisfying supper.
Creamed canned corn with bacon

Beneath the quiet hum of the kitchen light, there’s a simple comfort waiting to be stirred together, a humble blend of pantry staples that feels like a warm, savory hug on a chilly evening. It’s the kind of unpretentious dish that asks for little but gives back so much in creamy, smoky satisfaction.
Serving: 4 | Pre Time: 5 minutes | Cooking Time: 15 minutes
Ingredients
– A couple of slices of thick-cut bacon
– A small yellow onion, about the size of a baseball
– Two 15-ounce cans of sweet corn, the kind that’s already creamy-style
– A splash of heavy cream, maybe a quarter cup
– A couple of tablespoons of butter
– A pinch of salt and a few cracks of black pepper
Instructions
1. Place a large skillet or Dutch oven over medium heat and let it warm for about 1 minute.
2. Add the slices of thick-cut bacon to the dry skillet. Cook for 5-7 minutes, flipping occasionally, until the bacon is crispy and has rendered its fat. Tip: Don’t rush this step—letting the bacon cook slowly will give you more flavorful fat to cook with.
3. Transfer the cooked bacon to a paper towel-lined plate to drain, leaving about 1 tablespoon of the bacon fat in the skillet.
4. While the bacon cooks, finely dice the small yellow onion.
5. Add the diced onion to the skillet with the bacon fat. Cook over medium heat, stirring occasionally, for 4-5 minutes until the onion turns translucent and softens.
6. Pour in the two cans of creamed corn, liquid included, and stir to combine with the onions.
7. Let the mixture simmer gently over medium-low heat for 5 minutes, stirring every minute or so to prevent sticking. Tip: A gentle simmer helps the flavors meld without scorching the bottom.
8. Crumble the cooked bacon into small pieces.
9. Stir the crumbled bacon, a splash of heavy cream, and a couple of tablespoons of butter into the corn mixture.
10. Continue cooking over low heat for 2-3 minutes, stirring constantly, until everything is heated through and the butter is fully melted. Tip: Constant stirring here ensures a smooth, creamy texture without separation.
11. Season with a pinch of salt and a few cracks of black pepper, then remove from heat.
Rich and velvety, the corn carries a subtle sweetness that’s beautifully cut by the salty, smoky bacon, creating a comforting side that’s perfect spooned over mashed potatoes or served alongside a simple roasted chicken. Its creamy texture makes it feel indulgent, yet it comes together with such ease that it might just become your go-back-to weeknight favorite.
Canned vegetable fried rice

Gently opening the pantry door, I find myself staring at those familiar cans—corn, peas, carrots—and realize how a humble collection of preserved vegetables can transform into something warm and comforting on a quiet afternoon like this. It’s a simple, forgiving dish that turns pantry staples into a satisfying meal, perfect for when you’re cooking just for yourself and want something easy yet nourishing.
Serving: 4 | Pre Time: 10 minutes | Cooking Time: 15 minutes
Ingredients
– 2 cups of cooked white rice, preferably day-old and chilled
– A 15-ounce can of mixed vegetables (like corn, peas, and carrots), drained well
– 2 large eggs, lightly beaten
– 3 tablespoons of vegetable oil
– 2 cloves of garlic, minced
– A small onion, finely chopped
– 3 tablespoons of soy sauce
– A splash of sesame oil
– A couple of green onions, sliced for garnish
– Salt and black pepper, just a pinch each
Instructions
1. Heat 1 tablespoon of vegetable oil in a large skillet or wok over medium-high heat until it shimmers, about 1 minute.
2. Add the beaten eggs to the skillet and scramble them quickly until just set, about 30 seconds, then transfer to a plate and set aside—this keeps them from overcooking.
3. In the same skillet, add the remaining 2 tablespoons of vegetable oil and heat it for another 30 seconds until hot.
4. Add the chopped onion and minced garlic, stirring constantly until fragrant and the onion turns translucent, about 2 minutes.
5. Tip in the drained canned vegetables and cook, stirring occasionally, until they’re heated through and any excess moisture evaporates, about 3 minutes.
6. Add the chilled rice to the skillet, breaking up any clumps with a spatula, and stir-fry for 2 minutes to warm it evenly.
7. Pour in the soy sauce and a splash of sesame oil, mixing thoroughly to coat the rice and vegetables, and cook for another 2 minutes.
8. Return the scrambled eggs to the skillet, along with a pinch of salt and black pepper, and gently fold everything together until well combined, about 1 minute.
9. Remove the skillet from the heat and sprinkle with sliced green onions for a fresh finish.
10. Serve immediately while hot. Each bite offers a soft, slightly chewy texture from the rice, balanced by the tender crunch of the vegetables and a savory umami depth from the soy sauce. Enjoy it straight from the skillet or pair it with a simple side of steamed greens for a complete, cozy meal.
Mediterranean canned chickpea salad

Kindly, as the afternoon light slants through the kitchen window, I find myself reaching for the simple, honest things—a can of chickpeas, a lemon, a handful of herbs—to compose something quietly nourishing. It’s a gentle assembly, a Mediterranean-inspired salad that feels less like cooking and more like gathering little treasures from the pantry and garden. There’s a quiet satisfaction in transforming these humble staples into a bright, textured meal that waits patiently in the fridge, ready whenever you are.
Serving: 4 | Pre Time: 15 minutes | Cooking Time: 0 minutes
Ingredients
– Two 15-ounce cans of chickpeas, rinsed and drained well
– A generous half-cup of pitted Kalamata olives, roughly chopped
– One medium English cucumber, diced into little half-inch pieces
– A whole pint of grape tomatoes, each one halved
– A small red onion, finely diced (about a quarter-cup’s worth)
– A big handful of fresh parsley, roughly chopped (that’s about a half-cup, packed)
– A couple of tablespoons of extra-virgin olive oil
– The juice from one whole lemon (aim for about three tablespoons)
– A couple of cloves of garlic, minced until they’re almost a paste
– A good pinch of kosher salt and a few cracks of black pepper
Instructions
1. Place the well-rinsed and drained chickpeas into a large mixing bowl. Gently pat them dry with a paper towel—this little tip helps the dressing cling better instead of sliding off.
2. Add the chopped Kalamata olives, diced cucumber, halved grape tomatoes, finely diced red onion, and roughly chopped fresh parsley to the bowl with the chickpeas.
3. In a small separate bowl or jar, whisk together the three tablespoons of lemon juice and two tablespoons of extra-virgin olive oil until they look lightly blended.
4. Stir the two cloves of minced garlic into the lemon and oil mixture. For the most flavorful result, let this dressing sit for about 5 minutes so the garlic can mellow and infuse the oil.
5. Pour the dressing over the chickpea and vegetable mixture in the large bowl.
6. Add a good pinch of kosher salt (start with about half a teaspoon) and a few cracks of fresh black pepper directly over the salad.
7. Using a large spoon or spatula, gently toss everything together until every chickpea and vegetable piece is evenly coated with the dressing. Be careful not to mash the chickpeas.
8. For the best flavor, cover the bowl and let the salad rest in the refrigerator for at least 30 minutes. This resting time is a key tip—it allows the flavors to marry and the vegetables to soften just slightly.
9. Before serving, give the salad one final gentle stir. Taste it and add another tiny pinch of salt only if you feel it needs it, remembering the olives already bring some saltiness.
Dappled with the deep purple of olives and the green of parsley, the salad is a mosaic of textures—the creamy give of a chickpea, the crisp pop of cucumber, the juicy burst of tomato. The garlic and lemon weave through it all, bright and clear. I love it scooped onto a thick slice of toasted sourdough or tucked into a pita with a dollop of cool tzatziki for a fuller lunch.
Cheesy canned broccoli rice bake

Remembering those quiet winter evenings when a simple, comforting dish felt like a warm hug, I found myself reaching for pantry staples to create something cozy. This cheesy broccoli rice bake is that kind of meal—unassuming, deeply satisfying, and perfect for when you need a little culinary comfort without any fuss.
Serving: 6 | Pre Time: 15 minutes | Cooking Time: 45 minutes
Ingredients
– A couple of cans of cream of mushroom soup
– A 15-ounce can of broccoli cheddar soup
– A cup and a half of long-grain white rice, uncooked
– A splash of whole milk, about a quarter cup
– A 12-ounce bag of frozen broccoli florets
– Two cups of shredded sharp cheddar cheese
– A teaspoon of garlic powder
– Half a teaspoon of onion powder
– A pinch of salt and a few cracks of black pepper
Instructions
1. Preheat your oven to 375°F and lightly grease a 9×13-inch baking dish with butter or cooking spray.
2. In a large mixing bowl, combine both cans of cream of mushroom soup and the can of broccoli cheddar soup.
3. Stir in the splash of whole milk until the mixture is smooth and creamy.
4. Add the uncooked white rice, frozen broccoli florets, garlic powder, onion powder, salt, and pepper to the bowl.
5. Mix everything together gently until the rice and broccoli are evenly coated with the soup mixture.
6. Pour the combined mixture into your prepared baking dish, spreading it out into an even layer.
7. Cover the dish tightly with aluminum foil and bake at 375°F for 30 minutes.
8. After 30 minutes, carefully remove the foil—the rice should be tender and most of the liquid absorbed.
9. Evenly sprinkle the shredded cheddar cheese over the top of the bake.
10. Return the dish to the oven, uncovered, and bake for an additional 15 minutes, or until the cheese is fully melted and bubbly with golden edges.
11. Remove the bake from the oven and let it rest for 5-10 minutes before serving to allow it to set slightly.
Perhaps the best part is how the creamy, cheesy sauce clings to each grain of rice, while the broccoli stays tender with just a bit of bite. Serve it straight from the dish with a simple green salad, or spoon it into bowls for a cozy, self-contained meal that feels both nostalgic and effortlessly modern.
Spicy canned diced tomatoes salsa
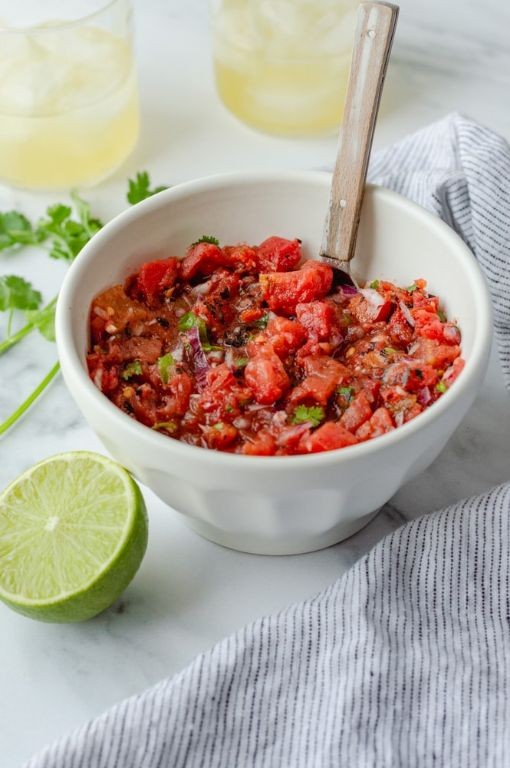
Gently, I find myself reaching for the familiar comfort of pantry staples on this quiet afternoon, when the world outside feels both festive and still. There’s something deeply satisfying about transforming humble canned tomatoes into a vibrant salsa that carries both warmth and spice, a small kitchen ritual that connects me to simple, honest flavors. It’s the kind of effortless recipe that feels like a quiet gift to yourself, ready to brighten a meal or share with loved ones.
Serving: 4 | Pre Time: 10 minutes | Cooking Time: 15 minutes
Ingredients
– A 14.5-ounce can of diced tomatoes, with their juices
– A couple of cloves of garlic, minced
– Half of a small white onion, finely chopped
– A jalapeño pepper, seeds removed and finely diced
– A big handful of fresh cilantro, roughly chopped
– A generous squeeze of lime juice from about half a lime
– A splash of olive oil
– A pinch of salt
Instructions
1. Heat a splash of olive oil in a medium skillet over medium heat until it shimmers lightly.
2. Add the finely chopped onion and cook, stirring occasionally, for about 4-5 minutes until it turns soft and translucent.
3. Stir in the minced garlic and diced jalapeño, cooking for another 2 minutes until fragrant—be careful not to let the garlic brown, as it can turn bitter.
4. Pour in the entire can of diced tomatoes with their juices, bringing the mixture to a gentle simmer.
5. Reduce the heat to low and let it cook uncovered for 8-10 minutes, stirring now and then, until the liquid reduces slightly and the flavors meld together.
6. Remove the skillet from the heat and let the salsa cool for 5 minutes to allow it to thicken a bit more as it sits.
7. Transfer the slightly cooled mixture to a bowl and stir in the roughly chopped cilantro and the squeeze of lime juice.
8. Season with a pinch of salt, mixing well to combine everything evenly.
Bright and chunky, this salsa holds a lovely balance between the tangy tomatoes and the gentle heat from the jalapeño, with the cilantro adding a fresh, herbal note. I love it spooned over grilled chicken or as a bold topping for scrambled eggs, where its texture—soft yet distinct—really shines through.
Simple canned vegetable soup

Under the soft glow of the kitchen light, with the quiet hum of the refrigerator in the background, there’s a humble comfort in turning a few pantry staples into a warm, nourishing bowl. It’s the kind of simple, forgiving recipe that feels like a gentle exhale at the end of a long day.
Serving: 4 | Pre Time: 10 minutes | Cooking Time: 25 minutes
Ingredients
– A couple of tablespoons of olive oil
– One medium yellow onion, finely chopped
– Two cloves of garlic, minced
– A 14.5-ounce can of diced tomatoes, with their juices
– A 15-ounce can of corn, drained
– A 15-ounce can of green beans, drained
– Four cups of vegetable broth
– A generous pinch of dried thyme
– A splash of soy sauce or Worcestershire sauce
– Salt and freshly ground black pepper
Instructions
1. Place a large pot or Dutch oven over medium heat and add the olive oil.
2. Once the oil shimmers, add the chopped onion and cook for about 5 minutes, stirring occasionally, until it becomes soft and translucent.
3. Add the minced garlic and cook for 1 more minute, just until fragrant—be careful not to let it burn.
4. Pour in the entire can of diced tomatoes with their juices, and use a wooden spoon to scrape up any browned bits from the bottom of the pot for extra flavor.
5. Add the drained corn and green beans, stirring to combine everything.
6. Pour in the vegetable broth and add the dried thyme and a splash of soy sauce.
7. Increase the heat to bring the soup to a gentle boil, then immediately reduce it to a simmer.
8. Let the soup simmer uncovered for 15 minutes, which allows the flavors to meld together beautifully.
9. After 15 minutes, taste the soup and season with salt and freshly ground black pepper as needed.
10. Ladle the hot soup into bowls and serve immediately.
Warm and brothy, this soup has a lovely balance of sweet corn, tender beans, and the bright acidity of tomatoes. For a creative twist, try topping it with a handful of buttery croutons or a dollop of pesto stirred in at the very end.
Summary
Ready to transform those pantry staples into something special? These 18 easy canned vegetable recipes prove that convenience and deliciousness can go hand-in-hand. We hope you find a new favorite! Give one a try this week, then drop a comment below to tell us which you loved. If you enjoyed this roundup, please share it on Pinterest to help other home cooks.