
Oh, cauliflower—you versatile veggie! Whether you’re craving quick weeknight dinners, cozy comfort food, or impressive seasonal dishes, this humble ingredient can do it all. We’ve rounded up 17 flavorful recipes that’ll make you see cauliflower in a whole new light. Ready to transform this kitchen staple? Let’s dive in and discover your next favorite meal!
Garlic Parmesan Roasted Cauliflower

Zesty yet comforting, this Garlic Parmesan Roasted Cauliflower transforms a simple vegetable into a crave-worthy side dish or snack. Perfect for busy weeknights or casual gatherings, it requires minimal hands-on time and delivers maximum flavor with crispy edges and a tender interior. Let’s walk through each step to ensure your results are golden and delicious every time.
Serving: 4 | Pre Time: 10 minutes | Cooking Time: 25 minutes
Ingredients
– 1 large head cauliflower
– 3 tablespoons olive oil
– 4 cloves garlic, minced
– 1/2 cup grated Parmesan cheese
– 1/2 teaspoon salt
– 1/4 teaspoon black pepper
– 1/4 teaspoon paprika
Instructions
1. Preheat your oven to 425°F and line a large baking sheet with parchment paper.
2. Cut the cauliflower into 1-inch florets, ensuring they are roughly uniform in size for even cooking.
3. In a large bowl, combine the olive oil, minced garlic, salt, black pepper, and paprika, whisking until fully blended.
4. Add the cauliflower florets to the bowl and toss thoroughly until each piece is evenly coated with the oil mixture.
5. Spread the cauliflower in a single layer on the prepared baking sheet, avoiding overcrowding to promote crispiness.
6. Roast in the preheated oven for 15 minutes, then remove the sheet and carefully flip each floret with a spatula.
7. Sprinkle the grated Parmesan cheese evenly over the cauliflower, covering all surfaces.
8. Return the baking sheet to the oven and roast for an additional 10 minutes, or until the cheese is melted and the edges are golden brown.
9. Remove from the oven and let cool for 2-3 minutes before serving to allow the flavors to settle.
Delightfully crispy on the outside with a soft, savory center, this cauliflower boasts a rich garlic and Parmesan flavor that pairs wonderfully with grilled meats or as a standalone appetizer. For a creative twist, try drizzling it with a bit of balsamic glaze or serving it over a bed of greens for a hearty salad.
Cauliflower Rice Stir-Fry with Vegetables
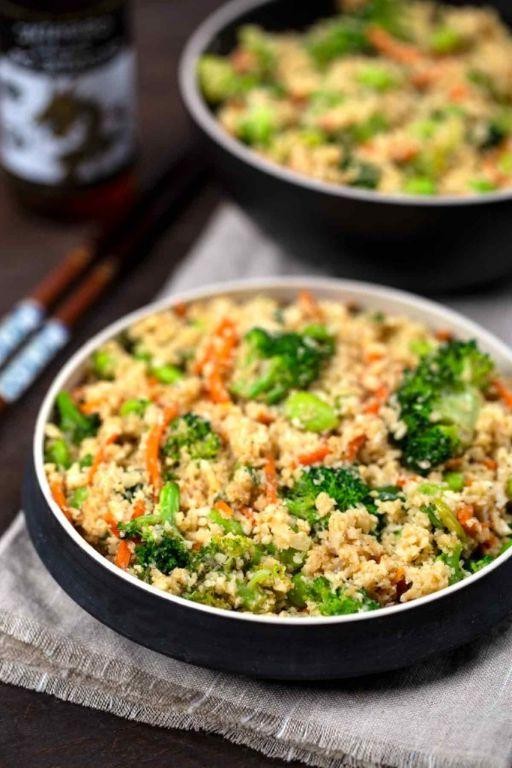
Perfect for a quick, healthy weeknight dinner, this Cauliflower Rice Stir-Fry with Vegetables transforms a simple head of cauliflower into a satisfying, low-carb meal. Let’s walk through the process together, step-by-step.
Serving: 4 | Pre Time: 15 minutes | Cooking Time: 15 minutes
Ingredients
- 1 large head cauliflower (about 6 cups riced)
- 2 tbsp olive oil, divided
- 1 medium yellow onion, diced
- 3 cloves garlic, minced
- 1 red bell pepper, thinly sliced
- 2 medium carrots, julienned
- 1 cup broccoli florets
- 3 tbsp low-sodium soy sauce
- 1 tbsp rice vinegar
- 1 tsp sesame oil
- 2 large eggs, beaten
- 2 green onions, thinly sliced
Instructions
- Cut the cauliflower into florets and pulse in a food processor until it resembles rice grains, about 10-15 pulses. Set aside 6 cups of riced cauliflower.
- Heat 1 tablespoon of olive oil in a large skillet or wok over medium-high heat until shimmering, about 1 minute.
- Add the diced yellow onion to the hot oil and cook, stirring frequently, until translucent and soft, about 3-4 minutes.
- Add the minced garlic and cook, stirring constantly, until fragrant, about 30 seconds. Tip: Adding garlic after the onion prevents it from burning.
- Add the sliced red bell pepper, julienned carrots, and broccoli florets to the skillet.
- Cook the vegetables, stirring often, until they are crisp-tender and bright in color, about 5-6 minutes.
- Push the cooked vegetables to one side of the skillet.
- Pour the remaining 1 tablespoon of olive oil into the empty side of the skillet.
- Add the 6 cups of riced cauliflower to the oil and cook, without stirring, for 2 minutes to lightly brown.
- Stir the cauliflower into the vegetables and cook, stirring occasionally, for 4-5 minutes until the cauliflower is tender but not mushy. Tip: Avoid overcrowding the pan to ensure the cauliflower rice gets slightly crispy edges.
- In a small bowl, whisk together the low-sodium soy sauce, rice vinegar, and sesame oil.
- Pour the sauce mixture over the cauliflower and vegetables in the skillet.
- Stir everything together until evenly coated and cook for 1 more minute.
- Push the stir-fry mixture to the sides of the skillet, creating a well in the center.
- Pour the beaten eggs into the center well.
- Let the eggs sit for 30 seconds, then scramble them with a spatula until fully cooked, about 1-2 minutes.
- Stir the scrambled eggs into the rest of the stir-fry until evenly distributed.
- Remove the skillet from the heat.
- Garnish the finished stir-fry with the thinly sliced green onions. Tip: Adding green onions at the end preserves their fresh, sharp flavor.
Vibrant and satisfying, this stir-fry offers a delightful contrast of textures, from the tender-crisp vegetables to the fluffy, grain-like cauliflower rice. The savory soy sauce and hint of sesame create a deeply flavorful base that pairs wonderfully with the fresh pop of green onion. For a creative twist, serve it in lettuce cups or top it with a sprinkle of toasted sesame seeds for extra crunch.
Cheesy Cauliflower Casserole

Holiday gatherings or cozy weeknights call for a comforting dish that’s both satisfying and surprisingly simple to prepare. This cheesy cauliflower casserole transforms humble ingredients into a creamy, golden-brown bake that’s sure to become a family favorite. Let’s walk through each step together to ensure perfect results every time.
Serving: 6 | Pre Time: 20 minutes | Cooking Time: 40 minutes
Ingredients
– 1 large head cauliflower, cut into 1-inch florets
– 2 tablespoons unsalted butter
– 1 small yellow onion, finely diced
– 2 cloves garlic, minced
– 3 tablespoons all-purpose flour
– 2 cups whole milk
– 1 cup shredded sharp cheddar cheese
– 1/2 cup grated Parmesan cheese
– 1/2 cup panko breadcrumbs
– 1 teaspoon kosher salt
– 1/2 teaspoon black pepper
– 1/4 teaspoon ground nutmeg
Instructions
1. Preheat your oven to 375°F and lightly grease a 9×13-inch baking dish.
2. Bring a large pot of salted water to a boil over high heat.
3. Add the cauliflower florets to the boiling water and cook for 5 minutes until just tender when pierced with a fork.
4. Drain the cauliflower thoroughly in a colander and set aside to cool slightly.
5. Melt the butter in a large saucepan over medium heat.
6. Add the diced onion and cook for 4-5 minutes, stirring occasionally, until translucent and soft.
7. Stir in the minced garlic and cook for 30 seconds until fragrant.
8. Sprinkle the flour over the onion mixture and cook, stirring constantly, for 1 minute to form a roux.
9. Gradually whisk in the milk, ensuring no lumps remain, and bring to a simmer.
10. Cook the sauce for 3-4 minutes, whisking frequently, until thickened enough to coat the back of a spoon.
11. Remove the saucepan from heat and stir in the cheddar cheese, Parmesan cheese, salt, pepper, and nutmeg until the cheeses are fully melted and the sauce is smooth.
12. Gently fold the drained cauliflower into the cheese sauce until evenly coated.
13. Transfer the mixture to the prepared baking dish and spread into an even layer.
14. Sprinkle the panko breadcrumbs evenly over the top of the casserole.
15. Bake at 375°F for 25-30 minutes until the top is golden brown and the edges are bubbling.
16. Let the casserole rest for 10 minutes before serving to allow it to set properly.
Kick back and enjoy this casserole fresh from the oven, where the cauliflower becomes tender without turning mushy, enveloped in a rich, velvety cheese sauce with a hint of nutmeg. The crispy panko topping adds a delightful crunch that contrasts beautifully with the creamy interior. For a fun twist, try serving individual portions in ramekins or topping it with crispy fried onions for extra texture.
Roasted Cauliflower and Chickpea Salad
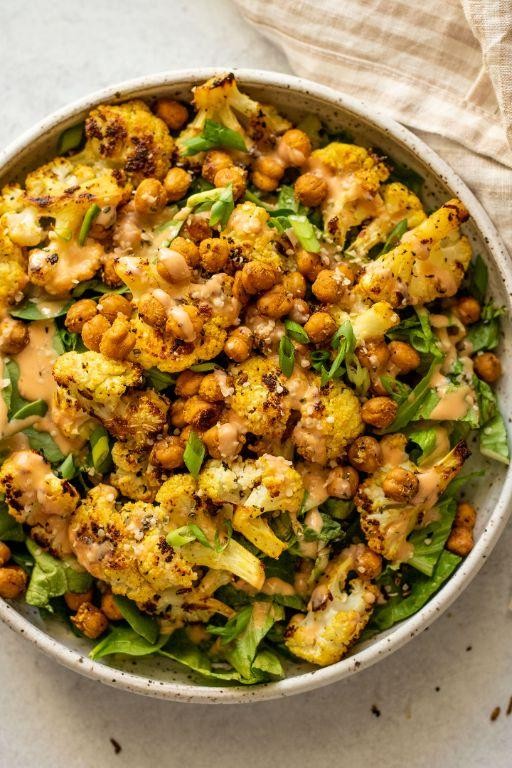
Now, let’s create a vibrant, hearty salad that’s perfect for meal prep or a quick weeknight dinner. This roasted cauliflower and chickpea salad combines warm, caramelized vegetables with fresh herbs and a zesty dressing for a satisfying dish that’s both nutritious and flavorful.
Serving: 4 | Pre Time: 15 minutes | Cooking Time: 25 minutes
Ingredients
– 1 head cauliflower, cut into 1-inch florets
– 1 (15-ounce) can chickpeas, drained and rinsed
– 3 tablespoons olive oil, divided
– 1 teaspoon salt
– 1/2 teaspoon black pepper
– 1/2 teaspoon garlic powder
– 1/4 cup lemon juice
– 2 tablespoons tahini
– 1 clove garlic, minced
– 4 cups mixed greens
– 1/4 cup chopped fresh parsley
Instructions
1. Preheat your oven to 425°F and line a baking sheet with parchment paper.
2. In a large bowl, toss the cauliflower florets and chickpeas with 2 tablespoons of olive oil, salt, black pepper, and garlic powder until evenly coated.
3. Spread the mixture in a single layer on the prepared baking sheet, ensuring the cauliflower pieces are not touching for even roasting.
4. Roast in the preheated oven for 20-25 minutes, flipping halfway through, until the cauliflower is tender and golden brown at the edges.
5. While the vegetables roast, whisk together the remaining 1 tablespoon of olive oil, lemon juice, tahini, and minced garlic in a small bowl until smooth.
6. In a serving bowl, arrange the mixed greens as the base layer.
7. Once the roasted cauliflower and chickpeas are done, remove them from the oven and let them cool for 5 minutes to prevent wilting the greens.
8. Top the mixed greens with the warm roasted cauliflower and chickpeas.
9. Drizzle the tahini dressing evenly over the salad.
10. Garnish with chopped fresh parsley for a burst of color and freshness.
This salad offers a delightful contrast of textures, with crispy roasted cauliflower and creamy chickpeas against the tender greens, all tied together by the rich, tangy dressing. Try serving it warm for a cozy meal or chilled for a refreshing lunch, and consider adding crumbled feta or toasted almonds for extra crunch and flavor.
Cauliflower Pizza Crust with Fresh Toppings

Kick off your healthy pizza night with this cauliflower crust that’s surprisingly simple to make and packed with fresh flavor. By following each step carefully, you’ll create a crisp, golden base ready for your favorite toppings. Let’s walk through the process together, ensuring success even if you’re new to gluten-free baking.
Serving: 4 | Pre Time: 20 minutes | Cooking Time: 25 minutes
Ingredients
– 1 large head cauliflower (about 4 cups riced)
– 1 large egg
– 1 cup shredded mozzarella cheese
– 1/4 cup grated Parmesan cheese
– 1 tsp dried oregano
– 1/2 tsp garlic powder
– 1/4 tsp salt
– 1 tbsp olive oil
– 1/2 cup pizza sauce
– 1/2 cup fresh basil leaves
– 1/2 cup cherry tomatoes (halved)
Instructions
1. Preheat your oven to 400°F and line a baking sheet with parchment paper.
2. Remove the cauliflower florets from the stem and pulse them in a food processor until they resemble rice-like grains.
3. Place the riced cauliflower in a microwave-safe bowl and microwave on high for 5 minutes to soften it, then let it cool for 5 minutes.
4. Transfer the cooled cauliflower to a clean kitchen towel and squeeze out as much moisture as possible—this tip is crucial for a crisp crust.
5. In a mixing bowl, combine the dried cauliflower, egg, 1/2 cup of the mozzarella cheese, Parmesan cheese, oregano, garlic powder, and salt until well blended.
6. Form the mixture into a ball and press it evenly onto the prepared baking sheet into a 10-inch round, about 1/4-inch thick.
7. Brush the top of the crust lightly with olive oil to promote browning.
8. Bake the crust at 400°F for 15 minutes, or until the edges turn golden brown and the center feels firm to the touch.
9. Remove the crust from the oven and spread pizza sauce evenly over it, leaving a small border around the edges.
10. Top with the remaining 1/2 cup of mozzarella cheese, cherry tomatoes, and fresh basil leaves.
11. Return the pizza to the oven and bake for an additional 10 minutes at 400°F, until the cheese is melted and bubbly.
12. Let the pizza cool on the baking sheet for 5 minutes before slicing to prevent the toppings from sliding off—this resting tip ensures neat servings.
Enjoy this cauliflower pizza crust with its satisfyingly crisp texture and light, herb-infused flavor that pairs perfectly with the fresh toppings. For a creative twist, try adding a drizzle of balsamic glaze or serving it alongside a simple green salad to round out the meal.
Curried Cauliflower Soup

Now that winter is fully upon us, nothing beats a warm, comforting bowl of soup to chase away the chill. This curried cauliflower soup is surprisingly simple to make, transforming humble ingredients into a velvety, flavor-packed meal that’s both nourishing and satisfying. Let’s walk through the process together, step-by-step, to ensure your success in the kitchen.
Serving: 4 | Pre Time: 15 minutes | Cooking Time: 30 minutes
Ingredients
– 1 large head cauliflower, cut into florets
– 1 medium yellow onion, diced
– 2 cloves garlic, minced
– 1 tbsp olive oil
– 1 tbsp curry powder
– 4 cups vegetable broth
– 1 cup coconut milk
– 1 tsp salt
– 1/2 tsp black pepper
– 2 tbsp fresh cilantro, chopped (for garnish)
Instructions
1. Heat 1 tbsp olive oil in a large pot over medium heat until it shimmers, about 1 minute.
2. Add 1 diced yellow onion to the pot and sauté, stirring frequently, until translucent and soft, about 5 minutes.
3. Stir in 2 minced garlic cloves and cook for 30 seconds until fragrant, being careful not to let it burn.
4. Add 1 tbsp curry powder to the pot and toast it with the onions and garlic for 1 minute to deepen its flavor.
5. Pour in 4 cups vegetable broth and 1 cup coconut milk, then increase the heat to bring the mixture to a gentle boil.
6. Add 1 large head of cauliflower florets to the boiling liquid, along with 1 tsp salt and 1/2 tsp black pepper.
7. Reduce the heat to low, cover the pot, and simmer the soup for 20 minutes until the cauliflower is fork-tender.
8. Carefully transfer the hot soup in batches to a blender, filling it only halfway to prevent spills, and blend on high until completely smooth and creamy.
9. Return the blended soup to the pot and warm it over low heat for 2 minutes, stirring occasionally.
10. Ladle the soup into bowls and garnish each serving with a sprinkle of 2 tbsp fresh chopped cilantro.
Silky and rich, this soup boasts a velvety texture that clings to the spoon, with the warm, aromatic curry perfectly balancing the mild sweetness of the cauliflower. For a creative twist, try topping it with a dollop of Greek yogurt or a handful of toasted pepitas for added crunch and contrast.
Cauliflower and Broccoli Gratin

Now that the holiday season is in full swing, many of us are looking for a comforting side dish that feels special but won’t overwhelm the cook. This Cauliflower and Broccoli Gratin fits the bill perfectly, offering a creamy, cheesy bake that’s both elegant and straightforward to prepare. Let’s walk through the process step-by-step to ensure your gratin turns out beautifully.
Serving: 6 | Pre Time: 20 minutes | Cooking Time: 35 minutes
Ingredients
– 1 large head cauliflower, cut into 1-inch florets
– 1 large head broccoli, cut into 1-inch florets
– 4 tablespoons unsalted butter
– 1/4 cup all-purpose flour
– 2 cups whole milk
– 1 cup heavy cream
– 1 teaspoon kosher salt
– 1/2 teaspoon black pepper
– 1/4 teaspoon ground nutmeg
– 2 cups shredded sharp cheddar cheese
– 1/2 cup grated Parmesan cheese
– 1/2 cup panko breadcrumbs
Instructions
1. Preheat your oven to 375°F (190°C) and grease a 9×13-inch baking dish.
2. Bring a large pot of salted water to a boil over high heat.
3. Add the cauliflower and broccoli florets to the boiling water and cook for 5 minutes until just tender but still firm.
4. Drain the vegetables in a colander and immediately rinse under cold water to stop the cooking process; this preserves their vibrant color and texture.
5. In a large saucepan over medium heat, melt the 4 tablespoons of unsalted butter.
6. Whisk in the 1/4 cup of all-purpose flour and cook for 2 minutes, stirring constantly, to form a smooth roux without letting it brown.
7. Gradually pour in the 2 cups of whole milk and 1 cup of heavy cream while whisking continuously to prevent lumps.
8. Cook the sauce for 5-7 minutes, whisking often, until it thickens enough to coat the back of a spoon.
9. Remove the saucepan from the heat and stir in the 1 teaspoon of kosher salt, 1/2 teaspoon of black pepper, and 1/4 teaspoon of ground nutmeg.
10. Add 1 1/2 cups of the shredded sharp cheddar cheese and the 1/2 cup of grated Parmesan cheese to the sauce, stirring until fully melted and smooth.
11. Arrange the blanched cauliflower and broccoli evenly in the prepared baking dish.
12. Pour the cheese sauce over the vegetables, ensuring they are completely covered.
13. In a small bowl, combine the remaining 1/2 cup of shredded sharp cheddar cheese with the 1/2 cup of panko breadcrumbs.
14. Sprinkle the breadcrumb mixture evenly over the top of the gratin for a golden, crispy crust.
15. Bake in the preheated oven for 25-30 minutes, until the top is bubbly and golden brown; for extra crispiness, broil for the final 2-3 minutes, watching closely to avoid burning.
16. Let the gratin rest for 10 minutes before serving to allow the sauce to set slightly, making it easier to slice.
Achieving a perfect gratin means the vegetables should be tender but not mushy, nestled in a rich, velvety sauce with a satisfying crunch from the topping. This dish pairs wonderfully with roasted meats or stands alone as a vegetarian main, and leftovers reheat beautifully for a quick meal the next day.
Cauliflower Tacos with Avocado Lime Sauce

Tired of the same old taco fillings? These cauliflower tacos offer a fresh, plant-based twist that’s both satisfying and simple to prepare. Let’s walk through each step together to create a flavorful meal that even beginners can master.
Serving: 4 | Pre Time: 15 minutes | Cooking Time: 25 minutes
Ingredients
– 1 head cauliflower, cut into bite-sized florets
– 2 tbsp olive oil
– 1 tsp chili powder
– 1/2 tsp cumin
– 1/2 tsp garlic powder
– 1/4 tsp salt
– 8 small corn tortillas
– 1 avocado, pitted and peeled
– 2 tbsp lime juice
– 1/4 cup plain Greek yogurt
– 1/4 cup fresh cilantro, chopped
– 1/2 cup red cabbage, shredded
– 1/4 cup red onion, thinly sliced
Instructions
1. Preheat your oven to 425°F and line a baking sheet with parchment paper.
2. In a large bowl, toss the cauliflower florets with olive oil, chili powder, cumin, garlic powder, and salt until evenly coated.
3. Spread the cauliflower in a single layer on the baking sheet, ensuring pieces aren’t touching for even roasting.
4. Roast for 20-25 minutes, flipping halfway through, until the edges are golden brown and crispy.
5. While the cauliflower roasts, warm the corn tortillas in a dry skillet over medium heat for 30 seconds per side, keeping them pliable by covering with a towel.
6. In a blender or food processor, combine avocado, lime juice, Greek yogurt, and cilantro, blending until smooth and creamy.
7. Assemble each taco by placing a spoonful of roasted cauliflower on a warmed tortilla.
8. Drizzle generously with the avocado lime sauce.
9. Top each taco with shredded red cabbage and sliced red onion for added crunch and color.
10. Serve immediately while the cauliflower is warm and crispy.
Perfectly roasted cauliflower provides a hearty, slightly charred texture that pairs beautifully with the cool, tangy sauce. For a fun twist, try adding pickled jalapeños or a sprinkle of cotija cheese to elevate the flavors even further.
Loaded Cauliflower Mash with Bacon and Chives

This comforting side dish transforms humble cauliflower into a creamy, savory mash loaded with crispy bacon and fresh chives. Think of it as a lighter, low-carb twist on classic mashed potatoes that’s just as satisfying. Today, we’ll walk through each step to ensure your mash is perfectly smooth and flavorful.
Serving: 4 | Pre Time: 15 minutes | Cooking Time: 25 minutes
Ingredients
– 1 large head cauliflower, cut into florets
– 4 slices bacon, chopped
– 1/2 cup heavy cream
– 1/4 cup unsalted butter
– 1/4 cup sour cream
– 1/4 cup grated Parmesan cheese
– 2 tablespoons chopped fresh chives
– 1/2 teaspoon salt
– 1/4 teaspoon black pepper
Instructions
1. Place the cauliflower florets in a large pot and cover with water.
2. Bring the water to a boil over high heat, then reduce to medium and simmer for 10–12 minutes until the cauliflower is fork-tender.
3. While the cauliflower cooks, heat a skillet over medium heat and add the chopped bacon.
4. Cook the bacon for 6–8 minutes, stirring occasionally, until crispy and browned, then transfer to a paper towel-lined plate to drain.
5. Drain the cooked cauliflower thoroughly in a colander to remove excess moisture, which helps prevent a watery mash.
6. Return the drained cauliflower to the pot and add the heavy cream, unsalted butter, sour cream, grated Parmesan cheese, salt, and black pepper.
7. Use a potato masher or immersion blender to mash the mixture until smooth and creamy, about 2–3 minutes.
8. Stir in half of the cooked bacon and half of the chopped fresh chives until evenly distributed.
9. Transfer the mash to a serving bowl and top with the remaining bacon and chives.
Gently scoop this mash onto plates for a side that’s rich with buttery creaminess and studded with smoky bacon bits. The fresh chives add a bright, oniony contrast that cuts through the richness, making it ideal alongside roasted meats or as a cozy standalone dish. For a fun twist, try serving it in individual ramekins topped with extra cheese and broiled until golden.
Cauliflower Steaks with Chimichurri

Diving into a hearty, plant-based meal doesn’t have to be complicated, and these cauliflower steaks are the perfect proof. They transform a simple vegetable into a satisfying main course, topped with a vibrant, herby chimichurri that brings everything to life. This methodical guide will walk you through each step to ensure perfect results every time.
Serving: 4 | Pre Time: 15 minutes | Cooking Time: 25 minutes
Ingredients
– 1 large head cauliflower
– 3 tablespoons olive oil
– 1 teaspoon kosher salt
– 1/2 teaspoon black pepper
– 1 cup fresh parsley leaves
– 1/4 cup fresh cilantro leaves
– 3 cloves garlic
– 2 tablespoons red wine vinegar
– 1/4 cup olive oil
– 1/4 teaspoon red pepper flakes
Instructions
1. Preheat your oven to 425°F and line a large baking sheet with parchment paper.
2. Remove the leaves and trim the stem from the cauliflower, keeping the core intact to hold the steaks together.
3. Place the cauliflower upright on a cutting board and slice it vertically into four 1-inch-thick steaks.
4. Arrange the cauliflower steaks in a single layer on the prepared baking sheet.
5. Brush both sides of each steak evenly with 3 tablespoons of olive oil.
6. Season both sides of the steaks evenly with 1 teaspoon of kosher salt and 1/2 teaspoon of black pepper.
7. Roast the steaks in the preheated oven for 20 minutes.
8. Carefully flip each steak using a spatula after 20 minutes of roasting.
9. Continue roasting the steaks for an additional 5 minutes, or until the edges are deeply golden brown and caramelized.
10. While the steaks roast, combine 1 cup of fresh parsley leaves, 1/4 cup of fresh cilantro leaves, and 3 cloves of garlic in a food processor.
11. Pulse the herb and garlic mixture until finely chopped, about 10 short pulses.
12. Transfer the chopped herb mixture to a small bowl.
13. Whisk 2 tablespoons of red wine vinegar and 1/4 cup of olive oil into the herb mixture until fully combined.
14. Stir 1/4 teaspoon of red pepper flakes into the chimichurri sauce.
15. Remove the roasted cauliflower steaks from the oven and transfer them to a serving platter.
16. Spoon the prepared chimichurri sauce generously over the warm cauliflower steaks.
Let these steaks rest for a few minutes before serving to allow the flavors to meld. The cauliflower becomes tender with a wonderfully meaty, caramelized crust, while the bright, tangy chimichurri cuts through the richness. For a creative twist, serve them over a bed of quinoa or alongside a simple white bean salad for a complete, satisfying meal.
Lemon Garlic Butter Cauliflower

Whether you’re looking for a simple side dish or a vegetarian main, this lemon garlic butter cauliflower delivers bright, savory flavors with minimal effort. We’ll walk through each step together, ensuring you get perfectly roasted florets every time.
Serving: 4 | Pre Time: 10 minutes | Cooking Time: 25 minutes
Ingredients
– 1 large head cauliflower
– 3 tablespoons unsalted butter
– 4 cloves garlic
– 2 tablespoons fresh lemon juice
– 1 teaspoon lemon zest
– 1/4 teaspoon salt
– 1/4 teaspoon black pepper
– 2 tablespoons chopped fresh parsley
Instructions
1. Preheat your oven to 425°F and line a large baking sheet with parchment paper.
2. Cut the cauliflower into 1-inch florets, ensuring they are roughly the same size for even cooking.
3. Place the florets in a large mixing bowl.
4. Mince the garlic cloves finely.
5. Melt the butter in a small saucepan over low heat, then remove it from the heat immediately to prevent browning.
6. Stir the minced garlic, lemon juice, lemon zest, salt, and black pepper into the melted butter until well combined.
7. Pour the butter mixture over the cauliflower florets in the bowl.
8. Toss the florets thoroughly with your hands or a spoon until they are evenly coated.
9. Spread the coated florets in a single layer on the prepared baking sheet, leaving space between them to allow for proper roasting.
10. Roast in the preheated oven for 20-25 minutes, flipping the florets halfway through with a spatula, until they are tender and golden brown at the edges.
11. Remove the baking sheet from the oven and transfer the roasted cauliflower to a serving dish.
12. Sprinkle the chopped fresh parsley over the top while the cauliflower is still hot.
Here, the roasted edges offer a delightful crispness that contrasts with the tender interior, all infused with the zesty lemon and rich garlic butter. Try serving it over creamy polenta or alongside grilled chicken for a complete meal that highlights its vibrant, savory notes.
Cauliflower and Cheese Stuffed Peppers
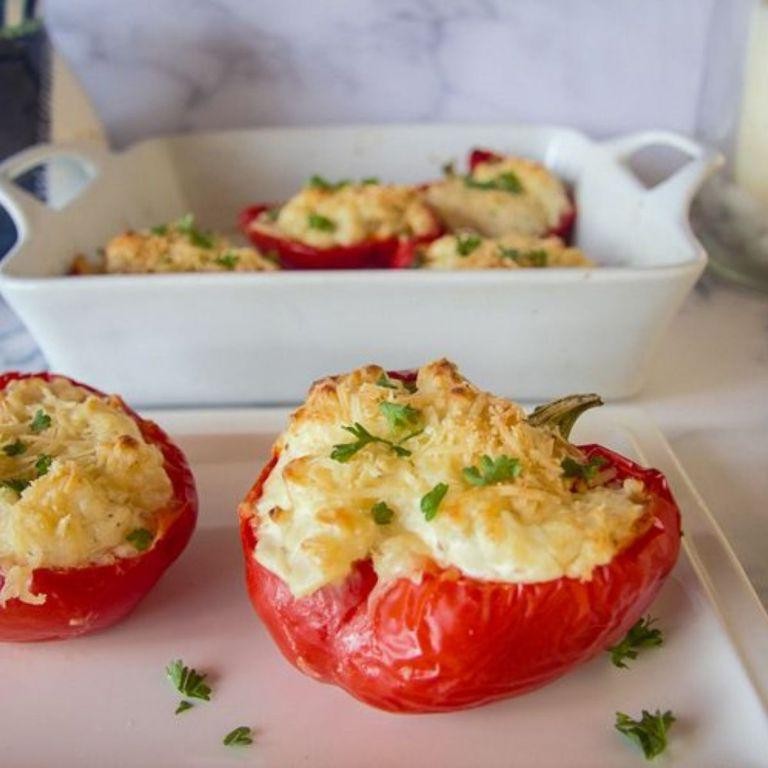
Zesty and wholesome, these cauliflower and cheese stuffed peppers are a perfect weeknight dinner that’s both comforting and nutritious. Let’s walk through each step together to ensure you end up with a delicious, golden-brown result. You’ll find the process straightforward, even if you’re new to cooking.
Serving: 4 | Pre Time: 15 minutes | Cooking Time: 30 minutes
Ingredients
– 4 large bell peppers
– 1 head cauliflower, cut into florets
– 1 cup shredded cheddar cheese
– 1/2 cup grated Parmesan cheese
– 1/4 cup olive oil
– 2 cloves garlic, minced
– 1 tsp salt
– 1/2 tsp black pepper
– 1/4 cup breadcrumbs
Instructions
1. Preheat your oven to 375°F (190°C).
2. Cut the tops off the bell peppers and remove the seeds and membranes.
3. Place the bell peppers upright in a baking dish.
4. Steam the cauliflower florets in a pot with 1 inch of water for 8-10 minutes until tender.
5. Drain the cauliflower thoroughly and transfer it to a large bowl.
6. Mash the cauliflower with a fork until it resembles rice.
7. Add the minced garlic, salt, and black pepper to the mashed cauliflower.
8. Stir in 3/4 cup of the shredded cheddar cheese and all of the grated Parmesan cheese.
9. Spoon the cauliflower and cheese mixture evenly into the bell peppers, packing it down lightly.
10. In a small bowl, mix the breadcrumbs with the remaining 1/4 cup shredded cheddar cheese.
11. Sprinkle the breadcrumb and cheese mixture over the top of each stuffed pepper.
12. Drizzle the olive oil evenly over the stuffed peppers.
13. Bake the stuffed peppers in the preheated oven for 25-30 minutes, until the peppers are tender and the tops are golden brown.
14. Remove the baking dish from the oven and let the stuffed peppers cool for 5 minutes before serving.
Softer than traditional rice-stuffed versions, these peppers offer a creamy interior with a satisfyingly crisp topping. Serve them alongside a fresh green salad or as a hearty standalone meal, and enjoy the rich, cheesy flavor that pairs perfectly with the sweet bell peppers.
Baked Cauliflower Tots

Finally, let’s tackle a healthier alternative to a classic favorite that’s perfect for holiday gatherings or weeknight dinners. These baked cauliflower tots transform humble cauliflower into crispy, flavorful bites that even picky eaters will love, and they come together with straightforward techniques that build kitchen confidence.
Serving: 4 | Pre Time: 20 minutes | Cooking Time: 25 minutes
Ingredients
– 1 head cauliflower, cut into florets
– 1 large egg
– 1/2 cup grated Parmesan cheese
– 1/4 cup breadcrumbs
– 1/2 tsp garlic powder
– 1/2 tsp onion powder
– 1/4 tsp salt
– 1/4 tsp black pepper
– 2 tbsp olive oil
Instructions
1. Preheat your oven to 400°F and line a baking sheet with parchment paper.
2. Steam the cauliflower florets in a steamer basket over boiling water for 8-10 minutes until fork-tender, then transfer them to a clean kitchen towel to cool slightly.
3. Once cool enough to handle, wrap the cauliflower in the towel and squeeze firmly over the sink to remove as much moisture as possible—this tip ensures crispier tots.
4. Place the dried cauliflower in a food processor and pulse 5-7 times until it resembles coarse rice, being careful not to over-process into a paste.
5. In a medium mixing bowl, combine the processed cauliflower, egg, Parmesan cheese, breadcrumbs, garlic powder, onion powder, salt, and black pepper.
6. Mix with a fork until all ingredients are evenly incorporated and the mixture holds together when pressed.
7. Scoop about 1 tablespoon of the mixture and shape it into a small cylinder or tot shape with your hands, repeating until all mixture is used—lightly wetting your hands prevents sticking.
8. Arrange the shaped tots on the prepared baking sheet, leaving about 1 inch between each for even cooking.
9. Brush the tops of the tots lightly with olive oil using a pastry brush, which helps achieve a golden-brown crust.
10. Bake in the preheated oven for 20-25 minutes, flipping halfway through, until the tots are crispy and golden brown on all sides.
Delightfully, these tots emerge from the oven with a satisfying crunch on the outside and a tender, savory interior infused with Parmesan and spices. Serve them warm with a side of marinara sauce or ranch dressing for dipping, or crumble them over salads for a nutritious twist—their versatility makes them a hit at any table.
Cauliflower Alfredo Pasta

Sometimes the simplest ingredients create the most comforting meals, and this Cauliflower Alfredo Pasta is a perfect example. Start by gathering your ingredients and prepping your workspace for a smooth cooking process.
Serving: 4 | Pre Time: 15 minutes | Cooking Time: 25 minutes
Ingredients
– 1 head cauliflower, cut into florets
– 12 ounces fettuccine pasta
– 2 tablespoons olive oil
– 3 cloves garlic, minced
– 1 cup vegetable broth
– 1/2 cup heavy cream
– 1/2 cup grated Parmesan cheese
– 1/4 teaspoon ground nutmeg
– Salt to taste
– Black pepper to taste
Instructions
1. Bring a large pot of salted water to a boil over high heat.
2. Add the cauliflower florets to the boiling water and cook for 8-10 minutes until fork-tender.
3. While the cauliflower cooks, heat olive oil in a large skillet over medium heat.
4. Add minced garlic to the skillet and sauté for 1-2 minutes until fragrant, being careful not to burn it.
5. Drain the cooked cauliflower and transfer it to a blender.
6. Add the sautéed garlic, vegetable broth, and heavy cream to the blender with the cauliflower.
7. Blend the mixture on high speed for 1-2 minutes until completely smooth and creamy.
8. Return the empty pot to the stove and fill it with fresh water, bringing it to a boil for the pasta.
9. Add fettuccine pasta to the boiling water and cook according to package directions, usually 8-10 minutes.
10. While the pasta cooks, pour the blended cauliflower sauce back into the skillet over low heat.
11. Stir in grated Parmesan cheese and ground nutmeg until the cheese is fully melted.
12. Season the sauce with salt and black pepper, tasting and adjusting as needed.
13. Drain the cooked pasta, reserving 1/4 cup of pasta water.
14. Add the drained pasta to the skillet with the sauce, tossing to coat evenly.
15. If the sauce seems too thick, gradually add the reserved pasta water until desired consistency is reached.
Buttery and rich with a velvety texture, this sauce clings beautifully to every strand of pasta. The subtle nuttiness from the cauliflower pairs perfectly with the sharp Parmesan, creating a dish that feels indulgent yet light. Try topping it with roasted cherry tomatoes or fresh basil for a colorful, restaurant-worthy presentation.
Cauliflower and Lentil Curry

Venturing into a new curry recipe can feel intimidating, but this cauliflower and lentil version breaks it down into simple, manageable steps that even a first-time cook can master. Let’s build layers of flavor together, starting with aromatic spices and finishing with tender vegetables and protein-packed lentils. Follow each instruction carefully, and you’ll have a comforting, nourishing meal ready in about an hour.
Serving: 4 | Pre Time: 15 minutes | Cooking Time: 45 minutes
Ingredients
– 1 tablespoon olive oil
– 1 medium yellow onion, diced
– 3 cloves garlic, minced
– 1 tablespoon fresh ginger, grated
– 1 tablespoon curry powder
– 1 teaspoon ground cumin
– 1/2 teaspoon ground turmeric
– 1/4 teaspoon cayenne pepper
– 1 (14.5-ounce) can diced tomatoes
– 1 cup brown lentils, rinsed
– 4 cups vegetable broth
– 1 medium head cauliflower, cut into 1-inch florets
– 1 (13.5-ounce) can coconut milk
– 1/2 teaspoon salt
– 1/4 cup fresh cilantro, chopped
Instructions
1. Heat 1 tablespoon olive oil in a large pot over medium heat until it shimmers, about 1 minute.
2. Add 1 medium diced yellow onion and cook, stirring occasionally, until translucent and soft, about 5 minutes.
3. Stir in 3 cloves minced garlic and 1 tablespoon grated fresh ginger, cooking until fragrant, about 30 seconds.
4. Add 1 tablespoon curry powder, 1 teaspoon ground cumin, 1/2 teaspoon ground turmeric, and 1/4 teaspoon cayenne pepper, toasting the spices while stirring constantly for 1 minute to deepen their flavor.
5. Pour in 1 can diced tomatoes with their juices, scraping the bottom of the pot to incorporate any browned bits.
6. Add 1 cup rinsed brown lentils and 4 cups vegetable broth, bringing the mixture to a boil over high heat.
7. Reduce heat to low, cover the pot, and simmer for 20 minutes to partially cook the lentils.
8. Stir in 1 head of cauliflower cut into 1-inch florets, cover, and simmer until the cauliflower is tender and the lentils are fully cooked, about 15 minutes.
9. Pour in 1 can coconut milk and add 1/2 teaspoon salt, stirring gently to combine.
10. Simmer uncovered for 5 minutes to allow the flavors to meld and the sauce to thicken slightly.
11. Remove from heat and stir in 1/4 cup chopped fresh cilantro.
Now, you have a hearty curry where the cauliflower retains a slight bite while the lentils become creamy, all enveloped in a rich, spiced coconut sauce. Naturally, this dish pairs wonderfully with steamed basmati rice or warm naan for soaking up every last drop, and leftovers taste even better the next day as the flavors continue to develop.
Cauliflower Hash Browns

You’ve probably tried regular hash browns, but cauliflower hash browns offer a lighter, veggie-packed alternative that’s just as satisfying. This recipe transforms simple ingredients into crispy, golden patties perfect for breakfast or a side dish. Let’s walk through each step together to ensure success, even if you’re new to cooking.
Serving: 4 | Pre Time: 15 minutes | Cooking Time: 20 minutes
Ingredients
– 1 head cauliflower, riced (about 4 cups)
– 2 large eggs
– 1/2 cup shredded cheddar cheese
– 1/4 cup almond flour
– 1 tbsp olive oil
– 1 tsp garlic powder
– 1/2 tsp salt
– 1/4 tsp black pepper
– 2 tbsp avocado oil
Instructions
1. Preheat your oven to 400°F and line a baking sheet with parchment paper.
2. Place the riced cauliflower in a microwave-safe bowl and microwave on high for 5 minutes to soften it, then let it cool for 5 minutes.
3. Transfer the cooled cauliflower to a clean kitchen towel and squeeze firmly over the sink to remove as much moisture as possible; this tip helps prevent soggy hash browns.
4. In a large mixing bowl, combine the dried cauliflower, eggs, cheddar cheese, almond flour, olive oil, garlic powder, salt, and black pepper, mixing until evenly incorporated.
5. Divide the mixture into 8 equal portions and shape each into a 1/2-inch thick patty with your hands, pressing firmly to hold together.
6. Heat the avocado oil in a large skillet over medium-high heat until it shimmers, about 2 minutes.
7. Carefully place the patties in the skillet, cooking for 3-4 minutes per side until golden brown and crispy; avoid overcrowding by working in batches if needed.
8. Transfer the browned patties to the prepared baking sheet and bake in the preheated oven for 10 minutes to ensure they’re cooked through and firm.
9. Remove from the oven and let cool on the baking sheet for 2 minutes before serving.
As a final touch, these hash browns boast a crispy exterior with a tender, cheesy interior that pairs wonderfully with a dollop of sour cream or a fried egg on top. For a creative twist, try serving them alongside a fresh avocado salsa or as a base for breakfast sliders—they’re versatile enough to shine in any meal setting.
Cauliflower and Spinach Lasagna
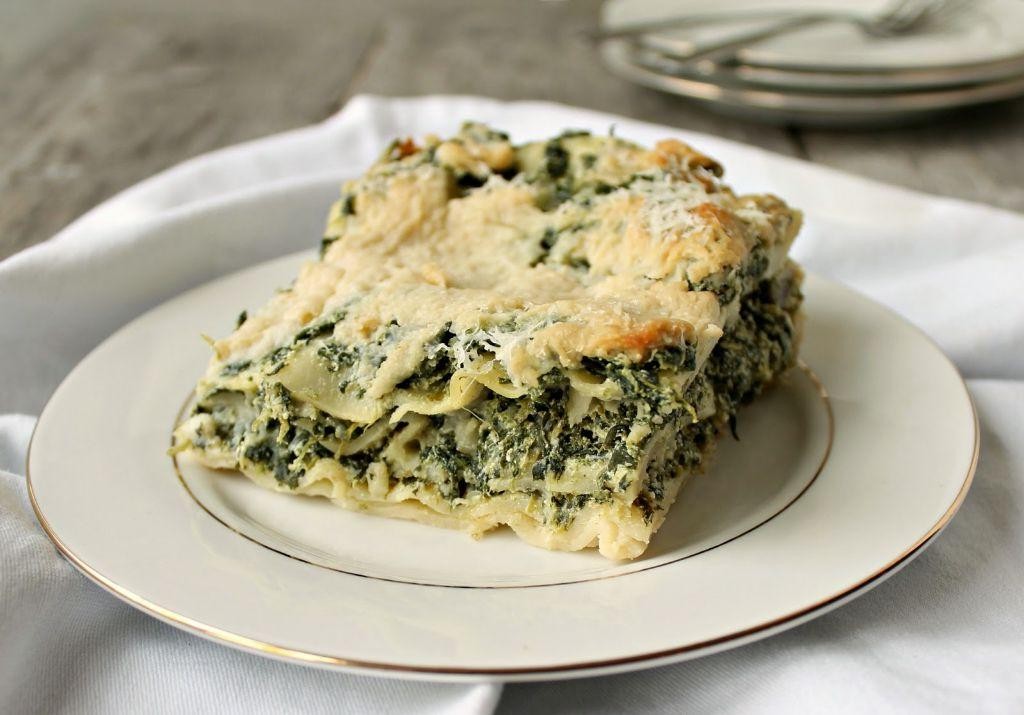
Kicking off a cozy dinner, this cauliflower and spinach lasagna transforms simple vegetables into a comforting, crowd-pleasing casserole that’s perfect for chilly evenings or meal prep. Let’s walk through each stage together, ensuring every layer comes out perfectly.
Serving: 8 | Pre Time: 25 minutes | Cooking Time: 50 minutes
Ingredients
– 1 large head cauliflower, cut into florets
– 10 ounces fresh spinach
– 1 tablespoon olive oil
– 1 medium onion, diced
– 3 cloves garlic, minced
– 24 ounces marinara sauce
– 15 ounces ricotta cheese
– 1 large egg
– 1/4 cup grated Parmesan cheese
– 12 no-boil lasagna noodles
– 2 cups shredded mozzarella cheese
– 1/2 teaspoon salt
– 1/4 teaspoon black pepper
Instructions
1. Preheat your oven to 375°F and lightly grease a 9×13-inch baking dish.
2. Steam the cauliflower florets in a pot with 1 inch of water for 8-10 minutes until fork-tender, then drain well and mash with a fork—this creates a chunky texture that mimics ricotta.
3. In a large skillet, heat 1 tablespoon olive oil over medium heat and sauté the diced onion for 5 minutes until translucent.
4. Add 3 cloves minced garlic to the skillet and cook for 1 minute until fragrant, being careful not to burn it.
5. Stir in 10 ounces fresh spinach and cook for 2-3 minutes until wilted, then remove from heat and set aside.
6. In a mixing bowl, combine 15 ounces ricotta cheese, 1 large egg, 1/4 cup grated Parmesan cheese, 1/2 teaspoon salt, and 1/4 teaspoon black pepper, mixing until smooth.
7. Spread 1/2 cup marinara sauce evenly over the bottom of the prepared baking dish.
8. Layer 4 no-boil lasagna noodles over the sauce, slightly overlapping them.
9. Spread half of the ricotta mixture over the noodles, then top with half of the mashed cauliflower and half of the spinach mixture.
10. Pour 1 cup marinara sauce over the vegetables and sprinkle with 2/3 cup shredded mozzarella cheese.
11. Repeat the layering: 4 noodles, remaining ricotta mixture, remaining cauliflower and spinach, 1 cup marinara sauce, and 2/3 cup mozzarella cheese.
12. Top with the final 4 noodles, remaining marinara sauce, and remaining mozzarella cheese.
13. Cover the dish tightly with aluminum foil and bake at 375°F for 30 minutes.
14. Remove the foil and bake for an additional 20 minutes until the cheese is bubbly and golden brown.
15. Let the lasagna rest for 10 minutes before slicing to allow the layers to set.
What emerges is a hearty, creamy lasagna with tender cauliflower bits and vibrant spinach woven throughout, offering a satisfying texture that holds its shape when sliced. The flavors meld into a rich, savory profile with a hint of sweetness from the marinara, making it ideal for serving with a crisp green salad or garlic bread for a complete meal.
Summary
Versatile and delicious, these cauliflower recipes prove this veggie can star in any meal. From cozy dinners to healthy snacks, there’s something here for every cook and occasion. We hope you find a new favorite! Give one a try, then let us know what you think in the comments. If you loved this roundup, please share it on Pinterest to help other home cooks discover these tasty ideas.