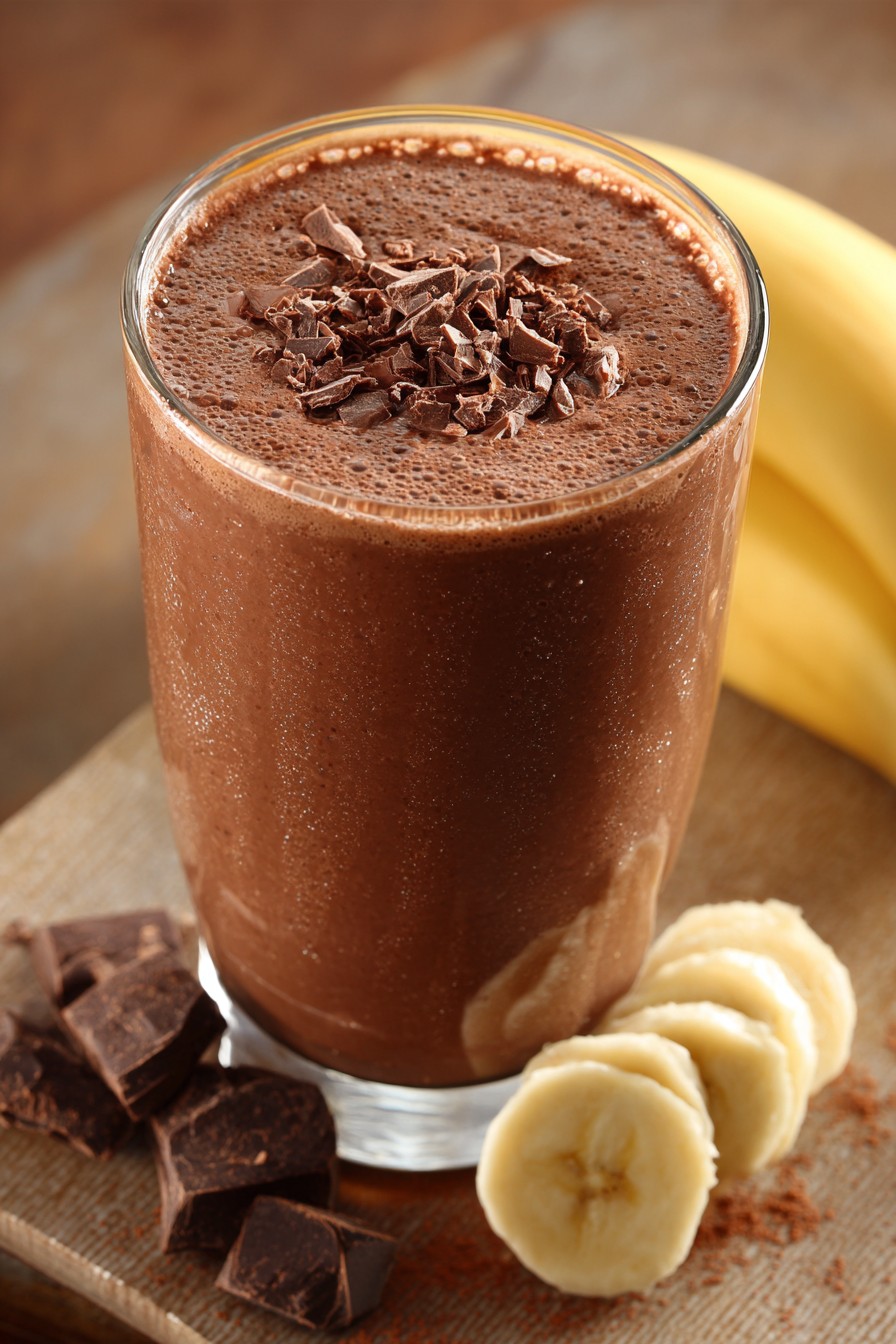
Crafting an exceptional chocolate banana smoothie requires more than simply tossing ingredients into a blender. Consider this recipe a foundational technique for achieving a luxuriously thick, aerated texture and a deeply layered chocolate flavor that avoids cloying sweetness. By applying professional methods to ingredient preparation and blending sequence, we transform a simple beverage into a refined, satisfying creation worthy of any culinary repertoire.
Why This Recipe Works
- Frozen Banana Base: Using frozen, ripe bananas provides natural sweetness and creates a thick, creamy, ice cream-like consistency without diluting flavor.
- Dual Chocolate Application: Incorporating both cocoa powder and dark chocolate chunks delivers a complex, rich chocolate profile with nuanced bitterness and melt-in-your-mouth texture.
- Strategic Liquid Ratios: A precise blend of whole milk and Greek yogurt introduces creaminess and tang while maintaining optimal viscosity for a spoonable smoothie.
- Layering Technique: Adding ingredients to the blender jar in a specific order ensures even distribution and prevents blade binding for a perfectly homogeneous emulsion.
Ingredients
- 2 large ripe bananas, peeled, sliced into 1-inch rounds, and frozen solid for at least 8 hours
- 1/4 cup unsweetened cocoa powder (preferably Dutch-processed for deeper flavor)
- 1.5 ounces high-quality dark chocolate (70% cacao), roughly chopped into 1/4-inch pieces
- 1 cup whole milk, chilled
- 1/2 cup plain whole-milk Greek yogurt, chilled
- 2 tablespoons pure maple syrup (Grade A Dark Amber preferred)
- 1 teaspoon pure vanilla extract
- 1/8 teaspoon fine sea salt
- Optional: 1/4 teaspoon instant espresso powder (to enhance chocolate notes)
Equipment Needed
- High-powered blender (minimum 1000 watts recommended)
- Rubber spatula
- Measuring cups and spoons
- Chef’s knife and cutting board
- Rimmed baking sheet and parchment paper (for freezing bananas)
Instructions
Step 1: Prepare and Freeze the Banana Base
Begin by selecting bananas that have developed a fully yellow peel with abundant brown speckles, indicating peak ripeness and maximum natural sugar conversion. Peel the bananas and slice them into uniform 1-inch rounds using a sharp chef’s knife. Arrange the slices in a single, non-touching layer on a parchment-lined rimmed baking sheet. This prevents the pieces from fusing into a solid mass during freezing. Transfer the baking sheet to the freezer and allow the banana slices to freeze completely for a minimum of 8 hours, or preferably overnight, until they are rock-hard to the touch. Proper freezing is critical; it transforms the banana’s cellular structure, allowing it to puree into a dense, creamy base that mimics soft-serve ice cream without the need for additional ice, which would water down the final product. Once frozen, the slices can be transferred to a sealed freezer bag for long-term storage.
Step 2: Assemble Ingredients in the Blender Jar
To facilitate optimal blending and prevent the motor from straining, you must load the blender jar following a specific layering protocol. First, pour the chilled whole milk into the bottom of the blender pitcher. This provides immediate liquid contact with the blades, ensuring smooth initial engagement. Next, add the chilled Greek yogurt, followed by the maple syrup, vanilla extract, fine sea salt, and optional instant espresso powder. These liquid and semi-liquid ingredients form the foundational slurry. Tip: Chilling all liquid components beforehand helps maintain a cold blend, preventing the friction of blending from prematurely warming the mixture. Finally, carefully add the frozen banana slices, unsweetened cocoa powder, and chopped dark chocolate on top. This order places the heaviest, most solid items furthest from the blade, allowing the liquids to create a vortex that gradually pulls them down for even incorporation.
Step 2: Execute the Blending Sequence
Securely fasten the blender lid. Begin processing on the lowest variable speed setting for approximately 15 seconds to initially combine the ingredients and start breaking down the frozen fruit. This low-speed start prevents ingredient splatter and reduces stress on the motor. Gradually increase the speed to the highest setting over a 5-second interval. Blend on high for 45 to 60 seconds, or until the mixture is completely smooth, homogenous, and has visibly increased in volume due to aeration. You should observe a consistent, velvety texture with no visible chunks of banana or streaks of cocoa powder. Tip: If the mixture struggles to blend, pause the machine, use a rubber spatula to carefully scrape down the sides, ensuring no dry pockets exist, and resume blending. Do not add more liquid at this stage, as it will compromise the desired thick consistency.
Step 4: Evaluate and Adjust Consistency
Step 5: Portion and Serve Immediately
Once the perfect texture is confirmed, immediately portion the smoothie into two chilled serving glasses. For a professional presentation, use a damp paper towel to wipe any drips from the glass rims. The smoothie is best consumed immediately to appreciate its peak texture and temperature. If a brief hold is necessary, you can transfer the entire blend to a chilled metal bowl set over an ice bath, stirring occasionally, for up to 10 minutes. Tip: For an elegant garnish, consider a light dusting of extra cocoa powder over the surface or a few delicate shavings of the reserved dark chocolate using a vegetable peeler. The contrast between the cold, creamy body and the delicate, melting chocolate garnish enhances the overall sensory experience.
Tips and Tricks
For the ultimate flavor development, consider roasting your bananas before freezing. Place whole, unpeeled ripe bananas on a baking sheet and roast in a 400°F oven for 15-20 minutes, until the skins are completely black. Let cool, then scrape out the intensely caramelized flesh before freezing. This deepens the banana flavor with rich, toffee-like notes. When selecting cocoa powder, a high-fat (22-24%) Dutch-processed variety will yield a smoother, less acidic chocolate flavor compared to natural cocoa. To achieve a mousse-like foam on top of your smoothie, reserve 1/4 cup of the milk and use a handheld milk frother to aerate it vigorously before gently folding it into the finished blend just before serving. For optimal storage of leftover smoothie base, freeze it in a sealed container; to reconstitute, thaw slightly in the refrigerator and re-blend with a splash of milk.
Recipe Variations
- Mocha Infusion: Replace 1/4 cup of the whole milk with strongly brewed, chilled coffee or a double shot of cold espresso. Add 1/4 teaspoon of cinnamon with the dry ingredients for a spiced mocha profile.
- Nutty Protein Boost: Incorporate 2 tablespoons of almond butter or peanut butter into the blender with the liquid ingredients. Substitute the whole milk with unsweetened almond milk for a fully nut-centric version and add a scoop of vanilla protein powder for a post-workout meal.
- Tropical Twist: Replace one of the frozen bananas with 1 cup of frozen mango chunks. Use coconut milk in place of whole milk and add 1 tablespoon of toasted coconut flakes with the dry ingredients. Garnish with toasted coconut and a lime zest.
- Mint Chocolate Chip: Add 1/4 teaspoon of pure peppermint extract with the vanilla. Fold in 2 tablespoons of mini dark chocolate chips by hand after blending to maintain their texture. Serve with a fresh mint sprig.
- Savory-Spiced: For a more complex, less sweet profile, add a pinch of cayenne pepper or 1/4 teaspoon of chipotle powder with the cocoa. Use a blackstrap molasses instead of maple syrup for a bitter, mineral-rich sweetness.
Frequently Asked Questions
Q: Can I make this smoothie ahead of time?
A: For optimal texture and flavor, immediate consumption is recommended. The emulsion will begin to separate and the bananas will oxidize, leading to a thinner consistency and slight browning within 1-2 hours. If necessary, store in a sealed jar in the refrigerator for up to 4 hours and shake vigorously before serving.
Q: My smoothie turned out too thin. What happened?
A: The most common cause is insufficiently frozen bananas. Ensure they are rock-solid. Using overripe bananas with a higher water content can also contribute. Next time, extend freezing time or add 1/2 a frozen banana extra. Avoid adding ice to correct, as it dilutes flavor.
Q: Is there a dairy-free alternative that maintains creaminess?
A: Absolutely. Substitute whole milk with full-fat canned coconut milk and use a plain, unsweetened coconut milk yogurt. The high fat content in coconut products mimics the mouthfeel of dairy. Cashew milk is another excellent option due to its natural creaminess.
Q: Can I use a regular blender instead of a high-powered one?
A: You can, but technique adjustments are required. Use slightly less frozen banana, let it sit at room temperature for 5 minutes to soften, and blend in stages, pulsing frequently and scraping down the sides to avoid motor burnout. The texture may be slightly less smooth.
Q: Why add salt to a sweet smoothie?
A: Salt is a flavor enhancer that amplifies the perception of sweetness and deepens the chocolate notes, preventing a one-dimensional sugary taste. The small amount used will not make the smoothie taste salty but will create a more rounded and sophisticated flavor profile.
Summary
This chef-inspired chocolate banana smoothie elevates a classic through technique: frozen bananas for thickness, dual chocolate for depth, and precise layering for a flawless, creamy emulsion. Master these methods for a consistently professional result.
Chocolate Banana Smoothie
2
servings10
minutesIngredients
Instructions
- 1 Prepare Banana Base: Slice ripe bananas into 1-inch rounds. Arrange on a parchment-lined baking sheet and freeze until rock-solid, at least 8 hours.
- 2 Layer Blender: To blender jar, add chilled milk, yogurt, maple syrup, vanilla, salt, and espresso powder (if using). Top with frozen banana slices, cocoa powder, and chopped chocolate.
- 3 Blend: Secure lid. Start on low speed for 15 seconds, then gradually increase to high. Blend on high for 45-60 seconds until completely smooth and aerated. Scrape sides if needed.
- 4 Adjust Consistency: Check texture. If too thick, blend in additional milk by the tablespoon. If too thin, blend in 2-3 ice cubes briefly.
- 5 Serve: Immediately pour into two chilled glasses. Garnish with extra cocoa powder or chocolate shavings if desired. Consume immediately for best texture.