Rushing through the week, I know you need a dessert that feels like a treat without turning the kitchen into a war zone. Ready in about 15 minutes of active time and requiring zero oven time, this chocolate peanut butter fudge is your secret weapon for satisfying sweet cravings with minimal fuss and maximum flavor. It’s the kind of simple, reliable recipe that becomes a staple in your busy household.
Why This Recipe Works
- Five pantry staples mean you can whip this up without a special grocery trip.
- One-bowl mixing keeps cleanup to an absolute minimum—no multiple dishes to wash.
- No baking required saves energy and avoids heating up the kitchen.
- Sets firmly in the fridge for perfect, sliceable squares every time.
- Rich, classic flavor combo that both kids and adults adore.
Ingredients
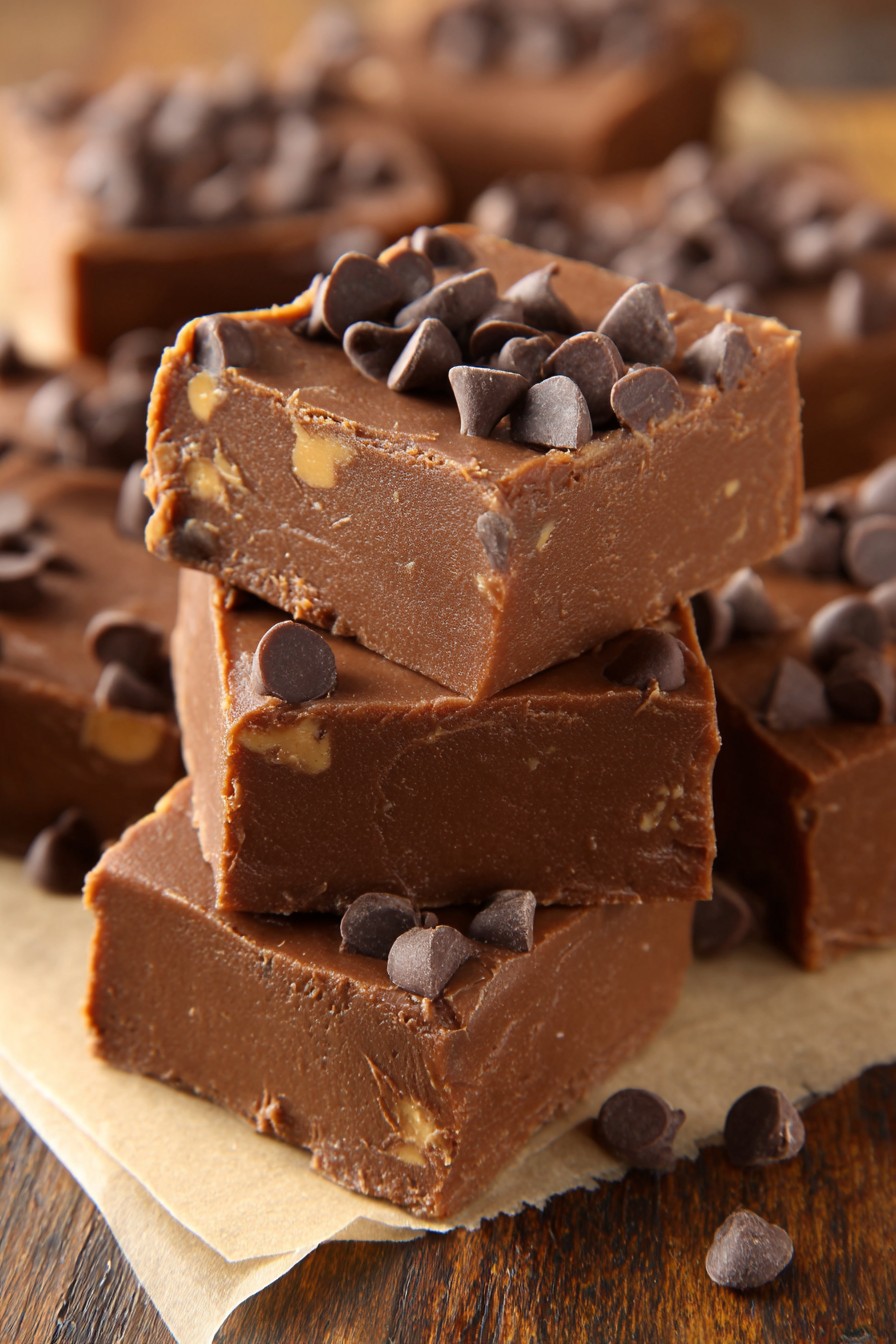
- 3 cups (about 18 ounces) semi-sweet chocolate chips
- 1 cup (8 ounces) creamy peanut butter (not natural or oily style)
- 1 can (14 ounces) sweetened condensed milk
- 1 teaspoon pure vanilla extract
- 1/4 teaspoon fine sea salt
Equipment Needed
- 8×8-inch square baking pan
- Parchment paper
- Medium-large microwave-safe bowl (or medium saucepan)
- Rubber spatula
- Measuring cups and spoons
Instructions
Step 1: Prep Your Pan for Easy Release
Grab your 8×8-inch pan—this is the perfect size for thick, satisfying fudge squares. Tear off a sheet of parchment paper large enough to line the bottom and extend up two opposite sides, creating handy “handles.” This isn’t just for looks; it guarantees you can lift the entire slab of fudge out in one piece for clean, easy cutting later. No more wrestling with a stuck-on mess or risking your pan with a knife. Lightly press the paper into the corners. If you don’t have parchment, you can generously grease the pan, but parchment is the true busy-parent hero here for zero-scrape cleanup. Set the pan aside.
Step 2: Gently Melt the Chocolate and Peanut Butter Base
Tip: If you prefer the stovetop, use a medium saucepan over the lowest possible heat, stirring constantly until smooth. The goal is a glossy, fully combined mixture without letting it get too hot.
Step 3: Incorporate the Sweetened Condensed Milk and Flavorings
Pour the entire can of sweetened condensed milk into the warm chocolate-peanut butter mixture. Add the 1 teaspoon of vanilla extract and the 1/4 teaspoon of fine sea salt. Now, stir everything together with your spatula until it is completely uniform, thick, and glossy—no streaks of condensed milk should remain. This will take a minute or two of steady stirring. The salt is crucial here; it doesn’t make the fudge taste salty but instead heightens the chocolate and peanut butter flavors, cutting through the sweetness perfectly. You’ll know it’s ready when the mixture pulls away from the sides of the bowl as you stir.
Step 4: Transfer and Smooth the Fudge into the Pan
Immediately scrape every last bit of the fudge mixture into your prepared parchment-lined pan. Use the spatula to spread it into an even layer, pushing it firmly into all four corners. For a perfectly smooth top, dip the spatula in very hot water, wipe it dry, and then glide it over the surface. Tip: Work relatively quickly here, as the fudge will begin to set as it cools. If the mixture becomes too stiff to spread easily, you can briefly warm the bowl again for 10-15 seconds. Your goal is a nice, level layer about 3/4-inch thick.
Step 5: Chill Firmly Before Slicing and Serving
This is the hardest part: waiting. Place the uncovered pan in the refrigerator. Let the fudge chill undisturbed for at least 3 hours, but for best results, let it go a full 4 hours or even overnight. It needs this time to set up completely firm so you get clean cuts. Tip: Don’t try to speed this up in the freezer, as it can cause condensation and affect texture. When fully set, use the parchment paper handles to lift the slab onto a cutting board. With a sharp knife, slice into 1-inch squares. For clean cuts, wipe the knife blade with a hot, damp cloth between slices. Store leftovers in an airtight container in the fridge for up to 2 weeks.
Tips and Tricks
For the cleanest cuts, score the top of the fudge lightly with a knife after about 30 minutes of chilling, then finish chilling—it will break neatly along those lines. If your kitchen is warm, let the sliced fudge come to room temperature for 5-10 minutes before serving for the best creamy texture. To gift this, layer squares between parchment in a tin—they travel beautifully. If you only have a 9×9 pan, your fudge will be slightly thinner; reduce the chill time by about 30 minutes. Always use a dry measuring cup for the chocolate chips, gently spooning them in and leveling off for accuracy.
Recipe Variations
- Crunchy Twist: Stir in 1/2 cup of chopped roasted peanuts or pretzel pieces with the condensed milk for added texture.
- Swirled Beauty: After spreading the fudge in the pan, drop small spoonfuls of extra peanut butter (about 1/4 cup) on top and use a knife to swirl it decoratively into the surface.
- Cookie Dough Style: Replace 1/2 cup of the chocolate chips with mini chocolate chips and add 2 tablespoons of all-purpose flour when mixing for a cookie dough flavor profile.
- Mint Chocolate: Use 1 1/2 cups semi-sweet chips and 1 1/2 cups Andes mint baking chips, and replace the vanilla with 1/2 teaspoon peppermint extract.
- Rocky Road: Fold in 1 cup of mini marshmallows and 1/2 cup of chopped walnuts after mixing everything together.
Frequently Asked Questions
Q: Can I use natural peanut butter?
A: I don’t recommend it for this recipe. Natural peanut butter tends to be oilier and can separate, leading to a greasy, less stable fudge that might not set properly. Stick with a standard creamy peanut butter like Jif or Skippy for guaranteed results.
Q: How long does this fudge keep, and how should I store it?
A: Stored in an airtight container in the refrigerator, it stays perfectly fresh for up to 2 weeks. You can also freeze it for up to 3 months. Thaw overnight in the fridge before serving. It’s fine at room temperature for a few hours if you’re serving it at a party.
Q: My fudge is too soft. What went wrong?
A: This usually means it didn’t chill long enough. Pop it back in the fridge for another hour or two. It could also mean the chocolate mixture was overheated or the measurements were slightly off. Ensure you’re using full, level cups and cans for accuracy next time.
Q: Can I make this dairy-free or vegan?
A: For a dairy-free version, use dairy-free chocolate chips and a can of full-fat coconut milk mixed with 3/4 cup of powdered sugar, simmered until reduced by half to mimic condensed milk. For vegan, also ensure your chocolate chips are vegan-certified.
Q: Is it okay to double the recipe?
A: Absolutely! Double all ingredients and use a 9×13-inch pan lined with parchment. You may need to melt the chocolate mixture in two batches or use a very large bowl. The chill time will remain roughly the same.
Summary
This five-ingredient, no-bake fudge delivers rich chocolate-peanut butter flavor with minimal effort and cleanup, making it the perfect stress-free treat for busy families.
Chocolate Peanut Butter Fudge
36
servings15
minutes2
minutesIngredients
Instructions
- 1 Line an 8x8-inch square baking pan with parchment paper, leaving overhang on two sides for handles.
- 2 In a microwave-safe bowl, combine chocolate chips and peanut butter. Microwave in 30-second intervals, stirring after each, until mostly melted and smooth (about 90 seconds total).
- 3 Stir in the sweetened condensed milk, vanilla extract, and sea salt until the mixture is completely uniform, thick, and glossy.
- 4 Immediately spread the mixture evenly into the prepared pan, smoothing the top.
- 5 Refrigerate uncovered for at least 3-4 hours, or until completely firm. Use parchment to lift out, then cut into 1-inch squares.