Magical holiday baking is here! As Christmas approaches, we’ve gathered 20 festive dessert recipes that will make your celebrations irresistible. From classic cookies to show-stopping cakes, these treats are perfect for sharing with family and friends. Whether you’re a seasoned baker or just starting out, you’ll find something delightful to create. Let’s dive into these mouthwatering ideas and make this season extra sweet!
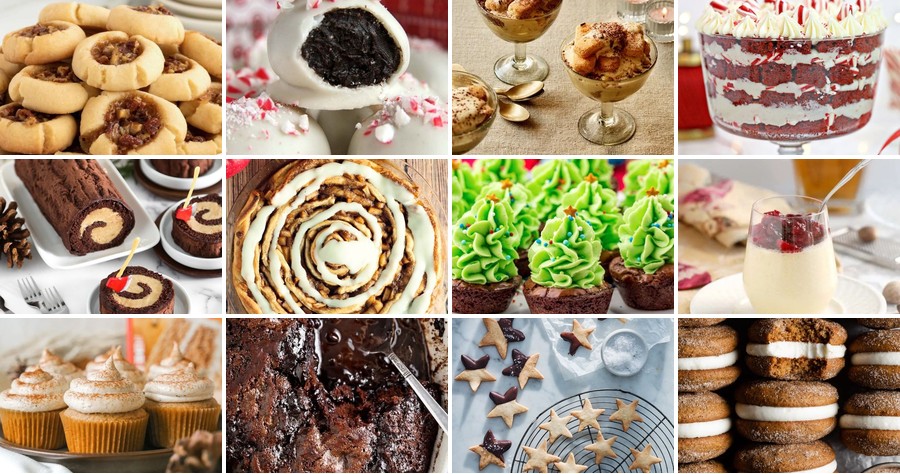
Eggnog Tiramisu
Brace your taste buds—this Eggnog Tiramisu swaps espresso for holiday cheer. Layer creamy eggnog mascarpone with rum-soaked ladyfingers for a festive twist on the classic. It’s the ultimate make-ahead dessert that’ll steal the spotlight at any gathering.
Serving: 8 | Pre Time: 25 minutes | Cooking Time: 0 minutes
Ingredients
– 1 ½ cups of cold heavy cream
– 8 ounces of mascarpone cheese, softened
– ½ cup of granulated sugar
– 1 cup of store-bought or homemade eggnog
– 2 tablespoons of dark rum (optional, but highly recommended)
– 24 ladyfinger cookies (savoiardi)
– A generous dusting of ground nutmeg and cocoa powder for topping
Instructions
1. In a large mixing bowl, whip 1 ½ cups of cold heavy cream with an electric mixer on high speed until stiff peaks form, about 3–4 minutes—tip: chill your bowl and beaters first for faster whipping.
2. In a separate bowl, beat 8 ounces of softened mascarpone cheese, ½ cup of granulated sugar, and 1 cup of eggnog together until smooth and creamy, about 2 minutes.
3. Gently fold the whipped cream into the mascarpone mixture until fully combined, being careful not to deflate the cream.
4. Pour 2 tablespoons of dark rum into a shallow dish and quickly dip 12 ladyfinger cookies, one at a time, for just 2–3 seconds each to avoid sogginess.
5. Arrange the dipped ladyfingers in a single layer in an 8×8-inch baking dish, breaking them if needed to fit.
6. Spread half of the eggnog mascarpone mixture evenly over the ladyfinger layer.
7. Repeat steps 4–6 with the remaining 12 ladyfingers and mascarpone mixture to create a second layer.
8. Cover the dish tightly with plastic wrap and refrigerate for at least 6 hours, or ideally overnight—tip: this chilling time allows the flavors to meld and the texture to set perfectly.
9. Just before serving, dust the top generously with a mix of ground nutmeg and cocoa powder using a fine-mesh sieve for an even coating.
10. Slice into squares and serve chilled.
Zesty with rum and rich from the eggnog, this tiramisu boasts a luxuriously creamy texture that melts in your mouth. For a creative twist, serve it in individual glasses layered with crushed gingerbread cookies, or garnish with a sprinkle of cinnamon for extra warmth. It’s a holiday treat that’s as indulgent as it is effortless.
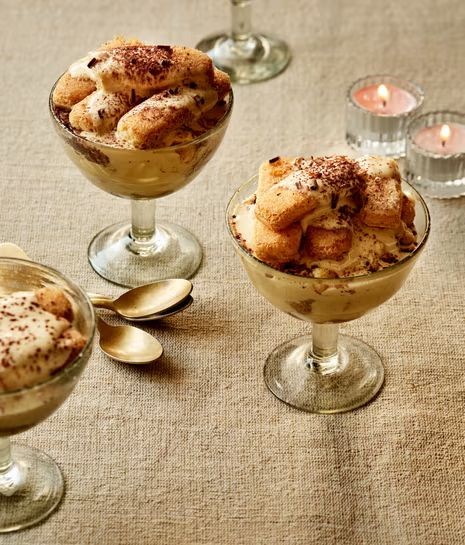
Cranberry White Chocolate Blondies
Whip up these festive blondies that blend tart cranberries with creamy white chocolate—perfect for holiday gatherings or a cozy treat. They’re chewy, vibrant, and ready in under an hour, making them an irresistible crowd-pleaser. Grab your mixing bowl and let’s bake!
Serving: 16 | Pre Time: 15 minutes | Cooking Time: 25 minutes
Ingredients
– 1 cup of unsalted butter, melted and cooled a bit
– 1 ½ cups of light brown sugar, packed tight
– 2 large eggs, at room temp
– 2 teaspoons of pure vanilla extract, a good splash
– 2 cups of all-purpose flour, spooned and leveled
– 1 teaspoon of baking powder
– ½ teaspoon of salt, just a pinch
– 1 cup of dried cranberries
– 1 cup of white chocolate chips, plus a handful extra for topping
Instructions
1. Preheat your oven to 350°F and line an 8×8-inch baking pan with parchment paper, letting it overhang the sides for easy removal.
2. In a large bowl, whisk together the melted butter and brown sugar until smooth and glossy, about 1 minute.
3. Crack in the eggs one at a time, whisking well after each addition until fully incorporated.
4. Stir in the vanilla extract until the mixture is evenly combined.
5. In a separate bowl, whisk the flour, baking powder, and salt to avoid lumps in your batter.
6. Gradually fold the dry ingredients into the wet mixture using a spatula, mixing just until no flour streaks remain—overmixing can make the blondies tough.
7. Gently fold in the dried cranberries and white chocolate chips until they’re evenly distributed throughout the batter.
8. Spread the batter evenly into the prepared pan, smoothing the top with the spatula.
9. Sprinkle the extra handful of white chocolate chips over the top for a melty, decorative finish.
10. Bake in the preheated oven for 23–25 minutes, or until the edges are golden brown and a toothpick inserted into the center comes out with a few moist crumbs (not wet batter).
11. Let the blondies cool completely in the pan on a wire rack, about 1 hour, before slicing into 16 squares—this helps them set for clean cuts.
A chewy, buttery base contrasts with bursts of tart cranberry and pockets of melted white chocolate, creating a balanced sweet-tart flavor. Serve them warm with a scoop of vanilla ice cream for an indulgent dessert, or pack them as a festive snack for holiday parties—they’re sure to disappear fast!
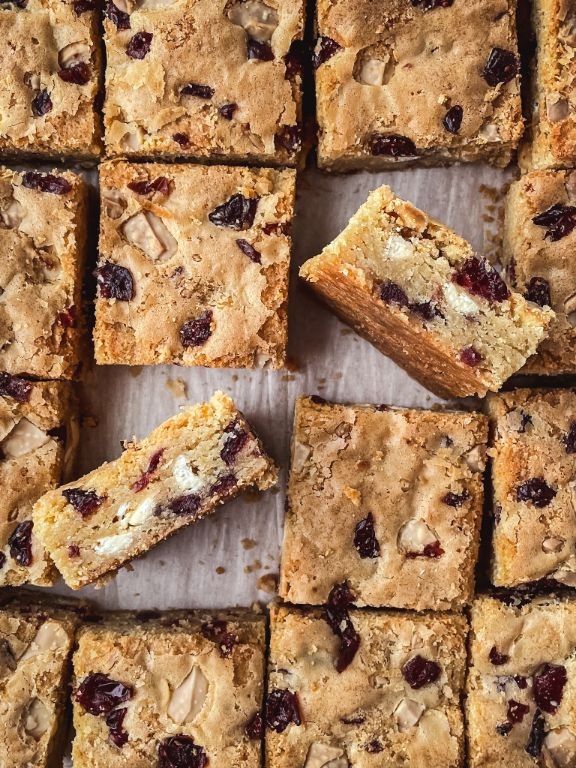
Spiced Apple Cinnamon Roll Cake
Ready to ditch the fuss of rolling? This spiced apple cinnamon roll cake delivers all the cozy swirls in one pan. Think warm cinnamon, tender apples, and a sticky-sweet glaze—no shaping required.
Serving: 9 | Pre Time: 20 minutes | Cooking Time: 35 minutes
Ingredients
– 2 cups of all-purpose flour
– 1 cup of granulated sugar
– 1/2 cup of packed brown sugar
– 1/2 cup of unsalted butter, melted
– 3/4 cup of milk
– 2 large eggs
– 2 teaspoons of baking powder
– 1 teaspoon of vanilla extract
– 2 medium apples, peeled and diced
– 2 tablespoons of ground cinnamon
– A splash of vegetable oil for the pan
– For the glaze: 1 cup of powdered sugar and 2 tablespoons of milk
Instructions
1. Preheat your oven to 350°F and grease a 9×9-inch baking pan with a splash of vegetable oil.
2. In a large bowl, whisk together 2 cups of all-purpose flour, 1 cup of granulated sugar, 2 teaspoons of baking powder, and a pinch of salt.
3. Add 1/2 cup of melted unsalted butter, 3/4 cup of milk, 2 large eggs, and 1 teaspoon of vanilla extract to the dry ingredients. Mix until just combined—overmixing can make the cake tough.
4. Pour half of the batter into the greased pan and spread it evenly with a spatula.
5. In a small bowl, toss 2 diced apples with 1/2 cup of packed brown sugar and 2 tablespoons of ground cinnamon until coated.
6. Sprinkle the apple-cinnamon mixture evenly over the batter layer in the pan.
7. Carefully spoon the remaining batter over the apples, spreading gently to cover them completely.
8. Use a knife to swirl the layers together in a circular motion for that classic roll effect.
9. Bake at 350°F for 30–35 minutes, or until a toothpick inserted into the center comes out clean. Tip: Check at 30 minutes to avoid overbaking.
10. While the cake cools slightly, whisk 1 cup of powdered sugar with 2 tablespoons of milk until smooth for the glaze.
11. Drizzle the glaze over the warm cake, letting it soak in for extra moisture.
12. Let the cake cool in the pan for 10 minutes before slicing into 9 squares. Tip: Serve warm for the best texture.
Keep it cozy—this cake is soft and moist with pockets of spiced apples that melt into every bite. The cinnamon swirls add a gooey richness, perfect with a scoop of vanilla ice cream or a hot coffee on the side.
Christmas Tree Brownie Bites
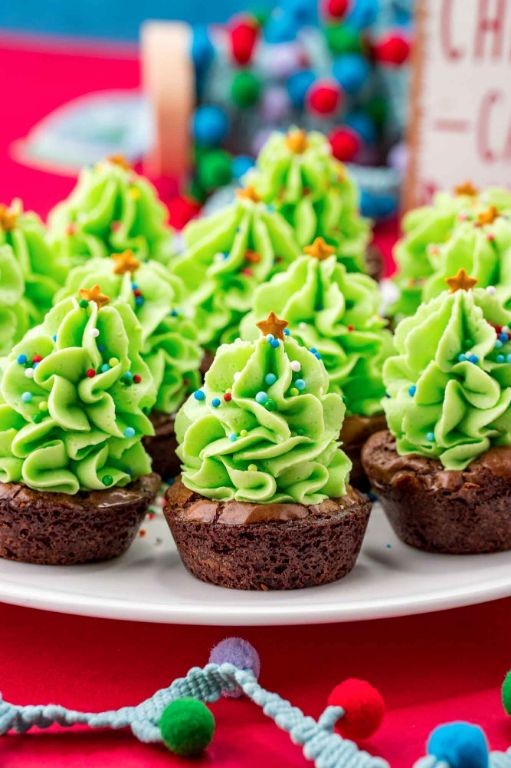
Brace yourself for the cutest holiday treat you’ll ever bake. These festive bites combine rich chocolate brownie with a simple, eye-catching design. Get ready to impress your feed and your friends.
Serving: 24 bites | Pre Time: 20 minutes | Cooking Time: 10 minutes
Ingredients
– 1 box of your favorite brownie mix (plus the oil, eggs, and water it calls for)
– 1 cup of green frosting (store-bought or homemade)
– A handful of colorful sprinkles
– A couple of star-shaped candies
– A splash of vegetable oil for greasing
Instructions
1. Preheat your oven to 350°F and grease a mini muffin tin with a splash of vegetable oil.
2. Prepare the brownie batter according to the box instructions, mixing in the required oil, eggs, and water.
3. Fill each mini muffin cup about ¾ full with batter using a spoon or small scoop.
4. Bake for 10 minutes, or until a toothpick inserted comes out with just a few moist crumbs (not wet batter).
5. Let the brownie bites cool completely in the tin for 15 minutes, then transfer to a wire rack—this prevents them from getting soggy.
6. Spoon 1 cup of green frosting into a piping bag fitted with a star tip.
7. Pipe the frosting in a spiral motion on top of each brownie bite to create a tree shape, starting from the center and working outward.
8. Immediately decorate each tree with a handful of colorful sprinkles before the frosting sets.
9. Top each tree with a star-shaped candy at the peak.
10. Let the frosting firm up for about 30 minutes before serving.
These bites deliver a fudgy, chocolatey base that pairs perfectly with the sweet, creamy frosting. The sprinkles add a fun crunch, making them a hit at holiday parties. Try stacking them on a tiered stand for a stunning dessert display that’s almost too pretty to eat.
Snowball Coconut Macaroons
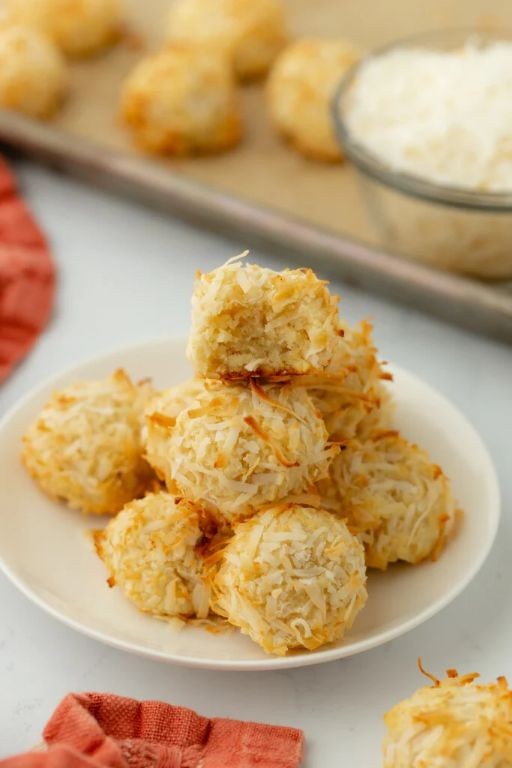
Ready to roll into holiday magic? These Snowball Coconut Macaroons are your shortcut to festive bliss—no fancy skills required, just sweet, chewy clouds that vanish faster than December daylight.
Serving: 24 | Pre Time: 10 minutes | Cooking Time: 15 minutes
Ingredients
– 4 cups of sweetened shredded coconut (the fluffier, the better)
– A 14-ounce can of sweetened condensed milk (that sticky-sweet magic)
– A couple of teaspoons of pure vanilla extract for that cozy aroma
– A pinch of fine salt to balance the sweetness
– 3 large egg whites, whipped to stiff peaks (they’re the secret to lift)
Instructions
1. Preheat your oven to 325°F and line two baking sheets with parchment paper—this prevents sticking and makes cleanup a breeze.
2. In a large mixing bowl, combine the 4 cups of shredded coconut, the entire can of sweetened condensed milk, 2 teaspoons of vanilla extract, and a pinch of salt. Stir until everything is evenly coated and clumpy.
3. In a separate, clean bowl, use an electric mixer to beat the 3 egg whites on high speed until they form stiff peaks, about 3-4 minutes; this adds air for a lighter texture.
4. Gently fold the whipped egg whites into the coconut mixture with a spatula, being careful not to deflate them—fold just until no white streaks remain.
5. Scoop heaping tablespoons of the mixture and roll them into tight 1-inch balls between your palms; if it’s too sticky, lightly wet your hands.
6. Place the balls about 1 inch apart on the prepared baking sheets, spacing them so they don’t spread into each other.
7. Bake in the preheated oven for 15-18 minutes, rotating the sheets halfway through, until the tops are golden brown and the edges are crisp.
8. Let the macaroons cool completely on the baking sheets for at least 30 minutes—they firm up as they cool, so don’t rush it!
Now, nibble into these little snowballs: they’re crispy on the outside, chewy in the center, with a toasty coconut flavor that screams holiday cheer. Need a twist? Dip the bottoms in melted dark chocolate or pile them into a jar for a last-minute gift—they’re as versatile as they are irresistible.
Yule Log Cake with Mocha Filling
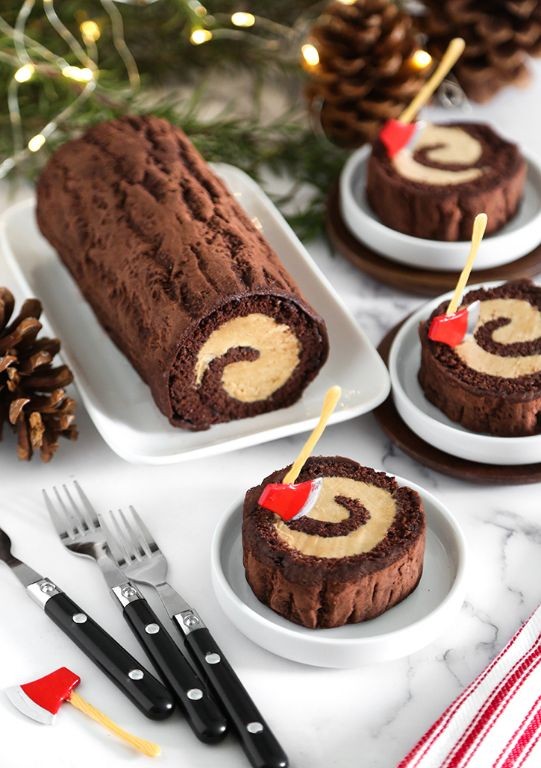
Perfect for holiday hosting—this Yule Log Cake with Mocha Filling delivers festive flair without fuss. Picture a light sponge rolled around rich coffee-chocolate cream, dusted with snowy powdered sugar. It’s the showstopper that looks intricate but comes together with simple steps.
Serving: 8 | Pre Time: 25 minutes | Cooking Time: 12 minutes
Ingredients
- 4 large eggs, at room temp
- ¾ cup granulated sugar
- 1 tsp vanilla extract
- ¾ cup all-purpose flour
- ¼ cup unsweetened cocoa powder
- 1 tsp baking powder
- ¼ tsp salt
- 2 tbsp powdered sugar for dusting
- 1 cup heavy cream
- 8 oz cream cheese, softened
- ½ cup powdered sugar
- 2 tbsp instant coffee granules dissolved in a splash of hot water
- 2 tbsp unsweetened cocoa powder
Instructions
- Preheat your oven to 350°F and line a 10×15-inch jelly roll pan with parchment paper.
- In a large bowl, beat the 4 eggs and ¾ cup granulated sugar with a mixer on high speed for 5 minutes until pale and thick. Tip: Room-temperature eggs whip up fluffier for a lighter sponge.
- Mix in 1 tsp vanilla extract.
- Sift together ¾ cup flour, ¼ cup cocoa powder, 1 tsp baking powder, and ¼ tsp salt, then gently fold into the egg mixture until just combined.
- Spread the batter evenly into the prepared pan and bake for 10–12 minutes, until the top springs back when lightly touched.
- While warm, dust a clean kitchen towel with 2 tbsp powdered sugar and invert the cake onto it. Carefully peel off the parchment.
- Starting from a short end, roll the cake up with the towel inside and let it cool completely on a wire rack for about 1 hour. Tip: Rolling while warm prevents cracking later.
- For the filling, beat 1 cup heavy cream to stiff peaks in a chilled bowl.
- In another bowl, beat 8 oz cream cheese, ½ cup powdered sugar, 2 tbsp dissolved coffee, and 2 tbsp cocoa powder until smooth.
- Fold the whipped cream into the cream cheese mixture gently to keep it airy.
- Unroll the cooled cake, spread the mocha filling evenly, leaving a ½-inch border, and re-roll tightly without the towel.
- Place seam-side down on a serving plate, dust with extra powdered sugar, and refrigerate for at least 2 hours before slicing. Tip: Chilling firms up the filling for cleaner cuts.
This cake boasts a tender, springy sponge wrapped around a velvety mocha filling that’s not too sweet. The coffee-chocolate combo gives it a sophisticated kick, perfect with a hot cocoa or espresso. Try garnishing with chocolate shavings or edible holly for an extra festive touch at your holiday table.
Pecan Pie Thumbprint Cookies
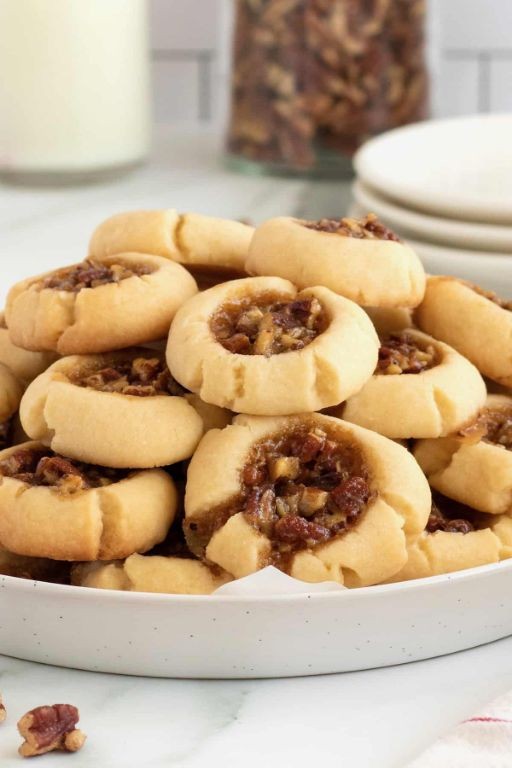
Zesty holiday baking just got a major upgrade. These pecan pie thumbprint cookies mash up two classics—buttery shortbread meets gooey pecan pie filling—into one irresistible bite-sized treat. Perfect for cookie swaps, gifting, or just demolishing straight off the tray.
Serving: 24 cookies | Pre Time: 20 minutes | Cooking Time: 12 minutes
Ingredients
– A couple of sticks of unsalted butter, softened
– A cup of granulated sugar, plus a little extra for rolling
– A couple of large eggs
– A splash of vanilla extract
– Two and a quarter cups of all-purpose flour
– A pinch of salt
– A cup of chopped pecans
– Half a cup of light corn syrup
– A third of a cup of packed brown sugar
– A tablespoon of melted butter
– Another splash of vanilla extract
Instructions
1. Preheat your oven to 350°F and line two baking sheets with parchment paper.
2. Beat the softened butter and granulated sugar in a large bowl with a mixer on medium speed for 2–3 minutes until fluffy and pale.
3. Crack in one egg and add the vanilla extract, then beat just until combined.
4. Whisk the flour and salt in a separate bowl, then gradually mix it into the wet ingredients on low speed until a soft dough forms. Tip: Don’t overmix—stop as soon as no dry flour remains to keep the cookies tender.
5. Scoop tablespoon-sized portions of dough, roll them into balls, then roll each ball in a small dish of granulated sugar to coat lightly.
6. Place the sugared balls 2 inches apart on the prepared baking sheets.
7. Press your thumb firmly into the center of each ball to create a deep, wide well. Tip: If the dough cracks, gently pinch it back together—the well should hold about a teaspoon of filling.
8. Bake for 10 minutes, then remove the sheets from the oven. The cookies will be puffed but still pale.
9. While the cookies bake, make the filling: Whisk the remaining egg, corn syrup, brown sugar, melted butter, vanilla, and chopped pecans in a medium bowl until smooth.
10. Carefully spoon about 1 teaspoon of the pecan filling into each cookie well, filling it almost to the top. Tip: Work quickly so the filling doesn’t set before baking.
11. Return the cookies to the oven and bake for another 2–3 minutes, until the filling is bubbly and the edges are lightly golden.
12. Let the cookies cool on the baking sheets for 10 minutes, then transfer them to a wire rack to cool completely.
Ultimate cookie magic happens here: the buttery, crumbly shortbread cradles a sticky-sweet, nutty center that’s pure pecan pie nostalgia. Serve them slightly warm with a dollop of whipped cream or crumble over vanilla ice cream for an instant dessert upgrade—they’re so good, you might just skip the pie altogether.
Eggnog Panna Cotta with Nutmeg
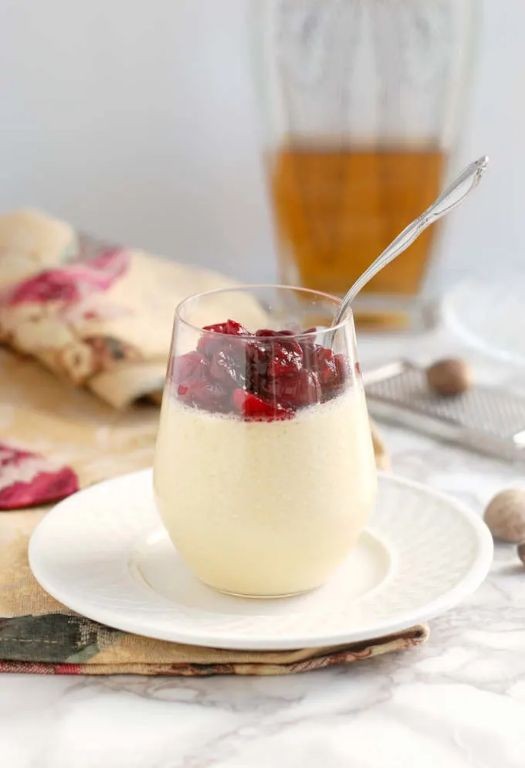
Omg, this is the holiday dessert you didn’t know you needed. It’s like your favorite creamy eggnog decided to get fancy and set up shop in a glass. Seriously, it’s a total vibe.
Serving: 6 | Pre Time: 15 minutes | Cooking Time: 5 minutes
Ingredients
– A couple of cups of heavy cream
– A cup of good-quality eggnog (the kind you’d drink straight)
– A packet of unflavored gelatin (about 2 1/4 teaspoons)
– A half cup of granulated sugar
– A splash of vanilla extract
– A pinch of freshly grated nutmeg (plus more for dusting)
Instructions
1. Pour a quarter cup of the heavy cream into a small bowl and sprinkle the entire packet of gelatin over the top. Let it sit for 5 minutes to “bloom.”
2. While the gelatin blooms, combine the remaining heavy cream, the eggnog, and the half cup of sugar in a medium saucepan.
3. Place the saucepan over medium-low heat. Warm the mixture, stirring constantly with a whisk, for about 5 minutes until the sugar is completely dissolved and tiny bubbles form around the edge. Do not let it boil.
4. Remove the saucepan from the heat and immediately whisk in the bloomed gelatin mixture until it is fully dissolved and no lumps remain.
5. Whisk in the splash of vanilla extract and the pinch of freshly grated nutmeg.
6. Strain the entire mixture through a fine-mesh sieve into a large measuring cup or bowl with a spout to catch any undissolved gelatin bits.
7. Divide the strained mixture evenly among 6 small serving glasses or ramekins.
8. Let the glasses cool to room temperature on the counter for about 30 minutes.
9. Once cooled, cover the tops of the glasses with plastic wrap and refrigerate for at least 4 hours, or ideally overnight, until completely set.
10. Just before serving, dust the top of each panna cotta with a little more freshly grated nutmeg.
But the texture is pure magic—silky, jiggly, and melts on your tongue. The flavor is all the cozy, spiced warmth of the holidays in one elegant bite. Try serving it with a drizzle of bourbon caramel or a side of ginger snap cookies for the ultimate festive moment.
Red Velvet Peppermint Trifle
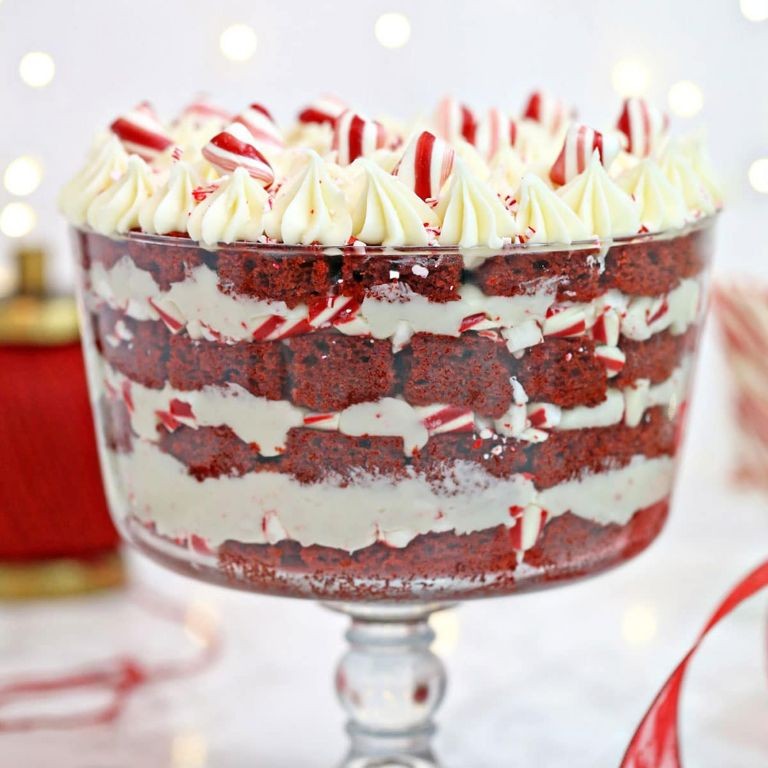
Craving holiday magic in a bowl? This Red Velvet Peppermint Trifle layers festive flavors into a showstopping dessert. Combine rich cocoa, cool peppermint, and creamy textures for a treat that’s as stunning as it is delicious.
Serving: 12 | Pre Time: 30 minutes | Cooking Time: 25 minutes
Ingredients
– A box of red velvet cake mix (plus the oil, eggs, and water it calls for)
– A couple of cups of heavy whipping cream
– A block of cream cheese (8 oz), softened
– A cup of powdered sugar
– A teaspoon of peppermint extract
– A splash of vanilla extract
– A bag of crushed peppermint candies (about 1 cup)
– A handful of chocolate shavings for topping
Instructions
1. Preheat your oven to 350°F and grease a 9×13-inch baking pan.
2. Prepare the red velvet cake mix according to the package directions, using the specified oil, eggs, and water.
3. Pour the batter into the pan and bake for 25 minutes, or until a toothpick inserted in the center comes out clean. Tip: Let the cake cool completely on a wire rack to prevent sogginess when layering.
4. While the cake cools, beat the heavy whipping cream in a large bowl with an electric mixer on high speed until stiff peaks form, about 3-4 minutes.
5. In another bowl, beat the softened cream cheese, powdered sugar, peppermint extract, and vanilla extract until smooth and creamy, about 2 minutes. Tip: Soften the cream cheese at room temperature for 30 minutes to avoid lumps.
6. Gently fold the whipped cream into the cream cheese mixture until fully combined to make the peppermint cream.
7. Crumble the cooled red velvet cake into bite-sized pieces using your hands.
8. In a trifle bowl or large glass dish, layer half of the cake crumbs, then half of the peppermint cream, and sprinkle with half of the crushed peppermint candies.
9. Repeat the layers with the remaining cake, cream, and candies. Tip: For a neat presentation, press the layers gently with a spoon to smooth them out.
10. Top with chocolate shavings and refrigerate for at least 2 hours before serving to let the flavors meld.
Just imagine digging into layers of moist red velvet cake mingled with cool, minty cream and crunchy candy bits. The contrast of rich chocolate and refreshing peppermint makes every spoonful a holiday delight—serve it in individual jars for a portable party treat!
Chocolate-Dipped Shortbread Stars
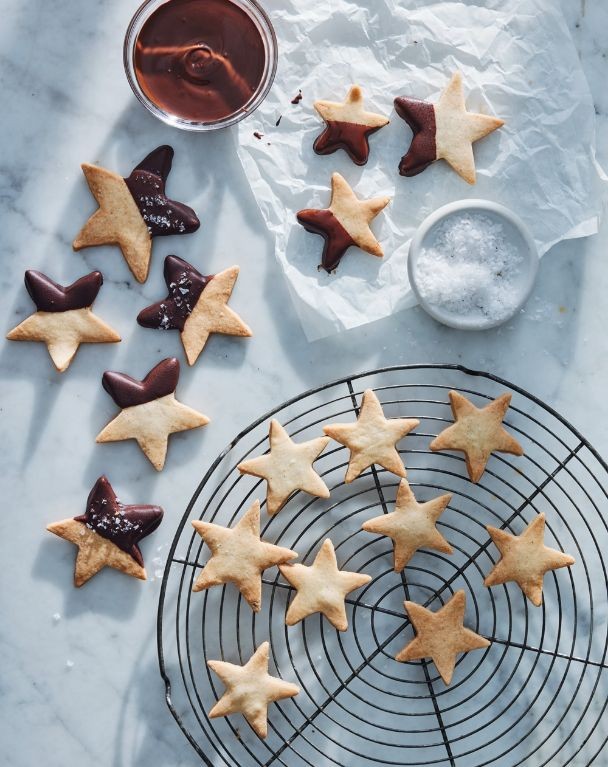
Perfect for holiday gifting or a cozy night in, these buttery shortbread stars get a glossy chocolate dip that’s pure magic. Grab your cookie cutters and let’s bake up some edible glitter.
Serving: 24 stars | Pre Time: 20 minutes | Cooking Time: 12 minutes
Ingredients
– 2 sticks of unsalted butter, softened to room temp
– 1/2 cup of granulated sugar
– 2 cups of all-purpose flour
– A big pinch of fine sea salt
– 1 teaspoon of pure vanilla extract
– 8 ounces of semi-sweet chocolate chips
– A couple of tablespoons of festive sprinkles (optional, but so fun)
Instructions
1. Preheat your oven to 325°F and line two baking sheets with parchment paper.
2. In a large bowl, beat the softened butter and sugar together with an electric mixer on medium speed for 3 minutes until light and fluffy.
3. Mix in the vanilla extract and salt until just combined.
4. Gradually add the flour, mixing on low speed until a soft dough forms and no dry streaks remain—don’t overmix.
5. Tip: Chill the dough for 15 minutes in the fridge if it feels too sticky to roll out easily.
6. On a lightly floured surface, roll the dough out to 1/4-inch thickness.
7. Use a star-shaped cookie cutter to cut out shapes, re-rolling scraps as needed.
8. Place the stars 1 inch apart on the prepared baking sheets.
9. Bake for 10–12 minutes, until the edges are just barely golden—they’ll firm up as they cool.
10. Tip: Rotate the baking sheets halfway through baking for even browning.
11. Let the cookies cool completely on the sheets for 20 minutes.
12. Melt the chocolate chips in a microwave-safe bowl in 30-second bursts, stirring between each, until smooth.
13. Dip half of each cooled cookie into the melted chocolate, letting excess drip off.
14. Immediately sprinkle with festive sprinkles if using, before the chocolate sets.
15. Tip: Place dipped cookies on a parchment-lined tray and refrigerate for 10 minutes to set the chocolate quickly.
16. Store in an airtight container at room temperature for up to a week.
You’ll love the crumbly, melt-in-your-mouth texture of the shortbread against that rich chocolate shell. Yes, they’re stunning on a holiday platter, but try crumbling one over vanilla ice cream for an instant dessert upgrade.
Spiced Pear and Almond Tart
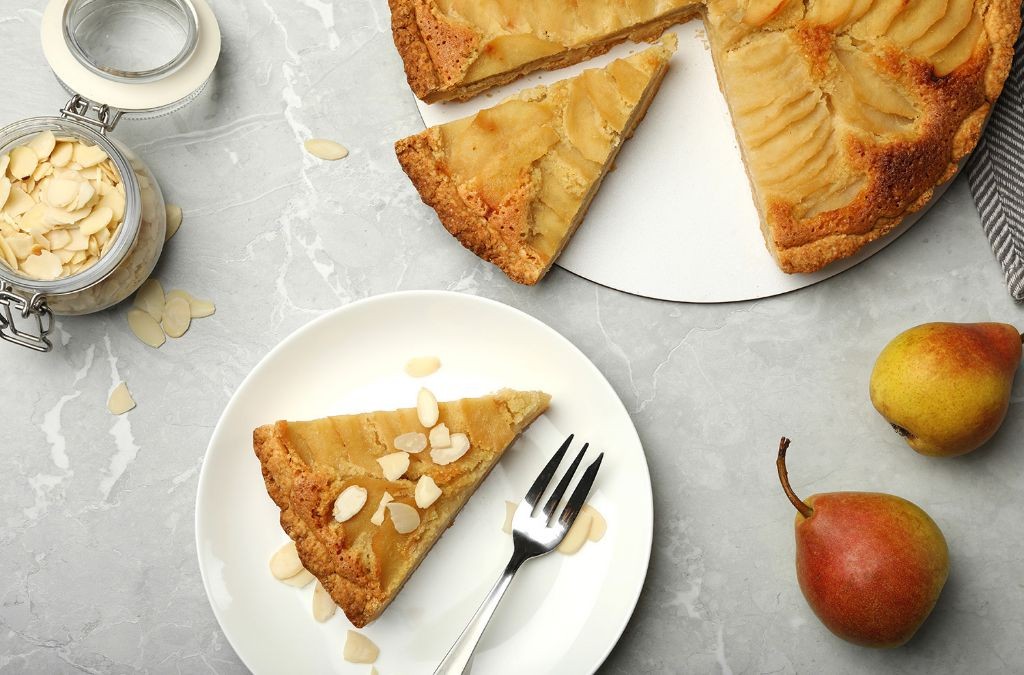
Kick your holiday dessert game into high gear with this elegant yet easy tart. Spiced pears and toasted almonds create a cozy flavor bomb that’ll impress any crowd. You’ll want seconds—trust me.
Serving: 8 | Pre Time: 25 minutes | Cooking Time: 45 minutes
Ingredients
– 1 ½ cups all-purpose flour
– A pinch of salt
– ½ cup cold unsalted butter, cubed
– 3-4 tbsp ice water
– 3 ripe but firm pears, peeled and sliced
– ½ cup granulated sugar
– 1 tsp ground cinnamon
– ¼ tsp ground nutmeg
– A splash of vanilla extract
– ¾ cup sliced almonds
– 2 tbsp honey
Instructions
1. Preheat your oven to 375°F (190°C).
2. In a large bowl, combine the flour and salt.
3. Add the cold butter cubes and use your fingers or a pastry cutter to work it into the flour until it resembles coarse crumbs.
4. Gradually add the ice water, 1 tablespoon at a time, mixing just until the dough comes together. Tip: Don’t overwork it—this keeps the crust flaky.
5. Press the dough evenly into a 9-inch tart pan with a removable bottom, covering the bottom and sides.
6. Prick the bottom all over with a fork to prevent puffing.
7. Bake the crust for 15 minutes, until lightly golden. Remove and let it cool slightly.
8. In a medium bowl, toss the pear slices with sugar, cinnamon, nutmeg, and vanilla extract until well-coated.
9. Arrange the spiced pear slices in a circular pattern over the pre-baked crust.
10. Sprinkle the sliced almonds evenly over the pears.
11. Drizzle the honey over the top. Tip: Warm the honey slightly for easier drizzling.
12. Bake at 375°F for 30 minutes, or until the pears are tender and the almonds are toasted to a golden brown. Tip: Check at 25 minutes to avoid over-browning.
13. Let the tart cool completely in the pan on a wire rack before slicing.
Warm from the oven, this tart boasts a buttery, crisp crust that contrasts beautifully with the soft, spiced pears. The toasted almonds add a delightful crunch and nutty depth. Serve it with a dollop of whipped cream or a scoop of vanilla ice cream for an extra-indulgent treat.
Hot Chocolate Fudge Pudding

Zap your winter blues with this decadent dessert that’s half cake, half gooey pudding. Think molten lava cake’s cozy cousin—it bakes into a rich chocolate cake with a hidden layer of warm fudge sauce underneath. Grab a spoon and dive in.
Serving: 6 | Pre Time: 15 minutes | Cooking Time: 35 minutes
Ingredients
– 1 cup of all-purpose flour
– ¾ cup of granulated sugar, plus another ½ cup for the sauce
– ¼ cup of unsweetened cocoa powder, plus another ¼ cup for the sauce
– 2 teaspoons of baking powder
– A pinch of salt
– ½ cup of whole milk
– ¼ cup of melted unsalted butter
– 1 teaspoon of vanilla extract
– 1 cup of boiling water
Instructions
1. Preheat your oven to 350°F (175°C) and grease an 8×8-inch baking dish.
2. In a medium bowl, whisk together 1 cup of all-purpose flour, ¾ cup of granulated sugar, ¼ cup of unsweetened cocoa powder, 2 teaspoons of baking powder, and a pinch of salt until well combined.
3. Add ½ cup of whole milk, ¼ cup of melted unsalted butter, and 1 teaspoon of vanilla extract to the dry ingredients. Tip: Use a spatula to gently fold—overmixing can make the cake dense.
4. Spread the batter evenly into the prepared baking dish.
5. In a small bowl, mix ½ cup of granulated sugar and ¼ cup of unsweetened cocoa powder for the sauce.
6. Sprinkle the sugar-cocoa mixture evenly over the batter in the dish.
7. Carefully pour 1 cup of boiling water over the top—do not stir. Tip: Pour slowly to avoid splashing and disturbing the layers.
8. Bake for 30–35 minutes, until the top is set and looks like a cake with cracks. Tip: Check at 30 minutes; a toothpick inserted into the cake part should come out clean, but the bottom will be saucy.
9. Remove from the oven and let it cool for 5–10 minutes before serving.
A warm, spoonable delight with a fudgy pool beneath a tender chocolate cake. Serve it straight from the dish with a scoop of vanilla ice cream melting into the sauce, or top with whipped cream and a sprinkle of sea salt for a sweet-salty kick.
Christmas Spice Cupcakes with Cream Cheese Frosting
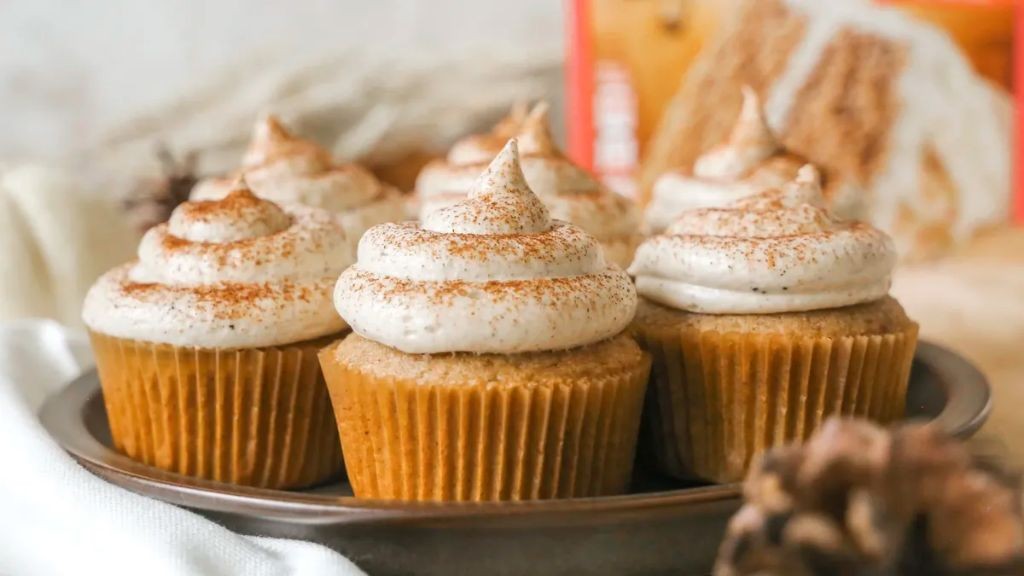
Vibe with the ultimate holiday treat that’ll make your kitchen smell like a festive dream. These Christmas Spice Cupcakes with Cream Cheese Frosting are fluffy, spiced perfection topped with a tangy-sweet cloud—your new go-to for parties or cozy nights in.
Serving: 12 | Pre Time: 15 minutes | Cooking Time: 20 minutes
Ingredients
– 1 and 1/2 cups of all-purpose flour
– 1 cup of granulated sugar
– 1/2 cup of unsalted butter, softened
– 2 large eggs
– 1/2 cup of whole milk
– 1 teaspoon of baking powder
– 1/2 teaspoon of baking soda
– 1 teaspoon of ground cinnamon
– 1/2 teaspoon of ground nutmeg
– 1/4 teaspoon of ground cloves
– A pinch of salt
– 8 ounces of cream cheese, at room temperature
– 1/4 cup of unsalted butter, softened
– 2 cups of powdered sugar
– A splash of vanilla extract
Instructions
1. Preheat your oven to 350°F and line a muffin tin with 12 cupcake liners.
2. In a large bowl, cream together 1/2 cup of softened butter and 1 cup of granulated sugar until light and fluffy, about 2-3 minutes.
3. Beat in 2 large eggs one at a time until fully incorporated.
4. In a separate bowl, whisk together 1 and 1/2 cups of flour, 1 teaspoon of baking powder, 1/2 teaspoon of baking soda, 1 teaspoon of cinnamon, 1/2 teaspoon of nutmeg, 1/4 teaspoon of cloves, and a pinch of salt.
5. Tip: Sift the dry ingredients to avoid lumps for a smoother batter.
6. Alternately add the dry mixture and 1/2 cup of milk to the butter mixture, starting and ending with the dry ingredients, mixing just until combined.
7. Divide the batter evenly among the cupcake liners, filling each about 2/3 full.
8. Bake for 18-20 minutes, or until a toothpick inserted into the center comes out clean.
9. Tip: Rotate the pan halfway through baking for even browning.
10. Let the cupcakes cool in the pan for 5 minutes, then transfer to a wire rack to cool completely.
11. While cooling, make the frosting: In a medium bowl, beat 8 ounces of cream cheese and 1/4 cup of softened butter until smooth.
12. Gradually add 2 cups of powdered sugar, beating on low speed to avoid a mess, then increase to high until fluffy.
13. Mix in a splash of vanilla extract until just combined.
14. Tip: Chill the frosting for 10 minutes if it’s too soft for easier piping.
15. Frost the cooled cupcakes using a piping bag or spatula.
Yes, these cupcakes are a total win with a moist, tender crumb infused with warm spices and a creamy frosting that’s not too sweet. Serve them topped with a sprinkle of cinnamon or crushed candy canes for a festive twist that’ll have everyone asking for seconds.
Cherry Almond Christmas Bark

Crank up the holiday cheer with this festive treat—it’s a crunchy, sweet, and salty masterpiece that’s ridiculously easy to make. Seriously, you’ll have it ready before the next Christmas movie starts.
Serving: 12 | Pre Time: 10 minutes | Cooking Time: 5 minutes
Ingredients
– 2 cups of white chocolate chips
– A couple of tablespoons of coconut oil
– A generous handful of dried cherries
– A big handful of sliced almonds
– A good pinch of flaky sea salt
Instructions
1. Line a baking sheet with parchment paper.
2. Combine the white chocolate chips and coconut oil in a microwave-safe bowl.
3. Microwave the mixture on high for 30 seconds, then stir thoroughly.
4. Repeat microwaving in 15-second intervals, stirring after each, until the chocolate is completely melted and smooth—this prevents burning.
5. Immediately pour the melted chocolate onto the prepared baking sheet.
6. Use a spatula to spread it into an even layer about ¼-inch thick.
7. Sprinkle the dried cherries evenly over the chocolate layer.
8. Sprinkle the sliced almonds evenly over the cherries.
9. Finish by sprinkling the flaky sea salt over the top for a salty contrast.
10. Let the bark sit at room temperature for 1 hour to set completely—don’t rush it or it might stay tacky.
11. Once set, break the bark into irregular pieces by hand for a rustic look.
Outrageously crunchy from the almonds and chewy from the cherries, this bark delivers a perfect sweet-and-salty punch. Serve it on a holiday platter or crumble it over ice cream for a festive twist.
Caramel Apple Bread Pudding
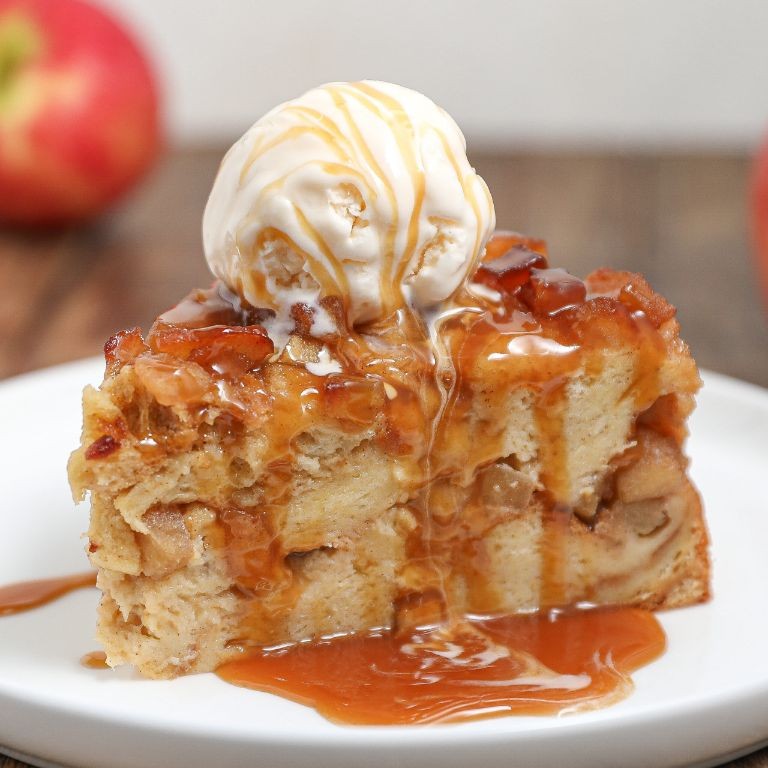
You need this cozy dessert in your life. Caramel apple bread pudding transforms stale bread into a gooey, spiced masterpiece that screams fall comfort. It’s the ultimate way to use up leftover challah or brioche.
Serving: 8 | Pre Time: 20 minutes | Cooking Time: 50 minutes
Ingredients
– About 6 cups of day-old challah or brioche, torn into bite-sized chunks
– 2 large Granny Smith apples, peeled and diced
– 1 cup of granulated sugar
– 1/2 cup of unsalted butter, plus a little extra for greasing
– 3 large eggs
– 2 cups of whole milk
– A generous splash of vanilla extract
– 1 teaspoon of ground cinnamon
– A pinch of salt
– 1/2 cup of heavy cream
– A couple of tablespoons of brown sugar for sprinkling
Instructions
1. Preheat your oven to 350°F. Grease a 9×13-inch baking dish with butter.
2. Spread the bread chunks evenly in the prepared dish. Scatter the diced apples over the top.
3. In a medium saucepan over medium heat, melt the 1/2 cup of butter. Add the granulated sugar and cook, stirring constantly, for 5-7 minutes until it turns a deep amber color and smells nutty—this is your caramel base. Tip: Don’t walk away; sugar burns quickly!
4. Carefully pour the heavy cream into the caramel—it will bubble vigorously. Stir until smooth, then remove from heat and let cool slightly for 5 minutes.
5. In a large bowl, whisk the eggs until frothy. Whisk in the milk, vanilla extract, cinnamon, and salt until fully combined.
6. Slowly pour the slightly cooled caramel into the egg mixture, whisking constantly to prevent the eggs from scrambling.
7. Pour this custard mixture evenly over the bread and apples in the dish. Use a spatula to gently press down, ensuring all bread is soaked. Let it sit for 10 minutes to absorb.
8. Sprinkle the brown sugar evenly over the top. Tip: This creates a deliciously crispy crust!
9. Bake on the middle rack for 45-50 minutes, until the top is golden brown and the center is set (a knife inserted should come out clean). Tip: Cover loosely with foil if the top browns too quickly.
10. Remove from the oven and let cool for at least 15 minutes before serving.
Perfectly rich and custardy with pockets of tender apple, this bread pudding is a hug in a dish. The caramel seeps into every bite, making it irresistibly sticky. Serve it warm with a scoop of vanilla ice cream for the ultimate contrast, or enjoy it cold straight from the fridge—it’s just as delicious the next day.
Peppermint Mocha Crème Brûlée
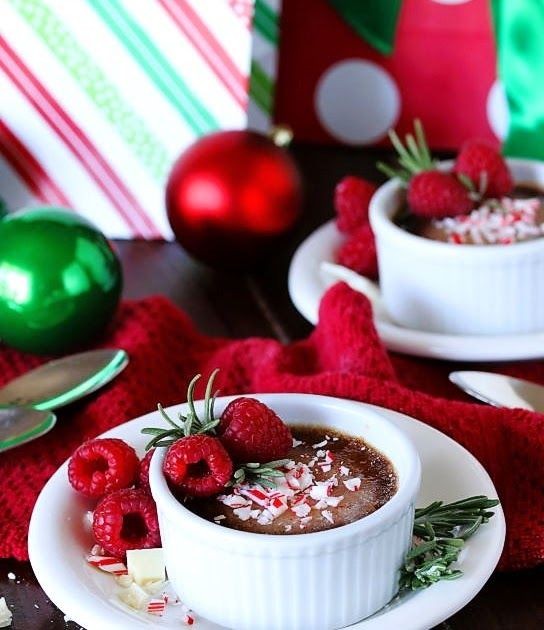
Zap your holiday dessert game with this festive twist on a classic. We’re blending rich chocolate, cool peppermint, and that iconic crackly sugar top into a showstopper. Get ready to brûlée like a pro.
Serving: 6 | Pre Time: 25 minutes | Cooking Time: 35 minutes
Ingredients
– 2 cups of heavy cream
– 5 large egg yolks
– 1/2 cup of granulated sugar, plus a little extra for that top layer
– 4 ounces of good dark chocolate, chopped up
– A splash of pure peppermint extract (about 1/2 teaspoon)
– A couple of tablespoons of strong brewed coffee, cooled
Instructions
1. Preheat your oven to 325°F and grab six 4-ounce ramekins.
2. Pour the 2 cups of heavy cream into a saucepan and heat it over medium until it just starts to simmer—you’ll see tiny bubbles around the edges.
3. Whisk the 5 large egg yolks with the 1/2 cup of granulated sugar in a bowl until it’s pale and smooth.
4. Slowly drizzle the hot cream into the egg mixture while whisking constantly to avoid scrambling the eggs.
5. Stir in the 4 ounces of chopped dark chocolate until it’s fully melted and the mixture is glossy.
6. Mix in the splash of peppermint extract and the couple of tablespoons of cooled coffee until everything is well combined.
7. Divide the custard evenly among the six ramekins.
8. Place the ramekins in a baking dish and fill the dish with hot water until it reaches halfway up the sides of the ramekins for a water bath.
9. Bake at 325°F for 30-35 minutes, until the edges are set but the centers still have a slight jiggle.
10. Carefully remove the ramekins from the water bath and let them cool to room temperature on a wire rack.
11. Chill the custards in the refrigerator for at least 4 hours, or overnight for the best texture.
12. Right before serving, sprinkle a thin, even layer of the extra granulated sugar over the top of each custard.
13. Use a kitchen torch to caramelize the sugar by moving it in slow circles until it turns golden brown and bubbly—let it harden for a minute.
Final thoughts: Feel that satisfying crack as your spoon breaks through the glassy caramel into the silky, chilled custard beneath. The rich chocolate and cool peppermint mingle with a hint of coffee for a flavor that’s pure holiday magic. Serve it straight from the fridge with a dusting of crushed candy canes for an extra festive crunch.
Gingerbread Whoopie Pies with Maple Frosting
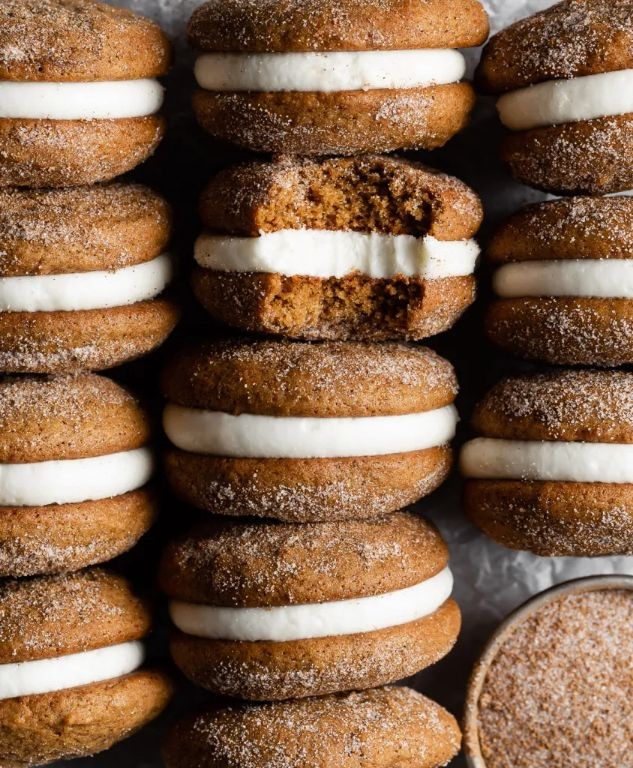
Let’s bake the holiday treat that’ll have everyone asking for seconds. These soft gingerbread cookies sandwich a dreamy maple frosting—perfect for cookie swaps or cozy nights in.
Serving: 12 | Pre Time: 20 minutes | Cooking Time: 10 minutes
Ingredients
– 2 cups of all-purpose flour
– 1 teaspoon of baking soda
– A couple of teaspoons of ground ginger
– A pinch of ground cinnamon
– A pinch of salt
– ¾ cup of unsalted butter, softened
– ½ cup of brown sugar
– ¼ cup of molasses
– 1 large egg
– A splash of vanilla extract
– 4 ounces of cream cheese, softened
– 1 cup of powdered sugar
– 2 tablespoons of pure maple syrup
Instructions
1. Preheat your oven to 350°F and line two baking sheets with parchment paper.
2. In a medium bowl, whisk together the all-purpose flour, baking soda, ground ginger, ground cinnamon, and salt until combined.
3. In a large bowl, beat the softened unsalted butter and brown sugar with an electric mixer on medium speed for 2 minutes until fluffy.
4. Add the molasses, large egg, and vanilla extract to the butter mixture, and beat for 1 minute until smooth.
5. Gradually mix in the dry ingredients from step 2 on low speed until a dough forms, scraping down the sides as needed.
6. Scoop tablespoon-sized balls of dough onto the prepared baking sheets, spacing them 2 inches apart.
7. Bake for 8-10 minutes until the edges are set and the tops spring back lightly when touched. Tip: Rotate the pans halfway through for even baking.
8. Let the cookies cool on the sheets for 5 minutes, then transfer to a wire rack to cool completely.
9. While cooling, make the frosting: In a clean bowl, beat the softened cream cheese on medium speed for 1 minute until creamy.
10. Add the powdered sugar and pure maple syrup, and beat on low speed for 30 seconds, then increase to high for 1 minute until smooth and fluffy. Tip: Chill the frosting for 10 minutes if it’s too soft to spread easily.
11. Once cookies are cool, spread about 1 tablespoon of frosting onto the flat side of half the cookies.
12. Top with the remaining cookies to form sandwiches, pressing gently to adhere. Tip: Store in an airtight container at room temperature for up to 3 days to keep them soft.
Here’s the magic: these whoopie pies boast a tender, cake-like texture with a warm ginger spice that melts into the creamy maple frosting. Serve them stacked on a festive platter or wrap individually for sweet holiday gifts—they’re so irresistible, you might just hide a few for yourself!
Summary
From decadent pies to cozy cookies, these 20 festive desserts offer something magical for every holiday gathering. We hope you find inspiration to create sweet memories in your kitchen! Give a recipe a try, then let us know your favorite in the comments. If you loved this roundup, please share it on Pinterest to spread the holiday cheer. Happy baking!