
Just imagine your next gathering transformed into an unforgettable soirée with these 18 elegant cocktail party recipes. Perfect for sophisticated hosts, this collection offers stunning appetizers and drinks that are surprisingly simple to prepare. Let’s elevate your entertaining game and impress your guests with effortless style. Dive in to discover the secrets to hosting a flawless, chic event everyone will remember.
Bacon-wrapped dates stuffed with goat cheese

Kick off your holiday party with a bite-sized marvel that’s equal parts fancy and fun—these bacon-wrapped dates stuffed with goat cheese are the ultimate sweet, salty, and creamy trifecta that’ll have guests swooning (and secretly plotting to hoard the tray). Think of them as little flavor bombs wrapped in a crispy, savory blanket, ready to elevate any gathering from ‘meh’ to magnificent in about 30 minutes flat.
Serving: 24 | Pre Time: 15 minutes | Cooking Time: 15 minutes
Ingredients
– 24 Medjool dates, pitted
– 4 ounces goat cheese, softened
– 12 slices bacon, cut in half crosswise
– 24 toothpicks
Instructions
1. Preheat your oven to 400°F and line a baking sheet with parchment paper.
2. Using a small knife, make a lengthwise slit in each pitted date to create an opening for stuffing.
3. Spoon about 1/2 teaspoon of softened goat cheese into each date, gently pressing to fill the cavity completely.
4. Wrap each stuffed date with one half-slice of bacon, ensuring the ends overlap slightly underneath.
5. Secure the bacon wrap by inserting a toothpick through the center of each date.
6. Arrange the wrapped dates seam-side down on the prepared baking sheet, spacing them about 1 inch apart.
7. Bake at 400°F for 12-15 minutes, flipping halfway through, until the bacon is crispy and golden brown.
8. Transfer the dates to a wire rack to cool for 5 minutes before serving.
So, what’s the final verdict? You’ll love the contrast of the sticky-sweet date, tangy goat cheese, and smoky, crisp bacon—it’s a textural party in every bite. Serve these warm on a platter drizzled with a touch of honey or alongside a spicy arugula salad for a playful appetizer that’s sure to disappear fast.
Smoked salmon blinis with crème fraîche and dill

Ready to impress your guests without breaking a sweat? These smoked salmon blinis are the ultimate fancy-but-easy appetizer that’ll have everyone thinking you hired a personal chef. Seriously, they’re so simple you could probably make them while binge-watching your favorite show.
Serving: 8 | Pre Time: 15 minutes | Cooking Time: 10 minutes
Ingredients
– 1 cup all-purpose flour
– 1 tsp baking powder
– 1/2 tsp salt
– 1 cup milk
– 1 large egg
– 2 tbsp unsalted butter, melted
– 4 oz smoked salmon
– 1/2 cup crème fraîche
– 2 tbsp fresh dill, chopped
Instructions
1. In a medium bowl, whisk together 1 cup all-purpose flour, 1 tsp baking powder, and 1/2 tsp salt until fully combined.
2. In a separate bowl, beat 1 large egg with 1 cup milk and 2 tbsp melted unsalted butter until smooth.
3. Tip: Pour the wet ingredients into the dry ingredients and stir gently—overmixing can make the blinis tough, so a few lumps are perfectly fine.
4. Heat a non-stick skillet or griddle over medium heat (about 350°F) and lightly grease it with butter or oil.
5. Drop tablespoon-sized portions of the batter onto the hot skillet, cooking for 1–2 minutes until bubbles form on the surface and the edges look set.
6. Tip: Flip each blini carefully with a spatula and cook for another 1–2 minutes until golden brown on both sides—this ensures a light, fluffy texture.
7. Transfer the cooked blinis to a wire rack to cool slightly; this prevents them from getting soggy.
8. While the blinis are cooling, thinly slice 4 oz smoked salmon into bite-sized pieces.
9. Tip: To assemble, spread about 1 tsp of crème fraîche onto each blini, then top with a piece of smoked salmon and a sprinkle of 2 tbsp fresh dill.
10. Arrange the blinis on a serving platter and serve immediately.
Let these little bites shine with their creamy, tangy crème fraîche balancing the rich, smoky salmon, all atop a pillowy blini. For a fun twist, try adding a squeeze of lemon or a tiny dollop of caviar to really up the elegance—perfect for holiday parties or a cozy night in!
Truffled mushrooms on toasted brioche
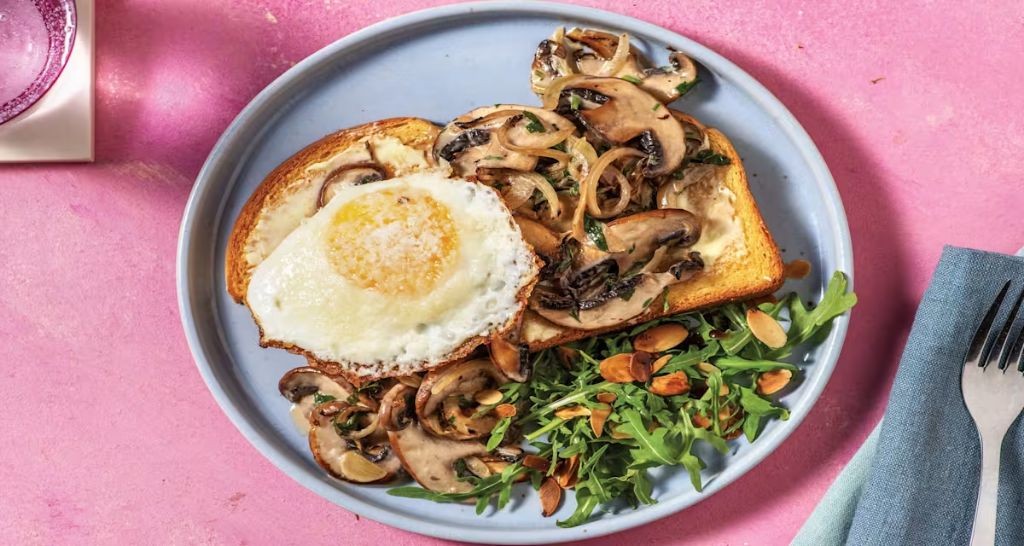
Pardon me while I interrupt your scrolling with a dish so decadent it might just make your other brunch plans jealous. Imagine earthy, umami-packed mushrooms getting a glamorous makeover with truffle oil, all piled high on buttery, golden brioche—it’s basically a fancy toast that’s shockingly easy to pull off.
Serving: 4 | Pre Time: 10 minutes | Cooking Time: 15 minutes
Ingredients
– 4 slices brioche bread
– 1 pound cremini mushrooms, sliced
– 2 tablespoons unsalted butter
– 2 tablespoons olive oil
– 2 cloves garlic, minced
– 1 teaspoon fresh thyme leaves
– 2 tablespoons truffle oil
– Salt to taste
– Freshly ground black pepper to taste
– 2 tablespoons chopped fresh parsley
Instructions
1. Preheat your oven to 375°F.
2. Place the brioche slices on a baking sheet in a single layer.
3. Toast the brioche in the oven for 5–7 minutes, until golden brown and crisp.
4. Heat a large skillet over medium-high heat and add the olive oil and unsalted butter.
5. Add the sliced cremini mushrooms to the skillet in a single layer, cooking without stirring for 3–4 minutes to develop a golden sear.
6. Stir the mushrooms and add the minced garlic and fresh thyme leaves, cooking for 1–2 minutes until fragrant.
7. Reduce the heat to medium and continue cooking the mushrooms for 5–7 minutes, stirring occasionally, until they release their moisture and become tender.
8. Remove the skillet from the heat and drizzle the truffle oil over the mushrooms, tossing to coat evenly.
9. Season the mushroom mixture with salt and freshly ground black pepper to taste.
10. Spoon the truffled mushrooms evenly over the toasted brioche slices.
11. Garnish each serving with chopped fresh parsley.
12. Serve immediately while warm.
As you take a bite, the crisp brioche gives way to the juicy, aromatic mushrooms, with the truffle oil adding a luxurious depth that’s utterly addictive. For a fun twist, top it with a poached egg or a sprinkle of grated Parmesan to make it a full meal that’s sure to impress at any gathering.
Crostini with fig jam and prosciutto
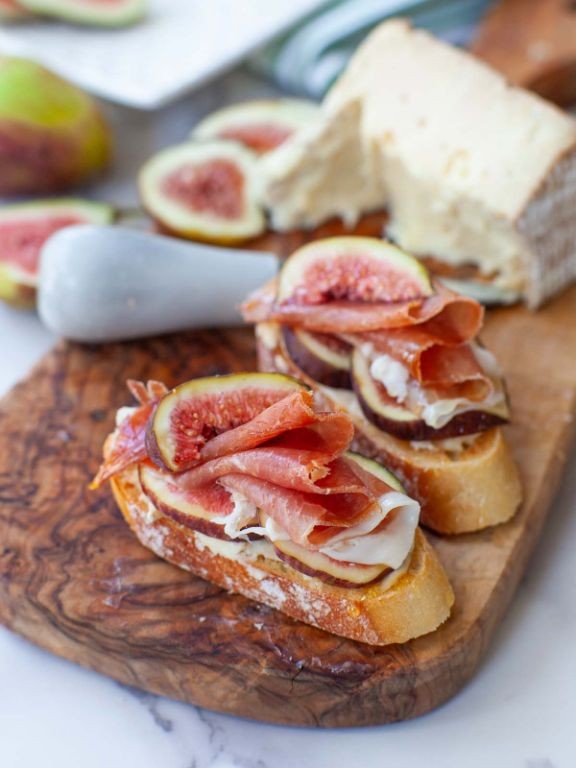
Gather ’round, snack enthusiasts, because we’re about to elevate your appetizer game from “meh” to “more, please!” with a combo that’s as classic as it is craveable. This crostini is the ultimate party trick—minimal effort for maximum flavor payoff, perfect for when you want to impress without the stress.
Serving: 12 pieces | Pre Time: 10 minutes | Cooking Time: 10 minutes
Ingredients
– 1 baguette (about 12 inches long)
– 2 tbsp olive oil
– 1/2 cup fig jam
– 4 oz thinly sliced prosciutto
– 4 oz goat cheese, at room temperature
– 1 tbsp fresh thyme leaves
– 1/4 tsp black pepper
Instructions
1. Preheat your oven to 375°F (190°C) and line a baking sheet with parchment paper.
2. Slice the baguette diagonally into 12 pieces, each about 1/2-inch thick, for maximum surface area.
3. Brush one side of each bread slice lightly with olive oil using a pastry brush.
4. Arrange the slices oiled-side up on the prepared baking sheet in a single layer.
5. Bake for 8–10 minutes, or until the edges are golden brown and crisp to the touch.
6. Remove the baking sheet from the oven and let the crostini cool on the sheet for 5 minutes to prevent sogginess.
7. Spread about 2 teaspoons of fig jam evenly onto each cooled crostini slice.
8. Tear the prosciutto slices into smaller pieces and drape them artfully over the jam layer.
9. Crumble or spread approximately 2 teaspoons of goat cheese on top of the prosciutto on each crostini.
10. Sprinkle each piece evenly with fresh thyme leaves and a pinch of black pepper.
11. Serve immediately on a platter. Tip: For best texture, assemble just before serving to keep the bread crisp.
Vividly sweet fig jam melds with salty prosciutto and tangy goat cheese, creating a delightful contrast on a crunchy canvas. The fresh thyme adds an herbal whisper that ties it all together beautifully. Try serving these on a rustic wooden board with a drizzle of balsamic glaze for an extra pop of flavor that’ll have guests coming back for seconds.
Coconut shrimp with spicy mango dipping sauce

Zesty, crispy, and downright addictive, this coconut shrimp with spicy mango dipping sauce is the tropical escape your taste buds have been dreaming of—no plane ticket required. Imagine golden-brown shrimp coated in a sweet, crunchy coconut crust, paired with a vibrant, tangy mango sauce that packs just the right punch of heat. It’s the perfect party appetizer or weeknight treat that’ll have everyone reaching for more, and honestly, who can blame them?
Serving: 4 | Pre Time: 20 minutes | Cooking Time: 10 minutes
Ingredients
– 1 pound large shrimp, peeled and deveined
– 1 cup all-purpose flour
– 2 large eggs
– 1 cup panko breadcrumbs
– 1 cup sweetened shredded coconut
– 1 teaspoon salt
– 1/2 teaspoon black pepper
– 1/4 teaspoon cayenne pepper
– 2 cups vegetable oil
– 1 ripe mango, peeled and diced
– 1/4 cup lime juice
– 1 tablespoon honey
– 1/2 teaspoon red pepper flakes
– 1/4 cup cilantro, chopped
Instructions
1. Pat the shrimp dry with paper towels to ensure the coating sticks properly.
2. In a shallow bowl, combine the flour, salt, black pepper, and cayenne pepper.
3. In a second shallow bowl, whisk the eggs until smooth.
4. In a third shallow bowl, mix the panko breadcrumbs and shredded coconut evenly.
5. Dredge each shrimp in the flour mixture, shaking off any excess.
6. Dip the floured shrimp into the beaten eggs, coating it completely.
7. Press the shrimp into the coconut-panko mixture, ensuring it’s fully covered on all sides.
8. Place the coated shrimp on a baking sheet lined with parchment paper.
9. In a large skillet, heat the vegetable oil to 350°F over medium-high heat.
10. Fry the shrimp in batches for 2–3 minutes per side until golden brown and crispy.
11. Transfer the fried shrimp to a paper towel-lined plate to drain excess oil.
12. In a blender, combine the diced mango, lime juice, honey, and red pepper flakes.
13. Blend the mixture on high speed for 30 seconds until smooth and creamy.
14. Stir in the chopped cilantro by hand for a fresh, herby finish.
15. Serve the coconut shrimp immediately with the spicy mango dipping sauce on the side.
Light and crunchy on the outside with tender, juicy shrimp inside, each bite is a tropical delight. The spicy mango sauce adds a zesty kick that balances the sweetness perfectly—try serving it over a bed of greens for a fun salad twist or alongside grilled pineapple for an extra burst of flavor.
Mini beef wellingtons with mushroom duxelles

Tired of the same old holiday appetizers? These mini beef wellingtons are here to save your party with a flaky, savory, and downright impressive bite that’s easier to pull off than you think—no culinary degree required, just a healthy dose of butter and a dash of swagger.
Serving: 12 | Pre Time: 30 minutes | Cooking Time: 25 minutes
Ingredients
– 1 lb beef tenderloin, trimmed and cut into 12 (1-inch) cubes
– 1 tbsp olive oil
– 1/2 tsp kosher salt
– 1/4 tsp black pepper
– 8 oz cremini mushrooms, finely chopped
– 2 tbsp unsalted butter
– 1 small shallot, minced
– 1 tbsp dry sherry
– 1 tsp fresh thyme leaves
– 1 sheet frozen puff pastry, thawed
– 2 tbsp Dijon mustard
– 1 large egg, beaten
– 1 tbsp water
Instructions
1. Preheat your oven to 400°F and line a baking sheet with parchment paper.
2. Pat the beef cubes dry with paper towels, then season them evenly with kosher salt and black pepper.
3. Heat olive oil in a large skillet over medium-high heat until shimmering, about 1 minute.
4. Sear the beef cubes for 1 minute per side until browned, then transfer to a plate to cool completely. Tip: Don’t overcrowd the skillet—work in batches if needed for a perfect sear.
5. In the same skillet, melt unsalted butter over medium heat and add minced shallot, cooking for 2 minutes until softened.
6. Add finely chopped cremini mushrooms and cook, stirring occasionally, for 8-10 minutes until all liquid evaporates and the mixture is dry.
7. Stir in dry sherry and fresh thyme leaves, cooking for 1 minute more, then remove from heat and let cool to room temperature. Tip: Spread the duxelles on a plate to cool faster and prevent soggy pastry.
8. Roll out the thawed puff pastry sheet on a lightly floured surface to a 12×12-inch square, then cut into 12 equal squares.
9. Spread 1/2 teaspoon of Dijon mustard on each pastry square.
10. Place a cooled beef cube in the center of each square, then top with 1 tablespoon of the cooled mushroom duxelles.
11. Fold the pastry corners over the filling, pinching the edges to seal tightly, and place seam-side down on the prepared baking sheet.
12. Whisk together the beaten egg and water in a small bowl to make an egg wash.
13. Brush the egg wash evenly over the top of each pastry bundle. Tip: Use a pastry brush for a thin, even coat to achieve a golden-brown finish.
14. Bake at 400°F for 20-25 minutes, until the pastry is puffed and golden brown.
15. Let the mini wellingtons rest for 5 minutes before serving.
Keep these beauties warm and watch them disappear—the flaky pastry gives way to juicy, medium-rare beef and an earthy mushroom filling that’s pure comfort. Serve them on a platter with a zesty aioli for dipping, or pair with a crisp salad to balance the richness.
Rosemary skewered lamb meatballs

Ever had one of those days where you’re craving something fancy but your energy level is screaming ‘takeout’? Enter these rosemary-skewered lamb meatballs—they’re basically a dinner party in a bite, but with way less fuss and way more fun. Imagine juicy, herb-kissed lamb hugged by a smoky char, all while you sip something chilled and feel wildly accomplished.
Serving: 4 | Pre Time: 20 minutes | Cooking Time: 15 minutes
Ingredients
– 1 lb ground lamb
– 1 large egg
– 1/4 cup breadcrumbs
– 2 tbsp fresh rosemary, finely chopped
– 2 cloves garlic, minced
– 1 tsp salt
– 1/2 tsp black pepper
– 2 tbsp olive oil
– 4 fresh rosemary sprigs (for skewers)
Instructions
1. Soak 4 fresh rosemary sprigs in water for 10 minutes to prevent burning on the grill.
2. In a large bowl, combine 1 lb ground lamb, 1 large egg, 1/4 cup breadcrumbs, 2 tbsp chopped rosemary, 2 cloves minced garlic, 1 tsp salt, and 1/2 tsp black pepper.
3. Mix the ingredients with your hands until just combined—overmixing can make the meatballs tough.
4. Divide the mixture into 12 equal portions and roll each into a smooth ball about 1 1/2 inches in diameter.
5. Thread 3 meatballs onto each soaked rosemary sprig, leaving a little space between them for even cooking.
6. Preheat a grill or grill pan to medium-high heat (about 400°F).
7. Brush the meatballs lightly with 2 tbsp olive oil to help them sear and prevent sticking.
8. Place the skewers on the grill and cook for 5–7 minutes per side, turning once, until they reach an internal temperature of 160°F and have a golden-brown crust.
9. Let the skewers rest for 5 minutes off the heat—this keeps the juices locked in for maximum flavor.
Zesty and tender, these meatballs boast a crispy exterior that gives way to a fragrant, rosemary-infused center. Serve them over a bed of creamy polenta or tuck them into warm pitas with a dollop of tzatziki for a handheld feast that’ll have everyone asking for seconds.
Brie and cranberry phyllo cups
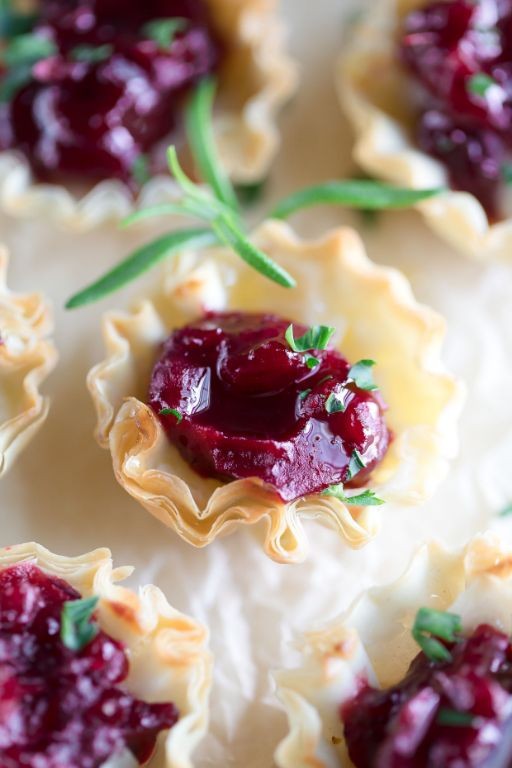
Yikes, have you ever met a more festive flavor couple than brie and cranberry? These phyllo cups are the ultimate holiday party hero—crispy, creamy, and just sweet enough to make you forget you’re technically eating a vegetable (we’re counting cranberries, okay?). They’re so easy, you’ll have more time to debate whether to wear the ugly sweater or the sparkly dress.
Serving: 24 | Pre Time: 15 minutes | Cooking Time: 12 minutes
Ingredients
– 24 phyllo dough cups
– 8 oz brie cheese
– 1/2 cup cranberry sauce
– 2 tbsp honey
– 1/4 cup chopped pecans
– Fresh rosemary for garnish
Instructions
1. Preheat your oven to 375°F and line a baking sheet with parchment paper.
2. Arrange the 24 phyllo dough cups evenly on the prepared baking sheet.
3. Cut the 8 oz brie cheese into 24 small cubes, about 1/2-inch each.
4. Place one brie cube into each phyllo cup, pressing gently to fit.
5. Spoon 1 teaspoon of cranberry sauce over the brie in each cup.
6. Drizzle 1/4 teaspoon of honey over the cranberry sauce in each cup.
7. Sprinkle 1/2 teaspoon of chopped pecans evenly over the top of each cup.
8. Bake at 375°F for 10–12 minutes, until the phyllo is golden brown and the brie is melted.
9. Remove from the oven and let cool on the baking sheet for 5 minutes to set.
10. Garnish each cup with a small sprig of fresh rosemary before serving.
Remarkably, these bites strike a perfect balance: the phyllo shatters with a delicate crunch, giving way to the oozy, rich brie and tangy cranberry. For a fun twist, try drizzling them with a balsamic glaze or serving alongside a crisp sparkling wine—they’re so addictive, you might need to hide a few for yourself!
Cucumber bites with herbed cream cheese and smoked salmon
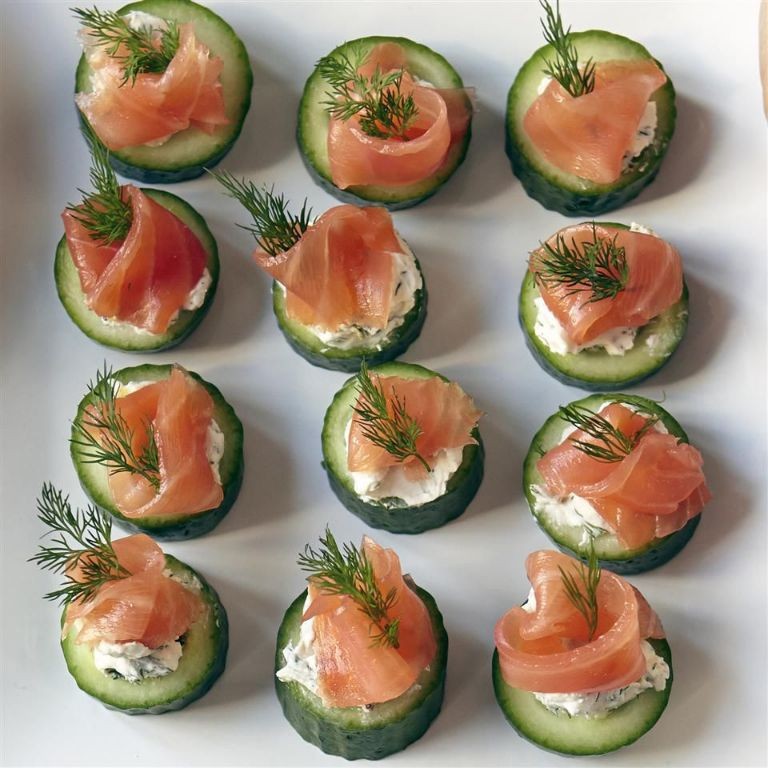
Gather ’round, snack enthusiasts, because we’re about to elevate your party platter from “meh” to “more, please!” with these ridiculously simple yet elegant cucumber bites. They’re the perfect blend of cool crunch, creamy herbaceousness, and smoky luxury that will have your guests wondering if you secretly hired a caterer.
Serving: 24 bites | Pre Time: 20 minutes | Cooking Time: 0 minutes
Ingredients
– 2 large English cucumbers
– 8 ounces cream cheese, softened to room temperature
– 2 tablespoons fresh dill, finely chopped
– 1 tablespoon fresh chives, finely chopped
– 1 teaspoon lemon zest
– 1/4 teaspoon freshly ground black pepper
– 8 ounces cold-smoked salmon, thinly sliced
– Fresh dill sprigs for garnish
Instructions
1. Wash and dry the 2 large English cucumbers thoroughly.
2. Using a sharp knife, trim and discard the ends from each cucumber.
3. Slice each cucumber crosswise into 24 rounds, approximately 1/2-inch thick, for a total of 48 rounds. Tip: For stable bases, slice the cucumbers on a flat, trimmed end to prevent rolling.
4. Arrange all 48 cucumber rounds in a single layer on a clean work surface or serving platter.
5. In a medium mixing bowl, combine the 8 ounces of softened cream cheese, 2 tablespoons of chopped fresh dill, 1 tablespoon of chopped fresh chives, 1 teaspoon of lemon zest, and 1/4 teaspoon of black pepper.
6. Using a spatula or spoon, mix the ingredients vigorously until fully combined and smooth, about 1-2 minutes. Tip: Ensure your cream cheese is truly at room temperature to avoid a lumpy mixture.
7. Using a small spoon or a piping bag fitted with a star tip, place approximately 1 teaspoon of the herbed cream cheese mixture onto the center of each of the 48 cucumber rounds.
8. Gently tear or cut the 8 ounces of cold-smoked salmon into 48 small, bite-sized pieces.
9. Carefully place one piece of smoked salmon on top of the herbed cream cheese on each cucumber round.
10. Garnish each assembled bite with a small fresh dill sprig. Tip: Assemble these bites just before serving to keep the cucumbers crisp and prevent sogginess.
11. Serve immediately on a platter. Unbelievably, these no-cook wonders deliver a symphony of textures and flavors in every single bite. The cool, crisp cucumber provides a refreshing base for the rich, tangy cream cheese and the savory, smoky salmon, creating a perfect party appetizer that looks fancy but is secretly a breeze to make. Try serving them on a slate board with lemon wedges for an extra touch of elegance that screams, “I know what I’m doing.”
Spicy tuna tartare in avocado cups

Just when you thought avocado toast had reached peak trendiness, along comes this spicy tuna tartare in avocado cups—a dish so effortlessly chic, it’ll make your brunch spread look like it hired a food stylist. Picture this: creamy avocado halves cradling a zesty, kicky tuna mixture that’s ready to party in under 20 minutes, no fancy skills required. It’s the perfect answer to ‘what’s for dinner?’ when you’re craving something fresh, fast, and fabulously Instagram-worthy.
Serving: 4 | Pre Time: 15 minutes | Cooking Time: 0 minutes
Ingredients
– 2 ripe avocados
– 8 oz sushi-grade tuna, finely diced
– 2 tbsp soy sauce
– 1 tbsp sesame oil
– 1 tbsp sriracha sauce
– 1 tbsp lime juice
– 2 tsp grated ginger
– 2 green onions, thinly sliced
– 1 tbsp toasted sesame seeds
– Salt to taste
Instructions
1. Cut the avocados in half lengthwise and remove the pits. Scoop out a small amount of flesh from each half to create a larger cavity, reserving the scooped avocado for another use.
2. In a medium bowl, combine the diced tuna, soy sauce, sesame oil, sriracha sauce, lime juice, and grated ginger. Gently mix until evenly coated. Tip: Use a sharp knife for dicing the tuna to keep the pieces clean and prevent mushiness.
3. Fold in the sliced green onions and toasted sesame seeds into the tuna mixture. Taste and add salt if needed, but be cautious as the soy sauce already adds saltiness.
4. Spoon the tuna mixture evenly into the prepared avocado halves, mounding it slightly for a generous serving. Tip: For best texture, assemble just before serving to keep the avocados from browning and the tuna fresh.
5. Arrange the filled avocado cups on a serving plate. Tip: If desired, garnish with extra sesame seeds or a drizzle of sriracha for an added visual pop.
Zesty and vibrant, this dish delivers a delightful contrast between the buttery avocado and the punchy, spicy tuna—each bite is a burst of freshness with a subtle heat that lingers. Serve it as a light appetizer at gatherings or pair it with crispy wonton chips for a fun, interactive snack that’s sure to impress even the pickiest eaters.
Parmesan crisps with whipped ricotta and honey
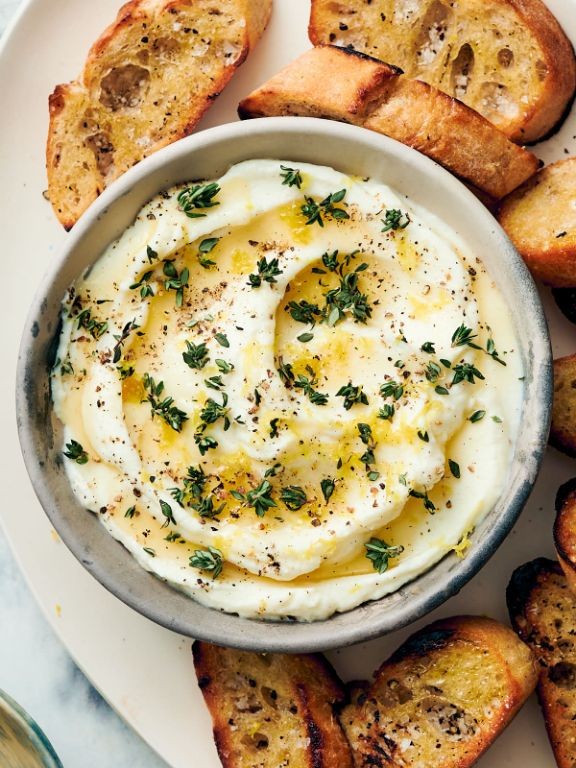
Savor this: you’re about five minutes away from the most sophisticated snack that ever pretended it wasn’t just fancy cheese and crackers. These Parmesan crisps with whipped ricotta and honey are the ultimate party trick—crispy, salty, creamy, and sweet, all in one elegant, dippable bite. They’re so easy, you’ll feel like a culinary wizard without even breaking a sweat.
Serving: 4 | Pre Time: 10 minutes | Cooking Time: 8 minutes
Ingredients
– 1 cup finely grated Parmesan cheese
– 1 cup whole-milk ricotta cheese
– 2 tablespoons honey
– 1 tablespoon fresh lemon juice
– 1/4 teaspoon kosher salt
– 1/8 teaspoon freshly ground black pepper
Instructions
1. Preheat your oven to 400°F and line a large baking sheet with parchment paper.
2. Place tablespoon-sized mounds of the grated Parmesan cheese onto the prepared baking sheet, spacing them about 2 inches apart to allow for spreading.
3. Bake the Parmesan mounds for 6 to 8 minutes, or until the edges are golden brown and the centers are bubbly. (Tip: Watch closely after 5 minutes, as they can burn quickly.)
4. Remove the baking sheet from the oven and let the crisps cool completely on the sheet for 10 minutes; they will crisp up as they cool.
5. While the crisps cool, combine the ricotta cheese, honey, lemon juice, salt, and pepper in a medium bowl.
6. Using a hand mixer or whisk, whip the ricotta mixture on medium-high speed for 2 to 3 minutes until light and fluffy. (Tip: Ensure your ricotta is well-drained to avoid a watery whip.)
7. Transfer the whipped ricotta to a serving bowl.
8. Arrange the cooled Parmesan crisps on a platter alongside the bowl of whipped ricotta.
9. Drizzle additional honey over the whipped ricotta just before serving, if desired. (Tip: For extra flair, garnish with a sprinkle of flaky sea salt or fresh thyme leaves.)
These crisps shatter with a satisfying crunch, giving way to the cloud-like, tangy-sweet ricotta. Try stacking them high for a dramatic appetizer tower, or simply let guests dive in—either way, they’re guaranteed to disappear faster than you can say ‘more cheese, please.’
Gougeres (French cheese puffs)

Unbelievably, these airy, cheesy clouds of joy—Gougeres—are about to become your new favorite party trick. They’re basically fancy French cheese puffs that look impressively gourmet but are secretly simple enough to whip up while binge-watching your favorite show. Just try not to eat them all straight off the baking sheet (we won’t judge).
Serving: 24 | Pre Time: 15 minutes | Cooking Time: 25 minutes
Ingredients
– 1 cup water
– 1/2 cup unsalted butter
– 1/4 teaspoon salt
– 1 cup all-purpose flour
– 4 large eggs
– 1 cup grated Gruyère cheese
– 1/4 teaspoon black pepper
Instructions
1. Preheat your oven to 425°F and line two baking sheets with parchment paper.
2. In a medium saucepan over medium heat, combine 1 cup water, 1/2 cup unsalted butter, and 1/4 teaspoon salt, bringing it to a rolling boil.
3. Tip: Once boiling, immediately remove the pan from heat to prevent the butter from separating.
4. Add 1 cup all-purpose flour all at once, stirring vigorously with a wooden spoon until the mixture forms a smooth ball that pulls away from the sides of the pan, about 1 minute.
5. Tip: Let the dough cool for 5 minutes before adding eggs to avoid scrambling them.
6. Beat in 4 large eggs, one at a time, ensuring each is fully incorporated before adding the next; the dough will become glossy and slightly sticky.
7. Stir in 1 cup grated Gruyère cheese and 1/4 teaspoon black pepper until evenly distributed.
8. Using a tablespoon or a small cookie scoop, drop rounded mounds of dough onto the prepared baking sheets, spacing them about 2 inches apart.
9. Tip: For extra crispiness, lightly wet your fingers and smooth any peaks on the dough mounds before baking.
10. Bake at 425°F for 10 minutes, then reduce the oven temperature to 375°F without opening the door, and bake for an additional 12-15 minutes until the puffs are golden brown and sound hollow when tapped.
11. Remove from the oven and immediately poke each puff with a toothpick to release steam, preventing sogginess.
12. Let cool on the baking sheets for 5 minutes before serving warm.
Golden and crisp on the outside with a tender, cheesy interior, these Gougeres offer a delightful contrast that’s simply irresistible. Serve them still warm from the oven alongside a glass of wine for an elegant appetizer, or get creative by splitting them and filling with herbed cream cheese for a savory snack. Their light, airy texture makes them perfect for popping straight into your mouth—just try to save some for your guests!
Mini lobster rolls with tarragon mayo

Gather ’round, seafood lovers, because we’re about to make your party-platter dreams come true with a bite-sized twist on a coastal classic. These mini lobster rolls are the ultimate fancy-fun finger food, packing all the luxurious flavor of the original into adorable, poppable packages that will have your guests swooning (and secretly hoping you made a double batch). Forget the fuss of a full-sized sandwich—this is all about maximum deliciousness with minimal commitment.
Serving: 12 | Pre Time: 20 minutes | Cooking Time: 5 minutes
Ingredients
– 1 lb cooked lobster meat, chopped
– 1/2 cup mayonnaise
– 1 tbsp fresh tarragon, finely chopped
– 1 tbsp lemon juice
– 1/4 tsp salt
– 1/8 tsp black pepper
– 12 mini hot dog buns
– 2 tbsp unsalted butter, melted
Instructions
1. Preheat your oven to 350°F (175°C) and line a baking sheet with parchment paper.
2. In a medium mixing bowl, combine 1/2 cup mayonnaise, 1 tbsp fresh tarragon, 1 tbsp lemon juice, 1/4 tsp salt, and 1/8 tsp black pepper. Whisk vigorously until the mixture is smooth and fully incorporated.
3. Gently fold 1 lb of chopped cooked lobster meat into the tarragon mayo mixture using a rubber spatula until evenly coated. Tip: For the best texture, avoid overmixing to keep the lobster tender.
4. Place 12 mini hot dog buns on the prepared baking sheet. Brush the inside and top of each bun evenly with 2 tbsp of melted unsalted butter.
5. Toast the buns in the preheated oven for 4–5 minutes, or until they turn golden brown and crisp on the edges. Tip: Watch closely after 4 minutes to prevent burning, as oven temperatures can vary.
6. Remove the toasted buns from the oven and let them cool on the baking sheet for 2 minutes to set slightly.
7. Spoon the lobster salad mixture evenly into each toasted bun, filling them generously without overflowing. Tip: Use a small spoon or piping bag for neat, mess-free assembly.
8. Arrange the filled mini lobster rolls on a serving platter.
Kindly note that these little gems boast a delightful contrast of textures—the buttery, crisp bun gives way to a creamy, herbaceous filling with sweet, succulent lobster bites. Serve them immediately as a show-stopping appetizer, or get creative by pairing them with a zesty cucumber salad for a light, elegant lunch that feels like a seaside vacation on a plate.
Stuffed mini peppers with feta and olives

Hold onto your aprons, folks, because we’re about to turn those adorable mini peppers into the ultimate, flavor-packed party starters that’ll disappear faster than your New Year’s resolutions! These little guys are the perfect blend of salty, creamy, and sweet, guaranteed to be the star of any gathering.
Serving: 6 | Pre Time: 15 minutes | Cooking Time: 20 minutes
Ingredients
– 1 lb mini sweet peppers
– 4 oz feta cheese, crumbled
– 1/4 cup kalamata olives, pitted and finely chopped
– 2 tbsp olive oil
– 1/2 tsp dried oregano
– 1/4 tsp black pepper
Instructions
1. Preheat your oven to 400°F (200°C) and line a baking sheet with parchment paper.
2. Carefully slice each mini pepper in half lengthwise and use a small spoon to remove all seeds and membranes. Tip: A grapefruit spoon works wonders for this task!
3. In a medium mixing bowl, combine the crumbled feta cheese, finely chopped kalamata olives, dried oregano, and black pepper.
4. Evenly divide the feta and olive mixture among the pepper halves, pressing it gently into place.
5. Arrange the stuffed peppers in a single layer on your prepared baking sheet.
6. Drizzle the olive oil evenly over all the stuffed peppers.
7. Place the baking sheet in the preheated oven and bake for 18-20 minutes. Tip: Bake until the peppers are tender and the feta just begins to get golden spots.
8. Remove the baking sheet from the oven and let the peppers cool for 5 minutes before serving. Tip: This brief rest allows the filling to set slightly, making them easier to pick up.
What you get is a fantastic contrast of the soft, warm, and slightly sweet pepper against the salty, tangy, and creamy filling. Try serving them atop a bed of lemony arugula for a light lunch or alongside grilled chicken for a complete, colorful meal.
Pulled pork sliders with apple cider slaw

Oh, the holidays have us all craving something that feels like a warm hug but doesn’t require a nap afterward—enter these pulled pork sliders with apple cider slaw, your new go-to for feeding a crowd without losing your sanity. Imagine tender, slow-cooked pork piled high on soft buns, topped with a crisp, tangy slaw that cuts through the richness like a culinary high-five. It’s the kind of dish that makes guests ask for the recipe while secretly hoping you’ll just hand them another slider.
Serving: 12 | Pre Time: 20 minutes | Cooking Time: 8 hours
Ingredients
– 4 lbs pork shoulder
– 1 tbsp salt
– 1 tbsp black pepper
– 1 tbsp smoked paprika
– 1 cup apple cider vinegar
– 1/2 cup brown sugar
– 1/4 cup ketchup
– 2 tbsp Worcestershire sauce
– 12 slider buns
– 4 cups shredded cabbage
– 1 cup shredded carrots
– 1/2 cup mayonnaise
– 2 tbsp apple cider vinegar
– 1 tbsp honey
– 1 tsp celery seed
Instructions
1. Preheat your oven to 300°F.
2. Pat the pork shoulder dry with paper towels to ensure a better crust.
3. In a small bowl, mix 1 tbsp salt, 1 tbsp black pepper, and 1 tbsp smoked paprika.
4. Rub the spice mixture evenly over the entire surface of the pork shoulder.
5. Place the pork shoulder in a large Dutch oven or roasting pan.
6. In a separate bowl, whisk together 1 cup apple cider vinegar, 1/2 cup brown sugar, 1/4 cup ketchup, and 2 tbsp Worcestershire sauce.
7. Pour the liquid mixture over the pork shoulder in the pan.
8. Cover the pan tightly with a lid or aluminum foil.
9. Cook in the preheated oven for 8 hours, until the pork shreds easily with a fork.
10. Remove the pork from the oven and let it rest for 15 minutes to retain juices.
11. While the pork rests, shred it using two forks, discarding any large fat pieces.
12. In a large bowl, combine 4 cups shredded cabbage, 1 cup shredded carrots, 1/2 cup mayonnaise, 2 tbsp apple cider vinegar, 1 tbsp honey, and 1 tsp celery seed.
13. Toss the slaw mixture until evenly coated, then refrigerate for 10 minutes to crisp up.
14. Toast the 12 slider buns lightly in a toaster or oven at 350°F for 3 minutes.
15. Assemble the sliders by placing a generous portion of pulled pork on each bun bottom.
16. Top the pork with a spoonful of apple cider slaw.
17. Place the bun tops over the slaw to complete the sliders.
18. Serve immediately while warm.
Gloriously messy and packed with flavor, these sliders offer a perfect balance of smoky, sweet pork and crunchy, tangy slaw that’ll have everyone reaching for seconds. Try serving them with extra slaw on the side for a refreshing crunch, or drizzle a bit of the cooking juices over the top for an extra burst of savory goodness—they’re ideal for game days or casual gatherings where finger food reigns supreme.
Grilled peach and burrata bruschetta

Y’all, if you’re looking for a dish that screams “summer vibes” while making you feel like a culinary genius with minimal effort, you’ve hit the jackpot. This grilled peach and burrata bruschetta is the ultimate crowd-pleaser—sweet, savory, creamy, and crunchy all in one glorious bite. It’s basically a party on toast, and trust me, your guests will be begging for the recipe (or at least a second helping!).
Serving: 4 | Pre Time: 10 minutes | Cooking Time: 8 minutes
Ingredients
- 4 slices rustic bread, 1/2-inch thick
- 2 ripe peaches, pitted and sliced into 1/2-inch wedges
- 1 ball burrata cheese (8 oz)
- 2 tbsp extra virgin olive oil
- 1 tbsp balsamic glaze
- 1/4 tsp flaky sea salt
- 1/4 tsp freshly ground black pepper
- 4 fresh basil leaves, thinly sliced
Instructions
- Preheat a grill or grill pan to medium-high heat (about 400°F).
- Brush both sides of the bread slices lightly with 1 tbsp olive oil.
- Place the bread on the grill and cook for 2–3 minutes per side until crisp and lightly charred. Tip: Press down gently with a spatula for even grill marks.
- Transfer the grilled bread to a serving plate.
- Brush the peach slices with the remaining 1 tbsp olive oil.
- Place the peaches on the grill and cook for 1–2 minutes per side until softened and grill marks appear. Tip: Don’t move them too soon—let them sear properly for that caramelized flavor.
- Arrange the grilled peach slices evenly over the toasted bread.
- Carefully tear the burrata ball into pieces and distribute it over the peaches. Tip: Use your hands for a rustic look, but a knife works if you prefer neat chunks.
- Drizzle the balsamic glaze evenly over each bruschetta.
- Sprinkle with flaky sea salt and black pepper.
- Garnish with sliced basil leaves just before serving.
Combining the warm, juicy peaches with the cool, creamy burrata creates a delightful contrast in textures, while the balsamic adds a tangy sweetness that ties it all together. Serve these immediately for the best experience—maybe with a crisp white wine in hand—and watch them disappear faster than you can say “more please!”
Summary
Masterfully curated, this collection transforms hosting into an art form. Each recipe offers elegance without complexity, perfect for creating memorable evenings. We’d love to hear which cocktails became the stars of your party—share your favorites in the comments below! If you found inspiration here, help other hosts discover these gems by pinning this article to your Pinterest boards. Cheers to your next sophisticated gathering!


