
Snuggle up, home cooks! When the temperature drops and you crave something warm and satisfying, nothing beats a comforting meal. We’ve gathered 20 cozy recipes perfect for chilly days—think hearty soups, rich casseroles, and soul-warming desserts. Whether you’re after a quick dinner or a weekend project, these dishes promise to fill your home with delicious aromas and your belly with joy. Let’s dive into the ultimate comfort food lineup!
Creamy Tomato Basil Soup

Finally, after a long day of holiday shopping in the chilly December air, I found myself craving the ultimate comfort food—a warm, creamy bowl of tomato basil soup. There’s something magical about how this simple dish can transform basic pantry staples into a velvety, soul-soothing meal that feels like a hug from the inside out. I love making a big batch on Christmas Eve to enjoy with grilled cheese sandwiches while wrapping last-minute gifts.
Serving: 4 | Pre Time: 10 minutes | Cooking Time: 25 minutes
Ingredients
– 2 tablespoons extra virgin olive oil (my go-to for its fruity flavor)
– 1 medium yellow onion, diced (I always keep these on hand for soups)
– 3 cloves garlic, minced (fresh is best here—it makes all the difference)
– 1 (28-ounce) can crushed tomatoes (I prefer San Marzano for their sweetness)
– 2 cups vegetable broth (homemade if you have it, but store-bought works fine)
– 1/2 cup heavy cream (room temperature to prevent curdling)
– 1/4 cup fresh basil leaves, chopped (don’t skimp—it adds that bright, herby punch)
– 1 teaspoon granulated sugar (just a pinch to balance the acidity)
– Salt and black pepper (I start with 1/2 teaspoon salt and adjust later)
Instructions
1. Heat 2 tablespoons extra virgin olive oil in a large pot over medium heat until shimmering, about 2 minutes.
2. Add 1 diced yellow onion and cook, stirring occasionally, until softened and translucent, about 5 minutes.
3. Stir in 3 minced garlic cloves and cook for 1 minute until fragrant—be careful not to burn it.
4. Pour in 1 can crushed tomatoes and 2 cups vegetable broth, then bring to a gentle boil.
5. Reduce heat to low, cover the pot, and simmer for 15 minutes to let the flavors meld.
6. Carefully transfer the soup to a blender and blend on high until completely smooth, about 1 minute (tip: hold the lid with a towel to avoid steam burns).
7. Return the blended soup to the pot over low heat and stir in 1/2 cup heavy cream until fully incorporated.
8. Add 1/4 cup chopped fresh basil, 1 teaspoon sugar, 1/2 teaspoon salt, and 1/4 teaspoon black pepper, then simmer for 5 more minutes (tip: taste and adjust seasoning here—I often add a pinch more salt).
9. Ladle the soup into bowls and serve immediately.
Keeping it cozy, this soup turns out luxuriously smooth with a rich tomato flavor that’s perfectly balanced by the sweet basil and creamy finish. I love topping it with a drizzle of olive oil and extra basil leaves, or pairing it with crispy garlic bread for dipping—it’s the kind of meal that makes any winter evening feel special.
Cheesy Potato and Bacon Chowder

Cozying up with a warm bowl of this chowder is my favorite way to spend a chilly evening. I first made this for a holiday potluck years ago, and it’s been a family request ever since—there’s something magical about that cheesy, smoky combination. It’s the ultimate comfort food that feels like a hug in a bowl.
Serving: 6 | Pre Time: 15 minutes | Cooking Time: 35 minutes
Ingredients
– 6 slices of thick-cut bacon, chopped (I always grab the applewood-smoked kind for extra flavor)
– 1 medium yellow onion, finely diced (a sharp knife makes this quick!)
– 3 cloves garlic, minced (fresh is best here—it really brightens the soup)
– 4 cups russet potatoes, peeled and diced into 1/2-inch cubes (about 3 large potatoes)
– 4 cups chicken broth (I use low-sodium so I can control the salt)
– 1 cup heavy cream (room temperature helps it blend smoothly)
– 2 cups shredded sharp cheddar cheese (I prefer grating my own—it melts better than pre-shredded)
– 1/2 cup sour cream (full-fat gives the richest texture)
– 2 tablespoons unsalted butter (my go-to for sautéing)
– 1 teaspoon dried thyme
– Salt and black pepper to taste (I start with 1/2 teaspoon salt and adjust later)
Instructions
1. In a large Dutch oven or heavy-bottomed pot over medium heat, cook the chopped bacon until crispy, about 8–10 minutes, stirring occasionally. Tip: Render the fat slowly for maximum crispiness.
2. Remove the bacon with a slotted spoon and set it aside on a paper towel-lined plate, leaving about 2 tablespoons of bacon fat in the pot.
3. Add the unsalted butter to the bacon fat in the pot, letting it melt completely over medium heat.
4. Add the finely diced onion to the pot and sauté until translucent and soft, about 5 minutes, stirring frequently.
5. Stir in the minced garlic and cook for 1 minute until fragrant, being careful not to let it burn.
6. Add the diced potatoes and dried thyme to the pot, tossing to coat them in the fat and aromatics.
7. Pour in the chicken broth, ensuring the potatoes are fully submerged, and bring the mixture to a boil over high heat.
8. Reduce the heat to medium-low, cover the pot, and simmer for 15–20 minutes until the potatoes are fork-tender. Tip: Check at 15 minutes to avoid overcooking.
9. Use a potato masher to gently mash about half of the potatoes right in the pot—this thickens the chowder beautifully while leaving some chunks for texture.
10. Stir in the heavy cream and sour cream until fully incorporated, heating the mixture through over low heat for 3–4 minutes without boiling.
11. Gradually add the shredded cheddar cheese, one handful at a time, stirring constantly until melted and smooth, about 2–3 minutes. Tip: Add the cheese off the heat to prevent separation.
12. Season with salt and black pepper, starting with 1/2 teaspoon salt and adjusting to your preference.
13. Ladle the chowder into bowls and top with the reserved crispy bacon.
What makes this chowder special is its velvety texture with tender potato bits, all wrapped in a smoky, cheesy broth. I love serving it with crusty bread for dipping or garnishing with fresh chives for a pop of color—it’s hearty enough to be a meal on its own.
Spicy Chili with Cornbread

Perfect for a cozy winter evening, this spicy chili with cornbread is my go-to comfort meal when I want something hearty and satisfying. I first made it for a holiday potluck years ago, and now it’s a family tradition—everyone loves the kick from the chili and the sweet, crumbly cornbread on the side.
Serving: 6 | Pre Time: 20 minutes | Cooking Time: 45 minutes
Ingredients
- 1 lb ground beef (I use 80/20 for the best flavor)
- 1 onion, diced (yellow onions are my favorite here)
- 2 cloves garlic, minced (freshly minced makes all the difference)
- 1 tbsp olive oil (extra virgin olive oil is my go-to)
- 1 can (15 oz) kidney beans, drained and rinsed
- 1 can (15 oz) diced tomatoes
- 2 tbsp chili powder (adjust if you’re sensitive to heat)
- 1 tsp cumin
- 1 cup cornmeal (I prefer fine-grain for a smoother texture)
- 1 cup all-purpose flour
- 1 tbsp sugar (a little sweetness balances the spice)
- 1 cup milk (whole milk gives the cornbread a richer taste)
- 1 egg (I prefer room temp eggs here for better mixing)
- 1/4 cup melted butter
- 1 tsp baking powder
- 1/2 tsp salt
Instructions
- Heat 1 tbsp olive oil in a large pot over medium-high heat until it shimmers, about 2 minutes.
- Add 1 lb ground beef and cook, breaking it up with a spoon, until browned, about 5-7 minutes.
- Add 1 diced onion and 2 minced garlic cloves to the pot, stirring until softened, about 3-4 minutes.
- Stir in 2 tbsp chili powder and 1 tsp cumin, coating the meat mixture evenly for 1 minute to toast the spices.
- Pour in 1 can diced tomatoes and 1 can kidney beans, bringing the mixture to a simmer.
- Reduce heat to low, cover, and let the chili simmer for 30 minutes, stirring occasionally to prevent sticking.
- While the chili simmers, preheat your oven to 400°F and grease an 8-inch baking dish.
- In a large bowl, whisk together 1 cup cornmeal, 1 cup all-purpose flour, 1 tbsp sugar, 1 tsp baking powder, and 1/2 tsp salt until well combined.
- In a separate bowl, beat 1 egg lightly, then mix in 1 cup milk and 1/4 cup melted butter until smooth.
- Pour the wet ingredients into the dry ingredients, stirring just until combined—avoid overmixing to keep the cornbread tender.
- Transfer the batter to the greased baking dish, spreading it evenly with a spatula.
- Bake the cornbread at 400°F for 20-25 minutes, or until a toothpick inserted in the center comes out clean and the top is golden brown.
- Remove the cornbread from the oven and let it cool in the dish for 5 minutes before slicing.
- Serve the chili hot, ladled into bowls, with a slice of warm cornbread on the side.
Keep in mind that the chili thickens as it sits, so if you prefer it saucier, add a splash of water before serving. The cornbread should be slightly crumbly and sweet, perfect for soaking up the spicy, savory broth—try crumbling a piece right into your bowl for an extra cozy bite!
French Onion Soup with Gruyère

Unwrapping the layers of flavor in a classic French onion soup feels like discovering a culinary treasure map—each caramelized onion, each simmering broth, and that glorious melted Gruyère topping leads to pure comfort. I first fell for this soup on a chilly Paris trip years ago, and now, making it at home has become my go-to cozy ritual, especially during holiday seasons when the kitchen smells like heaven.
Serving: 4 | Pre Time: 15 minutes | Cooking Time: 60 minutes
Ingredients
– 4 large yellow onions, thinly sliced (I always grab an extra because they shrink so much during caramelization)
– 3 tbsp unsalted butter (I prefer unsalted to control the saltiness better)
– 2 tbsp extra virgin olive oil, my go-to for a richer base
– 4 cups beef broth, homemade if you have it, but a good store-bought works fine
– 1 cup dry white wine, like a Sauvignon Blanc, which adds a nice acidity
– 2 tsp fresh thyme leaves, stripped from the stems (dried works in a pinch, but fresh is worth it)
– 1 bay leaf, a little secret for depth
– Salt and freshly ground black pepper, to season as you go
– 4 slices of baguette, toasted until crisp
– 1 1/2 cups shredded Gruyère cheese, because that nutty melt is non-negotiable
Instructions
1. Heat a large Dutch oven or heavy pot over medium heat and add the unsalted butter and extra virgin olive oil until the butter melts completely.
2. Add the thinly sliced yellow onions to the pot and stir to coat them in the fat.
3. Cook the onions over medium-low heat, stirring occasionally, for about 40-45 minutes until they turn a deep golden brown and caramelize—be patient here, as rushing can burn them.
4. Pour in the dry white wine to deglaze the pot, scraping up any browned bits from the bottom with a wooden spoon.
5. Add the beef broth, fresh thyme leaves, and bay leaf to the pot, then bring the mixture to a gentle boil.
6. Reduce the heat to low, cover the pot, and let the soup simmer for 20 minutes to allow the flavors to meld together.
7. While the soup simmers, preheat your oven’s broiler to high and place the baguette slices on a baking sheet.
8. Toast the baguette slices under the broiler for 2-3 minutes per side until they are crisp and lightly browned—watch closely to avoid burning.
9. Remove the bay leaf from the soup and season with salt and freshly ground black pepper to your liking.
10. Ladle the hot soup into oven-safe bowls, top each with a toasted baguette slice, and sprinkle the shredded Gruyère cheese evenly over the bread.
11. Place the bowls on a baking sheet and broil in the oven for 3-5 minutes until the cheese is bubbly and golden brown.
12. Carefully remove the bowls from the oven using oven mitts, as they will be very hot.
Kicking back with this soup, the rich, savory broth soaked into the crisp bread and that gooey Gruyère topping creates a texture that’s both hearty and indulgent. I love serving it with a simple green salad on the side to balance the richness, and sometimes, I’ll add a splash of sherry at the end for an extra layer of warmth.
Butternut Squash and Sage Risotto

Usually, when December rolls around, I find myself craving something cozy and comforting—something that feels like a warm hug in a bowl. That’s exactly what this butternut squash and sage risotto delivers, with its creamy texture and earthy, aromatic flavors that make it a perfect centerpiece for a chilly evening or a festive holiday meal. I love how the sweetness of the squash balances the savory notes, creating a dish that’s both simple and sophisticated, and it’s become a staple in my winter cooking rotation, often paired with a glass of crisp white wine for the ultimate cozy night in.
Serving: 4 | Pre Time: 15 minutes | Cooking Time: 45 minutes
Ingredients
– 1 medium butternut squash, peeled, seeded, and diced into 1/2-inch cubes—I find this size cooks evenly without turning mushy.
– 2 tablespoons extra virgin olive oil, my go-to for its fruity flavor that enhances the dish.
– 1 small yellow onion, finely chopped—I prefer this over white onion for a sweeter base.
– 2 cloves garlic, minced, because fresh garlic adds a punch that powdered just can’t match.
– 1 1/2 cups Arborio rice, which I always keep stocked for its perfect starchiness that creates that creamy risotto texture.
– 1/2 cup dry white wine, like a Sauvignon Blanc, to deglaze the pan and add a subtle acidity.
– 4 cups low-sodium vegetable broth, warmed on the stove—this is key to prevent the rice from cooling and cooking unevenly.
– 1/4 cup fresh sage leaves, chopped, as dried sage lacks the vibrant aroma I love here.
– 1/2 cup grated Parmesan cheese, freshly grated for the best melt and flavor.
– Salt and black pepper, to season throughout—I start with a pinch and adjust as I go.
– 2 tablespoons unsalted butter, added at the end for a rich, glossy finish.
Instructions
1. Preheat your oven to 400°F and line a baking sheet with parchment paper.
2. Toss the diced butternut squash with 1 tablespoon of olive oil, a pinch of salt, and a few grinds of black pepper on the baking sheet.
3. Roast the squash in the preheated oven for 25 minutes, or until it’s tender and lightly caramelized at the edges, then set it aside.
4. While the squash roasts, heat the remaining 1 tablespoon of olive oil in a large, heavy-bottomed pot or Dutch oven over medium heat.
5. Add the chopped onion to the pot and cook for 5 minutes, stirring occasionally, until it becomes translucent and soft.
6. Stir in the minced garlic and cook for 1 minute, just until fragrant—be careful not to burn it, as it can turn bitter.
7. Add the Arborio rice to the pot and toast it for 2 minutes, stirring constantly, until the grains are lightly golden and coated in oil.
8. Pour in the white wine and cook for 2 minutes, scraping up any browned bits from the bottom of the pot, until the wine is mostly absorbed.
9. Begin adding the warmed vegetable broth, one ladleful at a time, stirring frequently and allowing each addition to be fully absorbed before adding the next—this process should take about 20-25 minutes total.
10. After about 15 minutes of adding broth, stir in the roasted butternut squash and chopped sage leaves.
11. Continue adding broth and stirring until the rice is al dente and the risotto has a creamy, porridge-like consistency.
12. Remove the pot from the heat and stir in the grated Parmesan cheese and unsalted butter until fully melted and incorporated.
13. Season with additional salt and black pepper to taste, then let the risotto rest for 2 minutes off the heat to allow the flavors to meld.
Finally, this risotto emerges with a velvety texture that clings to the spoon, punctuated by tender bites of squash and the aromatic hint of sage. For a creative twist, I sometimes top it with toasted pine nuts or a drizzle of balsamic glaze to add a crunchy or tangy contrast, making it feel extra special for guests or a quiet dinner at home.
Beef and Barley Soup
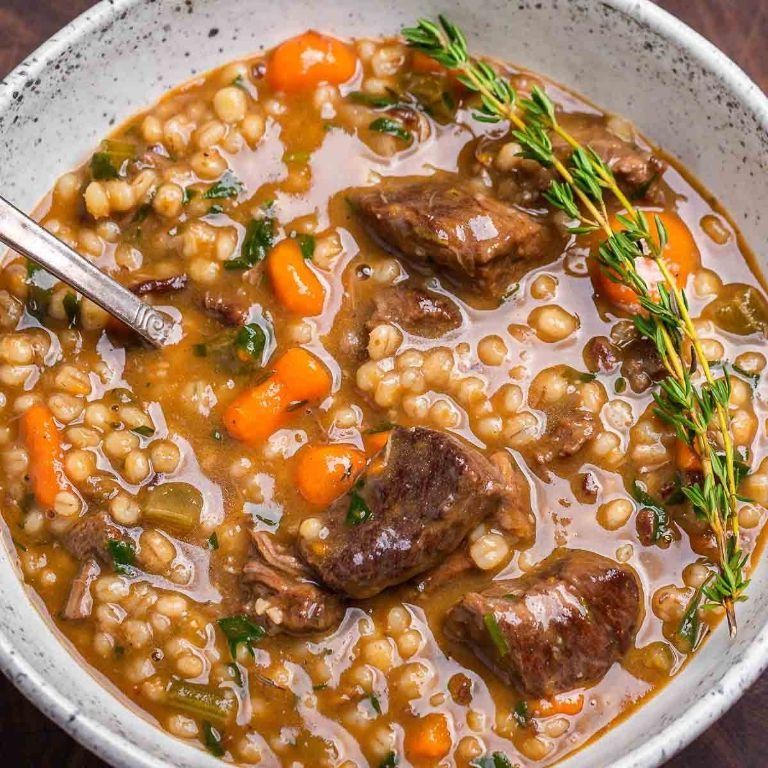
Unbelievably cozy and perfect for a chilly December evening like today, this beef and barley soup has been my go-to comfort food for years—I first made it after a long ski trip when all I craved was something hearty to warm my bones. There’s something magical about how the barley plumps up and the beef becomes fall-apart tender, making every spoonful feel like a hug in a bowl.
Serving: 6 | Pre Time: 15 minutes | Cooking Time: 90 minutes
Ingredients
– 2 lbs beef chuck roast, cut into 1-inch cubes (I trim excess fat but leave some for flavor)
– 1 tbsp extra virgin olive oil (my go-to for sautéing)
– 1 large yellow onion, diced (I always keep these on hand for soups)
– 3 carrots, peeled and sliced into ½-inch rounds
– 3 celery stalks, chopped (the leaves add great aroma, so I include them)
– 4 cloves garlic, minced (freshly minced makes all the difference)
– 6 cups beef broth (I use low-sodium to control saltiness)
– 1 cup pearl barley, rinsed (rinsing removes excess starch for a clearer broth)
– 2 bay leaves (dried works fine, but I stash fresh ones when I can)
– 1 tsp dried thyme (crush it between your fingers to release more flavor)
– Salt and black pepper (I start with ½ tsp salt and adjust later)
Instructions
1. Pat the beef cubes dry with paper towels to ensure a good sear.
2. Heat the olive oil in a large pot or Dutch oven over medium-high heat until shimmering, about 2 minutes.
3. Add the beef in a single layer, working in batches if needed, and sear until browned on all sides, about 4-5 minutes per batch. Tip: Don’t overcrowd the pot to avoid steaming the meat.
4. Transfer the seared beef to a plate and set aside.
5. Reduce the heat to medium and add the onion, carrots, and celery to the pot, scraping up any browned bits from the bottom.
6. Sauté the vegetables until softened, about 8 minutes, stirring occasionally.
7. Add the minced garlic and cook for 1 minute until fragrant.
8. Return the beef and any accumulated juices to the pot.
9. Pour in the beef broth, ensuring it covers the ingredients by about an inch.
10. Stir in the rinsed barley, bay leaves, thyme, ½ tsp salt, and ¼ tsp black pepper.
11. Bring the mixture to a boil over high heat, then reduce to a low simmer.
12. Cover the pot and let it simmer for 1 hour and 15 minutes, stirring every 20 minutes to prevent sticking. Tip: Check the barley at 1 hour—it should be tender but still chewy.
13. After simmering, remove the bay leaves and discard them.
14. Taste the soup and adjust seasoning with more salt and pepper if needed. Tip: Let it sit off the heat for 10 minutes to allow flavors to meld before serving.
15. Ladle the soup into bowls and serve hot.
Every spoonful of this soup delivers a rich, savory broth with tender beef and plump barley that soaks up all the flavors beautifully. I love serving it with a crusty loaf of bread for dipping, or for a twist, top it with a dollop of sour cream and fresh parsley to brighten it up—it’s the kind of meal that makes a cold night feel downright cozy.
Loaded Baked Potato Soup

You know those cozy winter nights when you crave something warm, hearty, and utterly comforting? That’s exactly where this loaded baked potato soup comes in—it’s like a hug in a bowl, perfect for a chilly December evening like tonight. I love making a big batch on Sundays; it reheats beautifully for quick weeknight dinners, and my family always asks for seconds.
Serving: 6 | Pre Time: 15 minutes | Cooking Time: 45 minutes
Ingredients
– 6 slices thick-cut bacon, chopped (I always grab the applewood-smoked kind for extra flavor)
– 1 large yellow onion, diced (a sweet onion works great too if you have it on hand)
– 4 cloves garlic, minced (fresh is best here—I keep a jar of minced garlic for busy days, but it’s worth the extra minute to chop fresh)
– 4 large russet potatoes, peeled and cubed into 1-inch pieces (about 6 cups total; I sometimes leave the skin on for more texture)
– 4 cups chicken broth (low-sodium is my go-to so I can control the salt)
– 1 cup heavy cream (room temperature helps it blend smoothly without curdling)
– 1 cup shredded sharp cheddar cheese (I prefer extra sharp for a bolder taste)
– 1/2 cup sour cream (full-fat gives the richest result)
– 2 tbsp unsalted butter (I always use unsalted to avoid over-salting)
– 1 tsp salt (adjust based on your broth and bacon saltiness)
– 1/2 tsp black pepper (freshly ground adds a nice kick)
– 2 green onions, thinly sliced (for garnish—I love the pop of color)
Instructions
1. In a large pot or Dutch oven over medium heat, cook the chopped bacon for 8–10 minutes, stirring occasionally, until crispy and browned. Tip: Use a slotted spoon to transfer the bacon to a paper towel-lined plate, leaving about 2 tablespoons of bacon fat in the pot.
2. Add the diced onion to the pot with the bacon fat and cook for 5–7 minutes, stirring frequently, until softened and translucent.
3. Stir in the minced garlic and cook for 1 minute, just until fragrant—be careful not to burn it.
4. Add the cubed potatoes and chicken broth to the pot, then increase the heat to high and bring to a boil.
5. Once boiling, reduce the heat to medium-low, cover the pot, and simmer for 20–25 minutes, until the potatoes are fork-tender. Tip: Check at 20 minutes by piercing a potato cube with a fork; if it slides in easily, it’s ready.
6. Use a potato masher or immersion blender to partially blend the soup, leaving some chunks for texture—I aim for about half mashed and half whole pieces.
7. Stir in the heavy cream, shredded cheddar cheese, sour cream, butter, salt, and black pepper. Cook over low heat for 5–7 minutes, stirring constantly, until the cheese is fully melted and the soup is heated through. Tip: Keep the heat low to prevent the dairy from separating.
8. Remove the pot from the heat and let it sit for 2–3 minutes to thicken slightly.
9. Ladle the soup into bowls and top with the crispy bacon and sliced green onions.
A creamy, velvety base with tender potato chunks makes this soup irresistibly rich, while the smoky bacon and sharp cheddar add depth that’s pure comfort. For a fun twist, serve it in hollowed-out bread bowls or with a side of crusty garlic bread to soak up every last drop—it’s a crowd-pleaser that always disappears fast!
Lentil and Sausage Stew

My kitchen always feels coziest when a pot of something hearty is simmering on the stove, especially as the holiday lights start to twinkle outside. This Lentil and Sausage Stew is my go-to for feeding a crowd without fuss, and it’s packed with the kind of flavor that makes everyone ask for seconds.
Serving: 6 | Pre Time: 15 minutes | Cooking Time: 45 minutes
Ingredients
– 1 tbsp extra virgin olive oil (my go-to for its fruity depth)
– 1 lb Italian sausage, casings removed (I like the mild kind, but spicy works too!)
– 1 medium yellow onion, diced
– 2 carrots, peeled and diced (they add a sweet crunch)
– 2 celery stalks, diced
– 3 garlic cloves, minced (fresh is best here, I always keep a head on hand)
– 1 cup brown lentils, rinsed
– 4 cups chicken broth (low-sodium lets you control the salt)
– 1 (14.5 oz) can diced tomatoes, undrained
– 1 tsp dried thyme
– 1 bay leaf
– Salt and black pepper
Instructions
1. Heat 1 tbsp extra virgin olive oil in a large Dutch oven or heavy pot over medium-high heat for 1 minute until shimmering.
2. Add 1 lb Italian sausage, breaking it into small chunks with a wooden spoon, and cook for 5-7 minutes until browned and no longer pink. Tip: Don’t overcrowd the pot—work in batches if needed for even browning.
3. Transfer the cooked sausage to a plate using a slotted spoon, leaving the drippings in the pot.
4. Add the diced onion, carrots, and celery to the pot and cook in the drippings for 5 minutes, stirring occasionally, until softened.
5. Stir in the minced garlic and cook for 30 seconds until fragrant. Tip: Garlic burns quickly, so keep the heat medium and watch it closely.
6. Add 1 cup rinsed brown lentils, 4 cups chicken broth, the can of diced tomatoes, 1 tsp dried thyme, and 1 bay leaf to the pot.
7. Bring the mixture to a boil over high heat, then reduce the heat to low, cover, and simmer for 25 minutes.
8. Return the cooked sausage to the pot, stir to combine, and continue simmering uncovered for 10 more minutes until the lentils are tender but not mushy. Tip: Taste a lentil to check for doneness—it should be soft with a slight bite.
9. Remove the bay leaf, season with salt and black pepper to taste, and let the stew sit off the heat for 5 minutes to thicken slightly.
But the best part is how the lentils soak up all that savory broth, creating a stew that’s thick and satisfying without being heavy. I love serving it in deep bowls with a crusty baguette for dipping, and it tastes even better the next day as the flavors meld together.
Chicken and Dumplings

Just like my grandma used to say on chilly evenings, there’s nothing quite as comforting as a steaming bowl of chicken and dumplings to wrap up the day. I always make this on Christmas Eve—it’s become our family tradition, filling the house with warmth and anticipation. Trust me, once you try this cozy classic, it’ll become your go-to comfort food too.
Serving: 6 | Pre Time: 20 minutes | Cooking Time: 40 minutes
Ingredients
– 2 tbsp extra virgin olive oil (my go-to for sautéing—it adds a lovely fruity note)
– 1 large yellow onion, diced (I like mine finely chopped so they melt into the broth)
– 3 carrots, sliced into ½-inch rounds (fresh from the farmer’s market if you can!)
– 2 celery stalks, chopped
– 3 cloves garlic, minced (don’t skimp—garlic is the secret to depth here)
– 1 lb boneless, skinless chicken thighs, cut into 1-inch pieces (thighs stay juicier than breasts, in my opinion)
– 6 cups chicken broth (homemade if you have it, but store-bought works fine)
– 1 tsp dried thyme
– 1 tsp salt
– ½ tsp black pepper
– 1 cup all-purpose flour (I keep mine in an airtight jar to avoid clumps)
– 2 tsp baking powder
– ½ cup milk (whole milk makes the dumplings extra tender)
– 2 tbsp unsalted butter, melted (room temp is best for mixing)
– ¼ cup fresh parsley, chopped (for a bright finish)
Instructions
1. Heat the extra virgin olive oil in a large Dutch oven or heavy pot over medium heat until shimmering, about 2 minutes.
2. Add the diced yellow onion, sliced carrots, and chopped celery to the pot, and sauté until the onions are translucent and the vegetables start to soften, about 5–7 minutes.
3. Stir in the minced garlic and cook for 1 minute until fragrant—be careful not to let it burn, as it can turn bitter quickly.
4. Add the cut chicken thighs to the pot, and cook until they are no longer pink on the outside, about 5 minutes, stirring occasionally to brown evenly.
5. Pour in the chicken broth, then add the dried thyme, salt, and black pepper, stirring to combine.
6. Bring the mixture to a boil over high heat, then reduce the heat to low, cover the pot, and let it simmer for 20 minutes to allow the flavors to meld and the chicken to cook through.
7. While the soup simmers, prepare the dumpling dough: In a medium bowl, whisk together the all-purpose flour and baking powder until well combined.
8. Add the milk and melted unsalted butter to the flour mixture, and stir just until a soft dough forms—overmixing can make the dumplings tough, so stop as soon as it comes together.
9. After the soup has simmered for 20 minutes, uncover the pot and increase the heat to medium to bring it back to a gentle boil.
10. Drop tablespoon-sized portions of the dumpling dough directly into the simmering soup, spacing them evenly—they’ll expand as they cook, so don’t overcrowd them.
11. Cover the pot again and let the dumplings cook undisturbed for 15 minutes; resist the urge to peek, as this helps them steam properly and become fluffy.
12. Remove the pot from the heat, and sprinkle the chopped fresh parsley over the top for a fresh, herby touch.
13. Ladle the chicken and dumplings into bowls, making sure each serving gets plenty of broth, vegetables, chicken, and dumplings.
Let this dish sit for a few minutes before serving—the dumplings soak up the rich broth, becoming pillowy soft against the tender chicken. I love pairing it with a simple green salad to balance the heartiness, or you can drizzle a bit of hot sauce on top for a spicy kick that cuts through the comfort.
Pumpkin and Coconut Curry

Winters in my house mean one thing: cozy, aromatic curries simmering on the stove. This pumpkin and coconut curry has become our go-to comfort dish when the temperature drops—it’s rich, creamy, and packed with warming spices that make the whole kitchen smell incredible. I love how the pumpkin melts into the sauce, creating a velvety texture that’s perfect for scooping up with fluffy rice or naan.
Serving: 4 | Pre Time: 15 minutes | Cooking Time: 30 minutes
Ingredients
– 1 tablespoon coconut oil (my favorite for its subtle tropical flavor)
– 1 medium yellow onion, diced (I always keep these on hand for base flavors)
– 3 cloves garlic, minced (fresh is best here for that punchy aroma)
– 1 tablespoon fresh ginger, grated (I keep a knob in the freezer for easy grating)
– 2 tablespoons red curry paste (I use a store-bought Thai brand for convenience)
– 1 (15-ounce) can pumpkin puree (not pie filling—pure pumpkin is key)
– 1 (13.5-ounce) can full-fat coconut milk (shake it well before opening)
– 2 cups vegetable broth (low-sodium lets you control the salt)
– 1 teaspoon ground turmeric (adds a warm, earthy note)
– 1/2 teaspoon salt (adjust later if needed)
– Fresh cilantro for garnish (a handful chopped brightens it up)
Instructions
1. Heat 1 tablespoon coconut oil in a large pot over medium heat until shimmering, about 2 minutes.
2. Add 1 diced onion and cook, stirring occasionally, until soft and translucent, 5–7 minutes.
3. Stir in 3 minced garlic cloves and 1 tablespoon grated ginger, cooking for 1 minute until fragrant—don’t let them burn.
4. Add 2 tablespoons red curry paste and mix well, toasting it for 30 seconds to deepen the flavors.
5. Pour in 1 can pumpkin puree, stirring to combine with the aromatics.
6. Gradually add 1 can coconut milk and 2 cups vegetable broth, stirring until smooth.
7. Sprinkle in 1 teaspoon turmeric and 1/2 teaspoon salt, then bring to a gentle simmer.
8. Reduce heat to low, cover, and let simmer for 20 minutes, stirring occasionally to prevent sticking.
9. Taste and adjust seasoning if desired, then remove from heat.
10. Ladle into bowls and top with fresh cilantro.
Buttery pumpkin melds with the creamy coconut base for a luscious, spoonable curry that’s not too heavy. The turmeric gives it a golden hue, while the ginger adds a subtle zing—perfect for drizzling over jasmine rice or pairing with crispy roasted vegetables. Leftovers taste even better the next day as the flavors deepen.
Beef Bourguignon

Last night, as the winter chill settled in, I found myself craving something deeply comforting and rich—the kind of dish that fills your home with an irresistible aroma and warms you from the inside out. That’s when I decided to revisit my favorite classic: Beef Bourguignon. It’s a labor of love, but trust me, every minute is worth it for that tender, flavorful result.
Serving: 6 | Pre Time: 30 minutes | Cooking Time: 3 hours
Ingredients
– 3 lbs beef chuck, cut into 2-inch cubes (I like to trim excess fat for a cleaner taste)
– 6 slices thick-cut bacon, chopped (it adds a smoky depth that’s essential)
– 1 large yellow onion, diced (I always keep these on hand for savory dishes)
– 2 carrots, peeled and sliced into 1/2-inch rounds (they sweeten beautifully as they cook)
– 3 cloves garlic, minced (fresh is best—I press mine right before using)
– 2 cups red wine, like a Pinot Noir (a good drinking wine makes all the difference)
– 2 cups beef broth (I use low-sodium to control the saltiness)
– 1 tbsp tomato paste (it adds a rich umami base)
– 2 tbsp all-purpose flour (for thickening the sauce)
– 2 tbsp unsalted butter (I prefer it for sautéing over oil)
– 1 tsp dried thyme (a pinch of herbs ties it all together)
– 1 bay leaf (don’t forget to remove it later!)
– Salt and black pepper, to taste (I season in layers as I go)
Instructions
1. Pat the beef cubes dry with paper towels to ensure a good sear.
2. In a large Dutch oven over medium-high heat, cook the chopped bacon until crispy, about 5-7 minutes, then remove it with a slotted spoon and set aside.
3. Add the beef cubes to the bacon fat in a single layer, searing for 3-4 minutes per side until browned on all sides, then remove and set aside.
4. Tip: Avoid overcrowding the pot—sear in batches if needed to prevent steaming.
5. Reduce the heat to medium, add the butter, and sauté the diced onion and sliced carrots for 5-7 minutes until softened.
6. Stir in the minced garlic and cook for 1 minute until fragrant.
7. Sprinkle the flour over the vegetables and cook for 2 minutes, stirring constantly to form a roux.
8. Pour in the red wine, scraping up any browned bits from the bottom of the pot, and simmer for 5 minutes to reduce slightly.
9. Tip: This deglazing step is key for building flavor—don’t skip it!
10. Return the beef and bacon to the pot, then add the beef broth, tomato paste, dried thyme, and bay leaf.
11. Bring to a boil, then reduce the heat to low, cover, and simmer for 2.5 to 3 hours until the beef is fork-tender.
12. Tip: Check occasionally and skim off any excess fat for a cleaner sauce.
13. Season with salt and black pepper to taste, then remove the bay leaf before serving.
Now, savor that melt-in-your-mouth beef and velvety sauce—it’s pure comfort in a bowl. I love serving it over buttery mashed potatoes or crusty bread to soak up every last drop, and it tastes even better the next day as the flavors deepen overnight.
Clam Chowder with Fresh Herbs
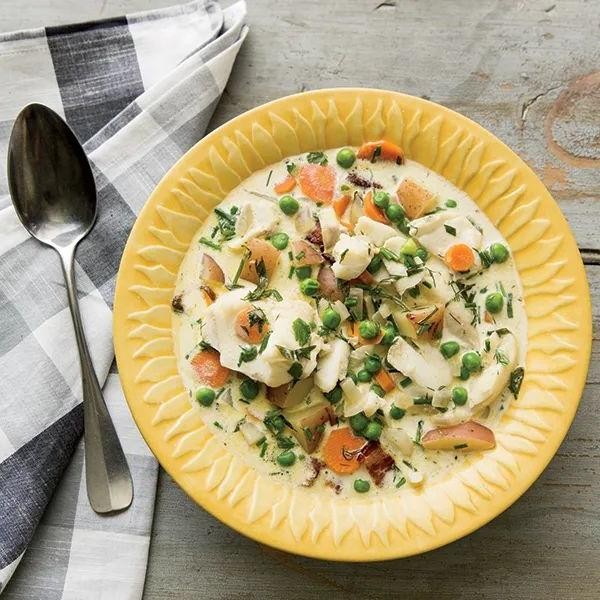
Every time winter rolls around, I find myself craving a bowl of something warm and comforting, and this clam chowder with fresh herbs has become my absolute go-to. There’s something magical about how the creamy broth and tender clams come together—it’s like a hug in a bowl that reminds me of cozy evenings by the fireplace. I love making a big batch on Sundays so I have leftovers to enjoy throughout the week.
Serving: 4 | Pre Time: 15 minutes | Cooking Time: 30 minutes
Ingredients
– 2 tablespoons unsalted butter (I always use unsalted to control the saltiness better)
– 1 medium yellow onion, finely chopped
– 2 celery stalks, diced (these add such a nice crunch)
– 2 cloves garlic, minced
– 2 cups clam juice (I save the juice from the canned clams for extra flavor)
– 2 cups heavy cream (go for the full-fat version for that rich texture)
– 2 (6.5-ounce) cans chopped clams, drained but juice reserved
– 2 medium russet potatoes, peeled and cubed into 1/2-inch pieces
– 1/4 cup fresh parsley, chopped (fresh makes all the difference here)
– 1 tablespoon fresh thyme leaves
– Salt and black pepper (I start with 1/2 teaspoon salt and adjust later)
Instructions
1. Melt 2 tablespoons unsalted butter in a large pot over medium heat until it bubbles slightly, about 1 minute.
2. Add 1 finely chopped yellow onion and 2 diced celery stalks to the pot, stirring occasionally until softened, about 5 minutes—this builds a flavorful base.
3. Stir in 2 minced garlic cloves and cook for 1 minute until fragrant, being careful not to burn them.
4. Pour in 2 cups clam juice and 2 cups heavy cream, then bring the mixture to a gentle simmer over medium-low heat, which should take about 3-4 minutes.
5. Add 2 cubed russet potatoes to the pot, reduce heat to low, cover, and let simmer for 15 minutes until the potatoes are fork-tender.
6. Tip: Check the potatoes by piercing one with a fork—if it slides in easily, they’re ready.
7. Stir in 2 cans drained chopped clams, 1/4 cup chopped fresh parsley, and 1 tablespoon fresh thyme leaves, cooking for another 5 minutes to heat through.
8. Tip: Add the herbs at the end to preserve their bright flavor and color.
9. Season with salt and black pepper to taste, starting with 1/2 teaspoon salt and adjusting as needed—I usually add a pinch more after tasting.
10. Tip: Let the chowder sit off the heat for 5 minutes before serving; this allows the flavors to meld beautifully.
That creamy, herb-infused broth pairs perfectly with the tender clams and soft potatoes, creating a comforting balance in every spoonful. Try serving it in a hollowed-out bread bowl for a fun, rustic twist that soaks up all the deliciousness.
Vegetable and Bean Minestrone

Whenever I’m craving a hearty, comforting soup that’s packed with veggies and protein, my mind always goes straight to this Vegetable and Bean Minestrone. It’s the kind of meal that simmers away on the stove, filling the kitchen with the most inviting aroma—perfect for a cozy winter evening like today, Christmas Eve. I love how flexible it is; you can toss in whatever vegetables you have on hand, making it a fantastic clean-out-the-fridge dinner.
Serving: 6 | Pre Time: 15 minutes | Cooking Time: 45 minutes
Ingredients
– 2 tbsp extra virgin olive oil (my go-to for its rich flavor)
– 1 medium yellow onion, diced (I always keep these on hand—they’re a soup staple)
– 2 medium carrots, peeled and diced (they add a subtle sweetness)
– 2 celery stalks, diced (for that classic savory base)
– 3 cloves garlic, minced (fresh is best here, in my opinion)
– 1 (28-oz) can diced tomatoes, undrained (I prefer fire-roasted for extra depth)
– 6 cups vegetable broth (homemade if you have it, but store-bought works fine)
– 1 tsp dried oregano (a pinch of Italian flair)
– 1 tsp dried basil (it brightens up the soup beautifully)
– 1 (15-oz) can cannellini beans, rinsed and drained (I love their creamy texture)
– 1 cup small pasta, like ditalini (it cooks right in the broth—so convenient)
– 2 cups fresh spinach, roughly chopped (I add it at the end to keep it vibrant)
– Salt and black pepper (to season as you go)
– Grated Parmesan cheese for serving (optional, but highly recommended)
Instructions
1. Heat 2 tbsp extra virgin olive oil in a large pot or Dutch oven over medium heat until shimmering, about 2 minutes.
2. Add 1 diced yellow onion, 2 diced carrots, and 2 diced celery stalks to the pot. Cook, stirring occasionally, until the vegetables soften and the onion turns translucent, about 8-10 minutes. Tip: Don’t rush this step—letting the veggies sweat builds a flavorful foundation.
3. Stir in 3 minced garlic cloves and cook until fragrant, about 1 minute, being careful not to let it burn.
4. Pour in 1 can diced tomatoes with their juices and 6 cups vegetable broth. Increase the heat to high and bring the mixture to a boil.
5. Once boiling, reduce the heat to medium-low to maintain a gentle simmer. Stir in 1 tsp dried oregano and 1 tsp dried basil.
6. Add 1 can rinsed cannellini beans and 1 cup small pasta to the pot. Simmer uncovered, stirring occasionally, until the pasta is al dente, about 10-12 minutes. Tip: Check the pasta package instructions for timing, as it can vary by brand.
7. Stir in 2 cups fresh spinach and cook just until wilted, about 2 minutes. Tip: Adding the spinach last preserves its bright color and nutrients.
8. Season the soup with salt and black pepper to your liking, starting with 1 tsp salt and ½ tsp pepper, then adjust as needed.
9. Ladle the hot minestrone into bowls and top with grated Parmesan cheese if desired.
Ultimately, this minestrone turns out thick and satisfying, with the beans and pasta making it feel like a complete meal in a bowl. The flavors meld together into a savory, herb-infused broth that’s perfect with a slice of crusty bread for dipping. I sometimes stir in a spoonful of pesto right before serving for an extra burst of freshness—it’s a game-changer!
Mac and Cheese with Crispy Breadcrumbs

Unbelievably cozy and perfect for a chilly December evening like tonight, this mac and cheese with crispy breadcrumbs has been my go-to comfort food since my college days. I still remember making huge batches for my roommates during finals week—it always felt like a warm hug in a bowl. There’s just something magical about that creamy, cheesy pasta topped with a golden, crunchy crust that makes everyone gather around the table.
Serving: 6 | Pre Time: 15 minutes | Cooking Time: 30 minutes
Ingredients
– 1 pound elbow macaroni (I always use a full pound—leftovers are a blessing!)
– 4 tablespoons unsalted butter, divided (I keep mine cold from the fridge for easier handling)
– 1/4 cup all-purpose flour
– 3 cups whole milk, warmed slightly (room temp helps prevent lumps, trust me!)
– 2 cups shredded sharp cheddar cheese (I grate it fresh for maximum meltiness)
– 1 cup shredded Gruyère cheese (this adds a nutty depth I adore)
– 1/2 teaspoon salt
– 1/4 teaspoon black pepper
– 1/4 teaspoon garlic powder (my secret flavor booster)
– 1 cup panko breadcrumbs (these give the crispiest topping)
– 2 tablespoons grated Parmesan cheese (for that extra savory kick)
Instructions
1. Preheat your oven to 375°F (190°C) and grease a 9×13-inch baking dish lightly with butter or cooking spray.
2. Bring a large pot of salted water to a rolling boil over high heat.
3. Add the elbow macaroni to the boiling water and cook for 7-8 minutes, until al dente (it should still have a slight bite).
4. Drain the macaroni in a colander and set it aside; do not rinse to keep the starch for creaminess.
5. In the same pot, melt 2 tablespoons of unsalted butter over medium heat.
6. Whisk in the all-purpose flour and cook for 1-2 minutes, until it forms a smooth paste and turns lightly golden (this is your roux—don’t rush it!).
7. Gradually pour in the warmed whole milk, whisking constantly to prevent lumps, and bring to a gentle simmer.
8. Cook the sauce for 3-4 minutes, stirring frequently, until it thickens enough to coat the back of a spoon.
9. Remove the pot from the heat and stir in the shredded sharp cheddar cheese and shredded Gruyère cheese until fully melted and smooth.
10. Season the cheese sauce with salt, black pepper, and garlic powder, then taste and adjust if needed (I usually add a pinch more pepper).
11. Fold the drained macaroni into the cheese sauce until evenly coated, then transfer the mixture to the prepared baking dish.
12. In a small bowl, melt the remaining 2 tablespoons of unsalted butter and mix it with the panko breadcrumbs and grated Parmesan cheese until crumbly.
13. Sprinkle the breadcrumb mixture evenly over the top of the mac and cheese in the baking dish.
14. Bake in the preheated oven for 20-25 minutes, until the breadcrumbs are golden brown and crispy and the edges are bubbly.
15. Let the dish rest for 5 minutes before serving to allow the sauce to set slightly.
Mouthwatering and irresistible, this mac and cheese emerges from the oven with a perfect contrast: the creamy, gooey interior gives way to that satisfyingly crunchy topping. I love serving it straight from the dish with a simple green salad on the side—it’s a crowd-pleaser that always disappears fast!
Turkey and Wild Rice Soup

There’s something about a steaming bowl of turkey and wild rice soup that just feels like a cozy hug after a long day—especially around the holidays when you might have leftover turkey. I love making this recipe because it transforms simple ingredients into something deeply comforting and nourishing.
Serving: 6 | Pre Time: 15 minutes | Cooking Time: 45 minutes
Ingredients
– 2 tbsp extra virgin olive oil (my go‑to for sautéing—it adds a lovely fruity note)
– 1 medium yellow onion, diced (I always keep these on hand for soups)
– 3 medium carrots, peeled and sliced into ¼‑inch rounds (they add a sweet crunch)
– 3 celery stalks, sliced (don’t skip the celery—it gives great depth)
– 3 cloves garlic, minced (fresh is best here, in my opinion)
– 6 cups low‑sodium chicken broth (I prefer low‑sodium so I can control the salt)
– 1 cup wild rice, rinsed (rinsing removes excess starch for fluffier rice)
– 3 cups cooked turkey, shredded or diced (leftover holiday turkey works perfectly)
– 1 tsp dried thyme (rubbed between your fingers to release the oils)
– 1 bay leaf (remove it before serving—it’s easy to forget!)
– ½ cup heavy cream (for a rich, velvety finish)
– Salt and black pepper to taste (I add these at the end after tasting)
Instructions
1. Heat the extra virgin olive oil in a large Dutch oven or soup pot over medium heat for 1–2 minutes until shimmering.
2. Add the diced yellow onion, sliced carrots, and sliced celery to the pot. Sauté for 6–8 minutes, stirring occasionally, until the vegetables are softened and the onion is translucent.
3. Stir in the minced garlic and cook for 1 minute until fragrant, being careful not to let it burn.
4. Pour in the low‑sodium chicken broth and add the rinsed wild rice, dried thyme, and bay leaf. Increase the heat to high and bring to a boil.
5. Once boiling, reduce the heat to low, cover the pot, and simmer for 35–40 minutes, or until the wild rice is tender and has split open slightly.
6. Stir in the cooked turkey and heavy cream. Simmer uncovered for 5 minutes to heat the turkey through and let the soup thicken slightly.
7. Remove and discard the bay leaf. Season with salt and black pepper to taste, starting with ½ tsp salt and ¼ tsp pepper, then adjust as needed.
8. Ladle the soup into bowls and serve immediately.
Finally, this soup has a wonderful heartiness from the wild rice and tender turkey, with a creamy broth that’s not too heavy. For a creative twist, I sometimes top it with a sprinkle of fresh parsley or a dash of hot sauce for a little kick.
Spicy Korean Army Stew (Budae Jjigae)

Craving something bold, comforting, and packed with flavor? This Spicy Korean Army Stew, or Budae Jjigae, is my go-to for a cozy night in—it’s a delicious fusion of Korean and American pantry staples that comes together in one bubbling pot. I love how its history as a post-war creation makes it feel both resourceful and incredibly satisfying.
Serving: 4 | Pre Time: 15 minutes | Cooking Time: 20 minutes
Ingredients
- 4 cups chicken broth (I always use low-sodium so I can control the salt)
- 2 tbsp gochujang (Korean red chili paste—this is the spicy heart of the stew)
- 1 tbsp gochugaru (Korean red pepper flakes, for that extra kick I adore)
- 2 tbsp soy sauce
- 1 tbsp minced garlic (freshly minced makes all the difference)
- 1 small onion, thinly sliced
- 4 oz sliced spam (a classic addition—I like to pan-sear mine first for extra crispiness)
- 4 hot dogs, sliced into rounds
- ½ cup kimchi, chopped (I prefer it slightly sour for more tang)
- 4 oz ramen noodles (the instant kind works perfectly here)
- 4 slices American cheese (it melts into the broth beautifully)
- 2 green onions, chopped (for a fresh finish)
Instructions
- In a large pot or Korean stone pot (ddukbaegi), combine 4 cups chicken broth, 2 tbsp gochujang, 1 tbsp gochugaru, 2 tbsp soy sauce, and 1 tbsp minced garlic over medium-high heat.
- Whisk the mixture vigorously for 1–2 minutes until the gochujang is fully dissolved and the broth is simmering. Tip: Whisking well prevents lumps and ensures even spice distribution.
- Add 1 small sliced onion, 4 oz sliced spam, 4 sliced hot dogs, and ½ cup chopped kimchi to the pot.
- Bring the stew to a boil, then reduce the heat to medium and let it simmer uncovered for 10 minutes, stirring occasionally. Tip: Simmering allows the flavors to meld—you’ll see the broth deepen in color.
- Add 4 oz ramen noodles to the pot and cook for 3–4 minutes, pushing them down to submerge, until they are tender but still slightly firm.
- Place 4 slices American cheese on top of the stew, spacing them evenly over the surface.
- Cover the pot and cook for 2 more minutes over low heat until the cheese is fully melted. Tip: Covering helps the cheese melt evenly without burning.
- Remove from heat and sprinkle with 2 chopped green onions.
When you dig in, you’ll get a wonderful mix of textures—chewy noodles, savory meats, and that creamy, cheesy broth that’s spicy, salty, and utterly addictive. I love serving it straight from the pot with extra kimchi on the side for a complete meal that always brings everyone to the table.
Garlic Butter Mushroom Pasta

Oof, after a long day of holiday shopping, I needed something comforting yet quick—enter this garlic butter mushroom pasta, my go-to for cozy winter evenings. It’s rich, savory, and comes together in under 30 minutes, perfect for when you’re craving something indulgent without the fuss. I love how the mushrooms soak up all that buttery garlic goodness, making every bite feel like a warm hug.
Serving: 4 | Pre Time: 10 minutes | Cooking Time: 20 minutes
Ingredients
– 12 ounces dried pasta (I use fettuccine for its hearty texture, but any long pasta works)
– 4 tablespoons unsalted butter (I always keep extra on hand for that rich flavor)
– 4 cloves garlic, minced (freshly minced is key—it makes all the difference)
– 1 pound cremini mushrooms, sliced (I prefer these for their earthy taste, but white mushrooms are fine too)
– 1/2 cup heavy cream (room temperature helps it blend smoothly)
– 1/2 cup grated Parmesan cheese (I grate it fresh to avoid clumping)
– 2 tablespoons chopped fresh parsley (for a bright finish)
– Salt and black pepper (to season as you go)
Instructions
1. Bring a large pot of salted water to a boil over high heat.
2. Add the pasta and cook according to package directions until al dente, about 10-12 minutes, then drain and set aside.
3. While the pasta cooks, melt the butter in a large skillet over medium heat until foamy, about 2 minutes.
4. Add the minced garlic and cook, stirring constantly, until fragrant and lightly golden, about 1 minute—be careful not to burn it, as garlic can turn bitter quickly.
5. Add the sliced mushrooms to the skillet and cook, stirring occasionally, until they release their liquid and turn golden brown, about 8-10 minutes.
6. Pour in the heavy cream and bring to a gentle simmer over medium-low heat, stirring to combine, about 2 minutes.
7. Stir in the grated Parmesan cheese until melted and the sauce is smooth, about 1 minute.
8. Add the drained pasta to the skillet and toss to coat evenly in the sauce, cooking for an additional 1-2 minutes to let the flavors meld.
9. Season with salt and black pepper to taste, then remove from heat and stir in the chopped parsley.
Here’s the best part: the creamy sauce clings beautifully to the pasta, with the mushrooms adding a meaty texture and the garlic butter infusing every strand. I love serving it with an extra sprinkle of Parmesan and a side of crusty bread to soak up every last drop—it’s a simple dish that always feels special.
Hot Chocolate with Homemade Marshmallows

Gathering around a warm mug on a chilly evening is one of my favorite winter rituals, and this homemade hot chocolate with fluffy marshmallows takes that cozy feeling to a whole new level. I remember my grandmother always making her marshmallows from scratch for Christmas Eve, and now I carry on the tradition—it’s easier than you think and so worth the effort! Let’s make a batch that’s rich, creamy, and utterly comforting.
Serving: 4 | Pre Time: 20 minutes | Cooking Time: 15 minutes
Ingredients
– 4 cups whole milk (I swear by whole milk for the creamiest texture—it makes all the difference!)
– 1/2 cup unsweetened cocoa powder (I use Dutch-processed for a deeper, smoother chocolate flavor)
– 1/2 cup granulated sugar (adjust to your sweetness preference, but this is my go-to amount)
– 1 tsp vanilla extract (pure vanilla is a must here for that warm, aromatic touch)
– 1/4 tsp salt (a pinch of salt enhances the chocolate flavor beautifully)
– 1 cup mini marshmallows (homemade or store-bought—I love making my own for that pillowy softness)
Instructions
1. In a medium saucepan, combine 4 cups whole milk, 1/2 cup unsweetened cocoa powder, 1/2 cup granulated sugar, and 1/4 tsp salt over medium heat.
2. Whisk the mixture constantly for about 5 minutes, until the cocoa powder is fully dissolved and no lumps remain—this prevents a gritty texture.
3. Increase the heat to medium-high and bring the mixture to a gentle simmer, stirring occasionally to avoid scorching on the bottom of the pan.
4. Once simmering, reduce the heat to low and let it cook for 10 minutes, stirring every 2-3 minutes to ensure it thickens slightly without boiling over.
5. Remove the saucepan from the heat and stir in 1 tsp vanilla extract until fully incorporated.
6. Ladle the hot chocolate into 4 mugs, filling each about 3/4 full to leave room for toppings.
7. Top each mug with 1/4 cup mini marshmallows, allowing them to melt slightly into the warm drink.
8. Serve immediately while hot, optionally garnishing with a sprinkle of extra cocoa powder or a cinnamon stick for a festive touch.
Velvety and rich, this hot chocolate has a smooth, indulgent mouthfeel that pairs perfectly with the soft, melting marshmallows—each sip feels like a warm hug. For a fun twist, try adding a dash of peppermint extract or serving it with a side of homemade cookies to dunk; it’s the ultimate treat for sharing with loved ones on a cold night.
Summary
Perfect for warming up from the inside out, this collection of 20 cozy recipes is your go-to for chilly days. We hope you find a new favorite to simmer, bake, or roast. Give one a try, leave a comment telling us which dish you loved most, and don’t forget to share this roundup on Pinterest to spread the comfort!


