
Unlock the ultimate comfort food with these 18 creamy corn recipes starring cream cheese! Whether you’re craving a quick weeknight dinner, a cozy seasonal side, or a delightful party dish, this roundup has something to satisfy every taste. Get ready to transform simple ingredients into mouthwatering meals that’ll have everyone asking for seconds. Let’s dive into these deliciously creamy creations!
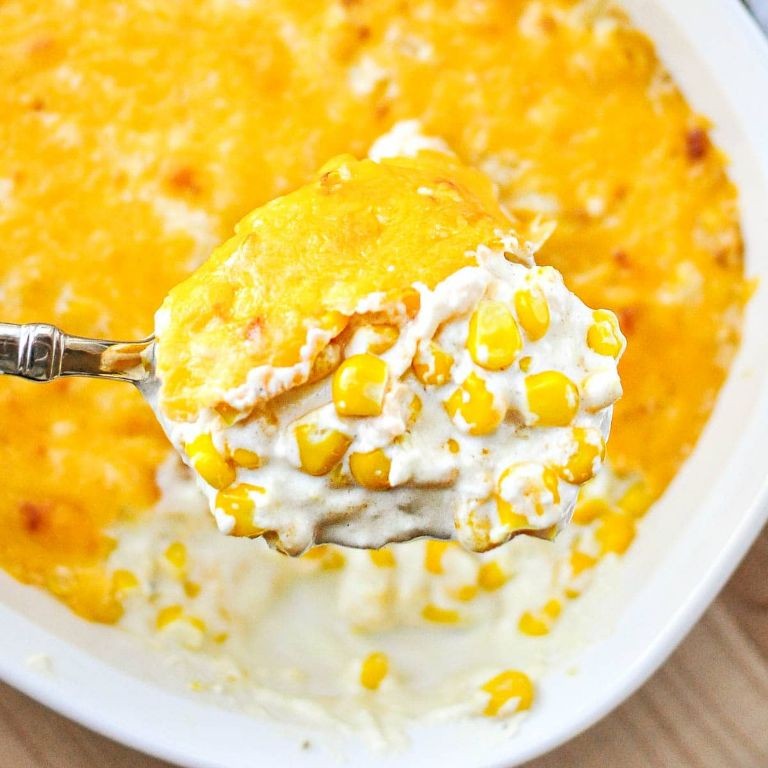
Creamy Corn and Cream Cheese Casserole

Many holiday tables need a comforting side dish that’s both creamy and satisfying, and this casserole fits the bill perfectly. Making it is straightforward, so let’s walk through each step together to ensure success.
Serving: 8 | Pre Time: 15 minutes | Cooking Time: 35 minutes
Ingredients
– For the base:
– 4 cups frozen corn kernels
– 1 cup diced yellow onion
– 2 tablespoons unsalted butter
– For the creamy mixture:
– 8 ounces cream cheese, softened to room temperature
– 1 cup whole milk
– 1/2 cup sour cream
– 1 teaspoon garlic powder
– 1/2 teaspoon black pepper
– 1/2 teaspoon salt
– For the topping:
– 1 cup shredded cheddar cheese
– 1/4 cup grated Parmesan cheese
Instructions
1. Preheat your oven to 375°F and grease a 9×13-inch baking dish with butter or non-stick spray.
2. Melt 2 tablespoons of unsalted butter in a large skillet over medium heat.
3. Add 1 cup of diced yellow onion to the skillet and cook for 5 minutes, stirring occasionally, until the onion turns translucent and soft.
4. Stir in 4 cups of frozen corn kernels and cook for an additional 3 minutes, just until the corn is heated through.
5. In a separate mixing bowl, combine 8 ounces of softened cream cheese, 1 cup of whole milk, 1/2 cup of sour cream, 1 teaspoon of garlic powder, 1/2 teaspoon of black pepper, and 1/2 teaspoon of salt; whisk until smooth and fully blended.
6. Tip: Softening the cream cheese beforehand prevents lumps in the sauce, ensuring a silky texture.
7. Pour the creamy mixture over the corn and onions in the skillet, stirring gently to coat everything evenly.
8. Transfer the combined mixture to the prepared baking dish, spreading it out into an even layer.
9. In a small bowl, mix 1 cup of shredded cheddar cheese and 1/4 cup of grated Parmesan cheese for the topping.
10. Sprinkle the cheese mixture evenly over the top of the casserole.
11. Tip: For a golden-brown crust, make sure the cheese layer is distributed uniformly without clumps.
12. Bake the casserole in the preheated oven at 375°F for 25 minutes.
13. After 25 minutes, switch the oven to broil on high and broil for 2-3 minutes, watching closely until the cheese topping is bubbly and lightly browned.
14. Tip: Keep a close eye during broiling to avoid burning, as it can happen quickly.
15. Remove the casserole from the oven and let it rest for 5 minutes before serving to allow the flavors to meld.
16. Let this casserole cool slightly to set, revealing a creamy interior with sweet corn bites and a savory, cheesy crust that’s irresistible. Serve it warm alongside roasted meats or as a cozy standalone dish for a comforting meal.
Spicy Jalapeño Corn Dip with Cream Cheese

Holiday gatherings or casual game-day snacks call for a crowd-pleasing dip that’s both creamy and boldly flavored. Here’s a step-by-step guide to making a Spicy Jalapeño Corn Dip with Cream Cheese, a simple yet irresistible appetizer that comes together in under 30 minutes.
Serving: 8 | Pre Time: 15 minutes | Cooking Time: 15 minutes
Ingredients
For the Base:
– 2 (8-ounce) packages cream cheese, softened to room temperature
– 1 cup sour cream
– 1 cup shredded Monterey Jack cheese
For the Corn Mixture:
– 2 cups frozen corn kernels, thawed
– 1/2 cup finely diced red bell pepper
– 1/4 cup finely diced red onion
– 2 jalapeño peppers, seeded and finely diced (about 1/4 cup)
– 2 cloves garlic, minced
For Seasoning and Topping:
– 1 teaspoon ground cumin
– 1/2 teaspoon smoked paprika
– 1/4 teaspoon salt
– 1/4 cup chopped fresh cilantro
Instructions
1. Preheat your oven to 375°F (190°C) and lightly grease a 9-inch baking dish with nonstick spray.
2. In a large mixing bowl, combine the softened cream cheese, sour cream, and shredded Monterey Jack cheese until smooth, using a hand mixer or spatula. Tip: Softening the cream cheese for 30 minutes at room temperature prevents lumps.
3. Add the thawed corn kernels, diced red bell pepper, red onion, jalapeños, and minced garlic to the cheese mixture.
4. Stir in the ground cumin, smoked paprika, and salt until all ingredients are evenly distributed.
5. Transfer the dip mixture to the prepared baking dish and spread it into an even layer.
6. Bake at 375°F (190°C) for 15 minutes, or until the edges are bubbly and the top is lightly golden. Tip: Check at 12 minutes to avoid over-browning; the dip should be hot throughout.
7. Remove the dip from the oven and let it cool for 5 minutes. Tip: Allowing it to rest helps the flavors meld and makes it easier to scoop.
8. Sprinkle the chopped fresh cilantro over the top just before serving.
Warm from the oven, this dip offers a creamy, cheesy base punctuated by sweet corn and a gentle heat from the jalapeños. Serve it with sturdy tortilla chips or sliced vegetables for a satisfying crunch that complements the rich texture. For a creative twist, spoon it over grilled chicken or use it as a flavorful spread in wraps.
Cream Cheese Cornbread with Sweet Corn

Baking a comforting side dish that combines creamy richness with sweet corn kernels is easier than you might think. This cream cheese cornbread delivers a moist, tender crumb with pockets of sweetness in every bite, perfect for holiday meals or cozy weeknight dinners.
Serving: 8 | Pre Time: 15 minutes | Cooking Time: 25 minutes
Ingredients
For the dry mixture:
– 1 cup all-purpose flour
– 1 cup yellow cornmeal
– 1 tablespoon baking powder
– 1/2 teaspoon salt
For the wet mixture:
– 1 cup whole milk
– 1/2 cup unsalted butter, melted and cooled slightly
– 2 large eggs
– 1/4 cup granulated sugar
For folding in:
– 4 ounces cream cheese, cut into 1/2-inch cubes
– 1 cup sweet corn kernels (fresh, frozen and thawed, or canned and drained)
Instructions
1. Preheat your oven to 375°F and grease an 8×8-inch baking pan thoroughly with butter or non-stick spray.
2. In a large mixing bowl, whisk together 1 cup all-purpose flour, 1 cup yellow cornmeal, 1 tablespoon baking powder, and 1/2 teaspoon salt until evenly combined.
3. In a separate medium bowl, whisk 1 cup whole milk, 1/2 cup melted unsalted butter, 2 large eggs, and 1/4 cup granulated sugar until the mixture is smooth and fully emulsified.
4. Pour the wet ingredients into the dry ingredients and stir gently with a spatula until just combined—do not overmix, as this keeps the cornbread tender.
5. Gently fold in 4 ounces of cubed cream cheese and 1 cup sweet corn kernels until they are evenly distributed throughout the batter.
6. Transfer the batter to the prepared pan and spread it into an even layer with your spatula.
7. Bake at 375°F for 23–25 minutes, or until the top is golden brown and a toothpick inserted into the center comes out clean.
8. Let the cornbread cool in the pan on a wire rack for at least 10 minutes before slicing to allow it to set properly.
Creating this cornbread yields a delightfully moist texture with creamy pockets from the melted cream cheese and bursts of sweetness from the corn. Consider serving it warm with a drizzle of honey or alongside a bowl of chili for a comforting meal.
Loaded Corn Chowder with Cream Cheese

Unbelievably creamy and satisfying, this loaded corn chowder is the ultimate comfort food for chilly evenings. Using cream cheese as a secret weapon, it transforms simple ingredients into a rich, velvety soup that’s packed with flavor and texture. Let’s walk through each step together to create this cozy masterpiece from your own kitchen.
Serving: 6 | Pre Time: 15 minutes | Cooking Time: 30 minutes
Ingredients
For the base:
– 4 slices thick-cut bacon, chopped
– 1 medium yellow onion, diced
– 2 cloves garlic, minced
– 4 cups frozen corn kernels
– 4 cups chicken broth
For the creamy finish:
– 8 oz cream cheese, softened and cubed
– 1 cup heavy cream
– 1 tsp smoked paprika
– Salt and black pepper
Instructions
1. Place a large pot or Dutch oven over medium heat and add the chopped bacon. Cook for 8-10 minutes, stirring occasionally, until the bacon is crispy and the fat has rendered. Tip: Resist the urge to stir too often to allow the bacon to crisp evenly.
2. Remove the bacon with a slotted spoon and set it aside on a paper towel-lined plate, leaving about 2 tablespoons of bacon fat in the pot.
3. Add the diced onion to the pot and sauté in the bacon fat for 5 minutes, until softened and translucent.
4. Stir in the minced garlic and cook for 1 minute, just until fragrant. Tip: Avoid browning the garlic to prevent a bitter taste.
5. Add the frozen corn kernels and chicken broth to the pot. Increase the heat to high and bring the mixture to a boil.
6. Once boiling, reduce the heat to medium-low, cover the pot, and simmer for 15 minutes to allow the flavors to meld.
7. Use an immersion blender to partially blend the soup, leaving about half of the corn kernels whole for texture. Alternatively, transfer 2 cups of the soup to a blender, blend until smooth, and return it to the pot.
8. Reduce the heat to low and add the softened cream cheese cubes, stirring constantly until fully melted and incorporated, about 3-4 minutes.
9. Pour in the heavy cream and smoked paprika, stirring to combine. Season with salt and black pepper to taste. Tip: Add salt gradually, as the bacon and broth already contribute saltiness.
10. Simmer on low for an additional 5 minutes, stirring occasionally, until the chowder is heated through and slightly thickened.
11. Ladle the chowder into bowls and top with the reserved crispy bacon.
Gloriously thick and velvety, this chowder boasts a smoky depth from the paprika and bacon, balanced by the sweet corn and tangy cream cheese. Serve it in bread bowls for a fun, edible presentation, or garnish with fresh chives and a dollop of sour cream to add brightness to each hearty spoonful.
Creamy Corn Fritters with Cream Cheese Glaze
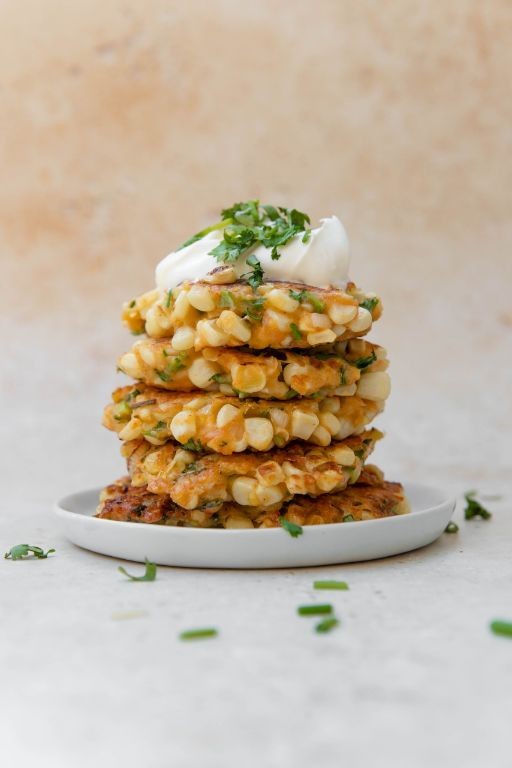
Holiday gatherings or cozy weeknights call for a comforting treat that’s both simple and impressive. Here’s how to make creamy corn fritters with a luscious cream cheese glaze, a dish that balances sweet corn with a tangy finish. Follow each step carefully for perfect results every time.
Serving: 4 | Pre Time: 15 minutes | Cooking Time: 20 minutes
Ingredients
– For the fritters: 1 cup all-purpose flour, 1 tsp baking powder, 1/2 tsp salt, 1/4 tsp black pepper, 1 large egg, 1/2 cup milk, 1 cup canned corn kernels (drained), 2 tbsp vegetable oil for frying
– For the glaze: 4 oz cream cheese (softened), 1/4 cup powdered sugar, 2 tbsp milk
Instructions
1. In a medium bowl, whisk together 1 cup all-purpose flour, 1 tsp baking powder, 1/2 tsp salt, and 1/4 tsp black pepper until fully combined.
2. Add 1 large egg and 1/2 cup milk to the dry ingredients, stirring gently until a smooth batter forms; avoid overmixing to keep the fritters tender.
3. Fold in 1 cup canned corn kernels (drained) until evenly distributed throughout the batter.
4. Heat 2 tbsp vegetable oil in a large skillet over medium heat until it shimmers, about 350°F, for even frying.
5. Drop 1/4 cup portions of the batter into the hot oil, flattening slightly with a spoon, and cook for 3-4 minutes per side until golden brown and crisp.
6. Transfer the cooked fritters to a paper towel-lined plate to drain excess oil; repeat with remaining batter, adding more oil if needed.
7. In a small bowl, beat 4 oz cream cheese (softened) with 1/4 cup powdered sugar until creamy and smooth.
8. Gradually add 2 tbsp milk to the cream cheese mixture, whisking until a pourable glaze forms without lumps.
9. Drizzle the cream cheese glaze over the warm fritters just before serving for the best texture.
Fluffy on the inside with a crispy exterior, these fritters offer a sweet corn flavor complemented by the tangy glaze. Try serving them as a brunch side or topped with fresh herbs for a colorful twist.
Corn and Cream Cheese Stuffed Peppers

Ready to transform simple bell peppers into a creamy, crowd-pleasing side dish? This corn and cream cheese stuffed peppers recipe delivers a perfect balance of sweet, savory, and creamy textures that’s surprisingly easy to make. Let’s walk through each step together so you can confidently prepare this comforting dish for any occasion.
Serving: 4 | Pre Time: 15 minutes | Cooking Time: 25 minutes
Ingredients
For the peppers:
– 4 large bell peppers (any color)
– 1 tablespoon olive oil
– 1/2 teaspoon salt
For the filling:
– 8 ounces cream cheese, softened
– 1 cup frozen corn kernels, thawed
– 1/4 cup shredded cheddar cheese
– 1/4 teaspoon black pepper
– 1/4 teaspoon garlic powder
Instructions
1. Preheat your oven to 375°F (190°C) and line a baking sheet with parchment paper.
2. Slice each bell pepper in half lengthwise and carefully remove all seeds and white membranes.
3. Brush the inside of each pepper half with 1 tablespoon olive oil and sprinkle with 1/2 teaspoon salt.
4. Place pepper halves cut-side up on the prepared baking sheet and bake for 15 minutes to soften.
5. While peppers bake, combine 8 ounces softened cream cheese, 1 cup thawed corn kernels, 1/4 cup shredded cheddar cheese, 1/4 teaspoon black pepper, and 1/4 teaspoon garlic powder in a medium bowl.
6. Tip: For easiest mixing, ensure your cream cheese is at room temperature—this prevents lumpy filling.
7. Remove peppers from oven after 15 minutes and carefully spoon the cream cheese mixture evenly into each pepper half.
8. Return stuffed peppers to the oven and bake for 10 minutes at 375°F.
9. Tip: For golden tops, switch your oven to broil for the final 2-3 minutes, watching closely to prevent burning.
10. Remove from oven and let rest for 5 minutes before serving.
11. Tip: The resting time allows the filling to set slightly, making the peppers easier to handle and serve.
Melted cream cheese creates a luxuriously smooth base that perfectly complements the sweet pop of corn kernels. The peppers become tender yet retain enough structure to hold the rich filling without becoming soggy. For a vibrant presentation, use a mix of red, yellow, and orange peppers, or crumble crispy bacon over the top just before serving for added savory depth.
Cheesy Corn Casserole with Cream Cheese Topping

Filled with creamy comfort and cheesy goodness, this corn casserole is the ultimate side dish for any gathering. Following these simple steps will yield a golden, bubbly casserole that’s sure to become a family favorite. Let’s begin by gathering our ingredients and preheating the oven.
Serving: 8 | Pre Time: 15 minutes | Cooking Time: 45 minutes
Ingredients
For the casserole base:
– 4 cups frozen corn kernels, thawed
– 1 cup sour cream
– 1/2 cup unsalted butter, melted
– 2 large eggs, lightly beaten
– 1 (8.5 oz) box corn muffin mix
For the cream cheese topping:
– 1 (8 oz) package cream cheese, softened to room temperature
– 1/4 cup granulated sugar
– 1/2 teaspoon vanilla extract
Instructions
1. Preheat your oven to 350°F and grease a 9×13-inch baking dish with butter or non-stick spray.
2. In a large mixing bowl, combine the thawed corn kernels, sour cream, melted butter, and lightly beaten eggs until evenly mixed.
3. Tip: For best results, ensure all ingredients are at room temperature to help them blend smoothly without curdling.
4. Gently fold in the corn muffin mix until just combined, being careful not to overmix to keep the texture tender.
5. Pour the corn mixture into the prepared baking dish and spread it into an even layer using a spatula.
6. In a medium bowl, beat the softened cream cheese with an electric mixer on medium speed until smooth and creamy, about 2 minutes.
7. Add the granulated sugar and vanilla extract to the cream cheese, continuing to beat until fully incorporated and fluffy.
8. Tip: Softening the cream cheese properly prevents lumps in the topping—leave it out on the counter for 30 minutes before starting.
9. Drop spoonfuls of the cream cheese mixture evenly over the corn base in the baking dish.
10. Use a knife or offset spatula to gently swirl the cream cheese topping into the corn mixture, creating a marbled effect.
11. Place the baking dish in the preheated oven and bake for 45 minutes, or until the edges are golden brown and the center is set.
12. Tip: Check for doneness by inserting a toothpick into the center; it should come out clean or with a few moist crumbs attached.
13. Remove the casserole from the oven and let it cool on a wire rack for 10 minutes before serving.
Enjoy this casserole warm, where the creamy, slightly sweet topping contrasts beautifully with the savory, corn-packed base. Its rich texture makes it perfect for holiday dinners or potlucks, and leftovers reheat wonderfully for a cozy next-day treat.
Creamy Corn and Bacon Pasta with Cream Cheese
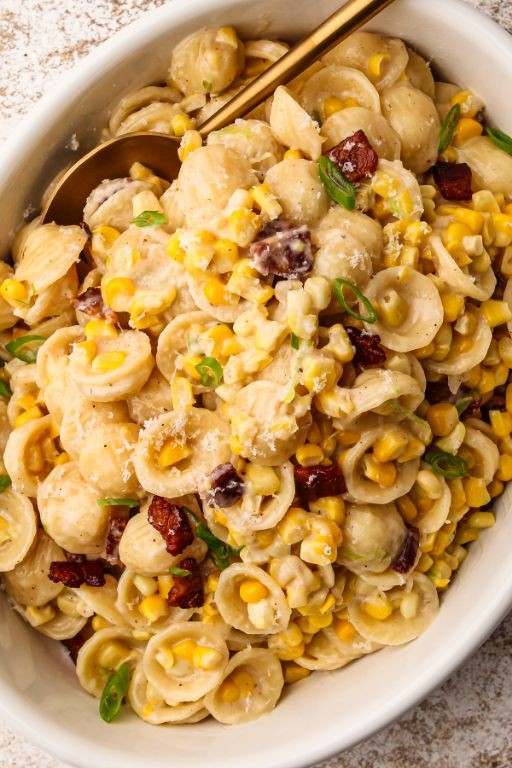
Ready to make a comforting pasta dish that combines sweet corn, smoky bacon, and creamy cheese? This creamy corn and bacon pasta with cream cheese is a simple yet satisfying meal that comes together in under 30 minutes, perfect for busy weeknights when you crave something hearty without the fuss.
Serving: 4 | Pre Time: 10 minutes | Cooking Time: 20 minutes
Ingredients
– For the pasta and bacon: 8 ounces dried pasta (such as penne or fusilli), 6 slices thick-cut bacon (chopped into ½-inch pieces), 1 tablespoon olive oil
– For the sauce: 1 cup fresh or frozen corn kernels (thawed if frozen), 4 ounces cream cheese (softened and cubed), ½ cup whole milk, ½ cup grated Parmesan cheese, 2 cloves garlic (minced), ¼ teaspoon black pepper, ¼ teaspoon salt
Instructions
1. Bring a large pot of salted water to a boil over high heat, then add 8 ounces dried pasta and cook according to package directions until al dente, about 8-10 minutes.
2. While the pasta cooks, heat 1 tablespoon olive oil in a large skillet over medium heat, add 6 slices chopped bacon, and cook for 5-7 minutes until crispy and browned, stirring occasionally.
3. Tip: Use a slotted spoon to transfer the cooked bacon to a paper towel-lined plate, leaving about 1 tablespoon of bacon fat in the skillet for added flavor.
4. Add 1 cup corn kernels and 2 cloves minced garlic to the skillet with the bacon fat and sauté for 3-4 minutes until the corn is tender and lightly golden.
5. Reduce the heat to low, then stir in 4 ounces cubed cream cheese and ½ cup whole milk, cooking for 2-3 minutes while whisking constantly until the cream cheese melts smoothly into a creamy sauce.
6. Tip: If the sauce seems too thick, add a splash of the pasta cooking water to thin it out and help it cling to the pasta better.
7. Drain the cooked pasta and add it directly to the skillet with the sauce, along with the cooked bacon, ½ cup grated Parmesan, ¼ teaspoon salt, and ¼ teaspoon black pepper.
8. Toss everything together for 1-2 minutes over low heat until the pasta is evenly coated and the cheese is fully incorporated.
9. Tip: For an extra burst of freshness, garnish with chopped parsley or a squeeze of lemon juice just before serving to balance the richness.
Just savor the creamy texture that clings to each pasta strand, complemented by the sweet pops of corn and savory bacon bits. This dish pairs wonderfully with a crisp green salad or crusty bread for dipping into the leftover sauce, making it a versatile favorite for any occasion.
Corn and Cream Cheese Stuffed Mushrooms
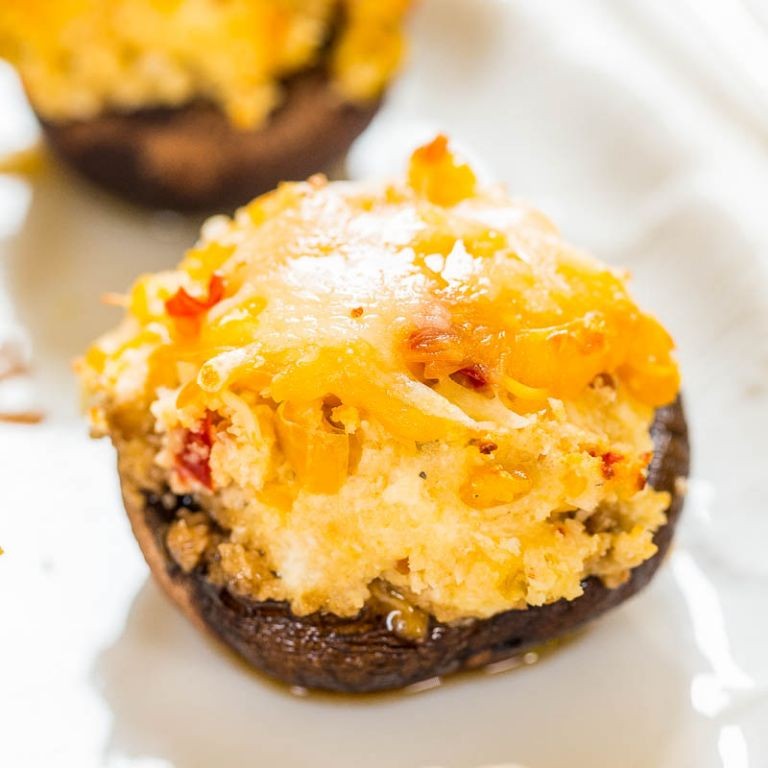
Just in time for holiday gatherings or cozy winter appetizers, these Corn and Cream Cheese Stuffed Mushrooms are a crowd-pleaser that’s surprisingly simple to make. Join me as we walk through each step methodically, ensuring even a beginner cook can achieve delicious results.
Serving: 24 | Pre Time: 15 minutes | Cooking Time: 20 minutes
Ingredients
For the mushrooms:
– 24 large white mushrooms (about 1.5 lbs)
– 1 tablespoon olive oil
– 1/4 teaspoon salt
For the filling:
– 8 ounces cream cheese, softened to room temperature
– 1 cup frozen corn kernels, thawed and patted dry
– 1/4 cup grated Parmesan cheese
– 2 cloves garlic, minced
– 1/4 teaspoon black pepper
– 1/4 teaspoon paprika
Instructions
1. Preheat your oven to 375°F and line a large baking sheet with parchment paper.
2. Clean the mushrooms by wiping them with a damp paper towel, then gently twist and remove the stems; set the stems aside for another use like stock.
3. Place the mushroom caps on the prepared baking sheet, gill-side up, and brush the insides lightly with 1 tablespoon of olive oil, then sprinkle evenly with 1/4 teaspoon of salt.
4. Bake the mushroom caps for 10 minutes at 375°F to release excess moisture and soften them slightly; remove from the oven and let cool for 5 minutes, carefully pouring out any liquid that has accumulated.
5. While the mushrooms bake, in a medium bowl, combine 8 ounces of softened cream cheese, 1 cup of thawed corn kernels, 1/4 cup of grated Parmesan cheese, 2 cloves of minced garlic, 1/4 teaspoon of black pepper, and 1/4 teaspoon of paprika; mix until fully blended and creamy.
6. Tip: For a smoother filling, ensure the cream cheese is at room temperature to avoid lumps.
7. Spoon the cream cheese mixture evenly into each mushroom cap, mounding it slightly; a small cookie scoop works well for uniform portions.
8. Return the stuffed mushrooms to the oven and bake at 375°F for 10-12 minutes, or until the filling is hot and the tops are lightly golden.
9. Tip: Check at 10 minutes—if the tops aren’t browning, broil for 1-2 minutes, watching closely to prevent burning.
10. Remove from the oven and let cool on the baking sheet for 5 minutes before serving to allow the filling to set.
11. Tip: For extra flavor, garnish with a sprinkle of fresh chopped parsley or chives after baking.
Mouthwatering and satisfying, these stuffed mushrooms offer a creamy, savory bite with a subtle sweetness from the corn and a hint of garlic. Serve them warm as an appetizer at parties, or pair with a crisp green salad for a light meal—their golden tops and tender texture make them irresistibly shareable.
Creamy Corn Soup with Cream Cheese Swirl

Kick off your cozy holiday cooking with this simple yet elegant Creamy Corn Soup with Cream Cheese Swirl, perfect for a comforting lunch or a starter for your festive dinner. Knowing that many home cooks feel intimidated by creamy soups, I’ll guide you through each step methodically, ensuring you achieve a smooth, velvety texture without any lumps. Let’s begin by gathering our ingredients and prepping our workspace.
Serving: 4 | Pre Time: 10 minutes | Cooking Time: 25 minutes
Ingredients
For the soup base:
– 2 tablespoons unsalted butter
– 1 medium yellow onion, finely chopped
– 2 cloves garlic, minced
– 4 cups frozen corn kernels
– 4 cups low-sodium vegetable broth
– 1 teaspoon salt
– 1/2 teaspoon black pepper
For the creamy swirl:
– 4 ounces cream cheese, softened to room temperature
– 1/4 cup heavy cream
– 2 tablespoons chopped fresh chives
Instructions
1. Melt 2 tablespoons of unsalted butter in a large pot over medium heat, which should take about 1 minute until fully liquid.
2. Add 1 finely chopped medium yellow onion to the pot and sauté for 5 minutes, stirring occasionally, until the onion turns translucent and soft.
3. Stir in 2 minced cloves of garlic and cook for 1 more minute, just until fragrant to avoid burning.
4. Tip: Use frozen corn directly from the freezer—no need to thaw—to save time and maintain freshness.
5. Pour in 4 cups of frozen corn kernels, 4 cups of low-sodium vegetable broth, 1 teaspoon of salt, and 1/2 teaspoon of black pepper into the pot.
6. Bring the mixture to a boil over high heat, then reduce the heat to low, cover the pot, and simmer for 15 minutes to allow the flavors to meld.
7. While the soup simmers, combine 4 ounces of softened cream cheese, 1/4 cup of heavy cream, and 2 tablespoons of chopped fresh chives in a small bowl, whisking until smooth.
8. Tip: Ensure the cream cheese is at room temperature to prevent clumping when mixed with the cream.
9. After 15 minutes, remove the pot from the heat and carefully blend the soup using an immersion blender until completely smooth, about 2-3 minutes.
10. Tip: For an extra-silky texture, strain the blended soup through a fine-mesh sieve to remove any fibrous bits.
11. Ladle the hot soup into four bowls, then drizzle the cream cheese mixture over the top in a circular motion to create a swirl.
12. Serve immediately while hot. For a creative twist, garnish with extra chives or a sprinkle of smoked paprika to enhance the visual appeal and add a subtle smoky note.
Finally, this soup boasts a velvety, rich texture from the blended corn and cream cheese, with a sweet and savory flavor profile that’s both comforting and elegant. Feel free to pair it with crusty bread for dipping or serve it chilled in the summer for a refreshing variation.
Corn and Cream Cheese Quesadillas
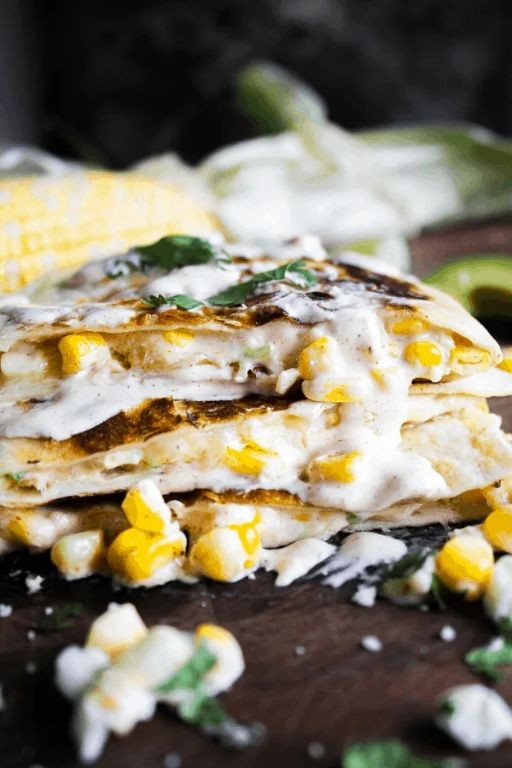
Wondering what to make for a quick, satisfying meal that combines creamy comfort with sweet corn crunch? These corn and cream cheese quesadillas come together in minutes with minimal ingredients, perfect for busy weeknights or casual gatherings. Let’s walk through each step methodically to ensure your quesadillas are golden, melty, and delicious every time.
Serving: 4 | Pre Time: 10 minutes | Cooking Time: 10 minutes
Ingredients
– For the filling:
– 1 cup canned corn kernels, drained
– 4 oz cream cheese, softened to room temperature
– 1/2 cup shredded cheddar cheese
– 1/4 cup finely chopped green onions
– 1/4 tsp salt
– For assembly:
– 4 large flour tortillas (8-inch diameter)
– 2 tbsp unsalted butter
Instructions
1. In a medium bowl, combine the drained corn kernels, softened cream cheese, shredded cheddar cheese, chopped green onions, and salt. Mix thoroughly with a spoon until evenly distributed. Tip: Softening the cream cheese beforehand prevents lumps and makes blending easier.
2. Lay one flour tortilla flat on a clean surface. Spread 1/4 of the corn and cream cheese mixture evenly over half of the tortilla, leaving a 1/2-inch border around the edges to prevent spillage during cooking.
3. Fold the empty half of the tortilla over the filling to create a half-moon shape, pressing down gently to seal. Repeat with the remaining tortillas and filling.
4. Heat a large skillet or griddle over medium heat (about 350°F). Add 1/2 tablespoon of unsalted butter and swirl to coat the surface evenly. Tip: Using medium heat ensures the tortillas brown slowly without burning the filling.
5. Place one filled quesadilla in the skillet. Cook for 2–3 minutes, or until the bottom is golden brown and crispy. You’ll see bubbles forming in the tortilla as it cooks.
6. Carefully flip the quesadilla using a spatula. Cook for an additional 2–3 minutes on the other side, until golden brown and the cheese inside is fully melted. Tip: Press down lightly with the spatula after flipping to help the cheese melt evenly and adhere the layers.
7. Transfer the cooked quesadilla to a cutting board. Repeat steps 4–6 with the remaining butter and quesadillas, adding more butter as needed to prevent sticking.
8. Let the quesadillas rest for 1 minute before slicing each into 3 wedges with a sharp knife or pizza cutter. This brief rest allows the filling to set slightly for cleaner cuts.
Unwrap these quesadillas to reveal a gooey, creamy interior punctuated by sweet corn pops, all hugged by a crisp, buttery tortilla. Serve them immediately with a side of salsa or sour cream for dipping, or slice them into smaller pieces as a crowd-pleasing appetizer at your next get-together.
Creamy Corn Pudding with Cream Cheese
You’ll love this comforting, creamy corn pudding with cream cheese—it’s a simple, crowd-pleasing side dish that’s perfect for holidays or cozy weeknights. Let’s walk through each step together to ensure your pudding turns out smooth and delicious every time.
Serving: 8 | Pre Time: 15 minutes | Cooking Time: 45 minutes
Ingredients
For the pudding base:
– 4 cups frozen corn kernels, thawed
– 8 oz cream cheese, softened to room temperature
– 1/2 cup granulated sugar
– 1/4 cup unsalted butter, melted
– 1/4 cup all-purpose flour
– 1 tsp salt
For the custard mixture:
– 4 large eggs
– 1 cup whole milk
– 1/2 cup heavy cream
Instructions
1. Preheat your oven to 350°F and grease a 9×13-inch baking dish with butter or non-stick spray.
2. In a large mixing bowl, combine the thawed corn kernels, softened cream cheese, granulated sugar, melted butter, all-purpose flour, and salt. Mix with a spatula until well blended and creamy.
3. In a separate medium bowl, whisk together the eggs, whole milk, and heavy cream until smooth and fully incorporated.
4. Pour the custard mixture into the corn mixture and stir gently until everything is evenly combined. Tip: Avoid overmixing to keep the texture light.
5. Transfer the combined mixture to the prepared baking dish and spread it into an even layer with the spatula.
6. Bake in the preheated oven for 45 minutes, or until the top is golden brown and the center is set—check by inserting a knife; it should come out clean. Tip: Rotate the dish halfway through baking for even browning.
7. Remove the pudding from the oven and let it cool on a wire rack for 10 minutes before serving. Tip: Cooling slightly helps the pudding firm up for easier slicing.
8. Serve warm directly from the baking dish.
Luxuriously creamy with a hint of sweetness from the corn, this pudding has a rich, velvety texture thanks to the cream cheese and custard base. For a creative twist, top it with crispy bacon bits or a drizzle of hot honey before serving to balance the flavors.
Corn and Cream Cheese Enchiladas

Wondering how to make a comforting, creamy Tex-Mex dish that’s perfect for a cozy dinner? These Corn and Cream Cheese Enchiladas combine sweet corn, rich cream cheese, and a zesty sauce for a satisfying meal that’s easier than you might think. Follow along step-by-step to create this crowd-pleaser.
Serving: 6 | Pre Time: 20 minutes | Cooking Time: 25 minutes
Ingredients
For the filling:
– 2 cups frozen corn kernels, thawed
– 8 ounces cream cheese, softened at room temperature
– 1/2 cup shredded Monterey Jack cheese
– 1/4 cup chopped fresh cilantro
– 1/2 teaspoon ground cumin
– 1/4 teaspoon salt
For the sauce:
– 1 (15-ounce) can red enchilada sauce
– 1/4 cup sour cream
For assembly:
– 8 (6-inch) corn tortillas
– 1 cup shredded Monterey Jack cheese (for topping)
Instructions
1. Preheat your oven to 350°F (175°C) and lightly grease a 9×13-inch baking dish with cooking spray or oil.
2. In a medium bowl, combine the thawed corn kernels, softened cream cheese, 1/2 cup shredded Monterey Jack cheese, chopped cilantro, ground cumin, and salt until well mixed.
3. Tip: Soften the cream cheese by leaving it out for 30 minutes to make blending easier and prevent lumps.
4. In a small bowl, whisk together the red enchilada sauce and sour cream until smooth to create a creamy sauce.
5. Warm the corn tortillas one at a time in a dry skillet over medium heat for about 10 seconds per side to make them pliable and prevent cracking.
6. Spoon about 1/4 cup of the corn and cream cheese filling onto the center of each warmed tortilla, roll it up tightly, and place it seam-side down in the prepared baking dish.
7. Pour the enchilada sauce evenly over the rolled tortillas in the baking dish, covering them completely.
8. Sprinkle the remaining 1 cup of shredded Monterey Jack cheese evenly over the top of the sauced enchiladas.
9. Bake in the preheated oven for 20-25 minutes, until the cheese is melted and bubbly and the edges are lightly golden.
10. Tip: Check at 20 minutes to avoid overbaking; the enchiladas should be heated through but not dried out.
11. Remove from the oven and let the enchiladas rest for 5 minutes before serving to allow the filling to set slightly.
12. Tip: Garnish with extra cilantro or a dollop of sour cream for added freshness and flavor.
Savor the creamy, slightly sweet filling paired with the tangy sauce in every bite. These enchiladas have a soft, comforting texture that’s perfect with a crisp side salad or refried beans for a complete meal.
Creamy Corn Risotto with Cream Cheese

Here’s a comforting, creamy risotto that’s perfect for a cozy winter evening. This creamy corn risotto with cream cheese is surprisingly simple to make and delivers rich, velvety results every time.
Serving: 4 | Pre Time: 10 minutes | Cooking Time: 30 minutes
Ingredients
For the base:
– 1 tablespoon olive oil
– 1 small yellow onion, finely diced
– 2 cloves garlic, minced
– 1 cup Arborio rice
– 4 cups low-sodium chicken broth, kept warm on the stove
For the corn and cream:
– 2 cups frozen corn kernels, thawed
– 4 ounces cream cheese, at room temperature and cut into cubes
– 1/2 cup grated Parmesan cheese
– 2 tablespoons unsalted butter
– Salt and black pepper
Instructions
1. Heat 1 tablespoon olive oil in a large, heavy-bottomed pot or Dutch oven over medium heat until shimmering, about 1 minute.
2. Add 1 small finely diced yellow onion and cook, stirring frequently, until translucent and soft, about 5 minutes.
3. Stir in 2 minced garlic cloves and cook until fragrant, about 30 seconds.
4. Add 1 cup Arborio rice to the pot and toast, stirring constantly, for 2 minutes until the grains are lightly golden and coated in oil. Tip: Toasting the rice helps it absorb liquid better for a creamier texture.
5. Pour in 1/2 cup of the warm chicken broth and stir continuously until the liquid is fully absorbed, about 2-3 minutes.
6. Continue adding the remaining warm chicken broth, 1/2 cup at a time, stirring constantly and allowing each addition to be absorbed before adding the next. This process should take about 20-25 minutes total.
7. When the rice is tender but still slightly firm to the bite (al dente) and the mixture is creamy, stir in 2 cups thawed frozen corn kernels and cook for 2 minutes to heat through.
8. Remove the pot from the heat and immediately stir in 4 ounces cubed cream cheese, 1/2 cup grated Parmesan cheese, and 2 tablespoons unsalted butter until fully melted and incorporated. Tip: Taking the pot off the heat before adding the dairy prevents the cream cheese from curdling.
9. Season the risotto with salt and black pepper to your preference, then let it rest, covered, for 2 minutes to thicken slightly. Tip: Resting allows the flavors to meld and gives you a perfect, spoonable consistency.
10. Divide the risotto among bowls and serve immediately.
Delightfully creamy with sweet pops of corn, this risotto has a luxurious texture from the melted cream cheese and Parmesan. For a fresh contrast, top it with a sprinkle of chopped chives or a drizzle of chili oil, or pair it with a simple green salad to balance the richness.
Corn and Cream Cheese Stuffed Chicken Breast

Preparing a flavorful, juicy chicken breast doesn’t have to be complicated, and this corn and cream cheese stuffed version is a perfect example. By stuffing the chicken, you lock in moisture and create a delightful surprise in every bite, making it an impressive yet approachable dish for any home cook.
Serving: 4 | Pre Time: 20 minutes | Cooking Time: 25 minutes
Ingredients
For the Stuffing:
- 4 oz cream cheese, softened
- 1/2 cup canned corn kernels, drained
- 1/4 cup shredded cheddar cheese
- 1 tbsp chopped fresh chives
- 1/4 tsp garlic powder
- 1/4 tsp black pepper
For the Chicken:
- 4 boneless, skinless chicken breasts (about 6 oz each)
- 1 tbsp olive oil
- 1/2 tsp salt
- 1/4 tsp paprika
For the Pan Sauce (Optional):
- 1/2 cup chicken broth
- 1 tbsp unsalted butter
Instructions
- Preheat your oven to 375°F (190°C) and line a baking sheet with parchment paper.
- In a medium bowl, combine the softened cream cheese, drained corn kernels, shredded cheddar cheese, chopped fresh chives, garlic powder, and black pepper until fully mixed. Tip: Softening the cream cheese at room temperature for 30 minutes makes it easier to blend.
- Place each chicken breast on a cutting board and use a sharp knife to cut a horizontal pocket into the thickest side, being careful not to cut all the way through.
- Divide the stuffing mixture evenly among the chicken breasts, using a spoon to fill each pocket. Tip: Do not overstuff, as the filling may leak out during cooking; aim for about 2 tablespoons per breast.
- Season the outside of each stuffed chicken breast with salt and paprika, rubbing it gently to coat.
- Heat olive oil in a large oven-safe skillet over medium-high heat until it shimmers, about 2 minutes.
- Place the chicken breasts in the skillet and sear for 3-4 minutes per side, until golden brown. Tip: Avoid moving the chicken during searing to develop a good crust.
- Transfer the skillet to the preheated oven and bake for 15-18 minutes, until the internal temperature reaches 165°F (74°C) when checked with a meat thermometer.
- Remove the chicken from the oven and let it rest on a plate for 5 minutes to allow juices to redistribute.
- For an optional pan sauce, place the skillet back on the stove over medium heat, add chicken broth, and scrape up any browned bits. Simmer for 3 minutes, then stir in butter until melted.
Moist and tender, the chicken pairs beautifully with the creamy, slightly sweet corn filling, offering a satisfying contrast in textures. Serve it sliced to reveal the colorful stuffing, perhaps alongside roasted vegetables or a simple salad for a complete meal that feels both comforting and elegant.
Creamy Corn Pancakes with Cream Cheese Drizzle
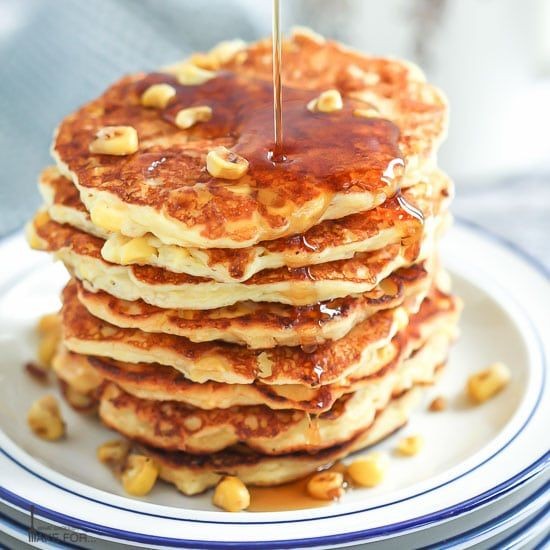
These creamy corn pancakes with cream cheese drizzle are a delightful twist on a breakfast classic, combining sweet corn kernels with a rich, tangy topping for a comforting dish perfect for weekend brunches or cozy dinners. They come together with simple pantry staples and straightforward techniques, making them accessible even for novice cooks. Today, we’ll walk through each step methodically to ensure your pancakes turn out fluffy and flavorful every time.
Serving: 4 | Pre Time: 15 minutes | Cooking Time: 20 minutes
Ingredients
– For the pancakes:
– 1 cup all-purpose flour
– 1 tablespoon granulated sugar
– 1 teaspoon baking powder
– 1/2 teaspoon salt
– 1 cup milk
– 1 large egg
– 2 tablespoons unsalted butter, melted
– 1 cup canned corn kernels, drained
– For the drizzle:
– 4 ounces cream cheese, softened
– 1/4 cup milk
– 1 tablespoon honey
Instructions
1. In a large mixing bowl, whisk together 1 cup all-purpose flour, 1 tablespoon granulated sugar, 1 teaspoon baking powder, and 1/2 teaspoon salt until fully combined.
2. In a separate bowl, beat 1 large egg lightly, then stir in 1 cup milk and 2 tablespoons melted unsalted butter until smooth.
3. Pour the wet ingredients into the dry ingredients and mix gently until just combined; avoid overmixing to keep the pancakes tender.
4. Fold in 1 cup drained canned corn kernels evenly into the batter.
5. Heat a non-stick skillet or griddle over medium heat (about 350°F) and lightly grease it with butter or oil.
6. Pour 1/4 cup of batter onto the skillet for each pancake, cooking until bubbles form on the surface and the edges look set, about 2-3 minutes.
7. Flip the pancakes carefully and cook for another 1-2 minutes until golden brown and cooked through; adjust heat if they brown too quickly.
8. While the pancakes cook, prepare the drizzle by combining 4 ounces softened cream cheese, 1/4 cup milk, and 1 tablespoon honey in a small bowl, whisking until smooth and creamy.
9. Transfer the cooked pancakes to a plate and repeat with the remaining batter, keeping them warm in a 200°F oven if needed.
10. Drizzle the cream cheese mixture generously over the warm pancakes just before serving.
Now, these pancakes boast a fluffy interior studded with sweet corn kernels, complemented by the creamy, slightly tangy drizzle that melts into every bite. For a creative twist, try topping them with crispy bacon bits or a sprinkle of fresh chives to balance the sweetness, making them a versatile dish that’s sure to impress at any gathering.
Corn and Cream Cheese Tartlets

Mastering a simple yet elegant appetizer can elevate any holiday gathering, and these Corn and Cream Cheese Tartlets are the perfect bite-sized treat to impress your guests. Making them requires just a few key ingredients and a methodical approach, so let’s walk through each step together to ensure your tartlets turn out perfectly flaky and flavorful every time.
Serving: 12 | Pre Time: 20 minutes | Cooking Time: 15 minutes
Ingredients
For the crust:
– 1 package (14.1 oz) refrigerated pie crusts, thawed
– 1 large egg, beaten
For the filling:
– 4 oz cream cheese, softened to room temperature
– 1/4 cup sour cream
– 1 cup frozen corn kernels, thawed and patted dry
– 1/4 cup shredded cheddar cheese
– 1/4 tsp garlic powder
– 1/4 tsp salt
– 1/8 tsp black pepper
Instructions
1. Preheat your oven to 375°F and lightly grease a 24-cup mini muffin tin with non-stick cooking spray.
2. Unroll the refrigerated pie crusts on a lightly floured surface and use a 2-inch round cookie cutter to cut out 24 circles, re-rolling scraps as needed.
3. Gently press each pie crust circle into the prepared muffin tin cups, forming a small tart shell.
4. Brush the inside of each tart shell with the beaten egg using a pastry brush to create a golden, crisp crust.
5. Bake the tart shells in the preheated oven for 8 minutes until lightly golden, then remove and let cool slightly.
6. In a medium mixing bowl, combine the softened cream cheese and sour cream, stirring until smooth and lump-free.
7. Fold in the thawed corn kernels, shredded cheddar cheese, garlic powder, salt, and black pepper until evenly distributed.
8. Spoon about 1 tablespoon of the corn and cream cheese filling into each pre-baked tart shell, filling them just to the top.
9. Return the filled tartlets to the oven and bake for an additional 7 minutes at 375°F until the filling is set and the edges are golden brown.
10. Carefully remove the tartlets from the muffin tin and transfer them to a wire rack to cool for 5 minutes before serving.
These tartlets boast a delightful contrast of textures, with a flaky, buttery crust giving way to a creamy, slightly tangy filling studded with sweet corn kernels. Try garnishing them with a sprinkle of fresh chives or a drizzle of hot honey for an extra pop of flavor that will have your guests coming back for more.
Creamy Corn and Shrimp Pasta with Cream Cheese

Many home cooks find pasta dishes intimidating, but this creamy corn and shrimp pasta with cream cheese is surprisingly simple to prepare. Mastering this recipe requires just a few fresh ingredients and straightforward techniques that yield restaurant-quality results in your own kitchen.
Serving: 4 | Pre Time: 15 minutes | Cooking Time: 20 minutes
Ingredients
For the pasta:
– 12 ounces dried fettuccine pasta
– 1 tablespoon kosher salt
For the shrimp:
– 1 pound large raw shrimp, peeled and deveined
– 1 tablespoon olive oil
– 1/2 teaspoon garlic powder
– 1/4 teaspoon black pepper
For the sauce:
– 2 tablespoons unsalted butter
– 3 cloves garlic, minced
– 1 cup fresh corn kernels (from about 2 ears)
– 8 ounces cream cheese, softened
– 1 cup whole milk
– 1/2 cup grated Parmesan cheese
– 1/4 cup chopped fresh parsley
Instructions
1. Bring 4 quarts of water to a rolling boil in a large pot over high heat.
2. Add 1 tablespoon kosher salt to the boiling water.
3. Add 12 ounces dried fettuccine pasta to the salted water.
4. Cook the pasta for 9-11 minutes until al dente, stirring occasionally to prevent sticking.
5. Drain the cooked pasta in a colander, reserving 1 cup of pasta water.
6. Pat 1 pound of large raw shrimp completely dry with paper towels.
7. Season the shrimp evenly with 1/2 teaspoon garlic powder and 1/4 teaspoon black pepper.
8. Heat 1 tablespoon olive oil in a large skillet over medium-high heat until shimmering.
9. Add the seasoned shrimp to the hot skillet in a single layer.
10. Cook the shrimp for 2-3 minutes per side until pink and opaque, then transfer to a plate.
11. Melt 2 tablespoons unsalted butter in the same skillet over medium heat.
12. Add 3 cloves minced garlic and cook for 1 minute until fragrant.
13. Add 1 cup fresh corn kernels and cook for 3-4 minutes until slightly softened.
14. Reduce heat to low and add 8 ounces softened cream cheese to the skillet.
15. Gradually whisk in 1 cup whole milk until the sauce becomes smooth and creamy.
16. Stir in 1/2 cup grated Parmesan cheese until fully melted into the sauce.
17. Add the drained pasta to the sauce along with 1/4 cup of the reserved pasta water.
18. Toss the pasta in the sauce for 2 minutes until evenly coated, adding more pasta water if needed.
19. Return the cooked shrimp to the skillet and gently fold into the pasta.
20. Remove from heat and stir in 1/4 cup chopped fresh parsley.
Here’s what makes this dish special: The cream cheese creates an exceptionally velvety sauce that clings beautifully to each strand of pasta, while the sweet corn provides delightful bursts of freshness against the savory shrimp. For an elegant presentation, serve this pasta in shallow bowls garnished with extra parsley and a sprinkle of Parmesan, perhaps alongside a crisp green salad to balance the richness.
Summary
Savor the versatility of cream cheese in these 18 creamy corn recipes, perfect for any occasion. We hope you find a new favorite to try in your kitchen! Don’t forget to leave a comment sharing which dish you loved most and pin this roundup on Pinterest to save these delightful ideas for later. Happy cooking!