
Zesty, creamy, and utterly irresistible—cream cheese is the secret star that transforms simple dishes into extraordinary delights. Whether you’re whipping up a quick weeknight dinner, hosting a festive gathering, or craving some cozy comfort food, these 14 delicious recipes have you covered for any occasion. Dive in and discover how this versatile ingredient can elevate your cooking from ordinary to amazing!
Cream Cheese Stuffed French Toast
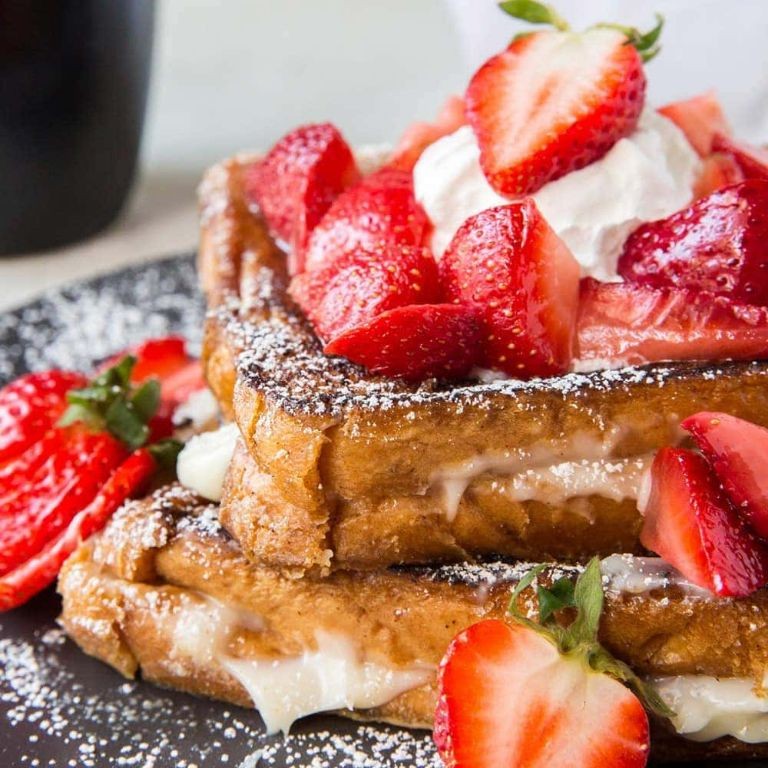
You know those mornings when you want something special but don’t want to spend hours in the kitchen? This cream cheese stuffed French toast is your answer—it’s indulgent, easy, and feels like a weekend treat any day of the week.
Serving: 4 | Pre Time: 10 minutes | Cooking Time: 15 minutes
Ingredients
– 8 slices of thick-cut bread (like brioche or challah)
– 4 ounces of cream cheese, softened at room temperature
– 2 tablespoons of powdered sugar
– 2 large eggs
– 1/2 cup of whole milk
– A splash of vanilla extract
– A pinch of ground cinnamon
– 2 tablespoons of unsalted butter
– Maple syrup or fresh berries for serving
Instructions
1. In a small bowl, mix the softened cream cheese and powdered sugar until smooth—this makes the filling easier to spread.
2. Lay out 4 slices of bread and evenly spread the cream cheese mixture on each, leaving a small border around the edges.
3. Top each with another slice of bread to form sandwiches, pressing gently to seal.
4. In a shallow dish, whisk together the eggs, milk, vanilla extract, and cinnamon until fully combined.
5. Heat a large non-stick skillet or griddle over medium heat and melt 1 tablespoon of butter, swirling to coat the surface.
6. Dip each sandwich into the egg mixture, letting it soak for about 10 seconds per side so it absorbs the liquid without getting soggy.
7. Place the dipped sandwiches in the skillet and cook for 3–4 minutes per side, until golden brown and crispy—adjust the heat if they brown too quickly.
8. Repeat with the remaining sandwiches, adding more butter as needed to prevent sticking.
9. Serve immediately while warm. Creamy and rich, this French toast has a gooey center that pairs perfectly with a drizzle of maple syrup or a handful of fresh berries for a bright contrast.
Garlic Herb Cream Cheese Spread
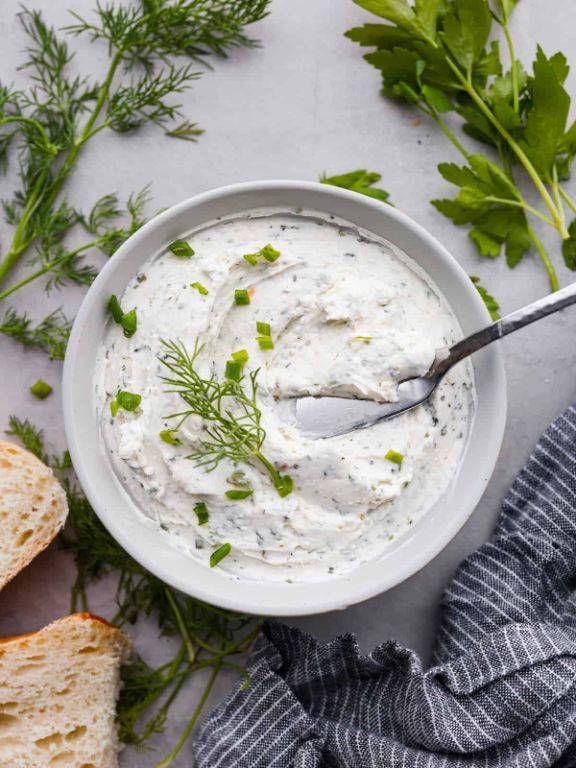
Gathering friends for the holidays? You need this garlic herb cream cheese spread in your life. It’s creamy, flavorful, and comes together in minutes—perfect for last-minute hosting or a cozy snack.
Serving: 8 | Pre Time: 10 minutes | Cooking Time: 0 minutes
Ingredients
– 2 blocks (16 ounces total) of cream cheese, softened to room temperature
– 4 cloves of garlic, minced super fine
– A handful of fresh parsley, finely chopped
– A couple of tablespoons of fresh chives, snipped small
– A splash of fresh lemon juice (about 1 tablespoon)
– A pinch of salt and a few cracks of black pepper
Instructions
1. Place the softened cream cheese blocks in a large mixing bowl.
2. Add the minced garlic, chopped parsley, and snipped chives to the bowl.
3. Squeeze in the fresh lemon juice directly over the mixture.
4. Sprinkle the salt and crack the black pepper evenly on top.
5. Use a hand mixer or a sturdy spoon to blend everything together on medium speed for about 2–3 minutes, until it’s smooth and all the herbs are evenly distributed. Tip: If the cream cheese is still a bit firm, let it sit out for another 10–15 minutes to soften further—this prevents lumps.
6. Scrape down the sides of the bowl with a spatula to ensure no ingredients are left unmixed.
7. Taste a small spoonful and adjust the seasoning if needed, but be careful not to over-salt since the flavors will develop as it chills. Tip: For a stronger garlic kick, you can roast the cloves first at 400°F for 15 minutes until soft and golden, then mash them into a paste before adding.
8. Transfer the spread to a serving dish or an airtight container. Tip: For best results, cover and refrigerate it for at least 1 hour before serving—this allows the flavors to meld and the texture to firm up nicely.
9. Serve chilled with crackers, veggie sticks, or as a bagel topping.
Out of the fridge, this spread is luxuriously smooth with a bright, herby punch from the parsley and chives, balanced by that mellow garlic warmth. It’s fantastic slathered on toasted crostini or stirred into mashed potatoes for an extra creamy twist. Honestly, you might want to double the batch—it disappears fast!
Spinach and Cream Cheese Stuffed Chicken

Bored of the same old chicken dinners? This spinach and cream cheese stuffed chicken is the cozy, impressive meal you need tonight. It looks fancy but comes together with simple ingredients you probably already have. You’ll love how the creamy filling pairs with juicy chicken.
Serving: 4 | Pre Time: 15 minutes | Cooking Time: 25 minutes
Ingredients
– 4 boneless, skinless chicken breasts (about 6 oz each)
– A 10 oz package of frozen chopped spinach, thawed and squeezed dry
– 8 oz of cream cheese, softened
– A couple of garlic cloves, minced
– A splash of olive oil
– A pinch of salt and black pepper
– A sprinkle of paprika
Instructions
1. Preheat your oven to 375°F and lightly grease a baking dish with a bit of olive oil.
2. In a medium bowl, mix the thawed spinach, softened cream cheese, and minced garlic until well combined. Tip: Squeeze the spinach really well in a clean towel to remove excess water—this keeps the filling from getting soggy.
3. Lay each chicken breast flat on a cutting board and use a sharp knife to cut a horizontal pocket through the thickest part, being careful not to cut all the way through.
4. Stuff each pocket with about ¼ cup of the spinach-cream cheese mixture, pressing it in gently.
5. Season the outside of the chicken all over with salt, pepper, and a light sprinkle of paprika.
6. Heat a splash of olive oil in a large oven-safe skillet over medium-high heat until shimmering, about 2 minutes.
7. Place the stuffed chicken breasts in the skillet and sear for 3-4 minutes per side until golden brown. Tip: Don’t move them around too much while searing to get a nice crust.
8. Transfer the skillet to the preheated oven and bake for 20-25 minutes, or until the internal temperature reaches 165°F when checked with a meat thermometer. Tip: Let the chicken rest for 5 minutes after baking—this helps the juices redistribute so it stays moist.
9. Serve the chicken warm, sliced to show off the creamy filling.
Melted cream cheese and spinach create a rich, savory center that oozes out when you cut into the tender chicken. The paprika adds a subtle smokiness that balances the creaminess perfectly. Try serving it over a bed of rice or with roasted veggies to soak up all the delicious juices.
Cream Cheese and Chive Mashed Potatoes
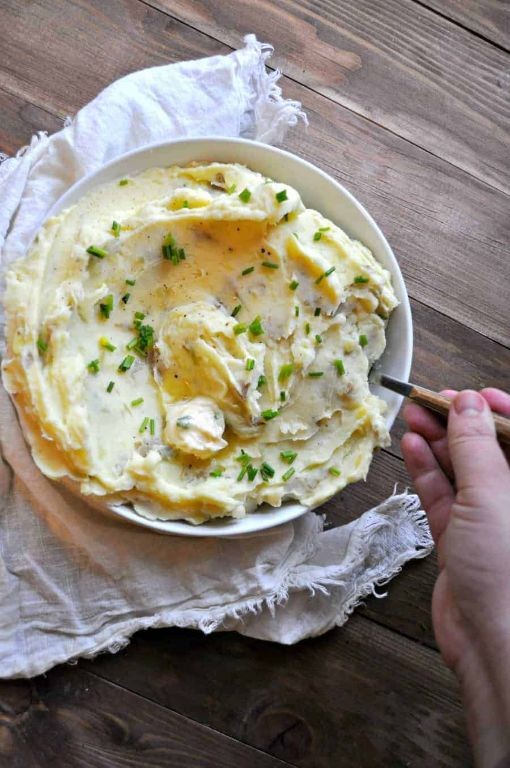
Tired of the same old mashed potatoes? You’re in for a treat. These creamy, tangy, and herby mashed potatoes are about to become your new favorite side dish—perfect for holidays or a cozy weeknight dinner.
Serving: 6 | Pre Time: 15 minutes | Cooking Time: 25 minutes
Ingredients
– 3 pounds of Yukon Gold potatoes, peeled and chopped into 1-inch chunks
– 1 cup of heavy cream
– 8 ounces of cream cheese, softened at room temperature
– 1/2 cup of unsalted butter, cut into tablespoons
– 1/4 cup of fresh chives, finely chopped
– 1 teaspoon of salt
– 1/2 teaspoon of black pepper
Instructions
1. Place the peeled and chopped potatoes in a large pot and cover them with cold water by about an inch.
2. Bring the pot to a boil over high heat, then reduce the heat to medium and let it simmer for 15–20 minutes, until the potatoes are fork-tender.
3. While the potatoes cook, warm the heavy cream in a small saucepan over low heat until it’s just steaming—don’t let it boil.
4. Drain the potatoes thoroughly in a colander, then return them to the hot pot to let any excess moisture evaporate for a minute.
5. Mash the potatoes with a potato masher or ricer until smooth, avoiding over-mixing to keep them fluffy.
6. Add the softened cream cheese and butter to the mashed potatoes, stirring until fully melted and incorporated.
7. Pour in the warmed heavy cream gradually, stirring continuously until the mixture is creamy and well combined.
8. Fold in the chopped chives, salt, and black pepper, mixing gently to distribute evenly.
9. Taste and adjust seasoning if needed, but be careful not to over-salt since the cream cheese adds tang.
Zesty and rich, these mashed potatoes have a velvety texture with pops of fresh chive in every bite. Serve them alongside roasted chicken or as a decadent base for gravy—they’re so good, you might just skip the main course!
Mini Cream Cheese Danish Pastries

Kicking off the holiday baking season? These Mini Cream Cheese Danish Pastries are the perfect little treat to whip up. They’re surprisingly simple to make but look and taste totally impressive. You’ll love how the flaky pastry pairs with that sweet, tangy cream cheese filling.
Serving: 12 | Pre Time: 20 minutes | Cooking Time: 20 minutes
Ingredients
– A couple of sheets of frozen puff pastry, thawed
– A block (8 ounces) of cream cheese, softened to room temperature
– A quarter cup of granulated sugar
– One large egg yolk
– A splash (about 1 teaspoon) of vanilla extract
– A pinch of salt
– One whole egg for that egg wash
– A couple of tablespoons of your favorite jam or fruit preserves (optional, for swirling)
Instructions
1. Preheat your oven to 400°F (200°C) and line a baking sheet with parchment paper.
2. In a medium bowl, beat the softened cream cheese, sugar, egg yolk, vanilla, and salt together until completely smooth. (Tip: Make sure your cream cheese is truly soft—this prevents lumps in your filling.)
3. Unfold one sheet of thawed puff pastry on a lightly floured surface and roll it out slightly to smooth any seams.
4. Cut the pastry sheet into 12 equal squares using a sharp knife or pizza cutter.
5. Place the squares onto your prepared baking sheet, leaving about an inch of space between them.
6. Spoon about a tablespoon of the cream cheese filling into the center of each pastry square.
7. (Optional) Add a tiny dollop (about ½ teaspoon) of jam on top of the cream cheese filling and use a toothpick to gently swirl it in.
8. In a small bowl, beat the whole egg with a tablespoon of water to make an egg wash.
9. Lightly brush the exposed edges of each pastry square with the egg wash. (Tip: This egg wash is the secret to that gorgeous, golden-brown shine.)
10. Fold two opposite corners of each square into the center, just over the filling, and press gently to seal.
11. Bake in your preheated oven for 18-20 minutes, or until the pastries are puffed and a deep golden brown all over.
12. Let the pastries cool on the baking sheet for at least 10 minutes before serving. (Tip: They need this time to set—the filling will be very hot right out of the oven.)
Vibrantly golden and wonderfully flaky, these pastries have a rich, creamy center that’s just sweet enough. The texture is a fantastic contrast between the crisp, buttery layers and the soft, cool filling. Try serving them slightly warm with a dusting of powdered sugar or alongside a cup of coffee for the ultimate cozy breakfast or dessert.
Cream Cheese and Jalapeño Stuffed Mushrooms
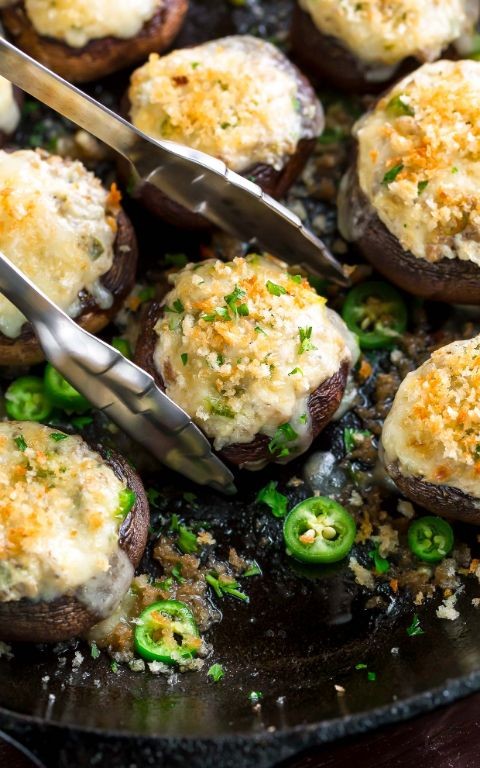
Deliciously creamy with just the right kick, these stuffed mushrooms are the perfect party appetizer or cozy snack. You’ll love how the rich cream cheese filling balances the spicy jalapeños, all tucked into tender mushroom caps. They’re surprisingly easy to make and always disappear fast!
Serving: 4 | Pre Time: 15 minutes | Cooking Time: 20 minutes
Ingredients
- 16 large white mushroom caps (about 1 pound)
- 8 ounces of cream cheese, softened at room temperature
- 2 jalapeños, finely chopped (remove seeds for less heat)
- 1/2 cup of shredded cheddar cheese
- 2 cloves of garlic, minced
- 2 tablespoons of olive oil
- A pinch of salt and black pepper
- A sprinkle of fresh parsley for garnish (optional)
Instructions
- Preheat your oven to 375°F and line a baking sheet with parchment paper.
- Gently twist off the stems from the mushroom caps and set the caps aside.
- Finely chop the mushroom stems and place them in a medium mixing bowl.
- Add the softened cream cheese, chopped jalapeños, shredded cheddar cheese, minced garlic, salt, and black pepper to the bowl with the chopped stems.
- Mix everything together until well combined—this is your filling.
- Brush the outside of each mushroom cap lightly with olive oil to prevent sticking.
- Spoon the filling generously into each mushroom cap, mounding it slightly on top.
- Arrange the stuffed mushrooms on the prepared baking sheet, spacing them about an inch apart.
- Bake in the preheated oven for 18-20 minutes, or until the mushrooms are tender and the filling is golden and bubbly.
- Remove from the oven and let cool for 5 minutes before serving.
- Garnish with fresh parsley if desired.
Now, these little bites are a total crowd-pleaser! The mushrooms turn tender and juicy, while the filling gets all creamy and slightly crispy on top. Not only do they taste amazing warm, but you can also serve them with a dollop of sour cream or alongside a crisp salad for a fun twist. Enjoy every cheesy, spicy bite!
Cream Cheese and Smoked Salmon Bagels
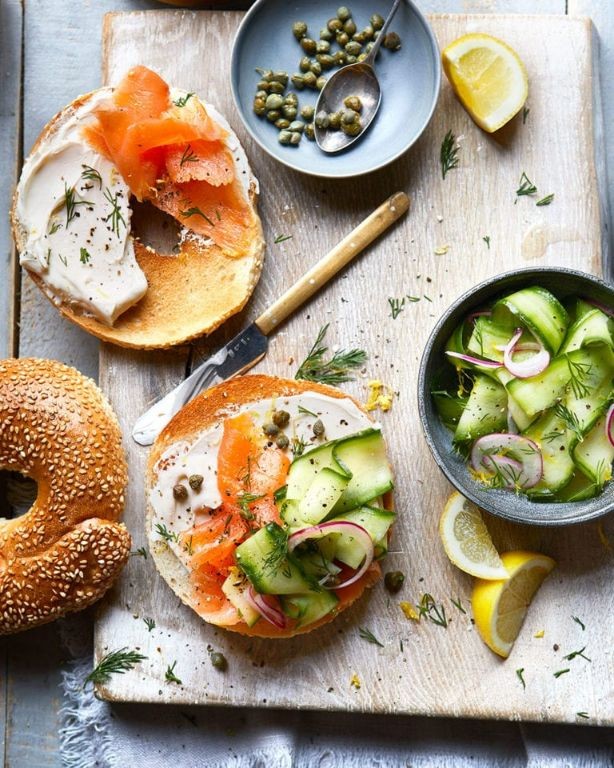
Kick off your weekend brunch with these creamy, savory bagels that feel fancy but are actually super simple to throw together. They’re perfect for lazy mornings or when you want to impress guests without spending hours in the kitchen. Honestly, you can’t beat that combo of cool cream cheese and smoky salmon on a chewy bagel.
Serving: 4 | Pre Time: 10 minutes | Cooking Time: 0 minutes
Ingredients
– 4 plain bagels (or everything bagels if you want extra flavor)
– 8 ounces of cream cheese, softened at room temperature for about 30 minutes
– 8 ounces of thinly sliced smoked salmon
– 1 small red onion, thinly sliced into half-moons
– A couple of tablespoons of capers, drained
– A handful of fresh dill, roughly chopped
– A squeeze of fresh lemon juice (about half a lemon’s worth)
Instructions
1. Slice the 4 bagels in half horizontally using a serrated knife to get clean cuts without squishing them.
2. Toast the bagel halves in a toaster or toaster oven until they’re golden brown and crisp on the edges, which usually takes about 2-3 minutes depending on your appliance.
3. Spread about 2 tablespoons of softened cream cheese evenly onto each toasted bagel half, covering the surface completely to prevent sogginess.
4. Layer 2 ounces of thinly sliced smoked salmon over the cream cheese on each bagel half, arranging it in loose folds for better texture.
5. Scatter a few slices of red onion over the salmon on each bagel, using about a quarter of the onion total for a sharp bite.
6. Sprinkle a teaspoon of drained capers over each bagel half for a briny pop that cuts through the richness.
7. Garnish each bagel with a pinch of roughly chopped fresh dill, distributing it evenly for a herby freshness.
8. Finish by squeezing a few drops of fresh lemon juice over the top of each assembled bagel, using about half a lemon in total to brighten all the flavors.
Tip: Let the cream cheese soften fully so it spreads easily without tearing the bagel. Tip: Toast the bagels just before assembling to keep them crisp under the toppings. Tip: Use your hands to gently separate the salmon slices for a more elegant presentation.
These bagels deliver a fantastic mix of textures—creamy, chewy, and a little crunchy from the capers and onion. The smoky salmon pairs perfectly with the tangy cream cheese and zesty lemon, making every bite irresistible. Try serving them open-faced with a side of crisp cucumber slices for a refreshing contrast.
Cream Cheese and Sausage Stuffed Bell Peppers

Zesty bell peppers get a cozy makeover when stuffed with a creamy sausage filling that’s pure comfort food. You’ll love how the sweet peppers balance the savory, cheesy mix inside. It’s a simple, satisfying meal that feels special without much fuss.
Serving: 4 | Pre Time: 15 minutes | Cooking Time: 30 minutes
Ingredients
– 4 large bell peppers (any color you like)
– 1 pound of ground Italian sausage
– 8 ounces of cream cheese, softened
– 1 cup of shredded cheddar cheese
– 1/2 cup of diced onion
– 2 cloves of garlic, minced
– 1 tablespoon of olive oil
– A splash of water
– A pinch of salt and black pepper
Instructions
1. Preheat your oven to 375°F.
2. Cut the tops off the bell peppers and remove the seeds and membranes.
3. Heat the olive oil in a large skillet over medium heat.
4. Add the diced onion and cook for about 3 minutes, until it starts to soften.
5. Add the minced garlic and cook for 1 more minute, stirring constantly to avoid burning.
6. Add the ground Italian sausage to the skillet, breaking it up with a spoon.
7. Cook the sausage for 8-10 minutes, until it’s fully browned and no longer pink.
8. Drain any excess grease from the skillet.
9. Reduce the heat to low and add the softened cream cheese to the sausage mixture.
10. Stir until the cream cheese is fully melted and combined, which should take about 2 minutes.
11. Remove the skillet from the heat and stir in half of the shredded cheddar cheese.
12. Season the filling with a pinch of salt and black pepper.
13. Spoon the sausage and cheese mixture evenly into the hollowed bell peppers.
14. Place the stuffed peppers in a baking dish and add a splash of water to the bottom of the dish to keep them moist.
15. Top each pepper with the remaining shredded cheddar cheese.
16. Bake in the preheated oven for 25-30 minutes, until the peppers are tender and the cheese is bubbly and golden brown.
17. Let the peppers cool for 5 minutes before serving.
Enjoy the creamy, savory filling paired with the tender, sweet bell peppers. These are great on their own or served over a bed of rice for a heartier meal. Every bite is a delicious mix of textures and flavors that’ll have everyone asking for seconds.
Cream Cheese and Crab Dip

You know those appetizers that disappear the second they hit the table? This creamy, dreamy crab dip is exactly that. It’s the perfect blend of rich cream cheese and sweet lump crab, and it’s ridiculously easy to throw together for any last-minute gathering.
Serving: 8 | Pre Time: 10 minutes | Cooking Time: 25 minutes
Ingredients
– Two 8-ounce blocks of cream cheese, softened
– 1 cup of mayonnaise
– A couple of cloves of garlic, minced
– A splash of Worcestershire sauce
– A squeeze of lemon juice (about 1 tablespoon)
– 1 pound of lump crabmeat, picked over for shells
– 1 cup of shredded Monterey Jack cheese
– A handful of chopped green onions
– A pinch of salt
Instructions
1. Preheat your oven to 350°F.
2. In a large mixing bowl, combine the softened cream cheese and mayonnaise until smooth. (Tip: Letting the cream cheese sit out for 30 minutes makes this step much easier.)
3. Stir in the minced garlic, Worcestershire sauce, lemon juice, and a pinch of salt.
4. Gently fold in the lump crabmeat, being careful not to break up the chunks too much.
5. Transfer the mixture to a 9-inch baking dish or an oven-safe skillet.
6. Sprinkle the shredded Monterey Jack cheese evenly over the top.
7. Bake the dip in the preheated oven for 20-25 minutes, until the cheese is melted and the edges are bubbly.
8. Remove the dip from the oven and let it rest for 5 minutes. (Tip: This resting time helps the dip set so it’s not too runny.)
9. Top the baked dip with the chopped green onions.
10. Serve immediately while warm. (Tip: For extra flavor, toast your bread or crackers in the oven for the last 5 minutes of the dip’s bake time.)
Very creamy and packed with sweet crab in every bite, this dip has a fantastic texture that’s thick enough to scoop but still luxuriously smooth. The hint of lemon and garlic really makes the flavors pop. Try serving it in a hollowed-out sourdough loaf for a fun, edible bowl that guests will love.
Cream Cheese and Bacon Stuffed Dates

Now, imagine a sweet, chewy date stuffed with creamy, tangy cheese and wrapped in salty, crispy bacon. You get a perfect bite every time. These little appetizers are surprisingly easy to make and always disappear fast at parties.
Serving: 12 | Pre Time: 15 minutes | Cooking Time: 15 minutes
Ingredients
– A dozen large Medjool dates, pitted
– A block of cream cheese (about 4 ounces), softened
– Six slices of bacon, cut right in half
– A couple of toothpicks
Instructions
1. Preheat your oven to 400°F and line a baking sheet with parchment paper.
2. Slice each date lengthwise on one side to create an opening for stuffing. (Tip: If a date still has its pit, just squeeze it out gently through the slit.)
3. Use a small spoon or a butter knife to stuff each date with about a teaspoon of the softened cream cheese. Don’t overfill it, or it’ll ooze out while baking.
4. Wrap one half-slice of bacon snugly around each stuffed date.
5. Secure the bacon wrap by poking a toothpick through the date where the bacon ends meet.
6. Arrange all the wrapped dates on your prepared baking sheet, making sure they aren’t touching.
7. Bake for 12 to 15 minutes. You’re looking for the bacon to be fully cooked, crispy, and a nice golden-brown color. (Tip: For extra crispiness, you can flip them halfway through the baking time.)
8. Carefully remove the baking sheet from the oven and let the dates cool for about 5 minutes. (Tip: The filling will be very hot, so this cooling time is important before serving.)
9. Serve warm. They’re best enjoyed right away while the bacon is still crisp.
That first bite gives you a fantastic mix of textures—the crispy bacon gives way to the soft, sweet date and the cool, creamy center. Try drizzling them with a little honey right before serving for an extra touch of sweetness, or serve them alongside a spicy dipping sauce to balance the flavors.
Cream Cheese and Berry Parfait
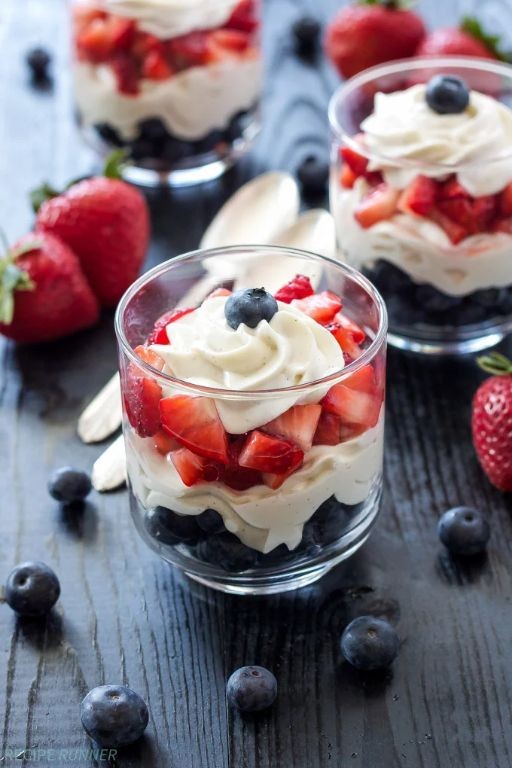
Ever had one of those days where you want something sweet but don’t want to spend hours in the kitchen? This cream cheese and berry parfait is your answer—it’s creamy, fruity, and comes together in minutes. Perfect for a quick dessert or a fancy-looking snack.
Serving: 4 | Pre Time: 15 minutes | Cooking Time: 0 minutes
Ingredients
– 8 ounces of cream cheese, softened to room temperature
– 1/2 cup of powdered sugar
– 1 teaspoon of vanilla extract
– cup of heavy cream
– 2 cups of mixed fresh berries (like strawberries, blueberries, and raspberries)
– 1 cup of granola
– A splash of lemon juice (optional, to brighten the berries)
Instructions
1. Place the softened cream cheese in a large mixing bowl and beat it with an electric mixer on medium speed for about 1 minute, until smooth and creamy. Tip: Let the cream cheese sit out for 30 minutes beforehand to avoid lumps.
2. Add the powdered sugar and vanilla extract to the cream cheese, then beat again on medium speed for another 1-2 minutes, scraping down the sides of the bowl with a spatula, until fully combined and fluffy.
3. In a separate bowl, pour in the heavy cream and whip it with the electric mixer on high speed for 2-3 minutes, until stiff peaks form. Tip: Chill the bowl and beaters in the freezer for 10 minutes first to help the cream whip faster.
4. Gently fold the whipped cream into the cream cheese mixture using the spatula, mixing just until no white streaks remain to keep it light and airy.
5. Rinse the mixed berries under cold water, pat them dry with a paper towel, and hull or slice any large strawberries. Toss them with a splash of lemon juice if using to enhance their flavor.
6. Grab four serving glasses or jars and start layering: spoon a couple of tablespoons of the cream cheese mixture into the bottom of each glass.
7. Add a layer of mixed berries on top of the cream cheese in each glass, using about 1/4 cup per glass.
8. Sprinkle a layer of granola over the berries in each glass, using about 2 tablespoons per glass for a nice crunch.
9. Repeat the layers—cream cheese mixture, berries, and granola—once more in each glass, ending with a final dollop of cream cheese mixture on top. Tip: Press down gently with a spoon to compact the layers for a neat presentation.
10. Garnish each parfait with a few extra berries and a sprinkle of granola, then serve immediately or refrigerate for up to 1 hour before eating. But before you dig in, take a moment to admire those pretty layers! The creamy filling melts with the juicy berries, while the granola adds a satisfying crunch—try serving it in clear mason jars to show it off at a brunch or picnic.
Cream Cheese and Pesto Stuffed Shells
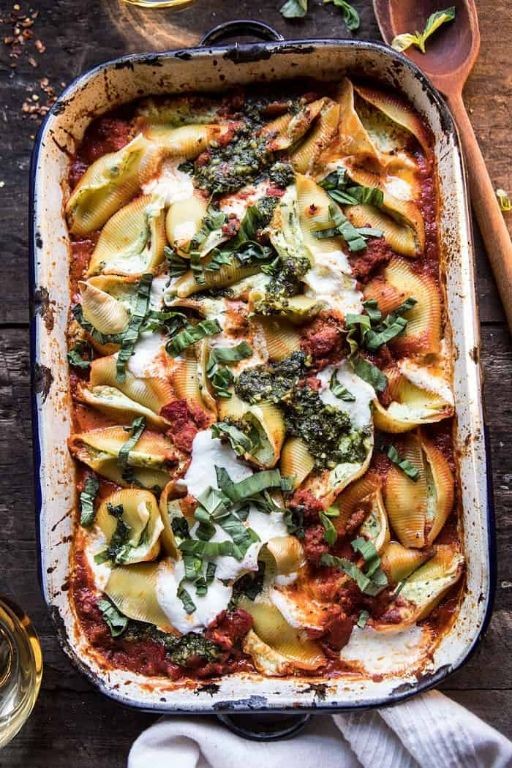
Zipping through holiday prep? You need something impressive but easy. These creamy, herby stuffed shells are your answer—they feel fancy but come together with minimal fuss. Perfect for feeding a crowd without spending all day in the kitchen.
Serving: 6 | Pre Time: 20 minutes | Cooking Time: 30 minutes
Ingredients
– A box of jumbo pasta shells (about 24 shells)
– A 15-ounce container of ricotta cheese
– An 8-ounce block of cream cheese, softened
– A cup of prepared pesto
– A couple of cups of shredded mozzarella cheese
– A splash of olive oil
– A 24-ounce jar of your favorite marinara sauce
– A pinch of salt and black pepper
Instructions
1. Preheat your oven to 375°F.
2. Bring a large pot of salted water to a rolling boil.
3. Cook the jumbo pasta shells according to the package directions until al dente, about 9-10 minutes. Tip: Stir them occasionally to prevent sticking.
4. Drain the shells in a colander and rinse them briefly under cool water to stop the cooking. Drizzle with a splash of olive oil and toss gently to prevent them from clumping together.
5. In a large mixing bowl, combine the ricotta cheese, softened cream cheese, and pesto. Mix until smooth and fully incorporated.
6. Season the cheese mixture with a pinch of salt and black pepper, then stir in half of the shredded mozzarella cheese.
7. Spread about a cup of the marinara sauce evenly over the bottom of a 9×13 inch baking dish.
8. Using a spoon or a piping bag, fill each cooked pasta shell generously with the cream cheese and pesto mixture. Tip: A small cookie scoop makes this filling process much faster and cleaner.
9. Arrange the stuffed shells in a single layer in the prepared baking dish.
10. Pour the remaining marinara sauce over the top of the stuffed shells, covering them evenly.
11. Sprinkle the remaining shredded mozzarella cheese over the sauce.
12. Cover the baking dish tightly with aluminum foil and bake in the preheated oven for 20 minutes.
13. Remove the foil and continue baking for another 8-10 minutes, or until the cheese on top is melted, bubbly, and starting to turn golden in spots. Tip: Let it rest for 5-10 minutes after baking—this helps the filling set so they hold their shape when served.
Outrageously creamy and packed with herby flavor from the pesto, these shells are a total crowd-pleaser. The texture is wonderfully rich and gooey, with the pasta holding its shape perfectly. Try serving them with a simple green salad and some garlic bread for a complete, comforting meal that everyone will love.
Cream Cheese and Pumpkin Roll
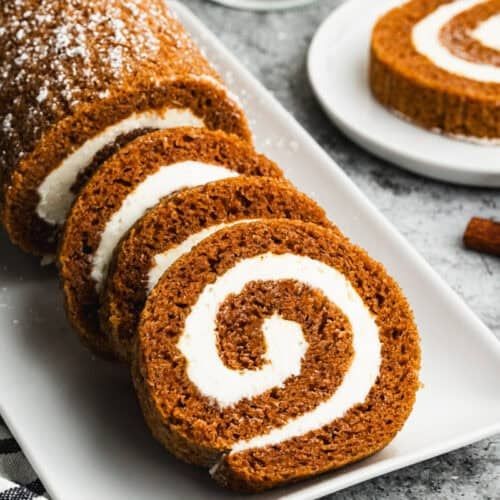
Holiday baking just got a whole lot easier with this cozy dessert. You’ll love how the spiced pumpkin cake wraps around a sweet cream cheese filling—it’s impressive but totally doable, even if you’re not a pro in the kitchen. Perfect for sharing with family or friends during the festive season.
Serving: 10 | Pre Time: 20 minutes | Cooking Time: 15 minutes
Ingredients
– 3 large eggs
– 1 cup of granulated sugar
– ⅔ cup of pumpkin puree (not pie filling)
– 1 teaspoon of vanilla extract
– ¾ cup of all-purpose flour
– 1 teaspoon of baking powder
– 2 teaspoons of pumpkin pie spice
– ½ teaspoon of salt
– Powdered sugar for dusting
– 8 ounces of cream cheese, softened to room temperature
– 1 cup of powdered sugar
– 6 tablespoons of unsalted butter, softened
– 1 teaspoon of vanilla extract
Instructions
1. Preheat your oven to 375°F and line a 15×10-inch jelly roll pan with parchment paper, lightly greasing it.
2. In a large bowl, beat the 3 large eggs and 1 cup of granulated sugar together on high speed for about 5 minutes until thick and pale yellow.
3. Mix in the ⅔ cup of pumpkin puree and 1 teaspoon of vanilla extract until just combined.
4. In a separate bowl, whisk together the ¾ cup of all-purpose flour, 1 teaspoon of baking powder, 2 teaspoons of pumpkin pie spice, and ½ teaspoon of salt.
5. Gently fold the dry ingredients into the wet mixture until no flour streaks remain, being careful not to overmix to keep the cake light.
6. Spread the batter evenly into the prepared pan using a spatula.
7. Bake for 13-15 minutes until the cake springs back when lightly touched in the center.
8. While baking, lay a clean kitchen towel on the counter and dust it generously with powdered sugar.
9. Immediately after removing the cake from the oven, invert it onto the towel and peel off the parchment paper.
10. Starting from a short end, carefully roll the cake up with the towel inside to help it hold its shape, then let it cool completely on a wire rack for about 1 hour.
11. For the filling, beat the 8 ounces of softened cream cheese, 1 cup of powdered sugar, 6 tablespoons of softened butter, and 1 teaspoon of vanilla extract in a bowl until smooth and creamy.
12. Unroll the cooled cake gently and spread the cream cheese filling evenly over it, leaving a small border around the edges.
13. Roll the cake back up tightly without the towel, using the towel as a guide to prevent cracking.
14. Wrap the roll in plastic wrap and refrigerate for at least 2 hours to set before slicing.
Elegant yet comforting, this roll boasts a soft, spiced pumpkin cake that pairs beautifully with the tangy cream cheese filling. Serve it chilled in slices for a festive treat, or dust with extra powdered sugar and a sprinkle of cinnamon for a pretty finish. It’s sure to become a holiday favorite!
Cream Cheese and Cinnamon Swirl Bread
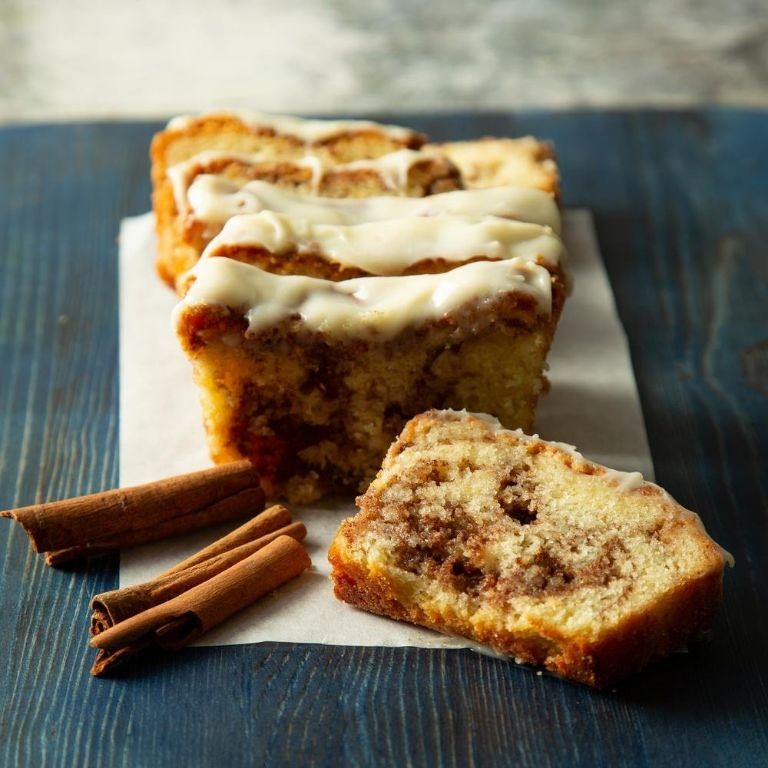
Nothing says cozy morning like the smell of warm cinnamon and sweet cream cheese wafting from your kitchen. You’re going to love this soft, swirly bread—it’s perfect for slicing thick and toasting, or just tearing right into it while it’s still warm. Trust me, your house will smell amazing.
Serving: 1 loaf (about 8-10 slices) | Pre Time: 20 minutes | Cooking Time: 35 minutes
Ingredients
- For the dough: 3 cups of all-purpose flour, a packet (or 2 1/4 teaspoons) of active dry yeast, a cup of warm milk (around 110°F), a third of a cup of granulated sugar, a quarter cup of melted unsalted butter, a large egg, and a teaspoon of salt.
- For the filling: a block (8 ounces) of softened cream cheese, a third of a cup of brown sugar, a tablespoon of ground cinnamon, and a splash of vanilla extract.
- For the top: an egg wash (just beat one egg with a tablespoon of water) and a couple of tablespoons of powdered sugar for dusting after it cools.
Instructions
- In a large bowl, whisk together the warm milk, granulated sugar, and yeast, then let it sit for 5 minutes until it gets foamy—this means your yeast is active and ready to go.
- Tip: If your milk is too hot, it can kill the yeast, so aim for that 110°F sweet spot; you can test it with a thermometer or just make sure it feels warm but not hot to your wrist.
- Stir in the melted butter, egg, and salt until everything is well combined.
- Gradually mix in the flour, one cup at a time, until a soft dough forms—it might be a bit sticky, but that’s okay.
- Turn the dough out onto a lightly floured surface and knead for about 5-7 minutes until it’s smooth and elastic.
- Place the dough in a greased bowl, cover it with a clean kitchen towel, and let it rise in a warm spot for 1 hour, or until it doubles in size.
- While the dough rises, make the filling: in a medium bowl, beat the softened cream cheese, brown sugar, cinnamon, and vanilla extract until it’s smooth and creamy.
- Tip: Let your cream cheese sit out at room temperature for 30 minutes before starting—it’ll mix much easier and give you a smoother swirl.
- Once the dough has risen, punch it down to release the air, then roll it out on a floured surface into a rectangle about 12×18 inches.
- Spread the cream cheese filling evenly over the dough, leaving a half-inch border around the edges.
- Starting from one of the long sides, tightly roll the dough into a log, pinching the seam to seal it.
- Place the log seam-side down in a greased 9×5-inch loaf pan, cover it with the towel again, and let it rise for another 30 minutes until it puffs up.
- Preheat your oven to 350°F while the dough does its second rise.
- Brush the top of the loaf with the egg wash—this will give it a beautiful golden-brown shine as it bakes.
- Bake the bread for 30-35 minutes, until the top is deeply golden and it sounds hollow when tapped.
- Tip: If the top starts browning too quickly, loosely tent it with aluminum foil halfway through baking to prevent burning.
- Let the bread cool in the pan for 10 minutes, then transfer it to a wire rack to cool completely.
- Once cooled, dust the top with powdered sugar using a fine-mesh sieve for an even sprinkle.
Oh, the texture is pure magic—soft and pillowy with those sweet, gooey cinnamon swirls in every bite. It’s fantastic toasted with a pat of butter for breakfast, or try slicing it thick and using it for a decadent French toast on the weekend. Either way, it’s bound to become a new favorite in your baking rotation.
Summary
Versatile and delightful, these 18 cream cheese recipes are your go-to for any gathering or cozy night in. From savory dips to sweet treats, there’s something for every taste. We’d love to hear which ones you try—drop a comment with your favorites and share this roundup on Pinterest to spread the cheesy joy!


