Unbelievably, we’ve discovered the culinary equivalent of finding a twenty-dollar bill in last winter’s coat pocket—crispy baked chicken thighs that’ll make you question why you ever bothered with the frying pan’s dramatic splatter show. Usually, achieving that perfect golden crunch involves enough oil to lubricate a small engine, but today we’re baking our way to crispy nirvana without the fire department on speed dial.
Why This Recipe Works
- Baking powder is our secret weapon—it’s like giving each thigh a microscopic exfoliating scrub that creates maximum surface area for crispy magic.
- High heat transforms chicken fat into nature’s perfect frying oil right in your baking dish.
- Patience during the resting period lets the crust settle into its crispy destiny instead of steaming into sadness.
- Bone-in, skin-on thighs forgive overcooking better than your aunt forgives your political opinions at Thanksgiving.
Ingredients
- 8 bone-in, skin-on chicken thighs (about 3 pounds total)
- 2 tablespoons olive oil
- 1 tablespoon baking powder (not baking soda—this isn’t science fair volcano territory)
- 1 1/2 teaspoons kosher salt
- 1 teaspoon freshly ground black pepper
- 1 teaspoon garlic powder
- 1 teaspoon smoked paprika
- 1/2 teaspoon onion powder
- Optional: 1/2 teaspoon cayenne pepper for those who like their chicken with attitude
Equipment Needed
- Rimmed baking sheet (the kind with edges to catch rogue chicken juices)
- Wire rack that fits inside said baking sheet
- Mixing bowl large enough to host a chicken thigh party
- Tongs (because fingers are not heat-resistant utensils)
- Paper towels for the pre-game pat-down
- Instant-read thermometer (the trusty sidekick that prevents food poisoning)
Instructions
Step 1: The Great Chicken Pat-Down
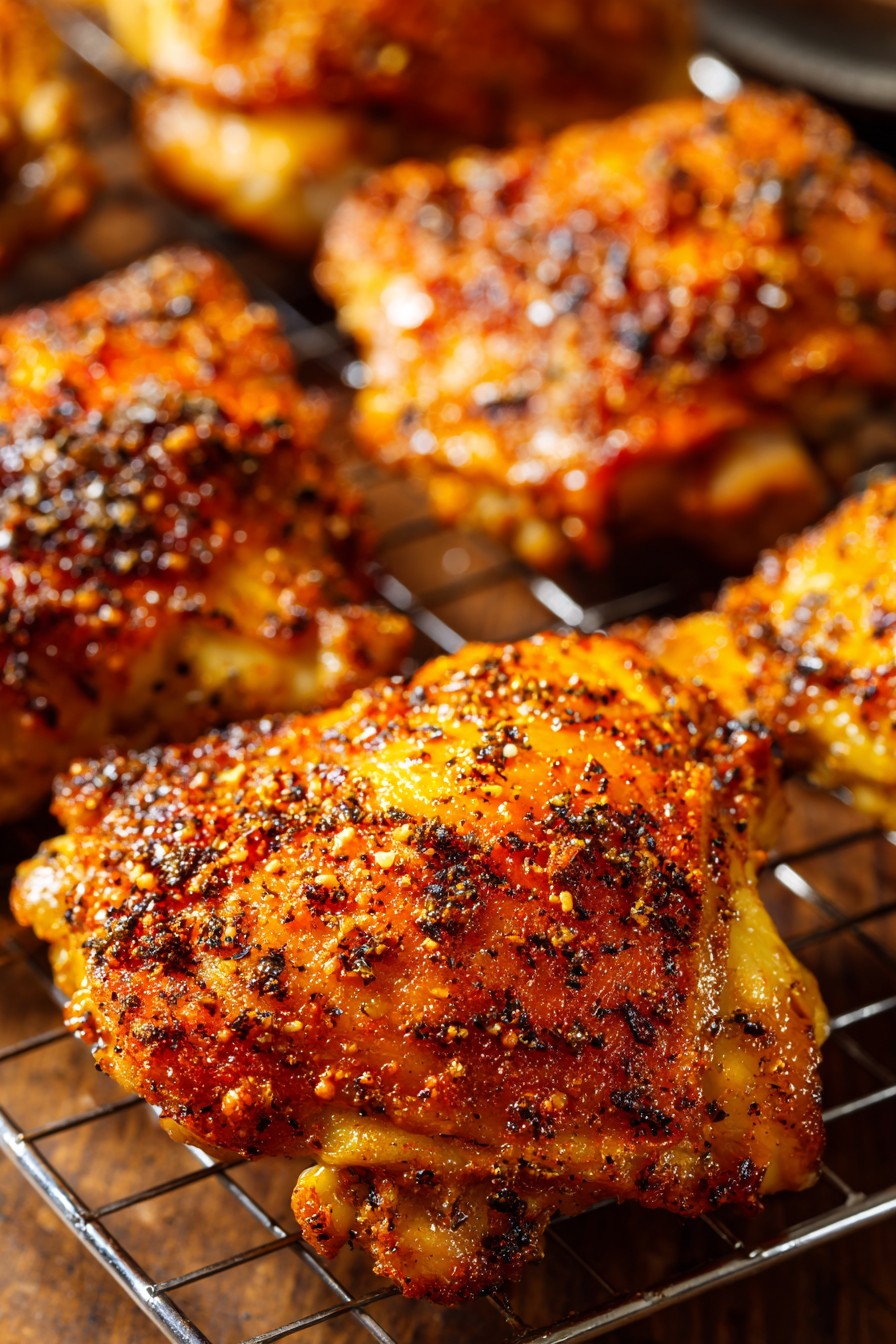
First, let’s address the elephant in the kitchen: wet chicken skin is the enemy of crispiness. Take your eight bone-in, skin-on chicken thighs and give them a thorough pat-down with paper towels like you’re a detective searching for concealed moisture. We’re talking serious business here—get between the skin and meat, around the bones, everywhere. This isn’t a gentle spa treatment; it’s an interrogation. The drier the skin, the crispier the outcome. Think of it as preparing your chicken for its crispy debut by removing all performance anxiety sweat. While you’re at it, preheat your oven to 425°F—we want it hot enough to make the chicken question its life choices immediately upon entry. Arrange your wire rack inside the rimmed baking sheet; this elevates the thighs so hot air can circulate like gossip at a neighborhood barbecue.
Step 2: Spice Alchemy in a Bowl
Now for the magical powder mixture that transforms humble chicken into crispy royalty. In your mixing bowl, combine 1 tablespoon of baking powder (yes, the same stuff that makes pancakes fluffy—trust the process), 1 1/2 teaspoons of kosher salt (if using table salt, reduce to 1 teaspoon because it’s saltier than a sailor’s vocabulary), 1 teaspoon each of freshly ground black pepper, garlic powder, and smoked paprika, plus 1/2 teaspoon of onion powder. If you’re feeling adventurous, add 1/2 teaspoon of cayenne pepper for a kick that says “I meant business.” Whisk these together like you’re conducting a tiny orchestra of flavor. The baking powder is the secret star here—it changes the pH of the chicken skin, helping it crisp up beautifully without needing a vat of oil. Tip: For extra crispy results, let the seasoned chicken rest uncovered in the refrigerator for 30 minutes before baking—this dries the skin even further.
Step 3: The Oil and Rub Tango
Drizzle 2 tablespoons of olive oil over your thoroughly patted chicken thighs—just enough to make them glisten like they’re about to walk a runway, not swim in it. Use your hands (clean ones, please) to massage the oil evenly over every nook and cranny. Now, sprinkle your spice mixture over both sides of each thigh with the confidence of a celebrity chef on television. Don’t just dust it on; really work it into the skin, especially on the top where all the crispy action happens. Make sure every millimeter is coated—we’re not leaving any flavor orphans behind. Arrange the thighs skin-side up on your prepared wire rack, leaving a little space between them like they need personal bubbles. This air circulation is crucial for even crisping. Tip: For extra flavor, gently lift the skin and rub some seasoning directly on the meat underneath—it’s like giving your chicken a secret flavor tattoo.
Step 4: The Oven Transformation
Slide your baking sheet onto the middle rack of your preheated 425°F oven and set a timer for 35 minutes. Do not, I repeat, DO NOT open the oven door during this time unless you smell something burning (which you won’t if you’ve followed directions). That oven needs to stay hot and focused on its crispy mission. After 35 minutes, the skin should be starting to look promisingly golden, but we’re not done yet. Rotate the baking sheet 180 degrees (front to back) to account for any hot spots in your oven—ovens have personality quirks just like people. Continue baking for another 15-25 minutes, until the skin is deeply golden brown and crispy enough to make audible crunching sounds when pressed. The internal temperature should reach 165°F when measured with your instant-read thermometer inserted into the thickest part of the thigh without touching bone. Tip: If the skin isn’t as crispy as you’d like after the minimum time, switch your oven to broil for 2-3 minutes, watching constantly to prevent burning.
Step 5: The Patient Resting Period
Here comes the hardest part of any recipe: waiting. Using your tongs, transfer the crispy chicken thighs to a clean plate or cutting board and let them rest for 10 full minutes. I know, I know—they smell incredible and you want to dive in immediately, but this resting period is non-negotiable. During this time, the juices redistribute throughout the meat instead of rushing out onto your plate in a sad puddle when you cut into them. The crust also continues to crisp up as it cools slightly. Think of it as the chicken’s victory lap after its oven marathon. After exactly 10 minutes (set a timer if you have zero willpower), serve immediately while the skin is at its peak crispiness. The thighs should be juicy inside with a shatteringly crisp exterior that makes you want to write thank-you notes to your oven.
Tips and Tricks
For maximum crispiness, pat your chicken dry, then leave it uncovered on a rack in the refrigerator for up to 24 hours before seasoning and baking—this air-drying technique works wonders. If you’re cooking for a crowd, don’t overcrowd the baking sheet; use two sheets if necessary, and rotate them between oven racks halfway through cooking. For easier cleanup, line your baking sheet with aluminum foil underneath the wire rack—the chicken drippings will make a mess otherwise. If your chicken skin isn’t getting crispy enough, your oven might be lying about its temperature; invest in an oven thermometer to check accuracy. Leftover chicken thighs reheat surprisingly well in a 375°F oven for 10-15 minutes to restore crispiness, though they’ll never be quite as perfect as fresh from the oven. Finally, save those delicious chicken drippings in the baking sheet—after removing the rack and straining, you’ve got incredible schmaltz for roasting vegetables or making gravy.
Recipe Variations
- Lemon Herb Explosion: Add 2 tablespoons of lemon zest and 1 tablespoon each of chopped fresh rosemary, thyme, and parsley to the spice mix. Squeeze fresh lemon juice over the thighs after baking for a bright finish.
- Spicy Honey Glaze: During the last 10 minutes of baking, brush thighs with a mixture of 3 tablespoons honey, 1 tablespoon hot sauce, and 1 tablespoon melted butter. Return to oven to caramelize into sticky-spicy perfection.
- Everything Bagel Chicken: Replace the spice mix with 2 tablespoons of everything bagel seasoning for that iconic New York deli flavor without leaving your kitchen.
- Mediterranean Twist: Season with 2 teaspoons dried oregano, 1 teaspoon sumac, and 1/2 teaspoon cinnamon. Serve with tzatziki and a Greek salad for a complete meal.
- Buffalo Style: After baking, toss thighs in 1/2 cup of buffalo sauce mixed with 2 tablespoons melted butter. Return to oven for 5 minutes to set the sauce, then serve with blue cheese dressing and celery sticks.
Frequently Asked Questions
Q: Can I use boneless, skinless chicken thighs instead?
A: You can, but you’ll sacrifice the crispy skin magic that makes this recipe special. Boneless thighs cook faster (reduce time by 10-15 minutes) and won’t get as crispy, but they’ll still be delicious. Consider increasing seasoning since you lose the flavor from bones and skin.
Q: Why baking powder instead of flour or cornstarch?
A: Baking powder is alkaline, which helps break down proteins in the chicken skin, allowing moisture to escape more efficiently and creating tiny bubbles that result in extra crispiness. Flour or cornstarch can create a coating, but baking powder gives that crackly texture we’re after.
Q: My chicken skin isn’t crispy—what went wrong?
A: Three likely culprits: 1) You didn’t pat the chicken dry enough before seasoning, 2) Your oven temperature is inaccurate (get an oven thermometer!), or 3) You overcrowded the baking sheet, preventing proper air circulation. Also ensure you’re using a wire rack, not baking directly on the sheet.
Q: Can I make this ahead of time?
A: You can season the chicken up to 24 hours in advance and store it uncovered in the refrigerator—this actually improves crispiness! After baking, leftovers keep refrigerated for 3-4 days. Reheat in the oven, not the microwave, to restore crispiness.
Q: What sides pair well with these chicken thighs?
A: These crispy thighs play well with mashed potatoes (to soak up juices), roasted vegetables (toss them in the chicken drippings!), simple green salad, cornbread, or rice pilaf. Basically, anything that won’t steal the spotlight from the star of the show.
Summary
With just eight ingredients and one baking sheet, you can achieve crispy chicken thigh perfection that rivals fried versions. The secret lies in thorough drying, baking powder magic, and oven patience. Your taste buds will thank you!
Crispy Baked Chicken Thighs
4
servings15
minutes50
minutesIngredients
Instructions
- 1 Preheat oven to 425°F. Place wire rack inside rimmed baking sheet.
- 2 Thoroughly pat chicken thighs dry with paper towels.
- 3 In a bowl, combine baking powder, salt, pepper, garlic powder, smoked paprika, onion powder, and cayenne (if using).
- 4 Drizzle chicken with olive oil, then rub seasoning mixture all over both sides of each thigh.
- 5 Arrange thighs skin-side up on prepared wire rack, leaving space between them.
- 6 Bake for 35 minutes, then rotate baking sheet and bake 15-25 minutes more until skin is crispy and golden and internal temperature reaches 165°F.
- 7 Let rest 10 minutes before serving.