Sizzling, golden, and impossibly crunchy, these zucchini fries are about to become your new obsession! Seriously, get ready to ditch those boring old potato fries because this veggie-packed version delivers a flavor explosion that’ll have everyone begging for seconds. Perfect for game day, family movie night, or just because you deserve something spectacularly delicious, these fries are the ultimate crowd-pleaser that proves healthy can be downright addictive!
Why This Recipe Works
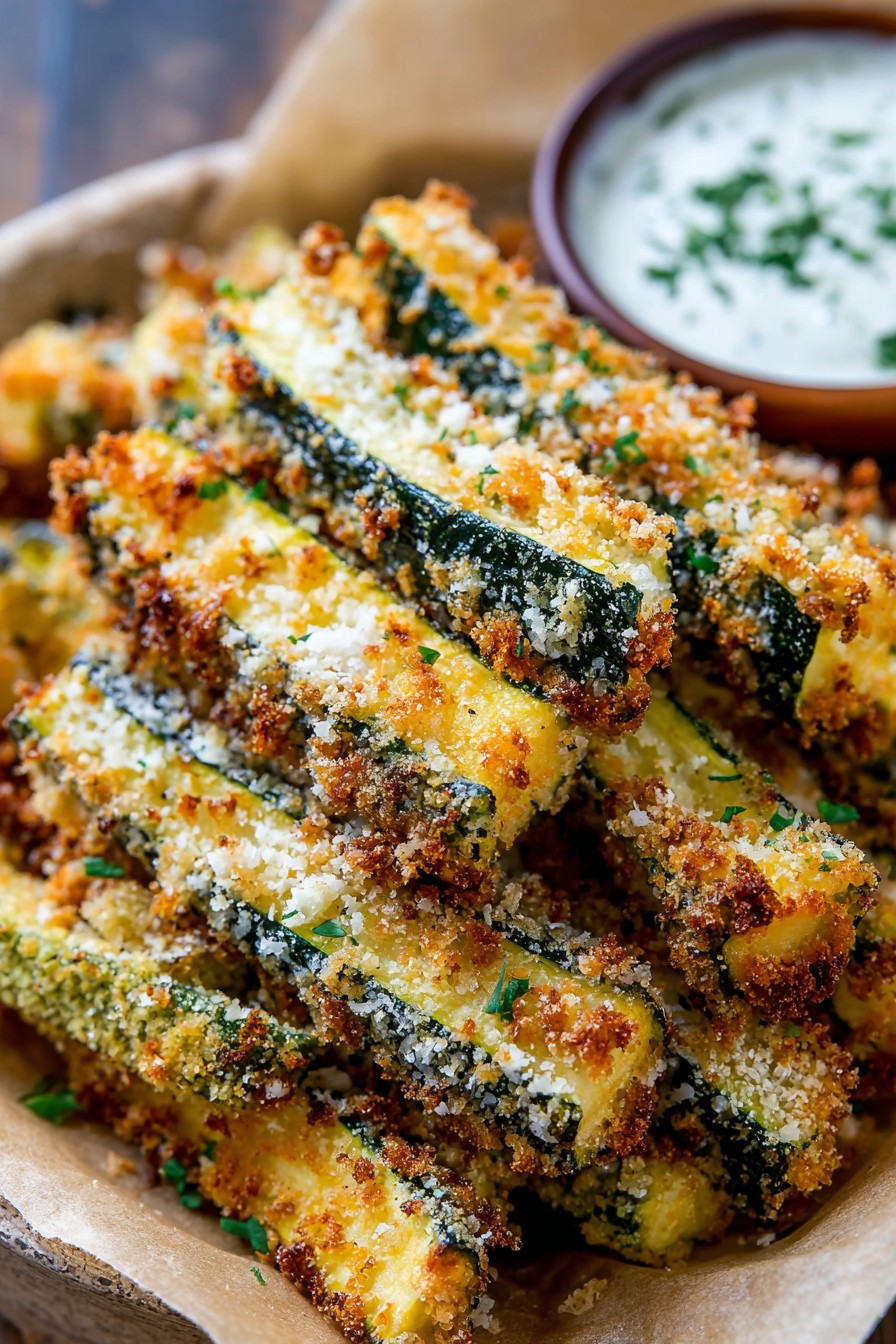
- Triple-coating technique creates an ultra-crispy exterior that stays crunchy for hours
- Panko breadcrumbs mixed with Parmesan cheese deliver maximum flavor and texture
- Perfectly balanced seasoning blend enhances the zucchini’s natural sweetness
- Baking method yields golden perfection without deep-frying mess
- Quick prep means you’re just 30 minutes away from crispy heaven
Ingredients
- 2 medium zucchini (about 1 pound total), cut into ½-inch thick fry-shaped sticks
- ½ cup all-purpose flour
- 2 large eggs, beaten until smooth and frothy
- 1 cup panko breadcrumbs
- ½ cup grated Parmesan cheese
- 1 teaspoon garlic powder
- 1 teaspoon paprika
- ½ teaspoon onion powder
- ½ teaspoon black pepper
- 1 teaspoon salt (divided)
- 3 tablespoons olive oil or cooking spray
- Your favorite dipping sauce (ranch, marinara, or spicy aioli recommended)
Equipment Needed
- Large baking sheet
- Parchment paper or silicone baking mat
- Three shallow bowls or plates
- Wire cooling rack (optional but recommended)
- Sharp knife and cutting board
- Measuring cups and spoons
- Small whisk or fork
Instructions
Step 1: Prep Your Zucchini and Set Up Your Station
First things first—let’s get organized! Grab those beautiful green zucchinis and give them a good rinse under cool water. Pat them completely dry with paper towels because moisture is the enemy of crispiness. Now, slice off both ends and cut each zucchini in half crosswise. Stand each half upright and slice down the middle lengthwise, then cut each half into ½-inch thick sticks that look like perfect little fries. You’re aiming for uniform size so everything cooks evenly. While you’re at it, go ahead and preheat that oven to a blazing 425°F—we want it HOT and ready when we are! Line your baking sheet with parchment paper or a silicone mat for easy cleanup, and set up your three coating stations: flour in the first bowl, beaten eggs in the second, and in the third bowl, combine panko, Parmesan, garlic powder, paprika, onion powder, black pepper, and ½ teaspoon of salt. Mix that breadcrumb mixture until every speck is perfectly seasoned!
Step 2: Master the Triple-Dip Coating Technique
This is where the magic happens, folks! Take one zucchini stick and dredge it completely in the flour, making sure every surface gets a light, even coating. Shake off any excess—we want just enough to help the egg stick. Next, dunk that floured stick into the beaten eggs, rolling it around until it’s completely coated. Let any extra egg drip off back into the bowl. Now for the grand finale: press that egg-coated zucchini firmly into the panko-Parmesan mixture, rolling it and pressing down to ensure maximum coverage. You want every millimeter covered in those glorious crunchy breadcrumbs! Pro tip: Use one hand for dry ingredients and the other for wet to avoid breadcrumb fingers. Place each perfectly coated fry on your prepared baking sheet, making sure they don’t touch—give them about ½ inch of space so hot air can circulate and create maximum crunch. Repeat with all zucchini sticks until your baking sheet looks like a golden treasure map!
Step 3: Bake to Golden Perfection
Ready for the transformation? Drizzle or spray your coated zucchini fries with olive oil—this is CRUCIAL for achieving that deep golden color and satisfying crunch. Make sure every fry gets a light coating. Now slide that baking sheet into your preheated 425°F oven and set your timer for 10 minutes. After 10 minutes, carefully remove the baking sheet (use oven mitts—that sheet is HOT!) and flip every single fry. This ensures even browning on all sides. Return to the oven for another 8-12 minutes. Watch closely during these final minutes—you’re looking for a deep golden brown color and a crispy texture that makes a satisfying tap when you gently press with a fork. The exact time will depend on your oven and fry thickness, but when they look irresistible, they’re done!
Step 4: The Crispy Finish and Serving Strategy
The moment of truth! Remove your gorgeous golden fries from the oven and immediately sprinkle with the remaining ½ teaspoon of salt while they’re still piping hot—this helps the salt stick and enhances every flavor layer. For extra crispiness, transfer the fries to a wire cooling rack for 2-3 minutes instead of leaving them on the hot baking sheet. This prevents steam from making them soggy. Pro tip: Serve them RIGHT AWAY while they’re at peak crispiness! Arrange them on a platter with your favorite dipping sauces in small bowls. I’m talking creamy ranch, zesty marinara, or a spicy aioli made with mayo, garlic, and a squeeze of lemon. The contrast of hot, crunchy fries and cool, creamy dip is absolutely heavenly!
Step 5: Storage and Reheating Secrets
Okay, let’s be real—these rarely last long enough to store, but just in case you have superhero-level willpower, here’s how to keep them crispy! First, let any leftovers cool completely on that wire rack—never store them while warm or they’ll get soggy. Once cooled, transfer to an airtight container with a paper towel at the bottom to absorb any moisture. They’ll keep in the refrigerator for up to 2 days. To reheat, DO NOT microwave—that’s the express lane to Soggy Town! Instead, spread them in a single layer on a baking sheet and pop them into a 400°F oven for 5-8 minutes until they’re hot and crispy again. They won’t be quite as perfect as fresh, but they’ll still be delicious. Pro tip: For best results, enjoy immediately—these are meant to be devoured hot and fresh!
Tips and Tricks
Want to take your zucchini fries from great to LEGENDARY? Try these pro moves! For extra crispy fries, place your coated zucchini sticks on a wire rack set over a baking sheet and refrigerate for 20-30 minutes before baking—this helps the coating set and adhere better. If you’re feeding a crowd, double or triple the recipe but bake in batches on separate sheets; overcrowding creates steam and prevents proper crisping. For gluten-free friends, swap the all-purpose flour for almond flour and use gluten-free panko breadcrumbs—they work beautifully! To add extra flavor, mix ¼ cup of finely crushed potato chips or tortilla chips into your breadcrumb mixture. And here’s a game-changer: spritz your fries with cooking spray halfway through baking for extra browning power. Finally, if you want to prep ahead, you can coat the zucchini sticks and refrigerate them on the baking sheet for up to 4 hours before baking—just add a couple extra minutes to the cooking time since they’ll be cold from the fridge.
Recipe Variations
- Spicy Kick: Add 1 teaspoon of chili powder and ½ teaspoon of cayenne pepper to the breadcrumb mixture. Serve with chipotle ranch dipping sauce!
- Italian Herb: Mix 1 tablespoon of Italian seasoning and ¼ cup of finely grated Romano cheese into the breadcrumbs. Perfect with marinara sauce!
- Everything Bagel: Replace half the panko with everything bagel seasoning and use cream cheese as your dipping sauce—unexpected and amazing!
- Air Fryer Magic: Cook at 400°F for 10-12 minutes, shaking halfway through. They come out extra crispy with less oil!
- Sweet Potato Swap: Use sweet potatoes instead of zucchini, adding ¼ teaspoon of cinnamon to the breadcrumb mix for a sweet-savory twist.
Frequently Asked Questions
Q: Can I make these zucchini fries ahead of time?
A: Absolutely! You can coat the zucchini sticks and arrange them on the baking sheet up to 4 hours before baking. Keep them refrigerated until ready to cook, then bake as directed, adding 2-3 extra minutes since they’ll be cold. The coating holds up beautifully!
Q: Why are my zucchini fries turning out soggy?
A: The most common culprit is excess moisture. Make sure to pat your zucchini completely dry before coating, don’t overcrowd the baking sheet, and use a wire rack for cooling. Also, bake at a high temperature (425°F) and flip halfway through for even crisping!
Q: Can I freeze zucchini fries before or after baking?
A: For best results, freeze before baking! Arrange coated fries on a parchment-lined sheet, freeze until solid (2 hours), then transfer to freezer bags. Bake from frozen at 425°F for 18-22 minutes. Already-baked fries can be frozen but may lose some crispiness when reheated.
Q: What’s the best dipping sauce for zucchini fries?
A: The possibilities are endless! Classic ranch is always a winner, but try garlic aioli, spicy sriracha mayo, creamy avocado lime sauce, or even a balsamic glaze. For something different, mix Greek yogurt with dill and lemon zest!
Q: Can I use regular breadcrumbs instead of panko?
A: You can, but panko creates a lighter, crispier texture. Regular breadcrumbs work in a pinch—just know they’ll be denser. For maximum crunch, stick with panko or try mixing half panko, half crushed cornflakes!
Summary
These crispy zucchini fries deliver incredible crunch without deep-frying! With a triple-coating technique and perfect seasoning, they’re party-ready in 30 minutes. Serve hot with your favorite dips for guaranteed applause!
Crispy Zucchini Fries
4
servings15
minutes20
minutesIngredients
Instructions
- 1 Preheat oven to 425°F. Line a baking sheet with parchment paper.
- 2 Cut zucchini into ½-inch thick sticks. Pat completely dry with paper towels.
- 3 Set up three bowls: flour in first, beaten eggs in second, and in third bowl combine panko, Parmesan, garlic powder, paprika, onion powder, black pepper, and ½ teaspoon salt.
- 4 Coat each zucchini stick: first in flour, then egg, then press firmly into panko mixture until fully covered.
- 5 Arrange on prepared baking sheet with space between each. Drizzle or spray with olive oil.
- 6 Bake at 425°F for 10 minutes, flip fries, then bake another 8-12 minutes until golden brown and crispy.
- 7 Remove from oven, sprinkle with remaining ½ teaspoon salt, and serve immediately with dipping sauces.