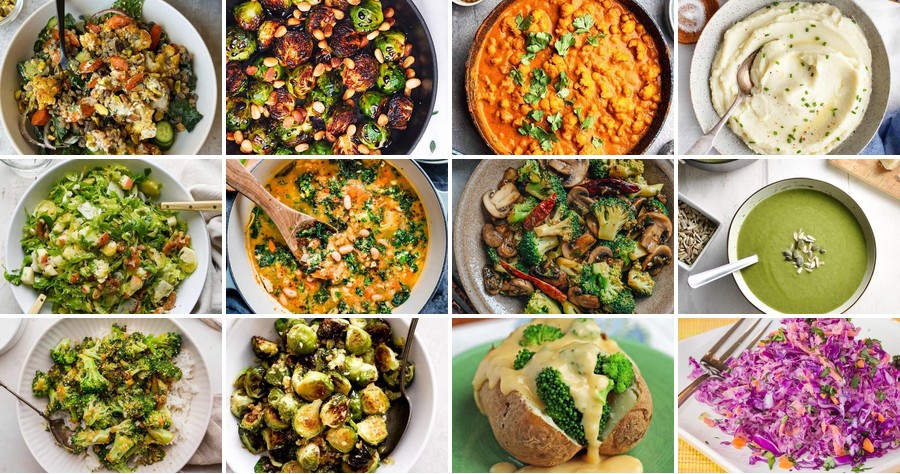
Ready to transform those humble cruciferous veggies into something spectacular? Whether you’re craving quick weeknight dinners or cozy comfort food, this collection of 20 delicious recipes will make broccoli, cauliflower, and their nutritious cousins the stars of your table. Let’s dive into fresh, healthy eating that’s anything but boring!
Creamy Cauliflower Mash with Garlic

Sick of the same old spuds? Let’s give mashed potatoes a witty little vacation and welcome a creamy, dreamy, and surprisingly sneaky superstar to the table. This cauliflower mash is so luxuriously smooth and packed with garlicky goodness, your taste buds might just write you a thank-you note.
Serving: 4 | Pre Time: 10 minutes | Cooking Time: 25 minutes
Ingredients
– 1 large head cauliflower, cut into florets (about 6 cups)
– 4 cloves garlic, peeled
– 3 tbsp unsalted butter
– ¼ cup heavy cream
– 2 tbsp grated Parmesan cheese
– ½ tsp salt, or adjust to taste
– ¼ tsp black pepper
– 1 tbsp fresh chives, chopped (optional, for garnish)
Instructions
1. Place the cauliflower florets and peeled garlic cloves in a large pot and add enough water to just cover them.
2. Bring the water to a boil over high heat, then reduce the heat to medium and simmer for 15–20 minutes, until the cauliflower is very tender when pierced with a fork.
3. Tip: Don’t overcook to mush—aim for soft but not disintegrating to keep some texture.
4. Carefully drain the cauliflower and garlic in a colander, then return them to the hot, dry pot for 1 minute to evaporate excess moisture.
5. Transfer the drained cauliflower and garlic to a food processor or high-powered blender.
6. Add the butter, heavy cream, Parmesan cheese, salt, and black pepper to the processor.
7. Tip: For extra silkiness, warm the cream slightly before adding to prevent a grainy texture.
8. Process the mixture on high speed for 1–2 minutes, scraping down the sides as needed, until completely smooth and creamy.
9. Tip: If the mash seems too thick, add a tablespoon of warm water or more cream and blend again.
10. Taste and adjust seasoning with more salt or pepper if desired.
11. Transfer the mash to a serving bowl and garnish with chopped fresh chives if using.
Just imagine a cloud that decided to get deliciously savory—this mash is velvety, rich, and has a subtle garlic punch that’s not overwhelming. Serve it as a cozy side for roasted chicken or get creative by using it as a low-carb base for a shepherd’s pie; it’s so good, you might forget potatoes exist!
Kale and Broccoli Stir-Fry with Sesame Seeds

Sick of the same old side dishes? Let’s shake things up with a veggie-packed stir-fry that’s so quick and flavorful, it might just become your weeknight superhero. This kale and broccoli duo gets a serious glow-up with a toasty sesame finish—trust me, even the pickiest eaters will be asking for seconds.
Serving: 4 | Pre Time: 10 minutes | Cooking Time: 15 minutes
Ingredients
– 1 large head broccoli, cut into small florets (about 4 cups)
– 1 bunch curly kale, stems removed and leaves roughly torn (about 6 cups packed)
– 2 tablespoons vegetable oil, or any neutral oil
– 3 cloves garlic, minced
– 1 tablespoon low-sodium soy sauce
– 1 teaspoon rice vinegar
– 1 tablespoon toasted sesame seeds
– ¼ teaspoon red pepper flakes, optional for a kick
Instructions
1. Heat the vegetable oil in a large skillet or wok over medium-high heat until shimmering, about 1–2 minutes.
2. Add the broccoli florets to the hot oil and stir-fry for 5–7 minutes, until bright green and slightly tender—don’t overcook, or they’ll lose their crunch!
3. Stir in the minced garlic and cook for 30 seconds, just until fragrant to avoid burning.
4. Toss in the kale leaves and cook for 2–3 minutes, stirring constantly until wilted but still vibrant.
5. Pour in the soy sauce and rice vinegar, stirring to coat the veggies evenly for about 1 minute.
6. Sprinkle the toasted sesame seeds and red pepper flakes (if using) over the stir-fry, then remove from heat immediately.
7. Transfer to a serving dish and let it rest for 2 minutes to allow flavors to meld.
Perfectly crisp-tender with a savory, nutty punch from those sesame seeds, this stir-fry is a texture dream. Serve it over fluffy rice for a hearty meal, or toss it into grain bowls for a lunch that’s anything but boring.
Grilled Cabbage Steaks with Lemon Tahini Dressing
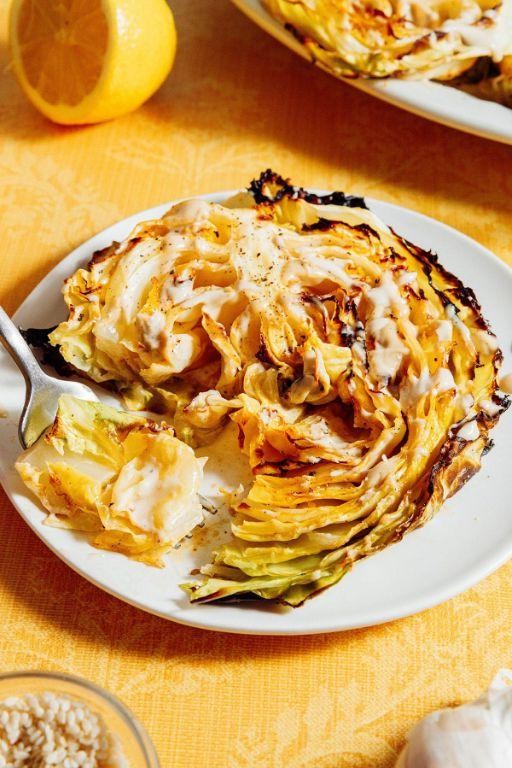
Prepare to have your mind blown by a vegetable that’s finally getting the main character energy it deserves! Grilled cabbage steaks are about to become your new favorite way to make a side dish feel like the star of the show, especially when drizzled with a zesty lemon tahini dressing that’s so good you might just eat it with a spoon.
Serving: 4 | Pre Time: 10 minutes | Cooking Time: 15 minutes
Ingredients
- 1 large head of green cabbage (about 2 lbs)
- 2 tbsp olive oil (or any neutral oil)
- 1 tsp kosher salt
- 1/2 tsp black pepper (freshly ground is best)
- 1/4 cup tahini paste
- 2 tbsp fresh lemon juice (about 1 lemon)
- 1 garlic clove, minced
- 2-3 tbsp water (to thin the dressing)
- 1 tbsp chopped fresh parsley (optional, for garnish)
Instructions
- Preheat your grill to medium-high heat, about 400°F.
- Remove any wilted outer leaves from the cabbage head.
- Cut the cabbage into 1-inch thick slices, keeping the core intact to hold the steaks together.
- Brush both sides of each cabbage steak with olive oil using a pastry brush.
- Sprinkle both sides evenly with kosher salt and black pepper.
- Place the cabbage steaks directly on the preheated grill grates.
- Grill for 7-8 minutes on the first side until you see deep grill marks and the edges start to caramelize.
- Carefully flip each steak using tongs and a spatula for support.
- Grill for another 6-7 minutes on the second side until tender when pierced with a fork.
- While the cabbage grills, make the dressing by whisking tahini paste, lemon juice, and minced garlic in a small bowl.
- Gradually add water, 1 tablespoon at a time, and whisk until the dressing reaches a pourable consistency.
- Transfer the grilled cabbage steaks to a serving platter.
- Drizzle the lemon tahini dressing generously over the warm cabbage steaks.
- Garnish with chopped fresh parsley if desired.
Caramelized edges give way to a tender, almost meaty center that soaks up the bright, creamy dressing perfectly. Consider serving these steaks over a bed of quinoa or alongside grilled chicken for a complete meal that’ll have everyone asking for seconds.
Spicy Roasted Cauliflower Tacos

Tired of the same old taco Tuesday routine? Let’s shake things up with a veggie-packed fiesta that’s so good, even the carnivores will be begging for seconds. These spicy roasted cauliflower tacos are the crispy, flavor-bomb answer to your weeknight dinner prayers—no sombrero required.
Serving: 4 | Pre Time: 15 minutes | Cooking Time: 25 minutes
Ingredients
– 1 large head cauliflower, cut into bite-sized florets (about 4 cups)
– 2 tbsp olive oil, or any neutral oil
– 1 tbsp chili powder
– 1 tsp smoked paprika
– 1/2 tsp garlic powder
– 1/4 tsp cayenne pepper, adjust to taste for heat
– 1/2 tsp salt
– 8 small corn tortillas
– 1 cup shredded purple cabbage
– 1/2 cup crumbled cotija cheese, or feta as a substitute
– 1/4 cup chopped fresh cilantro
– 1 lime, cut into wedges
– 1/4 cup sour cream, for drizzling
Instructions
1. Preheat your oven to 425°F and line a baking sheet with parchment paper.
2. In a large bowl, toss the cauliflower florets with olive oil until evenly coated.
3. Sprinkle chili powder, smoked paprika, garlic powder, cayenne pepper, and salt over the cauliflower, and toss again to coat every floret.
4. Spread the seasoned cauliflower in a single layer on the prepared baking sheet.
5. Roast in the preheated oven for 20-25 minutes, flipping halfway through, until the edges are crispy and golden brown.
6. While the cauliflower roasts, warm the corn tortillas in a dry skillet over medium heat for about 30 seconds per side, or until pliable.
7. Assemble each taco by placing a spoonful of roasted cauliflower on a warm tortilla.
8. Top with shredded purple cabbage, crumbled cotija cheese, and chopped fresh cilantro.
9. Squeeze a lime wedge over each taco for a zesty kick.
10. Drizzle with sour cream just before serving.
Serve these tacos immediately to savor the contrast of the crispy, spicy cauliflower against the cool, crunchy cabbage and creamy toppings. They’re perfect for a quick dinner or a fun party platter—just watch them disappear faster than you can say “¡Olé!”
Broccoli and Cheddar Stuffed Potatoes

Let’s be real: sometimes a baked potato feels like a sad, lonely sidekick. But stuff it with a cheesy broccoli dream team, and suddenly you’ve got a cozy, carb-loaded hero ready to save your dinner. It’s the ultimate comfort food upgrade that even the pickiest veggie skeptics will devour.
Serving: 4 | Pre Time: 15 minutes | Cooking Time: 75 minutes
Ingredients
– 4 large russet potatoes (scrubbed clean, about 1 lb each)
– 2 tbsp olive oil (or any neutral oil)
– 1 tsp kosher salt (plus more for seasoning)
– 1/2 tsp black pepper (freshly ground is best)
– 3 cups broccoli florets (fresh or frozen, chopped small)
– 1 cup shredded sharp cheddar cheese (divided, reserve 1/4 cup for topping)
– 1/2 cup sour cream (full-fat for extra creaminess)
– 1/4 cup whole milk (or half-and-half for richness)
– 2 tbsp unsalted butter (softened)
– 1/4 tsp garlic powder (adjust to taste)
Instructions
1. Preheat your oven to 400°F (200°C) and line a baking sheet with parchment paper.
2. Pierce each potato 6-8 times with a fork to allow steam to escape during baking.
3. Rub the potatoes all over with olive oil, then sprinkle evenly with 1 tsp kosher salt and 1/2 tsp black pepper.
4. Place the potatoes directly on the prepared baking sheet and bake for 60-70 minutes, until the skins are crisp and a fork easily pierces the center.
5. While the potatoes bake, bring a large pot of salted water to a boil over high heat.
6. Add the broccoli florets to the boiling water and cook for 3-4 minutes, until bright green and tender-crisp.
7. Drain the broccoli immediately in a colander and rinse under cold water to stop the cooking process—this keeps it vibrant.
8. Once the potatoes are cool enough to handle, slice each one lengthwise about 3/4 of the way through, leaving the bottom intact.
9. Scoop out the warm potato flesh into a large bowl, leaving a 1/4-inch thick shell to hold the filling.
10. Add the softened butter, sour cream, milk, and garlic powder to the bowl with the potato flesh.
11. Mash the mixture with a potato masher or fork until smooth and creamy, about 2 minutes.
12. Gently fold in the cooked broccoli and 3/4 cup of shredded cheddar cheese until evenly distributed.
13. Spoon the filling back into the potato shells, mounding it slightly on top.
14. Sprinkle the remaining 1/4 cup of cheddar cheese over the stuffed potatoes.
15. Return the potatoes to the oven and bake at 400°F for 10-12 minutes, until the cheese is melted and bubbly.
16. Remove from the oven and let cool for 5 minutes before serving.
Ready to dig in? You’ll love the contrast of the crispy potato skin against the velvety, cheesy filling, with little pops of broccoli adding a fresh crunch. For a fun twist, top these with crumbled bacon or a drizzle of hot sauce to kick things up a notch!
Garlic Butter Sautéed Brussels Sprouts
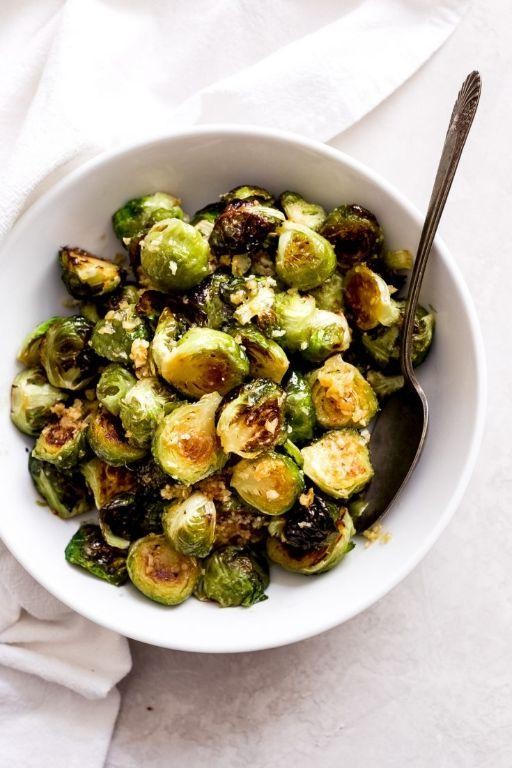
Jingle all the way to your plate with these Brussels sprouts that ditch their boring, boiled reputation for a buttery, garlicky glow-up! They’re the holiday side dish that might just steal the spotlight from the main event, turning even the most skeptical sprout-avoiders into enthusiastic fans with their crispy edges and savory punch.
Serving: 4 | Pre Time: 10 minutes | Cooking Time: 15 minutes
Ingredients
– 1 pound Brussels sprouts, trimmed and halved (or quartered if large, for faster cooking)
– 3 tablespoons unsalted butter (divided, for layering flavor)
– 2 tablespoons olive oil (or any neutral oil, to prevent burning)
– 4 cloves garlic, minced (about 1 tablespoon, adjust to taste)
– 1/2 teaspoon salt (plus more for seasoning)
– 1/4 teaspoon black pepper (freshly ground for best flavor)
– 1 tablespoon fresh lemon juice (from about 1/2 lemon, to brighten it up)
– 2 tablespoons grated Parmesan cheese (optional, for a cheesy finish)
Instructions
1. Trim the Brussels sprouts by slicing off the dry stem ends, then cut each sprout in half lengthwise through the core to help them cook evenly.
2. Heat a large skillet over medium-high heat and add the olive oil, swirling to coat the pan evenly.
3. Place the Brussels sprouts in the skillet cut-side down in a single layer, working in batches if needed to avoid overcrowding, which steams instead of sears them.
4. Cook without stirring for 5–7 minutes, until the cut sides develop a deep golden-brown crust and the edges start to crisp.
5. Flip the sprouts with tongs and cook for another 3–5 minutes, stirring occasionally, until they are tender when pierced with a fork but still have a slight bite.
6. Reduce the heat to medium-low and push the sprouts to the side of the skillet, then add 2 tablespoons of butter to the empty space.
7. Once the butter melts, add the minced garlic and sauté for 30–60 seconds, just until fragrant and lightly golden, being careful not to burn it.
8. Stir the garlic butter into the sprouts, coating them evenly, then season with salt and pepper, tossing to combine.
9. Remove the skillet from the heat and stir in the remaining 1 tablespoon of butter and the lemon juice for a glossy, tangy finish.
10. Transfer to a serving dish and sprinkle with Parmesan cheese if using, serving immediately while hot and crispy.
Crunchy on the outside with tender centers, these sprouts boast a rich, garlicky butter flavor balanced by a zesty lemon kick. Try piling them over creamy mashed potatoes for a cozy twist or tossing with cooked pasta for a quick vegetarian meal—they’re versatile enough to shine at any table!
Cauliflower Fried Rice with Vegetables

Zesty, zippy, and zero-guilt—this cauliflower fried rice is the veggie-packed answer to your takeout cravings, swapping grains for grated goodness and packing a punch of flavor without the carb coma. It’s a weeknight warrior that’s ready to rumble in your skillet faster than you can say “fried rice faux pas.”
Serving: 4 | Pre Time: 15 minutes | Cooking Time: 10 minutes
Ingredients
– 1 large head cauliflower, riced (about 4 cups; pulse florets in a food processor until rice-like)
– 2 tbsp vegetable oil (or any neutral oil)
– 2 large eggs, beaten
– 1 cup frozen mixed vegetables (peas, carrots, corn; no need to thaw)
– 3 cloves garlic, minced
– 2 tbsp soy sauce (adjust to taste)
– 1 tbsp sesame oil
– 2 green onions, thinly sliced (for garnish)
– Salt and pepper to taste (optional; soy sauce adds saltiness)
Instructions
1. Heat 1 tbsp vegetable oil in a large skillet or wok over medium-high heat (about 350°F).
2. Add the beaten eggs to the skillet and scramble for 1–2 minutes until fully cooked, then remove and set aside on a plate.
3. In the same skillet, add the remaining 1 tbsp vegetable oil and sauté the minced garlic for 30 seconds until fragrant, being careful not to burn it.
4. Add the frozen mixed vegetables to the skillet and stir-fry for 3–4 minutes until heated through and slightly tender.
5. Stir in the riced cauliflower and cook for 4–5 minutes, stirring occasionally, until it softens and any excess moisture evaporates (tip: spread it in an even layer to help it crisp up).
6. Return the scrambled eggs to the skillet and pour in the soy sauce and sesame oil, tossing everything together for 1 minute to combine evenly.
7. Remove from heat and garnish with sliced green onions, seasoning with salt and pepper only if needed (tip: taste first—soy sauce is salty!).
8. Serve immediately while hot for the best texture.
Crunchy from the veggies and savory from the soy sauce, this dish delivers a satisfying bite that’s light yet filling. Toss in some grilled shrimp or top with a fried egg for a protein boost, or enjoy it straight from the skillet—it’s so good, you might forget it’s cauliflower!
Roasted Broccoli with Parmesan and Lemon
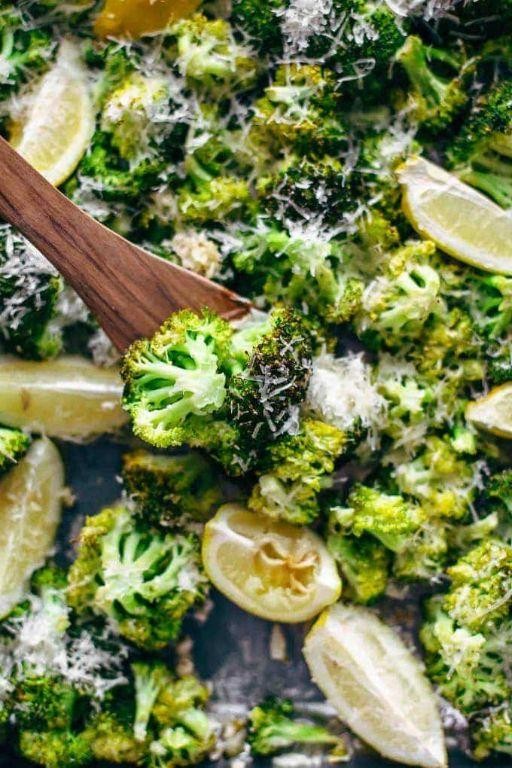
Let’s be honest: broccoli often gets a bad rap as the sad, steamed sidekick on your plate. But today, we’re giving it a glow-up so dazzling it might just steal the spotlight from the main course—roasted until crispy-edged and golden, then showered with nutty Parmesan and a zesty lemon kiss. Consider this your permission slip to fall in love with veggies all over again.
Serving: 4 | Pre Time: 10 minutes | Cooking Time: 20 minutes
Ingredients
– 1 large head of broccoli, cut into florets (about 4 cups)
– 2 tablespoons olive oil, or any neutral oil
– 3 cloves garlic, minced
– 1/2 teaspoon kosher salt, adjust to taste
– 1/4 teaspoon black pepper, freshly ground
– 1/4 cup grated Parmesan cheese
– 1 lemon, zested and juiced (about 2 tablespoons juice)
– 1/4 teaspoon red pepper flakes, optional for a kick
Instructions
1. Preheat your oven to 425°F (218°C) and line a baking sheet with parchment paper for easy cleanup.
2. In a large bowl, toss the broccoli florets with olive oil, minced garlic, salt, and black pepper until evenly coated.
3. Spread the broccoli in a single layer on the prepared baking sheet, ensuring pieces aren’t crowded to promote crispiness.
4. Roast in the preheated oven for 15–20 minutes, flipping halfway through, until the edges are browned and crispy.
5. Remove the baking sheet from the oven and immediately sprinkle the roasted broccoli with grated Parmesan cheese.
6. Drizzle the lemon juice over the broccoli and sprinkle with lemon zest and red pepper flakes, if using.
7. Toss gently on the sheet to combine all ingredients while the broccoli is still hot.
8. Serve immediately for the best texture and flavor.
Out of the oven, this dish boasts a delightful contrast: tender-crisp florets with caramelized, almost charred edges that give way to a savory, cheesy coating. The lemon cuts through the richness with a bright, tangy pop, making it irresistible straight from the pan—try piling it over creamy polenta or alongside grilled chicken for a weeknight win that feels anything but ordinary.
Brussels Sprouts and Bacon Pasta
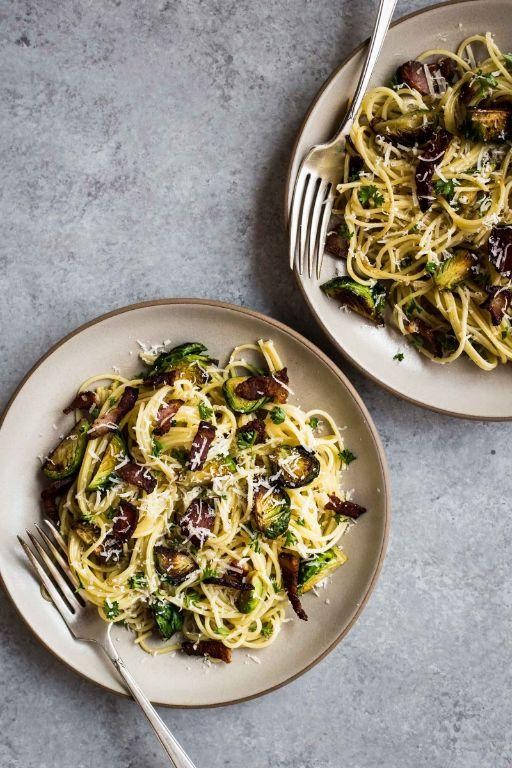
Brace yourselves, pasta lovers—this dish is about to make your holiday season (or any Tuesday) infinitely more delicious. Brussels Sprouts and Bacon Pasta is the cozy, savory hug you didn’t know you needed, combining crispy, salty bacon with tender, caramelized sprouts in a creamy, garlicky sauce that clings perfectly to every noodle. It’s the ultimate comfort food upgrade that’ll have everyone asking for seconds (and the recipe).
Serving: 4 | Pre Time: 15 minutes | Cooking Time: 25 minutes
Ingredients
– 8 ounces dried pasta (like fettuccine or rigatoni)
– 6 slices thick-cut bacon, chopped into ½-inch pieces
– 1 pound Brussels sprouts, trimmed and halved
– 3 cloves garlic, minced
– 1 cup heavy cream
– ½ cup grated Parmesan cheese, plus extra for serving
– 2 tablespoons olive oil (or any neutral oil)
– Salt and black pepper, to taste
– Fresh parsley, chopped (optional, for garnish)
Instructions
1. Bring a large pot of salted water to a rolling boil over high heat.
2. Add the pasta and cook according to package directions until al dente, about 10–12 minutes, then drain and set aside, reserving ½ cup of pasta water.
3. While the pasta cooks, heat a large skillet over medium heat and add the bacon pieces.
4. Cook the bacon, stirring occasionally, until crispy and browned, about 8–10 minutes, then transfer to a paper towel-lined plate using a slotted spoon, leaving the bacon fat in the skillet.
5. Add the Brussels sprouts to the skillet, cut-side down, and cook undisturbed for 4–5 minutes until golden brown and slightly charred.
6. Flip the sprouts and continue cooking for another 3–4 minutes until tender but still crisp, then stir in the minced garlic and cook for 30 seconds until fragrant.
7. Pour in the heavy cream and bring to a gentle simmer over medium-low heat, stirring occasionally to combine.
8. Stir in the grated Parmesan cheese until melted and the sauce thickens slightly, about 2–3 minutes.
9. Add the cooked pasta and crispy bacon to the skillet, tossing everything together until well-coated, adding reserved pasta water a tablespoon at a time if the sauce seems too thick.
10. Season with salt and black pepper to taste, then remove from heat and garnish with fresh parsley if desired.
Zesty, creamy, and packed with savory goodness, this pasta delivers a delightful contrast of textures—crispy bacon bits against tender sprouts and silky sauce. Serve it straight from the skillet for a rustic touch, or top with an extra sprinkle of Parmesan and a crack of black pepper to make it truly irresistible.
Creamy Broccoli and Spinach Soup
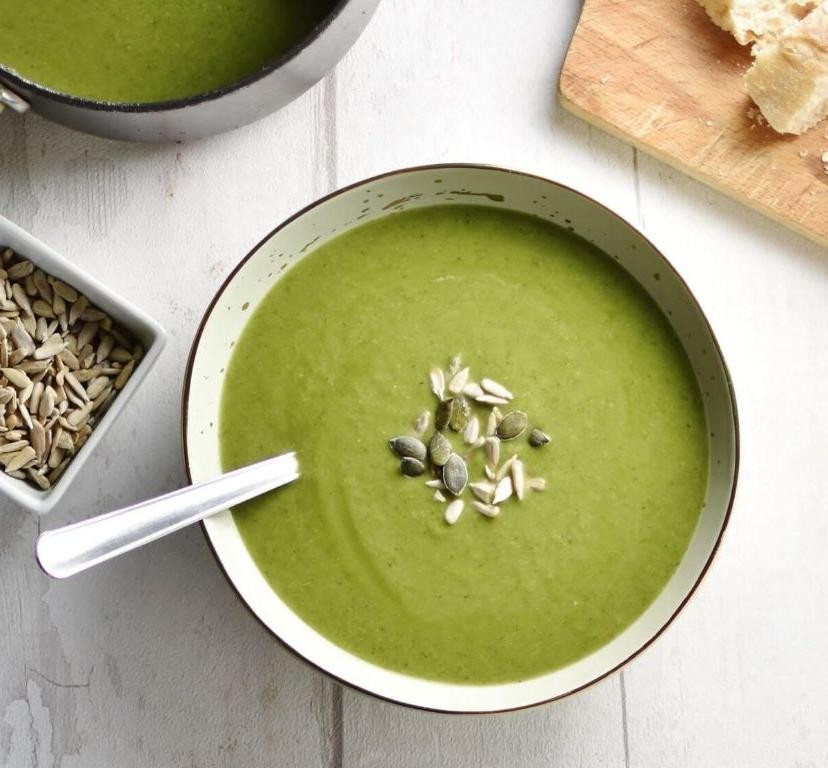
Mmm, let’s be real—when the holiday hustle hits like a sugar crash, you need a cozy, veggie-packed hug in a bowl that won’t have you slaving over the stove. This creamy broccoli and spinach soup is the ultimate weeknight hero, blending vibrant greens into a velvety, dreamy delight that even the pickiest eaters will devour (no green-bean-casserole trauma here!).
Serving: 4 | Pre Time: 10 minutes | Cooking Time: 25 minutes
Ingredients
– 1 tablespoon olive oil (or any neutral oil)
– 1 medium yellow onion, diced
– 2 cloves garlic, minced
– 4 cups broccoli florets, chopped into bite-sized pieces
– 4 cups fresh spinach, packed
– 4 cups vegetable broth
– 1 cup heavy cream (for extra richness, or substitute with half-and-half)
– 1 teaspoon salt (adjust to taste)
– ½ teaspoon black pepper
– Optional: ¼ teaspoon nutmeg for a warm, aromatic kick
Instructions
1. Heat 1 tablespoon olive oil in a large pot over medium heat until shimmering, about 1 minute.
2. Add 1 diced yellow onion and cook, stirring occasionally, until softened and translucent, about 5 minutes.
3. Stir in 2 minced garlic cloves and cook for 30 seconds until fragrant—don’t let it brown!
4. Tip: Toasting the garlic briefly enhances flavor without bitterness.
5. Add 4 cups chopped broccoli florets and 4 cups vegetable broth to the pot.
6. Bring the mixture to a boil over high heat, then reduce to a simmer and cook uncovered for 15 minutes, or until the broccoli is tender when pierced with a fork.
7. Tip: Simmering uncovered helps concentrate the broth’s flavor.
8. Stir in 4 cups packed fresh spinach and cook for 2 minutes until wilted and bright green.
9. Remove the pot from heat and let it cool slightly, about 5 minutes, to avoid splatters.
10. Carefully blend the soup until smooth using an immersion blender or transfer to a countertop blender in batches.
11. Tip: For an ultra-creamy texture, blend on high for at least 1 minute.
12. Return the blended soup to the pot over low heat and stir in 1 cup heavy cream, 1 teaspoon salt, and ½ teaspoon black pepper.
13. Heat gently for 3–4 minutes until warmed through, stirring constantly—do not boil to prevent curdling.
14. Taste and adjust seasoning with more salt or pepper if desired.
15. Ladle the soup into bowls and serve immediately.
Expect a luxuriously smooth, vibrant green puree with a subtle sweetness from the broccoli and a fresh pop from the spinach. Elevate it by topping with crispy croutons, a drizzle of olive oil, or a sprinkle of grated Parmesan for a savory crunch that makes every spoonful irresistible.
Shredded Brussels Sprouts Salad with Apples
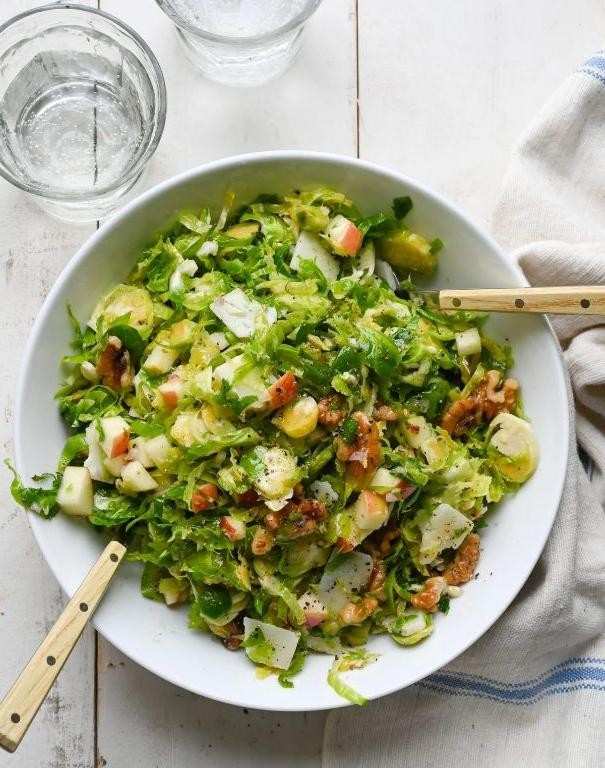
Just when you thought Brussels sprouts were only for roasting into submission, this salad swoops in to prove they can be delightfully crisp, fresh, and downright fun. It’s a vibrant, crunchy escape from heavy holiday fare, perfect for when you need a plate that feels as light and bright as your post-meal ambitions. Think of it as the confetti your dinner table deserves.
Serving: 4 | Pre Time: 20 minutes | Cooking Time: 0 minutes
Ingredients
– 1 lb Brussels sprouts, trimmed and shredded (use a food processor’s shredding disc for speed, or a sharp knife for a workout)
– 1 large crisp apple (like Honeycrisp or Fuji), julienned (toss in a squeeze of lemon juice to prevent browning)
– 1/2 cup walnuts, roughly chopped (toasting optional but highly recommended for deeper flavor)
– 1/4 cup dried cranberries
– 1/4 cup crumbled feta cheese (or goat cheese for extra tang)
– 3 tbsp extra virgin olive oil (or any neutral oil)
– 2 tbsp apple cider vinegar (adjust to taste)
– 1 tbsp honey (or maple syrup for a vegan swap)
– 1/2 tsp Dijon mustard
– 1/4 tsp salt (adjust to taste)
– 1/4 tsp black pepper (adjust to taste)
Instructions
1. Trim the stem ends from 1 lb of Brussels sprouts and discard any loose outer leaves.
2. Shred the Brussels sprouts using a food processor fitted with a shredding disc, or slice them thinly with a sharp knife until you have a fluffy pile of shreds.
3. Core 1 large crisp apple and cut it into matchstick-sized julienne pieces.
4. In a small bowl, whisk together 3 tbsp extra virgin olive oil, 2 tbsp apple cider vinegar, 1 tbsp honey, 1/2 tsp Dijon mustard, 1/4 tsp salt, and 1/4 tsp black pepper until fully emulsified.
5. Place the shredded Brussels sprouts, julienned apple, 1/2 cup roughly chopped walnuts, 1/4 cup dried cranberries, and 1/4 cup crumbled feta cheese in a large mixing bowl.
6. Pour the whisked dressing over the salad ingredients in the bowl.
7. Toss everything together thoroughly with salad tongs or two large spoons until every shred is lightly coated in dressing.
8. Let the salad sit at room temperature for 10 minutes to allow the flavors to meld and the Brussels sprouts to soften slightly.
9. Taste the salad and adjust seasoning with more salt, pepper, or vinegar if desired.
10. Transfer the salad to a serving platter or individual plates for immediate enjoyment.
Kick back and savor the symphony of textures: the sprouts stay pleasingly crisp, the apples add a juicy sweetness, and the walnuts bring a toasty crunch. For a creative twist, pile it onto a toasted baguette for an open-faced sandwich, or top it with grilled chicken to turn this side into a hearty main. It’s the kind of dish that makes you wonder why you ever doubted Brussels sprouts in the first place.
Steamed Bok Choy with Ginger Soy Sauce
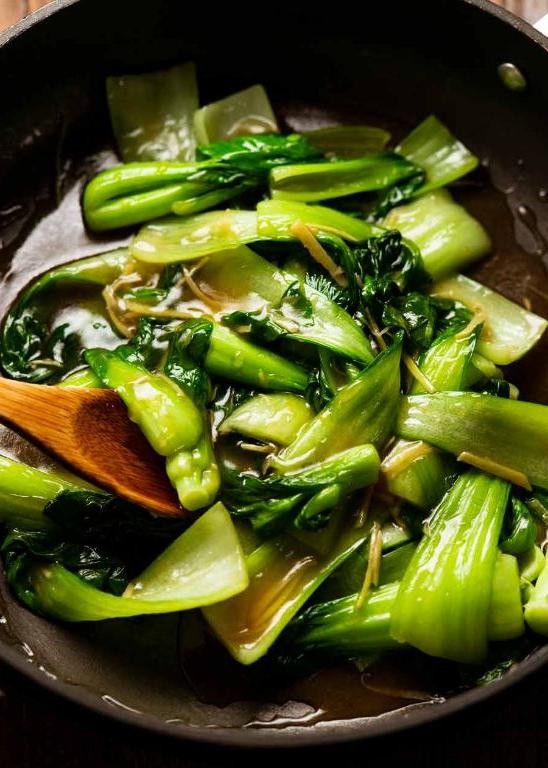
Sick of the same old steamed veggies? Let’s jazz things up with a dish that’s so simple, you’ll wonder why you ever bothered with complicated sides. This steamed bok choy with a zippy ginger-soy sauce is your new weeknight hero—ready in minutes and packed with flavor that’ll make your taste buds do a happy dance.
Serving: 4 | Pre Time: 10 minutes | Cooking Time: 10 minutes
Ingredients
– 2 heads baby bok choy (about 1 lb total), halved lengthwise
– 2 tbsp soy sauce (use low-sodium if preferred)
– 1 tbsp rice vinegar
– 1 tsp sesame oil
– 1 tbsp vegetable oil (or any neutral oil)
– 1 tbsp fresh ginger, finely grated (about a 1-inch knob)
– 2 cloves garlic, minced
– 1 tsp honey (or maple syrup for a vegan swap)
– 1 tbsp water
– 1 tsp cornstarch
– 1 green onion, thinly sliced, for garnish
– 1 tsp sesame seeds, for garnish
Instructions
1. Rinse 2 heads of baby bok choy under cold water to remove any dirt, then pat them dry with a clean towel.
2. Cut each bok choy head in half lengthwise through the core to create 4 halves total.
3. Fill a large pot with 1 inch of water and bring it to a boil over high heat.
4. Place a steamer basket in the pot, then arrange the bok choy halves in a single layer in the basket.
5. Cover the pot and steam the bok choy for 5–6 minutes, until the stems are tender-crisp when pierced with a fork.
6. While the bok choy steams, whisk together 1 tbsp water and 1 tsp cornstarch in a small bowl until smooth to create a slurry.
7. Heat 1 tbsp vegetable oil in a small saucepan over medium heat for 30 seconds.
8. Add 1 tbsp grated ginger and 2 cloves minced garlic to the saucepan, sautéing for 1 minute until fragrant but not browned.
9. Pour in 2 tbsp soy sauce, 1 tbsp rice vinegar, 1 tsp sesame oil, and 1 tsp honey, stirring to combine.
10. Bring the sauce to a gentle simmer over medium heat, then whisk in the cornstarch slurry.
11. Cook the sauce for 1–2 minutes, stirring constantly, until it thickens slightly and becomes glossy.
12. Remove the steamed bok choy from the pot and arrange it on a serving platter.
13. Drizzle the warm ginger-soy sauce evenly over the bok choy halves.
14. Garnish with 1 thinly sliced green onion and 1 tsp sesame seeds.
15. Serve immediately while hot.
Kick back and enjoy that crisp-tender texture with a sauce that’s savory, slightly sweet, and packed with ginger-garlic punch. It’s perfect as a light side or piled over rice for a quick, satisfying meal—leftovers? Toss them into a stir-fry tomorrow!
Roasted Cauliflower and Lentil Salad

Alright, let’s get roasting! This isn’t your average salad—it’s a flavor-packed, texture-tastic adventure that’ll make your taste buds do a happy dance. Perfect for a quick weeknight dinner or a show-stopping side, it’s hearty, healthy, and downright delicious.
Serving: 4 | Pre Time: 15 minutes | Cooking Time: 25 minutes
Ingredients
– 1 large head cauliflower, cut into bite-sized florets (about 4 cups)
– 1 cup dried brown lentils, rinsed
– 2 tbsp olive oil, or any neutral oil
– 1 tsp smoked paprika
– ½ tsp garlic powder
– ½ tsp salt, adjust to taste
– ¼ tsp black pepper
– 3 cups water
– 2 tbsp lemon juice, freshly squeezed
– ¼ cup chopped fresh parsley, for garnish
Instructions
1. Preheat your oven to 425°F (218°C) and line a baking sheet with parchment paper for easy cleanup.
2. In a large bowl, toss the cauliflower florets with 1 tbsp olive oil, smoked paprika, garlic powder, salt, and black pepper until evenly coated.
3. Spread the cauliflower in a single layer on the prepared baking sheet and roast for 20-25 minutes, flipping halfway through, until golden brown and tender.
4. While the cauliflower roasts, combine the rinsed lentils and 3 cups water in a medium saucepan and bring to a boil over high heat.
5. Reduce the heat to low, cover, and simmer the lentils for 15-20 minutes, or until tender but not mushy, then drain any excess water.
6. In a small bowl, whisk together the remaining 1 tbsp olive oil and lemon juice to make a simple dressing.
7. In a large serving bowl, gently mix the roasted cauliflower and cooked lentils.
8. Drizzle the lemon-olive oil dressing over the mixture and toss to combine everything evenly.
9. Garnish with chopped fresh parsley just before serving for a pop of color and freshness.
10. Ready to dig in? Revel in the crispy, caramelized cauliflower paired with earthy lentils—it’s a texture dream! Serve it warm as a main dish or chill it for a refreshing lunch; either way, it’s a crowd-pleaser that’ll have everyone asking for seconds.
Broccoli and Mushroom Stir-Fry
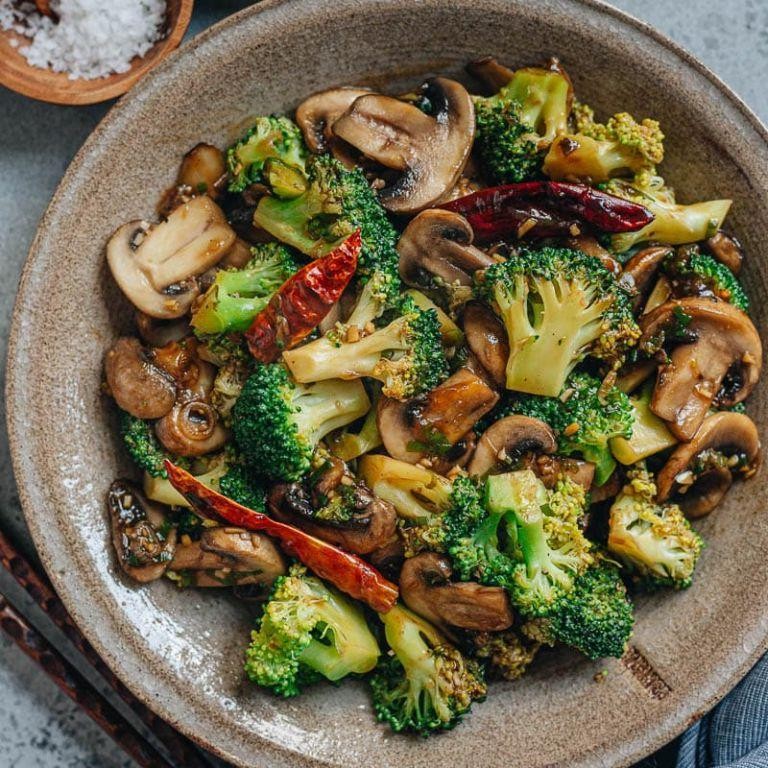
Ready to rescue your weeknight dinner routine from the brink of boredom? This Broccoli and Mushroom Stir-Fry is here to save the day, packing a punch of flavor and color that’ll make your taste buds do a happy dance. It’s the kind of veggie-forward hero that comes together faster than you can say “takeout menu.”
Serving: 4 | Pre Time: 15 minutes | Cooking Time: 10 minutes
Ingredients
– 1 lb broccoli florets, cut into bite-sized pieces (fresh is best, but frozen works in a pinch)
– 8 oz cremini mushrooms, sliced (or any mushroom you fancy)
– 1 medium yellow onion, thinly sliced
– 3 cloves garlic, minced (don’t skimp—this is flavor central!)
– 1 tbsp fresh ginger, grated (peel it first with a spoon for less waste)
– 3 tbsp vegetable oil, divided (or any neutral oil like canola)
– 1/4 cup low-sodium soy sauce
– 1 tbsp rice vinegar
– 1 tsp sesame oil (for that nutty, aromatic finish)
– 1/2 tsp red pepper flakes (adjust to your heat preference)
– Cooked white rice, for serving (about 4 cups)
Instructions
1. Heat 2 tablespoons of vegetable oil in a large wok or skillet over medium-high heat until it shimmers, about 1 minute.
2. Add the broccoli florets and stir-fry for 3–4 minutes until they turn bright green and are slightly tender but still crisp. Tip: Don’t overcrowd the pan—cook in batches if needed for the best sear.
3. Push the broccoli to the sides of the pan, add the remaining 1 tablespoon of oil to the center, and toss in the sliced mushrooms and onion. Cook for 4–5 minutes, stirring occasionally, until the mushrooms release their liquid and start to brown.
4. Stir in the minced garlic and grated ginger, cooking for just 30 seconds until fragrant to avoid burning. Tip: Have your ingredients prepped and ready to go (mise en place) for a smooth, stress-free stir-fry session.
5. Pour in the soy sauce, rice vinegar, sesame oil, and red pepper flakes, stirring everything together to coat evenly. Let it simmer for 1–2 minutes until the sauce thickens slightly and clings to the veggies.
6. Remove from heat and serve immediately over cooked white rice. Tip: For an extra crunch, sprinkle with toasted sesame seeds or chopped green onions right before serving.
Finally, dig into a bowl that’s bursting with tender-crisp broccoli and savory, umami-rich mushrooms, all wrapped in a glossy, tangy sauce. It’s a texture party in your mouth—serve it up with a side of steamed dumplings or pile it into lettuce wraps for a fun, hands-on twist!
Kale and Quinoa Stuffed Peppers

Crank up the oven, folks—we’re about to stuff some peppers so full of wholesome goodness they’ll practically do a happy dance on your plate! This kale and quinoa combo is the ultimate weeknight hero, turning a few humble ingredients into a vibrant, satisfying meal that even the pickiest eaters will devour.
Serving: 4 | Pre Time: 15 minutes | Cooking Time: 40 minutes
Ingredients
– 4 large bell peppers (any color, but red or yellow add sweetness)
– 1 cup quinoa, rinsed
– 2 cups vegetable broth (or water for a lighter flavor)
– 2 tbsp olive oil (or any neutral oil)
– 1 small onion, finely chopped
– 2 cloves garlic, minced
– 2 cups kale, stems removed and chopped (pack it in for extra greens!)
– 1 cup canned black beans, rinsed and drained
– 1 tsp ground cumin
– ½ tsp smoked paprika (adjust to taste for a smoky kick)
– ½ cup shredded cheddar cheese (or a dairy-free alternative)
– Salt and pepper, to season throughout
Instructions
1. Preheat your oven to 375°F (190°C) and lightly grease a baking dish.
2. Slice the tops off the bell peppers, remove the seeds and membranes, and set them aside in the dish.
3. In a medium saucepan, combine the quinoa and vegetable broth, bring to a boil, then reduce heat to low, cover, and simmer for 15 minutes until the liquid is absorbed and quinoa is fluffy.
4. Heat olive oil in a large skillet over medium heat, add the chopped onion, and sauté for 5 minutes until translucent.
5. Add minced garlic to the skillet and cook for 1 minute until fragrant, being careful not to burn it.
6. Stir in the chopped kale and cook for 3–4 minutes until wilted and bright green.
7. Mix in the cooked quinoa, black beans, cumin, smoked paprika, salt, and pepper, stirring well to combine and heat through for 2 minutes.
8. Spoon the quinoa mixture evenly into the bell peppers, packing it down gently.
9. Top each stuffed pepper with shredded cheddar cheese.
10. Bake in the preheated oven for 25–30 minutes until the peppers are tender and the cheese is melted and bubbly.
11. Let the peppers cool for 5 minutes before serving to set the filling.
Look at those beauties—each bite delivers a hearty crunch from the kale, a nutty chew from the quinoa, and a smoky warmth from the spices. Serve them with a dollop of Greek yogurt or a squeeze of lime for an extra zing, and watch them disappear faster than holiday cookies!
Grilled Romaine with Caesar Dressing
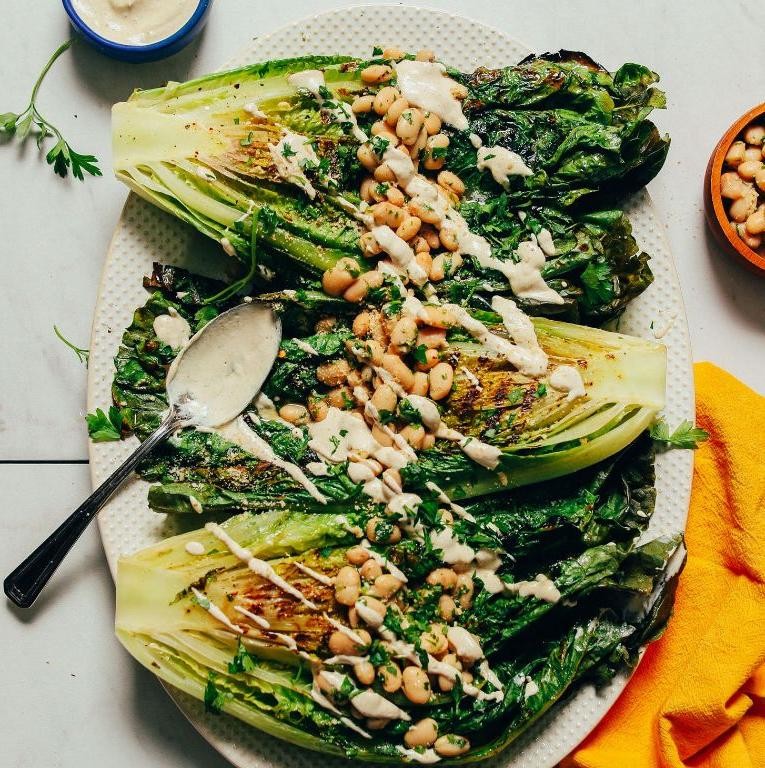
Okay, let’s be real: sometimes a salad needs a little more drama than just a rinse and toss. Grilling romaine transforms it from a crunchy sidekick into a smoky, charred star with warm, tender leaves and a cool, creamy Caesar hug. It’s the salad that decided to go on a summer adventure and came back with a tan and a better personality.
Serving: 4 | Pre Time: 15 minutes | Cooking Time: 5 minutes
Ingredients
– 2 large romaine hearts, halved lengthwise (keep the core intact to hold leaves together)
– 2 tbsp olive oil (or any neutral oil)
– 1/4 tsp kosher salt
– 1/4 tsp black pepper, freshly ground
– 1/2 cup mayonnaise (full-fat for best creaminess)
– 2 tbsp grated Parmesan cheese, plus extra for garnish
– 1 tbsp fresh lemon juice (about half a lemon)
– 1 tsp Dijon mustard
– 1 small garlic clove, minced (or 1/4 tsp garlic powder if you’re in a pinch)
– 2 anchovy fillets, minced (optional, but adds authentic umami)
Instructions
1. Preheat a grill or grill pan to medium-high heat (about 400°F).
2. Brush the cut sides of the romaine halves evenly with olive oil, then sprinkle with salt and pepper.
3. Place the romaine halves cut-side down on the grill and cook for 2–3 minutes, until grill marks appear and edges are lightly charred. Tip: Don’t move them around—let them sear for that perfect caramelization.
4. Flip the romaine halves and grill for another 1–2 minutes on the other side, just until slightly wilted but still crisp. Remove from heat and set aside.
5. In a small bowl, whisk together mayonnaise, Parmesan cheese, lemon juice, Dijon mustard, minced garlic, and minced anchovies (if using) until smooth and creamy. Tip: For a smoother dressing, blend the ingredients in a food processor for 10 seconds.
6. Drizzle the Caesar dressing generously over the grilled romaine halves.
7. Garnish with extra grated Parmesan cheese. Tip: Add a sprinkle of cracked black pepper or a squeeze of lemon for a bright finish.
And just like that, you’ve got a salad that’s anything but boring. The warm, smoky leaves contrast beautifully with the cool, tangy dressing, creating a texture party in every bite. Serve it as a standout side at your next barbecue or top it with grilled shrimp for a main dish that’ll make your taste buds do a happy dance.
Cabbage and Carrot Slaw with Yogurt Dressing
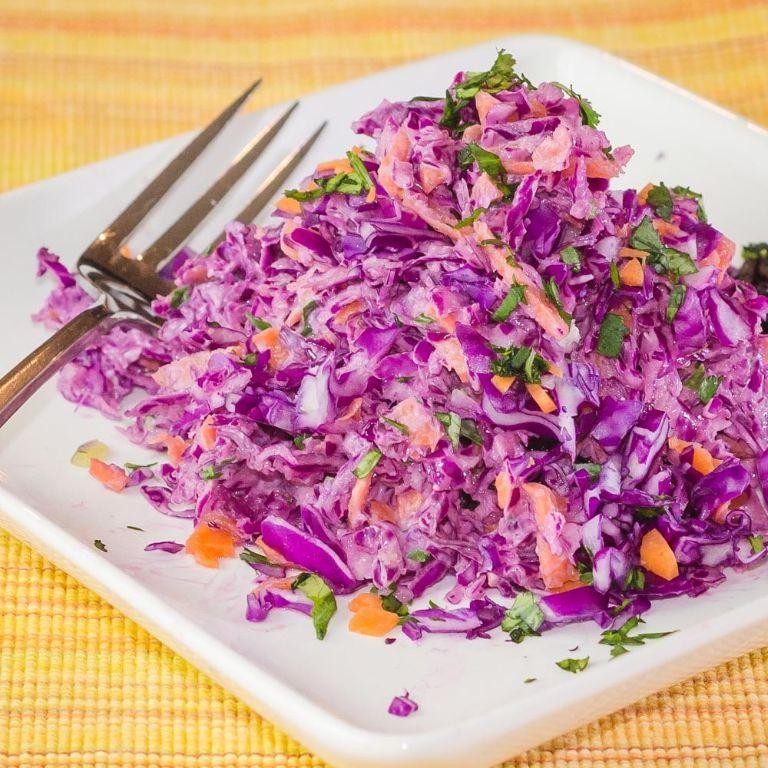
Forget those sad, soggy slaws of yesteryear—this vibrant Cabbage and Carrot Slaw with Yogurt Dressing is about to become your new crunchy obsession. It’s the perfect sidekick for everything from backyard barbecues to weeknight tacos, and it comes together faster than you can say “pass the coleslaw.” Seriously, your taste buds will thank you.
Serving: 6 | Pre Time: 20 minutes | Cooking Time: 0 minutes
Ingredients
– 1 small green cabbage, shredded (about 6 cups)
– 3 large carrots, peeled and grated (about 2 cups)
– 1/2 cup plain Greek yogurt
– 2 tbsp apple cider vinegar
– 1 tbsp honey
– 1 tsp Dijon mustard
– 1/4 cup olive oil, or any neutral oil
– 1/2 tsp salt
– 1/4 tsp black pepper, adjust to taste
– 2 tbsp chopped fresh dill, optional for extra herby flair
Instructions
1. Place the shredded cabbage and grated carrots in a large mixing bowl.
2. In a separate medium bowl, whisk together the Greek yogurt, apple cider vinegar, honey, and Dijon mustard until smooth.
3. Slowly drizzle in the olive oil while whisking continuously to emulsify the dressing.
4. Stir in the salt and black pepper until fully incorporated.
5. Pour the dressing over the cabbage and carrot mixture in the large bowl.
6. Using tongs or clean hands, toss everything together until the vegetables are evenly coated.
7. Fold in the chopped fresh dill if using, distributing it throughout the slaw.
8. Cover the bowl with plastic wrap and refrigerate for at least 30 minutes to allow the flavors to meld.
This slaw stays delightfully crisp with a tangy, creamy dressing that clings to every shred. Serve it piled high on pulled pork sandwiches or as a bright, refreshing side with grilled chicken—it’s versatile enough to steal the show at any meal.
Summary
Let’s celebrate the power of cruciferous veggies! This roundup offers 20 tasty ways to enjoy their health benefits. We hope you find a new favorite dish. Give a recipe a try, then drop a comment below to tell us which one you loved. If you enjoyed this collection, please share it on Pinterest to help other home cooks discover these delicious ideas. Happy cooking!