
Fancy baking something that’s as delightful to look at as it is to eat? You’re in the right place! We’ve gathered 13 of the most adorable, creative, and downright delicious cookie recipes perfect for any occasion. From charming animal shapes to beautifully decorated treats, these ideas will bring a smile to your face and joy to your kitchen. Let’s get started and find your next baking project!
Panda Face Shortbread Cookies

Zigzagging through holiday memories, I find myself drawn back to the quiet kitchen moments that feel like gentle whispers of comfort. Today, that whisper takes the shape of something whimsical yet deeply soothing—a simple shortbread cookie transformed into a playful panda’s face, its round, edible canvas waiting to be adorned with chocolate details that mirror a beloved creature’s gentle gaze.
Serving: 24 cookies | Pre Time: 30 minutes | Cooking Time: 12 minutes
Ingredients
– 2 cups all-purpose flour
– 1 cup unsalted butter, softened to room temperature
– 1/2 cup granulated sugar
– 1/4 teaspoon salt
– 1 teaspoon vanilla extract
– 1/2 cup semisweet chocolate chips
– 2 tablespoons white chocolate chips
– 1 tablespoon vegetable shortening
Instructions
1. In a large mixing bowl, combine 2 cups all-purpose flour, 1/2 cup granulated sugar, and 1/4 teaspoon salt using a whisk to ensure even distribution.
2. Add 1 cup softened unsalted butter and 1 teaspoon vanilla extract to the dry ingredients, then mix with an electric mixer on low speed for 2 minutes until a crumbly dough forms.
3. Tip: For tender cookies, avoid overmixing—stop as soon as the dough holds together when pressed between your fingers.
4. Turn the dough onto a lightly floured surface and knead gently 4-5 times to bring it together into a smooth ball.
5. Wrap the dough tightly in plastic wrap and refrigerate for 20 minutes to firm it up, which prevents spreading during baking.
6. Preheat your oven to 350°F and line two baking sheets with parchment paper.
7. Roll out the chilled dough to a 1/4-inch thickness on a floured surface, then use a 2-inch round cookie cutter to cut out circles, re-rolling scraps as needed.
8. Place the circles 1 inch apart on the prepared baking sheets and bake for 10-12 minutes, or until the edges turn a very light golden brown.
9. Tip: Rotate the baking sheets halfway through baking for even browning, checking at 10 minutes to avoid over-baking.
10. Transfer the cookies to a wire rack and let them cool completely for 30 minutes before decorating.
11. Melt 1/2 cup semisweet chocolate chips with 1/2 tablespoon vegetable shortening in a microwave-safe bowl in 20-second intervals, stirring until smooth.
12. Use a small piping bag or a ziplock bag with a corner snipped to pipe two small oval ears and two round eyes onto each cookie with the melted chocolate.
13. Melt 2 tablespoons white chocolate chips with the remaining 1/2 tablespoon vegetable shortening similarly, then pipe a small oval nose and two dot pupils within the chocolate eyes.
14. Tip: If the chocolate sets too quickly, briefly re-warm it for 5-10 seconds to maintain a pipeable consistency.
15. Allow the chocolate decorations to set at room temperature for 15 minutes until firm.
Reflecting on these cookies, their crumbly, buttery texture melts delicately with each bite, while the semisweet chocolate adds a subtle richness that contrasts beautifully with the sweet vanilla base. Serve them stacked on a rustic platter for a charming display, or tuck them into gift boxes lined with tissue paper to share a touch of whimsy with loved ones during cozy gatherings.
Unicorn Horn Sugar Cookies

Frosted windowpanes blur the winter afternoon as I measure flour into a bowl, the quiet kitchen holding space for this sweet, whimsical creation. These unicorn horn sugar cookies aren’t just a treat; they’re a gentle, colorful pause, a chance to shape something magical with your own hands. The process is simple, the result a swirl of pastel joy that feels like a quiet celebration.
Serving: 24 cookies | Pre Time: 30 minutes | Cooking Time: 10 minutes
Ingredients
– 2 ¾ cups all-purpose flour
– 1 teaspoon baking powder
– ½ teaspoon salt
– 1 cup unsalted butter, softened to room temperature
– 1 ½ cups granulated sugar
– 1 large egg
– 2 teaspoons vanilla extract
– ¼ cup whole milk
– Gel food coloring in pink, purple, and blue
– 1 cup powdered sugar
– 2 tablespoons whole milk
– ½ teaspoon vanilla extract
– Rainbow sprinkles
Instructions
1. In a medium bowl, whisk together 2 ¾ cups all-purpose flour, 1 teaspoon baking powder, and ½ teaspoon salt until fully combined.
2. In a large bowl, use an electric mixer on medium speed to beat 1 cup softened unsalted butter and 1 ½ cups granulated sugar together for 3 minutes, until light and fluffy.
3. Add 1 large egg and 2 teaspoons vanilla extract to the butter mixture, beating on medium speed for 1 minute until fully incorporated.
4. With the mixer on low speed, gradually add the flour mixture and ¼ cup whole milk to the wet ingredients, mixing just until a soft dough forms and no dry streaks remain.
5. Divide the dough into three equal portions, placing each in a separate small bowl.
6. Add 3 drops of pink gel food coloring to one dough portion, 3 drops of purple to another, and 3 drops of blue to the last, kneading each by hand until the color is uniform.
7. Roll each colored dough portion into a rope about 12 inches long and ½ inch thick on a lightly floured surface.
8. Lay the three ropes side-by-side and gently press them together at one end, then twist them tightly along their entire length to form a single, multicolored rope.
9. Wrap the twisted rope in plastic wrap and refrigerate it for 1 hour to firm up, which prevents spreading during baking.
10. Preheat your oven to 350°F and line two baking sheets with parchment paper.
11. Slice the chilled dough rope into ½-inch thick pieces, placing them 2 inches apart on the prepared baking sheets.
12. Bake one sheet at a time in the preheated oven for 9-11 minutes, until the edges are just set and lightly golden; the centers will look soft but will firm as they cool.
13. Let the cookies cool on the baking sheet for 5 minutes, then transfer them to a wire rack to cool completely for 30 minutes.
14. For the glaze, whisk together 1 cup powdered sugar, 2 tablespoons whole milk, and ½ teaspoon vanilla extract in a small bowl until smooth and drizzle-able.
15. Drizzle the glaze over the cooled cookies in a zigzag pattern, then immediately sprinkle with rainbow sprinkles before the glaze sets.
16. Allow the glaze to set completely at room temperature for 1 hour before serving.
Vividly soft and tender, these cookies melt with a buttery vanilla sweetness, their colorful swirls revealing themselves with each bite. The crisp glaze adds a delicate sugar shell, while the sprinkles offer tiny bursts of crunch. For a whimsical touch, arrange them on a platter like a herd of magical horns, or package them in clear bags tied with ribbon as edible holiday favors.
Mini Flower Petal Cookies

Yesterday, as the afternoon light faded, I found myself drawn to the quiet rhythm of baking, wanting to create something delicate and small to hold the last of the day’s warmth. These miniature cookies, shaped like gentle petals, are a simple meditation in butter and sugar, perfect for a quiet moment with tea or to share as a tender, edible gift.
Serving: 24 cookies | Pre Time: 20 minutes | Cooking Time: 12 minutes
Ingredients
– 1 cup unsalted butter, softened to room temperature
– 3/4 cup granulated sugar
– 1 large egg
– 1 teaspoon pure vanilla extract
– 2 1/2 cups all-purpose flour
– 1/4 teaspoon salt
– 1/4 cup sanding sugar, for rolling
Instructions
1. In a large mixing bowl, use an electric mixer on medium speed to cream the softened unsalted butter and granulated sugar together for 3 minutes, until light and fluffy—this incorporates air for a tender cookie.
2. Add the large egg and pure vanilla extract to the butter mixture, and beat on medium speed for 1 minute, just until fully combined, to avoid overmixing.
3. In a separate medium bowl, whisk together the all-purpose flour and salt until evenly distributed.
4. Gradually add the flour mixture to the wet ingredients, mixing on low speed until a soft dough forms and no dry streaks remain, about 2 minutes; scrape down the bowl halfway through to ensure even mixing.
5. Divide the dough into two equal portions, shape each into a disk, wrap tightly in plastic wrap, and chill in the refrigerator for 30 minutes to firm up for easier handling.
6. Preheat your oven to 350°F and line two baking sheets with parchment paper.
7. On a lightly floured surface, roll out one dough disk to 1/8-inch thickness; using a small flower-shaped cookie cutter (about 1.5 inches wide), cut out shapes, re-rolling scraps as needed.
8. Dip the top of each cookie into the sanding sugar to coat lightly, then place them 1 inch apart on the prepared baking sheets.
9. Bake one sheet at a time in the preheated oven for 10–12 minutes, until the edges are just set and very lightly golden—watch closely to prevent over-browning.
10. Let the cookies cool on the baking sheet for 5 minutes before transferring to a wire rack to cool completely.
Delicate and crisp, these cookies offer a subtle sweetness with a buttery richness that melts on the tongue. Serve them stacked in a glass jar for a charming display, or pair with a dollop of lemon curd to highlight their floral shape and gentle crunch.
Piggy Pink Frosted Cookies

Lately, I’ve found myself drawn back to the kitchen in these quiet winter afternoons, the soft light filtering through the window as I measure out flour and sugar, creating something sweet and simple to share. These piggy pink frosted cookies are a gentle nod to childhood whimsy, with their playful color and tender crumb, perfect for leaving out on a plate with a glass of milk. They require just a bit of patience and a willingness to embrace a little pink mess, resulting in treats that feel both nostalgic and freshly made.
Serving: 24 | Pre Time: 20 minutes | Cooking Time: 10 minutes
Ingredients
– 2 1/4 cups all-purpose flour
– 1/2 tsp baking powder
– 1/4 tsp salt
– 3/4 cup unsalted butter, softened
– 3/4 cup granulated sugar
– 1 large egg
– 1 tsp vanilla extract
– 2-3 drops pink gel food coloring
– 2 cups powdered sugar
– 3 tbsp milk
– 1/2 tsp vanilla extract
Instructions
1. Preheat your oven to 350°F and line two baking sheets with parchment paper.
2. In a medium bowl, whisk together 2 1/4 cups all-purpose flour, 1/2 tsp baking powder, and 1/4 tsp salt until fully combined.
3. In a large bowl, use an electric mixer on medium speed to cream 3/4 cup softened unsalted butter and 3/4 cup granulated sugar for 3 minutes, until light and fluffy.
4. Tip: Scrape down the sides of the bowl halfway through creaming to ensure even mixing.
5. Add 1 large egg and 1 tsp vanilla extract to the butter mixture, and beat on medium speed for 1 minute until smooth.
6. Gradually add the flour mixture to the wet ingredients, mixing on low speed just until a dough forms, about 1-2 minutes.
7. Divide the dough in half, and add 2-3 drops of pink gel food coloring to one half, kneading by hand until the color is evenly distributed.
8. Tip: Use gel food coloring instead of liquid to avoid altering the dough’s consistency.
9. Roll out both the plain and pink doughs separately between two sheets of parchment paper to 1/4-inch thickness.
10. Use cookie cutters to cut shapes from the doughs, re-rolling scraps as needed, and place them 1 inch apart on the prepared baking sheets.
11. Bake one sheet at a time in the preheated oven for 8-10 minutes, until the edges are just set and lightly golden.
12. Tip: Rotate the baking sheet halfway through baking for even browning.
13. Let the cookies cool on the baking sheets for 5 minutes, then transfer them to a wire rack to cool completely, about 30 minutes.
14. In a small bowl, whisk together 2 cups powdered sugar, 3 tbsp milk, and 1/2 tsp vanilla extract until smooth to make the frosting.
15. Spread or pipe the frosting onto the cooled cookies, and allow it to set for at least 1 hour before serving.
They emerge from the oven with a delicate crispness at the edges that gives way to a soft, cake-like center, the vanilla scent mingling with the subtle sweetness of the pink frosting. Try stacking them in a jar with layers of parchment paper for a charming gift, or serve them alongside a pot of herbal tea to highlight their gentle flavor on a quiet afternoon.
Baby Chick Lemon Cookies

Perhaps there’s something quietly magical about a cookie that looks like a tiny chick, especially on a day like today. The soft lemon scent fills the kitchen slowly, a gentle reminder of simple, joyful baking. It’s a sweet little project, perfect for when you want to create something whimsical with your hands.
Serving: 24 cookies | Pre Time: 20 minutes | Cooking Time: 10 minutes
Ingredients
– 2 cups all-purpose flour
– 1/2 tsp baking powder
– 1/4 tsp salt
– 3/4 cup unsalted butter, softened to 68°F
– 3/4 cup granulated sugar
– 1 large egg
– 1 tbsp lemon zest
– 2 tbsp fresh lemon juice
– 1/2 tsp vanilla extract
– 24 mini candy eyes
– 24 orange candy-coated sunflower seeds
Instructions
1. Preheat your oven to 350°F and line two baking sheets with parchment paper.
2. In a medium bowl, whisk together 2 cups all-purpose flour, 1/2 tsp baking powder, and 1/4 tsp salt until fully combined.
3. In a large bowl, use an electric mixer on medium speed to cream 3/4 cup softened unsalted butter and 3/4 cup granulated sugar for 3 minutes, until light and fluffy. Tip: Scrape down the bowl sides halfway through to ensure even mixing.
4. Beat in 1 large egg until just incorporated, about 30 seconds.
5. Mix in 1 tbsp lemon zest, 2 tbsp fresh lemon juice, and 1/2 tsp vanilla extract on low speed until blended.
6. Gradually add the flour mixture to the wet ingredients, mixing on low until a soft dough forms and no dry streaks remain.
7. Scoop dough into 1-tbsp portions, roll into balls, and place 2 inches apart on the prepared sheets. Tip: Chill the dough for 10 minutes if it feels too sticky to handle easily.
8. Bake one sheet at a time for 9–11 minutes, until the edges are lightly golden. Tip: Rotate the sheet halfway through baking for even browning.
9. Let cookies cool on the sheet for 5 minutes, then transfer to a wire rack to cool completely, about 20 minutes.
10. Once cooled, attach 2 mini candy eyes and 1 orange candy-coated sunflower seed as a beak to each cookie using a dab of frosting or melted chocolate as adhesive.
Here, the cookies emerge tender and cake-like, with a bright citrus zing that’s not overpowering. Their cheerful faces seem to wink back from the plate, inviting you to share them over a cozy afternoon tea or tuck them into a spring picnic basket for a sweet surprise.
Star-Shaped Galaxy Cookies

As the afternoon light fades on this quiet December day, I find myself drawn to the kitchen, to the simple alchemy of flour and sugar and the quiet hope that something sweet and celestial might emerge from the oven.
Serving: 24 cookies | Pre Time: 25 minutes | Cooking Time: 10 minutes
Ingredients
– 2 cups all-purpose flour
– 1/2 teaspoon baking powder
– 1/4 teaspoon salt
– 3/4 cup unsalted butter, softened to 68°F
– 3/4 cup granulated sugar
– 1 large egg
– 1 teaspoon vanilla extract
– 1/2 cup purple sanding sugar
– 1/2 cup blue sanding sugar
Instructions
1. Preheat your oven to 350°F and line two baking sheets with parchment paper.
2. In a medium bowl, whisk together the 2 cups of all-purpose flour, 1/2 teaspoon of baking powder, and 1/4 teaspoon of salt until fully combined.
3. In a separate large bowl, use an electric mixer on medium speed to cream the 3/4 cup of softened unsalted butter and 3/4 cup of granulated sugar together for 3 minutes, until the mixture is pale and fluffy.
4. Beat in the 1 large egg and 1 teaspoon of vanilla extract until just incorporated, about 30 seconds.
5. Gradually add the dry flour mixture to the wet butter mixture, mixing on low speed until a soft dough forms and no dry streaks remain.
6. Divide the dough into two equal portions. Roll each portion into a log approximately 1.5 inches in diameter.
7. Pour the 1/2 cup of purple sanding sugar onto one plate and the 1/2 cup of blue sanding sugar onto another.
8. Roll one dough log in the purple sugar until fully coated, then roll the second log in the blue sugar. Tip: For the best sparkle, roll the logs while the dough is still slightly tacky.
9. Wrap each coated log tightly in plastic wrap and chill in the refrigerator for 1 hour to firm up, which prevents spreading during baking.
10. Remove one log from the refrigerator and use a sharp knife to slice it into 1/2-inch thick rounds. Tip: Wiping your knife clean between slices helps maintain clean, defined edges.
11. Arrange the slices 2 inches apart on the prepared baking sheets, as they will spread slightly.
12. Bake one sheet at a time in the preheated 350°F oven for 9 to 11 minutes. The cookies are done when the edges are set and just beginning to turn a light golden brown, while the centers still look soft. Tip: For even baking, rotate the sheet halfway through the cooking time.
13. Let the cookies cool on the baking sheet for 5 minutes before transferring them to a wire rack to cool completely.
Momentarily, the kitchen fills with the warm scent of vanilla and butter, giving way to cookies that are crisp at the very edge yet tender in the center. The coarse sanding sugar provides a delightful, glittery crunch that contrasts with the soft crumb, while the vanilla offers a comforting, familiar sweetness against the visual spectacle of purple and blue galaxies. Serve them stacked on a dark plate to make the colors pop, or pair a blue and a purple cookie together for a miniature cosmic display.
Bunny Tail Coconut Cookies
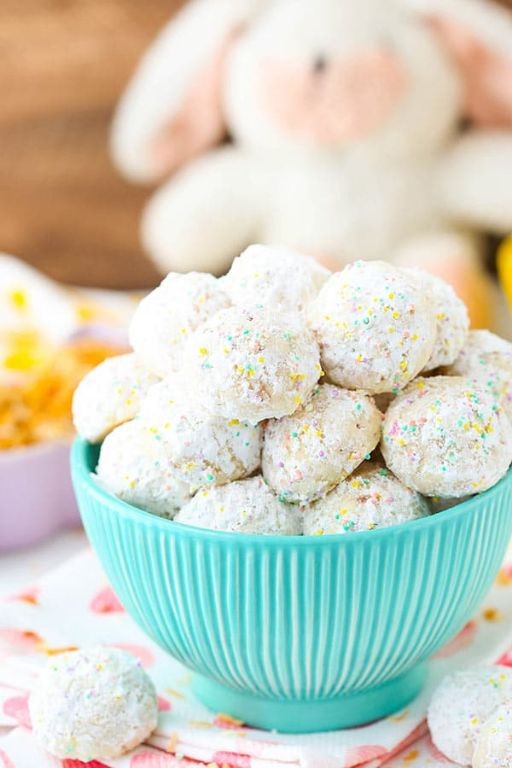
Zigzagging through holiday memories, I find myself craving something sweet yet simple—a cookie that whispers of childhood wonder and tropical escapes. Bunny Tail Coconut Cookies are just that: delicate, coconut-kissed treats shaped like fluffy rabbit tails, perfect for quiet moments with tea or festive gatherings where joy needs no explanation. They come together with gentle hands and a patient heart, turning basic pantry staples into edible magic.
Serving: 24 cookies | Pre Time: 20 minutes | Cooking Time: 12 minutes
Ingredients
– 1 cup unsalted butter, softened to room temperature
– ¾ cup granulated sugar
– 1 large egg
– 1 teaspoon vanilla extract
– 2 ¼ cups all-purpose flour
– ½ teaspoon baking powder
– ¼ teaspoon salt
– 1 ½ cups sweetened shredded coconut
– ¼ cup powdered sugar for rolling
Instructions
1. Preheat your oven to 350°F and line two baking sheets with parchment paper.
2. In a large mixing bowl, cream the softened butter and granulated sugar together on medium speed for 3 minutes until light and fluffy—this incorporates air for a tender cookie.
3. Add the egg and vanilla extract to the butter mixture, beating on low speed just until combined, about 30 seconds.
4. In a separate bowl, whisk together the flour, baking powder, and salt to ensure even distribution.
5. Gradually add the dry ingredients to the wet mixture, mixing on low speed until a soft dough forms, which should take about 2 minutes.
6. Fold in the shredded coconut with a spatula until evenly distributed throughout the dough.
7. Scoop tablespoon-sized portions of dough and roll them into smooth balls between your palms.
8. Roll each ball in powdered sugar to coat lightly, tapping off any excess—this creates a crackled, snowy finish after baking.
9. Place the coated balls 2 inches apart on the prepared baking sheets to allow for spreading.
10. Bake one sheet at a time in the preheated oven for 10–12 minutes, until the edges are just golden but the centers remain soft; rotate the sheet halfway through for even browning.
11. Let the cookies cool on the baking sheet for 5 minutes before transferring them to a wire rack to cool completely, as they firm up as they set.
Delicate and crumbly, these cookies offer a subtle coconut flavor with a melt-in-your-mouth texture from the powdered sugar coating. Serve them stacked on a vintage plate with a sprinkle of extra coconut for whimsy, or pair with a citrus glaze to balance their sweetness—they’re as versatile as they are charming.
Beehive Honey Cookies
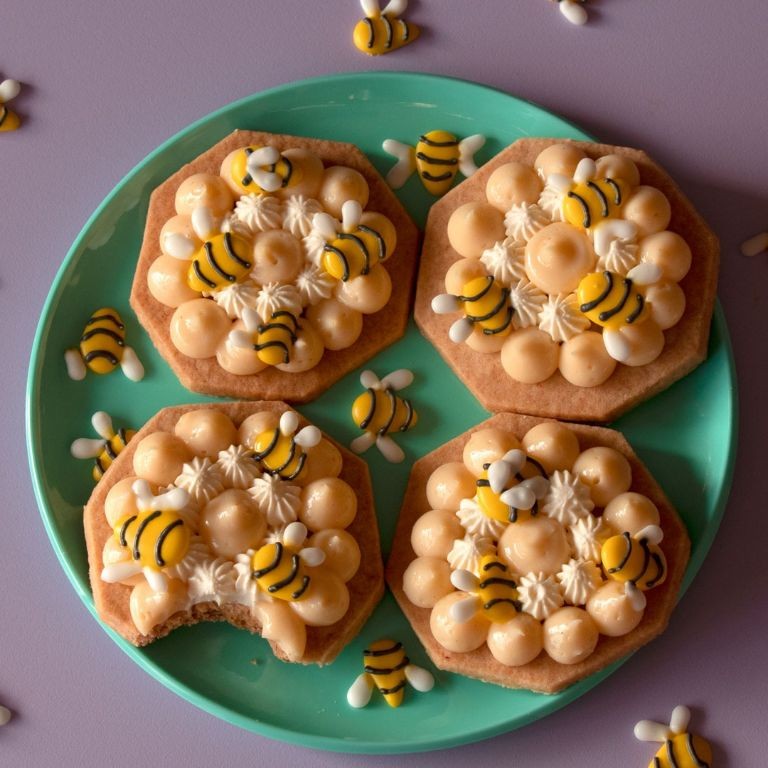
Drifting through the kitchen on a quiet afternoon, I find myself drawn to the warm, golden glow of honey—a simple ingredient that holds the memory of summer sun and buzzing fields. These beehive honey cookies are my gentle answer to the holiday rush, a soft pause shaped by hand and heart, where each swirl feels like a whispered secret from the hive.
Serving: 24 | Pre Time: 20 minutes | Cooking Time: 12 minutes
Ingredients
– 2 cups all-purpose flour
– 1/2 cup unsalted butter, softened to room temperature
– 1/2 cup granulated sugar
– 1/4 cup honey
– 1 large egg
– 1 tsp vanilla extract
– 1/2 tsp baking soda
– 1/4 tsp salt
Instructions
1. Preheat your oven to 350°F and line two baking sheets with parchment paper.
2. In a medium bowl, whisk together the all-purpose flour, baking soda, and salt until fully combined.
3. In a separate large bowl, use an electric mixer on medium speed to cream the softened unsalted butter and granulated sugar for 3 minutes, until light and fluffy—this incorporates air for a tender cookie.
4. Add the honey, large egg, and vanilla extract to the butter mixture, and beat on low speed for 1 minute until smooth and uniform.
5. Gradually add the flour mixture to the wet ingredients, mixing on low speed just until no dry streaks remain, being careful not to overmix to avoid tough cookies.
6. Scoop 1-tablespoon portions of dough and roll them into balls, then place them 2 inches apart on the prepared baking sheets.
7. Use a fork to gently press each ball into a 1/2-inch thick disk, creating a crosshatch pattern on top for a classic look.
8. Bake one sheet at a time in the preheated oven for 10–12 minutes, until the edges turn a light golden brown and the centers are set.
9. Let the cookies cool on the baking sheet for 5 minutes to firm up, then transfer them to a wire rack to cool completely—this prevents breakage.
10. Store the cooled cookies in an airtight container at room temperature for up to 5 days.
Warm from the oven, these cookies offer a delicate crunch at the edges that gives way to a soft, chewy center, infused with the floral sweetness of honey. Serve them alongside a cup of spiced tea or crumbled over vanilla ice cream for a simple, comforting treat that feels like a hug in every bite.
Ladybug Red Velvet Cookies
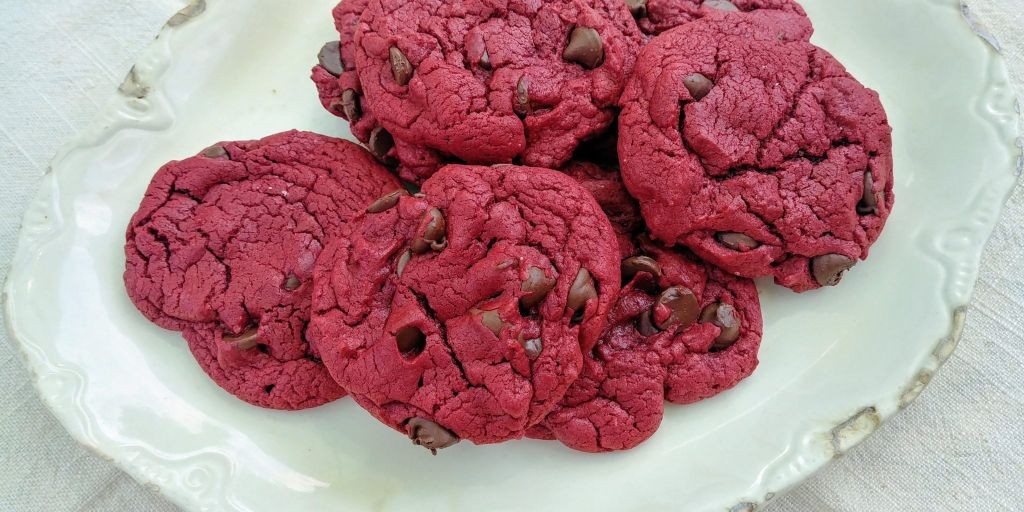
Beneath the soft glow of holiday lights, there’s a quiet comfort in turning simple ingredients into something whimsical—like these charming red velvet cookies, dotted with sweet spots to resemble little ladybugs. They’re a gentle nod to festive cheer, perfect for a cozy afternoon of baking when the world outside feels still. Let’s gather our bowls and begin.
Serving: 24 cookies | Pre Time: 20 minutes | Cooking Time: 10 minutes
Ingredients
– 1 cup unsalted butter, softened
– 1 cup granulated sugar
– 1 large egg
– 1 tsp vanilla extract
– 2 1/4 cups all-purpose flour
– 1/4 cup unsweetened cocoa powder
– 1 tsp baking soda
– 1/2 tsp salt
– 1 tbsp red food coloring
– 1/2 cup white chocolate chips
– 1/4 cup semisweet chocolate chips
Instructions
1. Preheat your oven to 350°F and line two baking sheets with parchment paper.
2. In a large mixing bowl, cream together 1 cup softened unsalted butter and 1 cup granulated sugar until light and fluffy, about 2-3 minutes with an electric mixer on medium speed.
3. Add 1 large egg and 1 tsp vanilla extract to the butter mixture, beating until fully incorporated.
4. In a separate bowl, whisk together 2 1/4 cups all-purpose flour, 1/4 cup unsweetened cocoa powder, 1 tsp baking soda, and 1/2 tsp salt until evenly combined.
5. Gradually add the dry ingredients to the wet mixture, mixing on low speed just until a dough forms, being careful not to overmix to keep the cookies tender.
6. Stir in 1 tbsp red food coloring until the dough is uniformly vibrant red, then fold in 1/2 cup white chocolate chips and 1/4 cup semisweet chocolate chips.
7. Scoop tablespoon-sized portions of dough, roll them into balls, and place them 2 inches apart on the prepared baking sheets, gently flattening each slightly with your palm.
8. Bake one sheet at a time in the preheated oven for 8-10 minutes, or until the edges are set but the centers are still soft—they’ll firm up as they cool.
9. Remove the cookies from the oven and let them cool on the baking sheet for 5 minutes before transferring to a wire rack to cool completely, which prevents breakage.
10. Once cooled, store the cookies in an airtight container at room temperature for up to 5 days.
Often, these cookies emerge with a soft, cake-like crumb that melts gently, the cocoa lending a subtle depth against the sweet bursts of chocolate chips. Their vivid red hue, speckled with white and dark chips, makes them a playful centerpiece for holiday gatherings or a simple treat with a cup of tea, evoking a sense of whimsy in every bite.
Pumpkin Patch Spice Cookies
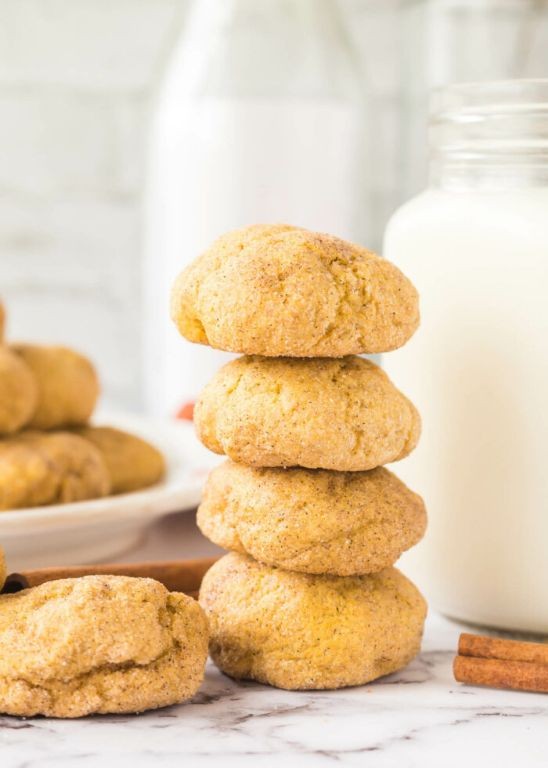
Sometimes, the quietest afternoons call for the simplest comforts, and these pumpkin patch spice cookies are just that—a warm, spiced embrace in cookie form, perfect for savoring slowly with a cup of tea as the light fades. They capture the essence of autumn in every soft, fragrant bite, a gentle reminder of cozy moments and harvest joys.
Serving: 24 | Pre Time: 15 minutes | Cooking Time: 10 minutes
Ingredients
– 2 1/4 cups all-purpose flour
– 1 teaspoon baking soda
– 1/2 teaspoon salt
– 1 teaspoon ground cinnamon
– 1/2 teaspoon ground nutmeg
– 1/4 teaspoon ground cloves
– 1 cup unsalted butter, softened to room temperature
– 3/4 cup granulated sugar
– 3/4 cup packed brown sugar
– 1 large egg
– 1 teaspoon vanilla extract
– 1 cup canned pumpkin puree
Instructions
1. Preheat your oven to 350°F and line two baking sheets with parchment paper.
2. In a medium bowl, whisk together the all-purpose flour, baking soda, salt, ground cinnamon, ground nutmeg, and ground cloves until fully combined.
3. In a large bowl, use an electric mixer on medium speed to cream the softened unsalted butter, granulated sugar, and packed brown sugar together for 2-3 minutes until light and fluffy.
4. Add the large egg and vanilla extract to the butter mixture, mixing on low speed just until incorporated.
5. Gently fold in the canned pumpkin puree with a spatula until the mixture is smooth and evenly blended.
6. Gradually add the dry flour mixture to the wet ingredients, mixing on low speed until a soft dough forms, being careful not to overmix to keep the cookies tender.
7. Drop rounded tablespoons of dough onto the prepared baking sheets, spacing them about 2 inches apart to allow for spreading.
8. Bake in the preheated oven for 10-12 minutes, or until the edges are lightly golden and the centers are set but still soft.
9. Let the cookies cool on the baking sheets for 5 minutes before transferring them to a wire rack to cool completely, as this helps them firm up without becoming too crisp.
Melt-in-your-mouth soft with a hint of spice, these cookies offer a subtly sweet, earthy flavor from the pumpkin, balanced by warm cinnamon and nutmeg. For a festive touch, try serving them slightly warm with a dollop of whipped cream or drizzled with a simple maple glaze to enhance their autumnal charm.
Snowman Frosted Cookies

Venturing into the quiet kitchen on this winter afternoon, the simple act of baking becomes a gentle meditation. There’s a particular comfort in shaping and frosting these cookies, a quiet ritual that mirrors the soft stillness outside the window.
Serving: 24 cookies | Pre Time: 30 minutes | Cooking Time: 10 minutes
Ingredients
– 3 cups all-purpose flour
– 1 cup unsalted butter, softened to 68°F
– 1 cup granulated sugar
– 1 large egg
– 2 tsp vanilla extract
– 1/2 tsp salt
– 4 cups powdered sugar
– 1/3 cup whole milk
– 1 tsp almond extract
– Black and orange gel food coloring
Instructions
1. In a large bowl, use an electric mixer on medium speed to cream 1 cup softened butter and 1 cup granulated sugar together for exactly 3 minutes, until light and fluffy—this creates a tender cookie base.
2. Beat in 1 large egg and 2 tsp vanilla extract until fully incorporated, about 1 minute.
3. In a separate bowl, whisk together 3 cups all-purpose flour and 1/2 tsp salt.
4. Gradually add the flour mixture to the butter mixture, mixing on low speed just until a soft dough forms and no dry streaks remain; avoid overmixing to prevent toughness.
5. Divide the dough in half, shape each half into a disk, wrap tightly in plastic wrap, and refrigerate for at least 2 hours until firm.
6. Preheat your oven to 350°F and line two baking sheets with parchment paper.
7. On a lightly floured surface, roll one dough disk to a consistent 1/4-inch thickness.
8. Use a 3-inch round cookie cutter to cut out circles, re-rolling scraps once; space them 2 inches apart on the prepared sheets.
9. Bake one sheet at a time in the center rack for 9–11 minutes, until the edges are just set and very lightly golden—the centers should remain pale for a soft texture.
10. Let cookies cool on the baking sheet for 5 minutes, then transfer to a wire rack to cool completely, about 1 hour.
11. For the frosting, sift 4 cups powdered sugar into a medium bowl to eliminate lumps.
12. Whisk in 1/3 cup whole milk and 1 tsp almond extract until smooth and thick enough to coat a spoon; if too thin, add more powdered sugar 1 tbsp at a time.
13. Reserve 1/2 cup of plain frosting in a small bowl for assembling.
14. Divide the remaining frosting: tint most with black gel food coloring and a small portion with orange, using a toothpick to add color gradually for control.
15. Spread a thin layer of reserved plain frosting on a cookie to act as edible glue, then immediately top with a second cookie, pressing gently to adhere.
16. Frost the stacked cookie entirely with black frosting, using an offset spatula for smooth coverage.
17. Use a piping bag fitted with a small round tip to pipe black dots for eyes and buttons, and orange dots for a carrot nose before the frosting sets.
18. Let frosted cookies sit undisturbed for 2 hours until the frosting is firm to the touch.
Ethereal in their simplicity, these cookies offer a delicate, buttery crumb that melts against the sweet, almond-kissed frosting. Their whimsical snowman shapes invite playful arrangements on a platter dusted with powdered sugar ‘snow,’ turning a quiet bake into a shared moment of winter joy.
Cactus-Shaped Lime Cookies
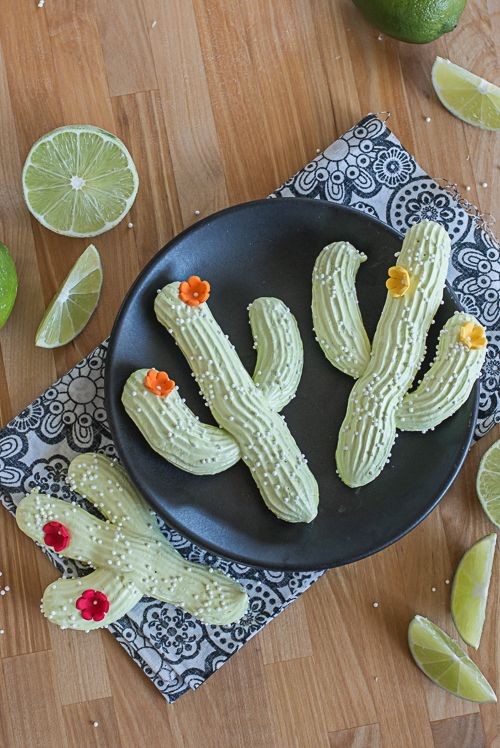
Zigzagging through holiday baking traditions, I found myself craving something that felt both whimsical and grounded—a treat that could capture the quiet magic of the season without overwhelming sweetness. These cactus-shaped lime cookies emerged from that gentle longing, their bright citrus notes and playful form offering a moment of calm, edible artistry. They’re a simple, tender project for a reflective afternoon, where the rhythm of shaping and baking becomes its own kind of meditation.
Serving: 24 | Pre Time: 25 minutes | Cooking Time: 12 minutes
Ingredients
– 2 cups all-purpose flour
– 1/2 cup granulated sugar
– 1/2 cup unsalted butter, softened to 68°F
– 1 large egg
– 2 tablespoons fresh lime juice
– 1 tablespoon lime zest
– 1/2 teaspoon baking powder
– 1/4 teaspoon salt
– 1/4 cup green sanding sugar
– 24 mini candy eyes
Instructions
1. In a medium bowl, whisk together 2 cups all-purpose flour, 1/2 teaspoon baking powder, and 1/4 teaspoon salt until fully combined.
2. In a large mixing bowl, use an electric mixer on medium speed to cream 1/2 cup softened unsalted butter and 1/2 cup granulated sugar for 3 minutes, until light and fluffy.
3. Add 1 large egg to the butter mixture and beat on low speed for 30 seconds until just incorporated.
4. Mix in 2 tablespoons fresh lime juice and 1 tablespoon lime zest with a spatula until evenly distributed.
5. Gradually add the dry ingredients to the wet mixture, folding gently with the spatula until a cohesive dough forms—avoid overmixing to keep the cookies tender.
6. Cover the dough with plastic wrap and refrigerate it for 20 minutes to firm up slightly, which makes shaping easier.
7. Preheat your oven to 350°F and line two baking sheets with parchment paper.
8. Scoop 1-tablespoon portions of dough and roll each into a small oval shape between your palms.
9. Use a toothpick to gently press indentations into each oval in a crosshatch pattern, mimicking cactus ridges, without cutting through the dough.
10. Roll each shaped cookie in 1/4 cup green sanding sugar to coat lightly, tapping off any excess for even coverage.
11. Place the cookies 2 inches apart on the prepared baking sheets and press 1 mini candy eye onto each near the top for a playful touch.
12. Bake one sheet at a time in the preheated oven for 10–12 minutes, until the edges are just set but the centers remain soft—rotate the sheet halfway through for even browning.
13. Let the cookies cool on the baking sheet for 5 minutes before transferring them to a wire rack to cool completely, as they firm up as they cool.
Kneaded with care, these cookies bake into a delicate, crumbly texture that melts softly with each bite, their lime zest offering a bright, tangy contrast to the buttery base. Serve them arranged on a platter like a desert garden, or pair them with a cup of herbal tea for a soothing, festive treat that feels both nostalgic and fresh.
Rainbow Cloud Meringue Cookies

Evenings like this, when the light fades softly and the world quiets, I find myself drawn to the kitchen to create something delicate and whimsical—a treat that feels like capturing a bit of magic in a bite. These airy cookies, with their gentle swirls of color, are a simple joy to make, requiring little more than patience and a light touch as they transform in the oven. They remind me of quiet moments spent dreaming, where sweetness meets serenity in the most unexpected ways.
Serving: 24 | Pre Time: 20 minutes | Cooking Time: 90 minutes
Ingredients
– 4 large egg whites
– 1 cup granulated sugar
– 1/4 tsp cream of tartar
– 1/2 tsp vanilla extract
– Food coloring (assorted colors)
Instructions
1. Preheat your oven to 200°F and line two baking sheets with parchment paper.
2. In a large, clean bowl, add the egg whites and cream of tartar, then beat with an electric mixer on medium speed until foamy, about 2 minutes.
3. Gradually add the granulated sugar, 1 tablespoon at a time, while beating on high speed until stiff, glossy peaks form, which should take 8–10 minutes; for best results, ensure the bowl and beaters are completely grease-free to help the meringue hold its shape.
4. Gently fold in the vanilla extract until just combined.
5. Divide the meringue evenly into small bowls, then tint each portion with a different food coloring until vibrant.
6. Spoon or pipe dollops of the colored meringue onto the prepared baking sheets, spacing them 1 inch apart and swirling the colors together slightly for a marbled effect; work quickly to prevent the meringue from deflating, as it can lose volume if left out too long.
7. Bake in the preheated oven for 90 minutes, then turn off the oven and let the cookies cool inside for 1 hour without opening the door to avoid cracking from sudden temperature changes.
8. Once completely cool, carefully remove the cookies from the parchment paper and store in an airtight container.
Whisper-light and crisp, these cookies dissolve on the tongue with a subtle vanilla sweetness, their pastel hues evoking a dreamy, cloud-like quality. Serve them stacked in a glass jar as a charming centerpiece or crumbled over ice cream for a playful, textural contrast that delights both the eyes and palate.
Summary
Absolutely delightful! This collection of 18 adorable cookie recipes proves that cute and delicious go hand-in-hand. Whether you’re baking for a special occasion or just a sweet treat, there’s something here for every home cook. We’d love to hear which recipes you try—leave a comment with your favorites and don’t forget to share this roundup on Pinterest to spread the baking joy!


