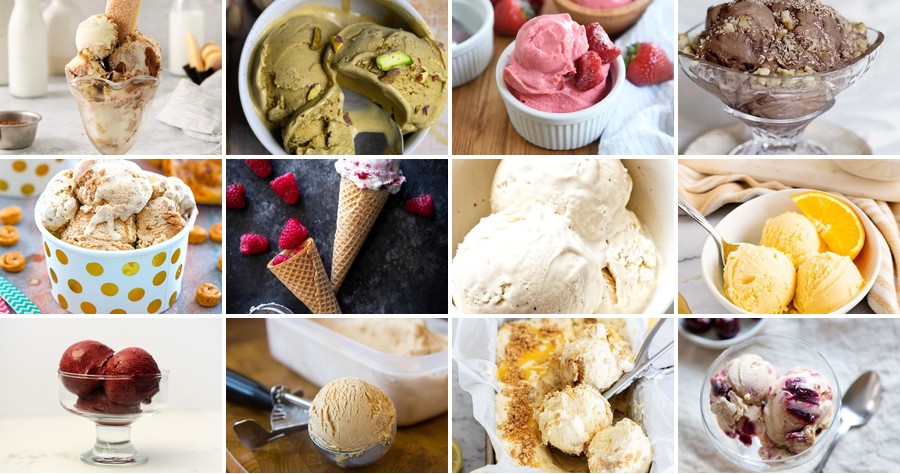
Kicking off a sweet journey without the sugar spike! For those managing diabetes or simply cutting back on sugar, ice cream doesn’t have to be off the menu. We’ve rounded up 18 delicious, sugar-free recipes that let you indulge in creamy, dreamy treats guilt-free. From classic vanilla to inventive flavors, get ready to scoop up some joy—your taste buds (and health) will thank you!
Vanilla Almond Milk Ice Cream

Only a few things beat homemade ice cream on a hot day, and this vanilla almond milk version is a dreamy dairy-free treat you can whip up with minimal fuss. It’s creamy, subtly sweet, and perfect for anyone looking for a lighter frozen dessert.
Serving: 6 | Pre Time: 15 minutes | Cooking Time: 0 minutes
Ingredients
– 2 cups unsweetened almond milk
– 1 cup granulated sugar
– 1 tablespoon pure vanilla extract
– 1/4 teaspoon fine sea salt
– 1/2 cup raw almond butter, stirred to emulsify
– 1/4 cup light agave nectar
Instructions
1. In a medium mixing bowl, combine 2 cups of unsweetened almond milk and 1 cup of granulated sugar, whisking vigorously for 2 minutes until the sugar is fully dissolved and the mixture is smooth.
2. Add 1 tablespoon of pure vanilla extract and 1/4 teaspoon of fine sea salt to the bowl, stirring gently to incorporate evenly.
3. Measure 1/2 cup of raw almond butter that has been stirred to emulsify, then slowly drizzle it into the mixture while whisking continuously to prevent clumping and ensure a uniform consistency.
4. Pour in 1/4 cup of light agave nectar, whisking for an additional 1 minute until all ingredients are fully blended and the base is silky.
5. Transfer the mixture to an ice cream maker and churn according to the manufacturer’s instructions, typically for 20–25 minutes, until it reaches a soft-serve texture. Tip: For best results, chill the mixture in the refrigerator for at least 2 hours before churning to enhance creaminess.
6. Once churned, scrape the ice cream into a freezer-safe container, smoothing the top with a spatula. Tip: Press a piece of parchment paper directly onto the surface before sealing to minimize ice crystal formation.
7. Cover the container tightly and freeze for at least 4 hours, or until firm enough to scoop. Tip: Let the ice cream sit at room temperature for 5–10 minutes before serving to soften slightly for easier scooping.
8. Serve the ice cream in chilled bowls or cones as desired.
You’ll love the velvety texture and rich vanilla aroma that shines through in every spoonful. Try topping it with toasted almond slivers or a drizzle of dark chocolate for an extra indulgent twist.
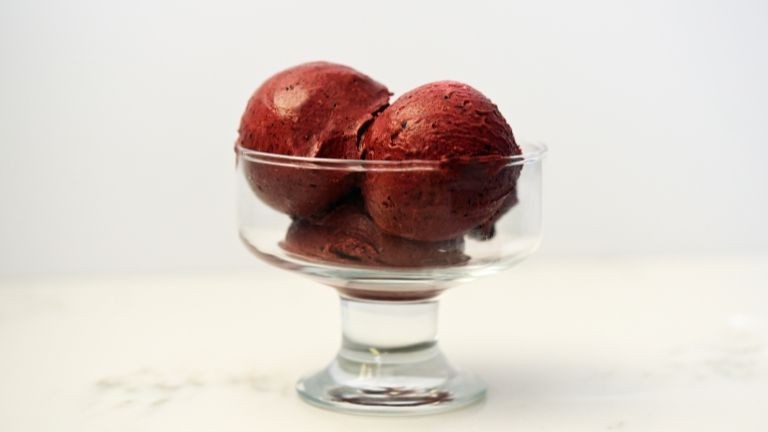
Chocolate Avocado Ice Cream
Just when you thought avocados couldn’t get any more versatile, here’s a creamy, dreamy dessert that’ll change your mind. You’re going to love how simple this is to whip up, and the rich chocolate flavor is absolutely divine.
Serving: 6 | Pre Time: 15 minutes | Cooking Time: 0 minutes
Ingredients
- 2 large, ripe Hass avocados, pitted and scooped
- 1 cup full-fat coconut milk, chilled
- 3/4 cup high-quality Dutch-process cocoa powder
- 1/2 cup pure maple syrup
- 1 tsp pure vanilla extract
- 1/4 tsp fine sea salt
Instructions
- Place the scooped avocado flesh into the bowl of a high-powered blender.
- Add the chilled coconut milk, Dutch-process cocoa powder, pure maple syrup, pure vanilla extract, and fine sea salt to the blender.
- Secure the lid and blend on high speed for 60-90 seconds, scraping down the sides once halfway through, until the mixture is completely smooth and silky. Tip: For the creamiest texture, ensure all ingredients are cold before blending.
- Pour the blended mixture into a 9×5-inch loaf pan or a shallow freezer-safe container.
- Cover the container tightly with plastic wrap, pressing it directly onto the surface of the mixture to prevent ice crystals from forming.
- Place the covered container in the freezer for a minimum of 6 hours, or until completely firm. Tip: Freezing overnight yields the best, scoopable consistency.
- Remove the ice cream from the freezer 10-15 minutes before serving to allow it to soften slightly for easy scooping.
- Use a warmed ice cream scoop to portion the ice cream into bowls. Tip: Running your scoop under hot water for a few seconds prevents sticking.
This ice cream sets up with an incredibly dense, fudgy texture that’s reminiscent of gelato. The avocado provides a luxurious mouthfeel without any hint of its flavor, letting the deep, bittersweet chocolate shine through. Try serving it with a sprinkle of flaky sea salt or a drizzle of raspberry coulis for a stunning dessert.
Strawberry Greek Yogurt Ice Cream

Craving something cool and creamy without the guilt? This strawberry Greek yogurt ice cream is your answer. You get that rich, frozen treat satisfaction with a protein-packed twist that feels indulgent yet light.
Serving: 6 | Pre Time: 15 minutes | Cooking Time: 0 minutes
Ingredients
– 2 cups fresh strawberries, hulled and quartered
– 1/3 cup granulated sugar
– 2 tablespoons freshly squeezed lemon juice
– 3 cups full-fat plain Greek yogurt
– 1/2 cup heavy cream
– 1 teaspoon pure vanilla extract
– 1/4 teaspoon fine sea salt
Instructions
1. Combine 2 cups of quartered strawberries, 1/3 cup granulated sugar, and 2 tablespoons of lemon juice in a medium saucepan.
2. Cook the mixture over medium heat for 8-10 minutes, stirring frequently, until the strawberries break down and the liquid thickens slightly into a syrup. (Tip: A wooden spoon dragged across the bottom should leave a clean path for a second before the syrup fills it in.)
3. Remove the saucepan from the heat and let the strawberry compote cool completely to room temperature, about 30 minutes.
4. In a large mixing bowl, whisk together 3 cups of Greek yogurt, 1/2 cup heavy cream, 1 teaspoon vanilla extract, and 1/4 teaspoon fine sea salt until perfectly smooth.
5. Fold the completely cooled strawberry compote into the yogurt base until just combined, leaving some visible streaks for a marbled effect. (Tip: Avoid overmixing to prevent the compote from fully blending and turning the base pink.)
6. Pour the mixture into the bowl of your ice cream maker and churn according to the manufacturer’s instructions, typically for 20-25 minutes, until it reaches a soft-serve consistency.
7. Transfer the churned ice cream to a freezer-safe container. (Tip: Press a piece of parchment paper directly onto the surface before sealing to prevent ice crystals from forming.)
8. Freeze the container for at least 4 hours, or until the ice cream is firm enough to scoop.
Velvety and rich with a bright, tangy berry swirl, this ice cream has a beautifully dense yet scoopable texture. Serve it in a waffle cone for classic appeal, or layer it with crumbled graham crackers for a deconstructed cheesecake vibe.
Peanut Butter Banana Ice Cream
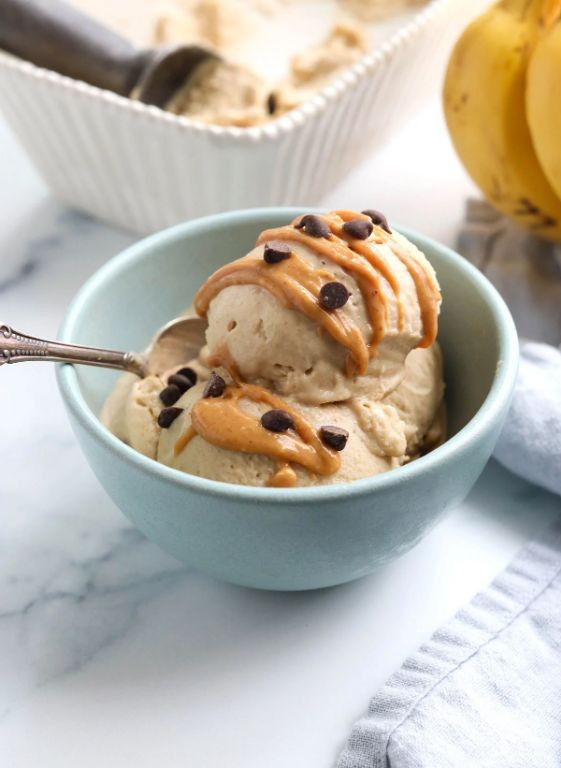
Nostalgic for that classic peanut butter and banana combo? You’re in luck. This no-churn ice cream brings those beloved flavors together in a creamy, dreamy frozen treat that’s surprisingly simple to make at home.
Serving: 6 | Pre Time: 15 minutes | Cooking Time: 0 minutes
Ingredients
– 4 large, very ripe bananas, peeled and sliced
– ½ cup creamy, natural peanut butter
– ¼ cup pure maple syrup
– 1 teaspoon pure vanilla extract
– ¼ teaspoon fine sea salt
– ½ cup heavy whipping cream
Instructions
1. Arrange the sliced bananas in a single layer on a parchment-lined baking sheet.
2. Freeze the bananas solid for a minimum of 4 hours, or preferably overnight, until completely firm.
3. Place the frozen banana slices into the bowl of a high-powered food processor.
4. Process the bananas on high speed for 1-2 minutes, stopping to scrape down the sides with a spatula, until they form a crumbly, coarse paste.
5. Add the creamy peanut butter, pure maple syrup, pure vanilla extract, and fine sea salt to the food processor bowl.
6. Process the mixture on high speed for 3-4 minutes, scraping down the sides every minute, until it is completely smooth, creamy, and has the consistency of soft-serve ice cream. (Tip: For the smoothest texture, ensure your bananas are fully frozen and use a powerful processor.)
7. In a separate, chilled metal bowl, pour the heavy whipping cream.
8. Using a hand mixer or a whisk, whip the cream on medium-high speed until it forms stiff peaks, about 2-3 minutes.
9. Gently fold the whipped cream into the banana-peanut butter mixture using a rubber spatula until just combined and no white streaks remain. (Tip: Folding gently preserves the air in the whipped cream, resulting in a lighter final texture.)
10. Transfer the ice cream base to a 9×5-inch loaf pan or a freezer-safe container.
11. Smooth the top with the spatula, then press a piece of parchment paper directly onto the surface of the ice cream.
12. Freeze the ice cream, covered, for at least 6 hours, or until firm enough to scoop. (Tip: For easier scooping, let the ice cream sit at room temperature for 5-10 minutes before serving.)
Oozing with rich peanut butter flavor and the natural sweetness of banana, this ice cream is luxuriously creamy without a hint of iciness. Serve it in a waffle cone for a classic treat, or crumble some dark chocolate on top for a delightful textural contrast.
Coconut Milk Mint Chip Ice Cream
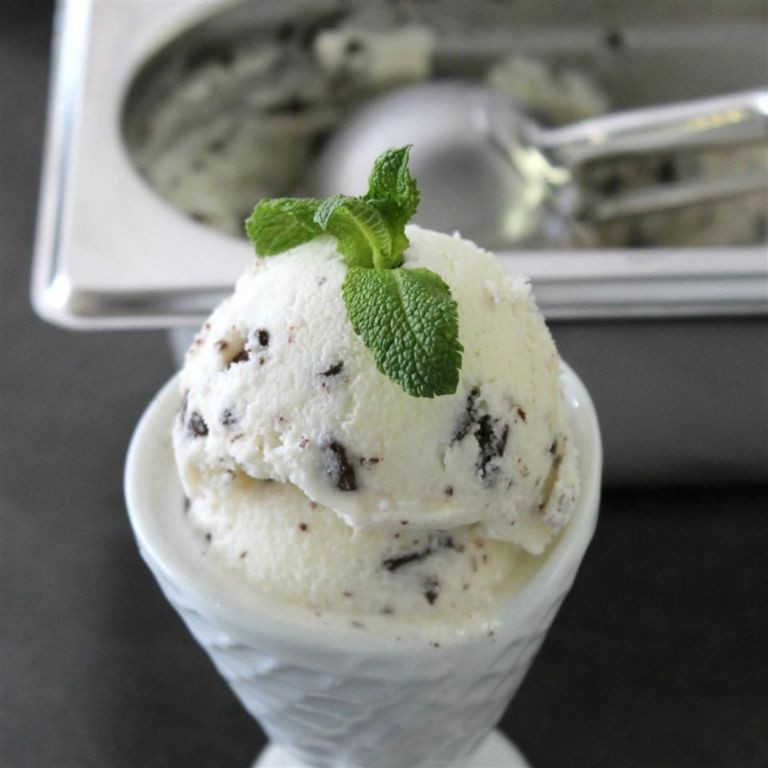
Tired of the same old ice cream flavors? You’ve got to try this creamy, dreamy coconut milk mint chip ice cream. It’s the perfect cool-down treat that feels fancy but is surprisingly simple to whip up.
Serving: 6 | Pre Time: 15 minutes | Cooking Time: 0 minutes
Ingredients
– 2 (13.5-ounce) cans full-fat coconut milk, chilled
– ¾ cup granulated sugar
– 1 teaspoon pure peppermint extract
– ¼ teaspoon fine sea salt
– 8 drops green gel food coloring (optional)
– 4 ounces high-quality dark chocolate (70% cacao), finely chopped
Instructions
1. In a large mixing bowl, whisk together the chilled full-fat coconut milk and granulated sugar until the sugar is completely dissolved, about 2 minutes.
2. Whisk in the pure peppermint extract, fine sea salt, and green gel food coloring (if using) until the mixture is uniformly smooth and tinted.
3. Pour the coconut milk base into the bowl of your ice cream maker and churn according to the manufacturer’s instructions, typically 20-25 minutes, until it reaches a soft-serve consistency. Tip: For the creamiest texture, ensure all ingredients and your ice cream maker bowl are thoroughly chilled before starting.
4. While the ice cream churns, place the finely chopped high-quality dark chocolate in a microwave-safe bowl.
5. Microwave the chocolate in 20-second intervals, stirring vigorously between each, until it is just melted and smooth, about 60 seconds total. Tip: Avoid overheating the chocolate to prevent it from seizing and becoming grainy.
6. Drizzle the melted chocolate in a thin stream into the churning ice cream during the last 2 minutes of churning; the cold ice cream will cause the chocolate to harden and splinter into delicate chips.
7. Transfer the churned ice cream to a freezer-safe container, smoothing the top with a spatula.
8. Press a piece of parchment paper directly onto the surface of the ice cream to prevent ice crystals from forming.
9. Seal the container with a lid and freeze the ice cream until firm, for at least 4 hours or preferably overnight. Tip: For easy scooping, let the ice cream sit at room temperature for 5-10 minutes before serving.
You’ll love the velvety, dairy-free texture that’s rich without being heavy. The pure peppermint flavor is refreshingly cool and perfectly balanced by the bittersweet shards of dark chocolate. Try serving it in a chilled bowl with a sprinkle of flaky sea salt or crumbled chocolate mint cookies for an extra-special dessert.
Pumpkin Spice Ice Cream

Savor the cozy flavors of fall in a frozen treat that’s perfect for any season. You’ll love this creamy, spiced pumpkin ice cream—it’s surprisingly simple to make at home with just a few ingredients. Let’s get churning!
Serving: 6 | Pre Time: 20 minutes | Cooking Time: 10 minutes
Ingredients
– 1 ½ cups heavy cream
– 1 cup whole milk
– ¾ cup granulated sugar
– 1 cup pumpkin puree
– 4 large pasture-raised egg yolks, lightly beaten
– 2 teaspoons pure vanilla extract
– 1 ½ teaspoons pumpkin pie spice
– ¼ teaspoon fine sea salt
Instructions
1. In a medium saucepan over medium heat, combine the heavy cream, whole milk, and granulated sugar, stirring constantly until the sugar dissolves completely, about 3–4 minutes.
2. In a separate bowl, whisk together the pumpkin puree, lightly beaten pasture-raised egg yolks, pure vanilla extract, pumpkin pie spice, and fine sea salt until smooth and fully incorporated.
3. Slowly pour about ½ cup of the warm cream mixture into the pumpkin-egg mixture while whisking vigorously to temper the eggs and prevent curdling.
4. Pour the tempered pumpkin mixture back into the saucepan with the remaining cream, whisking constantly to combine.
5. Cook the mixture over medium-low heat, stirring continuously with a spatula, until it thickens enough to coat the back of a spoon and reaches 170°F on an instant-read thermometer, about 5–7 minutes. Tip: Avoid boiling to ensure a smooth custard base.
6. Immediately strain the custard through a fine-mesh sieve into a clean bowl to remove any cooked egg bits for a silky texture.
7. Cover the bowl with plastic wrap, pressing it directly onto the surface of the custard to prevent a skin from forming, and refrigerate until completely chilled, at least 4 hours or overnight. Tip: Chilling thoroughly improves the ice cream’s creaminess and reduces ice crystal formation.
8. Pour the chilled custard into an ice cream maker and churn according to the manufacturer’s instructions until it reaches a soft-serve consistency, about 20–25 minutes.
9. Transfer the churned ice cream to an airtight container, smooth the top, and freeze until firm, at least 4–6 hours. Tip: For best results, let the ice cream sit at room temperature for 5–10 minutes before scooping to soften slightly.
Gently scoop this ice cream into bowls or cones for a delightful treat. Its velvety texture melts smoothly, with warm pumpkin spice notes that pair beautifully with a drizzle of caramel or crushed gingersnap cookies. Enjoy it as a cozy dessert that brings autumn vibes to any day!
Blueberry Chia Seed Ice Cream
Sometimes you want something creamy and indulgent without the dairy or added sugar. This blueberry chia seed ice cream delivers just that—a vibrant, naturally sweet treat that comes together with minimal effort. You’ll love how the chia seeds create a delightfully creamy texture while adding a nutritional boost.
Serving: 4 | Pre Time: 15 minutes | Cooking Time: 0 minutes
Ingredients
– 2 cups fresh blueberries
– 1 cup unsweetened almond milk
– ¼ cup chia seeds
– 2 tbsp pure maple syrup
– 1 tsp pure vanilla extract
– ¼ tsp fine sea salt
Instructions
1. Rinse 2 cups of fresh blueberries under cool running water and pat them completely dry with a clean kitchen towel.
2. Combine the rinsed blueberries, 1 cup of unsweetened almond milk, ¼ cup of chia seeds, 2 tbsp of pure maple syrup, 1 tsp of pure vanilla extract, and ¼ tsp of fine sea salt in a high-speed blender.
3. Blend the mixture on high speed for 45-60 seconds, until it is completely smooth and uniform, with no visible chia seeds or blueberry skins.
4. Pour the blended mixture into a freezer-safe container with a tight-fitting lid, using a rubber spatula to scrape the blender jar clean.
5. Place the uncovered container in the freezer for 30 minutes to allow the mixture to chill slightly and begin to set.
6. After 30 minutes, remove the container from the freezer and stir the mixture vigorously with a fork for 1 full minute to break up any ice crystals that have formed.
7. Cover the container securely with its lid and return it to the freezer for 4 hours, or until the mixture is completely frozen solid.
8. Remove the container from the freezer 10 minutes before serving to allow the ice cream to soften slightly for easy scooping.
9. Scoop the ice cream into chilled bowls or cones using a sturdy ice cream scoop.
Note the vibrant purple hue and the creamy, scoopable texture that belies its dairy-free nature. The chia seeds provide a subtle, pleasant crunch, while the blueberries offer a burst of sweet-tart flavor. For a creative twist, try layering scoops with fresh berries and a drizzle of almond butter for an elevated sundae.
Lemon Cheesecake Ice Cream
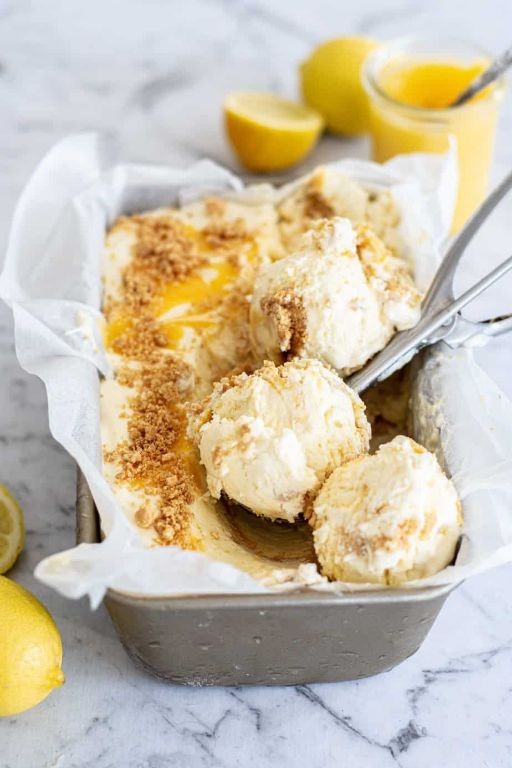
Just when you think cheesecake can’t get any better, it turns into ice cream. This lemon cheesecake ice cream is the ultimate summer dessert—creamy, tangy, and ridiculously refreshing. You’ll want to make a double batch because it disappears fast.
Serving: 8 | Pre Time: 25 minutes | Cooking Time: 0 minutes
Ingredients
– 2 cups heavy cream, cold
– 1 (14-ounce) can sweetened condensed milk
– 8 ounces full-fat cream cheese, at room temperature
– 1/3 cup granulated sugar
– 1/4 cup freshly squeezed lemon juice
– 2 tablespoons finely grated lemon zest
– 1 teaspoon pure vanilla extract
– 1/4 teaspoon fine sea salt
– 6 whole graham crackers, finely crushed
– 2 tablespoons unsalted butter, melted
Instructions
1. Place the bowl of your stand mixer and the whisk attachment in the freezer for 15 minutes to chill thoroughly.
2. In the chilled bowl, pour in the 2 cups of cold heavy cream. Whip on medium-high speed until stiff peaks form, about 3-4 minutes. Tip: The bowl and cream must be very cold for proper whipping.
3. In a separate large bowl, combine the 8 ounces of room-temperature cream cheese and 1/3 cup granulated sugar. Beat with a hand mixer on medium speed until completely smooth and no lumps remain, about 2 minutes.
4. To the cream cheese mixture, add the 1 (14-ounce) can of sweetened condensed milk, 1/4 cup freshly squeezed lemon juice, 2 tablespoons finely grated lemon zest, 1 teaspoon pure vanilla extract, and 1/4 teaspoon fine sea salt. Beat on low speed just until fully incorporated, about 1 minute.
5. Using a large rubber spatula, gently fold the whipped heavy cream into the cream cheese mixture in three additions until no white streaks remain. Tip: Fold gently to maintain the airy volume.
6. In a small bowl, combine the 6 finely crushed whole graham crackers with the 2 tablespoons of melted unsalted butter. Stir until the crumbs are evenly coated and resemble wet sand.
7. Pour half of the ice cream base into a 9×5-inch loaf pan. Sprinkle half of the buttered graham cracker crumbs evenly over the surface.
8. Pour the remaining ice cream base over the crumbs. Top with the remaining buttered graham cracker crumbs, distributing them evenly.
9. Cover the pan tightly with plastic wrap, pressing it directly onto the surface of the ice cream. Freeze for at least 6 hours, or preferably overnight, until firm. Tip: Pressing the plastic wrap directly on the surface prevents ice crystals from forming.
Finally, this no-churn marvel sets into a luxuriously smooth, scoopable texture with the perfect balance of rich cream cheese and bright lemon. The buttery graham cracker crumbs add a delightful crunch in every bite. For a stunning presentation, serve it in chilled martini glasses with an extra sprinkle of zest or a drizzle of raspberry coulis.
Raspberry Swirl Ice Cream
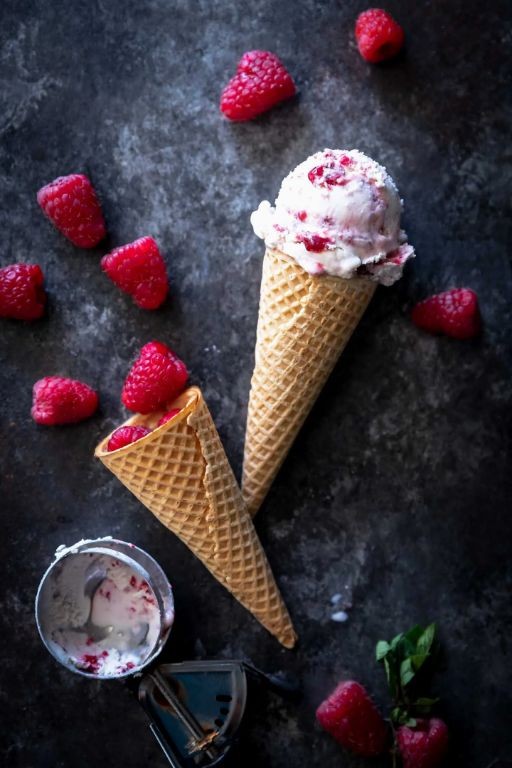
Nothing beats homemade ice cream on a hot day, and this raspberry swirl version is a total game-changer. You get creamy vanilla ice cream swirled with sweet-tart raspberry sauce for a dessert that feels fancy but is surprisingly simple to make. It’s the perfect treat to cool down with friends or family.
Serving: 8 | Pre Time: 30 minutes | Cooking Time: 0 minutes
Ingredients
– 2 cups heavy cream
– 1 cup whole milk
– ¾ cup granulated sugar
– 1 tablespoon pure vanilla extract
– 6 large pasture-raised egg yolks, lightly beaten
– 1 cup fresh raspberries
– ¼ cup water
– 2 tablespoons granulated sugar
– 1 teaspoon fresh lemon juice
Instructions
1. In a medium saucepan over medium heat, combine 2 cups heavy cream, 1 cup whole milk, and ¾ cup granulated sugar, stirring constantly until the sugar dissolves completely, about 3–4 minutes.
2. Temper the egg yolks by slowly pouring ½ cup of the warm cream mixture into 6 large pasture-raised egg yolks, lightly beaten, while whisking vigorously to prevent curdling.
3. Pour the tempered yolk mixture back into the saucepan and cook over low heat, stirring continuously with a wooden spoon, until the custard thickens enough to coat the back of the spoon, about 8–10 minutes; do not let it boil.
4. Remove the custard from heat and stir in 1 tablespoon pure vanilla extract, then strain it through a fine-mesh sieve into a clean bowl to ensure a smooth texture.
5. Cover the custard with plastic wrap pressed directly onto the surface to prevent a skin from forming, and chill in the refrigerator for at least 4 hours or until completely cold.
6. While the custard chills, make the raspberry swirl: in a small saucepan over medium heat, combine 1 cup fresh raspberries, ¼ cup water, and 2 tablespoons granulated sugar, mashing the berries with a fork as they cook.
7. Simmer the raspberry mixture for 5–7 minutes until it thickens into a sauce, then remove from heat and stir in 1 teaspoon fresh lemon juice; let it cool to room temperature.
8. Churn the chilled custard in an ice cream maker according to the manufacturer’s instructions until it reaches a soft-serve consistency, about 20–25 minutes.
9. Layer the churned ice cream and cooled raspberry sauce in a freezer-safe container, gently swirling with a knife to create ribbons; avoid overmixing to maintain distinct swirls.
10. Freeze the ice cream for at least 6 hours or until firm before serving.
Gorgeous swirls of raspberry ripple through every scoop, offering a burst of fruity flavor against the rich, creamy vanilla base. Serve it in waffle cones for a classic touch or alongside warm brownies for an indulgent dessert pairing that’s sure to impress.
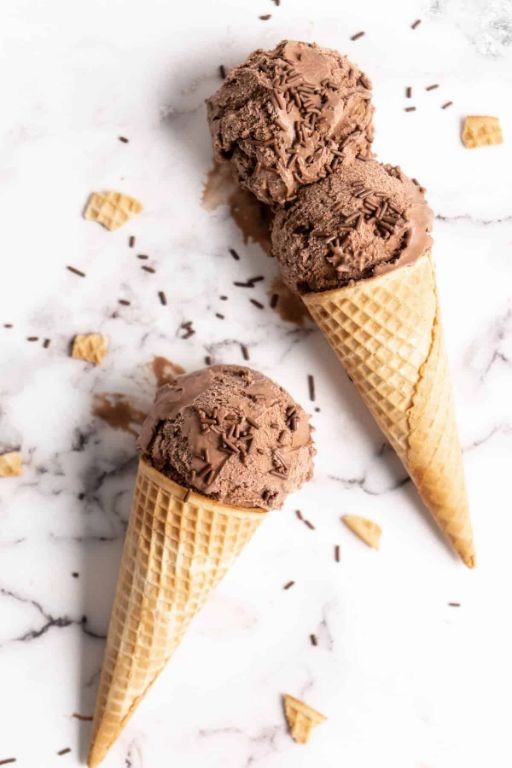
Dark Chocolate Walnut Ice Cream
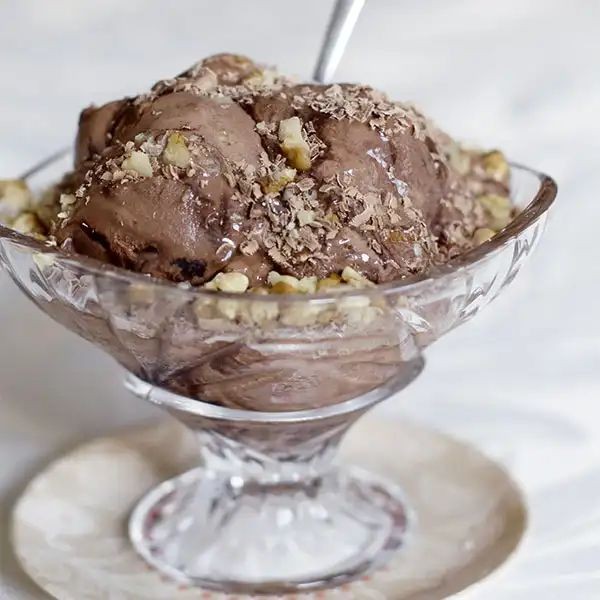
Let’s be honest—you deserve a treat that’s both indulgent and a little sophisticated. This dark chocolate walnut ice cream delivers deep, bittersweet notes and a satisfying crunch, perfect for when you want something special without a fuss.
Serving: 6 | Pre Time: 25 minutes | Cooking Time: 15 minutes
Ingredients
– 2 cups heavy cream
– 1 cup whole milk
– ¾ cup granulated sugar
– ½ cup Dutch-process cocoa powder
– 4 ounces high-quality dark chocolate (70% cacao), finely chopped
– 4 large pasture-raised egg yolks, lightly beaten
– 1 teaspoon pure vanilla extract
– ½ teaspoon fine sea salt
– ¾ cup toasted walnuts, roughly chopped
Instructions
1. In a medium saucepan over medium heat, combine the heavy cream, whole milk, granulated sugar, and Dutch-process cocoa powder, whisking constantly until the sugar dissolves and the mixture is smooth, about 5 minutes.
2. Remove the saucepan from the heat and immediately stir in the finely chopped dark chocolate until fully melted and incorporated, about 2 minutes.
3. Temper the egg yolks by slowly pouring ½ cup of the warm chocolate mixture into the lightly beaten yolks while whisking vigorously to prevent curdling.
4. Pour the tempered yolk mixture back into the saucepan with the remaining chocolate base, whisking to combine thoroughly.
5. Return the saucepan to low heat and cook the custard, stirring constantly with a silicone spatula, until it thickens enough to coat the back of a spoon and reaches 170°F on an instant-read thermometer, about 8–10 minutes.
6. Remove the custard from the heat and stir in the pure vanilla extract and fine sea salt until fully blended.
7. Strain the custard through a fine-mesh sieve into a clean bowl to ensure a silky texture, discarding any solids.
8. Cover the bowl with plastic wrap, pressing it directly onto the surface of the custard to prevent a skin from forming, and refrigerate until completely chilled, at least 4 hours or overnight.
9. Pour the chilled custard into an ice cream maker and churn according to the manufacturer’s instructions until it reaches a soft-serve consistency, about 20–25 minutes.
10. In the last 2 minutes of churning, add the roughly chopped toasted walnuts, allowing them to distribute evenly throughout the ice cream.
11. Transfer the ice cream to an airtight container, press a piece of parchment paper directly onto the surface, and freeze until firm, at least 4 hours.
Keep in mind that patience pays off here—the longer freeze yields a creamier scoop. This ice cream balances intense chocolate richness with a nutty crunch, making it ideal for serving in chilled bowls or as a decadent topping for warm brownies.
Cinnamon Roll Ice Cream
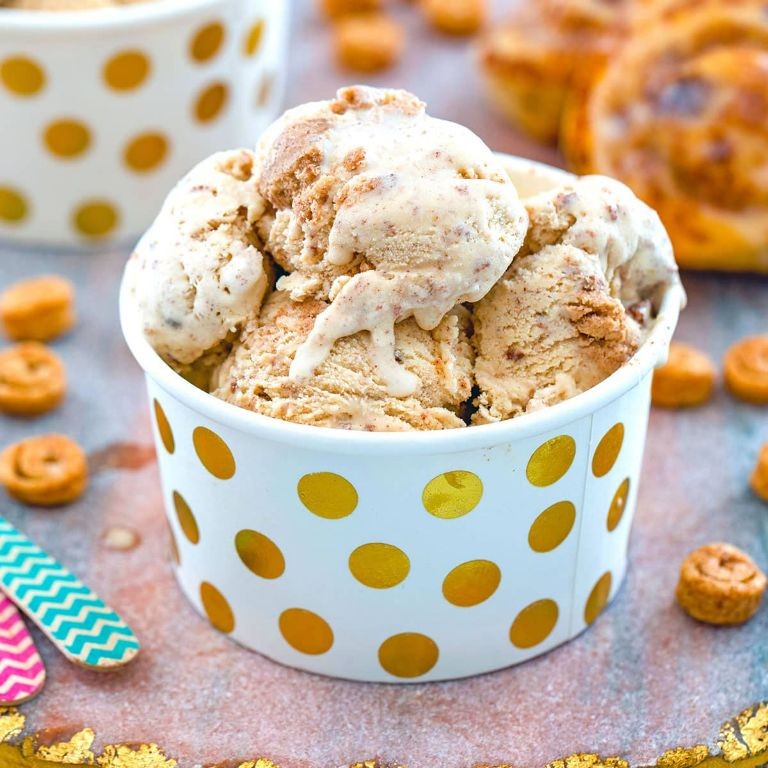
Remember those cozy mornings with fresh cinnamon rolls? Now imagine that warm, spiced flavor swirled into creamy ice cream. You’re going to love this sweet, nostalgic treat that’s perfect for any season.
Serving: 8 | Pre Time: 30 minutes | Cooking Time: 10 minutes
Ingredients
– 2 cups heavy cream
– 1 cup whole milk
– 3/4 cup granulated sugar
– 6 large pasture-raised egg yolks, lightly beaten
– 1 tablespoon pure vanilla extract
– 2 teaspoons ground cinnamon
– 1/4 teaspoon freshly grated nutmeg
– 1/8 teaspoon fine sea salt
– 1/2 cup cinnamon roll pieces (about 1 large roll), crumbled
– 2 tablespoons unsalted butter, clarified
– 1/4 cup light brown sugar
Instructions
1. Combine 2 cups heavy cream, 1 cup whole milk, 3/4 cup granulated sugar, 2 teaspoons ground cinnamon, 1/4 teaspoon freshly grated nutmeg, and 1/8 teaspoon fine sea salt in a medium saucepan.
2. Heat the mixture over medium heat, stirring frequently, until it reaches 170°F on a digital thermometer and the sugar is fully dissolved, about 5-7 minutes.
3. Temper the egg yolks by slowly whisking about 1/2 cup of the hot cream mixture into the 6 lightly beaten pasture-raised egg yolks in a separate bowl to prevent curdling.
4. Pour the tempered yolk mixture back into the saucepan with the remaining cream, whisking constantly.
5. Cook over medium-low heat, stirring continuously with a wooden spoon, until the custard thickens enough to coat the back of the spoon and reaches 185°F, about 3-5 minutes.
6. Immediately strain the custard through a fine-mesh sieve into a clean bowl to ensure a perfectly smooth texture.
7. Whisk in 1 tablespoon pure vanilla extract until fully incorporated.
8. Cover the bowl with plastic wrap, pressing it directly onto the surface of the custard to prevent a skin from forming, and refrigerate for at least 4 hours or until completely chilled.
9. While the custard chills, prepare the cinnamon swirl by melting 2 tablespoons clarified unsalted butter in a small skillet over medium heat.
10. Add 1/4 cup light brown sugar to the skillet and cook, stirring constantly, until the sugar dissolves and the mixture becomes bubbly and fragrant, about 2 minutes.
11. Remove the skillet from heat and let the cinnamon swirl cool to room temperature, then refrigerate until ready to use.
12. Churn the chilled custard in an ice cream maker according to the manufacturer’s instructions until it reaches a soft-serve consistency, typically 20-25 minutes.
13. In the last 2 minutes of churning, drizzle in the chilled cinnamon swirl and add 1/2 cup crumbled cinnamon roll pieces to create ribbons and chunks.
14. Transfer the ice cream to an airtight container, press a piece of parchment paper directly onto the surface, and freeze for at least 4 hours or until firm.
15. For optimal scooping, let the ice cream sit at room temperature for 5-10 minutes before serving.
Gorgeously swirled with ribbons of buttery cinnamon sugar and studded with soft, spiced bread pieces, this ice cream delivers the perfect contrast of creamy and chewy. The deep, warm spice notes from the cinnamon and nutmeg make it an exceptional standalone dessert or a decadent topping for warm apple pie.
Cherry Almond Ice Cream
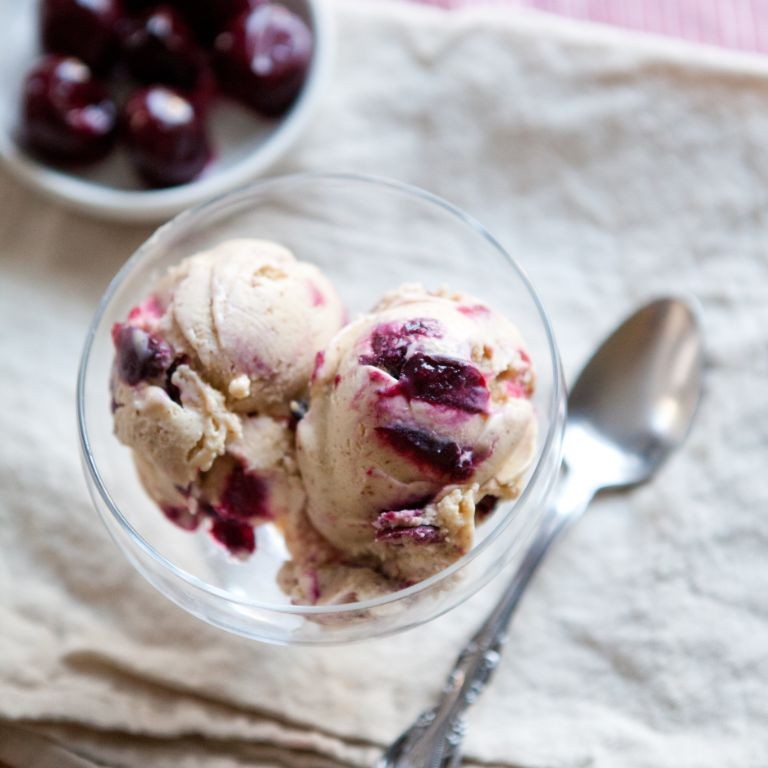
Visions of summer desserts just got a whole lot sweeter. This cherry almond ice cream is the perfect way to celebrate the season, combining juicy fruit with a nutty crunch for a treat you’ll want to make all year long. It’s surprisingly simple to whip up, even without a fancy ice cream maker.
Serving: 6 | Pre Time: 25 minutes | Cooking Time: 0 minutes
Ingredients
– 2 cups heavy cream, cold
– 1 (14-ounce) can sweetened condensed milk
– 1 teaspoon pure almond extract
– 1/4 teaspoon fine sea salt
– 1 1/2 cups fresh sweet cherries, pitted and roughly chopped
– 1/2 cup sliced almonds, toasted
Instructions
1. In a large mixing bowl, combine the cold heavy cream and pure almond extract.
2. Using a hand mixer or stand mixer fitted with the whisk attachment, whip the cream mixture on medium-high speed until stiff peaks form, about 3-4 minutes. Tip: Ensure your bowl and beaters are chilled for maximum volume.
3. In a separate medium bowl, gently fold the sweetened condensed milk and fine sea salt into the whipped cream until just combined, being careful not to deflate the mixture.
4. Add the pitted, roughly chopped sweet cherries and toasted sliced almonds to the base.
5. Using a rubber spatula, fold the cherries and almonds into the ice cream base until evenly distributed, about 15-20 folds.
6. Transfer the mixture to a 9×5-inch loaf pan or a freezer-safe container with a tight-fitting lid.
7. Smooth the top with the spatula to create an even surface.
8. Cover the container securely with plastic wrap, pressing it directly onto the surface of the ice cream to prevent ice crystals from forming.
9. Place the covered container in the freezer for at least 6 hours, or until completely firm. Tip: For best texture, freeze overnight.
10. Before serving, let the ice cream sit at room temperature for 5-7 minutes to soften slightly for easier scooping. Tip: Dip your ice cream scoop in warm water between servings for clean, round scoops.
Delightfully creamy with pops of tart cherry and a satisfying crunch, this no-churn ice cream is a dream. The almond extract adds a sophisticated depth that pairs beautifully with the fresh fruit. Try serving it sandwiched between two chewy almond cookies for an extra-special treat.
Caramel Pecan Ice Cream
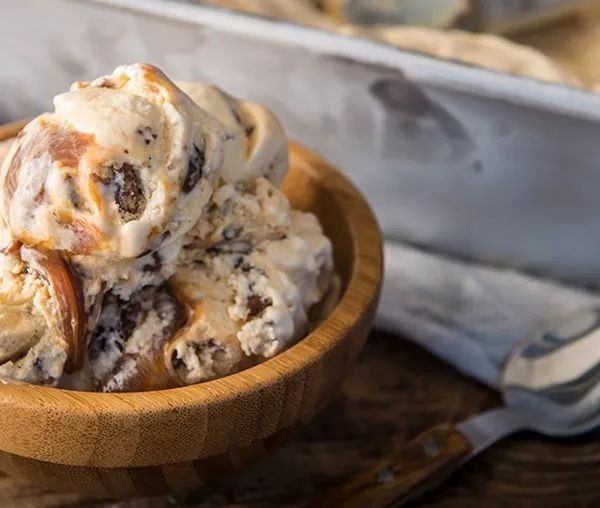
Kick back and imagine a dessert that’s both creamy and crunchy. This caramel pecan ice cream brings together rich, buttery caramel with toasted pecans for a treat that’s perfect for any gathering. You’ll love how the flavors meld together after a freeze.
Serving: 8 | Pre Time: 30 minutes | Cooking Time: 15 minutes
Ingredients
– 2 cups heavy cream
– 1 cup whole milk
– 3/4 cup granulated sugar
– 5 large pasture-raised eggs, lightly beaten
– 1 teaspoon pure vanilla extract
– 1/4 teaspoon fine sea salt
– 1 cup chopped pecans
– 1/2 cup light brown sugar, packed
– 2 tablespoons unsalted butter
– 1/4 cup water
Instructions
1. In a medium saucepan over medium heat, combine 1 cup heavy cream, whole milk, and granulated sugar, stirring constantly until the sugar dissolves completely and the mixture reaches 170°F on a candy thermometer.
2. Temper the eggs by slowly pouring 1/2 cup of the hot cream mixture into the lightly beaten pasture-raised eggs while whisking vigorously to prevent curdling.
3. Pour the tempered egg mixture back into the saucepan and cook over low heat, stirring continuously with a wooden spoon, until the custard thickens to coat the back of the spoon and reaches 175°F, about 5-7 minutes.
4. Remove the custard from heat and stir in the remaining 1 cup heavy cream, pure vanilla extract, and fine sea salt until fully incorporated.
5. Strain the custard through a fine-mesh sieve into a clean bowl to ensure a smooth texture, then cover and refrigerate until completely chilled to 40°F, at least 4 hours or overnight.
6. While the custard chills, toast the chopped pecans in a dry skillet over medium heat for 3-4 minutes, stirring frequently, until fragrant and lightly browned, then set aside to cool.
7. In a small saucepan over medium heat, combine light brown sugar, unsalted butter, and water, bringing to a boil while stirring until the sugar dissolves.
8. Reduce heat to medium-low and simmer the caramel, without stirring, for 5 minutes until it turns a deep amber color and reaches 240°F on a candy thermometer.
9. Carefully stir the toasted pecans into the hot caramel until evenly coated, then spread the mixture onto a parchment-lined baking sheet to cool and harden completely.
10. Break the hardened caramel pecan mixture into small pieces using your hands or a knife.
11. Churn the chilled custard in an ice cream maker according to the manufacturer’s instructions until it reaches a soft-serve consistency, about 20-25 minutes.
12. Fold the caramel pecan pieces into the churned ice cream until just distributed, avoiding overmixing to maintain texture.
13. Transfer the ice cream to an airtight container and freeze until firm, at least 6 hours or overnight.
Elegantly smooth with ribbons of crunchy caramel, this ice cream offers a delightful contrast in every scoop. The toasted pecans add a nutty depth that complements the sweet, buttery notes, making it ideal for serving in waffle cones or alongside a warm fruit crisp.
Espresso Bean Ice Cream
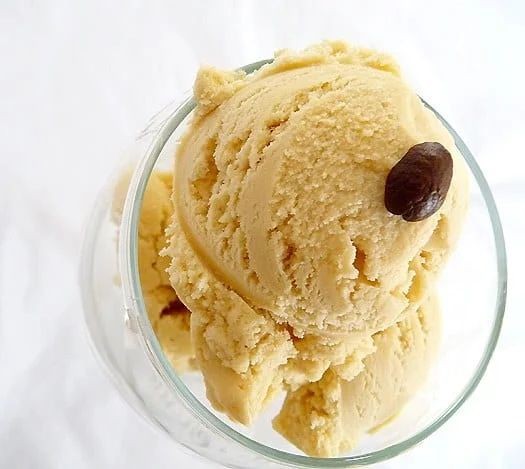
Kick off your holiday season with this rich, caffeinated treat that’s perfect for a festive gathering or a cozy night in. Espresso bean ice cream combines the deep, roasty notes of coffee with a creamy, luxurious base—it’s like your favorite coffee shop drink transformed into a frozen dessert you can scoop straight from the freezer. You’ll love how the crunchy espresso beans add a delightful texture to every bite.
Serving: 8 | Pre Time: 30 minutes | Cooking Time: 20 minutes
Ingredients
– 2 cups heavy cream
– 1 cup whole milk
– ¾ cup granulated sugar
– 6 large pasture-raised egg yolks, lightly beaten
– 2 tbsp high-quality instant espresso powder
– 1 tsp pure vanilla extract
– ½ cup dark chocolate-covered espresso beans, coarsely chopped
– ¼ tsp fine sea salt
Instructions
1. In a medium saucepan over medium heat, combine the heavy cream, whole milk, and granulated sugar, stirring constantly until the sugar dissolves completely and the mixture reaches 170°F on an instant-read thermometer, about 5–7 minutes.
2. Temper the egg yolks by slowly pouring ½ cup of the hot cream mixture into the beaten yolks while whisking vigorously to prevent curdling.
3. Pour the tempered yolk mixture back into the saucepan, reduce the heat to low, and cook, stirring continuously with a silicone spatula, until the custard thickens to coat the back of a spoon and reaches 175°F, about 8–10 minutes.
4. Remove the saucepan from the heat and immediately whisk in the instant espresso powder, pure vanilla extract, and fine sea salt until fully incorporated and smooth.
5. Strain the custard through a fine-mesh sieve into a clean bowl to remove any cooked egg bits, ensuring a silky texture.
6. Cover the bowl with plastic wrap, pressing it directly onto the surface of the custard to prevent a skin from forming, and refrigerate for at least 4 hours or until thoroughly chilled to 40°F.
7. Pour the chilled custard into an ice cream maker and churn according to the manufacturer’s instructions until it reaches a soft-serve consistency, about 20–25 minutes.
8. In the last 2 minutes of churning, add the coarsely chopped dark chocolate-covered espresso beans, allowing them to distribute evenly throughout the ice cream.
9. Transfer the churned ice cream to an airtight container, press a piece of parchment paper directly onto the surface, and freeze for at least 6 hours or until firm.
Now, savor this decadent creation—its velvety base contrasts beautifully with the crunchy espresso beans, offering a bold coffee flavor that’s not too sweet. Try serving it alongside a warm brownie or drizzled with a shot of espresso for an adult-friendly affogato that’ll impress any guest.
Pistachio Ice Cream
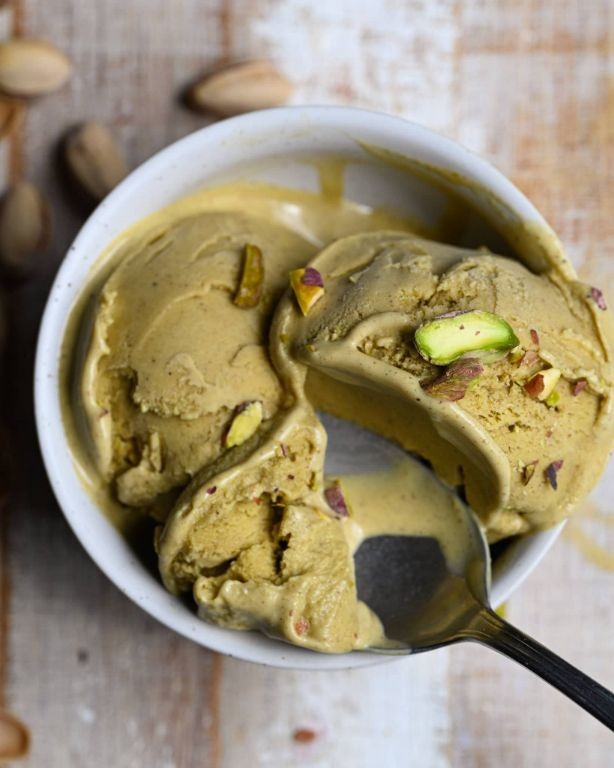
Brace yourself for the creamiest, most luxurious pistachio ice cream you’ve ever tasted. This homemade version beats anything from the store with its vibrant green hue and rich nutty flavor that’ll have you scooping seconds before you know it. You’ll love how simple it is to make this restaurant-quality dessert right in your own kitchen.
Serving: 8 | Pre Time: 15 minutes | Cooking Time: 25 minutes
Ingredients
– 1½ cups raw shelled pistachios, toasted and finely ground
– 2 cups heavy cream
– 1 cup whole milk
– ¾ cup granulated sugar
– 6 large pasture-raised egg yolks, lightly beaten
– ¼ teaspoon fine sea salt
– 1 teaspoon pure vanilla extract
– 2-3 drops natural green food coloring (optional)
Instructions
1. Preheat your oven to 350°F and spread the raw shelled pistachios in a single layer on a baking sheet.
2. Toast the pistachios for 8-10 minutes until fragrant and lightly golden, stirring halfway through to prevent burning.
3. Transfer the toasted pistachios to a food processor and pulse until finely ground with a sandy texture, about 1-2 minutes.
4. In a medium saucepan over medium heat, combine the heavy cream, whole milk, and granulated sugar, stirring constantly until the sugar dissolves completely and tiny bubbles form around the edges (about 5-7 minutes).
5. Temper the egg yolks by slowly pouring ½ cup of the warm cream mixture into the beaten yolks while whisking vigorously to prevent curdling.
6. Pour the tempered yolk mixture back into the saucepan and cook over low heat, stirring constantly with a wooden spoon until the custard thickens enough to coat the back of the spoon (about 8-10 minutes at 170°F).
7. Remove from heat and immediately stir in the finely ground pistachios, fine sea salt, pure vanilla extract, and optional natural green food coloring until fully incorporated.
8. Strain the mixture through a fine-mesh sieve into a clean bowl, pressing gently with a spatula to extract maximum flavor from the pistachio solids.
9. Cover the bowl with plastic wrap pressed directly against the surface of the custard to prevent a skin from forming.
10. Chill the custard in the refrigerator for at least 4 hours or overnight until completely cold (40°F or below).
11. Pour the chilled custard into your ice cream maker and churn according to manufacturer’s instructions until it reaches a soft-serve consistency (about 20-25 minutes).
12. Transfer the churned ice cream to an airtight container and freeze for 4-6 hours until firm enough to scoop.
For the smoothest texture, make sure your custard is completely chilled before churning—this prevents ice crystals from forming. Freshly ground pistachios release their oils better than pre-ground nuts, giving you that authentic pistachio flavor. When straining, don’t skip pressing those solids; that’s where the deepest pistachio essence lives.
Finally, you’ll be rewarded with ice cream that’s luxuriously smooth with just the right amount of pistachio grit for texture. The flavor develops beautifully overnight, becoming even nuttier and more complex. For an elegant presentation, serve it in chilled coupe glasses with a drizzle of dark chocolate ganache and a sprinkle of crushed pistachios on top.
Orange Creamsicle Ice Cream
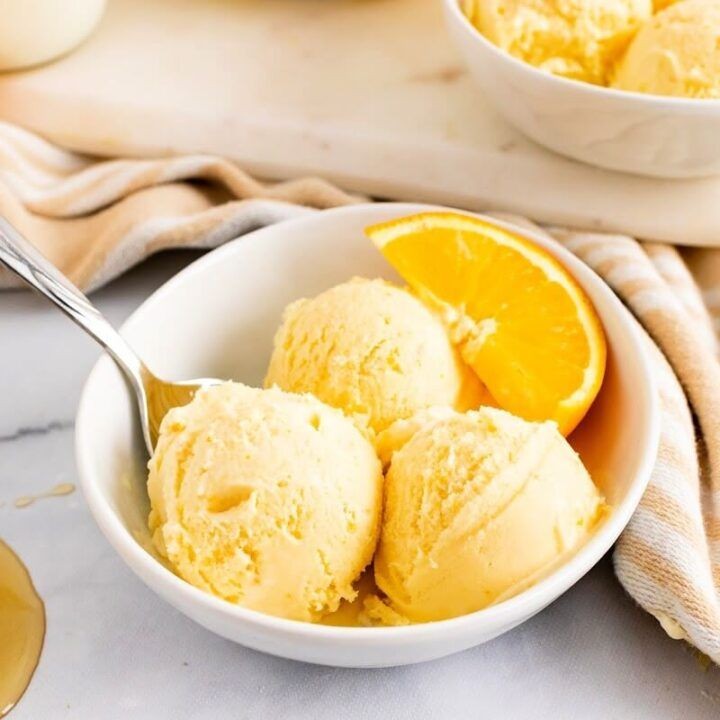
Fancy a taste of pure nostalgia? You’re about to make the ultimate summer treat—Orange Creamsicle Ice Cream. It’s that perfect, creamy blend of bright citrus and smooth vanilla you remember, but so much better homemade.
Serving: 8 | Pre Time: 25 minutes | Cooking Time: 0 minutes
Ingredients
– 2 cups heavy cream, chilled
– 1 (14-ounce) can sweetened condensed milk
– 1 cup whole milk
– 1 tablespoon pure vanilla extract
– 1 tablespoon finely grated orange zest
– 1/2 cup freshly squeezed orange juice, strained
– 1/4 teaspoon fine sea salt
Instructions
1. In a large mixing bowl, combine the chilled heavy cream and sweetened condensed milk.
2. Using a hand mixer or stand mixer fitted with the whisk attachment, whip the mixture on medium-high speed until it forms stiff peaks, about 3 to 4 minutes.
3. Gently fold in the whole milk, pure vanilla extract, and finely grated orange zest with a rubber spatula until just incorporated. Tip: For the brightest flavor, zest the orange directly over the bowl to capture the essential oils.
4. In a separate small bowl, whisk together the freshly squeezed, strained orange juice and fine sea salt until the salt is fully dissolved.
5. Slowly drizzle the orange juice mixture into the cream base while gently folding with the spatula to create a marbled effect, being careful not to overmix. Tip: Leaving distinct swirls of orange ensures a beautiful presentation and bursts of flavor in each scoop.
6. Pour the mixture into a 9×5-inch loaf pan or a freezer-safe container with a tight-fitting lid.
7. Cover the surface directly with parchment paper to prevent ice crystals from forming, then seal the container with its lid.
8. Freeze the ice cream for at least 6 hours, or until it is completely firm and scoopable. Tip: For the creamiest texture, avoid opening the freezer frequently during the first few hours of setting.
9. Remove the ice cream from the freezer and let it sit at room temperature for 5 to 10 minutes to soften slightly before serving.
Gorgeously smooth and bursting with sunny citrus, this ice cream has a luxuriously creamy mouthfeel that store-bought versions can’t match. Try serving it in chilled bowls with a sprinkle of extra orange zest or sandwiched between two soft sugar cookies for a playful twist.
Summary
Tasty, sugar-free ice cream is totally within reach! This roundup proves you can enjoy cool, creamy treats while managing diabetes. We hope these 18 delicious recipes inspire your next sweet moment. Give one a try, then drop a comment with your favorite or share this article on Pinterest to spread the joy!


