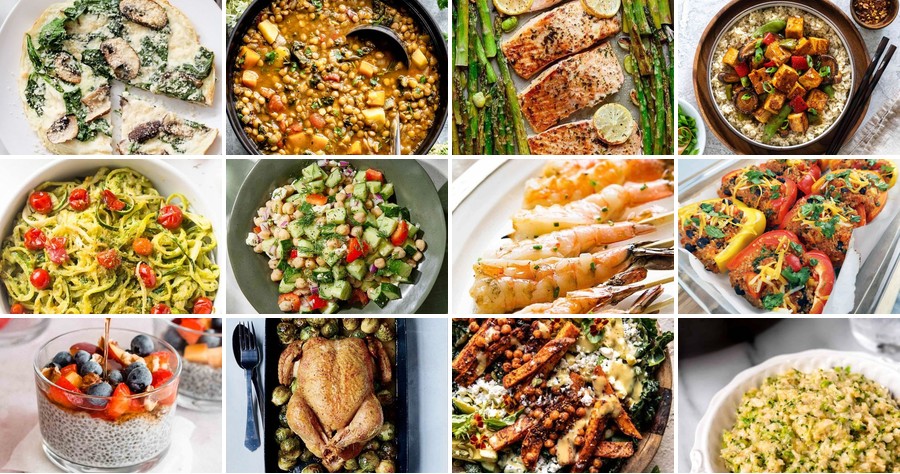
Keeping your blood sugar in check doesn’t mean sacrificing flavor or fun in the kitchen! We’ve gathered 20 delicious diabetic diet recipes that prove healthy eating can be vibrant and satisfying. From quick weeknight dinners to comforting classics with a wholesome twist, this roundup is your go-to guide for nourishing meals the whole family will love. Let’s dive into these tasty, health-conscious dishes!
Baked Lemon Garlic Salmon with Asparagus

Cradling a warm plate on a quiet evening, I find myself returning to this simple yet elegant dish—a harmony of bright citrus, savory garlic, and tender greens that feels both nourishing and celebratory. It’s the kind of meal that slows time, inviting you to savor each flaky bite and crisp spear.
Serving: 4 | Pre Time: 15 minutes | Cooking Time: 15 minutes
Ingredients
– 4 (6-ounce) skin-on salmon fillets, patted dry with paper towels
– 1 pound fresh asparagus spears, woody ends trimmed
– 3 tablespoons rich extra virgin olive oil
– 2 tablespoons freshly squeezed lemon juice
– 4 cloves garlic, minced into a fragrant paste
– 1 teaspoon finely ground black pepper
– ½ teaspoon flaky sea salt
– 1 lemon, thinly sliced into rounds
– 2 tablespoons chopped fresh parsley, for garnish
Instructions
1. Preheat your oven to 400°F and line a large rimmed baking sheet with parchment paper.
2. In a small bowl, whisk together the extra virgin olive oil, freshly squeezed lemon juice, minced garlic, finely ground black pepper, and flaky sea salt until emulsified.
3. Arrange the salmon fillets skin-side down on one half of the baking sheet, spacing them evenly.
4. Place the trimmed asparagus spears on the other half of the baking sheet in a single layer.
5. Brush the salmon fillets generously with the lemon-garlic mixture, coating the tops and sides.
6. Drizzle the remaining mixture over the asparagus spears, tossing gently to coat.
7. Lay the thin lemon slices over the salmon fillets for added citrus infusion during baking.
8. Bake in the preheated oven for 12–15 minutes, until the salmon flakes easily with a fork and the asparagus is tender-crisp.
9. Remove from the oven and let rest for 3 minutes to allow the juices to redistribute.
10. Sprinkle with chopped fresh parsley before serving.
Kissed by the oven’s heat, the salmon emerges with a delicate, flaky texture that melts against the bright lemon-garlic glaze, while the asparagus retains a satisfying snap. For a creative twist, serve it over a bed of creamy polenta or alongside crusty bread to soak up the savory pan juices—each component sings in quiet harmony.
Slow Cooker Turkey Chili

Wandering through the quiet kitchen this afternoon, I found myself craving something warm and grounding—a meal that could simmer patiently while I tended to other things. This slow cooker turkey chili is just that: a gentle, hands-off dish that fills the house with the comforting scent of spices and simmering tomatoes, perfect for a cozy evening in.
Serving: 6 | Pre Time: 15 minutes | Cooking Time: 6 hours
Ingredients
– 1 tablespoon of rich extra virgin olive oil
– 1 large yellow onion, finely diced
– 3 cloves of aromatic garlic, minced
– 1 pound of lean ground turkey
– 2 tablespoons of warm chili powder
– 1 teaspoon of smoky ground cumin
– 1 teaspoon of sweet paprika
– 1/2 teaspoon of earthy dried oregano
– 1/4 teaspoon of finely ground black pepper
– 1 (28-ounce) can of fire-roasted diced tomatoes, with their juices
– 1 (15-ounce) can of plump red kidney beans, drained and rinsed
– 1 (15-ounce) can of tender black beans, drained and rinsed
– 2 cups of rich beef broth
– 1/2 teaspoon of fine sea salt
Instructions
1. Heat 1 tablespoon of rich extra virgin olive oil in a large skillet over medium heat until it shimmers, about 2 minutes.
2. Add 1 large yellow onion, finely diced, and sauté until translucent and fragrant, 5–7 minutes, stirring occasionally to prevent burning.
3. Stir in 3 cloves of aromatic garlic, minced, and cook for 1 minute until just golden and aromatic.
4. Add 1 pound of lean ground turkey to the skillet, breaking it apart with a wooden spoon, and cook until no pink remains, 8–10 minutes, draining any excess fat for a leaner chili.
5. Transfer the turkey mixture to a 6-quart slow cooker.
6. Sprinkle 2 tablespoons of warm chili powder, 1 teaspoon of smoky ground cumin, 1 teaspoon of sweet paprika, 1/2 teaspoon of earthy dried oregano, and 1/4 teaspoon of finely ground black pepper over the turkey, stirring to coat evenly and bloom the spices.
7. Pour in 1 (28-ounce) can of fire-roasted diced tomatoes with their juices, 1 (15-ounce) can of plump red kidney beans drained and rinsed, 1 (15-ounce) can of tender black beans drained and rinsed, and 2 cups of rich beef broth.
8. Stir all ingredients in the slow cooker until well combined, then cover with the lid.
9. Cook on low heat for 6 hours, avoiding lifting the lid to maintain steady temperature and develop deep flavors.
10. After 6 hours, stir in 1/2 teaspoon of fine sea salt, taste and adjust seasoning if needed, and cook for an additional 10 minutes to meld.
11. Ladle the chili into bowls, serving hot.
Ladling this chili reveals a thick, hearty texture with tender beans and savory turkey melding in a rich, spiced broth. The fire-roasted tomatoes add a subtle smokiness that pairs beautifully with toppings like sharp cheddar cheese or a dollop of cool sour cream, making each spoonful a comforting embrace on a chilly day.
Grilled Chicken with Avocado Salsa
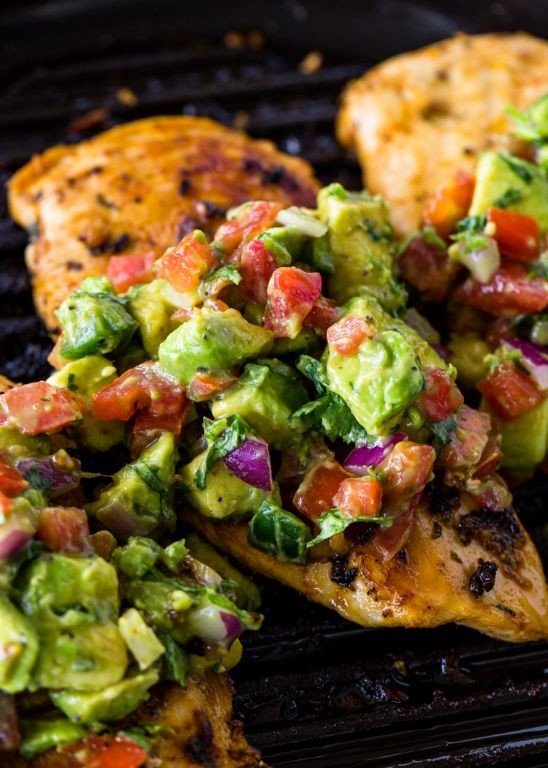
Evenings like this, with the sun dipping low and the kitchen quiet, I find myself craving something simple yet deeply satisfying—a meal that feels like a gentle exhale after a long day. It’s in these moments that I turn to the humble harmony of flame-kissed chicken and creamy, bright salsa, a pairing that never asks for much but always gives so much in return.
Serving: 4 | Pre Time: 20 minutes | Cooking Time: 15 minutes
Ingredients
– 4 boneless, skinless chicken breasts
– 2 tablespoons of rich extra virgin olive oil
– 1 teaspoon of finely ground black pepper
– 1 teaspoon of coarse kosher salt
– 2 ripe, creamy Hass avocados
– 1 juicy lime
– 1/4 cup of finely chopped fresh cilantro
– 1/4 cup of finely diced red onion
– 1 finely minced jalapeño pepper (seeds removed for mild heat)
Instructions
1. Pat the 4 boneless, skinless chicken breasts completely dry with paper towels to ensure a good sear.
2. Drizzle the chicken with 2 tablespoons of rich extra virgin olive oil, then rub with 1 teaspoon of finely ground black pepper and 1 teaspoon of coarse kosher salt, coating evenly on both sides.
3. Preheat a grill or grill pan to medium-high heat, about 400°F, and let it heat for 5 minutes until hot.
4. Place the chicken on the grill and cook for 6-7 minutes per side, until the internal temperature reaches 165°F and the exterior has clear grill marks.
5. Remove the chicken from the grill, transfer to a plate, and let it rest for 5 minutes to allow the juices to redistribute.
6. While the chicken rests, halve and pit the 2 ripe, creamy Hass avocados, scoop the flesh into a medium bowl, and mash lightly with a fork, leaving some chunks for texture.
7. Juice the 1 juicy lime directly over the avocado to prevent browning, then stir in 1/4 cup of finely chopped fresh cilantro, 1/4 cup of finely diced red onion, and 1 finely minced jalapeño pepper.
8. Gently fold the salsa ingredients together until just combined, being careful not to overmix.
9. Slice the rested chicken against the grain into 1/2-inch thick pieces.
10. Arrange the chicken slices on a serving platter and spoon the avocado salsa generously over the top.
Mouthwatering in its simplicity, this dish offers a beautiful contrast: the chicken, tender and smoky from the grill, pairs perfectly with the cool, creamy salsa that bursts with zesty lime and herbaceous cilantro. For a creative twist, serve it over a bed of warm quinoa or tucked into soft corn tortillas, letting the flavors meld into something truly comforting.
Cauliflower Crust Pizza with Veggies

Beneath the quiet hum of the kitchen, there’s a simple, grounding joy in transforming humble ingredients into something nourishing and bright. This cauliflower crust pizza feels like a gentle whisper of summer, a canvas for the season’s crispest vegetables, offering a lighter embrace without sacrificing the comforting ritual of pizza night.
Serving: 4 | Pre Time: 25 minutes | Cooking Time: 25 minutes
Ingredients
– 1 large head of fresh cauliflower, cut into small florets
– 1 cup of finely shredded, part-skim mozzarella cheese
– 1 large farm-fresh egg, lightly beaten
– 1 teaspoon of dried Italian seasoning
– ½ teaspoon of finely ground sea salt
– 2 tablespoons of rich extra virgin olive oil, divided
– ½ cup of vibrant marinara sauce
– 1 cup of thinly sliced, colorful bell peppers (red, yellow, and orange)
– ½ cup of sliced, earthy cremini mushrooms
– ½ cup of fresh baby spinach leaves
– ¼ cup of grated Parmesan cheese
Instructions
1. Preheat your oven to 400°F (200°C) and line a large baking sheet with parchment paper.
2. Place the cauliflower florets in a food processor and pulse until they resemble fine, snow-like crumbs.
3. Transfer the cauliflower crumbs to a microwave-safe bowl and microwave on high for 5 minutes to steam and soften them. (Tip: Let it cool slightly before handling to avoid steam burns.)
4. Once cool enough to handle, wrap the cauliflower in a clean kitchen towel or cheesecloth and squeeze firmly over the sink to remove as much moisture as possible—this is crucial for a crisp crust.
5. In a medium mixing bowl, combine the dried cauliflower, shredded mozzarella, beaten egg, Italian seasoning, and sea salt until a cohesive dough forms.
6. Press the dough onto the prepared baking sheet into a 12-inch round, about ¼-inch thick, using your hands or the bottom of a measuring cup for an even layer.
7. Brush the top of the crust lightly with 1 tablespoon of extra virgin olive oil.
8. Bake the crust at 400°F for 15-18 minutes, or until the edges turn a deep golden brown and the center feels firm to the touch.
9. Remove the crust from the oven and evenly spread the marinara sauce over it, leaving a small border around the edges.
10. In a medium skillet over medium heat, warm the remaining 1 tablespoon of olive oil, then add the sliced bell peppers and mushrooms, sautéing for 5-7 minutes until they are tender and lightly caramelized.
11. Scatter the sautéed vegetables and fresh baby spinach leaves over the sauced crust, then sprinkle the grated Parmesan cheese on top. (Tip: For extra flavor, add a pinch of red pepper flakes with the vegetables while sautéing.)
12. Return the pizza to the oven and bake for an additional 8-10 minutes, until the cheese is melted and bubbly and the spinach has wilted. (Tip: Let it rest for 5 minutes before slicing to allow the crust to set and prevent a soggy bottom.)
Just out of the oven, this pizza offers a delightful contrast: the crust is satisfyingly crisp with a subtle, nutty undertone, while the toppings meld into a sweet and savory medley. Serve it warm, perhaps with a side of garlic-infused olive oil for dipping, to highlight its rustic, vegetable-forward charm.
Spinach and Mushroom Egg White Omelet
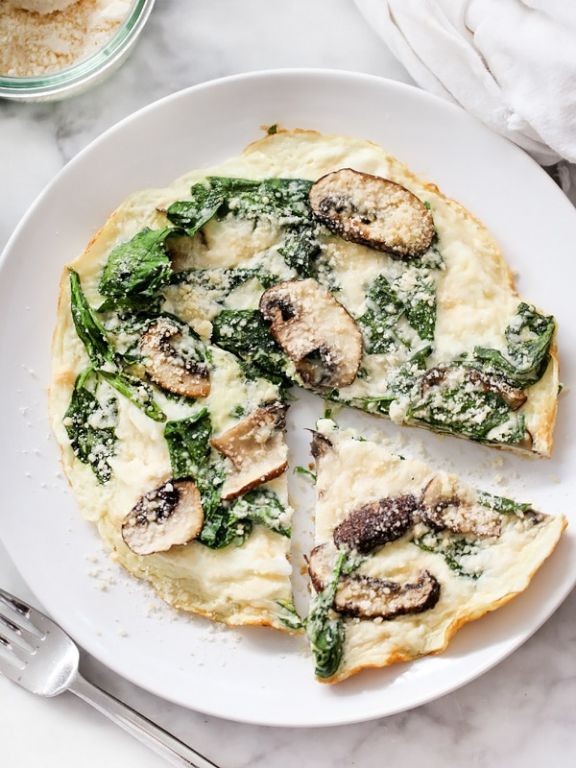
Under the soft morning light filtering through the kitchen window, there’s a quiet comfort in preparing something simple yet nourishing, a gentle ritual to start the day with intention and care.
Serving: 1 | Prep Time: 10 minutes | Cooking Time: 8 minutes
Ingredients
– 3 large egg whites, lightly whisked until frothy
– 1 cup fresh baby spinach leaves, washed and patted dry
– ½ cup sliced cremini mushrooms, wiped clean with a damp cloth
– 1 tablespoon unsalted butter, cold and cut into small pieces
– 1 tablespoon grated Parmesan cheese, finely shredded
– ¼ teaspoon kosher salt
– ⅛ teaspoon freshly ground black pepper, finely milled
Instructions
1. Place a small nonstick skillet over medium-low heat and add the cold unsalted butter pieces, allowing them to melt slowly without browning, about 1 minute.
2. Add the sliced cremini mushrooms to the skillet in a single layer and cook undisturbed until they release their moisture and turn golden-brown, approximately 4 minutes, stirring occasionally for even cooking.
3. Tip: Resist the urge to overcrowd the mushrooms—this ensures they caramelize properly instead of steaming.
4. Stir in the fresh baby spinach leaves and cook just until wilted, about 1 minute, then transfer the vegetable mixture to a plate and set aside.
5. Wipe the skillet clean with a paper towel and return it to medium-low heat.
6. Pour the lightly whisked egg whites into the warm skillet, tilting it to spread them evenly into a thin circle.
7. Cook the egg whites undisturbed until the edges set and lift easily from the pan, about 2 minutes, then sprinkle the kosher salt and freshly ground black pepper evenly over the surface.
8. Tip: For a tender omelet, avoid high heat, which can make the eggs rubbery.
9. Spoon the cooked spinach and mushroom mixture onto one half of the set egg white circle.
10. Sprinkle the grated Parmesan cheese over the vegetables.
11. Using a spatula, carefully fold the empty half of the egg white over the filling, pressing gently to seal.
12. Cook for another 1 minute to warm the filling through, then slide the omelet onto a plate.
13. Tip: Let the omelet rest for a minute before serving—this allows the flavors to meld and makes slicing cleaner.
Zesty yet delicate, this omelet offers a fluffy texture that cradles the earthy mushrooms and tender spinach, with the Parmesan adding a subtle salty depth. Enjoy it alongside toasted whole-grain bread or topped with a dollop of creamy avocado for a satisfying, wholesome meal that feels both light and fulfilling.
Greek Yogurt Parfait with Berries and Nuts
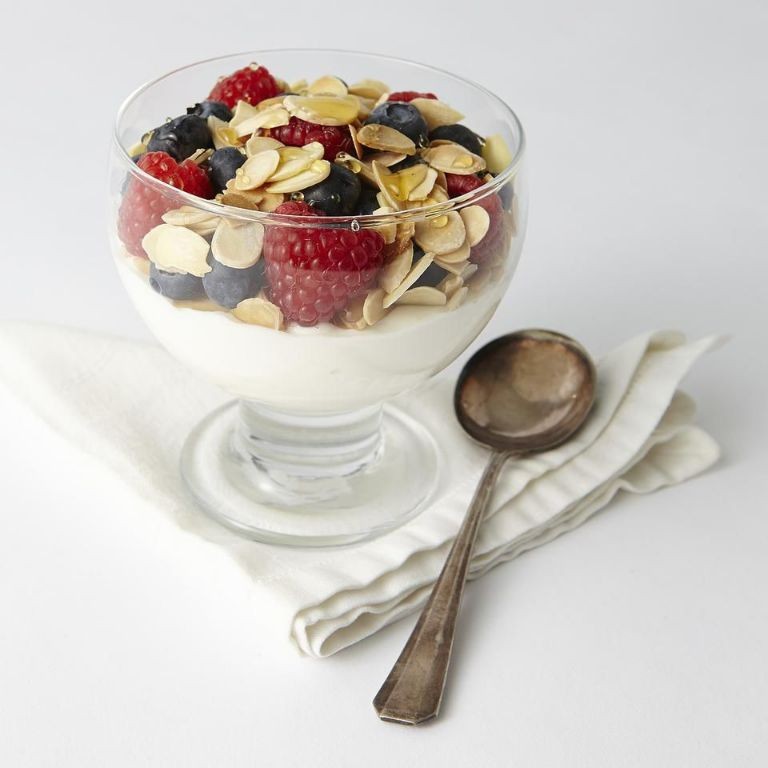
Maybe it’s the quiet of the morning, or the way the light falls across the counter, but there’s something deeply comforting about building this simple parfait. It feels less like making a meal and more like arranging a small, personal gift for the day ahead, a quiet moment of care before the world wakes up.
Serving: 1 | Pre Time: 10 minutes | Cooking Time: 0 minutes
Ingredients
– 1 cup of thick, creamy plain Greek yogurt
– 1/2 cup of mixed fresh berries (like plump raspberries and sweet blueberries)
– 2 tablespoons of crunchy honey-roasted almonds, roughly chopped
– 1 tablespoon of golden, raw wildflower honey
– 1/4 teaspoon of fragrant pure vanilla extract
Instructions
1. In a small bowl, gently stir the fragrant pure vanilla extract into the 1 cup of thick, creamy plain Greek yogurt until just combined; this infuses the yogurt with flavor from the bottom layer up.
2. Select a clear glass or jar to showcase the layers, and spoon half of the vanilla-kissed yogurt into the bottom, creating a smooth, even base.
3. Scatter half of the 1/2 cup of mixed fresh berries (reserving a few for garnish) over the yogurt layer, allowing some to nestle into the creamy surface for visual appeal.
4. Sprinkle 1 tablespoon of the crunchy honey-roasted almonds over the berries, which adds the first textural crunch and prevents the next yogurt layer from sinking.
5. Carefully spoon the remaining vanilla yogurt on top, using the back of the spoon to spread it evenly and seal in the layers below.
6. Arrange the remaining fresh berries artistically over the top yogurt layer, pressing some in lightly so they don’t roll off.
7. Drizzle the 1 tablespoon of golden, raw wildflower honey in a slow, zigzag pattern over the berries and yogurt, adjusting the amount to your preferred sweetness.
8. Finish by sprinkling the final tablespoon of chopped honey-roasted almonds over the top for a final, satisfying crunch.
9. Let the parfait sit undisturbed for 5 minutes before serving; this brief rest allows the flavors to meld and the honey to seep slightly into the yogurt.
Zesty yet soothing, each spoonful delivers a cool, creamy contrast to the juicy burst of berries and the hearty snap of nuts. For a playful twist, layer it in a wide-mouth mason jar and take it on a picnic, or swap the almonds for spiced pecans when autumn arrives.
Baked Chicken with Roasted Brussels Sprouts
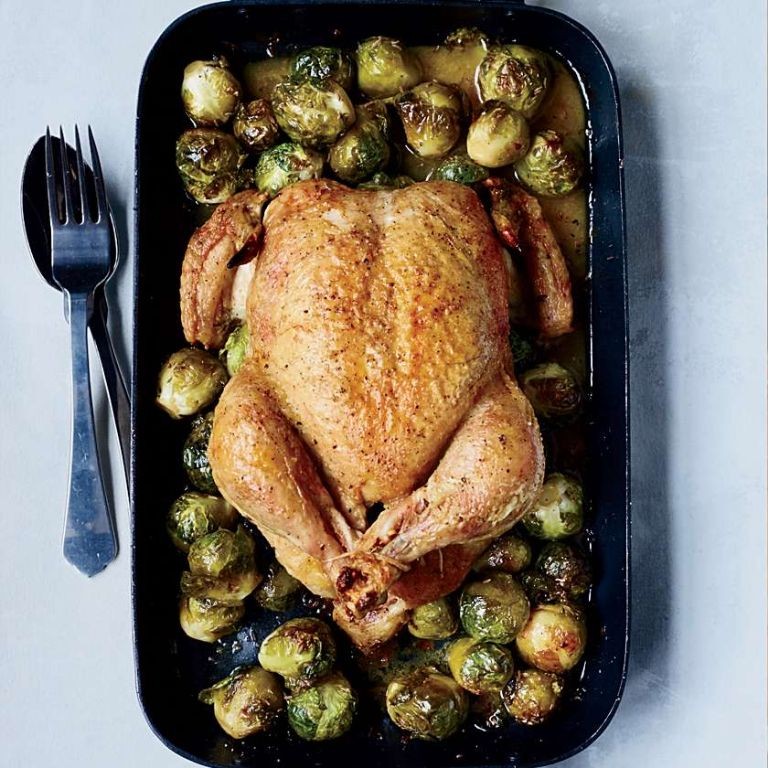
Musing on quiet evenings, I often find myself craving something warm and nourishing—a meal that fills the kitchen with comforting aromas and leaves the soul satisfied. This simple baked chicken with roasted Brussels sprouts is just that, a humble dish where each ingredient sings in harmony, turning an ordinary dinner into a gentle celebration of home.
Serving: 4 | Pre Time: 15 minutes | Cooking Time: 45 minutes
Ingredients
– 4 bone-in, skin-on chicken thighs
– 1 pound fresh Brussels sprouts, trimmed and halved
– 3 tablespoons rich extra virgin olive oil
– 2 cloves garlic, minced
– 1 teaspoon finely ground black pepper
– 1 teaspoon coarse sea salt
– 1 tablespoon fragrant dried thyme
– 1 tablespoon sweet smoked paprika
– 1 lemon, thinly sliced
Instructions
1. Preheat your oven to 400°F and line a large baking sheet with parchment paper for easy cleanup.
2. Pat the chicken thighs dry with paper towels to ensure crispy skin during baking.
3. In a small bowl, whisk together the olive oil, minced garlic, black pepper, salt, thyme, and smoked paprika until well combined.
4. Place the chicken thighs and halved Brussels sprouts in a large mixing bowl, then pour the oil mixture over them, tossing gently to coat everything evenly.
5. Arrange the chicken thighs skin-side up on the prepared baking sheet, spacing them apart to allow for proper air circulation.
6. Scatter the Brussels sprouts around the chicken in a single layer, avoiding overcrowding to promote even roasting.
7. Tuck the lemon slices among the Brussels sprouts to infuse a bright citrus note as they bake.
8. Bake in the preheated oven for 45 minutes, or until the chicken skin is golden brown and crispy, and the Brussels sprouts are tender with caramelized edges.
9. Check the chicken’s doneness by inserting a meat thermometer into the thickest part of a thigh; it should read 165°F.
10. Let the dish rest for 5 minutes before serving to allow the juices to redistribute, keeping the chicken moist.
Gently, the chicken emerges with a crackling skin that gives way to succulent, herb-infused meat, while the Brussels sprouts offer a tender bite with hints of smokiness and lemon. For a creative twist, serve it over a bed of creamy polenta or alongside crusty bread to soak up the savory pan juices, making each bite a cozy embrace.
Turkey and Spinach Stuffed Portobello Mushrooms

Wandering through the quiet kitchen this afternoon, the earthy scent of mushrooms and the promise of a comforting meal felt like a gentle embrace. This simple dish, with its warm, savory filling and tender caps, offers a moment of quiet nourishment on a busy day. It’s the kind of recipe that feels both special and effortlessly humble, perfect for a cozy evening at home.
Serving: 4 | Pre Time: 15 minutes | Cooking Time: 25 minutes
Ingredients
– 4 large, meaty portobello mushroom caps
– 1 tablespoon rich extra virgin olive oil
– 1/2 cup finely chopped sweet yellow onion
– 2 cloves fragrant garlic, minced
– 1 pound lean ground turkey
– 5 ounces fresh baby spinach leaves
– 1/2 cup grated sharp Parmesan cheese
– 1/4 cup panko breadcrumbs
– 1 teaspoon dried Italian seasoning
– 1/2 teaspoon finely ground black pepper
– 1/4 teaspoon flaky sea salt
Instructions
1. Preheat your oven to 400°F and line a baking sheet with parchment paper.
2. Gently remove the stems from the portobello mushroom caps and use a spoon to scrape out the dark gills to create a deep well for the filling.
3. Heat the rich extra virgin olive oil in a large skillet over medium heat until it shimmers.
4. Add the finely chopped sweet yellow onion and cook, stirring occasionally, for about 4 minutes until it becomes soft and translucent.
5. Stir in the minced fragrant garlic and cook for just 30 seconds until its aroma is released, being careful not to let it burn.
6. Add the lean ground turkey to the skillet, breaking it apart with a wooden spoon, and cook for 6-7 minutes until it is no longer pink and is fully cooked through.
7. Tip: If excess liquid pools in the pan from the turkey, simply drain it off for a less soggy filling.
8. Mix in the fresh baby spinach leaves, stirring until they are just wilted, which should take about 1-2 minutes.
9. Remove the skillet from the heat and stir in the grated sharp Parmesan cheese, panko breadcrumbs, dried Italian seasoning, finely ground black pepper, and flaky sea salt until everything is well combined.
10. Tip: Let the filling cool slightly for a minute or two before stuffing to make it easier to handle and prevent the mushrooms from steaming too much.
11. Spoon the turkey and spinach mixture evenly into the prepared portobello mushroom caps, packing it gently but firmly into each well.
12. Place the stuffed mushrooms on the lined baking sheet and bake in the preheated oven for 15-18 minutes, until the mushroom caps are tender and the tops are lightly golden.
13. Tip: For an extra crispy topping, you can broil the mushrooms for the final 1-2 minutes, watching closely to avoid burning.
14. Remove from the oven and let the mushrooms rest for 5 minutes before serving to allow the flavors to settle.
Remembering the first bite, the juicy turkey mingles with the earthy mushrooms and melted cheese, creating a satisfying texture that’s both hearty and light. Serve these warm alongside a crisp green salad or over a bed of creamy polenta for a complete, comforting meal that feels lovingly made.
Chickpea and Cucumber Salad with Lemon Dressing
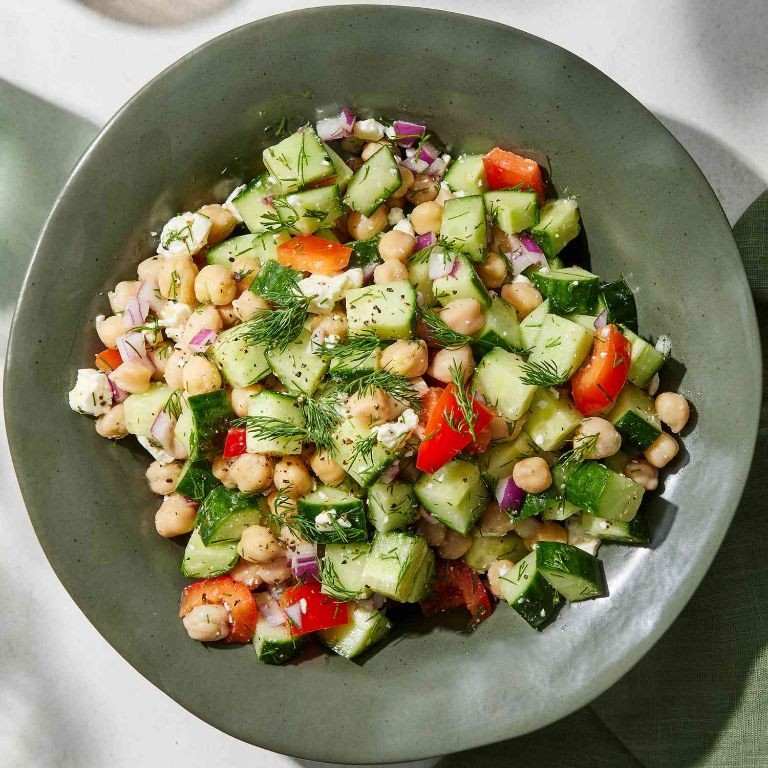
Here in my quiet kitchen, with the afternoon light softening around me, I find myself drawn to the simple, honest ingredients waiting on the counter. This salad feels like a gentle pause, a collection of crisp textures and bright flavors meant to be assembled with care, not haste.
Serving: 4 | Pre Time: 15 minutes | Cooking Time: 0 minutes
Ingredients
– 2 (15-ounce) cans of plump, tender chickpeas, thoroughly rinsed and drained
– 1 large English cucumber, with its cool, crisp skin left on and diced into ½-inch pieces
– ½ cup of finely chopped fresh parsley, its leaves bright and grassy
– ¼ cup of finely chopped fresh mint, offering a sweet, aromatic lift
– ⅓ cup of rich extra virgin olive oil
– ¼ cup of freshly squeezed lemon juice, from about 2 juicy lemons
– 2 minced garlic cloves, releasing their pungent, earthy scent
– 1 teaspoon of fine sea salt
– ½ teaspoon of finely ground black pepper
Instructions
1. Place the rinsed chickpeas into a large, wide mixing bowl. Gently pat them dry with a paper towel to help the dressing cling better—this is a key tip for maximum flavor absorption.
2. Add the diced cucumber, chopped parsley, and chopped mint to the bowl with the chickpeas.
3. In a separate small bowl or liquid measuring cup, combine the extra virgin olive oil and freshly squeezed lemon juice.
4. Whisk the oil and lemon juice vigorously for about 30 seconds until the mixture is fully emulsified and slightly thickened.
5. Stir the minced garlic, fine sea salt, and finely ground black pepper into the emulsified dressing.
6. Pour the dressing over the chickpea and vegetable mixture in the large bowl.
7. Using a large rubber spatula or spoon, fold everything together gently but thoroughly for about 1 minute, ensuring every component is lightly coated. For the best flavor, let the salad rest for 10 minutes before serving to allow the ingredients to meld—this resting time is a simple trick that deepens the taste.
8. Taste a spoonful and, if desired, adjust the seasoning with an extra pinch of salt or a squeeze of lemon. Serve immediately, or cover and refrigerate for up to 2 hours for a chillier, more refreshing bite.
Each forkful delivers a delightful contrast: the creamy give of the chickpeas against the cucumber’s watery crunch, all bound by the dressing’s sharp, garlicky brightness. Enjoy it piled high on a plate with grilled fish, or spoon it into lettuce cups for a light, handheld lunch that feels both nourishing and effortless.
Broccoli and Cheddar Cauliflower Rice
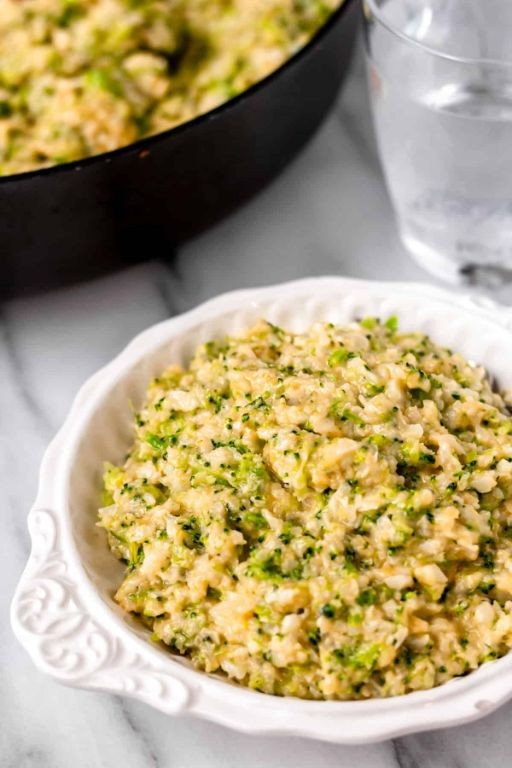
Perhaps you’ve found yourself craving something cozy and nourishing, a dish that feels like a warm hug on a quiet evening. This broccoli and cheddar cauliflower rice is just that—a simple, comforting blend that transforms humble ingredients into a satisfying meal, perfect for when you need a moment of gentle sustenance.
Serving: 4 | Pre Time: 10 minutes | Cooking Time: 20 minutes
Ingredients
- 1 tablespoon of rich extra virgin olive oil
- 1 small yellow onion, finely diced
- 2 cloves of garlic, minced
- 4 cups of riced cauliflower, fresh or frozen
- 2 cups of broccoli florets, chopped into bite-sized pieces
- 1 cup of sharp cheddar cheese, freshly grated
- 1/2 cup of heavy cream
- 1/2 teaspoon of finely ground black pepper
- 1/4 teaspoon of sea salt
Instructions
- Heat the rich extra virgin olive oil in a large skillet over medium heat until it shimmers lightly.
- Add the finely diced yellow onion and sauté for 5 minutes, stirring occasionally, until it turns translucent and soft.
- Stir in the minced garlic and cook for 1 minute, just until fragrant to avoid burning.
- Tip: Use a non-stick skillet to prevent sticking and ensure even cooking throughout.
- Add the riced cauliflower and chopped broccoli florets to the skillet, spreading them in an even layer.
- Cook for 8-10 minutes, stirring every 2 minutes, until the vegetables are tender and lightly golden.
- Pour in the heavy cream and sprinkle with the finely ground black pepper and sea salt, stirring to coat evenly.
- Reduce the heat to low and simmer for 3 minutes, allowing the cream to thicken slightly.
- Tip: For a creamier texture, let it simmer a minute longer until it coats the back of a spoon.
- Remove the skillet from the heat and fold in the freshly grated sharp cheddar cheese until melted and smooth.
- Tip: Grate the cheese yourself for better melting and a richer flavor compared to pre-shredded varieties.
- Let the dish rest for 2 minutes off the heat to allow the flavors to meld together.
Each bite offers a delightful contrast—the tender cauliflower rice mingles with crisp-tender broccoli, all enveloped in a velvety, cheesy sauce that’s both rich and comforting. Enjoy it as a standalone vegetarian main or pair it with grilled chicken for a heartier meal, perhaps garnished with a sprinkle of fresh herbs for a pop of color.
Grilled Shrimp Skewers with Garlic Butter
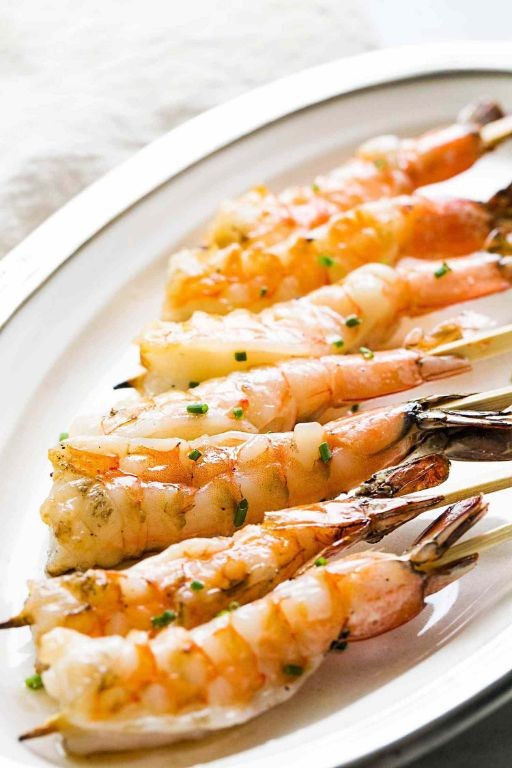
Moments like these, when the late December light slants through the kitchen window, call for something simple yet celebratory. The quiet sizzle of shrimp on the grill, basted with golden garlic butter, feels like a small, personal feast for the senses.
Serving: 4 | Pre Time: 20 minutes | Cooking Time: 10 minutes
Ingredients
– 1 ½ pounds of large, wild-caught shrimp, peeled and deveined
– 3 tablespoons of rich extra virgin olive oil
– 3 cloves of aromatic fresh garlic, minced
– ½ cup (1 stick) of high-quality unsalted butter
– 1 tablespoon of freshly squeezed lemon juice
– 1 teaspoon of finely ground sea salt
– ½ teaspoon of freshly cracked black pepper
– 2 tablespoons of finely chopped fresh parsley
Instructions
1. Pat the peeled and deveined shrimp completely dry with paper towels to ensure a good sear.
2. In a medium bowl, toss the shrimp with 2 tablespoons of the rich extra virgin olive oil, the finely ground sea salt, and the freshly cracked black pepper until evenly coated.
3. Thread the shrimp onto metal or soaked wooden skewers, placing about 4-5 shrimp per skewer.
4. Preheat a grill or grill pan to medium-high heat, approximately 400°F.
5. While the grill heats, melt the high-quality unsalted butter in a small saucepan over low heat.
6. Add the remaining 1 tablespoon of rich extra virgin olive oil and the minced aromatic fresh garlic to the melted butter and cook for 1-2 minutes, just until fragrant but not browned.
7. Remove the garlic butter sauce from the heat and stir in the freshly squeezed lemon juice and the finely chopped fresh parsley.
8. Place the shrimp skewers on the preheated grill and cook for 2-3 minutes per side, or until the shrimp are opaque and firm with light grill marks.
9. During the last minute of cooking, generously brush the shrimp with the prepared garlic butter sauce using a pastry brush.
10. Remove the skewers from the grill and immediately drizzle with any remaining garlic butter sauce from the saucepan.
Grilled to perfection, the shrimp offer a tender, juicy bite with a subtle smoky char. The garlic butter, infused with bright lemon and fresh parsley, pools around each piece, creating a luxurious, savory sauce perfect for sopping up with crusty bread or drizzling over a simple bed of rice.
Avocado and Black Bean Lettuce Wraps
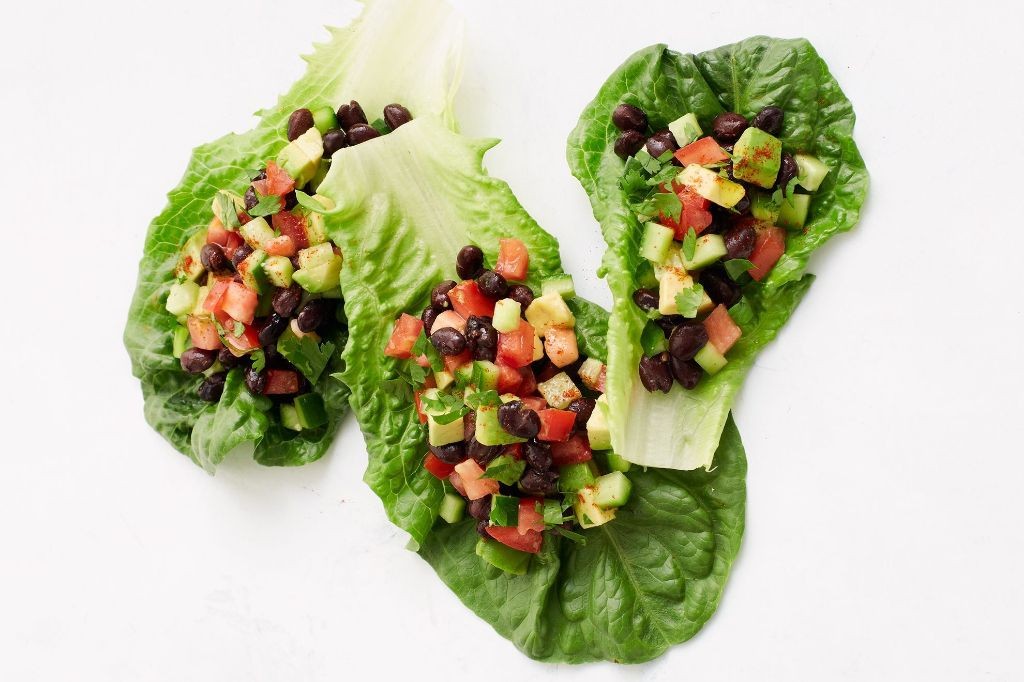
Folding back the crisp lettuce leaves, I remember how these simple wraps became my quiet afternoon ritual—a moment to pause with something fresh, nourishing, and gently satisfying.
Serving: 4 | Pre Time: 15 minutes | Cooking Time: 10 minutes
Ingredients
– 1 large, ripe avocado, creamy and smooth
– 1 (15-ounce) can of black beans, rinsed and drained until cool
– 8 large butter lettuce leaves, crisp and cup-shaped
– 1/4 cup of finely diced red onion, vibrant and sharp
– 1/4 cup of fresh cilantro leaves, bright and fragrant
– 2 tablespoons of freshly squeezed lime juice, tangy and zesty
– 1 tablespoon of extra virgin olive oil, rich and golden
– 1/2 teaspoon of ground cumin, warm and earthy
– 1/4 teaspoon of fine sea salt, clean and balanced
– 1/4 teaspoon of freshly cracked black pepper, aromatic and bold
Instructions
1. Place the rinsed black beans in a medium mixing bowl and gently mash them with a fork until about half are broken down, leaving some whole for texture—this helps the mixture hold together without becoming pasty.
2. Halve the ripe avocado, remove the pit, scoop the flesh into the bowl with the beans, and mash lightly with the fork to combine, creating a chunky, cohesive base.
3. Add the finely diced red onion, fresh cilantro leaves, freshly squeezed lime juice, extra virgin olive oil, ground cumin, fine sea salt, and freshly cracked black pepper to the bowl.
4. Stir all ingredients together with a spoon until evenly mixed, tasting once to adjust seasoning if needed, but avoid overmixing to keep the texture varied.
5. Rinse the butter lettuce leaves under cool water, pat them completely dry with a clean kitchen towel to prevent sogginess, and arrange them on a serving platter.
6. Spoon about 1/4 cup of the avocado-black bean mixture into the center of each lettuce leaf, dividing it evenly among the 8 leaves for consistent servings.
7. Serve immediately at room temperature to enjoy the fresh contrast of flavors and textures.
Gently biting into these wraps reveals a cool, crisp lettuce shell giving way to the creamy avocado and hearty beans, with pops of sharp onion and zesty lime. For a creative twist, top them with a sprinkle of crumbled queso fresco or a drizzle of smoky chipotle sauce to add depth without overwhelming the lightness.
Low-Carb Turkey Meatballs with Zucchini Pasta

Today, as the afternoon light slants through my kitchen window, I find myself craving something comforting yet light—a meal that feels nourishing without weighing me down. These low-carb turkey meatballs with zucchini pasta are my answer to that quiet yearning, a simple dish that brings together earthy herbs and fresh vegetables in a gentle embrace.
Serving: 4 | Pre Time: 20 minutes | Cooking Time: 25 minutes
Ingredients
– 1 pound of lean ground turkey
– 2 medium-sized, firm zucchini
– 1 large, farm-fresh egg
– 1/4 cup of finely grated Parmesan cheese
– 1/4 cup of almond flour
– 2 cloves of fragrant garlic, minced
– 1 tablespoon of rich extra virgin olive oil
– 1 teaspoon of dried oregano
– 1/2 teaspoon of finely ground black pepper
– 1/2 teaspoon of sea salt
– 1/4 cup of fresh, chopped parsley
Instructions
1. Preheat your oven to 375°F and line a baking sheet with parchment paper.
2. In a large mixing bowl, combine the lean ground turkey, farm-fresh egg, finely grated Parmesan cheese, almond flour, minced fragrant garlic, dried oregano, finely ground black pepper, sea salt, and fresh, chopped parsley.
3. Gently mix the ingredients with your hands until just combined, being careful not to overwork the meat to keep the meatballs tender.
4. Shape the mixture into 16 evenly sized meatballs, about 1 inch in diameter, and place them on the prepared baking sheet.
5. Bake the meatballs in the preheated oven for 20-25 minutes, or until they reach an internal temperature of 165°F and are golden brown on the outside.
6. While the meatballs bake, wash and trim the ends off the firm zucchini.
7. Use a spiralizer to create long, thin zucchini noodles, or carefully slice them into ribbons with a vegetable peeler for a rustic touch.
8. Heat the rich extra virgin olive oil in a large skillet over medium heat until it shimmers lightly.
9. Add the zucchini noodles to the skillet and sauté for 3-5 minutes, stirring occasionally, until they are just tender but still have a slight bite to avoid becoming mushy.
10. Remove the zucchini noodles from the heat and divide them among four serving plates.
11. Once the meatballs are done baking, let them rest for 2 minutes to allow the juices to redistribute, then place them atop the zucchini noodles.
12. Garnish with additional fresh parsley if desired.
Here, the meatballs offer a juicy, herb-infused heartiness that pairs beautifully with the delicate, slightly crisp zucchini noodles. For a creative twist, try drizzling with a lemon-herb vinaigrette or topping with a sprinkle of chili flakes to add a gentle kick to this wholesome meal.
Spicy Tofu Stir-Fry with Mixed Vegetables
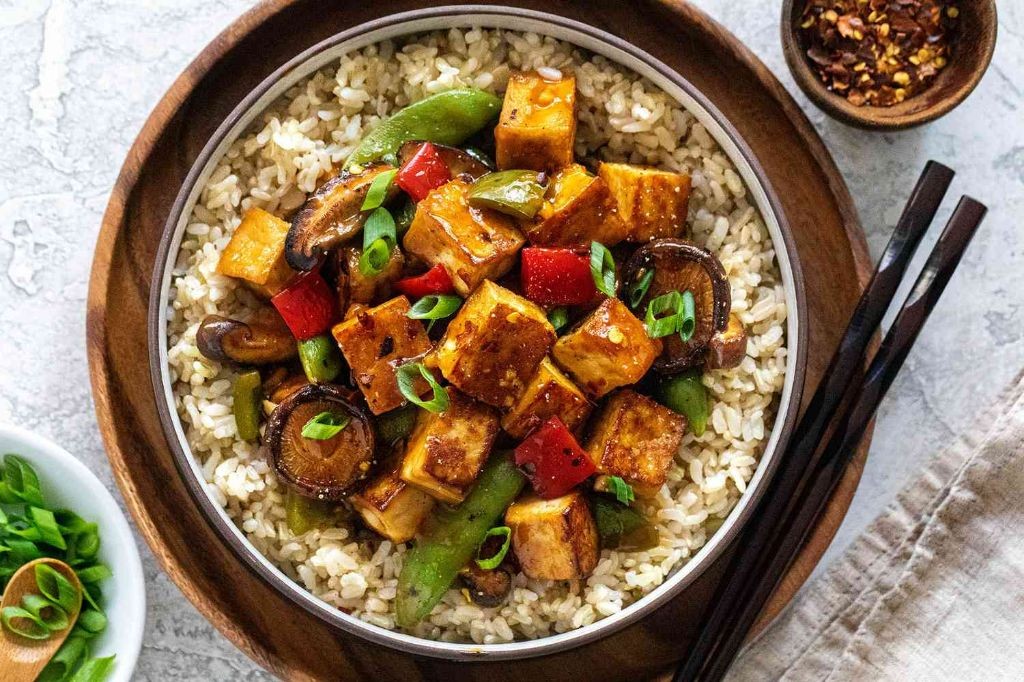
Venturing into the kitchen on this quiet afternoon, I find myself drawn to the simple comfort of a stir-fry, a dish that feels like a warm embrace after a long day. There’s something deeply soothing about the sizzle of tofu hitting a hot pan and the vibrant colors of fresh vegetables coming together in a harmonious dance. This spicy tofu stir-fry with mixed vegetables is my go-to when I need a meal that’s both nourishing and gently invigorating, a reminder that even the busiest days can end with a moment of quiet satisfaction.
Serving: 4 | Pre Time: 15 minutes | Cooking Time: 15 minutes
Ingredients
– 1 block (14 oz) firm tofu, pressed and cubed into 1-inch pieces
– 2 tbsp toasted sesame oil, with its nutty, aromatic fragrance
– 3 cloves garlic, minced into fine, pungent bits
– 1 tbsp fresh ginger, grated to release its zesty, warming essence
– 1 red bell pepper, sliced into thin, crisp strips
– 1 cup broccoli florets, cut into small, tender pieces
– 1 carrot, julienned into sweet, crunchy matchsticks
– 1/2 cup snap peas, trimmed for a fresh, crisp bite
– 3 tbsp soy sauce, for a rich, savory depth
– 1 tbsp rice vinegar, adding a bright, tangy note
– 1 tsp honey, for a subtle, balancing sweetness
– 1/2 tsp red pepper flakes, to infuse a gentle, lingering heat
– 2 green onions, thinly sliced for a fresh, oniony garnish
– 1 tbsp sesame seeds, toasted for a nutty, crunchy finish
Instructions
1. Press the firm tofu between paper towels for 10 minutes to remove excess moisture, then cut it into 1-inch cubes for even cooking.
2. Heat 1 tbsp toasted sesame oil in a large skillet or wok over medium-high heat until it shimmers, about 1 minute.
3. Add the tofu cubes in a single layer and cook for 5-7 minutes, turning occasionally, until golden brown and crispy on all sides.
4. Remove the tofu from the skillet and set it aside on a plate, covering loosely to keep warm.
5. In the same skillet, add the remaining 1 tbsp toasted sesame oil and heat for 30 seconds until fragrant.
6. Add the minced garlic and grated ginger, stirring constantly for 1 minute until aromatic but not browned.
7. Tip: To prevent burning, keep the heat at medium and stir frequently—this releases the flavors without bitterness.
8. Add the sliced red bell pepper, broccoli florets, julienned carrot, and trimmed snap peas to the skillet.
9. Stir-fry the vegetables for 5-6 minutes, until they are tender-crisp and bright in color, stirring occasionally.
10. Tip: For even cooking, cut the vegetables into uniform sizes, which helps them cook at the same rate.
11. In a small bowl, whisk together the soy sauce, rice vinegar, honey, and red pepper flakes until well combined.
12. Return the cooked tofu to the skillet with the vegetables, pouring the sauce mixture over the top.
13. Gently toss everything together and cook for 2-3 minutes, until the sauce thickens slightly and coats the ingredients evenly.
14. Tip: Let the stir-fry sit off the heat for a minute before serving to allow the flavors to meld together beautifully.
15. Garnish with thinly sliced green onions and toasted sesame seeds just before serving.
16. Perhaps what I love most about this dish is the delightful contrast of textures—the crispy tofu against the tender-crisp vegetables, all enveloped in a sauce that’s both spicy and subtly sweet. It pairs wonderfully with fluffy jasmine rice or can be tucked into lettuce wraps for a lighter, hands-on meal, making it versatile enough for any mood or occasion.
Chia Seed Pudding with Almond Milk and Cinnamon
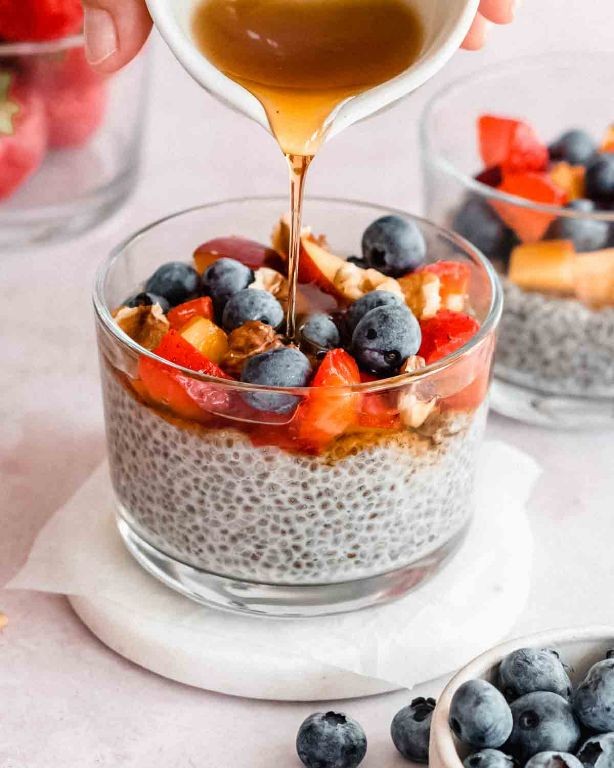
Dawn’s first light finds me in the kitchen, measuring out ingredients with quiet intention, as if this simple pudding could hold the stillness of the morning itself. It’s a gentle ritual of stirring and waiting, a promise of creamy comfort that requires nothing more than patience and the softest touch of cinnamon.
Serving: 2 | Pre Time: 5 minutes | Cooking Time: 0 minutes
Ingredients
– 1/2 cup of plump, black chia seeds
– 1 1/2 cups of creamy, unsweetened almond milk
– 2 tablespoons of pure, golden maple syrup
– 1/2 teaspoon of fragrant, ground cinnamon
– A pinch of flaky, sea salt
Instructions
1. In a medium-sized mixing bowl, combine the plump, black chia seeds and the creamy, unsweetened almond milk.
2. Whisk the mixture vigorously for 30 seconds to prevent the chia seeds from clumping together as they hydrate.
3. Add the pure, golden maple syrup, fragrant, ground cinnamon, and a pinch of flaky, sea salt to the bowl.
4. Whisk again until all ingredients are fully incorporated and the mixture appears uniform.
5. Cover the bowl tightly with plastic wrap, pressing it directly onto the surface of the pudding to prevent a skin from forming.
6. Place the covered bowl in the refrigerator for at least 4 hours, or ideally overnight, to allow the chia seeds to fully absorb the liquid and thicken.
7. After the chilling time, remove the bowl from the refrigerator and give the pudding one final stir to break up any gel that formed on top.
8. Divide the pudding evenly between two serving glasses or bowls.
You’ll find the texture transforms into a delightfully thick, tapioca-like gel, with each spoonful offering a subtle nuttiness from the almond milk perfectly balanced by the warm spice. For a creative twist, layer it in a glass with fresh berries and a dollop of coconut whipped cream just before serving.
Summary
Savoring these 20 diabetic-friendly recipes can truly transform your health journey. Each dish proves that eating well is both delicious and doable. We’d love to hear which recipes become your new favorites—please leave a comment below! And if you found this roundup helpful, consider sharing it on Pinterest to inspire others in your community. Happy, healthy cooking!


