Mmm, can you already smell the aromas? Hosting a dinner party should be about creating moments, not stressing over the menu. We’ve gathered 20 elegant recipes that are as impressive as they are approachable, perfect for turning your evening into a celebration of good food and great company. Let’s make your next gathering truly memorable—read on for the inspiration you need.
Garlic Butter Herb Roasted Chicken
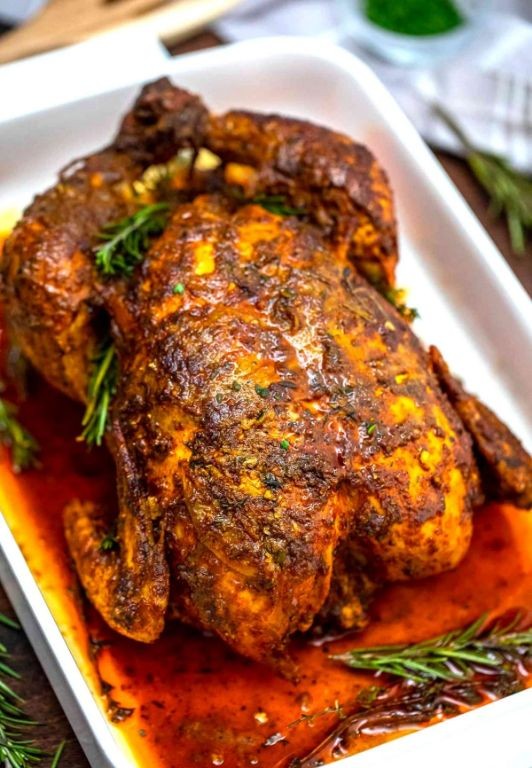
Under the gentle warmth of the oven, a humble chicken transforms into a masterpiece of comfort and flavor, its skin crisping to a perfect golden-brown while the interior remains impossibly juicy. This Garlic Butter Herb Roasted Chicken is the centerpiece every home cook dreams of—deceptively simple to prepare yet delivering restaurant-worthy results that fill the kitchen with an intoxicating, herbaceous aroma. It’s the kind of dish that turns an ordinary evening into a celebration, promising tender, flavorful meat with every succulent slice.
Serving: 4 | Pre Time: 15 minutes | Cooking Time: 75 minutes
Ingredients
– 1 whole chicken (3.5 to 4 lbs), patted dry with paper towels
– 4 tbsp unsalted butter, softened to room temperature for easy mixing
– 4 cloves garlic, minced
– 1 tbsp fresh rosemary, finely chopped (or 1 tsp dried)
– 1 tbsp fresh thyme, finely chopped (or 1 tsp dried)
– 1 tsp kosher salt
– 1/2 tsp freshly ground black pepper
– 1 lemon, halved
– 1 tbsp olive oil, for drizzling (or any neutral oil)
Instructions
1. Preheat your oven to 425°F (218°C) and position a rack in the middle of the oven.
2. In a small bowl, combine the softened butter, minced garlic, chopped rosemary, chopped thyme, kosher salt, and black pepper until a smooth, fragrant herb butter forms.
3. Gently loosen the skin over the chicken breast by sliding your fingers underneath, being careful not to tear it, to create pockets for the butter.
4. Spread half of the garlic herb butter evenly under the loosened skin, massaging it over the breast meat to ensure even flavor distribution and moisture.
5. Rub the remaining herb butter all over the outside of the chicken, coating the skin thoroughly for maximum crispiness and golden color.
6. Place the halved lemon inside the chicken cavity, which will steam from within to keep the meat tender and infuse it with a bright, citrusy note.
7. Drizzle the olive oil over the chicken and place it breast-side up in a roasting pan or oven-safe skillet.
8. Roast the chicken at 425°F for 15 minutes to quickly sear the skin, then reduce the oven temperature to 375°F (190°C) and continue roasting for 60 minutes, or until a meat thermometer inserted into the thickest part of the thigh reads 165°F (74°C).
9. Remove the chicken from the oven and let it rest, uncovered, for 15 minutes on a cutting board to allow the juices to redistribute, ensuring every slice is moist and flavorful.
10. Carve the chicken and serve immediately, spooning any pan juices over the top for added richness.
Every bite of this roasted chicken offers a symphony of textures, from the crackling, herb-infused skin to the impossibly tender, garlicky meat that falls effortlessly off the bone. The subtle citrus from the lemon brightens the rich butter, while the rosemary and thyme lend an earthy, aromatic depth that makes this dish feel both rustic and refined. For a creative twist, shred any leftovers into a creamy pasta or layer them atop a crisp salad with a tangy vinaigrette, transforming yesterday’s centerpiece into today’s delightful new meal.
Creamy Mushroom Risotto
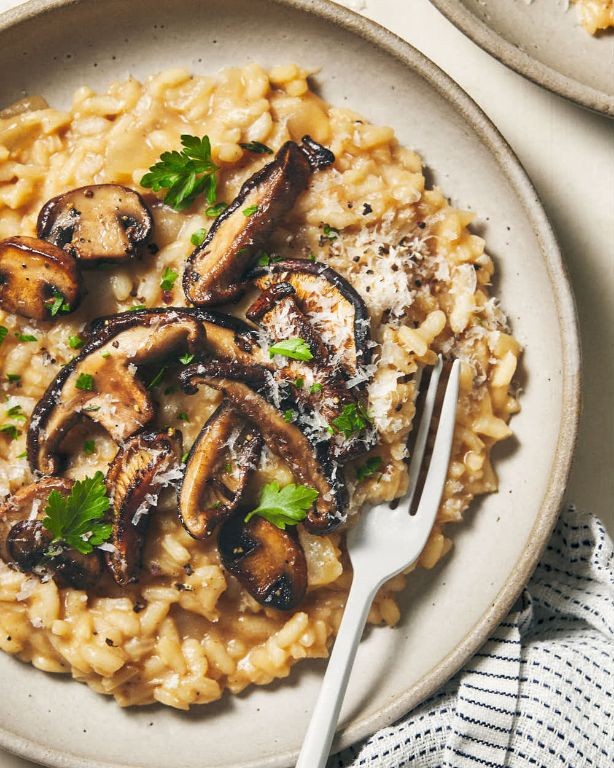
A velvety, aromatic risotto, this creamy mushroom version transforms humble ingredients into an elegant centerpiece, perfect for a cozy winter evening or a sophisticated dinner party. As the arborio rice slowly absorbs a rich broth, it releases its starches to create that signature luxurious texture, while earthy mushrooms and sharp Parmesan add depth and complexity. This dish, though requiring patience, rewards with a comforting yet refined experience that feels both indulgent and wholesome.
Serving: 4 | Pre Time: 15 minutes | Cooking Time: 30 minutes
Ingredients
– 1 ½ cups arborio rice (do not rinse to retain starch)
– 8 ounces cremini mushrooms, sliced (or a mix of wild mushrooms)
– 4 cups low-sodium chicken or vegetable broth, warmed
– 1 small yellow onion, finely diced
– 3 cloves garlic, minced
– ½ cup dry white wine, such as Sauvignon Blanc
– ½ cup grated Parmesan cheese, plus extra for serving
– ¼ cup unsalted butter, divided
– 2 tablespoons olive oil
– 2 tablespoons fresh parsley, chopped (for garnish)
– Salt and freshly ground black pepper, to season
Instructions
1. In a medium saucepan, heat the broth over medium-low heat until it simmers gently, then reduce to low to keep warm throughout cooking.
2. In a large, heavy-bottomed pot or Dutch oven, heat the olive oil and 2 tablespoons of butter over medium heat until the butter melts and foams slightly.
3. Add the diced onion and cook, stirring frequently, for 4–5 minutes until translucent and soft but not browned.
4. Stir in the minced garlic and cook for 1 minute until fragrant, being careful not to let it burn.
5. Add the sliced mushrooms and cook, stirring occasionally, for 6–8 minutes until they release their liquid and turn golden brown.
6. Tip: For deeper flavor, let the mushrooms sear without stirring for a minute at a time to develop a caramelized crust.
7. Add the arborio rice to the pot and toast, stirring constantly, for 2 minutes until the grains become slightly translucent at the edges.
8. Pour in the white wine and cook, stirring, until the liquid is fully absorbed, about 2–3 minutes.
9. Tip: Use a wooden spoon to stir gently to avoid breaking the rice grains, which helps maintain the risotto’s creamy structure.
10. Begin adding the warm broth one ladleful (about ½ cup) at a time, stirring frequently and allowing each addition to be nearly absorbed before adding the next.
11. Continue this process for 18–22 minutes, until the rice is al dente—tender with a slight bite—and the mixture is creamy but not soupy.
12. Remove the pot from the heat and stir in the remaining 2 tablespoons of butter and the grated Parmesan cheese until fully incorporated and glossy.
13. Season with salt and freshly ground black pepper to taste, remembering that the broth and cheese add saltiness.
14. Tip: Let the risotto rest off the heat for 2 minutes before serving to allow the flavors to meld and the texture to settle.
15. Garnish with chopped parsley and extra Parmesan if desired.
Finished with a final stir of butter and Parmesan, this risotto achieves a luscious, almost pudding-like consistency that clings to the spoon. Flavors of earthy mushrooms and sharp cheese balance beautifully, while a hint of white wine adds a subtle brightness. For a creative twist, top with sautéed wild mushrooms or a drizzle of truffle oil just before serving to elevate its rustic elegance.
Pan-Seared Scallops with Lemon Beurre Blanc
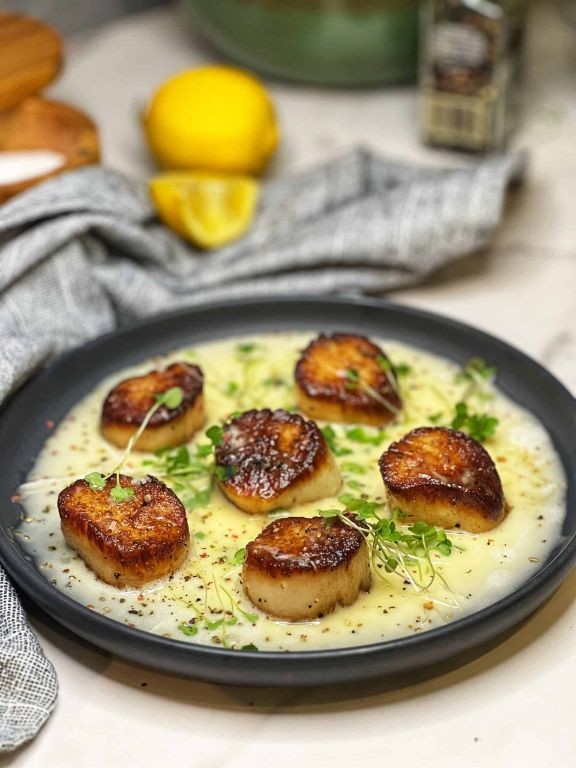
Pristine scallops, with their sweet, briny essence, transform into an elegant centerpiece when kissed by a hot pan and crowned with a silky lemon beurre blanc. This classic French technique yields a dish that feels celebratory yet is deceptively simple to master, perfect for a sophisticated weeknight dinner or a special holiday gathering. The key lies in achieving a perfect sear on the scallops and emulsifying the butter into a luscious, tangy sauce.
Serving: 4 | Pre Time: 10 minutes | Cooking Time: 15 minutes
Ingredients
– 1 lb large sea scallops, side muscle removed
– 2 tbsp unsalted butter, divided
– 1 tbsp olive oil, or any neutral high-heat oil
– 1/4 cup dry white wine, such as Sauvignon Blanc
– 2 tbsp fresh lemon juice, from about 1 lemon
– 1/4 cup heavy cream
– 1/2 cup cold unsalted butter, cut into 1/2-inch cubes
– Salt, to season
– Freshly ground black pepper, to season
– 2 tbsp fresh parsley, finely chopped for garnish
Instructions
1. Pat the scallops completely dry with paper towels and season both sides generously with salt and pepper. (Tip: Thorough drying is crucial for a golden sear, not steaming.)
2. Heat a large skillet over medium-high heat for 2 minutes until very hot.
3. Add 1 tablespoon of olive oil and 1 tablespoon of unsalted butter to the hot skillet, swirling to coat.
4. Carefully place the scallops in the skillet, ensuring they are not touching, and sear undisturbed for 2 minutes until a deep golden crust forms.
5. Using tongs, flip each scallop and cook for 1 more minute until just opaque and firm to the touch. Transfer to a warm plate.
6. Reduce the skillet heat to medium and pour in 1/4 cup of dry white wine to deglaze, scraping up any browned bits with a wooden spoon for 1 minute.
7. Add 2 tablespoons of fresh lemon juice and 1/4 cup of heavy cream, simmering for 2 minutes until the mixture reduces slightly and thickens.
8. Whisk in the 1/2 cup of cold, cubed unsalted butter, one cube at a time, until fully incorporated and the sauce is smooth and emulsified. (Tip: Keep the heat low to prevent the sauce from breaking.)
9. Remove the skillet from the heat and season the lemon beurre blanc sauce with a pinch of salt.
10. Spoon the warm sauce onto serving plates, top with the seared scallops, and garnish with 2 tablespoons of finely chopped fresh parsley.
Resulting in a luxurious contrast, the tender, sweet scallops are beautifully complemented by the rich, velvety sauce with its bright citrus notes. For a creative presentation, serve over a bed of creamy risotto or alongside crisp asparagus to soak up every drop of the exquisite beurre blanc.
Spinach and Artichoke Stuffed Chicken

Glistening with golden-brown perfection, this elegant Spinach and Artichoke Stuffed Chicken transforms a weeknight staple into a centerpiece-worthy dish. A savory blend of creamy cheeses, tender spinach, and briny artichoke hearts nestles within juicy chicken breasts, creating a symphony of textures and flavors that feels both indulgent and comforting. It’s an impressive yet approachable recipe that promises to delight both casual dinners and special occasions alike.
Serving: 4 | Pre Time: 20 minutes | Cooking Time: 25 minutes
Ingredients
– 4 boneless, skinless chicken breasts (about 6 oz each)
– 1 cup frozen chopped spinach, thawed and squeezed very dry
– 1 cup canned artichoke hearts, drained and finely chopped
– 4 oz cream cheese, softened to room temperature
– 1/2 cup shredded mozzarella cheese
– 1/4 cup grated Parmesan cheese
– 1 tbsp olive oil (or any neutral oil)
– 1 tsp garlic powder
– 1/2 tsp dried oregano
– 1/2 tsp salt
– 1/4 tsp black pepper
– Cooking spray (for the baking dish)
Instructions
1. Preheat your oven to 375°F (190°C) and lightly coat a 9×13-inch baking dish with cooking spray.
2. In a medium mixing bowl, combine the thawed spinach, chopped artichoke hearts, softened cream cheese, mozzarella, Parmesan, garlic powder, oregano, salt, and pepper until fully incorporated.
3. Place one chicken breast on a cutting board and use a sharp knife to carefully slice a horizontal pocket through the thickest part, being careful not to cut all the way through.
4. Evenly divide the spinach-artichoke mixture among the four chicken breasts, stuffing about 1/4 cup into each pocket.
5. Secure each stuffed chicken breast with 2-3 toothpicks to prevent the filling from leaking during baking.
6. Brush the outside of each chicken breast lightly with olive oil and season with a pinch of additional salt and pepper.
7. Arrange the stuffed chicken breasts in the prepared baking dish, ensuring they are not touching.
8. Bake in the preheated oven for 22-25 minutes, or until the chicken reaches an internal temperature of 165°F (74°C) when measured with a meat thermometer inserted into the thickest part.
9. Remove the baking dish from the oven and let the chicken rest for 5 minutes before carefully removing the toothpicks.
10. Serve the chicken warm, optionally garnished with fresh herbs like parsley or a squeeze of lemon juice.
Nestled within each tender chicken breast, the rich, creamy filling offers a delightful contrast to the perfectly cooked poultry. The melted cheeses bind the spinach and artichokes into a savory, cohesive center that oozes slightly when sliced, while the golden exterior provides a satisfying textural counterpoint. For a complete meal, serve alongside roasted asparagus or a simple arugula salad dressed with lemon vinaigrette to cut through the richness.
Lobster Thermidor
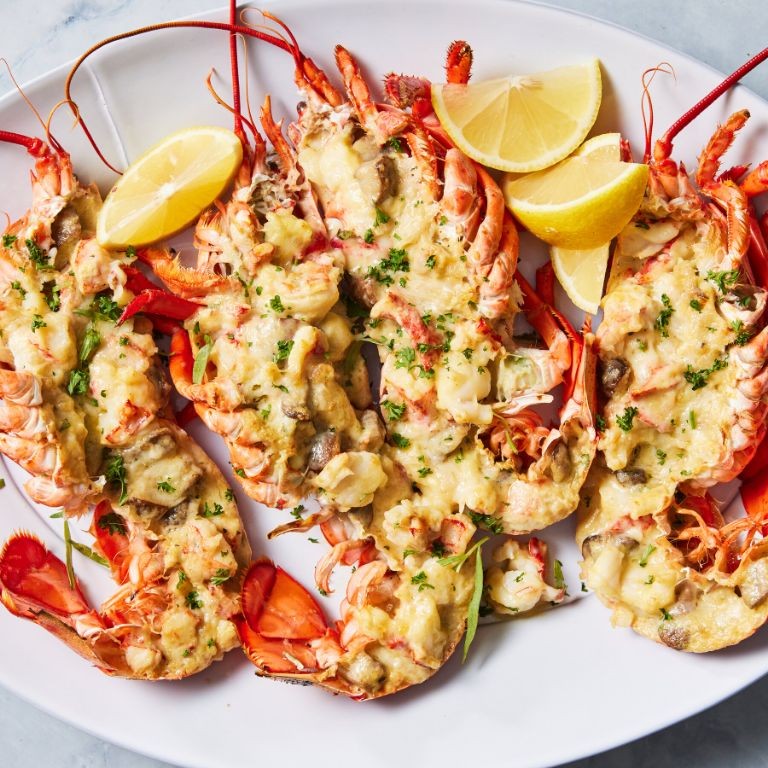
Crafted for special occasions yet surprisingly approachable, Lobster Thermidor is a classic French dish that transforms sweet lobster meat into a luxurious, creamy gratin. This elegant recipe features tender chunks of lobster enveloped in a rich, brandy-kissed béchamel sauce, topped with a golden, bubbling cheese crust. It’s a show-stopping centerpiece that promises to impress at any holiday gathering or celebratory dinner.
Serving: 4 | Pre Time: 30 minutes | Cooking Time: 25 minutes
Ingredients
– 2 (1.5 lb) live lobsters
– 2 tbsp unsalted butter
– 1/4 cup finely chopped shallots
– 1/4 cup brandy or dry sherry
– 2 tbsp all-purpose flour
– 1 cup whole milk, warmed
– 1/2 cup heavy cream
– 1/4 tsp freshly grated nutmeg
– 1/4 cup grated Gruyère cheese, plus extra for topping
– 2 tbsp chopped fresh parsley
– 1 tsp Dijon mustard
– Salt and freshly ground black pepper, to season
Instructions
1. Bring a large pot of salted water to a rolling boil over high heat. Carefully add the live lobsters, cover, and cook for 8–10 minutes until the shells turn bright red and the meat is opaque.
2. Transfer the lobsters to a bowl of ice water to stop the cooking process for 5 minutes, which helps keep the meat tender.
3. Remove the meat from the shells, chop it into 1-inch pieces, and set aside. Reserve the shells for presentation if desired.
4. Preheat your oven to 400°F (204°C) and lightly grease four individual ramekins or a medium baking dish.
5. In a large skillet over medium heat, melt the butter until foamy, about 1–2 minutes.
6. Add the shallots and cook, stirring frequently, for 3–4 minutes until softened and fragrant.
7. Pour in the brandy, let it simmer for 1 minute to cook off the alcohol, then stir in the flour to form a paste (roux).
8. Gradually whisk in the warm milk and heavy cream until smooth, cooking for 3–4 minutes until the sauce thickens enough to coat the back of a spoon.
9. Reduce the heat to low and stir in the nutmeg, Gruyère cheese, parsley, and Dijon mustard until the cheese melts fully.
10. Gently fold in the chopped lobster meat and season with salt and pepper to taste, being careful not to break up the chunks.
11. Divide the mixture evenly among the prepared ramekins and sprinkle with extra Gruyère cheese.
12. Bake for 10–12 minutes, or until the tops are golden brown and bubbly. For a deeper color, broil for the final 1–2 minutes, watching closely to prevent burning.
13. Let the Thermidor rest for 5 minutes before serving to allow the flavors to meld and the dish to set slightly.
Warm and indulgent, this Lobster Thermidor boasts a velvety sauce that clings to each succulent piece of lobster, with a crisp, cheesy topping providing delightful contrast. Serve it straight from the oven in the ramekins for a rustic touch, or plate it alongside a simple green salad to balance the richness. Its elegant presentation and decadent flavor make it a timeless choice for turning an ordinary meal into a memorable feast.
Truffle Mac and Cheese
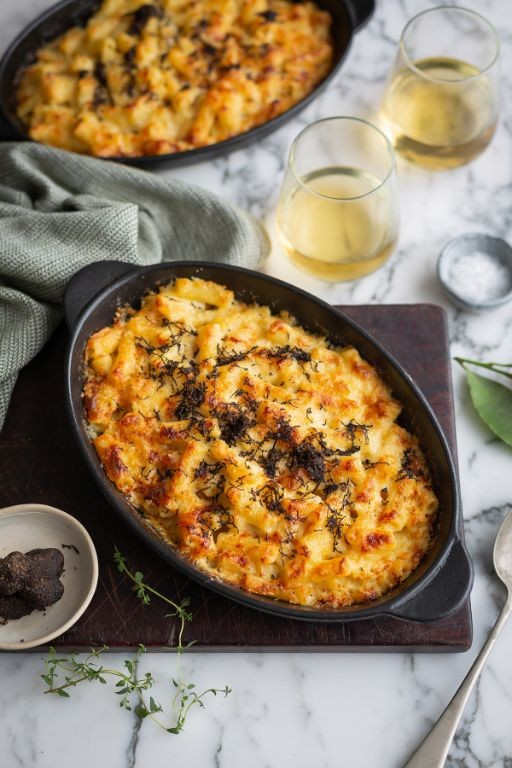
Wrapped in a velvety embrace of creamy cheeses and earthy truffle essence, this elevated take on a classic comfort dish transforms humble macaroni into a sophisticated centerpiece worthy of any holiday table or special gathering. The rich, aromatic notes of truffle meld seamlessly with a decadent cheese sauce, creating a luxurious experience that feels both indulgent and comforting. It’s the perfect dish to impress guests or treat yourself to a moment of culinary elegance.
Serving: 6 | Pre Time: 15 minutes | Cooking Time: 25 minutes
Ingredients
– 1 lb elbow macaroni
– 4 tbsp unsalted butter
– 1/4 cup all-purpose flour
– 3 cups whole milk, warmed to about 110°F
– 8 oz sharp white cheddar cheese, shredded (pre-shredded works, but block cheese melts smoother)
– 4 oz Gruyère cheese, shredded
– 2 tbsp truffle oil (or adjust to taste for a stronger aroma)
– 1/2 cup panko breadcrumbs
– 1/4 cup grated Parmesan cheese
– 1 tsp kosher salt (adjust based on cheese saltiness)
– 1/2 tsp freshly ground black pepper
– 1 tbsp chopped fresh parsley, for garnish (optional)
Instructions
1. Preheat your oven to 375°F and lightly grease a 9×13-inch baking dish.
2. Bring a large pot of salted water to a rolling boil over high heat.
3. Add the elbow macaroni to the boiling water and cook for 7-8 minutes, stirring occasionally, until al dente (it should be tender but still firm to the bite).
4. Drain the pasta in a colander and set it aside; do not rinse to help the sauce adhere better.
5. In the same pot over medium heat, melt the unsalted butter until it bubbles slightly.
6. Whisk in the all-purpose flour and cook for 2 minutes, stirring constantly, until it forms a smooth, pale roux (this eliminates the raw flour taste).
7. Gradually pour in the warmed whole milk while whisking continuously to prevent lumps from forming.
8. Cook the mixture for 5-7 minutes, whisking often, until it thickens enough to coat the back of a spoon.
9. Remove the pot from the heat and stir in the shredded sharp white cheddar and Gruyère cheeses until fully melted and smooth.
10. Fold in the truffle oil, kosher salt, and freshly ground black pepper, tasting to adjust seasoning if needed.
11. Add the drained elbow macaroni to the cheese sauce, stirring gently to coat every piece evenly.
12. Transfer the macaroni mixture to the prepared baking dish, spreading it into an even layer.
13. In a small bowl, combine the panko breadcrumbs and grated Parmesan cheese for the topping.
14. Sprinkle the breadcrumb mixture evenly over the macaroni in the baking dish.
15. Bake in the preheated oven for 15-20 minutes, or until the topping is golden brown and the edges are bubbly.
16. Let the dish rest for 5 minutes after baking to allow the sauce to set slightly before serving.
17. Garnish with chopped fresh parsley if desired.
Melted into a creamy, cohesive whole, this truffle mac and cheese boasts a luxuriously smooth texture punctuated by the satisfying crunch of its golden panko topping. The deep, earthy flavors of truffle oil complement the sharpness of the cheddar and nutty Gruyère, creating a harmonious balance that elevates each bite. For a stunning presentation, serve it in individual ramekins or alongside a crisp green salad to cut through the richness.
Pomegranate Glazed Salmon

Crafted for festive gatherings or elegant weeknight dinners, this pomegranate glazed salmon transforms a simple fillet into a showstopping centerpiece. The sweet-tart glaze caramelizes into a glossy, ruby-red crust, while the fish remains tender and flaky within. It’s a dish that feels celebratory yet comes together with minimal fuss, perfect for impressing guests or treating yourself.
Serving: 4 | Pre Time: 10 minutes | Cooking Time: 15 minutes
Ingredients
– 4 (6-ounce) salmon fillets, skin-on or skinless (pat dry with paper towels for better searing)
– 1 tablespoon olive oil, or any neutral oil
– 1/2 teaspoon kosher salt
– 1/4 teaspoon freshly ground black pepper
– 1 cup pomegranate juice (100% juice, not cocktail, for intense flavor)
– 2 tablespoons honey
– 1 tablespoon balsamic vinegar
– 1 teaspoon Dijon mustard
– 1 garlic clove, minced (about 1 teaspoon)
– 1/2 teaspoon fresh thyme leaves, or 1/4 teaspoon dried thyme
– 1 tablespoon unsalted butter, cold (cut into small pieces for easy incorporation)
Instructions
1. Preheat your oven to 400°F (200°C) and line a baking sheet with parchment paper.
2. Pat the salmon fillets completely dry with paper towels to ensure a crisp exterior.
3. Season both sides of the salmon evenly with kosher salt and freshly ground black pepper.
4. Heat olive oil in a large oven-safe skillet over medium-high heat until shimmering, about 2 minutes.
5. Place the salmon fillets in the skillet, skin-side down if using skin-on, and sear undisturbed for 3 minutes to form a golden crust.
6. Transfer the skillet to the preheated oven and bake the salmon for 8–10 minutes, until it flakes easily with a fork and reaches an internal temperature of 145°F (63°C).
7. While the salmon bakes, combine pomegranate juice, honey, balsamic vinegar, Dijon mustard, minced garlic, and thyme in a small saucepan.
8. Bring the mixture to a boil over medium-high heat, then reduce to a simmer and cook for 10–12 minutes, stirring occasionally, until it reduces to about 1/3 cup and thickens to a syrup-like consistency.
9. Remove the glaze from heat and whisk in cold butter pieces one at a time until fully melted and emulsified, creating a glossy finish.
10. Brush the warm glaze generously over the baked salmon fillets just before serving.
Now, savor the contrast of the sticky, sweet-tart glaze against the moist, flaky salmon. For a vibrant presentation, garnish with fresh pomegranate arils and thyme sprigs, or serve alongside roasted vegetables or a simple quinoa salad to balance the richness.
Chocolate Lava Cake with Raspberry Coulis
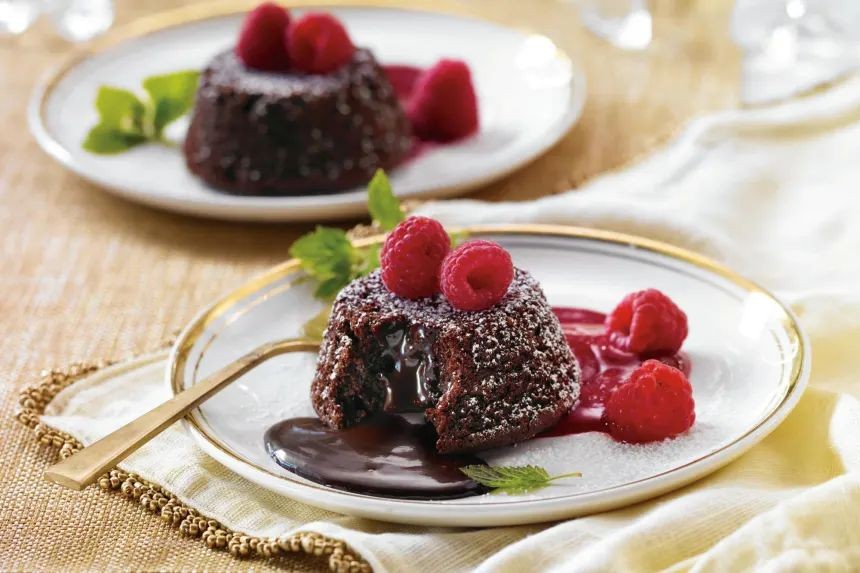
Just when you thought chocolate desserts couldn’t get more decadent, this molten masterpiece emerges—a warm, gooey-centered cake that oozes with rich chocolate upon each spoonful, elegantly paired with a vibrant raspberry coulis that cuts through the sweetness with its bright, tart notes. Perfect for holiday gatherings or an indulgent weeknight treat, it transforms simple ingredients into a restaurant-worthy finale that’s surprisingly approachable for home bakers. The contrast of textures and flavors creates a symphony in every bite, making it an unforgettable dessert experience.
Serving: 6 | Pre Time: 20 minutes | Cooking Time: 12 minutes
Ingredients
– 6 ounces semisweet chocolate, chopped (use high-quality chocolate for best flavor)
– ½ cup unsalted butter, plus extra for greasing ramekins
– 2 large eggs, at room temperature
– 2 large egg yolks, at room temperature
– ¼ cup granulated sugar
– 1 teaspoon vanilla extract
– 2 tablespoons all-purpose flour
– ⅛ teaspoon salt
– 6 ounces fresh or frozen raspberries (thaw if frozen)
– 2 tablespoons granulated sugar, for the coulis
– 1 tablespoon water
– Powdered sugar, for dusting (optional)
Instructions
1. Preheat your oven to 425°F (218°C) and generously grease six 6-ounce ramekins with butter, ensuring even coating to prevent sticking.
2. In a heatproof bowl set over a saucepan of simmering water, melt the 6 ounces of chopped semisweet chocolate and ½ cup unsalted butter together, stirring occasionally until smooth, then remove from heat and let cool slightly.
3. In a separate bowl, whisk together 2 large eggs, 2 large egg yolks, ¼ cup granulated sugar, and 1 teaspoon vanilla extract until pale and slightly thickened, about 2-3 minutes.
4. Gently fold the cooled chocolate mixture into the egg mixture until fully combined, being careful not to deflate the eggs.
5. Sift 2 tablespoons all-purpose flour and ⅛ teaspoon salt into the batter, then fold gently until just incorporated, avoiding overmixing to keep the cake tender.
6. Divide the batter evenly among the prepared ramekins, filling each about three-quarters full, and place them on a baking sheet for easier handling.
7. Bake in the preheated oven for exactly 10-12 minutes, until the edges are set but the centers still jiggle slightly when shaken—this ensures the molten interior.
8. While the cakes bake, combine 6 ounces raspberries, 2 tablespoons granulated sugar, and 1 tablespoon water in a small saucepan over medium heat, stirring until the berries break down and the sauce thickens, about 5-7 minutes.
9. Strain the raspberry coulis through a fine-mesh sieve to remove seeds, pressing with a spoon to extract all liquid, then set aside to cool.
10. Remove the cakes from the oven and let them rest for 1 minute before carefully inverting each onto a serving plate, tapping gently to release.
11. Dust the cakes with powdered sugar if desired, then drizzle the raspberry coulis around each plate or over the top for a decorative touch.
From the moment you crack into the warm exterior, the velvety chocolate lava flows luxuriously, creating a rich pool that mingles with the tangy raspberry coulis. The cake itself boasts a delicate crumb that contrasts beautifully with the molten center, while the coulis adds a refreshing acidity that balances the sweetness. For a creative twist, serve with a scoop of vanilla ice cream or garnish with fresh mint leaves to elevate this dessert into a true showstopper.
Tiramisu with Espresso Soaked Ladyfingers
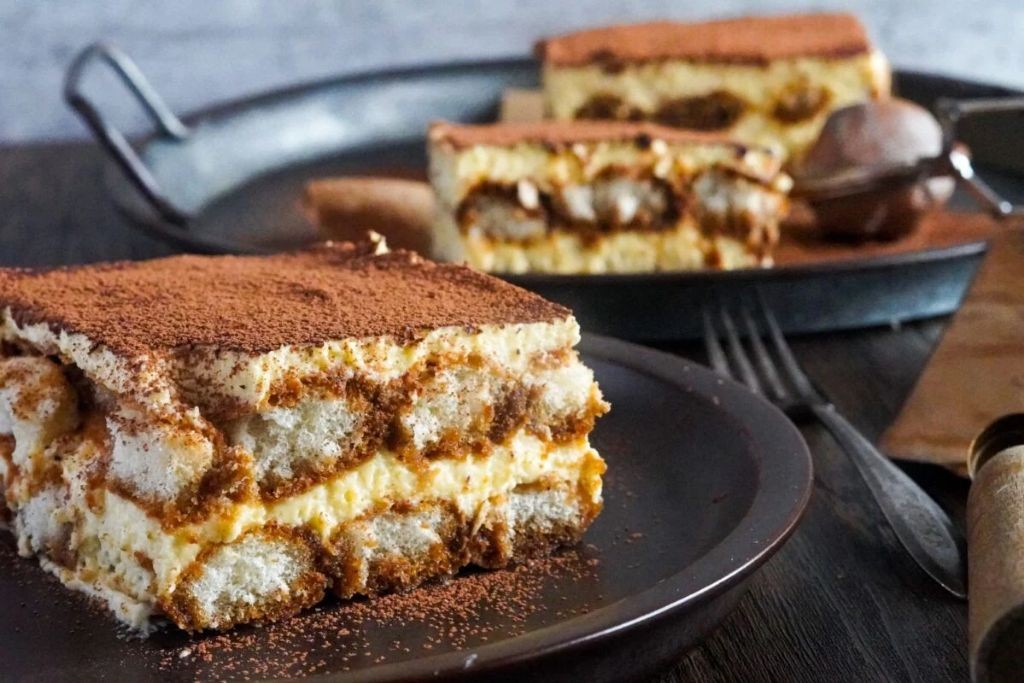
Revered as the quintessential Italian dessert, Tiramisu with Espresso Soaked Ladyfingers offers a sublime interplay of textures and flavors. This no-bake masterpiece layers airy mascarpone cream with coffee-kissed cookies for an elegant yet surprisingly simple treat. Its name, translating to ‘pick me up,’ perfectly captures the delightful lift from rich espresso and cocoa.
Serving: 8 | Pre Time: 30 minutes | Cooking Time: 0 minutes
Ingredients
– 1 cup strong brewed espresso, cooled to room temperature (or 1 cup hot water mixed with 2 tbsp instant espresso powder)
– 3 tbsp granulated sugar, divided
– 1/4 cup coffee liqueur, optional for a boozy version (or substitute with extra espresso)
– 24 ladyfinger cookies (savoiardi)
– 16 oz mascarpone cheese, at room temperature for easy mixing
– 3 large eggs, separated (use pasteurized eggs for safety if concerned about raw eggs)
– 1 tsp pure vanilla extract
– 1/4 cup heavy whipping cream, chilled
– 2 tbsp unsweetened cocoa powder, for dusting
Instructions
1. In a shallow bowl, combine the cooled espresso, 1 tablespoon of the granulated sugar, and the coffee liqueur (if using), stirring until the sugar dissolves completely.
2. Quickly dip each ladyfinger cookie into the espresso mixture for 2-3 seconds per side—just until moistened but not soggy—and arrange them in a single layer in an 8×8-inch baking dish. Tip: Work swiftly to prevent the cookies from becoming too soft and breaking.
3. In a large mixing bowl, use an electric mixer on medium speed to beat the egg yolks with the remaining 2 tablespoons of granulated sugar for 3-4 minutes, until the mixture is pale yellow and slightly thickened.
4. Add the room-temperature mascarpone cheese and vanilla extract to the yolk mixture, beating on low speed just until smooth and combined, about 1 minute; avoid overmixing to keep the cream light.
5. In a separate, clean bowl, use the electric mixer on high speed to whip the heavy cream until it forms stiff peaks, about 2-3 minutes, then gently fold it into the mascarpone mixture with a spatula until no white streaks remain.
6. In another clean bowl, beat the egg whites on high speed until they form stiff peaks, about 3-4 minutes, then carefully fold them into the mascarpone-cream mixture to incorporate air and create a fluffy texture.
7. Spread half of the mascarpone cream evenly over the layer of soaked ladyfingers in the baking dish using a spatula.
8. Arrange a second layer of espresso-dipped ladyfingers over the cream, repeating the dipping process from step 2.
9. Spread the remaining mascarpone cream over the second layer of ladyfingers, smoothing the top with the spatula.
10. Cover the baking dish with plastic wrap and refrigerate for at least 6 hours, or preferably overnight, to allow the flavors to meld and the dessert to set firmly. Tip: Chilling is crucial for the tiramisu to hold its shape when sliced.
11. Just before serving, use a fine-mesh sieve to dust the top of the tiramisu evenly with the unsweetened cocoa powder. Tip: Dusting right before serving prevents the cocoa from absorbing moisture and becoming blotchy.
Tender layers of espresso-infused ladyfingers meld with the velvety, cloud-like mascarpone cream, offering a luxurious contrast between the bold coffee notes and the sweet, creamy richness. For a creative twist, serve individual portions in elegant glasses, garnished with a sprinkle of chocolate shavings or a few coffee beans to enhance the visual appeal and aromatic experience.


