
Busy weeknights just got a whole lot tastier! We’ve rounded up 20 creative dinner sandwich recipes that transform the humble sandwich into a satisfying, delicious meal. From cozy comfort food to quick-fix favorites, these ideas will inspire you to ditch the takeout menu and get cooking. Get ready to discover your new go-to dinner—let’s dive in!
Grilled Chicken Avocado Sandwich
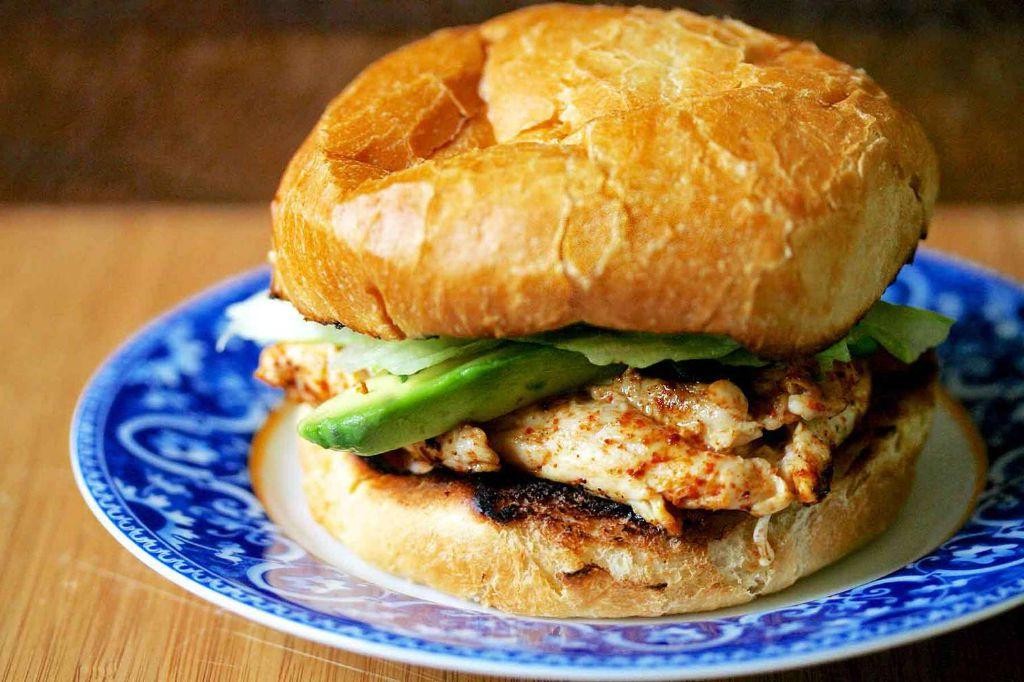
Whenever I’m craving something hearty yet fresh, this grilled chicken avocado sandwich is my absolute go-to—it’s the perfect balance of smoky, creamy, and crisp that always hits the spot, especially on busy weeknights when I want a satisfying meal without the fuss. I first whipped this up after a summer barbecue, using leftover grilled chicken, and it’s been a staple in my kitchen ever since!
Serving: 2 | Pre Time: 15 minutes | Cooking Time: 10 minutes
Ingredients
– 2 boneless, skinless chicken breasts (I like to pound them to an even thickness for quicker cooking)
– 1 ripe avocado (go for one that yields slightly to gentle pressure)
– 4 slices of sourdough bread (my favorite for its tangy chew)
– 2 tbsp extra virgin olive oil (it’s my go-to for its fruity flavor)
– 1/4 cup mayonnaise (I prefer full-fat for extra creaminess)
– 1 tsp garlic powder (a pantry staple that adds depth)
– 1/2 tsp smoked paprika (it gives a lovely smoky hint)
– 1/4 tsp salt (I use sea salt for a clean taste)
– 1/4 tsp black pepper (freshly ground is best)
– 4 leaves of romaine lettuce (crisp and refreshing)
– 2 slices of tomato (I opt for beefsteak for juiciness)
Instructions
1. Preheat a grill or grill pan to medium-high heat, about 400°F, to ensure even cooking.
2. In a small bowl, mix 1 tbsp olive oil, garlic powder, smoked paprika, salt, and black pepper to create a marinade.
3. Brush the chicken breasts evenly with the marinade on both sides, coating them thoroughly for maximum flavor.
4. Place the chicken on the preheated grill and cook for 5-6 minutes per side, until the internal temperature reaches 165°F and the exterior has nice grill marks.
5. While the chicken cooks, slice the avocado in half, remove the pit, and scoop the flesh into a bowl, mashing it lightly with a fork until slightly chunky.
6. Toast the sourdough bread slices in a toaster or on the grill for 1-2 minutes per side, until golden and crisp, to add texture.
7. Spread mayonnaise evenly on one side of each toasted bread slice, using about 1 tbsp per slice for a creamy base.
8. Once the chicken is done, remove it from the grill and let it rest for 3 minutes on a cutting board to retain juices before slicing thinly.
9. Layer the sliced chicken, mashed avocado, romaine lettuce, and tomato slices on two slices of the mayonnaise-spread bread.
10. Top with the remaining bread slices, press gently, and slice each sandwich in half diagonally for easy serving.
Now, this sandwich delivers a wonderful contrast of textures—the smoky, tender chicken pairs beautifully with the creamy avocado and crisp lettuce, while the tangy sourdough holds it all together without getting soggy. For a creative twist, I sometimes add a drizzle of hot sauce or serve it with sweet potato fries on the side for a complete meal that always feels special.
Turkey Cranberry Club Sandwich
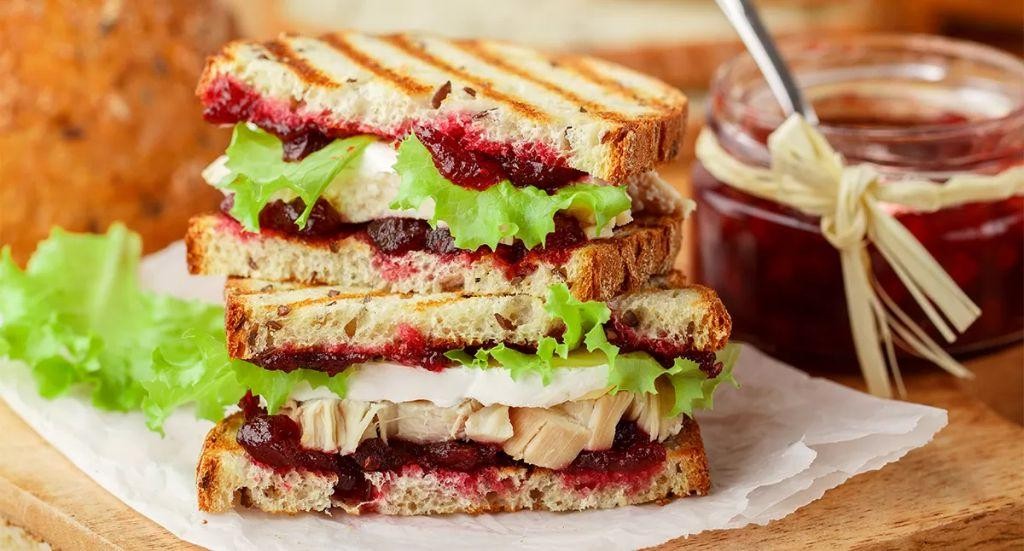
Just in time for the holiday season, I’m sharing my ultimate leftover solution that’s become a family tradition. Every year after Thanksgiving, my kitchen counter looks like a turkey graveyard, but this sandwich transforms those remnants into something truly special—it’s the perfect blend of festive flavors and comforting familiarity.
Serving: 2 | Pre Time: 15 minutes | Cooking Time: 10 minutes
Ingredients
– 4 slices sourdough bread (I love the tangy chewiness of sourdough for this)
– 8 oz cooked turkey breast, thinly sliced (leftover Thanksgiving turkey works beautifully)
– 4 slices thick-cut bacon (I always bake mine at 400°F for 18 minutes for perfect crispiness)
– 4 tbsp cranberry sauce (homemade or high-quality store-bought—I prefer whole berry for texture)
– 4 leaves green leaf lettuce (rinsed and patted completely dry so the sandwich doesn’t get soggy)
– 4 slices sharp cheddar cheese (room temperature cheese melts more evenly)
– 2 tbsp mayonnaise (Duke’s is my Southern go-to)
– 1 tbsp unsalted butter, softened (for toasting the bread)
Instructions
1. Preheat your skillet or griddle over medium heat (about 325°F if using an electric griddle).
2. Spread softened butter evenly on one side of each sourdough bread slice.
3. Place bread butter-side down in the preheated skillet and cook for 3-4 minutes until golden brown and crisp.
4. Flip bread slices and immediately place one slice of cheddar cheese on each piece of bread.
5. Cover the skillet with a lid for 1 minute to help the cheese melt evenly (this prevents dry edges).
6. Remove toasted bread from skillet and place on a cutting board cheese-side up.
7. Spread 1 tablespoon of mayonnaise on the non-cheese side of two bread slices.
8. Layer 4 ounces of turkey breast evenly over the mayonnaise on both slices.
9. Spoon 2 tablespoons of cranberry sauce over the turkey on each sandwich half.
10. Place 2 slices of crisp bacon over the cranberry sauce on each sandwich.
11. Add 2 lettuce leaves to each sandwich, tearing them to fit if necessary.
12. Carefully place the remaining cheese-topped bread slices on top, cheese-side down toward the fillings.
13. Cut each sandwich diagonally with a serrated knife (this prevents squishing the layers).
14. Serve immediately while the bread is still warm and crisp.
Heavenly layers of warm, melty cheese against cool crisp lettuce create the perfect temperature contrast. The tart cranberry sauce cuts through the richness of the bacon and mayo, while that toasted sourdough holds everything together without getting soggy. For a festive twist, I sometimes serve these with sweet potato fries dusted with cinnamon sugar.
BBQ Pulled Pork Sandwich
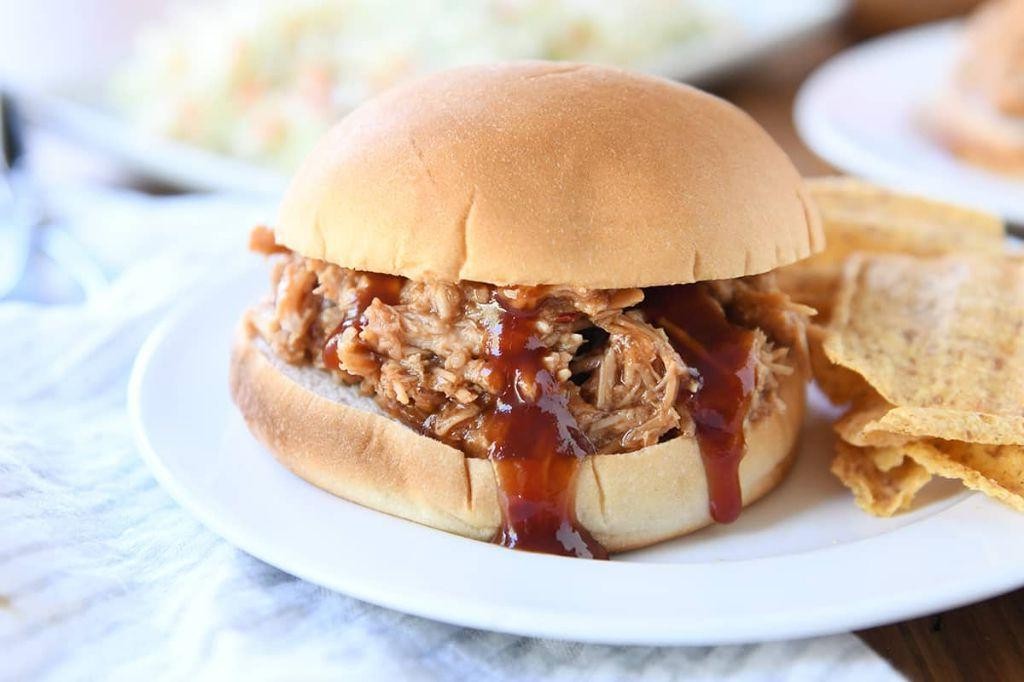
Just in time for the holidays, I’m sharing my go-to BBQ pulled pork sandwich recipe—it’s the ultimate crowd-pleaser that always disappears first at our family gatherings. I’ve been tweaking this slow-cooked version for years, and trust me, the secret is all in the patience and a few personal touches. Let’s dive in!
Serving: 8 | Pre Time: 20 minutes | Cooking Time: 480 minutes
Ingredients
– 4 lbs pork shoulder (I always ask my butcher for a well-marbled cut—it stays juicier)
– 1 cup ketchup (I use a no-high-fructose-corn-syrup brand for a cleaner flavor)
– 1/2 cup apple cider vinegar (the tang really balances the sweetness)
– 1/4 cup brown sugar (packed—don’t skimp here!)
– 2 tbsp Worcestershire sauce (this adds that umami depth I love)
– 1 tbsp smoked paprika (my pantry staple for that smoky kick)
– 1 tbsp garlic powder (I prefer powder over fresh for even distribution)
– 1 tsp salt (kosher salt is my go-to for seasoning meat)
– 1/2 tsp black pepper (freshly ground makes all the difference)
– 8 hamburger buns (I toast them lightly for extra crunch)
– 1 cup coleslaw (store-bought is fine, but I whip up a quick vinegar-based slaw)
Instructions
1. Preheat your oven to 300°F—low and slow is key for tender pork.
2. In a medium bowl, whisk together 1 cup ketchup, 1/2 cup apple cider vinegar, 1/4 cup brown sugar, 2 tbsp Worcestershire sauce, 1 tbsp smoked paprika, 1 tbsp garlic powder, 1 tsp salt, and 1/2 tsp black pepper until smooth. Tip: Taste the sauce now and adjust sweetness or tang if needed—it should be balanced.
3. Place the 4 lbs pork shoulder in a large Dutch oven or roasting pan.
4. Pour the sauce mixture evenly over the pork, coating it completely. Tip: Let it sit for 10 minutes to marinate slightly—this helps the flavors penetrate.
5. Cover the pan tightly with a lid or aluminum foil to trap moisture.
6. Cook in the preheated oven at 300°F for 8 hours, until the pork shreds easily with a fork. Tip: Check at 7 hours—if it’s fork-tender, it’s done; overcooking can dry it out.
7. Remove the pan from the oven and let the pork rest, covered, for 20 minutes to retain juices.
8. Using two forks, shred the pork directly in the pan, mixing it with the sauce.
9. Toast 8 hamburger buns lightly in a toaster or oven until golden brown.
10. Spoon the shredded pork onto the bottom halves of the buns.
11. Top each with about 2 tbsp of 1 cup coleslaw for a crunchy contrast.
12. Place the top buns over the coleslaw to complete the sandwiches. This sandwich boasts a melt-in-your-mouth texture with a tangy, smoky flavor that’s perfectly balanced by the crisp coleslaw. Try serving it with pickles on the side or piling the leftovers into tacos for a fun twist the next day.
Reuben Sandwich with Homemade Russian Dressing
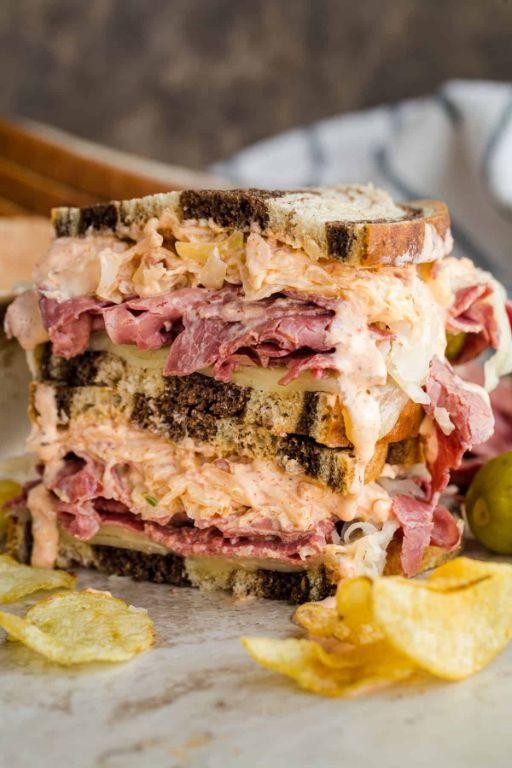
Biting into a Reuben sandwich feels like a warm hug on a cold day—it’s my go-to comfort food when I’m craving something hearty and nostalgic. I’ve been perfecting this version for years, tweaking the Russian dressing until it’s just tangy enough to cut through the richness, and today, I’m sharing my favorite homemade take. Trust me, once you try it, you’ll never go back to store-bought dressing again!
Serving: 2 | Pre Time: 15 minutes | Cooking Time: 10 minutes
Ingredients
– 4 slices of rye bread (I love the caraway seeds for extra flavor)
– 8 ounces corned beef, thinly sliced (ask your deli to slice it thick if you prefer more texture)
– 1 cup sauerkraut, drained well (I squeeze out excess liquid to prevent soggy bread)
– 4 slices Swiss cheese (I use a mild variety that melts beautifully)
– 2 tablespoons unsalted butter, softened (room temp spreads easier without tearing the bread)
– For the Russian dressing: 1/2 cup mayonnaise (I use full-fat for creaminess), 2 tablespoons ketchup, 1 tablespoon sweet pickle relish, 1 teaspoon prepared horseradish (add more if you like it spicy), 1/2 teaspoon Worcestershire sauce, and a pinch of salt and black pepper
Instructions
1. In a small bowl, whisk together 1/2 cup mayonnaise, 2 tablespoons ketchup, 1 tablespoon sweet pickle relish, 1 teaspoon prepared horseradish, 1/2 teaspoon Worcestershire sauce, and a pinch of salt and black pepper until smooth to make the Russian dressing; set aside.
2. Heat a large skillet or griddle over medium heat until a drop of water sizzles, about 2 minutes.
3. Spread 1 tablespoon softened unsalted butter evenly on one side of each of the 4 rye bread slices.
4. Place 2 bread slices buttered-side down in the skillet, then top each with 4 ounces corned beef, 1/2 cup drained sauerkraut, 2 slices Swiss cheese, and a generous spoonful of Russian dressing.
5. Cover the skillet with a lid and cook for 3–4 minutes, until the cheese starts to melt and the bottom bread is golden brown.
6. Place the remaining 2 bread slices buttered-side up on top of the sandwiches, then carefully flip them using a spatula.
7. Press down lightly with the spatula and cook uncovered for another 3–4 minutes, until the second side is crispy and the cheese is fully melted.
8. Remove the sandwiches from the skillet and let them rest for 1 minute on a cutting board before slicing diagonally.
Ultimately, this Reuben sandwich delivers a perfect crunch from the toasted rye, with the homemade Russian dressing adding a zesty kick that balances the salty corned beef and tangy sauerkraut. I love serving it with a side of crispy potato chips or a simple pickle spear for an extra bite—it’s a classic that never disappoints!
Buffalo Chicken Sandwich with Blue Cheese Slaw

Nothing beats a spicy, crunchy sandwich after a long day, and this Buffalo Chicken Sandwich with Blue Cheese Slaw is my go-to comfort food. I first made it for a game day party years ago, and now it’s a weekly staple in my kitchen—my husband always asks for extra slaw!
Serving: 4 | Pre Time: 15 minutes | Cooking Time: 20 minutes
Ingredients
– 4 boneless, skinless chicken breasts (I like to pound them to an even thickness for quicker cooking)
– 1 cup all-purpose flour (I keep mine in a sealed container to stay fresh)
– 2 large eggs, lightly beaten (room temp eggs help the coating stick better)
– 1 cup panko breadcrumbs (for that extra crunch I adore)
– ½ cup hot sauce, such as Frank’s RedHot (my pantry essential—adjust based on your heat tolerance)
– ¼ cup unsalted butter, melted (I use unsalted to control the saltiness)
– 4 brioche buns, split (toasted buns make all the difference)
– 2 cups shredded green cabbage (I buy pre-shredded to save time)
– ½ cup crumbled blue cheese (I prefer a milder variety if you’re new to blue cheese)
– ¼ cup mayonnaise (full-fat mayo gives the slaw a creamier texture)
– 1 tbsp apple cider vinegar (a splash brightens up the slaw)
– 1 tsp celery seed (it adds a subtle earthy note)
– Vegetable oil for frying (I use about 1 inch in the pan)
Instructions
1. In a shallow bowl, combine the flour with a pinch of salt and pepper.
2. Place the beaten eggs in a second shallow bowl.
3. Add the panko breadcrumbs to a third shallow bowl.
4. Dredge each chicken breast in the flour, shaking off any excess.
5. Dip the floured chicken into the eggs, coating it completely.
6. Press the chicken into the panko breadcrumbs, ensuring an even layer on all sides.
7. Heat 1 inch of vegetable oil in a large skillet over medium-high heat until it reaches 350°F (use a thermometer for accuracy—this prevents soggy chicken).
8. Carefully add the breaded chicken to the hot oil and fry for 5-6 minutes per side, or until golden brown and the internal temperature reaches 165°F.
9. Transfer the fried chicken to a paper towel-lined plate to drain excess oil.
10. In a small bowl, whisk together the hot sauce and melted butter to make the Buffalo sauce.
11. Brush the Buffalo sauce generously over both sides of each fried chicken breast.
12. In a medium bowl, toss the shredded cabbage, blue cheese, mayonnaise, apple cider vinegar, and celery seed until well combined to make the slaw.
13. Toast the split brioche buns in a toaster or under a broiler for 1-2 minutes until lightly golden (toasting adds crunch and prevents sogginess).
14. Place a sauced chicken breast on the bottom half of each toasted bun.
15. Top the chicken with a generous scoop of the blue cheese slaw.
16. Cover with the top half of the bun and serve immediately.
All that crispy, spicy chicken paired with the tangy, creamy slaw creates a perfect bite—the crunch from the panko holds up beautifully against the soft bun. I love serving these with extra hot sauce on the side for dipping, or try them open-faced with a fried egg on top for a brunch twist!
Monte Cristo Sandwich with Raspberry Jam

Over the holidays, I always crave something indulgent yet comforting—like this Monte Cristo Sandwich with Raspberry Jam. It’s my go-to when I want to impress brunch guests without spending all morning in the kitchen, and that sweet-tangy raspberry jam cuts through the richness perfectly.
Serving: 2 | Pre Time: 10 minutes | Cooking Time: 15 minutes
Ingredients
– 4 slices of thick-cut brioche bread (I love brioche for its buttery softness, but challah works too)
– 4 slices of deli ham (I prefer Black Forest ham for its smoky flavor)
– 4 slices of Swiss cheese (room temperature cheese melts more evenly)
– ½ cup raspberry jam (I use a high-quality jam with real fruit chunks)
– 2 large eggs (room temperature eggs blend better into the batter)
– ½ cup whole milk (whole milk makes the batter extra creamy)
– ¼ cup all-purpose flour
– ¼ teaspoon salt
– 2 tablespoons unsalted butter (I always use unsalted to control the saltiness)
– Powdered sugar for dusting (optional, but it adds a festive touch)
Instructions
1. In a shallow bowl, whisk together 2 large eggs, ½ cup whole milk, ¼ cup all-purpose flour, and ¼ teaspoon salt until smooth—no lumps should remain. Tip: Let the batter rest for 5 minutes to thicken slightly for better coating.
2. Lay out 4 slices of brioche bread on a clean surface.
3. Spread 2 tablespoons of raspberry jam evenly on two slices of bread.
4. Layer 2 slices of ham and 2 slices of Swiss cheese on top of the jam-covered bread.
5. Top each with the remaining bread slices to form two sandwiches, pressing gently to seal.
6. Heat a large skillet or griddle over medium heat and add 1 tablespoon of unsalted butter, letting it melt completely.
7. Dip one sandwich fully into the batter, coating both sides evenly, and let excess drip off.
8. Place the battered sandwich in the skillet and cook for 3–4 minutes until golden brown and crisp. Tip: Check the bottom by lifting with a spatula—it should be a deep golden hue.
9. Flip the sandwich carefully and cook for another 3–4 minutes until the second side is golden brown and the cheese is melted. Tip: Reduce heat to medium-low if browning too quickly to avoid burning.
10. Transfer the cooked sandwich to a plate and repeat steps 7–9 with the second sandwich, adding the remaining 1 tablespoon of butter to the skillet first.
11. Dust the sandwiches lightly with powdered sugar if desired.
Perfectly crispy on the outside and oozy with melted cheese inside, this sandwich is a delightful mix of savory and sweet. I love serving it with extra raspberry jam for dipping or a side of fresh fruit to balance the richness—it’s a crowd-pleaser every time!
Portobello Mushroom Sandwich with Garlic Aioli
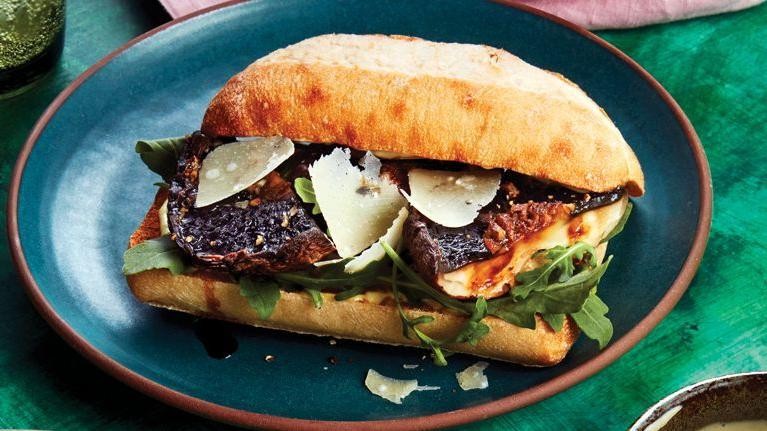
Finally, after years of searching for the perfect meatless sandwich that satisfies both texture and flavor cravings, I stumbled upon this Portobello Mushroom Sandwich with Garlic Aioli during a cozy winter evening experiment. My husband, usually skeptical of “mushroom burgers,” took one bite and declared it his new favorite—now we make it nearly every Friday night. There’s something magical about how the earthy mushrooms pair with that creamy, garlicky sauce that makes it feel indulgent yet wholesome.
Serving: 2 | Pre Time: 15 minutes | Cooking Time: 20 minutes
Ingredients
– 2 large Portobello mushroom caps, stems removed (look for ones with deep gills—they hold more flavor)
– 2 burger buns, lightly toasted (I prefer brioche for that buttery richness)
– 2 tbsp extra virgin olive oil, my go-to for its fruity notes
– 1/4 cup mayonnaise (use full-fat for the creamiest aioli)
– 2 garlic cloves, minced (fresh is key here—it makes all the difference)
– 1 tbsp lemon juice, freshly squeezed (bottled just doesn’t compare)
– 1/2 tsp salt, for seasoning the mushrooms
– 1/4 tsp black pepper, freshly ground
– 2 large lettuce leaves, crisp and washed (I love butter lettuce for its tenderness)
– 2 slices of tomato, about 1/4-inch thick (ripe summer tomatoes are ideal)
Instructions
1. Preheat your oven to 400°F and line a baking sheet with parchment paper.
2. In a small bowl, whisk together the mayonnaise, minced garlic, and lemon juice until smooth to make the garlic aioli—set it aside to let the flavors meld.
3. Brush both sides of the Portobello mushroom caps evenly with the olive oil, using about 1 tbsp total.
4. Sprinkle the salt and black pepper over both sides of the mushrooms, rubbing gently to adhere.
5. Place the mushrooms gill-side up on the prepared baking sheet and roast in the preheated oven for 15-20 minutes, until tender and slightly shriveled. Tip: Check at 15 minutes—overcooking can make them soggy.
6. While the mushrooms roast, toast the burger buns lightly in a toaster or on a dry skillet over medium heat for 1-2 minutes per side, until golden brown. Tip: Toasting adds crunch and prevents sogginess from the aioli.
7. Remove the mushrooms from the oven and let them rest for 2 minutes to firm up slightly.
8. Spread about 1 tbsp of the garlic aioli on the bottom half of each toasted bun.
9. Layer a lettuce leaf and a tomato slice on top of the aioli on each bun.
10. Place one roasted Portobello mushroom cap on each sandwich, gill-side down to catch any juices.
11. Spread another 1 tbsp of garlic aioli on the top half of each bun and place it on the mushroom to complete the sandwich. Tip: Assemble just before serving to keep the buns crisp.
Really, the first bite reveals a juicy, meaty texture from the mushrooms that contrasts beautifully with the crisp lettuce and creamy aioli. The garlicky punch from the sauce melds with the earthy flavors, making each mouthful a delight—try serving it with sweet potato fries for a cozy meal that feels like a hug in sandwich form.
Shrimp Po’ Boy Sandwich with Remoulade Sauce

Every time I think about New Orleans, my mind goes straight to the iconic Po’ Boy—and this shrimp version with a zesty remoulade is my absolute favorite to make at home, especially when I’m craving that perfect crunch and tang. It’s one of those recipes that feels like a celebration, whether I’m whipping it up for a casual weeknight dinner or a festive gathering with friends. I love how the crispy shrimp pairs with the creamy sauce, and I always end up making extra because, trust me, it disappears fast!
Serving: 4 | Pre Time: 20 minutes | Cooking Time: 10 minutes
Ingredients
– 1 pound large shrimp, peeled and deveined (I like to buy them fresh from my local market for the best flavor)
– 1 cup all-purpose flour (I always sift mine to avoid lumps)
– 2 large eggs, at room temperature (they blend more smoothly into the batter)
– 1 cup buttermilk (it adds a nice tang and helps the coating stick)
– 1 cup cornmeal (for that extra crispy texture I adore)
– 1 teaspoon paprika (I use smoked paprika for a deeper flavor)
– 1 teaspoon garlic powder (a must-have in my spice cabinet)
– 1/2 teaspoon cayenne pepper (adjust if you prefer less heat)
– 1/2 cup mayonnaise (I go for full-fat for richness)
– 2 tablespoons Dijon mustard (it gives the remoulade a sharp kick)
– 1 tablespoon lemon juice (freshly squeezed is key for brightness)
– 1 tablespoon chopped parsley (I grow mine in a small herb garden)
– 4 French bread rolls, split (toasted lightly for extra crunch)
– 2 cups shredded lettuce (I use crisp iceberg for that refreshing bite)
– 1 large tomato, sliced (ripe and juicy works best)
– Vegetable oil for frying (enough to fill a deep skillet about 1 inch deep)
– Salt and black pepper (I season generously at each step)
Instructions
1. In a medium bowl, whisk together 2 large eggs and 1 cup buttermilk until fully combined to create a wet batter.
2. In a separate shallow dish, mix 1 cup all-purpose flour, 1 cup cornmeal, 1 teaspoon paprika, 1 teaspoon garlic powder, 1/2 teaspoon cayenne pepper, 1 teaspoon salt, and 1/2 teaspoon black pepper for the dry coating.
3. Pat 1 pound of shrimp dry with paper towels to ensure the batter adheres well—this tip prevents a soggy coating.
4. Dip each shrimp first into the dry coating, shaking off any excess, then into the wet batter, and back into the dry coating to coat evenly.
5. Heat vegetable oil in a deep skillet over medium-high heat until it reaches 350°F, using a thermometer for accuracy.
6. Fry the coated shrimp in batches for 2-3 minutes per side, or until golden brown and crispy, avoiding overcrowding the pan for even cooking.
7. Transfer the fried shrimp to a paper towel-lined plate to drain excess oil.
8. In a small bowl, combine 1/2 cup mayonnaise, 2 tablespoons Dijon mustard, 1 tablespoon lemon juice, and 1 tablespoon chopped parsley to make the remoulade sauce, stirring until smooth.
9. Spread the remoulade sauce generously on the cut sides of 4 French bread rolls.
10. Layer the bottom halves of the rolls with 2 cups shredded lettuce and 1 large tomato, sliced.
11. Top with the fried shrimp and cover with the roll tops to assemble the sandwiches.
Just serve these sandwiches immediately while the shrimp are still hot and crispy for the ultimate experience—the contrast between the crunchy exterior and tender shrimp is pure magic. I often pair them with a side of pickles or a cold beer, and they’re always a hit at picnics or game-day gatherings!
Grilled Vegetable Panini with Pesto

There’s something magical about a warm, crispy panini packed with smoky grilled veggies and vibrant pesto—it’s my go-to lunch when I want something hearty but not heavy, especially after a morning spent holiday shopping with my family. This grilled vegetable panini is a staple in our house because it’s endlessly customizable and comes together in minutes, making it perfect for busy weeknights or lazy weekends. I love how the pesto adds a fresh, herby punch that ties everything together, and I often double the recipe to have leftovers for quick meals later in the week.
Serving: 2 | Pre Time: 15 minutes | Cooking Time: 10 minutes
Ingredients
– 1 medium zucchini, sliced into ¼-inch rounds (I like to leave the skin on for extra texture)
– 1 red bell pepper, cored and sliced into ½-inch strips (the sweetness balances the pesto perfectly)
– 1 small red onion, peeled and sliced into ¼-inch rings (they caramelize beautifully on the grill)
– 2 tbsp extra virgin olive oil, plus extra for brushing (my go-to for its fruity flavor)
– ½ tsp kosher salt (I prefer it over table salt for even seasoning)
– ¼ tsp black pepper, freshly ground
– 4 slices of sourdough bread, about ½-inch thick (it holds up well to grilling without getting soggy)
– ¼ cup homemade or store-bought basil pesto (I often add a squeeze of lemon juice to brighten it up)
– 4 slices of provolone cheese (mozzarella works too, but provolone melts into a lovely gooey layer)
Instructions
1. Preheat a grill or grill pan to medium-high heat, about 400°F, and lightly oil the grates with a paper towel dipped in olive oil to prevent sticking.
2. In a medium bowl, toss the zucchini, red bell pepper, and red onion with 2 tbsp olive oil, ½ tsp kosher salt, and ¼ tsp black pepper until evenly coated.
3. Place the vegetables on the preheated grill in a single layer, cooking for 3–4 minutes per side until they have visible grill marks and are tender but still slightly crisp.
4. Remove the grilled vegetables from the heat and set them aside on a plate; tip: let them cool slightly so they don’t steam the bread.
5. Lay out the 4 slices of sourdough bread on a clean surface and spread 1 tbsp of pesto evenly on one side of each slice.
6. Divide the grilled vegetables evenly between two slices of bread, arranging them in a single layer over the pesto.
7. Top the vegetables with 2 slices of provolone cheese per sandwich, then place the remaining bread slices on top, pesto-side down.
8. Brush the outside of each sandwich lightly with olive oil to help it crisp up during cooking.
9. Heat a panini press or a large skillet over medium heat, about 350°F, and cook the sandwiches for 3–4 minutes per side if using a skillet, pressing down with a spatula, or 4–5 minutes in a press until the bread is golden brown and the cheese is fully melted.
10. Remove the panini from the heat, let them rest for 1 minute to set, then slice diagonally with a serrated knife for easier serving.
Really, the contrast of the crispy, golden bread with the tender, smoky vegetables and melty cheese is what makes this panini irresistible. For a creative twist, I sometimes add a drizzle of balsamic glaze or serve it with a side of sweet potato fries—it’s a crowd-pleaser that never fails to satisfy.
French Dip Sandwich with Au Jus

There’s something deeply comforting about a French Dip Sandwich—the tender, savory beef, the crusty roll that soaks up every drop of that rich au jus, it’s pure cozy perfection on a plate. I first fell in love with this classic at a little diner years ago, and after countless attempts, I’ve honed a homemade version that’s become my go-to for chilly evenings or casual gatherings. Let’s dive in and make this soul-warming sandwich together!
Serving: 4 | Pre Time: 15 minutes | Cooking Time: 3 hours 30 minutes
Ingredients
– 2 lbs beef chuck roast (I like a well-marbled cut for maximum tenderness)
– 1 large onion, thinly sliced (yellow onions are my favorite for their sweet caramelization)
– 4 cloves garlic, minced (freshly minced makes all the difference in flavor)
– 4 cups beef broth (I use low-sodium so I can control the salt)
– 1 tbsp Worcestershire sauce (this adds a nice umami kick)
– 1 tbsp soy sauce (my secret for depth—trust me on this!)
– 1 tsp dried thyme
– 2 tbsp olive oil (extra virgin olive oil is my go-to for sautéing)
– Salt and black pepper
– 4 French rolls or hoagie buns (toasted lightly for that perfect crunch)
– 8 slices provolone cheese (melty and mild—it balances the beef beautifully)
Instructions
1. Preheat your oven to 325°F.
2. Season the beef chuck roast generously on all sides with salt and black pepper.
3. Heat 2 tbsp olive oil in a large Dutch oven or oven-safe pot over medium-high heat until shimmering, about 2 minutes.
4. Sear the beef roast for 4-5 minutes per side until deeply browned—this locks in juices and builds flavor for the au jus.
5. Remove the beef from the pot and set it aside on a plate.
6. Add the thinly sliced onion to the same pot and cook over medium heat for 8-10 minutes, stirring occasionally, until softened and golden brown.
7. Stir in the minced garlic and cook for 1 minute until fragrant.
8. Pour in 4 cups beef broth, 1 tbsp Worcestershire sauce, 1 tbsp soy sauce, and 1 tsp dried thyme, scraping up any browned bits from the bottom—this deglazing step is key for a rich au jus.
9. Return the seared beef to the pot, ensuring it’s mostly submerged in the liquid.
10. Cover the pot with a lid and transfer it to the preheated oven.
11. Braise the beef for 3 hours until it’s fork-tender and easily shreds—check doneness by pulling with a fork; it should fall apart effortlessly.
12. Remove the pot from the oven and carefully take out the beef, placing it on a cutting board to rest for 10 minutes.
13. While the beef rests, strain the cooking liquid through a fine-mesh sieve into a saucepan, pressing on the solids to extract all flavor, then simmer over medium heat for 10-15 minutes to reduce slightly into a flavorful au jus.
14. Shred the beef using two forks, discarding any large fat pieces.
15. Lightly toast the French rolls in a toaster or under a broiler for 2-3 minutes until crisp—this prevents sogginess when dipped.
16. Divide the shredded beef evenly among the toasted rolls, top each with 2 slices provolone cheese, and broil for 1-2 minutes until the cheese is melted and bubbly.
17. Slice each sandwich in half and serve immediately with small bowls of the warm au jus for dipping.
Really, the magic is in that first bite—the beef is melt-in-your-mouth tender, the cheese adds a creamy contrast, and the au jus brings it all together with its savory, aromatic depth. For a fun twist, I sometimes add sautéed mushrooms to the beef or serve it with a side of crispy fries for the ultimate comfort meal. Enjoy every dip!
Chicken Parmesan Sandwich with Marinara Sauce

Kicking off the holiday cooking marathon, I always crave something hearty yet handheld—enter this Chicken Parmesan Sandwich, my go-to for feeding a crowd without fuss. It’s a cozy twist on the classic, perfect for a festive weeknight when you want comfort food fast.
Serving: 4 | Pre Time: 15 minutes | Cooking Time: 20 minutes
Ingredients
– 4 boneless, skinless chicken breasts (I like to pound them thin for even cooking)
– 1 cup all-purpose flour (I keep mine in a sealed jar to avoid clumps)
– 2 large eggs, lightly beaten (room temp eggs here help the coating stick better)
– 1 cup Italian-seasoned breadcrumbs (I often add a pinch of extra dried oregano for more flavor)
– 1/2 cup grated Parmesan cheese (freshly grated melts so much smoother)
– 1/4 cup extra virgin olive oil (my go-to for frying—it adds a nice fruity note)
– 4 soft hoagie rolls, split (toasted rolls hold up better against the saucy filling)
– 1 cup marinara sauce (I use my homemade batch, but store-bought works in a pinch)
– 1 cup shredded mozzarella cheese (for that gooey, melty top)
– Fresh basil leaves for garnish (a few torn leaves brighten it all up)
Instructions
1. Place each chicken breast between two pieces of plastic wrap and pound with a meat mallet to 1/2-inch thickness for even cooking.
2. Set up three shallow bowls: fill the first with 1 cup all-purpose flour, the second with 2 large beaten eggs, and the third with a mix of 1 cup breadcrumbs and 1/2 cup Parmesan cheese.
3. Dredge each chicken breast first in the flour, shaking off excess, then dip fully in the eggs, and finally coat evenly in the breadcrumb-Parmesan mixture, pressing gently to adhere.
4. Heat 1/4 cup olive oil in a large skillet over medium-high heat until it shimmers, about 350°F—test by dropping a breadcrumb; it should sizzle immediately.
5. Fry the coated chicken breasts for 4-5 minutes per side until golden brown and cooked through, with an internal temperature of 165°F.
6. Transfer the fried chicken to a paper towel-lined plate to drain any excess oil.
7. Preheat your oven’s broiler to high and place the split hoagie rolls on a baking sheet, cut-side up, toasting for 2-3 minutes until lightly golden.
8. Spoon 1/4 cup marinara sauce onto the bottom half of each toasted roll, then top with a fried chicken breast.
9. Spread another 1/4 cup marinara sauce over each chicken breast, followed by 1/4 cup shredded mozzarella cheese.
10. Broil the assembled sandwiches for 2-3 minutes, watching closely until the cheese is bubbly and slightly browned.
11. Remove from the oven and garnish each sandwich with fresh basil leaves before serving immediately.
The crispy chicken gives way to tender meat, while the melted mozzarella and tangy marinara create a saucy, satisfying bite. I love serving these with a side of garlic fries or a simple salad for a complete meal that’s always a hit at gatherings.
Eggplant Parmesan Sandwich with Mozzarella

Diving into my kitchen on this chilly December evening, I was craving something hearty yet familiar—a sandwich that feels like a warm hug. That’s when I decided to whip up my go-to Eggplant Parmesan Sandwich, a recipe I’ve perfected over countless cozy nights, always with a generous sprinkle of mozzarella because, let’s be honest, more cheese is never a bad idea.
Serving: 4 | Pre Time: 20 minutes | Cooking Time: 25 minutes
Ingredients
– 2 medium eggplants, sliced into 1/2-inch rounds (I always pick firm ones for less bitterness)
– 1 cup all-purpose flour (I keep mine in a sealed jar to avoid clumps)
– 2 large eggs, beaten (room temp eggs help the coating stick better)
– 1 cup Italian-style breadcrumbs (I add a pinch of garlic powder for extra flavor)
– 1/2 cup extra virgin olive oil (my go-to for frying—it adds a rich aroma)
– 1 cup marinara sauce (homemade or store-bought, warmed up)
– 8 slices fresh mozzarella cheese (I tear it by hand for a rustic look)
– 4 ciabatta rolls, split (toasted lightly for crunch)
– Fresh basil leaves (a handful, torn—it brightens everything up)
Instructions
1. Preheat your oven to 375°F and line a baking sheet with parchment paper.
2. Place the eggplant slices on a paper towel, sprinkle with salt, and let sit for 10 minutes to draw out moisture—this prevents sogginess.
3. Pat the eggplant dry with another paper towel to remove excess liquid.
4. Set up three shallow bowls: one with flour, one with beaten eggs, and one with breadcrumbs.
5. Dredge each eggplant slice in flour, shaking off any excess.
6. Dip the floured slice into the beaten eggs, coating it evenly.
7. Press the slice into the breadcrumbs, ensuring full coverage on both sides.
8. Heat the olive oil in a large skillet over medium-high heat until it shimmers, about 350°F.
9. Fry the breaded eggplant slices for 3-4 minutes per side, until golden brown and crispy.
10. Transfer the fried slices to the prepared baking sheet in a single layer.
11. Top each eggplant slice with 2 tablespoons of marinara sauce and 2 slices of mozzarella cheese.
12. Bake in the preheated oven for 10 minutes, until the cheese is melted and bubbly.
13. While baking, toast the ciabatta rolls in a toaster or oven for 2-3 minutes until lightly crisp.
14. Assemble each sandwich by placing 2-3 eggplant slices on the bottom half of a roll.
15. Garnish with torn basil leaves and cover with the top half of the roll.
This sandwich delivers a satisfying crunch from the fried eggplant, balanced by the creamy mozzarella and tangy marinara. The fresh basil adds a pop of herbaceous freshness that ties it all together. Try serving it with a side of crispy sweet potato fries for a complete meal that’s perfect for sharing—or not, because it’s honestly hard to stop at just one!
Cuban Sandwich with Ham and Swiss Cheese
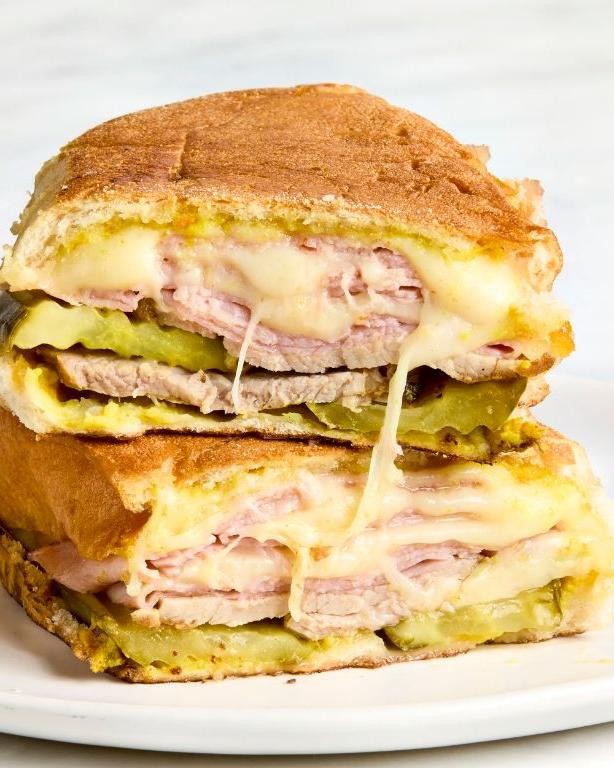
Growing up in Miami, I’d watch the lunchtime crowds at the local Cuban cafés, mesmerized by the presses flattening those glorious sandwiches. Today, I’m sharing my home-kitchen version of that classic—a Cuban sandwich layered with savory ham and melty Swiss cheese, perfect for a quick, satisfying meal any day of the week.
Serving: 4 | Pre Time: 15 minutes | Cooking Time: 10 minutes
Ingredients
– 1 loaf Cuban bread (about 16 inches long), sliced lengthwise—I grab mine from the bakery section; it’s got that perfect crisp crust.
– 1/2 cup yellow mustard, the classic tangy base—I always use the classic yellow kind for authenticity.
– 1 lb sliced Swiss cheese, about 12 slices; I love how it melts into gooey perfection.
– 1 lb sliced ham, preferably Black Forest or honey-baked for extra flavor.
– 1/4 cup unsalted butter, softened to room temp—this makes spreading a breeze.
– 1 large dill pickle, thinly sliced into about 16 rounds; the crunch is non-negotiable!
Instructions
1. Preheat a panini press or large skillet to 350°F—if using a skillet, place a heavy pan on top to press the sandwich.
2. Slice the Cuban bread loaf lengthwise and lay both halves cut-side up on a clean work surface.
3. Spread 1/4 cup of yellow mustard evenly on the bottom half of the bread, covering it from edge to edge.
4. Layer 6 slices of Swiss cheese over the mustard on the bottom half, ensuring full coverage.
5. Arrange all the sliced ham evenly on top of the Swiss cheese, folding slices as needed to fit.
6. Place the thinly sliced dill pickle rounds in a single layer over the ham, spacing them out for even crunch.
7. Top the pickles with the remaining 6 slices of Swiss cheese, pressing lightly to adhere.
8. Spread the softened unsalted butter evenly on the cut side of the top half of the bread.
9. Place the buttered top half of the bread over the layered ingredients, butter-side up, to form a sandwich.
10. Carefully transfer the assembled sandwich to the preheated panini press or skillet.
11. Press the sandwich for 4–5 minutes, or until the bread is golden brown and crispy, and the cheese is fully melted—peek to check doneness.
12. Remove the sandwich from the press using a spatula and let it rest on a cutting board for 1 minute to set.
13. Slice the sandwich into 4 equal portions with a sharp serrated knife for clean cuts.
14. Serve immediately while warm and crispy.
Mouthwatering from the first bite, this sandwich delivers a perfect harmony of textures—crispy bread, gooey cheese, and that signature pickle crunch. For a fun twist, I sometimes add a side of plantain chips or a drizzle of mojo sauce for dipping, making it a festive centerpiece at casual gatherings.
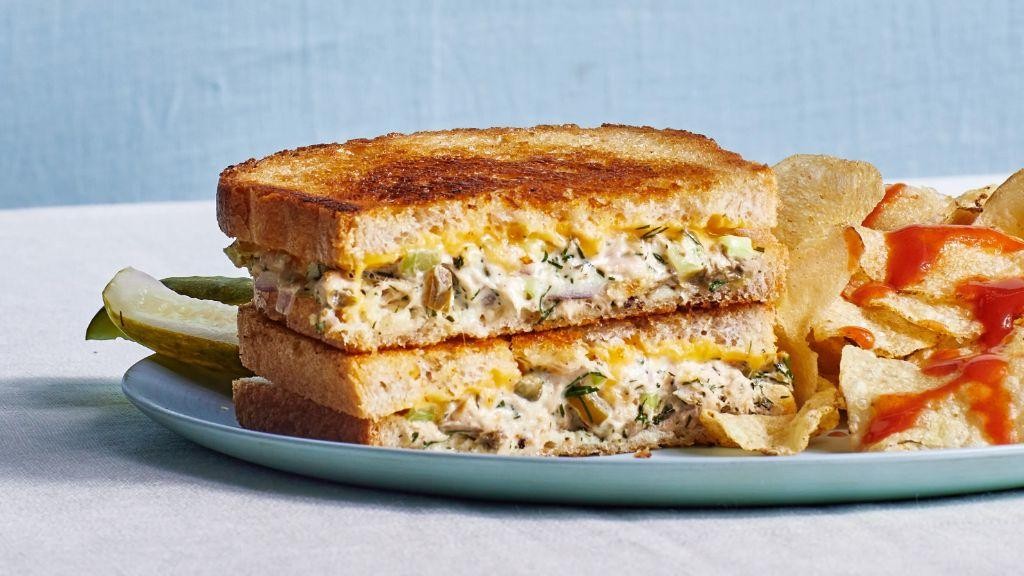
Tuna Melt Sandwich with Cheddar and Pickles
Nothing beats a cozy, cheesy sandwich on a chilly December evening like today, and this tuna melt with cheddar and pickles is my ultimate comfort food—it’s the recipe I turn to when I want something satisfyingly simple yet packed with flavor, reminding me of the quick lunches my mom used to whip up during busy holiday seasons. Serving: 2 | Pre Time: 10 minutes | Cooking Time: 10 minutes
Ingredients
– 2 cans of tuna in water, drained (I always go for chunk light tuna—it’s more budget-friendly and has a great texture)
– 1/2 cup mayonnaise (I prefer full-fat mayo for extra creaminess, but light works too if you’re watching calories)
– 1/4 cup finely chopped dill pickles (these add a tangy crunch that I love; I chop them small so they blend well)
– 1 cup shredded sharp cheddar cheese (freshly shredded melts better than pre-shredded, which can have anti-caking agents)
– 4 slices of sourdough bread (toasted sourdough holds up perfectly against the gooey filling)
– 2 tbsp unsalted butter, softened (room temp butter spreads easily without tearing the bread)
– 1/4 tsp black pepper (freshly ground pepper gives a nice kick)
Instructions
1. In a medium bowl, combine the drained tuna, mayonnaise, chopped pickles, and black pepper, mixing with a fork until well blended—this ensures every bite is flavorful. Tip: For a smoother texture, break up any large tuna chunks gently.
2. Preheat a skillet or griddle over medium heat, about 350°F, to get it ready for toasting.
3. Spread 1 tbsp of softened butter evenly on one side of each slice of sourdough bread, covering the entire surface to prevent burning.
4. Place 2 slices of bread, buttered-side down, on the preheated skillet.
5. Divide the tuna mixture evenly between the 2 slices in the skillet, spreading it to the edges with a spoon.
6. Sprinkle 1/2 cup of shredded cheddar cheese over the tuna mixture on each slice, ensuring it covers the filling completely for even melting.
7. Top each with the remaining 2 slices of bread, buttered-side up, pressing down lightly to seal.
8. Cook the sandwiches for 3-4 minutes on the first side, or until the bread is golden brown and crispy—check by lifting with a spatula.
9. Carefully flip the sandwiches using a spatula and cook for another 3-4 minutes on the second side, until the cheese is fully melted and bubbly. Tip: Cover the skillet with a lid briefly to help the cheese melt faster without overcooking the bread.
10. Remove the sandwiches from the skillet and let them rest for 1 minute on a cutting board before slicing. Tip: Letting them rest allows the filling to set slightly, making them easier to cut without oozing.
Buttery, crispy bread gives way to a warm, creamy tuna filling with pops of pickle tang and gooey cheddar—it’s a texture dream. Serve it with a side of extra pickles or a simple green salad for a complete meal that feels indulgent yet effortless.
Spicy Sausage and Pepper Sandwich
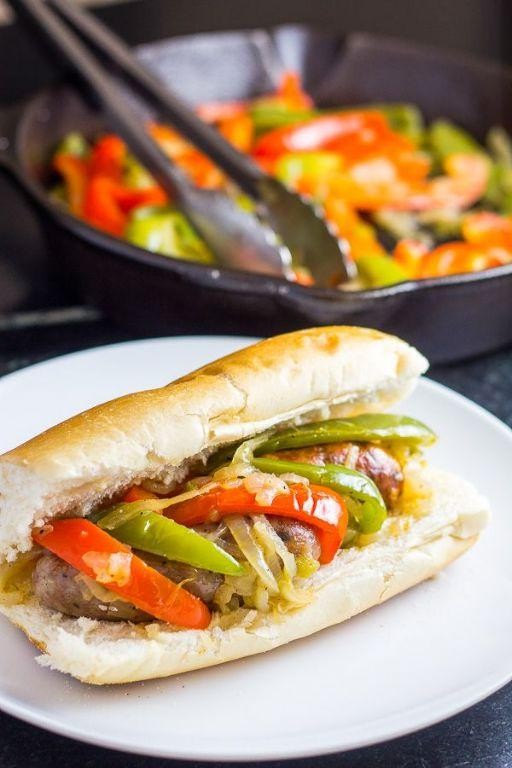
Mmm, nothing beats the sizzle of sausage and peppers on a chilly evening—this sandwich has been my go-to comfort food since my college days when I’d whip it up for friends after football games. It’s hearty, spicy, and packed with flavor, perfect for a quick weeknight dinner or a casual weekend lunch. I love how the peppers soften into sweet, caramelized goodness while the sausage adds a kick that warms you right up.
Serving: 4 | Pre Time: 10 minutes | Cooking Time: 20 minutes
Ingredients
– 1 lb Italian sausage links (I use spicy ones for that extra heat, but mild works too)
– 2 bell peppers, sliced (I mix red and green for color—they’re sweeter when ripe)
– 1 onion, thinly sliced (yellow onions are my favorite for their mild flavor)
– 2 tbsp extra virgin olive oil (my go-to for sautéing—it adds a fruity note)
– 4 hoagie rolls (toasted lightly for a crisp texture)
– 1 cup marinara sauce (I prefer a jarred brand like Rao’s for convenience, but homemade is great too)
– 1 tsp dried oregano (a pinch really brings out the Italian vibes)
– Salt and black pepper (to season as you go—I always keep these handy)
Instructions
1. Heat 2 tbsp extra virgin olive oil in a large skillet over medium-high heat until it shimmers, about 1 minute.
2. Add 1 lb Italian sausage links to the skillet and cook for 5–7 minutes, turning occasionally, until browned on all sides and cooked through (internal temperature should reach 160°F).
3. Remove the sausage from the skillet and set it aside on a plate to rest for 2 minutes, then slice it into 1/2-inch pieces.
4. In the same skillet, add 2 bell peppers and 1 onion, and sauté for 8–10 minutes, stirring occasionally, until the vegetables are soft and slightly caramelized.
5. Stir in 1 tsp dried oregano, and season with salt and black pepper to taste, cooking for another 1 minute to blend the flavors.
6. Pour 1 cup marinara sauce into the skillet, reduce the heat to low, and simmer for 3–4 minutes until the sauce thickens slightly and coats the vegetables.
7. Return the sliced sausage to the skillet, stirring to combine, and cook for 2 minutes until everything is heated through.
8. While the mixture simmers, toast 4 hoagie rolls in a toaster or under a broiler for 1–2 minutes until golden and crisp.
9. Spoon the sausage and pepper mixture evenly into the toasted hoagie rolls, pressing down gently to pack it in.
10. Serve immediately while warm. Keep in mind: letting the sausage rest before slicing keeps it juicy, and toasting the rolls prevents sogginess—I learned that the hard way after a few messy sandwiches!
Kick back and enjoy this sandwich with its tender, juicy sausage and sweet, smoky peppers melding into the rich marinara. The toasted roll adds a satisfying crunch that contrasts beautifully with the saucy filling—it’s a flavor bomb in every bite. For a fun twist, top it with melted provolone or serve it alongside a simple arugula salad to balance the spice.
Lobster Roll Sandwich with Lemon Mayo

Remember those summer trips to the New England coast where the smell of saltwater and butter hung in the air? That’s exactly the feeling I wanted to capture with this recipe—a simple, luxurious lobster roll that feels like a seaside escape, no matter where you are. It’s my go-to for impressing guests without spending all day in the kitchen.
Serving: 4 | Pre Time: 15 minutes | Cooking Time: 10 minutes
Ingredients
– 1 lb cooked lobster meat, chopped (I find fresh-picked meat makes all the difference, but high-quality frozen works in a pinch)
– 1/3 cup mayonnaise (Duke’s is my absolute favorite for its tang)
– 1 tbsp fresh lemon juice (always fresh-squeezed—bottled just doesn’t cut it here)
– 1 tsp lemon zest (I use a microplane to get it fine and fragrant)
– 2 tbsp unsalted butter, softened (I leave it out for 30 minutes to soften perfectly)
– 4 top-split hot dog buns (New England-style if you can find them—they toast up so nicely)
– 2 tbsp chopped fresh chives (from my little herb garden when possible)
– 1/4 tsp kosher salt (I prefer Diamond Crystal for its light texture)
– 1/4 tsp freshly ground black pepper (freshly cracked adds a brighter flavor)
Instructions
1. In a medium bowl, combine the mayonnaise, fresh lemon juice, lemon zest, kosher salt, and black pepper. Stir with a fork until fully blended—this is your lemon mayo base.
2. Gently fold the chopped lobster meat and chopped fresh chives into the lemon mayo mixture using a rubber spatula. Be careful not to break up the lobster chunks too much; you want nice, substantial pieces.
3. Heat a large skillet or griddle over medium heat for about 2 minutes until it’s evenly warm. Tip: A well-heated pan ensures even toasting without burning.
4. Spread the softened unsalted butter on the outer sides of each top-split hot dog bun. Use about 1/2 tablespoon per bun for a rich, golden crust.
5. Place the buns buttered-side down in the skillet. Toast for 2–3 minutes, checking at the 2-minute mark, until they are golden brown and crisp. Tip: Don’t walk away—they can go from perfect to burnt quickly!
6. Remove the toasted buns from the skillet and let them cool on a wire rack for 1 minute to prevent sogginess.
7. Divide the lobster salad evenly among the toasted buns, piling it high into each one. Tip: For a neat presentation, I like to slightly overfill them—it looks indulgent and prevents the filling from shifting.
8. Serve immediately while the buns are still warm and crisp.
Vibrant and satisfying, this lobster roll delivers a perfect contrast of textures: the cool, creamy lemon-kissed salad against the warm, buttery crunch of the bun. I love serving these with a side of crispy kettle chips and an extra lemon wedge for squeezing—it brightens every bite and makes even a weekday dinner feel like a coastal celebration.
Summary
Creative sandwich ideas can transform your dinner routine with delicious ease. We hope these 20 recipes inspire your next meal. Try one out, leave a comment with your favorite, and share this roundup on Pinterest to spread the joy of a great sandwich!


