
Brimming with rich, nutty flavor, Dubliner cheese transforms everyday meals into extraordinary comfort food. Whether you’re craving cozy dinners, quick appetizers, or indulgent snacks, these 17 creamy recipes promise to delight your taste buds. Let’s dive into irresistible dishes that make this versatile cheese the star of your kitchen—get ready to bookmark your favorites!
Dubliner Cheese and Bacon Stuffed Mushrooms

Venturing into appetizer territory, these stuffed mushrooms combine savory bacon and nutty cheese in a bite-sized package perfect for holiday gatherings or cozy nights in. They’re surprisingly simple to assemble, and I’ll walk you through each step to ensure golden, bubbly success.
Serving: 6 | Pre Time: 15 minutes | Cooking Time: 20 minutes
Ingredients
– 18 large, firm white button mushrooms
– 6 slices thick-cut applewood smoked bacon
– 1 cup finely shredded Dubliner cheese
– 1/2 cup full-fat sour cream
– 1/4 cup finely chopped fresh chives
– 1 tablespoon rich extra virgin olive oil
– 1/2 teaspoon finely ground black pepper
Instructions
1. Preheat your oven to 400°F (200°C) and line a large baking sheet with parchment paper.
2. Gently twist the stems from all 18 large, firm white button mushrooms and set the caps aside; finely chop the stems.
3. In a large skillet over medium heat, cook 6 slices thick-cut applewood smoked bacon until crisp, about 8–10 minutes, then transfer to a paper towel-lined plate.
4. Drain all but 1 tablespoon of bacon grease from the skillet, then add the chopped mushroom stems and sauté until softened, about 5 minutes.
5. Crumble the cooled bacon into small pieces and combine it in a medium bowl with the sautéed stems, 1 cup finely shredded Dubliner cheese, 1/2 cup full-fat sour cream, 1/4 cup finely chopped fresh chives, and 1/2 teaspoon finely ground black pepper.
6. Tip: For easier filling, use a small spoon or piping bag to neatly stuff each mushroom cap without overfilling.
7. Arrange the mushroom caps on the prepared baking sheet and lightly brush the outsides with 1 tablespoon rich extra virgin olive oil.
8. Evenly divide the bacon-cheese mixture among the caps, mounding it slightly.
9. Bake at 400°F for 18–20 minutes, until the mushrooms are tender and the filling is golden and bubbly.
10. Tip: Rotate the baking sheet halfway through cooking for even browning, and let the mushrooms rest for 5 minutes before serving to set the filling.
11. Tip: If the tops aren’t browning to your liking, broil for 1–2 minutes at the end, watching closely to prevent burning.
Out of the oven, these mushrooms offer a delightful contrast: the caps become juicy and tender, while the filling turns creamy with crispy bacon bits and a sharp, nutty cheese flavor. Serve them warm on a platter garnished with extra chives, or pair with a crisp green salad for a light meal that’s irresistibly savory.
Dubliner Cheese Fondue with Crusty Bread
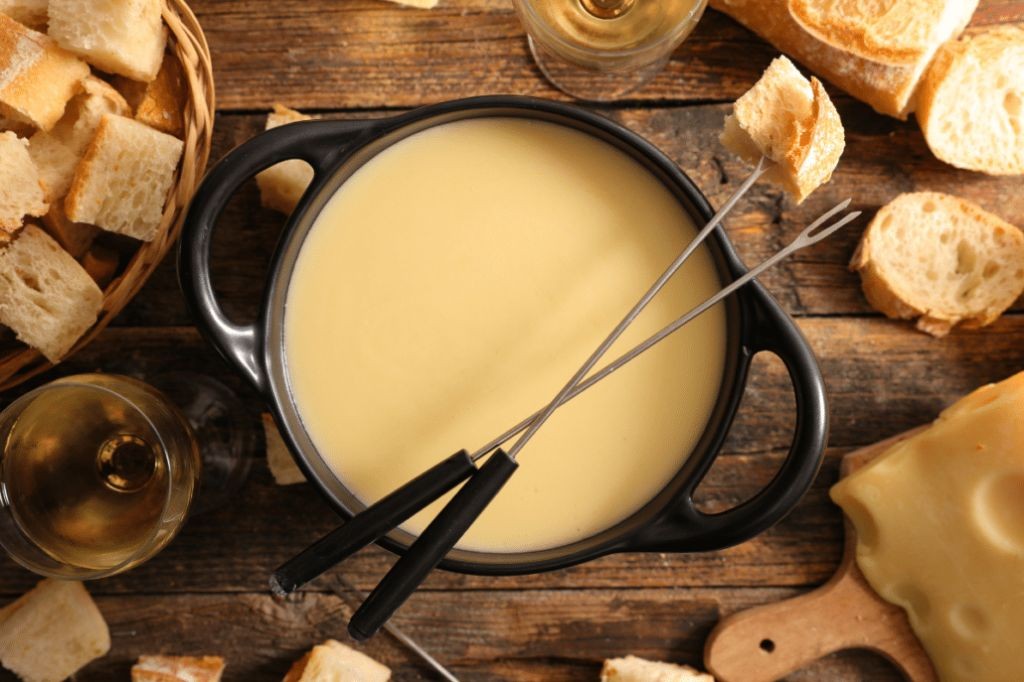
Venturing into the world of cheese fondue is simpler than you might think, and this Dubliner version offers a wonderfully sharp and nutty twist on the classic. Let’s walk through each step together to create a cozy, shareable centerpiece for your table.
Serving: 4 | Pre Time: 10 minutes | Cooking Time: 15 minutes
Ingredients
– 1 cup dry white wine, such as a crisp Sauvignon Blanc
– 1 tablespoon freshly squeezed lemon juice
– 1 clove garlic, finely minced
– 8 ounces Dubliner cheese, freshly grated from a firm, aged block
– 1 tablespoon cornstarch
– 1/4 teaspoon freshly ground nutmeg
– 1 loaf crusty artisan bread, such as a rustic sourdough, cut into 1-inch cubes
Instructions
1. Pour 1 cup of dry white wine into a medium, heavy-bottomed saucepan or fondue pot.
2. Add 1 tablespoon of freshly squeezed lemon juice and 1 finely minced clove of garlic to the pot.
3. Place the pot over medium-low heat and bring the mixture to a gentle simmer, which should take about 3-4 minutes; you’ll see small bubbles forming around the edges.
4. While the liquid heats, toss 8 ounces of freshly grated Dubliner cheese with 1 tablespoon of cornstarch in a medium bowl until evenly coated; this helps prevent clumping later.
5. Reduce the heat to low once the wine mixture is simmering.
6. Gradually add the cheese-cornstarch mixture to the pot, one small handful at a time, stirring constantly with a wooden spoon or silicone spatula in a slow figure-eight motion until each addition is fully melted before adding the next; this gradual process ensures a smooth, velvety fondue.
7. Continue stirring until all the cheese is incorporated and the fondue is thick, creamy, and free of lumps, which should take about 5-7 minutes total.
8. Stir in 1/4 teaspoon of freshly ground nutmeg until just combined.
9. Immediately transfer the fondue to a pre-warmed fondue pot or serving dish to keep it hot and fluid.
10. Serve immediately with 1 loaf of crusty artisan bread cut into 1-inch cubes for dipping.
Oozing with a rich, tangy sharpness from the Dubliner cheese, this fondue boasts a luxuriously smooth texture that clings perfectly to each bread cube. The subtle nutmeg adds a warm, aromatic note that complements the cheese’s inherent nuttiness beautifully. For a fun twist, set out additional dippers like crisp apple slices or steamed broccoli florets alongside the bread to create a vibrant, interactive spread.
Creamy Dubliner Cheese and Potato Gratin

Savor the ultimate comfort food with this Creamy Dubliner Cheese and Potato Gratin—a rich, bubbling dish that transforms simple ingredients into a showstopping side or cozy main. This methodical recipe walks you through each step for perfect layers of tender potatoes and sharp, melty cheese every time.
Serving: 6 | Pre Time: 20 minutes | Cooking Time: 75 minutes
Ingredients
– 2 pounds of starchy russet potatoes, peeled and thinly sliced
– 1 ½ cups of heavy cream with a velvety richness
– 1 cup of shredded sharp Dubliner cheese, packed with nutty flavor
– 3 tablespoons of unsalted butter, cut into small cubes
– 2 cloves of aromatic garlic, minced
– 1 teaspoon of fine sea salt
– ½ teaspoon of freshly ground black pepper
– ¼ teaspoon of freshly grated nutmeg for warm spice
Instructions
1. Preheat your oven to 375°F and lightly grease a 9×13-inch baking dish with 1 tablespoon of the cubed unsalted butter.
2. In a medium bowl, combine the heavy cream, minced garlic, fine sea salt, black pepper, and grated nutmeg, whisking until fully blended.
3. Arrange one-third of the thinly sliced potatoes in an even layer at the bottom of the prepared baking dish.
4. Pour one-third of the cream mixture evenly over the potato layer, then sprinkle one-third of the shredded Dubliner cheese on top.
5. Repeat steps 3 and 4 two more times to create three complete layers, ending with a final layer of cheese.
6. Dot the top layer with the remaining 2 tablespoons of cubed unsalted butter for added richness.
7. Cover the baking dish tightly with aluminum foil and bake in the preheated oven for 45 minutes.
8. Remove the foil and continue baking for an additional 25–30 minutes, until the top is golden brown and bubbly and a knife inserted into the center slides through the potatoes easily.
9. Let the gratin rest at room temperature for 10 minutes before serving to allow the layers to set.
10. Tip: For even slicing, use a mandoline or sharp knife to cut the potatoes to ⅛-inch thickness.
11. Tip: To prevent the top from browning too quickly, check after 20 minutes of uncovered baking and tent with foil if needed.
12. Tip: For a crispier top, broil for 2–3 minutes at the end, watching closely to avoid burning.
Vibrant with golden edges and a creamy interior, this gratin offers a delightful contrast of textures—crispy on top, tender within. Its robust Dubliner cheese flavor pairs beautifully with roasted meats or stands alone as a hearty vegetarian centerpiece; try serving it alongside a crisp green salad to balance the richness.
Dubliner Cheese and Caramelized Onion Tart

Unbelievably simple yet sophisticated, this savory tart transforms humble ingredients into a show-stopping centerpiece. You’ll layer sweet caramelized onions with nutty Dubliner cheese in a buttery crust for a dish that feels both rustic and elegant. Let’s walk through each step together to ensure perfect results every time.
Serving: 6 | Pre Time: 25 minutes | Cooking Time: 45 minutes
Ingredients
– 1 refrigerated pie crust, thawed
– 2 tablespoons rich extra virgin olive oil
– 2 large yellow onions, thinly sliced
– 1 teaspoon granulated sugar
– 1/4 teaspoon kosher salt
– 1/4 teaspoon freshly ground black pepper
– 1 cup shredded Dubliner cheese
– 2 large farm-fresh eggs
– 1/2 cup heavy cream
– 1/4 teaspoon freshly grated nutmeg
Instructions
1. Preheat your oven to 375°F (190°C).
2. Unroll the thawed pie crust and press it into a 9-inch tart pan, trimming any excess dough.
3. Prick the bottom of the crust all over with a fork to prevent puffing.
4. Line the crust with parchment paper and fill with pie weights or dried beans.
5. Blind bake the crust for 15 minutes, until the edges are lightly golden.
6. Carefully remove the parchment and weights and set the crust aside.
7. Heat the extra virgin olive oil in a large skillet over medium-low heat.
8. Add the thinly sliced onions and cook, stirring occasionally, for 10 minutes until softened.
9. Sprinkle the granulated sugar, kosher salt, and black pepper over the onions.
10. Continue cooking the onions for another 20-25 minutes, stirring every 5 minutes, until they turn a deep golden brown and caramelize fully. Tip: Low, slow heat is key for even caramelization without burning.
11. Spread the caramelized onions evenly over the bottom of the pre-baked crust.
12. Sprinkle the shredded Dubliner cheese evenly over the onions.
13. In a medium bowl, whisk together the farm-fresh eggs, heavy cream, and freshly grated nutmeg until smooth.
14. Pour the egg mixture carefully over the cheese and onions in the crust. Tip: Pour slowly to avoid disturbing the layers.
15. Bake the tart at 375°F for 30-35 minutes, until the filling is set and the top is golden brown. Tip: The tart is done when a knife inserted near the center comes out clean.
16. Let the tart cool on a wire rack for at least 10 minutes before slicing.
The tart emerges with a crisp, flaky crust giving way to a creamy, savory filling where the sweet onions and sharp cheese meld beautifully. Serve it warm with a simple arugula salad dressed in lemon vinaigrette to cut through the richness, or enjoy a slice at room temperature as part of a brunch spread.
Irish Dubliner Cheese Scones
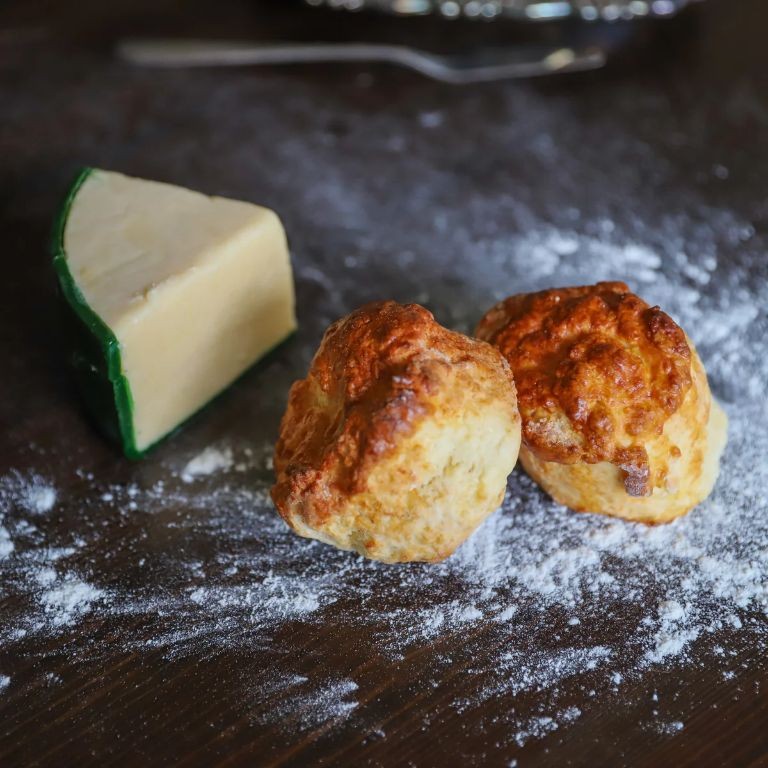
Savor the rich, buttery aroma of freshly baked Irish Dubliner Cheese Scones, a delightful twist on a classic that combines sharp, aged cheddar with the comforting simplicity of a traditional scone. These savory treats are perfect for a cozy brunch or an elegant afternoon tea, offering a golden, flaky exterior and a tender, cheesy interior that melts in your mouth. Follow this methodical guide to create bakery-worthy scones right in your own kitchen.
Serving: 8 | Pre Time: 15 minutes | Cooking Time: 15 minutes
Ingredients
– 2 cups all-purpose flour, sifted for lightness
– 1 tablespoon baking powder, for a fluffy rise
– 1/2 teaspoon fine sea salt, to enhance flavors
– 1/4 cup cold unsalted butter, cubed for flakiness
– 1 cup shredded Irish Dubliner cheese, sharp and aged
– 3/4 cup whole milk, cold and creamy
– 1 large farm-fresh egg, beaten for a golden glaze
Instructions
1. Preheat your oven to 400°F and line a baking sheet with parchment paper.
2. In a large mixing bowl, whisk together the sifted all-purpose flour, baking powder, and fine sea salt until fully combined.
3. Add the cold, cubed unsalted butter to the dry ingredients, using a pastry cutter or your fingers to work it in until the mixture resembles coarse crumbs.
4. Tip: Keep the butter cold to ensure flaky layers in your scones.
5. Gently fold in the shredded Irish Dubliner cheese until evenly distributed throughout the mixture.
6. Pour in the cold, creamy whole milk, stirring just until a soft dough forms without overmixing.
7. Tip: Overmixing can lead to tough scones, so stop as soon as the dough comes together.
8. Turn the dough out onto a lightly floured surface and pat it into a 1-inch thick circle.
9. Use a sharp knife or biscuit cutter to cut the dough into 8 equal wedges or rounds.
10. Place the scones on the prepared baking sheet, spacing them about 2 inches apart.
11. Brush the tops of each scone with the beaten farm-fresh egg for a shiny, golden finish.
12. Tip: For extra flavor, sprinkle a pinch of leftover cheese on top before baking.
13. Bake in the preheated oven at 400°F for 12-15 minutes, or until the scones are puffed and golden brown on top.
14. Remove from the oven and let cool on a wire rack for 5 minutes before serving.
15. Gather these warm scones and enjoy their crumbly texture and rich, cheesy flavor, perfect with a pat of butter or a dollop of savory jam. Serve them alongside a hot cup of tea for a comforting treat that highlights the nutty notes of the Irish Dubliner cheese.
Dubliner Cheese and Apple Grilled Sandwich
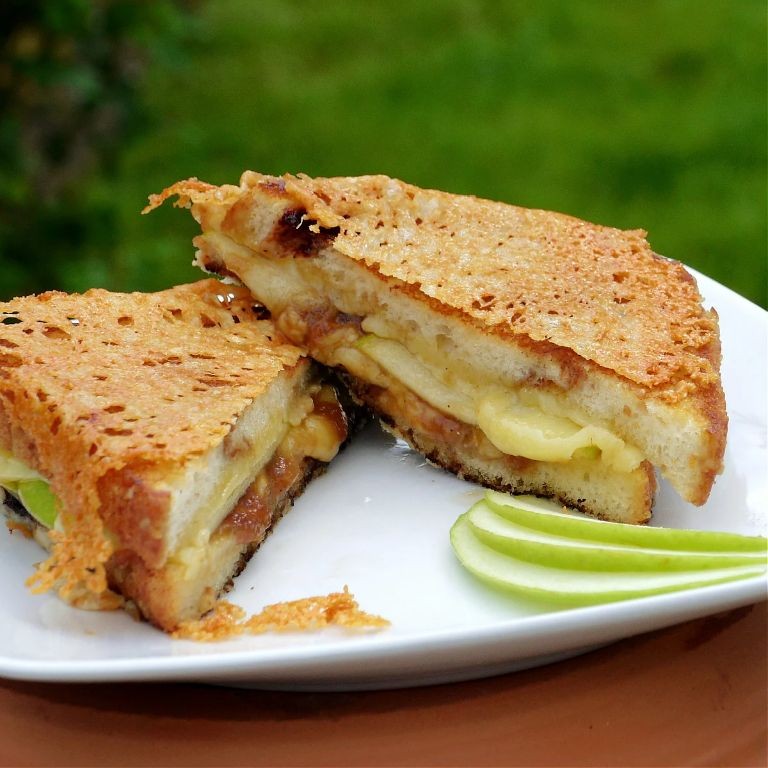
Kick off your cozy evening with this elevated grilled cheese that combines sharp, nutty Dubliner cheese with sweet-tart apple slices for a perfect balance of flavors. This simple yet sophisticated sandwich transforms basic ingredients into a comforting meal that feels special enough for a quiet night in or casual entertaining. Let’s walk through each step together to ensure your sandwich comes out perfectly golden and melty every time.
Serving: 2 | Pre Time: 10 minutes | Cooking Time: 10 minutes
Ingredients
– 4 slices of rustic sourdough bread, about 1/2-inch thick
– 4 ounces of sharp Dubliner cheese, thinly sliced
– 1 medium crisp Honeycrisp apple, cored and thinly sliced into 1/8-inch pieces
– 2 tablespoons of creamy unsalted butter, softened to room temperature
– 1 tablespoon of pure maple syrup
– 1/4 teaspoon of flaky sea salt
Instructions
1. Lay out 4 slices of rustic sourdough bread on a clean work surface.
2. Evenly distribute 4 ounces of thinly sliced sharp Dubliner cheese across 2 slices of bread, covering them completely.
3. Arrange thin slices from 1 medium crisp Honeycrisp apple in a single layer over the cheese on each slice.
4. Drizzle 1/2 tablespoon of pure maple syrup over the apple slices on each sandwich half.
5. Sprinkle 1/8 teaspoon of flaky sea salt evenly over the apple layers on each half.
6. Top each with the remaining bread slices to form 2 sandwiches.
7. Spread 1 tablespoon of softened creamy unsalted butter evenly on one side of each sandwich, covering the entire surface.
8. Heat a large non-stick skillet or griddle over medium-low heat for 2 minutes until warm.
9. Place both sandwiches butter-side down in the skillet, then spread the remaining 1 tablespoon of butter on the top sides of the bread.
10. Cook for 4-5 minutes until the bottom is golden brown and crisp, checking at 4 minutes by gently lifting a corner with a spatula.
11. Carefully flip both sandwiches using a wide spatula.
12. Cook for another 4-5 minutes on the second side until equally golden brown and the cheese is fully melted, pressing down lightly with the spatula halfway through.
13. Remove sandwiches from the skillet and let rest on a cutting board for 1 minute before slicing.
14. Cut each sandwich diagonally with a serrated knife and serve immediately.
Gorgeously crisp sourdough gives way to oozy, nutty cheese that beautifully melds with the tender, sweet-tart apples. The hint of maple syrup caramelizes slightly against the warm cheese, creating a delightful sweet-savory contrast in every bite. For a fun twist, try serving these with a side of spicy whole-grain mustard for dipping or pair with a simple arugula salad dressed in lemon vinaigrette to cut through the richness.
Dubliner Cheese and Guinness Dip

On a chilly evening, nothing warms the soul quite like a rich, savory dip. This Dubliner Cheese and Guinness Dip combines the sharp, nutty flavor of Irish cheddar with the deep, malty notes of stout for a crowd-pleasing appetizer that’s surprisingly simple to make.
Serving: 6 | Pre Time: 10 minutes | Cooking Time: 15 minutes
Ingredients
– 8 ounces of sharp Dubliner cheddar cheese, freshly grated
– 1 cup of full-fat sour cream
– 1/2 cup of Guinness stout, at room temperature
– 2 tablespoons of unsalted butter
– 1/4 cup of all-purpose flour
– 1/2 teaspoon of garlic powder
– 1/4 teaspoon of smoked paprika
– 1/4 teaspoon of finely ground black pepper
– 1/4 teaspoon of kosher salt
Instructions
1. Grate 8 ounces of sharp Dubliner cheddar cheese using the large holes of a box grater for even melting.
2. In a medium saucepan over medium-low heat, melt 2 tablespoons of unsalted butter until it bubbles gently.
3. Whisk in 1/4 cup of all-purpose flour to form a smooth paste, cooking for 1 minute to remove the raw flour taste—this is your roux, the base for a creamy dip.
4. Slowly pour in 1/2 cup of Guinness stout while whisking constantly to prevent lumps from forming.
5. Add 1 cup of full-fat sour cream, whisking until the mixture is smooth and begins to thicken, about 2-3 minutes.
6. Reduce the heat to low and stir in the grated Dubliner cheddar cheese until fully melted and the dip is velvety, which should take 3-4 minutes.
7. Season the dip with 1/2 teaspoon of garlic powder, 1/4 teaspoon of smoked paprika, 1/4 teaspoon of finely ground black pepper, and 1/4 teaspoon of kosher salt, stirring well to combine.
8. Transfer the dip to a serving bowl and let it cool for 5 minutes before serving to allow the flavors to meld.
Let this dip rest briefly to achieve a thick, scoopable texture that clings perfectly to pretzels or crusty bread. Its bold, cheesy flavor is balanced by the earthy undertones of Guinness, making it an ideal centerpiece for game day or a cozy night in. For a creative twist, try serving it warm with apple slices or roasted vegetables to cut through the richness.
Baked Dubliner Cheese Mac and Cheese
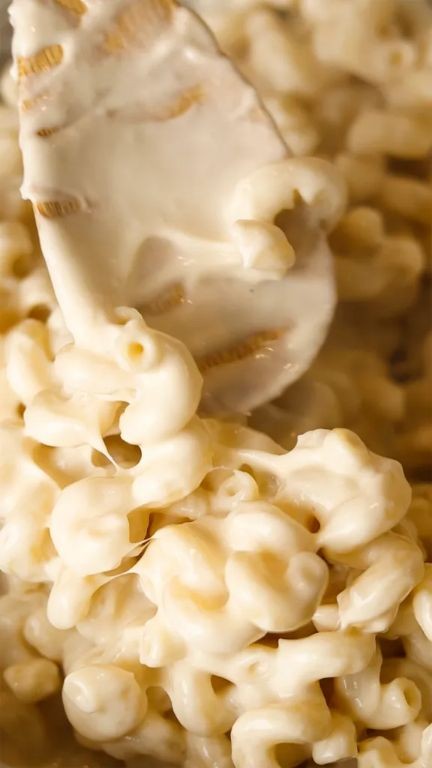
Kick off your cozy winter evening with this comforting twist on a classic—a creamy, indulgent mac and cheese elevated by the sharp, nutty notes of Dubliner cheese, baked to golden perfection. This methodical recipe walks you through each step, ensuring even beginners can create a showstopping dish that’s both hearty and sophisticated. Let’s dive into the process, focusing on precision and flavor-building techniques to make every bite memorable.
Serving: 6 | Pre Time: 15 minutes | Cooking Time: 30 minutes
Ingredients
– 8 ounces of dried elbow macaroni
– 4 tablespoons of unsalted butter, cut into small cubes
– ¼ cup of all-purpose flour, sifted for smoothness
– 2 cups of whole milk, warmed to room temperature
– 8 ounces of shredded Dubliner cheese, with its sharp, nutty flavor
– ½ teaspoon of kosher salt
– ¼ teaspoon of freshly ground black pepper
– ½ cup of panko breadcrumbs, for a crispy topping
– 1 tablespoon of extra virgin olive oil, for drizzling
Instructions
1. Preheat your oven to 375°F (190°C) to ensure it’s fully heated for baking.
2. Bring a large pot of salted water to a rolling boil over high heat.
3. Add 8 ounces of dried elbow macaroni to the boiling water and cook for 7–8 minutes, until al dente, stirring occasionally to prevent sticking.
4. Drain the cooked macaroni in a colander and set it aside; do not rinse to help the sauce cling better.
5. In a medium saucepan over medium heat, melt 4 tablespoons of unsalted butter until it bubbles slightly.
6. Whisk in ¼ cup of all-purpose flour and cook for 1–2 minutes, until it forms a pale golden roux, stirring constantly to avoid burning.
7. Gradually pour in 2 cups of whole milk while whisking continuously to create a smooth, lump-free béchamel sauce.
8. Cook the sauce for 3–4 minutes, until it thickens enough to coat the back of a spoon, then remove from heat.
9. Stir in 8 ounces of shredded Dubliner cheese until fully melted and creamy.
10. Season the cheese sauce with ½ teaspoon of kosher salt and ¼ teaspoon of freshly ground black pepper, tasting to adjust if needed.
11. Combine the drained macaroni and cheese sauce in a large bowl, folding gently to coat every piece evenly.
12. Transfer the mac and cheese mixture to a greased 9×13-inch baking dish, spreading it into an even layer.
13. In a small bowl, mix ½ cup of panko breadcrumbs with 1 tablespoon of extra virgin olive oil until lightly coated.
14. Sprinkle the breadcrumb mixture evenly over the top of the mac and cheese for a crispy crust.
15. Bake in the preheated oven for 20–25 minutes, until the top is golden brown and the edges are bubbly.
16. Remove from the oven and let it rest for 5 minutes before serving to allow the flavors to meld.
Relish the creamy interior and crispy topping, where the sharp Dubliner cheese adds a delightful tang that cuts through the richness. Serve it straight from the dish for a family-style meal, or pair it with a simple green salad to balance the indulgence—either way, it’s a comforting masterpiece that’s sure to become a favorite.
Dubliner Cheese and Herb Soufflé
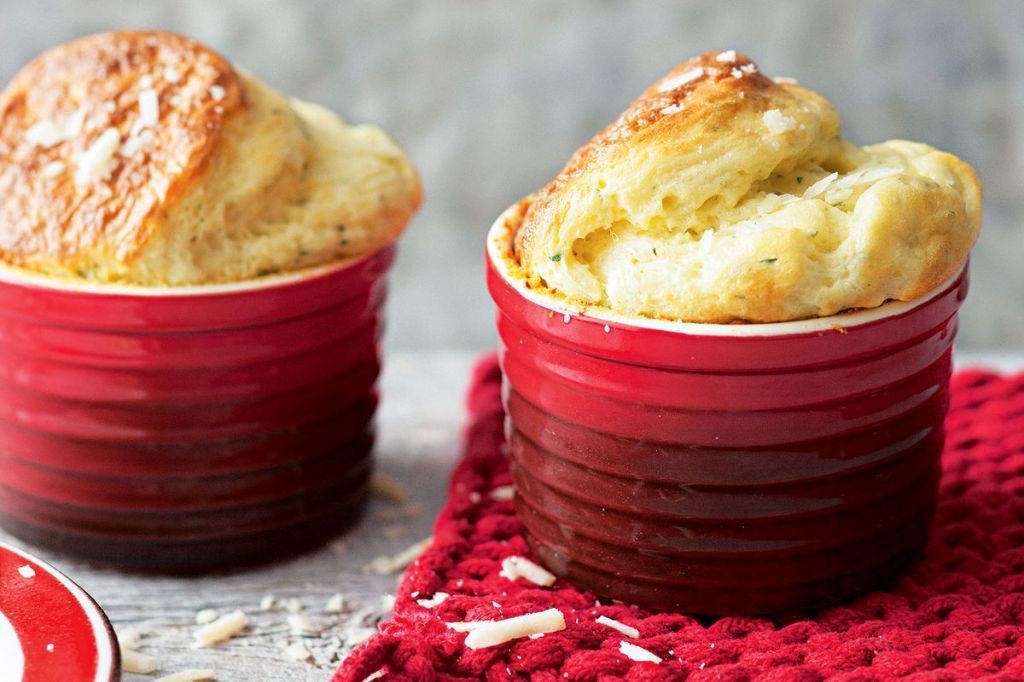
Gently whisking air into egg whites transforms humble ingredients into a cloud-like masterpiece. This Dubliner Cheese and Herb Soufflé is a surprisingly approachable showstopper that bakes into a golden, towering delight, perfect for a special brunch or elegant dinner. Follow these methodical steps to ensure your soufflé rises beautifully every time.
Serving: 4 | Pre Time: 25 minutes | Cooking Time: 25 minutes
Ingredients
– 3 tablespoons of unsalted butter, cold and cubed
– 3 tablespoons of all-purpose flour, sifted
– 1 cup of whole milk, warmed to about 110°F
– 4 large eggs, farm-fresh and separated
– 1 cup of Dubliner cheese, freshly grated
– 2 tablespoons of fresh chives, finely chopped
– 1 tablespoon of fresh thyme leaves
– 1/4 teaspoon of fine sea salt
– 1/4 teaspoon of freshly ground black pepper
– 1/4 teaspoon of cream of tartar
Instructions
1. Preheat your oven to 375°F and position a rack in the lower third.
2. Generously butter the inside of a 1.5-quart soufflé dish using 1 tablespoon of the cold, cubed butter.
3. Sprinkle 1 tablespoon of the sifted all-purpose flour into the buttered dish, tilting to coat all sides evenly, then tap out any excess.
4. In a medium saucepan over medium heat, melt the remaining 2 tablespoons of cold, cubed butter.
5. Whisk in the remaining 2 tablespoons of sifted all-purpose flour and cook for 1 full minute, stirring constantly until the mixture forms a smooth, pale paste (a roux).
6. Gradually pour in the 1 cup of whole milk, warmed to 110°F, whisking continuously to prevent lumps.
7. Cook the mixture for 2-3 minutes, whisking constantly, until it thickens to the consistency of a thick pudding or pastry cream.
8. Remove the saucepan from the heat and immediately whisk in the 4 egg yolks, one at a time, until fully incorporated.
9. Stir in the 1 cup of freshly grated Dubliner cheese, 2 tablespoons of finely chopped fresh chives, 1 tablespoon of fresh thyme leaves, 1/4 teaspoon of fine sea salt, and 1/4 teaspoon of freshly ground black pepper until the cheese is melted and the mixture is smooth. Set this base aside to cool slightly.
10. In a spotlessly clean, dry mixing bowl, combine the 4 egg whites and 1/4 teaspoon of cream of tartar.
11. Using an electric mixer on medium speed, beat the egg whites until soft peaks form, which takes about 2-3 minutes; the tips should curl over when you lift the beaters. (Tip: Ensure no trace of yolk is in the whites, as fat prevents proper whipping.)
12. Gently fold one-third of the beaten egg whites into the slightly cooled cheese base using a rubber spatula to lighten the mixture.
13. Carefully fold in the remaining beaten egg whites just until no large white streaks remain, being careful not to deflate the mixture. (Tip: Use a folding motion, cutting through the center and turning the bowl.)
14. Pour the batter into the prepared soufflé dish and smooth the top with the spatula.
15. Run your thumb around the inside edge of the dish to create a shallow trench, which helps the soufflé rise straight. (Tip: This simple step promotes an even, dramatic rise.)
16. Place the dish on a baking sheet and bake in the preheated 375°F oven for 22-25 minutes, without opening the oven door for the first 20 minutes.
17. The soufflé is done when it has risen 2-3 inches above the rim, the top is deeply golden brown, and the center jiggles slightly when gently shaken.
18. Serve immediately straight from the oven.
Marvel at the delicate, airy interior that contrasts with the crisp, golden crust, offering a rich, savory flavor from the nutty Dubliner cheese balanced by the fresh herbs. For a creative twist, serve individual portions in ramekins with a simple arugula salad dressed in lemon vinaigrette to cut through the richness.
Dubliner Cheese and Pear Salad with Walnuts
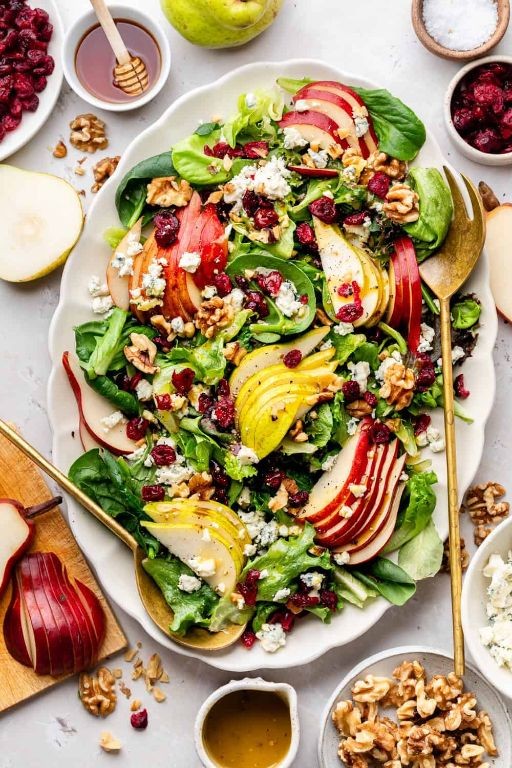
Just as winter’s chill settles in, this salad brings a welcome burst of freshness and warmth to the table. It’s a simple yet sophisticated combination of sweet, savory, and crunchy elements that comes together in minutes, perfect for a quick lunch or an elegant starter. Let’s walk through each step to ensure your salad is perfectly balanced and delicious.
Serving: 4 | Pre Time: 15 minutes | Cooking Time: 0 minutes
Ingredients
– 8 cups of crisp, fresh mixed greens
– 2 ripe, juicy Bartlett pears
– 8 ounces of sharp, nutty Dubliner cheese
– 1 cup of raw walnut halves
– 1/3 cup of rich extra virgin olive oil
– 3 tablespoons of smooth, aged balsamic vinegar
– 1 teaspoon of Dijon mustard with whole grains
– 1/2 teaspoon of finely ground black pepper
– 1/4 teaspoon of fine sea salt
Instructions
1. Place 8 cups of crisp, fresh mixed greens into a large salad bowl.
2. Core and thinly slice 2 ripe, juicy Bartlett pears, then arrange the slices over the greens.
3. Cut 8 ounces of sharp, nutty Dubliner cheese into 1/2-inch cubes, and scatter them evenly across the salad.
4. Toast 1 cup of raw walnut halves in a dry skillet over medium heat for 5 minutes, stirring frequently until fragrant and lightly browned, then let them cool for 2 minutes before adding to the bowl. (Tip: Toasting enhances the walnuts’ flavor and crunch.)
5. In a small mixing bowl, whisk together 1/3 cup of rich extra virgin olive oil, 3 tablespoons of smooth, aged balsamic vinegar, 1 teaspoon of Dijon mustard with whole grains, 1/2 teaspoon of finely ground black pepper, and 1/4 teaspoon of fine sea salt until fully emulsified.
6. Drizzle the dressing over the salad ingredients in the bowl.
7. Using salad tongs, gently toss all components for 30 seconds to ensure even coating without crushing the delicate pears. (Tip: Toss just before serving to keep the greens crisp.)
8. Divide the salad equally among four plates, piling it high for a beautiful presentation.
9. Serve immediately to enjoy the optimal texture and flavor. (Tip: For a heartier meal, add grilled chicken or serve with crusty bread on the side.)
Refreshingly crisp greens meet the sweet burst of pear and the savory bite of cheese in every forkful. The toasted walnuts add a satisfying crunch that contrasts beautifully with the creamy dressing, making this salad a delightful balance of textures. Try it as a light dinner paired with a glass of white wine, or pack it for a picnic to impress friends with its elegant simplicity.
Dubliner Cheese-Stuffed Chicken Breast

Wondering how to turn ordinary chicken into a restaurant-worthy meal? This Dubliner Cheese-Stuffed Chicken Breast recipe delivers impressive flavor with surprisingly simple steps. Let’s walk through each stage together to ensure your success.
Serving: 4 | Pre Time: 20 minutes | Cooking Time: 25 minutes
Ingredients
– 4 boneless, skinless chicken breasts (about 6 ounces each)
– 4 ounces Dubliner cheese, shredded into fine, melty strands
– 2 tablespoons rich extra virgin olive oil
– 1 teaspoon finely ground black pepper
– 1 teaspoon coarse kosher salt
– 1 cup all-purpose flour
– 2 large farm-fresh eggs, lightly beaten
– 1 cup panko breadcrumbs, for a golden, crispy crust
– 1 tablespoon unsalted butter
Instructions
1. Preheat your oven to 375°F and line a baking sheet with parchment paper.
2. Place one chicken breast on a cutting board and use a sharp knife to slice a horizontal pocket through the thickest side, being careful not to cut all the way through.
3. Stuff each pocket with 1 ounce of shredded Dubliner cheese, pressing gently to distribute it evenly.
4. Season the outside of each breast generously with coarse kosher salt and finely ground black pepper.
5. Set up a breading station with three shallow dishes: place all-purpose flour in the first, lightly beaten farm-fresh eggs in the second, and panko breadcrumbs in the third.
6. Dredge one stuffed chicken breast in the flour, shaking off any excess.
7. Dip the floured breast into the beaten eggs, coating it completely.
8. Press the breast firmly into the panko breadcrumbs, ensuring an even, golden crust forms on all sides.
9. Heat rich extra virgin olive oil and unsalted butter in a large oven-safe skillet over medium-high heat until the butter melts and foams slightly.
10. Carefully place the breaded chicken breasts in the skillet and sear for 3–4 minutes per side, or until the crust turns a deep golden brown.
11. Transfer the skillet to the preheated oven and bake for 15–18 minutes, until the internal temperature reaches 165°F when checked with a meat thermometer.
12. Remove the skillet from the oven and let the chicken rest on a cutting board for 5 minutes before slicing.
Rely on that rest time—it allows the juices to redistribute, keeping the meat incredibly moist. Each bite reveals a crispy, golden exterior giving way to tender chicken and a gooey, savory cheese center. For a vibrant plate, serve slices over a bed of garlicky sautéed spinach or alongside roasted cherry tomatoes.
Dubliner Cheese and Garlic Scalloped Potatoes
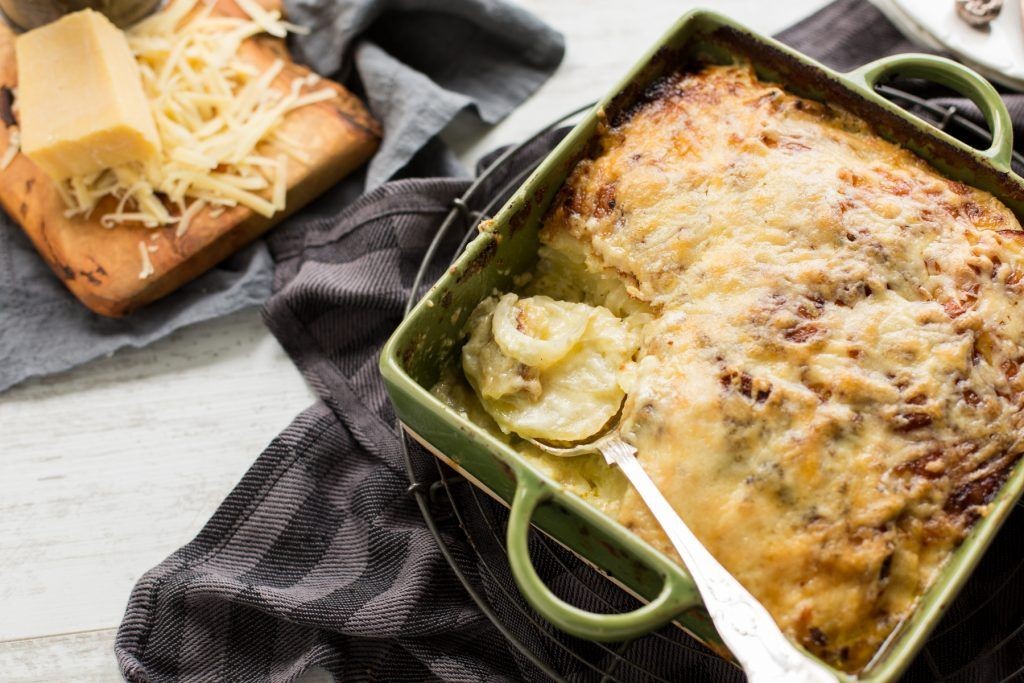
Unquestionably, the combination of creamy potatoes and sharp cheese creates a comforting classic, but this version elevates the dish with the nutty, slightly sweet notes of Dubliner cheese and the aromatic punch of fresh garlic. Let’s build these layers of flavor together, step by step, for a truly memorable side.
Serving: 6 | Pre Time: 20 minutes | Cooking Time: 75 minutes
Ingredients
– 2 pounds of russet potatoes, peeled and sliced into ⅛-inch thick rounds
– 4 cloves of fresh garlic, minced
– 8 ounces of sharp Dubliner cheese, freshly grated
– 2 cups of heavy cream
– ½ cup of whole milk
– 3 tablespoons of unsalted butter
– 1 teaspoon of kosher salt
– ½ teaspoon of freshly ground black pepper
– ¼ teaspoon of freshly grated nutmeg
Instructions
1. Preheat your oven to 375°F (190°C) and generously grease a 9×13-inch baking dish with 1 tablespoon of the unsalted butter.
2. In a medium saucepan over medium heat, combine the heavy cream, whole milk, minced fresh garlic, kosher salt, freshly ground black pepper, and freshly grated nutmeg.
3. Heat the cream mixture just until it begins to steam and small bubbles form around the edges, about 5 minutes, then immediately remove it from the heat. (Tip: Do not let it boil, as this can cause the cream to separate.)
4. Arrange one-third of the peeled russet potato slices in a single, slightly overlapping layer on the bottom of the prepared baking dish.
5. Sprinkle one-third of the freshly grated sharp Dubliner cheese evenly over the potato layer.
6. Carefully pour one-third of the warm cream mixture over the cheese and potatoes.
7. Repeat steps 4 through 6 two more times to create two additional layers, ending with a final layer of cream mixture.
8. Dot the top of the casserole with the remaining 2 tablespoons of unsalted butter, cut into small pieces.
9. Cover the baking dish tightly with aluminum foil and bake on the middle rack for 45 minutes. (Tip: The foil trap steam, which helps the potatoes cook through tenderly without drying out.)
10. After 45 minutes, carefully remove the foil. The potatoes should be fork-tender.
11. Continue baking, uncovered, for an additional 25-30 minutes, or until the top is golden brown and bubbly. (Tip: For extra browning, broil for the final 1-2 minutes, watching closely to prevent burning.)
12. Remove the dish from the oven and let it rest for 15 minutes before serving to allow the sauce to thicken slightly.
Layers of tender potato melt into the rich, garlic-infused cream, while the Dubliner cheese forms a beautifully browned, savory crust with a delightful crystalline texture. This dish pairs wonderfully with a simple roast chicken or can stand alone as a decadent vegetarian centerpiece.
Dubliner Cheese and Porter Ale Soup
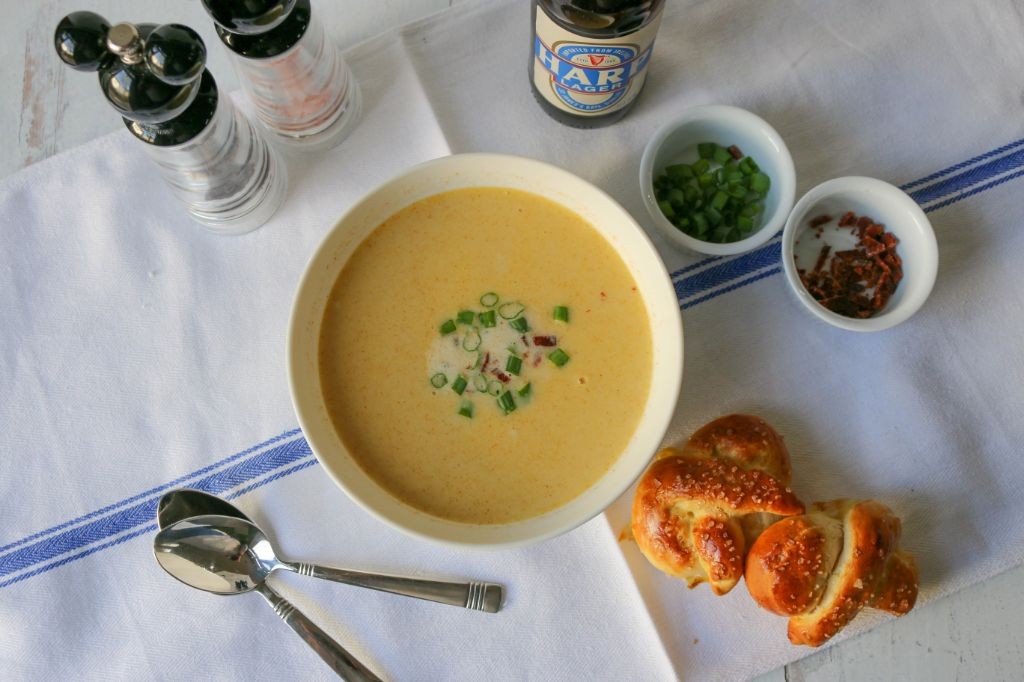
Warming up on a chilly evening calls for something hearty and comforting, and this Dubliner Cheese and Porter Ale Soup delivers exactly that. This rich, creamy soup combines sharp aged cheese with malty porter ale for a deeply satisfying flavor that’s surprisingly simple to make. Follow these step-by-step instructions to create a restaurant-worthy soup right in your own kitchen.
Serving: 4 | Pre Time: 15 minutes | Cooking Time: 25 minutes
Ingredients
– 4 tablespoons of creamy unsalted butter
– 1 large yellow onion, finely diced
– 2 cloves of aromatic garlic, minced
– 1/4 cup of all-purpose flour
– 2 cups of robust porter ale
– 2 cups of rich chicken broth
– 2 cups of heavy cream
– 8 ounces of sharp Dubliner cheese, freshly grated
– 1 teaspoon of fine sea salt
– 1/2 teaspoon of freshly ground black pepper
– 2 tablespoons of fresh chives, finely chopped
Instructions
1. Melt 4 tablespoons of creamy unsalted butter in a large Dutch oven over medium heat until fully liquid and bubbling gently.
2. Add 1 large finely diced yellow onion and cook for 5-7 minutes, stirring occasionally, until the onion turns translucent and soft.
3. Stir in 2 cloves of minced aromatic garlic and cook for exactly 1 minute until fragrant, being careful not to let it brown.
4. Sprinkle 1/4 cup of all-purpose flour over the onion mixture and cook while stirring constantly for 2 minutes to form a roux, which will thicken the soup later.
5. Slowly pour in 2 cups of robust porter ale while whisking continuously to prevent lumps from forming.
6. Add 2 cups of rich chicken broth and bring the mixture to a gentle simmer over medium-high heat, then reduce to medium-low.
7. Simmer the soup uncovered for 10 minutes, stirring occasionally, to allow the alcohol to cook off and flavors to meld.
8. Gradually whisk in 2 cups of heavy cream until fully incorporated and the soup is smooth.
9. Reduce the heat to low and slowly add 8 ounces of freshly grated sharp Dubliner cheese, one handful at a time, stirring until completely melted after each addition.
10. Season the soup with 1 teaspoon of fine sea salt and 1/2 teaspoon of freshly ground black pepper, then taste and adjust if needed.
11. Ladle the hot soup into bowls and garnish each serving with a sprinkle of 2 tablespoons of finely chopped fresh chives.
Decadently creamy with a velvety texture, this soup features the perfect balance of sharp cheese and malty ale notes. Serve it with crusty sourdough bread for dipping, or for a fun twist, top it with crispy bacon bits and a drizzle of honey to contrast the savory richness.
Dubliner Cheese and Honey Crostini
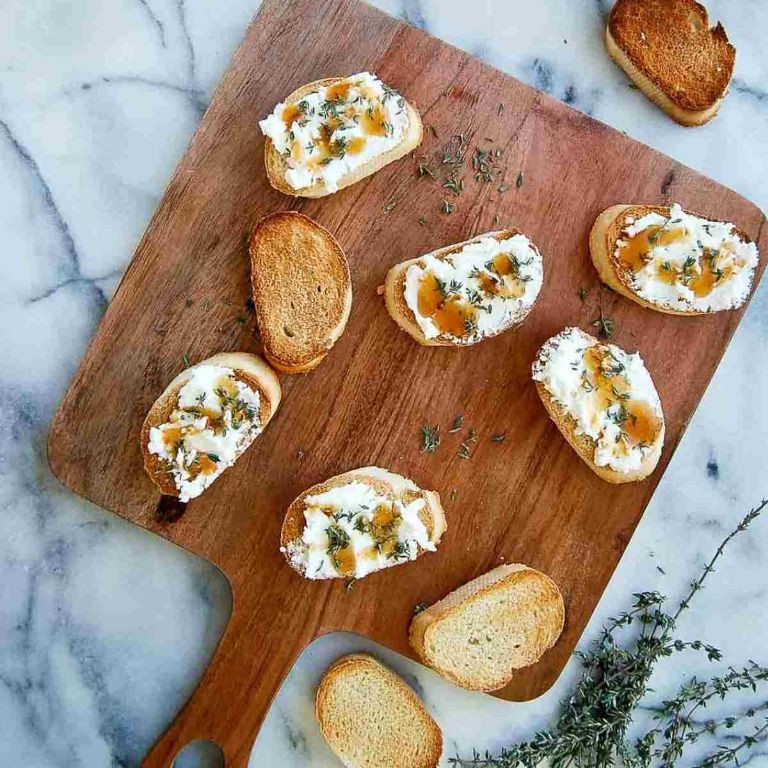
A simple yet sophisticated appetizer, these Dubliner Cheese and Honey Crostini combine sharp, aged cheese with sweet honey on crisp bread for a perfect balance of flavors. Let’s walk through each step methodically to ensure your crostini turn out beautifully every time.
Serving: 8 | Pre Time: 10 minutes | Cooking Time: 10 minutes
Ingredients
– 1 French baguette, sliced into 16 thin pieces
– 2 tablespoons rich extra virgin olive oil
– 8 ounces aged Dubliner cheese, grated
– 3 tablespoons raw wildflower honey
– 1 teaspoon flaky sea salt
– 1 tablespoon fresh thyme leaves
Instructions
1. Preheat your oven to 375°F and line a baking sheet with parchment paper.
2. Arrange the baguette slices in a single layer on the prepared baking sheet.
3. Brush each slice lightly with the rich extra virgin olive oil using a pastry brush for even coverage.
4. Bake the slices for 8-10 minutes, or until they are golden brown and crisp around the edges.
5. Remove the baking sheet from the oven and let the crostini cool for 2 minutes to prevent the cheese from melting too quickly.
6. Sprinkle the grated aged Dubliner cheese evenly over each crostini slice.
7. Return the baking sheet to the oven and bake for an additional 3-4 minutes, just until the cheese is melted and bubbly.
8. Drizzle the raw wildflower honey over the warm crostini using a spoon for controlled application.
9. Garnish each crostini with a pinch of flaky sea salt and a sprinkle of fresh thyme leaves.
10. Serve immediately while warm to enjoy the optimal texture and flavor.
Combining the crisp, toasted bread with the gooey melted cheese creates a delightful contrast in every bite. Consider pairing these crostini with a glass of dry white wine or serving them alongside a fresh green salad for a complete appetizer spread.
Dubliner Cheese and Beef Sliders with Irish Butter

Perfect for a cozy gathering or game day, these Dubliner Cheese and Beef Sliders with Irish Butter combine savory ground beef, nutty aged cheese, and rich butter in a warm, satisfying bite. Let’s walk through each step together to ensure your sliders turn out juicy, flavorful, and perfectly golden. You’ll find this recipe straightforward, even if you’re new to cooking, so grab your ingredients and let’s get started.
Serving: 12 | Pre Time: 15 minutes | Cooking Time: 20 minutes
Ingredients
– 1 pound of 80/20 lean ground beef
– 12 soft slider buns
– 8 ounces of shredded Dubliner cheese, a sharp and nutty aged cheddar
– 4 tablespoons of salted Irish butter, rich and creamy
– 1 tablespoon of Worcestershire sauce, tangy and savory
– 1 teaspoon of garlic powder, finely ground
– 1 teaspoon of onion powder, finely ground
– 1/2 teaspoon of kosher salt, coarse and flaky
– 1/2 teaspoon of freshly ground black pepper, aromatic and bold
Instructions
1. Preheat your oven to 350°F and line a baking sheet with parchment paper.
2. In a large mixing bowl, combine the ground beef, Worcestershire sauce, garlic powder, onion powder, kosher salt, and black pepper.
3. Gently mix the ingredients with your hands until just combined, being careful not to overwork the meat to keep it tender.
4. Divide the mixture into 12 equal portions and shape each into a thin patty, about 2 inches in diameter.
5. Heat a large skillet over medium-high heat and add 1 tablespoon of Irish butter, allowing it to melt and coat the pan evenly.
6. Place the patties in the skillet, cooking for 3-4 minutes per side until they develop a deep brown crust and reach an internal temperature of 160°F.
7. Transfer the cooked patties to the prepared baking sheet and top each with a generous sprinkle of shredded Dubliner cheese.
8. Bake in the preheated oven for 5 minutes, or until the cheese is fully melted and bubbly.
9. While the patties bake, split the slider buns and lightly toast them in the same skillet over medium heat for 1-2 minutes until golden, using the remaining Irish butter for extra flavor.
10. Assemble the sliders by placing a cheesy patty on the bottom half of each bun, then covering with the top half.
Fluffy and warm, these sliders offer a delightful contrast between the crisp toasted buns and the juicy, cheese-topped beef patties. The nutty Dubliner cheese melts into a creamy layer that pairs beautifully with the savory beef, while the Irish butter adds a subtle richness throughout. For a creative twist, serve them with a side of tangy pickles or a dollop of spicy mustard to enhance the flavors even further.
Dubliner Cheese and Broccoli Quiche
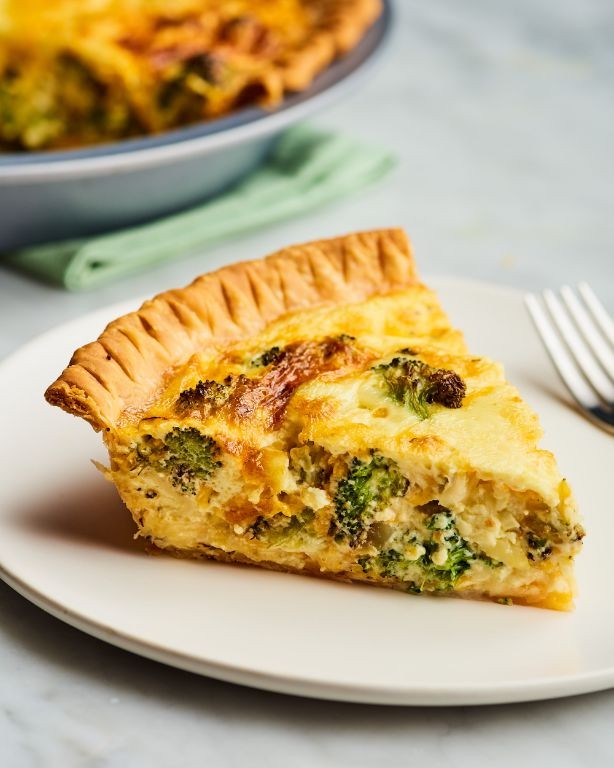
On a chilly December evening like today, nothing warms the kitchen and the soul quite like a savory, cheesy quiche. This Dubliner Cheese and Broccoli Quiche is a perfect blend of rich, nutty cheese and tender-crisp broccoli, all nestled in a buttery, flaky crust that’s surprisingly simple to make from scratch. Let’s walk through each step together to create this comforting classic.
Serving: 6 | Pre Time: 25 minutes | Cooking Time: 45 minutes
Ingredients
– 1 ¼ cups all-purpose flour, plus extra for dusting
– ½ cup unsalted butter, cold and cubed
– ¼ teaspoon fine sea salt
– 3-4 tablespoons ice-cold water
– 1 ½ cups fresh broccoli florets, cut into small, bite-sized pieces
– 1 cup grated Dubliner cheese, sharp and nutty
– 4 large farm-fresh eggs
– 1 cup heavy cream, rich and velvety
– ½ teaspoon freshly ground black pepper
– ¼ teaspoon freshly grated nutmeg
Instructions
1. In a large mixing bowl, combine the all-purpose flour and fine sea salt.
2. Add the cold, cubed unsalted butter to the flour mixture.
3. Use a pastry cutter or your fingertips to work the butter into the flour until the mixture resembles coarse crumbs with pea-sized butter pieces.
4. Gradually sprinkle in the ice-cold water, one tablespoon at a time, mixing with a fork until the dough just comes together. Tip: Avoid overworking the dough to keep the crust flaky.
5. Form the dough into a disc, wrap it tightly in plastic wrap, and refrigerate for 30 minutes to chill.
6. Preheat your oven to 375°F (190°C).
7. On a lightly floured surface, roll out the chilled dough into a 12-inch circle.
8. Carefully transfer the dough to a 9-inch pie dish, gently pressing it into the bottom and sides.
9. Trim any excess dough from the edges and crimp them decoratively with your fingers or a fork.
10. In a medium bowl, whisk together the farm-fresh eggs, heavy cream, freshly ground black pepper, and freshly grated nutmeg until smooth and well combined.
11. Evenly scatter the small, bite-sized broccoli florets and grated Dubliner cheese over the bottom of the pie crust.
12. Slowly pour the egg and cream mixture over the broccoli and cheese in the pie dish. Tip: Pour gently to avoid displacing the fillings.
13. Place the quiche on the middle rack of the preheated oven and bake for 45 minutes, or until the center is set and the top is golden brown. Tip: Check for doneness by inserting a knife near the center; it should come out clean.
14. Remove the quiche from the oven and let it cool on a wire rack for 10 minutes before slicing.
This quiche emerges from the oven with a golden, flaky crust that shatters delicately with each bite, encasing a creamy, custardy filling. The sharp, nutty notes of the Dubliner cheese beautifully complement the tender-crisp broccoli, while a hint of nutmeg adds a warm, aromatic depth. Serve it warm with a simple side salad for a cozy weeknight dinner, or slice it cold for a satisfying picnic or brunch addition that only gets better as the flavors meld.
Dubliner Cheese and Irish Soda Bread Panini
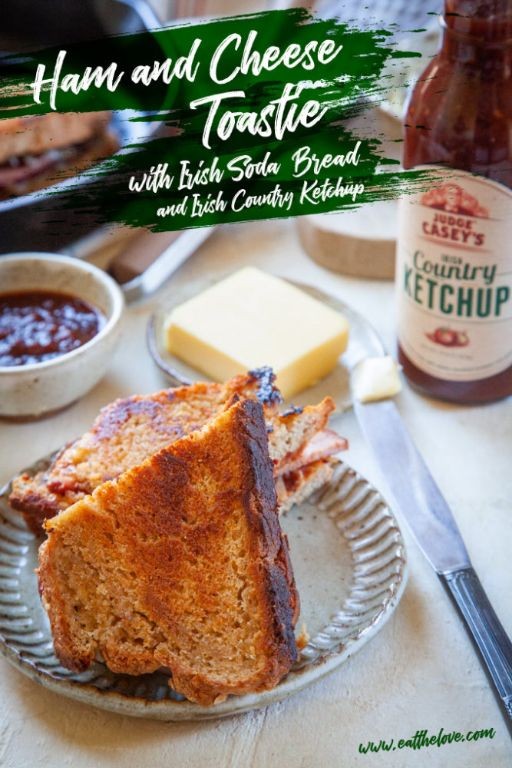
Let’s craft a cozy, satisfying sandwich that brings together the sharp, nutty notes of Irish cheese with the rustic charm of soda bread. This Dubliner Cheese and Irish Soda Bread Panini is perfect for a quick lunch or a comforting snack, offering a delightful twist on a classic grilled cheese. We’ll walk through each step methodically to ensure a perfectly melted, golden-brown result every time.
Serving: 2 | Pre Time: 10 minutes | Cooking Time: 8 minutes
Ingredients
– 4 slices of hearty Irish soda bread
– 6 ounces of sharp Dubliner cheese, thinly sliced
– 2 tablespoons of creamy unsalted butter, softened
– 1 tablespoon of rich extra virgin olive oil
Instructions
1. Preheat a panini press or a large skillet over medium heat to 375°F.
2. Spread 1 tablespoon of creamy unsalted butter evenly on one side of each slice of hearty Irish soda bread.
3. Layer 3 ounces of sharp Dubliner cheese, thinly sliced, between two slices of bread with the buttered sides facing outward.
4. Drizzle 1 tablespoon of rich extra virgin olive oil onto the preheated panini press or skillet to prevent sticking.
5. Place the assembled sandwich onto the press or skillet and cook for 4 minutes, or until the bread is golden brown and crispy.
6. Flip the sandwich carefully using a spatula and cook for an additional 4 minutes, pressing down gently to ensure even melting.
7. Remove the sandwich from the heat and let it rest for 1 minute on a cutting board to allow the cheese to set slightly.
8. Slice the panini diagonally with a sharp knife for easier serving.
Dubliner cheese melts into a creamy, tangy layer that contrasts beautifully with the dense, slightly sweet crumb of the soda bread. For a creative twist, serve it alongside a crisp apple salad or dunk it into a bowl of tomato soup for a comforting meal that highlights its rich, savory flavors.
Summary
Mouthwatering! This roundup proves Dubliner cheese is a versatile star for creamy comfort food. We hope these 18 recipes inspire your next delicious meal. Give one a try, leave a comment with your favorite, and if you loved this list, please share it on Pinterest to spread the cheesy joy!


