
Let’s celebrate Earth Day in the most delicious way possible! This roundup features 18 sustainable recipes that are as good for the planet as they are for your taste buds. From vibrant seasonal salads to cozy plant-based dinners, each dish is designed to minimize waste and maximize flavor. Ready to cook up some eco-friendly goodness? Let’s dive into these tasty, earth-conscious meals.
Vegan Lentil and Vegetable Stew

Yesterday, as the first snowflakes dusted my windowpane, I found myself craving something deeply nourishing—a pot of something that would fill the kitchen with warmth and my bowl with comfort. This simple lentil and vegetable stew is just that, a gentle simmer of earthy flavors that feels like a quiet, restorative hug on a cold afternoon.
Serving: 4 | Pre Time: 15 minutes | Cooking Time: 45 minutes
Ingredients
– A couple of tablespoons of olive oil
– One large yellow onion, diced
– Three cloves of garlic, minced
– Two large carrots, chopped into half-inch pieces
– Two stalks of celery, chopped
– One cup of dried brown lentils, rinsed
– Four cups of vegetable broth
– A 14.5-ounce can of diced tomatoes, with their juices
– Two teaspoons of dried thyme
– One teaspoon of smoked paprika
– A good pinch of salt and a few cracks of black pepper
– A couple of handfuls of fresh spinach
– A splash of apple cider vinegar
Instructions
1. Warm the olive oil in a large, heavy-bottomed pot over medium heat for about 1 minute until it shimmers lightly.
2. Add the diced onion to the pot and cook, stirring occasionally, for 5-7 minutes until it becomes soft and translucent.
3. Stir in the minced garlic and cook for 1 more minute, just until fragrant—be careful not to let it burn.
4. Add the chopped carrots and celery to the pot and cook, stirring, for another 5 minutes to let them soften slightly.
5. Tip in the rinsed lentils, vegetable broth, diced tomatoes with their juices, dried thyme, smoked paprika, salt, and black pepper.
6. Bring the mixture to a boil, then immediately reduce the heat to low, cover the pot with a lid, and let it simmer gently for 30 minutes.
7. After 30 minutes, remove the lid and check the lentils; they should be tender but not mushy. If the stew seems too thick, you can add a splash more broth or water.
8. Stir in the fresh spinach and let it wilt into the stew for about 2 minutes, just until it turns bright green and softens.
9. Remove the pot from the heat and stir in the splash of apple cider vinegar—this little trick brightens all the flavors beautifully.
10. Let the stew sit, uncovered, for 5 minutes off the heat to allow the flavors to meld together.
For the final touch, ladle it into bowls while it’s still steaming. The texture is wonderfully hearty, with the lentils holding their shape against the soft vegetables, and the broth is deeply savory with a subtle smoky warmth from the paprika. I love serving it over a mound of creamy mashed potatoes or with a thick slice of crusty bread for dipping, letting each spoonful be a slow, comforting moment all its own.
Roasted Root Vegetable Medley
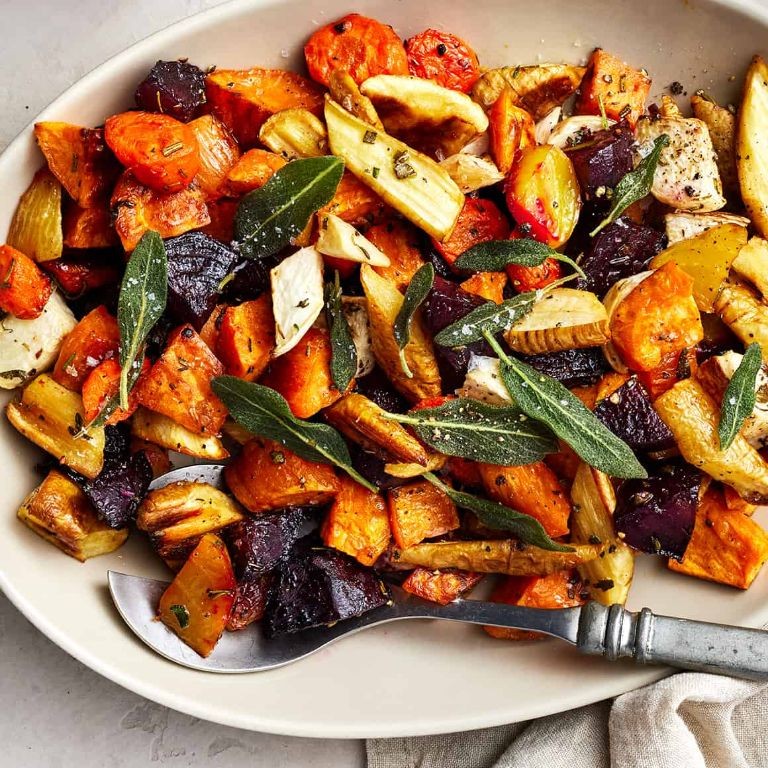
Wandering through the winter market this morning, I found myself drawn to the earthy simplicity of root vegetables—their rugged skins holding stories of the cold ground, their colors muted yet vibrant in the dim light. There’s something quietly comforting about transforming these humble staples into a warm, caramelized dish that fills the kitchen with a sweet, savory aroma, a gentle reminder that even in the depths of December, nourishment can be found in the simplest of things.
Serving: 4 | Pre Time: 15 minutes | Cooking Time: 40 minutes
Ingredients
– A couple of large carrots, peeled and chopped into 1-inch chunks
– Two medium sweet potatoes, peeled and diced into 1-inch cubes
– One large parsnip, peeled and sliced into half-moons about 1/2-inch thick
– A red onion, roughly chopped into wedges
– Three tablespoons of olive oil
– A tablespoon of maple syrup
– A teaspoon of dried thyme
– Half a teaspoon of salt
– A quarter teaspoon of black pepper
– A splash of balsamic vinegar
Instructions
1. Preheat your oven to 425°F and line a large baking sheet with parchment paper for easy cleanup.
2. In a big mixing bowl, combine the carrot chunks, sweet potato cubes, parsnip slices, and red onion wedges.
3. Drizzle the vegetables with three tablespoons of olive oil, tossing gently to coat them evenly—this helps them roast without sticking.
4. Add the tablespoon of maple syrup, teaspoon of dried thyme, half teaspoon of salt, and quarter teaspoon of black pepper to the bowl, mixing until the vegetables are lightly seasoned.
5. Spread the vegetables in a single layer on the prepared baking sheet, ensuring they aren’t crowded to allow for proper browning.
6. Roast in the preheated oven for 30 minutes, then remove the sheet and drizzle a splash of balsamic vinegar over the vegetables for a tangy depth.
7. Return the baking sheet to the oven and roast for an additional 10 minutes, or until the vegetables are tender when pierced with a fork and have crispy, caramelized edges.
8. Remove from the oven and let the medley rest for 5 minutes before serving to allow the flavors to meld together.
You’ll notice the sweet potatoes turn soft and creamy, while the carrots and parsnips retain a slight bite, all wrapped in a glossy, sweet-and-savory glaze from the maple and balsamic. Try serving it over a bed of fluffy quinoa or alongside a simple roast chicken for a cozy, complete meal that feels like a warm hug on a chilly evening.
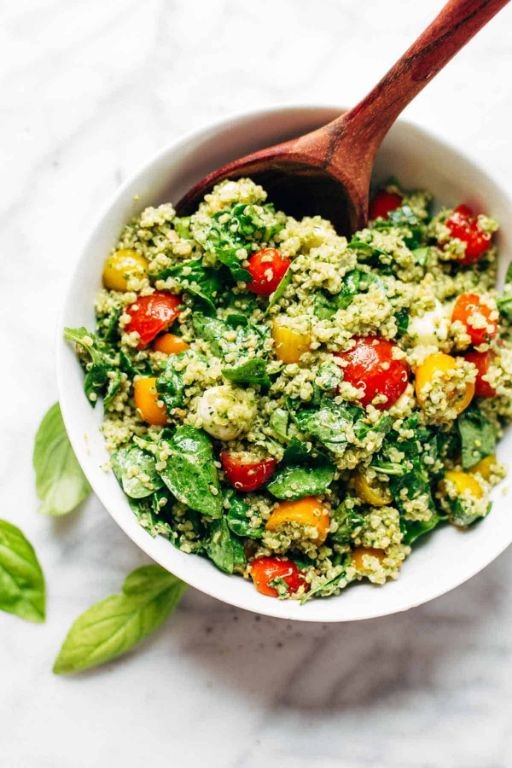
Quinoa Salad with Seasonal Greens
You know those quiet December mornings when the world feels still and you crave something fresh yet comforting? Yesterday, I found myself craving just that—a simple, nourishing bowl to match the gentle winter light. So I gathered some seasonal greens and cooked up a pot of quinoa, letting the kitchen fill with its nutty aroma as I reflected on the year’s quiet moments.
Serving: 4 | Pre Time: 15 minutes | Cooking Time: 20 minutes
Ingredients
– 1 cup of quinoa, rinsed well under cold water
– 2 cups of water
– A big handful of mixed seasonal greens, like kale and spinach, roughly chopped
– A couple of ripe avocados, diced
– A generous handful of dried cranberries
– A small handful of toasted pecans, roughly chopped
– A splash of extra virgin olive oil
– The juice of one lemon
– A pinch of sea salt
– A pinch of freshly ground black pepper
Instructions
1. In a medium saucepan, combine 1 cup of rinsed quinoa and 2 cups of water, then bring to a boil over high heat. Tip: Rinsing quinoa removes its natural bitter coating, so don’t skip this step for a smoother flavor.
2. Once boiling, reduce the heat to low, cover the saucepan, and simmer for exactly 15 minutes, or until all the water is absorbed and the quinoa is fluffy with little white tails visible.
3. While the quinoa cooks, place the chopped seasonal greens in a large mixing bowl.
4. Add the diced avocados, dried cranberries, and toasted pecans to the bowl with the greens.
5. In a small bowl, whisk together a splash of extra virgin olive oil, the juice of one lemon, a pinch of sea salt, and a pinch of freshly ground black pepper until well combined. Tip: For a creamier dressing, mash a bit of avocado into the mixture—it adds richness without overpowering.
6. Once the quinoa is done, remove it from the heat and let it cool for about 5 minutes, fluffing it with a fork to prevent clumping. Tip: Cooling the quinoa slightly before mixing keeps the greens crisp and vibrant.
7. Add the cooled quinoa to the large mixing bowl with the greens, avocados, cranberries, and pecans.
8. Pour the dressing over the salad and gently toss everything together until evenly coated.
9. Serve immediately or chill in the refrigerator for up to 30 minutes to let the flavors meld.
Vibrant with colors and textures, this salad offers a delightful crunch from the pecans against the creamy avocados and tender quinoa. I love how the tart cranberries brighten each bite, making it perfect for a light lunch or as a festive side dish during the holiday season—try topping it with crumbled feta or grilled chicken for an extra twist.
Homemade Compostable Crackers

Sometimes, the simplest kitchen projects become the most meaningful—like these homemade crackers that feel like a quiet conversation with the earth. They’re made from ingredients that could return to the soil, turning a humble snack into a gentle, mindful ritual.
Serving: 24 crackers | Pre Time: 15 minutes | Cooking Time: 20 minutes
Ingredients
– A cup and a half of whole wheat flour, plus a little extra for dusting
– A half cup of ground flaxseed
– A quarter cup of olive oil
– A third cup of water, maybe a splash more if it feels dry
– A teaspoon of sea salt
– A couple of pinches of dried rosemary, crushed between your fingers
Instructions
1. Preheat your oven to 350°F and line a baking sheet with parchment paper.
2. In a medium bowl, combine the whole wheat flour, ground flaxseed, and sea salt.
3. Add the olive oil and water to the dry ingredients, stirring until a dough forms—if it’s crumbly, add a splash more water, one teaspoon at a time, until it holds together.
4. Tip: Let the dough rest for 5 minutes; this allows the flaxseed to absorb moisture, making it easier to roll out without cracking.
5. Lightly dust a clean surface with flour and roll the dough into a thin rectangle, about 1/8-inch thick, using even pressure to avoid uneven baking.
6. Sprinkle the crushed rosemary evenly over the dough, gently pressing it in with your palms.
7. Cut the dough into 2-inch squares with a knife or pizza cutter, then transfer them to the prepared baking sheet, spacing them slightly apart.
8. Tip: Prick each cracker a few times with a fork to prevent puffing up in the oven, ensuring they stay crisp.
9. Bake for 18–20 minutes, or until the edges turn golden brown and the centers feel firm to the touch.
10. Remove from the oven and let cool completely on the baking sheet—they’ll crisp up as they cool, so resist the urge to move them while warm.
11. Tip: Store in an airtight container at room temperature; if they soften, a quick 5-minute reheat in a 300°F oven will restore their crunch.
Naturally, these crackers have a rustic, hearty texture with a subtle nuttiness from the flaxseed and a hint of herbal fragrance. Serve them alongside a soft cheese or simply on their own, letting their earthy flavor shine in a quiet moment.
Zero-Waste Vegetable Soup

You know those quiet winter afternoons when the kitchen feels like the warmest, most forgiving place in the world? That’s the perfect moment for this soup, a gentle simmer of everything you might have tucked away in the crisper drawer, transforming scraps into something deeply nourishing.
Serving: 4 | Pre Time: 15 minutes | Cooking Time: 45 minutes
Ingredients
– A glug of olive oil, about 2 tablespoons
– A couple of yellow onions, roughly chopped
– A few cloves of garlic, minced
– A handful of celery stalks, chopped
– A couple of large carrots, chopped into coins
– A splash of dry white wine, about 1/4 cup
– 6 cups of vegetable broth
– A bay leaf or two
– A big pinch of salt and a few cracks of black pepper
– Whatever leftover veggies you have—maybe a cup of chopped kale stems, some broccoli stalks, or a lonely potato
– A can of diced tomatoes, about 14.5 ounces
– A final drizzle of olive oil for serving
Instructions
1. Warm the olive oil in a large, heavy-bottomed pot over medium heat for about 2 minutes until it shimmers.
2. Add the chopped onions and a pinch of salt, stirring occasionally, and cook for 8-10 minutes until they turn translucent and soft.
3. Stir in the minced garlic and cook for exactly 1 minute until fragrant, being careful not to let it burn.
4. Add the chopped celery and carrots to the pot, cooking for another 5 minutes to soften them slightly.
5. Pour in the splash of white wine, scraping up any browned bits from the bottom of the pot, and let it bubble for 2 minutes until the alcohol smell cooks off.
6. Tip in the vegetable broth, add the bay leaf, and bring the mixture to a gentle boil over high heat.
7. Once boiling, reduce the heat to low, cover the pot with a lid, and let it simmer for 20 minutes to allow the flavors to meld.
8. Add your leftover chopped vegetables and the can of diced tomatoes with their juices, stirring to combine.
9. Continue simmering, uncovered, for another 15 minutes until all the vegetables are tender when pierced with a fork.
10. Remove the pot from the heat, discard the bay leaf, and season with more salt and pepper if needed.
11. Ladle the soup into bowls and finish each serving with a drizzle of olive oil.
Here, the broth turns rich and slightly sweet from the slow-cooked onions and carrots, while the leftover veggies add surprising bits of texture. Try serving it with a thick slice of crusty bread for dipping, or stir in a spoonful of pesto just before eating to brighten the deep, earthy flavors.
Farmers Market Stir-Fry
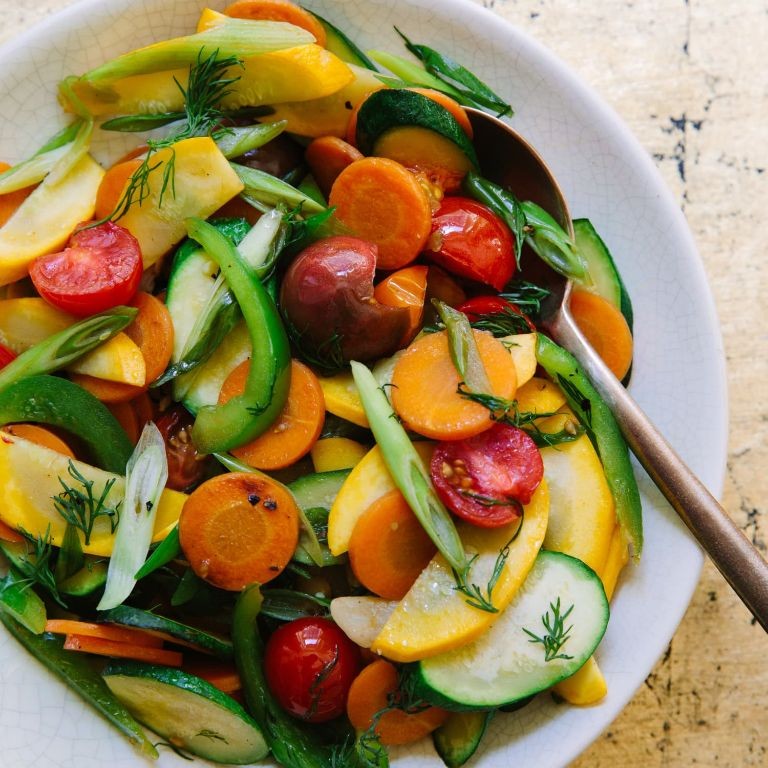
Often, the best meals come from simply wandering through the farmers market, letting the season’s brightest finds guide your hand. On this quiet morning, with the crisp December air outside, I’m drawn to the simple comfort of a stir-fry that feels like a warm hug from the market itself—a celebration of what’s fresh and fleeting.
Serving: 4 | Pre Time: 15 minutes | Cooking Time: 10 minutes
Ingredients
– A couple of tablespoons of olive oil
– One large yellow onion, thinly sliced
– Two cloves of garlic, minced
– A big handful of rainbow carrots, cut into thin matchsticks
– A couple of cups of broccoli florets
– A splash of soy sauce (about 2 tablespoons)
– A splash of rice vinegar (about 1 tablespoon)
– A pinch of red pepper flakes
– A cup of cooked quinoa, for serving
Instructions
1. Heat a large skillet or wok over medium-high heat and add the olive oil, letting it shimmer for about 30 seconds—this helps prevent sticking.
2. Add the sliced onion to the hot oil and cook, stirring occasionally, for 3-4 minutes until it turns soft and translucent.
3. Stir in the minced garlic and cook for 1 minute more, just until fragrant to avoid burning.
4. Toss in the carrot matchsticks and broccoli florets, stirring to coat them in the oil.
5. Cook the vegetables for 5-6 minutes, stirring every minute or so, until the carrots are tender-crisp and the broccoli is bright green.
6. Pour in the soy sauce and rice vinegar, adding the red pepper flakes for a gentle kick.
7. Stir everything together for 1-2 minutes until the sauce lightly coats the vegetables and reduces slightly.
8. Remove the skillet from the heat immediately to keep the veggies from overcooking.
9. Serve the stir-fry hot over the cooked quinoa.
Really, the magic here is in the texture—the crunch of the carrots against the tender broccoli, all wrapped in that savory, tangy sauce. Try topping it with a sprinkle of sesame seeds or a squeeze of fresh lime for an extra burst of brightness, making each bite a little celebration of the market’s bounty.
Plant-Based Buddha Bowl

Unwinding into the quiet rhythm of a winter morning, I find myself craving something that feels both nourishing and grounding—a meal that comes together like a gentle meditation. This plant-based Buddha bowl is my answer, a colorful mosaic of textures and flavors that invites you to slow down and savor each bite, perfect for a cozy December day when the world outside feels hushed and still.
Serving: 2 | Pre Time: 15 minutes | Cooking Time: 25 minutes
Ingredients
– 1 cup of quinoa, rinsed well under cold water
– 2 cups of vegetable broth
– 1 large sweet potato, peeled and diced into ½-inch cubes
– 1 tablespoon of olive oil
– A pinch of sea salt
– A couple of handfuls of fresh baby spinach
– 1 can (15 ounces) of chickpeas, drained and rinsed
– A splash of lemon juice (about 1 tablespoon)
– ¼ cup of tahini
– 2 tablespoons of warm water
– A drizzle of maple syrup (about 1 teaspoon)
Instructions
1. Preheat your oven to 400°F and line a baking sheet with parchment paper.
2. Toss the diced sweet potato with ½ tablespoon of olive oil and a pinch of sea salt on the prepared baking sheet.
3. Roast the sweet potato for 20-25 minutes, flipping halfway through, until the edges are caramelized and tender when pierced with a fork.
4. While the sweet potato roasts, combine the quinoa and vegetable broth in a small saucepan over medium-high heat.
5. Bring the mixture to a boil, then reduce the heat to low, cover, and simmer for 15 minutes, or until the quinoa has absorbed all the liquid and fluffs easily with a fork.
6. Tip: Let the quinoa sit covered off the heat for 5 minutes after cooking to steam and become extra fluffy.
7. Heat the remaining ½ tablespoon of olive oil in a skillet over medium heat.
8. Add the chickpeas to the skillet and cook for 5-7 minutes, shaking the pan occasionally, until they are lightly golden and crispy.
9. Tip: Pat the chickpeas dry with a paper towel before cooking to help them crisp up better in the skillet.
10. In a small bowl, whisk together the tahini, lemon juice, warm water, and maple syrup until smooth and creamy.
11. Tip: If the tahini sauce seems too thick, add a little more warm water, one teaspoon at a time, until it reaches your desired consistency.
12. To assemble the bowls, divide the cooked quinoa between two serving bowls.
13. Top each bowl with roasted sweet potato, crispy chickpeas, and a handful of baby spinach.
14. Drizzle the tahini sauce generously over each bowl.
15. Gently toss everything together just before eating to coat all the components in the sauce.
Here, the creamy tahini melds with the earthy sweetness of the roasted potatoes and the crisp bite of chickpeas, while the quinoa adds a nutty softness that ties it all together. For a playful twist, try serving it in a wide, shallow bowl to showcase the vibrant layers, or top it with a sprinkle of toasted sesame seeds for an extra crunch that echoes the quiet joy of a winter meal shared—or savored alone.
Sustainable Seafood Paella

Dipping my wooden spoon into the saffron-tinted broth today, I’m reminded how this paella—a celebration of ocean stewardship—transforms humble ingredients into a communal feast, each grain of rice absorbing stories of sustainable harvests. It’s a dish that asks us to slow down, to savor not just the flavors but the intention behind each carefully chosen seafood piece, creating warmth that lingers long after the last bite is shared around the table.
Serving: 6 | Pre Time: 20 minutes | Cooking Time: 45 minutes
Ingredients
– 2 cups of bomba rice
– 4 cups of seafood stock
– a generous pinch of saffron threads
– 1 lb of sustainably sourced mussels, scrubbed
– 1 lb of U.S.-farmed shrimp, peeled and deveined
– 1 cup of chopped onion
– 3 cloves of garlic, minced
– 1 red bell pepper, sliced thinly
– a splash of olive oil
– a couple of lemons, cut into wedges
– 1 tsp of smoked paprika
– salt for seasoning
Instructions
1. Heat a large paella pan or wide skillet over medium heat, then add a splash of olive oil—just enough to coat the bottom lightly.
2. Sauté the chopped onion and minced garlic for about 5 minutes, until they turn soft and fragrant, stirring occasionally to prevent burning.
3. Stir in the sliced red bell pepper and cook for another 3 minutes, until it begins to soften.
4. Add the bomba rice to the pan, toasting it for 2 minutes while stirring constantly to coat each grain with the oil and aromatics.
5. Sprinkle in the saffron threads and smoked paprika, mixing well to distribute the spices evenly throughout the rice.
6. Pour in the seafood stock all at once, then season with salt—start with 1 tsp and adjust later if needed.
7. Bring the mixture to a gentle boil, then reduce the heat to low and let it simmer uncovered for 20 minutes; avoid stirring to develop the coveted socarrat (crispy bottom layer).
8. Nestle the sustainably sourced mussels and U.S.-farmed shrimp into the partially cooked rice, arranging them evenly across the surface.
9. Cover the pan loosely with aluminum foil and cook for 10 more minutes, until the shrimp turn pink and opaque and the mussels open fully.
10. Remove the pan from heat and discard any mussels that haven’t opened, as they may be unsafe to eat.
11. Let the paella rest for 5 minutes to allow the flavors to meld and the rice to absorb any remaining liquid.
12. Garnish with lemon wedges just before serving, squeezing the juice over the top to brighten the dish.
Letting the paella rest briefly yields a perfect texture—the rice stays separate and tender, while the socarrat adds a delightful crunch. Each spoonful bursts with briny sweetness from the seafood, balanced by smoky paprika and earthy saffron; try serving it straight from the pan with crusty bread to scoop up every last bit of flavor.
Locally Sourced Grain Bowl
Under the soft morning light, I find myself drawn to the kitchen, craving something that feels both nourishing and grounding—a simple bowl that celebrates what’s nearby. This locally sourced grain bowl is my quiet answer, a gentle assembly of seasonal ingredients that whisper of the earth and the hands that tended them. It’s a meal that asks for patience and rewards with every mindful bite.
Serving: 2 | Pre Time: 15 minutes | Cooking Time: 25 minutes
Ingredients
– a cup of farro, rinsed well
– a couple of cups of water
– a pinch of sea salt
– a tablespoon of olive oil
– a small bunch of kale, stems removed and leaves torn
– a splash of lemon juice
– a handful of cherry tomatoes, halved
– half an avocado, sliced
– a quarter cup of crumbled feta cheese
– a drizzle of honey
Instructions
1. Combine the rinsed farro, water, and sea salt in a medium saucepan over high heat.
2. Bring the mixture to a boil, then reduce the heat to low, cover the saucepan, and simmer for 20 minutes until the farro is tender and has absorbed most of the water.
3. While the farro cooks, heat the olive oil in a skillet over medium heat until it shimmers lightly.
4. Add the torn kale to the skillet and sauté for 3–4 minutes, stirring occasionally, until the leaves are wilted and bright green.
5. Remove the skillet from the heat and stir in the lemon juice to brighten the kale’s flavor.
6. Once the farro is done, drain any excess water and fluff it with a fork to separate the grains.
7. Divide the cooked farro evenly between two bowls as a base layer.
8. Top the farro with the sautéed kale, arranging it gently over the grains.
9. Scatter the halved cherry tomatoes and sliced avocado over the kale in each bowl.
10. Sprinkle the crumbled feta cheese evenly across the top of both bowls.
11. Finish by drizzling honey lightly over each bowl just before serving.
This bowl offers a delightful contrast of textures—the chewy farro, tender kale, and creamy avocado meld together with bursts of juicy tomato and tangy feta. The subtle sweetness from the honey ties it all into a harmonious blend that feels both rustic and refined. Try serving it with a side of crusty bread to soak up any lingering flavors, or enjoy it as is for a light, satisfying meal that honors the season’s bounty.
Seasonal Fruit and Nut Bars

Zigzagging through the holiday rush, I found myself craving something simple and grounding—a treat that whispers of quiet kitchens and unhurried afternoons. These seasonal fruit and nut bars are just that, a cozy embrace of winter’s bounty, perfect for tucking into a lunchbox or savoring with a cup of tea. They come together with a gentle rhythm, like folding a favorite sweater into a drawer.
Serving: 12 bars | Pre Time: 15 minutes | Cooking Time: 25 minutes
Ingredients
– A cup and a half of old-fashioned rolled oats
– A heaping cup of chopped walnuts
– A half-cup of dried cranberries
– A half-cup of chopped dried apricots
– A third of a cup of honey
– A quarter-cup of melted coconut oil
– A splash of vanilla extract
– A pinch of salt
Instructions
1. Preheat your oven to 325°F and line an 8×8-inch baking pan with parchment paper, letting the edges hang over for easy lifting later.
2. In a large bowl, combine the rolled oats, chopped walnuts, dried cranberries, chopped dried apricots, and that pinch of salt, stirring until everything is evenly mixed.
3. In a smaller bowl, whisk together the honey, melted coconut oil, and vanilla extract until smooth and well-blended.
4. Pour the honey mixture over the dry ingredients and stir thoroughly with a spatula, making sure every oat and nut is lightly coated—this helps the bars hold together nicely after baking.
5. Transfer the mixture to the prepared pan and press it down firmly and evenly with the back of a spoon or your hands to create a compact layer.
6. Bake in the preheated oven for 22 to 25 minutes, until the edges turn a light golden brown and the center feels set to the touch.
7. Let the bars cool completely in the pan on a wire rack for about an hour, which allows them to firm up properly before cutting.
8. Once cooled, use the parchment paper to lift the slab out of the pan and slice it into 12 even bars with a sharp knife.
9. Store the bars in an airtight container at room temperature for up to a week, or freeze them for longer keeping—they’re great straight from the freezer for a chilly snack.
These bars emerge with a delightful chew from the fruit and a satisfying crunch from the nuts, all bound by the warm sweetness of honey. Try crumbling one over a bowl of vanilla yogurt for breakfast, or wrap them individually for a heartfelt holiday gift—they carry the quiet joy of the season in every bite.
Eco-Friendly Chickpea Curry

Venturing into the kitchen on this quiet December morning, I find myself drawn to something warm and grounding. This chickpea curry feels like a gentle embrace, a simple pot of comfort that honors both the season and our little corner of the earth.
Serving: 4 | Pre Time: 15 minutes | Cooking Time: 25 minutes
Ingredients
– A glug of olive oil, about 2 tablespoons
– One yellow onion, finely diced
– A couple of garlic cloves, minced
– A thumb of fresh ginger, grated (about 1 tablespoon)
– A heaping tablespoon of curry powder
– A 15-ounce can of chickpeas, drained and rinsed
– A 14.5-ounce can of diced tomatoes
– A 13.5-ounce can of full-fat coconut milk
– A big handful of fresh spinach (about 2 cups)
– A generous squeeze of lime juice, from half a lime
– A small bunch of cilantro, chopped, for serving
– Cooked basmati rice, for serving
Instructions
1. Warm the olive oil in a large pot or Dutch oven over medium heat for about 1 minute until it shimmers.
2. Add the diced onion and cook for 5-7 minutes, stirring occasionally, until it turns soft and translucent.
3. Stir in the minced garlic and grated ginger, cooking for just 1 minute until fragrant to avoid burning.
4. Sprinkle the curry powder over the onion mixture and stir constantly for 30 seconds to toast the spices and deepen their flavor.
5. Pour in the drained chickpeas and diced tomatoes with their juices, stirring to coat everything in the spiced base.
6. Add the full can of coconut milk, stir to combine, and bring the mixture to a gentle simmer.
7. Reduce the heat to medium-low, cover the pot with a lid, and let the curry simmer for 15 minutes to allow the flavors to meld.
8. Uncover the pot and stir in the fresh spinach, letting it wilt into the curry for about 2 minutes.
9. Remove the pot from the heat and stir in the fresh lime juice.
10. Taste the curry and adjust with a pinch of salt if needed, remembering the canned ingredients already contain some.
Finally, ladle the creamy curry over fluffy basmati rice. The chickpeas offer a tender bite against the silky, spiced tomato-coconut sauce, while the wilted spinach and bright lime keep each spoonful feeling fresh. For a cozy twist, try serving it in a deep bowl with a dollop of cool yogurt and extra cilantro scattered on top.
Herb-Infused Garden Salad
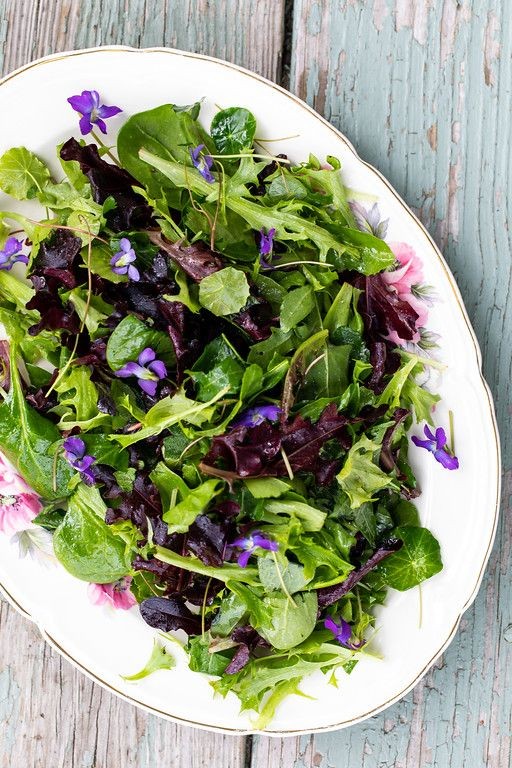
Evenings like this, when the world outside slows to a quiet hum, I find myself drawn to the kitchen not for elaborate feasts, but for simple, honest food that feels like a gentle pause. This herb-infused garden salad is just that—a quiet celebration of fresh greens and fragrant herbs that comes together with little fuss but offers so much brightness. It’s the kind of dish that feels both nourishing and deeply comforting, perfect for a light lunch or a side to something heartier.
Serving: 4 | Pre Time: 15 minutes | Cooking Time: 0 minutes
Ingredients
– A couple of big handfuls of fresh mixed greens, like romaine and arugula
– A small handful of fresh basil leaves
– A small handful of fresh mint leaves
– A small handful of fresh parsley leaves
– Half a cup of cherry tomatoes, halved
– A quarter of a red onion, thinly sliced
– A third of a cup of extra virgin olive oil
– Two tablespoons of fresh lemon juice
– A pinch of salt
– A pinch of freshly ground black pepper
– A quarter cup of crumbled feta cheese (optional, but lovely)
Instructions
1. Gently rinse your mixed greens under cold water in a colander, then pat them completely dry with a clean kitchen towel or paper towels to prevent a soggy salad.
2. In a large mixing bowl, combine the dried greens, basil leaves, mint leaves, and parsley leaves.
3. Add the halved cherry tomatoes and thinly sliced red onion to the bowl with the greens and herbs.
4. In a small jar or bowl, whisk together the extra virgin olive oil and fresh lemon juice until emulsified, about 30 seconds.
5. Pour the dressing over the salad ingredients in the large bowl.
6. Sprinkle a pinch of salt and a pinch of freshly ground black pepper evenly over the salad.
7. Using clean hands or salad tongs, toss everything together gently for about 1 minute to ensure every leaf is lightly coated with the dressing.
8. If using, sprinkle the crumbled feta cheese over the top of the tossed salad just before serving to keep it from getting too wet.
9. Divide the salad evenly among four plates or bowls immediately.
Moments after tossing, this salad offers a beautiful contrast of textures—the crisp greens and juicy tomatoes against the soft herbs and creamy feta, all brought together by that bright, lemony dressing. For a creative twist, try serving it alongside grilled chicken or fish, or pile it into a wrap with some hummus for a quick, herb-packed lunch on the go.
Homemade Fermented Vegetables
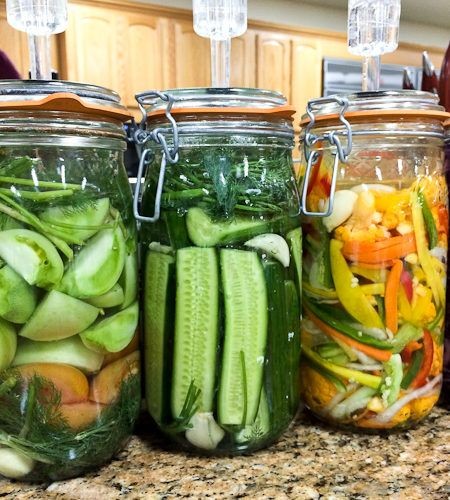
Now, as the year draws to a close and the light grows thin, there’s a quiet magic in turning humble vegetables into something alive and tangy—a slow, patient alchemy that fills the pantry with jars of bubbly, probiotic goodness. It’s a gentle practice of waiting and watching, a perfect counterpoint to the season’s rush.
Serving: Makes about 2 quarts | Pre Time: 30 minutes | Cooking Time: 0 minutes (Fermentation: 5-7 days)
Ingredients
– A couple of pounds of fresh, crunchy vegetables—think a mix of cabbage, carrots, and maybe a few radishes for color
– 4 cups of filtered water (chlorine can hinder the good bugs)
– 3 tablespoons of fine sea salt (non-iodized, so it doesn’t interfere)
– A splash of brine from a previous batch or a pinch of starter culture, if you have it (this just gives the fermentation a friendly nudge)
– A few whole peppercorns and a couple of bay leaves, if you like
– 2 clean quart-sized glass jars with lids
Instructions
1. Thoroughly wash all your vegetables under cool running water to remove any dirt.
2. Chop or shred the vegetables into your desired size—I like thin ribbons of cabbage and matchstick carrots for even fermentation.
3. In a large bowl, dissolve the 3 tablespoons of sea salt completely into the 4 cups of filtered water to create your brine. Tip: Use warm water to help the salt dissolve faster, then let it cool to room temperature.
4. Tightly pack the chopped vegetables into your two clean glass jars, leaving about 1.5 inches of space at the top.
5. If using, tuck the peppercorns and bay leaves between the vegetable layers in the jars.
6. Slowly pour the cooled brine over the vegetables in each jar until they are completely submerged, maintaining that 1.5-inch headspace.
7. If you have it, add that splash of old brine or pinch of starter culture to each jar and gently stir with a clean spoon.
8. Loosely place the lids on the jars—don’t screw them tight, as gases need to escape during fermentation. Tip: You can cover the jar mouth with a clean cloth secured by a rubber band instead.
9. Place the jars in a cool, dark spot (like a pantry or cupboard) where the temperature stays around 65-75°F.
10. Check the jars daily for the next 5-7 days. Use a clean spoon to push any floating vegetables back under the brine and look for tiny bubbles—a sure sign fermentation is active. Tip: A white, cloudy film on the surface is usually harmless kahm yeast; just skim it off if it appears.
11. After 5 days, taste a small piece. It should be pleasantly sour and crisp. If you prefer more tang, let it ferment for 1-2 more days, tasting daily.
12. Once the flavor is to your liking, screw the lids on tightly and transfer the jars to the refrigerator to slow the fermentation.
Slowly, the vegetables transform, becoming effervescent and complexly sour while retaining a delightful crunch. Tuck them into grain bowls for a bright contrast, layer them on a hearty sandwich, or simply enjoy a small forkful straight from the jar as a vibrant, gut-happy snack.
Recycled Bread Pudding

Wandering through the kitchen this morning, I found myself staring at yesterday’s leftover bread, its edges slightly dry but still holding stories of meals shared. There’s something quietly beautiful about transforming those forgotten slices into a warm, comforting pudding—a gentle reminder that nothing need go to waste when a little care is applied. Let’s gather these simple bits and pieces and create something softly sweet to fill the house with the scent of cinnamon and nostalgia.
Serving: 6 | Pre Time: 15 minutes | Cooking Time: 45 minutes
Ingredients
– About 4 cups of day-old bread, torn into rough chunks (I used a rustic loaf, but any kind works)
– 2 cups of whole milk
– 3 large eggs
– ½ cup of granulated sugar
– A generous splash of vanilla extract, maybe a tablespoon
– A couple of teaspoons of ground cinnamon
– A pinch of salt
– A handful of raisins, if you like them (optional, but they add a nice chew)
– A pat of butter for greasing the dish
Instructions
1. Preheat your oven to 350°F (175°C) and lightly butter an 8×8-inch baking dish—this helps the pudding release easily later.
2. In a large bowl, tear the bread into chunks until you have about 4 cups; tip: slightly stale bread absorbs the custard better without turning mushy.
3. In another bowl, whisk together the eggs, milk, sugar, vanilla extract, cinnamon, and salt until smooth and fully combined.
4. Pour the egg mixture over the bread chunks, adding raisins if using, and gently stir to coat every piece; let it sit for 10 minutes so the bread soaks up the liquid evenly.
5. Transfer the mixture to the prepared baking dish, pressing it down lightly with a spoon to create an even layer.
6. Bake in the preheated oven for 45 minutes, or until the top is golden brown and a knife inserted in the center comes out clean—check at 40 minutes to avoid over-baking.
7. Remove from the oven and let it cool for at least 15 minutes before serving; this allows the custard to set properly for a better texture.
Resting on the counter, this pudding emerges with a tender, almost cake-like interior beneath its crisped top, each bite carrying whispers of cinnamon and vanilla. Serve it warm with a drizzle of cream or a scoop of vanilla ice cream for a cozy treat, or enjoy it plain as a humble dessert that feels like a quiet hug on a chilly evening.
Sustainable Smoothie Bowl

Just now, as the morning light filters through my kitchen window on this quiet December day, I find myself craving something that feels both nourishing and gentle—a bowl that celebrates what the earth offers while honoring the need for simplicity. This sustainable smoothie bowl is my small ritual, a way to start slowly with intention, using ingredients that feel good for both body and planet.
Serving: 1 | Pre Time: 10 minutes | Cooking Time: 0 minutes
Ingredients
– A couple of frozen bananas
– A handful of fresh spinach
– A splash of almond milk, about 1/2 cup
– A spoonful of chia seeds, roughly 1 tablespoon
– A drizzle of local honey, maybe 1 teaspoon
– A sprinkle of granola for topping, around 1/4 cup
Instructions
1. Peel and slice the frozen bananas into chunks to help them blend smoothly—this prevents the blender from straining.
2. Add the fresh spinach to the blender first, followed by the banana chunks and almond milk, which helps create a creamy base without ice.
3. Blend on high speed for about 45 seconds, or until the mixture is completely smooth with no green flecks visible, scraping down the sides once halfway through.
4. Pour the smoothie into a wide, shallow bowl to allow for easy topping and a beautiful presentation.
5. Sprinkle the chia seeds evenly over the surface, letting them sit for 2 minutes to soak up moisture and add a subtle crunch.
6. Drizzle the local honey in a zigzag pattern across the bowl for natural sweetness that enhances the flavors without overpowering.
7. Top with the granola, scattering it generously to create texture and a hearty finish that contrasts with the smooth base.
Here, the bowl emerges with a velvety texture that melts on the tongue, punctuated by the gentle pop of chia seeds and the earthy sweetness of honey. For a creative twist, try serving it with sliced seasonal fruit like pears or a dusting of cinnamon to echo the winter warmth, making each spoonful a quiet celebration of mindful eating.
Upcycled Vegetable Broth

This quiet morning, as I gather vegetable scraps from the week’s cooking, I’m reminded how the simplest kitchen rituals can transform what we might discard into something nourishing. Upcycled vegetable broth feels like a gentle pause—a way to honor ingredients fully before they leave our hands.
Serving: 8 | Pre Time: 10 minutes | Cooking Time: 60 minutes
Ingredients
– A couple of cups of onion peels and ends
– A handful of carrot tops and peels
– A few celery leaves and the tough ends
– A splash of olive oil
– 8 cups of cold water
– A couple of bay leaves
– A pinch of black peppercorns
– A sprinkle of salt
Instructions
1. Rinse all vegetable scraps under cold water to remove any dirt.
2. Heat a large pot over medium heat and add a splash of olive oil.
3. Add the onion peels, carrot tops, and celery ends to the pot, stirring occasionally for about 5 minutes until they soften slightly and become fragrant—this helps deepen the flavor.
4. Pour in 8 cups of cold water, ensuring it covers the scraps by at least an inch.
5. Drop in a couple of bay leaves and a pinch of black peppercorns.
6. Bring the mixture to a gentle boil over high heat, then reduce to a low simmer.
7. Let it simmer uncovered for 45 minutes, skimming off any foam that rises to the top for a clearer broth.
8. After 45 minutes, add a sprinkle of salt and taste, adjusting if needed—salt early can make the broth too intense, so I add it toward the end.
9. Remove the pot from heat and let it cool for 10 minutes.
10. Strain the broth through a fine-mesh sieve into a large bowl, pressing gently on the solids to extract all the liquid without making it cloudy.
11. Discard the vegetable scraps and bay leaves.
12. Transfer the broth to jars or containers for storage.
Rich and aromatic, this broth has a subtle earthiness from the vegetable scraps, with a light body that’s perfect for sipping on its own or using as a base for soups. Try it warmed with a squeeze of lemon for a cozy drink, or freeze it in ice cube trays to add instant flavor to future dishes.
Eco-Conscious Energy Bites

Zigzagging through my thoughts this morning, I found myself craving something simple yet sustaining—a little treat that feels both nourishing and gentle on the earth. These energy bites are my quiet answer, a humble mix of pantry staples that come together with minimal fuss. They’re perfect for tucking into a lunchbox or savoring with a cup of tea when the afternoon lull settles in.
Serving: 12 | Pre Time: 15 minutes | Cooking Time: 0 minutes
Ingredients
– A cup of old-fashioned rolled oats
– A heaping half-cup of creamy almond butter
– A generous third-cup of pure maple syrup
– A couple of tablespoons of chia seeds
– A splash of vanilla extract
– A pinch of fine sea salt
Instructions
1. In a medium mixing bowl, combine 1 cup of old-fashioned rolled oats, a heaping 1/2 cup of creamy almond butter, and a generous 1/3 cup of pure maple syrup.
2. Add 2 tablespoons of chia seeds, a splash of vanilla extract (about 1 teaspoon), and a pinch of fine sea salt (roughly 1/8 teaspoon) to the bowl.
3. Stir everything together with a sturdy spoon or spatula until the mixture is fully combined and holds together when pressed—it should feel slightly sticky but not wet.
4. Tip: If the mixture seems too dry, add another teaspoon of maple syrup; if too wet, sprinkle in a few more oats until it reaches the right consistency.
5. Using your hands, roll the mixture into 12 evenly sized balls, each about 1 inch in diameter.
6. Place the balls on a parchment-lined plate or baking sheet, spacing them slightly apart.
7. Tip: For easier rolling, lightly dampen your hands with water to prevent sticking.
8. Transfer the plate or baking sheet to the refrigerator and chill the energy bites for at least 30 minutes, or until firm to the touch.
9. Tip: For longer storage, keep them in an airtight container in the fridge for up to a week, or freeze for up to a month.
Mellow and chewy, these bites offer a subtle sweetness from the maple syrup, balanced by the nutty depth of almond butter. Roll them in extra chia seeds or crushed nuts for a bit of crunch, or enjoy them straight from the fridge as a quick, grounding snack.
Seasonal Berry Compote
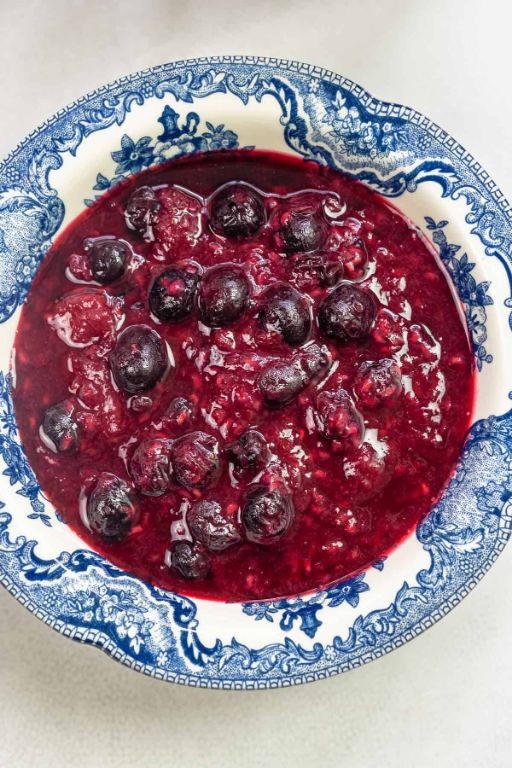
Falling into the rhythm of the kitchen on this quiet December morning, I find myself drawn to the simple alchemy of transforming winter’s last bright berries into something warm and comforting. There’s a gentle magic in watching them soften and sweeten, their juices mingling into a syrup that tastes like preserved sunshine.
Serving: 6 | Pre Time: 10 minutes | Cooking Time: 15 minutes
Ingredients
– A couple of cups of mixed frozen berries (like strawberries, blueberries, and raspberries)
– A generous half cup of granulated sugar
– A splash of fresh lemon juice (about a tablespoon)
– A pinch of fine salt
– A teaspoon of pure vanilla extract
Instructions
1. Combine the frozen berries, granulated sugar, lemon juice, and salt in a medium saucepan over medium heat.
2. Stir gently with a wooden spoon until the sugar dissolves completely, which should take about 3-4 minutes—you’ll see the berries start to release their juices.
3. Reduce the heat to medium-low and let the mixture simmer uncovered for 10-12 minutes, stirring occasionally to prevent sticking.
4. Tip: As it simmers, use the back of your spoon to lightly mash some of the berries against the side of the pan for a chunkier texture, if you like.
5. After 10-12 minutes, check that the compote has thickened slightly; it should coat the back of a spoon without being too runny.
6. Remove the saucepan from the heat and stir in the vanilla extract until fully incorporated.
7. Tip: Let the compote cool in the pan for 5 minutes before transferring—this helps it thicken further as it rests.
8. Transfer the warm compote to a serving bowl or storage container using a spatula to scrape all the goodness from the pan.
9. Tip: If you prefer a smoother compote, you can press it through a fine-mesh sieve while still warm, but I love the rustic bits of fruit.
Using this compote feels like unwrapping a little gift of flavor—it’s wonderfully jammy with bursts of tart berry essence, softened by the vanilla’s warmth. Spoon it over morning yogurt, let it melt into a pool on vanilla ice cream, or swirl it into oatmeal for a cozy, vibrant start to the day.
Summary
Gathering these Earth Day recipes shows how delicious sustainability can be! I hope you’re inspired to try a few, reduce food waste, and celebrate our planet. Let me know in the comments which dish is your favorite—and if you found this helpful, please share it on Pinterest to spread the eco-friendly cooking love!