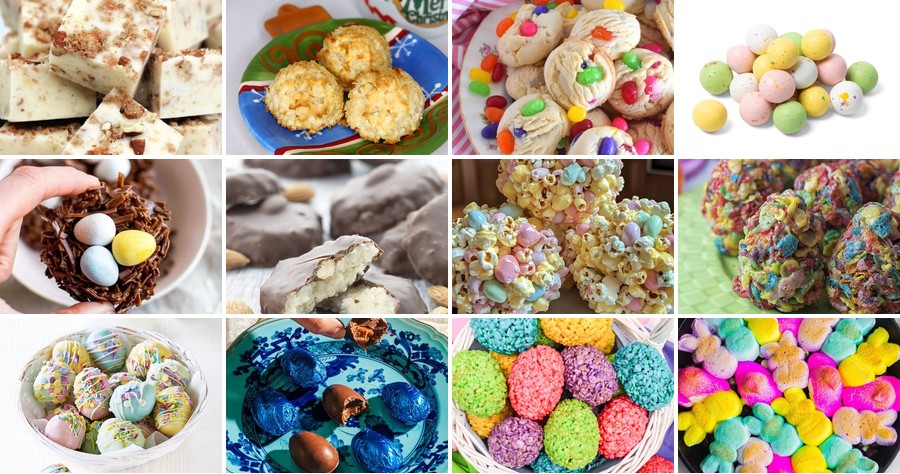
Fancy making your Easter celebrations extra sweet? You’re in for a treat! We’ve gathered 20 delightful candy recipes that are perfect for the season. From classic favorites to fun twists, these goodies will bring joy to your table. Whether you’re a seasoned baker or just starting out, there’s something here for everyone. Let’s dive into these delicious creations and make this Easter unforgettable!
Homemade Peanut Butter Eggs

Venturing beyond store-bought treats, these homemade peanut butter eggs deliver rich flavor with minimal fuss. They’re perfect for holiday gifting or satisfying a sweet tooth craving.
Serving: 12 | Pre Time: 20 minutes | Cooking Time: 0 minutes
Ingredients
– A cup of creamy peanut butter
– Half a cup of unsalted butter, softened
– A teaspoon of pure vanilla extract
– A pinch of fine salt
– Two and a half cups of powdered sugar
– A 12-ounce bag of semi-sweet chocolate chips
– A tablespoon of coconut oil
Instructions
1. Line a baking sheet with parchment paper.
2. In a large bowl, combine the creamy peanut butter and softened unsalted butter using a hand mixer on medium speed for 1 minute until smooth.
3. Add the pure vanilla extract and a pinch of fine salt, mixing for 30 seconds to incorporate.
4. Gradually add the two and a half cups of powdered sugar, mixing on low speed until a thick, moldable dough forms—this should take about 2 minutes. Tip: If the mixture feels too sticky, chill it in the refrigerator for 10 minutes to firm up.
5. Scoop about 2 tablespoons of the dough and shape it into a flat egg shape, about 1/2-inch thick. Place it on the prepared baking sheet. Repeat with the remaining dough.
6. Freeze the shaped peanut butter eggs for 30 minutes until firm. Tip: Freezing ensures the chocolate coating sets quickly without melting the filling.
7. In a microwave-safe bowl, combine the semi-sweet chocolate chips and tablespoon of coconut oil. Microwave in 30-second intervals, stirring after each, until fully melted and smooth—about 1.5 minutes total.
8. Using a fork, dip each frozen peanut butter egg into the melted chocolate, coating completely. Let excess chocolate drip off.
9. Return the coated eggs to the parchment-lined baking sheet. Tip: For a decorative touch, drizzle any remaining chocolate over the tops with a spoon before it sets.
10. Let the chocolate set at room temperature for 1 hour, or refrigerate for 20 minutes to speed up the process.
Oozing with creamy peanut butter, these eggs boast a satisfying snap from the chocolate shell. Their rich, not-too-sweet flavor pairs wonderfully with a cold glass of milk. Try crumbling one over vanilla ice cream for an indulgent dessert twist.
Easter Bunny Bark
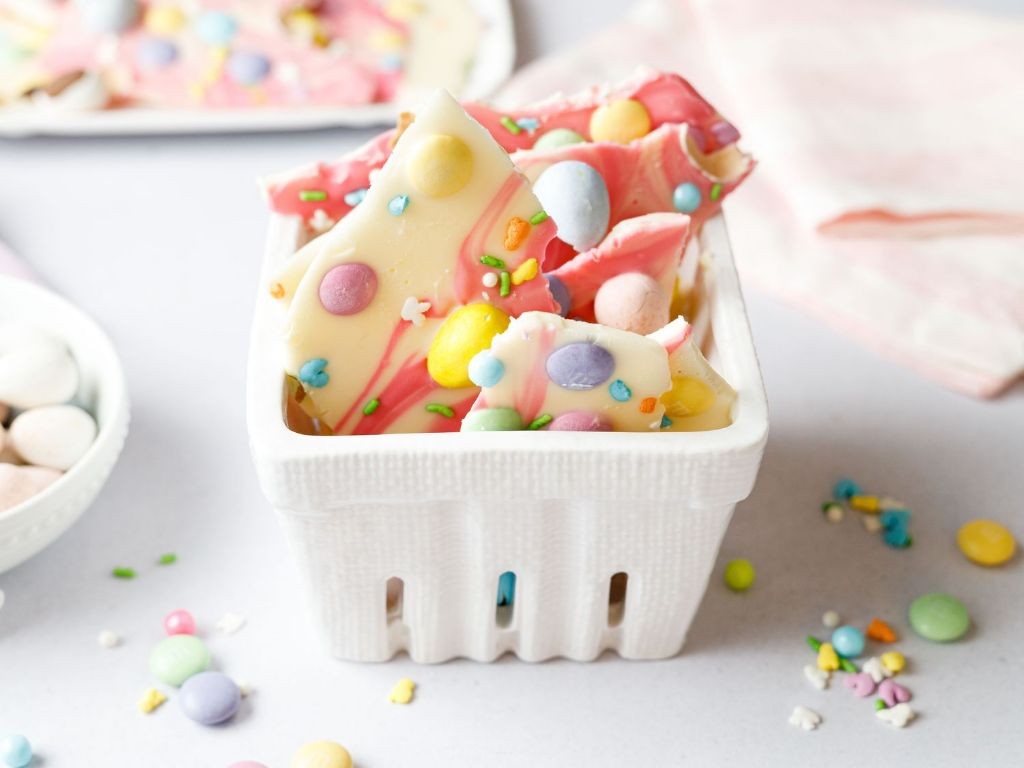
Ostensibly a treat for kids, this colorful bark is a fun, no-bake project for any spring gathering. It combines white chocolate with pastel candies for a festive look that’s easy to customize. Just melt, sprinkle, and break into pieces.
Serving: 12 | Pre Time: 10 minutes | Cooking Time: 5 minutes
Ingredients
– 3 cups of white chocolate chips
– A couple of tablespoons of coconut oil
– A handful of pastel M&M’s
– A handful of mini marshmallows
– A sprinkle of pastel sprinkles
– A splash of vanilla extract
Instructions
1. Line a baking sheet with parchment paper.
2. Combine the white chocolate chips and coconut oil in a microwave-safe bowl.
3. Microwave the mixture in 30-second intervals, stirring thoroughly after each interval, until completely smooth and melted—this usually takes about 2 minutes total.
4. Stir in the vanilla extract until fully incorporated.
5. Pour the melted chocolate mixture onto the prepared baking sheet.
6. Use a spatula to spread it into an even layer about ¼-inch thick.
7. Immediately sprinkle the pastel M&M’s, mini marshmallows, and pastel sprinkles evenly over the top, pressing them in lightly so they stick.
8. Let the bark set at room temperature for 1 hour, or until completely firm and cool to the touch.
9. Break the bark into irregular pieces by hand or with a knife.
10. Store the pieces in an airtight container at room temperature for up to 1 week.
Perfectly crisp with creamy pockets from the chocolate, it offers a sweet crunch from the candies. The pastel colors make it ideal for an Easter basket centerpiece or as a playful dessert table addition.
Creamy Coconut Nest Candies
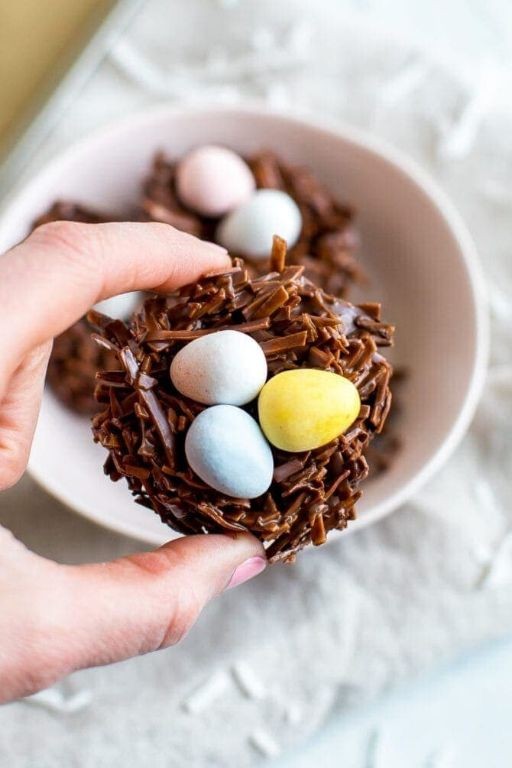
Creamy coconut nest candies combine shredded coconut with sweetened condensed milk for a simple no-bake treat. These bite-sized delights come together in minutes and offer a chewy texture with tropical flavor. Perfect for holiday gifting or quick dessert cravings.
Serving: 24 | Pre Time: 15 minutes | Cooking Time: 0 minutes
Ingredients
– 3 cups of sweetened shredded coconut
– 1 can (14 ounces) of sweetened condensed milk
– A splash of vanilla extract
– A couple of cups of powdered sugar for rolling
– A pinch of salt
Instructions
1. In a large mixing bowl, combine 3 cups of sweetened shredded coconut with the entire can of sweetened condensed milk.
2. Add a splash of vanilla extract and a pinch of salt to the bowl.
3. Mix all ingredients thoroughly with a spatula until fully incorporated and sticky.
4. Tip: Chill the mixture in the refrigerator for 30 minutes if it feels too soft to handle easily.
5. Scoop about 1 tablespoon of the coconut mixture and roll it into a ball between your palms.
6. Tip: Lightly wet your hands with water to prevent sticking while forming the balls.
7. Place the rolled balls on a parchment-lined baking sheet.
8. Pour about 2 cups of powdered sugar into a shallow bowl.
9. Roll each coconut ball in the powdered sugar until completely coated.
10. Tip: For extra sweetness, roll the candies twice in powdered sugar after the first coat sets slightly.
11. Return the coated candies to the baking sheet.
12. Let the candies set at room temperature for 1 hour before serving.
Dense and chewy with a sweet coconut flavor, these candies have a satisfying texture that holds its shape. The powdered sugar coating adds a delicate finish without being overly sweet. Try serving them in mini cupcake liners for parties or storing in an airtight container for up to a week.
Pastel M&M Pretzel Bites

Munch on these sweet-salty bites that combine crunchy pretzels, creamy pastel M&Ms, and smooth white chocolate. They’re perfect for holiday parties or a quick treat, with minimal effort for maximum payoff. Just assemble, melt, and enjoy in under 30 minutes.
Serving: 24 bites | Pre Time: 15 minutes | Cooking Time: 5 minutes
Ingredients
– About 2 cups of mini pretzel twists
– A 10-ounce bag of pastel M&Ms (the spring ones work great!)
– A 12-ounce bag of white chocolate chips
– A couple of tablespoons of coconut oil or shortening
Instructions
1. Line a large baking sheet with parchment paper.
2. Arrange the mini pretzel twists in a single layer on the sheet, leaving a little space between each.
3. Place a pastel M&M in the center of each pretzel twist.
4. Pour the white chocolate chips into a microwave-safe bowl.
5. Add the coconut oil or shortening to the bowl with the chocolate chips.
6. Microwave the mixture on high for 30 seconds, then stir well.
7. Continue microwaving in 15-second intervals, stirring after each, until the chocolate is completely melted and smooth (tip: don’t overheat or it’ll seize up).
8. Use a spoon to drizzle the melted white chocolate over each pretzel and M&M combo, covering them lightly.
9. Let the bites sit at room temperature for about 20 minutes until the chocolate hardens (tip: for faster setting, pop them in the fridge for 10 minutes).
10. Once set, gently peel the bites off the parchment paper.
11. Store any leftovers in an airtight container at room temperature for up to 3 days (tip: layer them with wax paper to prevent sticking).
Fresh from the tray, these bites offer a fun crunch from the pretzel, a creamy melt from the white chocolate, and a sweet burst from the M&Ms. Serve them piled high on a platter for a colorful snack, or package them in clear bags as edible gifts. The pastel colors make them especially festive for spring gatherings or Easter celebrations.
Classic Chocolate Easter Truffles

Whip up these decadent chocolate truffles for your Easter celebration—they’re surprisingly simple to make with just a few quality ingredients. The rich ganache center coated in cocoa powder delivers pure chocolate bliss in every bite.
Serving: 24 | Pre Time: 30 minutes | Cooking Time: 5 minutes
Ingredients
– 8 oz of good-quality dark chocolate, chopped
– 1/2 cup of heavy cream
– A splash of vanilla extract
– A pinch of salt
– 1/2 cup of unsweetened cocoa powder for rolling
Instructions
1. Place the chopped dark chocolate in a medium heatproof bowl.
2. Heat the heavy cream in a small saucepan over medium heat until it just begins to simmer—watch for tiny bubbles around the edges.
3. Pour the hot cream over the chocolate and let it sit for 2 minutes to melt.
4. Add the vanilla extract and salt to the bowl.
5. Whisk the mixture gently until smooth and glossy; if any chocolate chunks remain, microwave in 15-second bursts, stirring between each, until fully melted.
6. Cover the bowl with plastic wrap, pressing it directly onto the surface of the ganache to prevent a skin from forming.
7. Refrigerate the ganache for at least 2 hours, or until firm enough to scoop—test by pressing with a spoon; it should hold an indentation without sticking.
8. Line a baking sheet with parchment paper.
9. Use a small cookie scoop or teaspoon to portion the ganache into 1-inch balls, rolling quickly between your palms to smooth them; if they get too soft, chill for 10 minutes.
10. Place the cocoa powder in a shallow bowl.
11. Roll each truffle in the cocoa powder until fully coated, shaking off any excess.
12. Arrange the coated truffles on the prepared baking sheet.
13. Refrigerate the truffles for 30 minutes to set before serving.
Buttery-smooth ganache melts on the tongue, balanced by the bitter cocoa dusting for a sophisticated finish. Serve them chilled in mini cupcake liners or gift them in festive boxes—they stay fresh for up to a week in the fridge.
Strawberry Cream Cheese Eggs
Craving something sweet and savory? These Strawberry Cream Cheese Eggs blend fluffy scrambled eggs with creamy cheese and fresh berries for a surprisingly delightful breakfast. They’re quick to whip up and perfect for a lazy weekend morning.
Serving: 2 | Pre Time: 5 minutes | Cooking Time: 10 minutes
Ingredients
– 4 large eggs
– A couple of tablespoons of whole milk
– A pinch of salt and black pepper
– A dollop of cream cheese (about 2 tablespoons)
– A handful of fresh strawberries, hulled and sliced
– A pat of unsalted butter (about 1 tablespoon)
– A drizzle of maple syrup for serving (optional)
Instructions
1. Crack 4 large eggs into a medium bowl.
2. Add a couple of tablespoons of whole milk to the eggs.
3. Whisk the eggs and milk vigorously until fully combined and slightly frothy, about 30 seconds.
4. Season the mixture with a pinch of salt and black pepper, whisking again to incorporate.
5. Heat a non-stick skillet over medium-low heat.
6. Add a pat of unsalted butter to the skillet, letting it melt and coat the bottom evenly.
7. Pour the egg mixture into the skillet.
8. Let the eggs cook undisturbed for 1 minute until the edges just begin to set.
9. Gently push the cooked edges toward the center with a spatula, tilting the pan to let the uncooked eggs flow to the edges.
10. Continue this gentle pushing and tilting process for about 3-4 minutes until the eggs are mostly set but still slightly wet.
11. Add a dollop of cream cheese and a handful of sliced strawberries to the center of the eggs.
12. Fold the eggs over the cream cheese and strawberries, cooking for another 1 minute until the cheese is just melted and the eggs are fully set but not dry.
13. Immediately remove the skillet from the heat to prevent overcooking.
14. Plate the eggs and optionally drizzle with maple syrup.
Perfectly creamy and subtly sweet, these eggs have a soft, fluffy texture with pockets of melted cream cheese and juicy strawberry bursts. Serve them warm with a side of toast or over a bed of greens for a light, satisfying meal that feels indulgent yet simple.
White Chocolate Carrot Cake Fudge

Ditch the boring desserts—this white chocolate carrot cake fudge combines cozy carrot cake flavors with creamy fudge in one no-bake treat. It’s perfect for holiday gifting or a quick sweet fix, with a hint of spice and plenty of texture. You’ll need just a few pantry staples and about 15 minutes of hands-on time.
Serving: 16 | Pre Time: 15 minutes | Cooking Time: 0 minutes
Ingredients
– 3 cups of white chocolate chips
– 1 can of sweetened condensed milk (about 14 ounces)
– 1 cup of finely grated carrots, squeezed dry
– 1/2 cup of crushed pineapple, drained well
– 1 teaspoon of ground cinnamon
– 1/2 teaspoon of ground nutmeg
– A pinch of salt
– 1/2 cup of chopped walnuts
– A splash of vanilla extract
Instructions
1. Line an 8×8-inch baking pan with parchment paper, letting it overhang the sides for easy removal later.
2. In a medium saucepan, combine the white chocolate chips and sweetened condensed milk over low heat.
3. Stir constantly with a spatula until the chocolate is fully melted and the mixture is smooth, about 5 minutes—tip: keep the heat low to prevent scorching.
4. Remove the saucepan from the heat and immediately stir in the vanilla extract and salt.
5. Fold in the grated carrots, crushed pineapple, cinnamon, and nutmeg until evenly distributed.
6. Add the chopped walnuts and mix gently to incorporate without over-stirring—tip: reserve a few walnuts to sprinkle on top for garnish.
7. Pour the fudge mixture into the prepared pan and spread it into an even layer with the spatula.
8. Sprinkle the reserved walnuts over the top and press them in lightly.
9. Refrigerate the fudge for at least 4 hours, or until firm—tip: for clean cuts, chill it overnight.
10. Use the parchment paper to lift the fudge out of the pan, then cut it into 16 squares with a sharp knife.
Firm yet creamy, this fudge melts with a sweet carrot cake vibe and a subtle crunch from walnuts. Serve it chilled as a festive snack or wrap pieces in parchment for homemade gifts that’ll impress any crowd.
Lemonade Jelly Bean Cookies
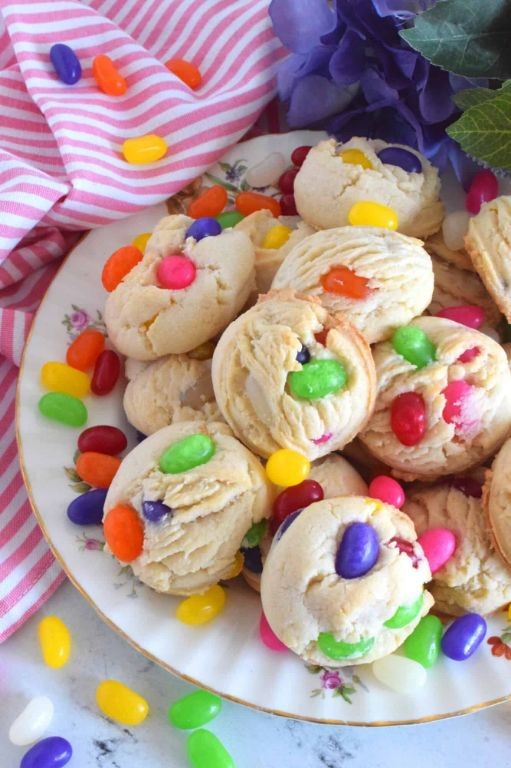
Vividly tart and sweet, these cookies capture summer in every bite. They combine zesty lemon with bursts of jelly bean candy for a playful treat. Perfect for picnics or a bright dessert.
Serving: 24 | Pre Time: 15 minutes | Cooking Time: 10 minutes
Ingredients
– 1 cup of softened unsalted butter
– 3/4 cup of granulated sugar
– 1 large egg
– 2 cups of all-purpose flour
– 1/2 teaspoon of baking soda
– A pinch of salt
– Zest from 2 lemons
– A splash of fresh lemon juice (about 2 tablespoons)
– 1 cup of assorted jelly beans, roughly chopped
Instructions
1. Preheat your oven to 350°F and line two baking sheets with parchment paper.
2. In a large bowl, cream the softened butter and granulated sugar together until light and fluffy, about 2 minutes.
3. Beat in the egg until fully combined.
4. Add the lemon zest and fresh lemon juice, mixing well.
5. In a separate bowl, whisk together the all-purpose flour, baking soda, and salt.
6. Gradually mix the dry ingredients into the wet ingredients until just combined—don’t overmix to keep cookies tender.
7. Gently fold in the chopped jelly beans until evenly distributed.
8. Scoop tablespoon-sized balls of dough onto the prepared baking sheets, spacing them 2 inches apart.
9. Bake for 8-10 minutes, or until the edges are lightly golden but centers are still soft.
10. Let the cookies cool on the baking sheets for 5 minutes before transferring to a wire rack to cool completely.
Warm from the oven, these cookies have a soft, chewy texture with a crisp edge. The lemonade flavor shines through the buttery dough, punctuated by colorful jelly bean surprises. Serve them alongside a glass of iced tea for a refreshing twist, or crumble over vanilla ice cream for an extra treat.
Speckled Robin’s Egg Candy

Grab a festive treat that’s as fun to make as it is to eat. These speckled candies mimic robin’s eggs with a crisp shell and creamy center. They’re perfect for spring celebrations or holiday gifting.
Serving: 24 candies | Pre Time: 30 minutes | Cooking Time: 10 minutes
Ingredients
– 2 cups of white chocolate chips
– A splash of vanilla extract
– A couple of drops of blue food coloring
– 1/4 cup of crushed chocolate cookies (for the speckles)
– 1/2 cup of creamy peanut butter
– A pinch of salt
Instructions
1. Line a baking sheet with parchment paper.
2. Melt the white chocolate chips in a microwave-safe bowl in 30-second intervals, stirring between each, until smooth.
3. Stir in the vanilla extract and blue food coloring until evenly combined. Tip: Use gel food coloring for a more vibrant hue without thinning the chocolate.
4. Spoon about 1 tablespoon of the blue chocolate onto the prepared sheet to form egg shapes, spacing them apart.
5. Let the chocolate set at room temperature for 10 minutes until firm to the touch.
6. In a small bowl, mix the peanut butter with a pinch of salt until creamy.
7. Place about 1 teaspoon of the peanut butter mixture in the center of each chocolate egg.
8. Spoon another tablespoon of blue chocolate over the peanut butter to cover it completely, sealing the edges. Tip: Work quickly to prevent the chocolate from hardening before sealing.
9. Sprinkle the crushed chocolate cookies over the tops of the candies to create speckles, pressing gently to adhere.
10. Allow the candies to set completely at room temperature for 1 hour, or refrigerate for 20 minutes to speed up the process. Tip: Store in an airtight container to keep them fresh and crisp.
11. Serve the candies on a platter or package them in clear bags for gifts.
Speckled Robin’s Egg Candy offers a delightful crunch from the chocolate shell, giving way to a smooth, salty-sweet peanut butter center. The blue hue and cookie speckles make them visually striking for Easter baskets or party favors. Try pairing them with a cup of coffee for a satisfying treat that balances richness with a hint of vanilla.
Chocolate-Covered Marshmallow Chicks

Chocolate-covered marshmallow chicks are the perfect festive treat that’s surprisingly simple to make. They combine soft marshmallows with rich chocolate for a delightful contrast. You’ll have these ready in no time for any holiday gathering or sweet craving.
Serving: 24 chicks | Pre Time: 15 minutes | Cooking Time: 5 minutes
Ingredients
– A 10-ounce bag of marshmallows (the standard size)
– 12 ounces of semi-sweet chocolate chips
– A tablespoon of coconut oil or shortening
– A couple of tablespoons of sprinkles or sanding sugar for decoration
– Optional: A splash of orange extract or a drop of food coloring for fun variations
Instructions
1. Line a baking sheet with parchment paper or a silicone mat.
2. Place 12 ounces of semi-sweet chocolate chips and 1 tablespoon of coconut oil in a microwave-safe bowl.
3. Microwave the chocolate mixture in 30-second intervals, stirring well after each interval, until completely melted and smooth—this usually takes about 1-2 minutes total.
4. Tip: Use a double boiler on the stove if you prefer more control to avoid scorching the chocolate.
5. Optional: Stir in a splash of orange extract or a drop of food coloring into the melted chocolate for a flavored or colored coating.
6. Take one marshmallow from the 10-ounce bag and dip it halfway into the melted chocolate using a fork or skewer.
7. Let excess chocolate drip off by gently tapping the marshmallow against the side of the bowl.
8. Place the dipped marshmallow onto the prepared baking sheet.
9. Immediately sprinkle a couple of tablespoons of sprinkles or sanding sugar over the wet chocolate before it sets.
10. Tip: Work quickly with one marshmallow at a time to ensure the chocolate doesn’t harden before decorating.
11. Repeat steps 6-9 with all remaining marshmallows from the bag.
12. Transfer the baking sheet to the refrigerator and chill for at least 30 minutes, or until the chocolate is firm to the touch.
13. Tip: Store leftovers in an airtight container in the fridge to prevent the chocolate from melting or becoming sticky.
14. Once set, gently peel the chocolate-covered marshmallow chicks from the parchment paper.
They offer a fun crunch from the chocolate shell that gives way to a soft, pillowy center. Try serving them stacked in a clear jar as a centerpiece or pairing with hot cocoa for an extra cozy treat.
Easter Popcorn Balls

Remember those sticky-sweet treats from childhood Easter baskets? These popcorn balls bring that nostalgia to your kitchen with minimal effort. They’re perfect for spring gatherings or edible gifts.
Serving: 12 | Pre Time: 10 minutes | Cooking Time: 15 minutes
Ingredients
– A big bowl of popped popcorn (about 12 cups)
– A couple of cups of mini marshmallows
– A good splash of butter (½ cup)
– A few drops of vanilla extract
– A handful of pastel sprinkles for that Easter vibe
– A pinch of salt to balance the sweetness
Instructions
1. Pop your popcorn using your preferred method—air-popping keeps it light, while stovetop adds a subtle richness.
2. Melt the butter in a large pot over medium-low heat, swirling occasionally until fully liquid.
3. Add the mini marshmallows to the melted butter, stirring constantly with a wooden spoon until they’re completely smooth and glossy, about 5–7 minutes.
4. Remove the pot from heat and stir in the vanilla extract and salt until just combined.
5. Immediately pour the marshmallow mixture over the popcorn in a large bowl, working quickly before it sets.
6. Use lightly buttered hands to gently fold everything together, coating each kernel evenly—the butter prevents sticking.
7. Sprinkle in the pastel sprinkles while folding to distribute them throughout without crushing them.
8. Shape the mixture into 12 equal-sized balls, compacting them firmly so they hold their shape as they cool.
9. Place the balls on a parchment-lined baking sheet and let them set at room temperature for 30 minutes until firm.
Unexpectedly addictive, these popcorn balls offer a chewy, crunchy texture with a buttery vanilla sweetness. The sprinkles add a festive pop of color—try wrapping them in cellophane with ribbon for a charming springtime gift, or serve alongside fresh fruit to cut the richness.
Carrot Patch Oreo Truffles

These adorable truffles look like carrots sprouting from edible dirt. They’re a playful, no-bake treat that comes together with just a few simple ingredients. Perfect for spring gatherings or a fun kitchen project with kids.
Serving: 24 | Pre Time: 30 minutes | Cooking Time: 0 minutes
Ingredients
– A whole package of Oreos (about 36 cookies)
– An 8-ounce block of cream cheese, softened
– A bag of orange candy melts (about 12 oz)
– A couple of tablespoons of green frosting or melted green candy melts
– A splash of vegetable oil
– A cup of crushed Oreo crumbs (save these from the package)
Instructions
1. Crush the entire package of Oreos into fine crumbs using a food processor or a zip-top bag and a rolling pin.
2. Tip: For the “dirt,” set aside 1 cup of these fine crumbs in a shallow bowl before proceeding.
3. In a large mixing bowl, combine the remaining Oreo crumbs with the softened 8-ounce block of cream cheese.
4. Mix thoroughly with a hand mixer or a sturdy spoon until a uniform, thick dough forms.
5. Roll the dough into 24 even, 1-inch balls and place them on a parchment-lined baking sheet.
6. Chill the balls in the freezer for 15 minutes to firm them up for dipping.
7. Tip: This chilling step is crucial; it prevents the balls from falling apart when coated.
8. Melt the 12-ounce bag of orange candy melts according to package directions, usually in 30-second intervals in the microwave.
9. Stir in a splash of vegetable oil to thin the coating for a smoother, more even dip.
10. Using a fork or dipping tool, dip each chilled ball into the melted orange candy coating, letting the excess drip off.
11. Immediately roll the bottom half of the coated ball in the reserved cup of crushed Oreo crumbs to create the “dirt.”
12. Return the truffle to the parchment-lined sheet, standing it upright with the “dirt” side down.
13. Repeat steps 10-12 for all remaining balls.
14. Let the orange coating set completely at room temperature for about 10 minutes.
15. Place the green frosting or melted green candy melts into a small piping bag or a zip-top bag with a tiny corner snipped off.
16. Pipe small, leafy green tops onto each truffle to complete the carrot look.
17. Tip: For best texture, let the truffles set in the refrigerator for at least 1 hour before serving.
18. Makes for a festive, hand-held dessert. The creamy, chocolatey center contrasts with the crisp candy shell and crumbly “dirt.” Serve them planted in a bed of more Oreo crumbs on a platter for a full garden effect.
Fruity Pebbles Easter Treats
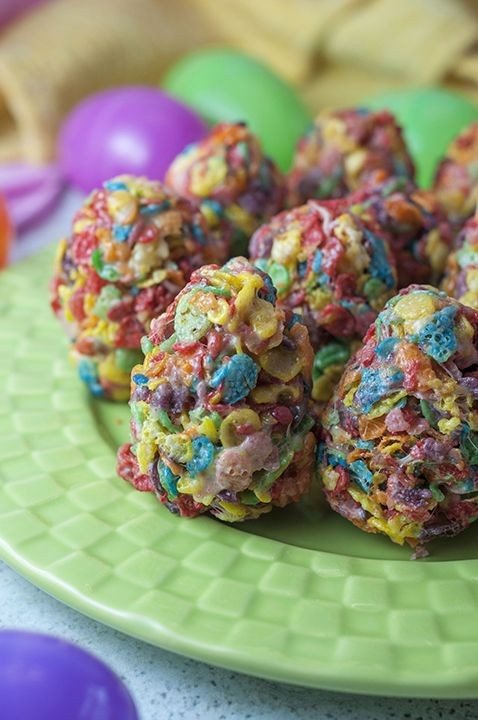
Let’s make these colorful no-bake treats that kids adore and adults secretly love too. They’re perfect for Easter baskets or spring parties, combining nostalgic cereal with creamy sweetness. You’ll have them ready in under 30 minutes.
Serving: 12 | Pre Time: 15 minutes | Cooking Time: 0 minutes
Ingredients
– 6 cups of Fruity Pebbles cereal
– A 10-ounce bag of marshmallows
– 3 tablespoons of unsalted butter
– A pinch of salt
– A splash of vanilla extract
Instructions
1. Line a 9×9-inch baking pan with parchment paper, letting the edges hang over for easy removal.
2. Measure 6 cups of Fruity Pebbles into a large mixing bowl and set it aside.
3. Melt 3 tablespoons of unsalted butter in a large pot over low heat, stirring constantly to prevent browning.
4. Add the entire 10-ounce bag of marshmallows to the melted butter, stirring until completely smooth and melted, about 5-7 minutes.
5. Remove the pot from heat and stir in a pinch of salt and a splash of vanilla extract until fully combined.
6. Immediately pour the marshmallow mixture over the Fruity Pebbles in the bowl, using a rubber spatula to quickly fold everything together until evenly coated.
7. Transfer the mixture to the prepared pan, pressing it firmly into an even layer with your hands or the bottom of a measuring cup.
8. Let the treats cool at room temperature for at least 1 hour until set and firm to the touch.
9. Use the parchment paper to lift the slab out of the pan, then cut it into 12 squares with a sharp knife.
Keep these treats in an airtight container at room temperature for up to 3 days—they stay delightfully chewy. Known for their vibrant crunch and marshmallow sweetness, they’re a fun twist on classic rice crispy treats. Try stacking them in clear jars as edible centerpieces or crumbling them over vanilla ice cream for a playful sundae topping.
Almond Joy Easter Eggs

Ditch the store-bought candy this Easter and make these homemade Almond Joy eggs instead. They combine coconut, almonds, and chocolate in a no-bake treat that’s surprisingly simple to whip up. You’ll have a festive, crowd-pleasing dessert ready in no time.
Serving: 24 eggs | Pre Time: 20 minutes | Cooking Time: 0 minutes
Ingredients
– 3 cups of sweetened shredded coconut
– A 14-ounce can of sweetened condensed milk
– A couple of teaspoons of vanilla extract
– A big pinch of salt
– About 48 whole almonds (that’s 2 per egg)
– 3 cups of semi-sweet chocolate chips
– A splash of coconut oil or shortening
Instructions
1. Line a large baking sheet with parchment paper.
2. In a large bowl, combine the 3 cups of sweetened shredded coconut, the entire can of sweetened condensed milk, 2 teaspoons of vanilla extract, and a big pinch of salt.
3. Mix everything with a spatula until it forms a thick, sticky dough. Tip: If the mixture seems too wet, you can add a little extra shredded coconut until it holds its shape.
4. Scoop out about 1 tablespoon of the coconut mixture and roll it into a small egg shape between your palms. Place it on the prepared baking sheet.
5. Repeat step 4 until all the mixture is used, spacing the eggs about an inch apart. You should have about 24 eggs.
6. Gently press 2 whole almonds into the top of each coconut egg, side by side.
7. Place the baking sheet with the coconut eggs in the freezer for 15 minutes to firm up. This makes dipping much easier.
8. While the eggs chill, create a double boiler: fill a saucepan with an inch of water and bring it to a simmer, then place a heatproof bowl on top, ensuring the bottom doesn’t touch the water.
9. Add the 3 cups of semi-sweet chocolate chips and 1 tablespoon of coconut oil to the bowl.
10. Stir the chocolate constantly with a spatula until it is completely melted and smooth, about 5-7 minutes. Tip: Keep the heat low to prevent the chocolate from seizing.
11. Remove the bowl from the heat. Take the coconut eggs out of the freezer.
12. Using a fork or dipping tool, submerge one coconut egg at a time into the melted chocolate, coating it completely.
13. Lift the egg out, let the excess chocolate drip off, and place it back on the parchment paper. Tip: If the chocolate gets too thick, you can briefly return the bowl to the double boiler to rewarm it.
14. Repeat step 12 until all eggs are coated.
15. Let the chocolate set completely at room temperature, which will take about 1 hour, or refrigerate for 20 minutes to speed up the process.
Keep these eggs stored in an airtight container in the fridge for up to two weeks. The texture is fantastic—a crisp chocolate shell gives way to a chewy, sweet coconut center with a satisfying crunch from the almonds. For a fun twist, try using dark chocolate instead of semi-sweet, or sprinkle a little sea salt on top before the chocolate sets.
Vanilla Bean Coconut Macaroons
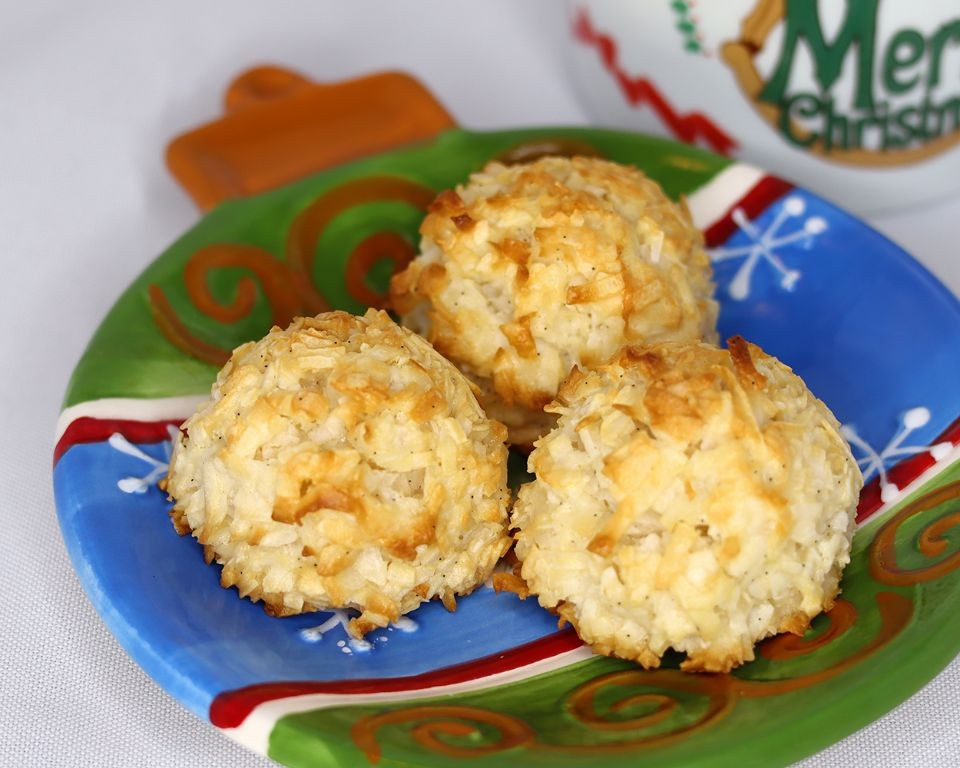
Just in time for holiday baking, these vanilla bean coconut macaroons are a simple yet elegant treat. They come together quickly with minimal ingredients but deliver maximum flavor and texture. Perfect for gifting or enjoying with coffee.
Serving: 24 | Pre Time: 15 minutes | Cooking Time: 15 minutes
Ingredients
– 4 cups of sweetened shredded coconut
– A 14-ounce can of sweetened condensed milk
– 2 large egg whites
– A splash of pure vanilla extract
– The seeds scraped from one vanilla bean pod
– A pinch of fine salt
Instructions
1. Preheat your oven to 325°F and line two baking sheets with parchment paper.
2. In a large mixing bowl, combine 4 cups of sweetened shredded coconut, the 14-ounce can of sweetened condensed milk, and a pinch of fine salt.
3. In a separate clean bowl, beat 2 large egg whites with an electric mixer on high speed until stiff peaks form, about 3-4 minutes—this adds air for a lighter texture.
4. Gently fold the beaten egg whites into the coconut mixture until just combined; avoid overmixing to keep them fluffy.
5. Stir in a splash of pure vanilla extract and the seeds scraped from one vanilla bean pod for that rich, aromatic flavor.
6. Use a cookie scoop or two spoons to form 1.5-inch mounds of the mixture onto the prepared baking sheets, spacing them about 1 inch apart.
7. Bake in the preheated oven for 15-18 minutes, or until the edges turn golden brown and the tops are lightly toasted—watch closely to prevent burning.
8. Let the macaroons cool on the baking sheets for 5 minutes, then transfer to a wire rack to cool completely, which helps them firm up.
9. Store in an airtight container at room temperature for up to 5 days.
Baked to perfection, these macaroons have a crisp exterior and a chewy, moist center infused with vanilla. Serve them drizzled with melted chocolate or alongside fresh berries for a festive touch.
Raspberry Rose Chocolate Bonbons

You’ll find these raspberry rose chocolate bonbons are surprisingly simple to make at home. They combine tart raspberry, floral rose, and rich chocolate in a bite-sized treat perfect for gifting or indulging.
Serving: 24 | Pre Time: 30 minutes | Cooking Time: 5 minutes
Ingredients
– 2 cups of dark chocolate chips
– 1/2 cup of heavy cream
– 1/4 cup of raspberry jam
– A couple of drops of rose water
– A pinch of salt
– A splash of vanilla extract
Instructions
1. Place 2 cups of dark chocolate chips in a heatproof bowl.
2. Heat 1/2 cup of heavy cream in a small saucepan over medium heat until it just begins to simmer, about 3-4 minutes.
3. Pour the hot cream over the chocolate chips and let it sit for 1 minute without stirring.
4. Add a pinch of salt and a splash of vanilla extract to the chocolate mixture.
5. Stir the mixture gently with a spatula until completely smooth and glossy, about 2 minutes.
6. Mix in 1/4 cup of raspberry jam until fully incorporated.
7. Add a couple of drops of rose water and stir to combine evenly.
8. Let the ganache cool at room temperature for 15 minutes until slightly thickened but still pourable.
9. Line a mini muffin tin with paper liners.
10. Spoon the ganache into the liners, filling each about 3/4 full.
11. Tap the tin gently on the counter to remove any air bubbles.
12. Refrigerate the bonbons for at least 2 hours until completely set and firm to the touch.
13. Remove the set bonbons from the liners and serve immediately or store in an airtight container.
For serving, these bonbons have a smooth, creamy center with a crisp chocolate shell that melts in your mouth. The raspberry provides a bright tartness that balances the floral rose notes beautifully. Try pairing them with a glass of sparkling wine or crushing them over vanilla ice cream for an elegant dessert twist.
Easter Egg Rice Krispie Treats
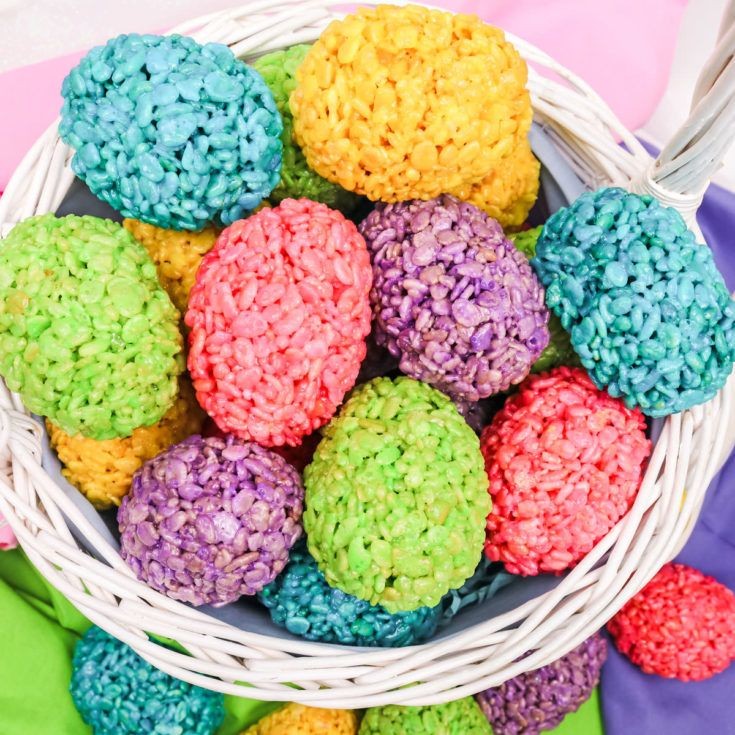
Fancy a festive twist on a classic treat? These Easter Egg Rice Krispie Treats are a colorful, no-bake delight that comes together in minutes. Perfect for spring gatherings or a fun kitchen project with kids.
Serving: 12 | Pre Time: 10 minutes | Cooking Time: 5 minutes
Ingredients
– 6 cups of Rice Krispies cereal
– a 10-ounce bag of mini marshmallows
– 3 tablespoons of unsalted butter
– a splash of vanilla extract
– a couple of drops of assorted food coloring (like pink, blue, and yellow)
– a handful of sprinkles for decorating
Instructions
1. Grease a 9×13-inch baking dish lightly with butter or cooking spray.
2. Melt 3 tablespoons of unsalted butter in a large pot over low heat, about 2-3 minutes until fully liquid.
3. Add the 10-ounce bag of mini marshmallows to the melted butter, stirring constantly with a spatula until completely smooth and melted, about 3-4 minutes. Tip: Keep the heat low to prevent the marshmallows from burning.
4. Remove the pot from the heat and stir in a splash of vanilla extract until well combined.
5. Quickly pour in 6 cups of Rice Krispies cereal, folding gently with the spatula to coat every piece evenly without crushing them.
6. Divide the mixture into three equal portions in separate bowls.
7. Add a couple of drops of different food coloring to each bowl—one pink, one blue, one yellow—and mix until the color is uniform. Tip: Use gloves to avoid staining your hands.
8. Press each colored portion into the greased baking dish in alternating sections, using your hands or a greased spatula to flatten it into an even layer about 1-inch thick.
9. Immediately top with a handful of sprinkles, pressing them gently into the surface so they stick.
10. Let the treats cool at room temperature for at least 30 minutes until firm to the touch. Tip: For faster setting, chill in the refrigerator for 15 minutes.
11. Cut into 12 egg-shaped pieces using a cookie cutter or a knife, wiping the blade between cuts for clean edges.
Just out of the pan, these treats boast a chewy, crisp texture with a sweet vanilla aroma. Their vibrant colors make them a festive centerpiece—try stacking them on a platter or wrapping individually for Easter baskets. They stay fresh in an airtight container for up to three days, if they last that long!
Salted Caramel Chocolate Eggs
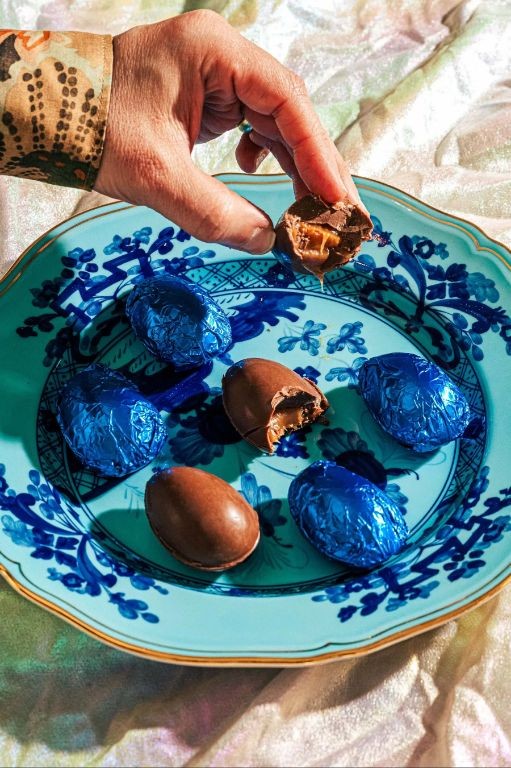
Holiday treats don’t need to be complicated. These salted caramel chocolate eggs deliver rich flavor with minimal fuss, combining sweet, salty, and creamy in one bite-sized package. They’re perfect for gifting or enjoying as a festive snack.
Serving: 12 | Pre Time: 20 minutes | Cooking Time: 10 minutes
Ingredients
– A cup of semi-sweet chocolate chips
– Half a cup of heavy cream
– A quarter cup of granulated sugar
– A couple of tablespoons of unsalted butter
– A teaspoon of vanilla extract
– A good pinch of flaky sea salt
– A splash of water
Instructions
1. Line a baking sheet with parchment paper and set aside.
2. In a small saucepan, combine the granulated sugar and splash of water over medium heat, stirring until the sugar dissolves completely.
3. Stop stirring and let the mixture bubble for 3-5 minutes until it turns a deep amber color, swirling the pan occasionally for even caramelization.
4. Remove from heat and immediately whisk in the unsalted butter until melted and smooth.
5. Slowly pour in the heavy cream while whisking constantly—it will bubble vigorously, so be careful.
6. Stir in the vanilla extract and a pinch of flaky sea salt, then let the caramel cool to room temperature, about 15 minutes.
7. In a microwave-safe bowl, melt the semi-sweet chocolate chips in 30-second intervals, stirring between each, until fully smooth.
8. Spoon about a tablespoon of melted chocolate into each cavity of a silicone egg mold, spreading it up the sides to create a shell.
9. Chill the chocolate shells in the freezer for 10 minutes until firm.
10. Fill each shell with a teaspoon of the cooled caramel, leaving a small gap at the top.
11. Seal the eggs by spooning more melted chocolate over the caramel, smoothing the tops with a knife.
12. Sprinkle the remaining flaky sea salt lightly over the tops before the chocolate sets.
13. Refrigerate the eggs for at least 30 minutes until completely firm, then pop them out of the mold.
Firm and glossy on the outside, these eggs crack to reveal a gooey, salted caramel center that balances sweetness with a savory kick. For a festive twist, drizzle them with white chocolate or crush them over ice cream—they’re irresistibly rich and perfect for sharing.
Orange Creamsicle Easter Candy

Boldly blending nostalgic flavors, this Orange Creamsicle Easter Candy transforms classic treats into festive bites. It’s a simple no-bake dessert that comes together quickly, perfect for spring gatherings. You’ll love the bright citrus and creamy vanilla combo.
Serving: 24 pieces | Pre Time: 15 minutes | Cooking Time: 0 minutes
Ingredients
– 2 cups of white chocolate chips
– A 12-ounce bag of orange candy melts
– 1/2 cup of heavy cream
– A teaspoon of vanilla extract
– A couple of drops of orange food coloring (optional, for extra vibrancy)
– A splash of vegetable oil for smoothing
Instructions
1. Line a 9×9-inch baking pan with parchment paper, letting the edges overhang for easy removal later.
2. Place the white chocolate chips in a microwave-safe bowl and microwave in 30-second intervals, stirring between each, until fully melted and smooth—this prevents scorching.
3. Pour the melted white chocolate into the prepared pan and spread it evenly with a spatula to form the base layer.
4. In a separate bowl, combine the orange candy melts and heavy cream, then microwave in 20-second bursts, stirring well after each, until the mixture is fluid and lump-free.
5. Stir in the vanilla extract and orange food coloring (if using) until the color is uniform and vibrant.
6. Pour the orange mixture over the white chocolate layer in the pan, using the back of a spoon to gently swirl the two layers together for a marbled effect—don’t overmix to keep distinct flavors.
7. Let the candy set at room temperature for about 2 hours, or until firm to the touch; for faster setting, refrigerate for 30 minutes.
8. Once set, lift the candy out using the parchment paper overhang and place it on a cutting board.
9. Use a sharp knife to cut the candy into 1-inch squares, wiping the blade clean between cuts for neat edges.
Perfectly creamy with a zesty orange kick, these candies have a smooth, melt-in-your-mouth texture that’s irresistibly rich. Serve them in pastel-colored cupcake liners for an Easter basket surprise, or crumble them over vanilla ice cream for a fun twist. The marbled layers make each piece a little work of art, sure to brighten any holiday table.
Summary
Delight in these 20 Easter candy recipes to make your celebration extra sweet! We hope this list inspires you to create some delicious treats. Give a recipe a try, leave a comment below telling us your favorite, and don’t forget to share this roundup on Pinterest to spread the sweetness. Happy baking!