
You know those evenings when you’re racing against the clock, hungry, and just need something delicious on the table fast? We’ve all been there. That’s exactly why we’ve gathered 18 quick and easy dinner recipes perfect for those busy nights. From one-pan wonders to 30-minute meals, these lifesavers will get you fed and satisfied without the stress. Let’s dive in and make your evenings easier!
Sheet Pan Lemon Butter Salmon with Veggies
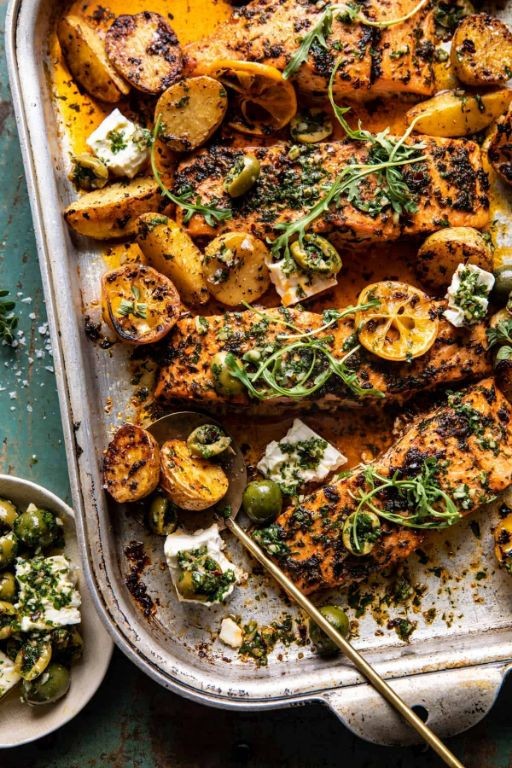
Wandering through the quiet kitchen this morning, I found myself craving something simple yet deeply comforting—a meal that feels like a gentle exhale after a long day. The soft glow of winter light through the window seemed to call for bright, citrusy flavors and tender, flaky fish, all nestled together on a single pan. It’s the kind of effortless dinner that fills the home with a warm, buttery aroma, promising coziness with every bite.
Serving: 4 | Pre Time: 15 minutes | Cooking Time: 18 minutes
Ingredients
– 4 (6-ounce) skin-on salmon fillets, patted dry with paper towels
– 1 pound fresh asparagus, woody ends trimmed
– 1 pint sweet cherry tomatoes, left whole
– 1 small red onion, thinly sliced into half-moons
– 3 tablespoons rich extra virgin olive oil
– 4 tablespoons unsalted butter, cut into small cubes
– 2 lemons, one thinly sliced and one juiced (about ¼ cup fresh lemon juice)
– 4 cloves garlic, minced until fragrant
– 1 tablespoon chopped fresh dill, plus extra for garnish
– 1 teaspoon kosher salt
– ½ teaspoon finely ground black pepper
Instructions
1. Preheat your oven to 425°F and line a large sheet pan with parchment paper for easy cleanup.
2. In a small bowl, whisk together the fresh lemon juice, minced garlic, chopped fresh dill, kosher salt, and finely ground black pepper until well combined.
3. Place the patted-dry salmon fillets, skin-side down, in the center of the prepared sheet pan.
4. Arrange the trimmed asparagus, whole cherry tomatoes, and thinly sliced red onion around the salmon in a single layer.
5. Drizzle the rich extra virgin olive oil evenly over the vegetables, tossing gently with your hands to coat them lightly.
6. Spoon the lemon-garlic mixture over the salmon fillets, ensuring each piece is generously covered.
7. Scatter the small cubes of unsalted butter and thin lemon slices over both the salmon and vegetables.
8. Roast in the preheated oven for 15–18 minutes, until the salmon flakes easily with a fork and the vegetables are tender with slight caramelization.
9. Remove the sheet pan from the oven and let it rest for 3 minutes to allow the flavors to meld.
10. Garnish with extra fresh dill before serving directly from the pan.
You’ll love how the salmon turns out buttery and flaky, with a zesty lemon punch that cuts through the richness, while the veggies soak up all those savory juices. Try serving it over a bed of fluffy quinoa or with crusty bread to mop up the delicious pan sauces—it’s a complete, vibrant meal that feels both nourishing and indulgent.
5-Ingredient White Chicken Chili

Venturing into the kitchen on a quiet afternoon, I find myself craving something both comforting and effortless—a meal that whispers of warmth without demanding hours of attention. This white chicken chili, with just five humble ingredients, feels like a gentle exhale, a simple promise of nourishment that comes together almost on its own. It’s the kind of dish that fills the house with a subtle, savory aroma, inviting you to slow down and savor the process.
Serving: 4 | Pre Time: 10 minutes | Cooking Time: 25 minutes
Ingredients
– 1 tablespoon rich extra virgin olive oil
– 1 pound boneless, skinless chicken breasts, cut into bite-sized pieces
– 1 (15-ounce) can creamy white beans, drained and rinsed
– 1 (4-ounce) can mild green chiles, with their tangy liquid
– 4 cups low-sodium chicken broth, simmering and aromatic
– 1 teaspoon finely ground cumin, earthy and warm
Instructions
1. Heat the rich extra virgin olive oil in a large Dutch oven over medium heat until it shimmers lightly, about 2 minutes.
2. Add the bite-sized chicken breast pieces to the pot, spreading them in a single layer to ensure even browning, and cook for 5–7 minutes until they turn opaque and develop a golden crust on all sides.
3. Pour in the low-sodium chicken broth, using a wooden spoon to scrape up any browned bits from the bottom of the pot—this adds a deep, savory flavor to the chili.
4. Stir in the drained creamy white beans, the mild green chiles with their tangy liquid, and the finely ground cumin, bringing the mixture to a gentle boil.
5. Reduce the heat to low, cover the pot partially to allow some steam to escape, and let it simmer for 15–20 minutes until the chicken is tender and easily shreds with a fork.
6. Using two forks, shred the chicken directly in the pot, stirring it back into the broth to create a thicker, heartier texture.
7. Remove the pot from the heat and let the chili rest for 5 minutes off the stove—this allows the flavors to meld together beautifully.
Creating this chili feels like weaving together simplicity and depth, where the tender chicken melts into the creamy beans, and the mild chiles offer a gentle, tangy warmth. Consider serving it with a dollop of cool sour cream or a sprinkle of fresh cilantro to brighten each spoonful, letting the subtle spices linger on your palate like a quiet, comforting memory.
Speedy Beef and Broccoli Stir-Fry
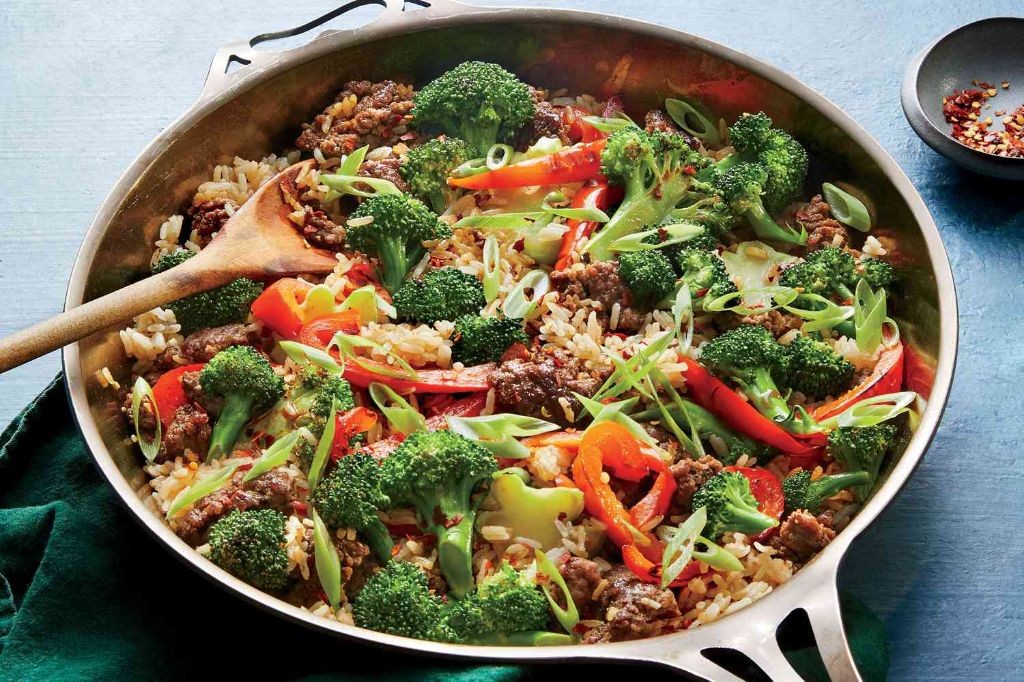
Zipping through the kitchen on a quiet evening, I find myself craving something warm and familiar, a dish that feels like a comforting embrace after a long day. This speedy beef and broccoli stir-fry is my go-to, a simple yet deeply satisfying meal that comes together in moments, filling the air with savory aromas and the promise of a cozy dinner.
Serving: 4 | Pre Time: 15 minutes | Cooking Time: 10 minutes
Ingredients
- 1 pound thinly sliced flank steak, cut into tender strips
- 3 cups fresh broccoli florets, crisp and vibrant green
- 2 tablespoons rich toasted sesame oil
- 3 cloves garlic, finely minced for aromatic depth
- 1 tablespoon freshly grated ginger, with its zesty kick
- 1/2 cup savory low-sodium soy sauce
- 2 tablespoons sweet honey, for a delicate balance
- 1 tablespoon smooth cornstarch
- 1/4 cup cool water
- 2 cups fluffy cooked white rice, steamed to perfection
- 1 tablespoon fragrant sesame seeds, for a nutty finish
Instructions
- In a small bowl, whisk together the low-sodium soy sauce, honey, cornstarch, and cool water until smooth to create the sauce, setting it aside for later use.
- Heat a large skillet or wok over medium-high heat and add the toasted sesame oil, allowing it to shimmer for about 30 seconds until fragrant.
- Add the thinly sliced flank steak to the hot oil, spreading it in a single layer, and cook for 2-3 minutes until browned on all sides, then remove it from the skillet and set it aside on a plate. Tip: Avoid overcrowding the pan to ensure the beef sears properly instead of steaming.
- In the same skillet, add the minced garlic and grated ginger, stirring constantly for 30 seconds until aromatic and lightly golden to release their flavors.
- Add the fresh broccoli florets to the skillet, tossing them with the garlic and ginger, and cook for 3-4 minutes until they turn bright green and are tender-crisp, stirring occasionally.
- Return the cooked beef to the skillet with the broccoli, pouring the prepared sauce over the mixture.
- Bring the sauce to a gentle simmer, stirring continuously for 1-2 minutes until it thickens and coats the beef and broccoli evenly. Tip: If the sauce thickens too quickly, add a splash of water to adjust the consistency.
- Remove the skillet from the heat and sprinkle the fragrant sesame seeds over the stir-fry, giving it a final gentle toss to incorporate.
- Serve the beef and broccoli stir-fry immediately over the fluffy cooked white rice. Tip: For an extra burst of freshness, garnish with sliced green onions or a squeeze of lime juice just before serving.
Finally, as you take that first bite, notice how the tender beef melts in your mouth, complemented by the crisp-tender broccoli and the glossy, savory-sweet sauce that clings to every grain of rice. This dish offers a delightful contrast in textures, with the nutty sesame seeds adding a subtle crunch, making it perfect for a quick weeknight dinner or even served over noodles for a creative twist.
15-Minute Creamy Tomato Basil Soup

Wandering through the kitchen on this quiet morning, I found myself craving something simple yet deeply comforting—a warm bowl of soup that whispers of home. With just a few pantry staples and a handful of fresh herbs, this creamy tomato basil soup comes together in moments, offering a gentle embrace on even the busiest of days. It’s the kind of recipe that feels less like cooking and more like a quiet, nourishing ritual.
Serving: 4 | Pre Time: 5 minutes | Cooking Time: 10 minutes
Ingredients
– 2 tablespoons rich extra virgin olive oil
– 1 medium yellow onion, finely diced
– 2 cloves fresh garlic, minced
– 1 (28-ounce) can of high-quality crushed tomatoes
– 1 cup low-sodium vegetable broth
– ½ cup heavy cream
– ¼ cup freshly grated Parmesan cheese
– ½ cup packed fresh basil leaves, roughly torn
– 1 teaspoon fine sea salt
– ½ teaspoon freshly cracked black pepper
Instructions
1. Heat the rich extra virgin olive oil in a large pot over medium heat until it shimmers lightly, about 1 minute.
2. Add the finely diced yellow onion and cook, stirring occasionally, until it turns translucent and soft, about 4–5 minutes.
3. Stir in the minced fresh garlic and cook for 30 seconds until fragrant, being careful not to let it brown.
4. Pour in the high-quality crushed tomatoes and low-sodium vegetable broth, then bring the mixture to a gentle simmer over medium-high heat.
5. Reduce the heat to low, cover the pot, and let it simmer for 5 minutes to allow the flavors to meld together.
6. Remove the pot from the heat and carefully blend the soup until smooth using an immersion blender, or transfer it to a countertop blender in batches.
7. Return the blended soup to the pot over low heat and stir in the heavy cream, freshly grated Parmesan cheese, and roughly torn fresh basil leaves.
8. Season with fine sea salt and freshly cracked black pepper, then heat for 2–3 minutes until warmed through, stirring gently to avoid curdling the cream.
9. Ladle the soup into bowls and serve immediately.
Finally, this soup settles into a velvety, lush texture with a bright acidity from the tomatoes balanced by the creamy richness. Each spoonful carries the sweet, aromatic notes of basil, making it perfect for dipping crusty bread or topping with a drizzle of olive oil and extra Parmesan for a cozy, elegant touch.
Honey Sriracha Glazed Meatballs with Rice
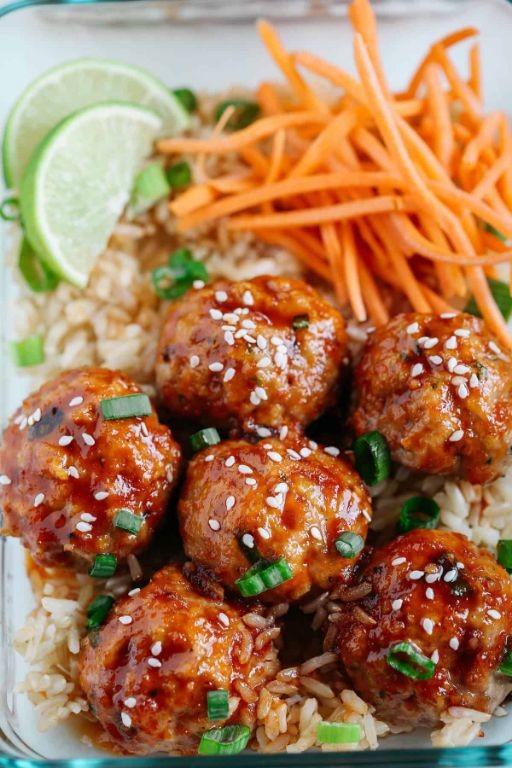
Evenings like this, when the kitchen light casts a soft glow and the world outside feels still, I find myself craving something that warms from the inside out. The gentle sizzle of meatballs in a pan, the sweet and spicy aroma of honey and sriracha mingling in the air—it’s a quiet comfort, a simple pleasure to be savored slowly.
Serving: 4 | Pre Time: 15 minutes | Cooking Time: 25 minutes
Ingredients
- 1 pound of ground beef (preferably 85/15 for juiciness)
- 1 large farm-fresh egg, lightly beaten
- 1/2 cup of fine, dry breadcrumbs
- 2 cloves of garlic, minced until fragrant
- 1 teaspoon of finely ground black pepper
- 1/2 teaspoon of kosher salt
- 1 tablespoon of rich extra virgin olive oil
- 1/3 cup of raw, golden honey
- 1/4 cup of sriracha sauce
- 2 tablespoons of low-sodium soy sauce
- 1 tablespoon of rice vinegar
- 1 cup of long-grain white rice, rinsed until the water runs clear
- 2 cups of filtered water
- 2 tablespoons of chopped fresh cilantro, for garnish
Instructions
- In a large mixing bowl, combine the ground beef, beaten egg, breadcrumbs, minced garlic, black pepper, and kosher salt until just incorporated, being careful not to overmix to keep the meatballs tender.
- Shape the mixture into 20 even meatballs, each about 1 inch in diameter, rolling them gently between your palms.
- Heat the olive oil in a large skillet over medium heat until it shimmers, about 2 minutes.
- Add the meatballs to the skillet in a single layer, leaving space between them to ensure even browning, and cook for 8-10 minutes, turning occasionally, until they are browned on all sides and reach an internal temperature of 160°F on an instant-read thermometer.
- While the meatballs cook, whisk together the honey, sriracha, soy sauce, and rice vinegar in a small bowl until smooth.
- In a medium saucepan, combine the rinsed rice and filtered water, bring to a boil over high heat, then reduce the heat to low, cover, and simmer for 18 minutes without lifting the lid to allow the rice to steam properly.
- Remove the cooked meatballs from the skillet and set them aside on a plate, then pour off any excess grease from the skillet.
- Return the skillet to medium-low heat, pour in the honey-sriracha mixture, and let it simmer for 3-4 minutes, stirring frequently, until it thickens slightly and becomes glossy.
- Tip: To test the glaze, dip a spoon into it—it should coat the back of the spoon without running off too quickly.
- Return the meatballs to the skillet, gently tossing them in the glaze until they are evenly coated and heated through, about 2 minutes.
- Fluff the cooked rice with a fork to separate the grains and divide it among four serving bowls.
- Top the rice with the glazed meatballs, spooning any extra glaze from the skillet over them.
- Garnish with the chopped fresh cilantro just before serving to add a bright, herbal note.
Here, the meatballs are wonderfully tender with a sticky, caramelized glaze that balances sweet honey against the gentle heat of sriracha. Serve them over the fluffy rice, perhaps with a side of crisp cucumber slices to cut through the richness, for a meal that feels both comforting and vibrant.
Cheesy Taco Skillet with Ground Beef

On this quiet December morning, with the world outside hushed by winter, I find myself drawn to the warmth of my kitchen. There’s something deeply comforting about the sizzle of ground beef and the earthy aroma of spices filling the air, a simple pleasure that feels like a gentle embrace on a cold day.
Serving: 4 | Pre Time: 10 minutes | Cooking Time: 25 minutes
Ingredients
– 1 tablespoon of golden extra virgin olive oil
– 1 pound of lean ground beef, freshly browned
– 1 medium yellow onion, finely diced
– 2 cloves of aromatic garlic, minced
– 1 packet of bold taco seasoning
– 1 (15-ounce) can of fire-roasted diced tomatoes, with their juices
– 1 (15-ounce) can of plump black beans, rinsed and drained
– 1 cup of frozen sweet corn kernels
– 1 cup of shredded sharp cheddar cheese, freshly grated
– ½ cup of fresh cilantro leaves, roughly chopped
– 4 large flour tortillas, warmed
– ½ cup of cool sour cream
Instructions
1. Heat 1 tablespoon of golden extra virgin olive oil in a large cast-iron skillet over medium-high heat until it shimmers, about 1 minute.
2. Add 1 pound of lean ground beef to the skillet, breaking it apart with a wooden spoon into small crumbles as it cooks for 5–7 minutes until no pink remains.
3. Stir in 1 finely diced medium yellow onion and 2 minced cloves of aromatic garlic, cooking for 3–4 minutes until the onion turns translucent and fragrant.
4. Sprinkle 1 packet of bold taco seasoning over the mixture, stirring constantly for 1 minute to toast the spices and deepen their flavor—this step unlocks their full aroma.
5. Pour in 1 can of fire-roasted diced tomatoes with their juices, 1 can of rinsed and drained plump black beans, and 1 cup of frozen sweet corn kernels, stirring gently to combine.
6. Reduce the heat to medium-low, cover the skillet with a lid, and let it simmer for 10–12 minutes until the liquid thickens slightly and the flavors meld together.
7. Uncover the skillet and evenly sprinkle 1 cup of shredded sharp cheddar cheese over the top, then cover again for 2–3 minutes until the cheese melts into a gooey, golden layer.
8. Remove the skillet from the heat and garnish with ½ cup of roughly chopped fresh cilantro leaves for a bright, herbal finish.
9. Warm 4 large flour tortillas in a dry skillet over low heat for 30 seconds per side until pliable and lightly toasted—this prevents them from tearing when served.
10. Serve the cheesy taco skillet directly from the pan, accompanied by the warmed tortillas and ½ cup of cool sour cream on the side for dipping or drizzling.
During your first bite, you’ll notice the creamy cheese melding with the hearty beef and beans, while the fire-roasted tomatoes add a subtle smokiness that lingers. For a creative twist, try scooping it onto crispy tortilla chips or layering it in a burrito bowl with avocado slices—it’s a versatile dish that invites playful experimentation.
Slow Cooker BBQ Pulled Chicken Sandwiches

Remembering how the slow cooker hummed all afternoon, filling the kitchen with the promise of something deeply comforting, feels like a small, quiet gift on a busy day. There’s a particular ease to letting ingredients mingle and transform over gentle heat, a process that asks for little more than patience and yields a reward so tender and flavorful. It’s the kind of meal that feels like a warm embrace, perfect for gathering around or savoring in peaceful solitude.
Serving: 6 | Pre Time: 15 minutes | Cooking Time: 4 hours
Ingredients
– 2 pounds boneless, skinless chicken breasts
– 1 cup smoky, tangy barbecue sauce
– 1/2 cup rich, low-sodium chicken broth
– 1/4 cup pure, golden honey
– 2 tablespoons robust apple cider vinegar
– 1 tablespoon warm, sweet smoked paprika
– 2 teaspoons finely ground garlic powder
– 1 teaspoon coarse, flaky sea salt
– 1/2 teaspoon freshly cracked black pepper
– 6 soft, pillowy brioche buns
– 1 cup crisp, finely shredded green cabbage for slaw (optional)
Instructions
1. Place 2 pounds of boneless, skinless chicken breasts in the bottom of a 6-quart slow cooker.
2. In a medium mixing bowl, whisk together 1 cup of smoky, tangy barbecue sauce, 1/2 cup of rich, low-sodium chicken broth, 1/4 cup of pure, golden honey, 2 tablespoons of robust apple cider vinegar, 1 tablespoon of warm, sweet smoked paprika, 2 teaspoons of finely ground garlic powder, 1 teaspoon of coarse, flaky sea salt, and 1/2 teaspoon of freshly cracked black pepper until fully combined.
3. Pour the sauce mixture evenly over the chicken breasts in the slow cooker, using a spatula to coat them thoroughly.
4. Cover the slow cooker with its lid and set it to cook on LOW heat for 4 hours. Tip: For the most tender shred, avoid lifting the lid during cooking to maintain a consistent temperature.
5. After 4 hours, carefully remove the lid and use two forks to shred the chicken directly in the slow cooker, pulling the meat apart until no large chunks remain. Tip: The chicken should fall apart easily; if it resists, let it cook for an additional 15-30 minutes.
6. Stir the shredded chicken into the remaining sauce in the slow cooker until it is fully coated and saucy.
7. While the chicken rests, lightly toast 6 soft, pillowy brioche buns in a dry skillet over medium heat for 1-2 minutes per side, just until golden and warm. Tip: Toasting the buns adds a pleasant crunch that contrasts beautifully with the tender chicken.
8. Spoon a generous portion of the saucy pulled chicken onto the bottom half of each toasted bun.
9. If using, top the chicken with 1 cup of crisp, finely shredded green cabbage for a fresh, crunchy slaw.
10. Place the top half of each bun over the filling to complete the sandwiches.
Each bite offers a wonderful contrast of textures, from the impossibly tender, saucy chicken that melts on the tongue to the slight resistance of a toasted bun. The flavor is a harmonious blend of smoky sweetness from the paprika and barbecue sauce, balanced by the gentle tang of vinegar. For a creative twist, try serving the pulled chicken over a baked sweet potato or tucked into warm corn tortillas with a sprinkle of fresh cilantro.
Baked Teriyaki Chicken Thighs with Pineapple

Zigzagging through my kitchen this morning, I found myself drawn to the sweet-salty aroma of teriyaki, a comforting memory from childhood potlucks. The thought of baking chicken thighs with pineapple felt like wrapping myself in a warm blanket of flavors, a simple pleasure on this quiet winter day. It’s a dish that whispers of shared meals and cozy evenings, where each bite tells a story of home.
Serving: 4 | Pre Time: 15 minutes | Cooking Time: 45 minutes
Ingredients
– 2 pounds of bone-in, skin-on chicken thighs, patted dry with paper towels
– 1 cup of sweet teriyaki sauce, with a glossy, sticky consistency
– 1 fresh pineapple, cored and cut into 1-inch chunks, bursting with tropical juiciness
– 2 tablespoons of toasted sesame oil, with a nutty, aromatic fragrance
– 1 tablespoon of minced fresh ginger, offering a warm, zesty kick
– 2 cloves of minced garlic, releasing a pungent, savory scent
– 1 tablespoon of honey, for a smooth, golden sweetness
– 1 teaspoon of finely ground black pepper, adding a subtle, earthy heat
– 2 green onions, thinly sliced for a crisp, fresh garnish
Instructions
1. Preheat your oven to 375°F (190°C) to ensure even baking from the start.
2. In a medium bowl, whisk together the sweet teriyaki sauce, toasted sesame oil, minced fresh ginger, minced garlic, honey, and finely ground black pepper until fully combined.
3. Place the bone-in, skin-on chicken thighs in a large baking dish, arranging them in a single layer without overlapping.
4. Pour half of the teriyaki mixture over the chicken thighs, using a brush to coat each piece evenly, including under the skin for maximum flavor penetration.
5. Scatter the fresh pineapple chunks around the chicken in the baking dish, ensuring they are nestled among the thighs.
6. Drizzle the remaining teriyaki mixture over the pineapple and chicken, then cover the dish tightly with aluminum foil.
7. Bake in the preheated oven for 30 minutes, allowing the chicken to cook through and absorb the sauce without drying out.
8. Remove the foil and increase the oven temperature to 400°F (205°C), then bake for an additional 15 minutes until the chicken skin is crispy and golden brown, and the pineapple is caramelized at the edges.
9. Check the chicken’s doneness by inserting a meat thermometer into the thickest part of a thigh; it should read 165°F (74°C).
10. Let the dish rest for 5 minutes after removing it from the oven to allow the juices to redistribute, keeping the meat tender and moist.
11. Garnish with thinly sliced green onions just before serving to add a pop of color and freshness.
12. Enjoy the baked teriyaki chicken thighs with pineapple while warm, perhaps over a bed of fluffy jasmine rice to soak up the savory-sweet sauce.
Each bite offers a delightful contrast: the chicken thighs emerge juicy and tender, infused with the deep, umami-rich teriyaki glaze, while the pineapple chunks caramelize into soft, sweet bursts that balance the savory notes. For a creative twist, serve it alongside a crisp cucumber salad or spoon the leftover sauce over steamed vegetables, letting the flavors mingle in new, unexpected ways.
One-Pan Sausage and Peppers
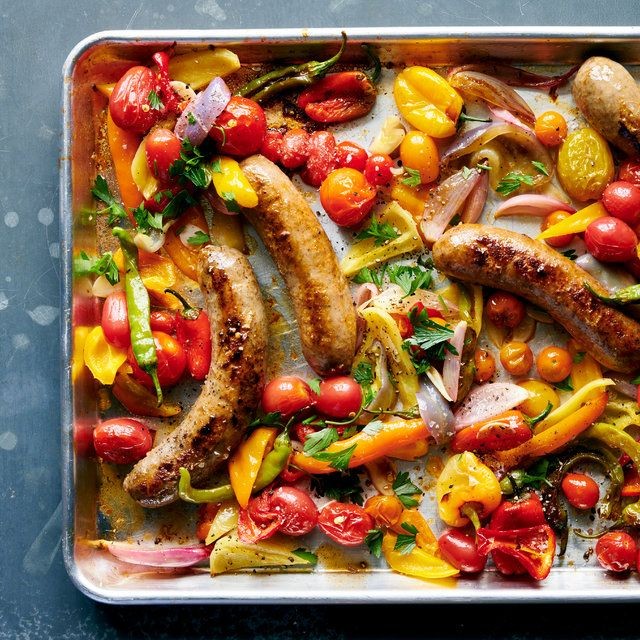
Here in the quiet kitchen, with winter light filtering through the window, there’s a simple comfort in gathering a few humble ingredients into one pan. This dish transforms sweet peppers and savory sausage into a warm, fragrant meal with minimal fuss, perfect for a reflective evening when you crave nourishment without complication.
Serving: 4 | Pre Time: 15 minutes | Cooking Time: 25 minutes
Ingredients
– 1 tablespoon rich extra virgin olive oil
– 1 pound sweet Italian sausage links
– 1 large yellow onion, thinly sliced into half-moons
– 3 bell peppers (a mix of red, yellow, and orange), cored and sliced into ½-inch strips
– 3 cloves garlic, minced into a fine paste
– 1 teaspoon dried oregano, fragrant and crumbled between your fingers
– ½ teaspoon crushed red pepper flakes (optional, for a gentle heat)
– ½ cup low-sodium chicken broth
– 1 (14.5-ounce) can fire-roasted diced tomatoes, with their juices
– Kosher salt and freshly cracked black pepper, to season layers
– 2 tablespoons chopped fresh parsley, for a bright finish
Instructions
1. Heat 1 tablespoon of rich extra virgin olive oil in a large, heavy-bottomed skillet or Dutch oven over medium-high heat until it shimmers, about 1 minute.
2. Add 1 pound of sweet Italian sausage links to the hot oil and cook, turning occasionally with tongs, until browned on all sides, about 6-8 minutes total. Transfer the sausages to a clean plate and set aside. Tip: Don’t overcrowd the pan—this ensures proper browning and prevents steaming.
3. In the same skillet, add the thinly sliced yellow onion and cook, stirring occasionally with a wooden spoon, until softened and beginning to turn translucent, about 4 minutes.
4. Add the sliced bell peppers to the skillet and cook, stirring occasionally, until they start to soften and develop slight char marks, about 6-8 minutes.
5. Stir in the minced garlic, crumbled dried oregano, and optional crushed red pepper flakes, cooking just until fragrant, about 30 seconds. Tip: Adding garlic last prevents it from burning and turning bitter.
6. Pour in ½ cup of low-sodium chicken broth and use your spoon to scrape up any browned bits stuck to the bottom of the pan—this deglazing step builds deep flavor.
7. Add the can of fire-roasted diced tomatoes with their juices and stir to combine all ingredients in the skillet.
8. Nestle the browned sausage links back into the skillet, submerging them partially in the vegetable and tomato mixture.
9. Bring the mixture to a gentle simmer, then reduce the heat to low. Cover the skillet with a tight-fitting lid and let it cook undisturbed for 15 minutes, or until the sausages are cooked through and reach an internal temperature of 160°F. Tip: A meat thermometer guarantees perfectly cooked sausage every time.
10. Uncover the skillet and season the entire dish with kosher salt and freshly cracked black pepper, tasting and adjusting as needed.
11. Remove the skillet from the heat and sprinkle with 2 tablespoons of chopped fresh parsley just before serving.
Let this one-pan wonder rest for a few minutes off the heat, allowing the juices to settle. The sausages emerge tender and juicy, while the peppers soften into a sweet, silky tangle infused with garlic and oregano. Serve it straight from the skillet over a bed of creamy polenta or tucked into a crusty roll for a hearty sandwich, letting the vibrant colors and comforting aromas fill your kitchen with warmth.
Easy Shrimp Scampi with Linguine
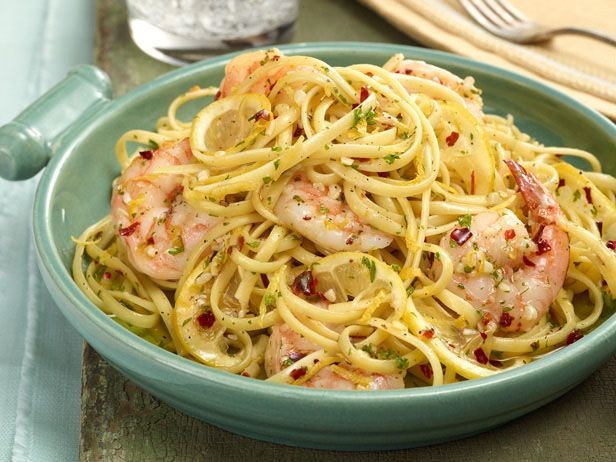
Cradling a warm bowl of pasta on a quiet evening feels like a gentle embrace, especially when it’s this simple yet elegant shrimp scampi. The aroma of garlic and lemon fills the kitchen, a comforting promise of a meal that comes together with minimal fuss but delivers maximum flavor, perfect for a reflective night in after a long day.
Serving: 4 | Pre Time: 15 minutes | Cooking Time: 15 minutes
Ingredients
– 1 pound large raw shrimp, peeled and deveined
– 12 ounces dried linguine pasta
– 4 tablespoons unsalted butter, cut into cubes
– 4 cloves garlic, minced to a fine paste
– 1/2 cup dry white wine, such as a crisp Pinot Grigio
– 1/4 cup freshly squeezed lemon juice, from about 2 juicy lemons
– 1/4 cup finely chopped fresh parsley, with vibrant green leaves
– 1/4 teaspoon crushed red pepper flakes, for a subtle warmth
– Salt and freshly ground black pepper, to season
– 2 tablespoons extra virgin olive oil, with a fruity aroma
Instructions
1. Bring a large pot of salted water to a rolling boil over high heat.
2. Add the dried linguine pasta to the boiling water and cook for 9-11 minutes, until al dente, stirring occasionally to prevent sticking.
3. While the pasta cooks, pat the large raw shrimp dry with paper towels to ensure a good sear.
4. Heat the extra virgin olive oil in a large skillet over medium-high heat until it shimmers, about 1 minute.
5. Add the shrimp to the skillet in a single layer and cook for 2-3 minutes per side, until they turn pink and opaque, then transfer to a plate.
6. Reduce the heat to medium-low and add the unsalted butter cubes to the same skillet, letting them melt completely.
7. Stir in the minced garlic and cook for 30-45 seconds, until fragrant but not browned, to avoid bitterness.
8. Pour in the dry white wine and simmer for 2-3 minutes, until reduced by half, scraping up any browned bits from the bottom of the skillet for added flavor.
9. Add the freshly squeezed lemon juice and crushed red pepper flakes, stirring to combine.
10. Drain the cooked linguine, reserving 1/2 cup of the pasta water, and add the pasta directly to the skillet with the sauce.
11. Toss the pasta with the sauce over low heat for 1-2 minutes, adding splashes of the reserved pasta water as needed to create a silky, cohesive coating.
12. Return the cooked shrimp to the skillet and gently toss to warm through, about 1 minute.
13. Remove from heat and stir in the finely chopped fresh parsley, then season with salt and freshly ground black pepper to taste.
14. Serve immediately in warm bowls, garnished with extra parsley if desired.
A buttery, garlicky sauce clings to each strand of linguine, while the shrimp remain tender and juicy, offering a delightful contrast in textures. The bright acidity from the lemon cuts through the richness, making every bite feel light yet satisfying—try serving it with a side of crusty bread to soak up every last drop of sauce, or top it with a sprinkle of grated Parmesan for an extra layer of umami.
15-Minute Veggie Fried Rice
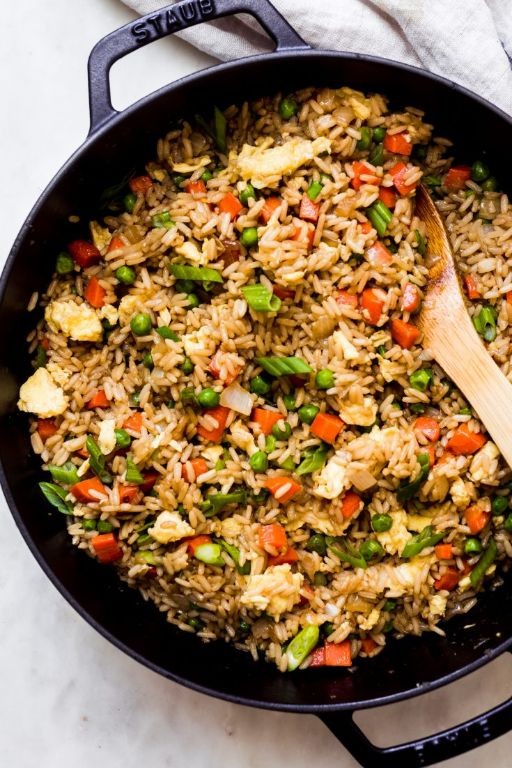
Under the soft glow of the kitchen light, with the quiet hum of the refrigerator in the background, I find myself reaching for the familiar comfort of a simple, nourishing meal. It’s a moment for gentle stirring and quiet reflection, a chance to transform humble ingredients into something warm and complete. This veggie fried rice is that quiet promise, ready in mere minutes yet deeply satisfying.
Serving: 4 | Pre Time: 5 minutes | Cooking Time: 10 minutes
Ingredients
– 3 tablespoons of rich toasted sesame oil
– 2 large farm-fresh eggs, lightly beaten
– 1 cup of finely diced sweet yellow onion
– 1 cup of petite frozen peas and carrots, thawed
– 3 cups of cold, day-old jasmine rice, grains separated
– 3 tablespoons of low-sodium soy sauce
– 1 teaspoon of finely ground black pepper
– 2 thinly sliced green onions, for garnish
Instructions
1. Heat a large skillet or wok over medium-high heat until a drop of water sizzles and evaporates upon contact.
2. Pour 1 tablespoon of the rich toasted sesame oil into the hot skillet, swirling to coat the surface evenly.
3. Add the 2 lightly beaten farm-fresh eggs to the skillet, letting them set for 15 seconds without stirring.
4. Gently scramble the eggs with a spatula for about 45 seconds, until they are just set but still soft, then transfer them to a clean plate. (Tip: Slightly undercooking the eggs here ensures they stay tender when added back later.)
5. Add the remaining 2 tablespoons of rich toasted sesame oil to the same skillet.
6. Sauté the 1 cup of finely diced sweet yellow onion for 2 minutes, stirring frequently, until it becomes translucent and fragrant.
7. Add the 1 cup of thawed petite frozen peas and carrots to the skillet, cooking for an additional 2 minutes until the vegetables are heated through and bright in color.
8. Increase the heat to high and add the 3 cups of cold, day-old jasmine rice to the skillet, breaking up any clumps with your spatula.
9. Stir-fry the rice and vegetable mixture for 3 minutes, allowing the rice to develop a slight crispness on the edges. (Tip: Using cold, leftover rice prevents it from becoming mushy and helps achieve the perfect fried rice texture.)
10. Push the rice mixture to one side of the skillet and return the scrambled eggs to the empty space, breaking them into small pieces with your spatula.
11. Combine everything in the skillet, stirring gently to distribute the eggs evenly throughout the rice.
12. Drizzle the 3 tablespoons of low-sodium soy sauce evenly over the rice mixture.
13. Sprinkle the 1 teaspoon of finely ground black pepper over everything.
14. Stir-fry the entire mixture for 1 final minute, ensuring the soy sauce and pepper are fully incorporated and the rice is piping hot. (Tip: Adding the soy sauce at the end, rather than earlier, gives the dish a brighter, more distinct flavor.)
15. Remove the skillet from the heat and transfer the fried rice to a serving dish.
16. Garnish the finished dish with the 2 thinly sliced green onions.
Perhaps what I love most is the gentle contrast in each bite—the soft, fluffy grains of rice against the slight pop of the peas and the tender crunch of the carrots. The toasted sesame oil lends a deep, nutty warmth that wraps around the savory soy sauce, creating a simple harmony. For a quiet twist, try serving it in a warmed bowl topped with a soft-poached egg, letting the yolk mingle with the rice for an extra layer of comfort.
Instant Pot Beef Stroganoff
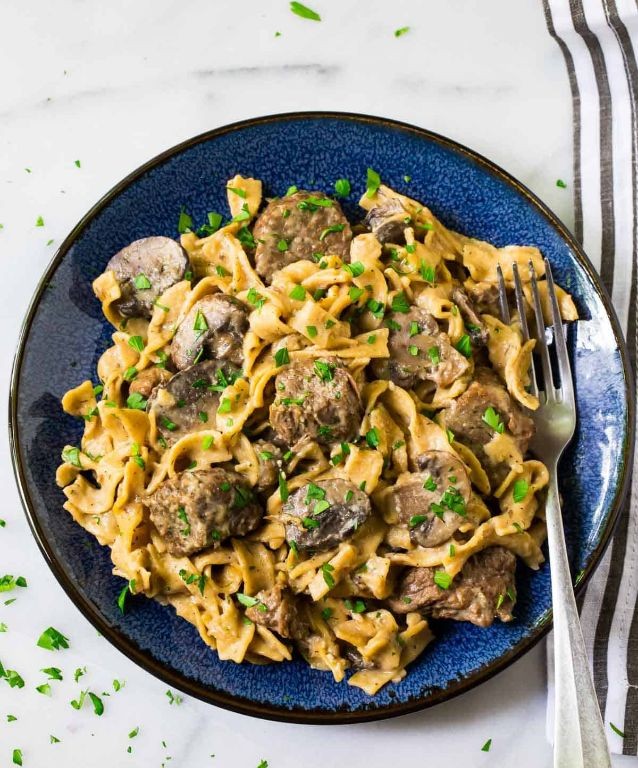
Just now, as the morning light filters through my kitchen window, I find myself drawn to the comforting ritual of preparing a meal that feels like a warm embrace. This Instant Pot Beef Stroganoff is one of those dishes that transforms simple ingredients into something deeply nourishing, perfect for a quiet moment or a gathering of loved ones.
Serving: 6 | Pre Time: 15 minutes | Cooking Time: 35 minutes
Ingredients
– 2 pounds of well-marbled beef chuck roast, cut into 1-inch cubes
– 1 tablespoon of rich extra virgin olive oil
– 1 large yellow onion, finely diced
– 8 ounces of earthy cremini mushrooms, sliced
– 3 cloves of aromatic garlic, minced
– 1 cup of robust beef broth
– 1 tablespoon of tangy Worcestershire sauce
– 1 teaspoon of finely ground black pepper
– 1 teaspoon of fragrant dried thyme
– 1 cup of velvety sour cream
– 2 tablespoons of all-purpose flour
– 12 ounces of wide egg noodles
– Fresh parsley, chopped for garnish
Instructions
1. Set your Instant Pot to the “Sauté” function and heat 1 tablespoon of rich extra virgin olive oil until it shimmers, about 2 minutes.
2. Add 2 pounds of well-marbled beef chuck roast cubes in a single layer, searing until browned on all sides, approximately 5-7 minutes, to develop deep flavor.
3. Stir in 1 large finely diced yellow onion, 8 ounces of sliced earthy cremini mushrooms, and 3 cloves of minced aromatic garlic, cooking until softened, about 4 minutes.
4. Pour in 1 cup of robust beef broth and 1 tablespoon of tangy Worcestershire sauce, scraping the bottom to release any browned bits for a richer sauce.
5. Season with 1 teaspoon of finely ground black pepper and 1 teaspoon of fragrant dried thyme, then secure the lid and set to “Manual” high pressure for 15 minutes.
6. Once cooking is complete, allow a natural pressure release for 10 minutes, then carefully quick-release any remaining pressure.
7. In a small bowl, whisk together 1 cup of velvety sour cream and 2 tablespoons of all-purpose flour until smooth to prevent lumps in the sauce.
8. Stir the sour cream mixture into the Instant Pot until fully incorporated and the sauce thickens, about 2 minutes.
9. Meanwhile, cook 12 ounces of wide egg noodles according to package directions until al dente, then drain and add to the stroganoff, tossing gently to coat.
10. Garnish with fresh chopped parsley before serving.
Luxuriously creamy and tender, this stroganoff melts in your mouth with each savory bite, the mushrooms adding an earthy depth that balances the rich beef. For a cozy twist, serve it over buttery mashed potatoes or alongside a crisp green salad to brighten the meal.
Lemon Garlic Butter Shrimp and Asparagus
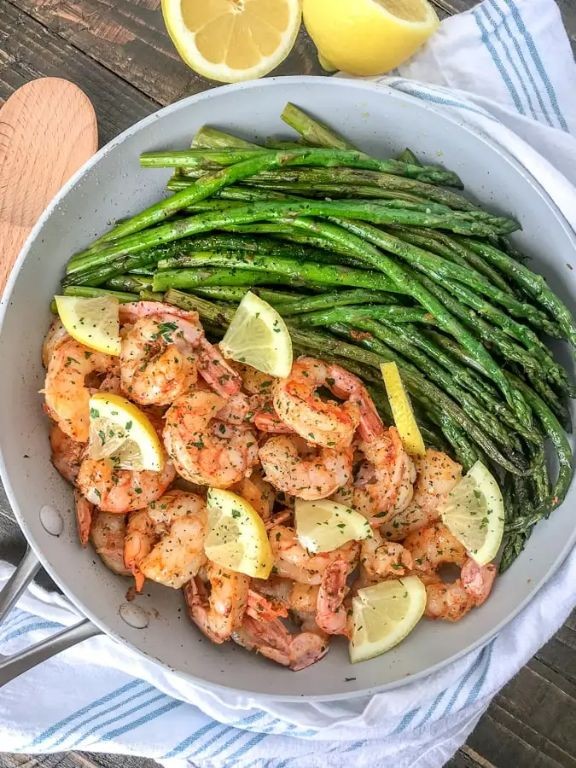
Holding this warm bowl in my hands on a quiet winter afternoon, I find comfort in the simple ritual of cooking—the sizzle of butter, the bright scent of lemon, the tender snap of asparagus. This dish feels like a gentle pause, a moment to savor what’s fresh and fleeting, as the light fades softly outside.
Serving: 4 | Pre Time: 10 minutes | Cooking Time: 15 minutes
Ingredients
– 1 pound large raw shrimp, peeled and deveined
– 1 bunch fresh asparagus, trimmed and cut into 2-inch pieces
– 4 tablespoons unsalted butter, divided
– 3 cloves garlic, minced
– 1 lemon, juiced and zested
– 2 tablespoons rich extra virgin olive oil
– ¼ cup dry white wine
– ¼ teaspoon finely ground black pepper
– ¼ teaspoon sea salt flakes
– 2 tablespoons chopped fresh parsley
Instructions
1. Pat the shrimp dry with paper towels to ensure a crisp sear.
2. Heat 2 tablespoons of butter and the olive oil in a large skillet over medium-high heat until shimmering, about 2 minutes.
3. Add the shrimp in a single layer and cook for 2 minutes per side until pink and opaque, then transfer to a plate.
4. Reduce heat to medium and add the remaining 2 tablespoons of butter to the skillet.
5. Sauté the minced garlic for 30 seconds until fragrant but not browned.
6. Add the asparagus pieces and cook for 4–5 minutes, stirring occasionally, until bright green and tender-crisp.
7. Pour in the white wine to deglaze the pan, scraping up any browned bits with a wooden spoon for added flavor.
8. Stir in the lemon juice, zest, pepper, and salt, then simmer for 2 minutes to let the sauce reduce slightly.
9. Return the shrimp to the skillet and toss gently to coat in the sauce, heating through for 1 minute.
10. Remove from heat and sprinkle with fresh parsley.
Delicate yet vibrant, the shrimp are plump and succulent against the crisp-tender asparagus, all enveloped in a silky, lemon-kissed butter sauce. Serve it over a bed of fluffy quinoa or with crusty bread to soak up every last drop, letting the flavors mingle in quiet satisfaction.
30-Minute Chicken and Dumplings

Lately, I’ve been craving the kind of comfort that only a warm, hearty bowl can provide—a simple, soulful dish that feels like a quiet exhale at the end of a long day. This version of chicken and dumplings comes together in just half an hour, transforming humble ingredients into a cozy, satisfying meal that simmers with gentle, savory notes. It’s the perfect remedy for a chilly evening when you need warmth from the inside out.
Serving: 4 | Pre Time: 10 minutes | Cooking Time: 20 minutes
Ingredients
– 1 tablespoon of golden, unsalted butter
– 1 pound of boneless, skinless chicken breasts, cut into 1-inch cubes
– 1 medium yellow onion, finely diced
– 2 large carrots, peeled and sliced into ¼-inch rounds
– 2 stalks of celery, thinly sliced
– 3 cloves of garlic, minced
– 4 cups of rich, low-sodium chicken broth
– 1 teaspoon of dried thyme leaves
– ½ teaspoon of finely ground black pepper
– 1 cup of all-purpose flour
– 2 teaspoons of baking powder
– ½ teaspoon of fine sea salt
– ½ cup of whole milk
– 2 tablespoons of fresh parsley, finely chopped
Instructions
1. In a large Dutch oven or heavy-bottomed pot, melt the golden, unsalted butter over medium heat until it foams slightly.
2. Add the cubed chicken breasts and cook for 5–7 minutes, stirring occasionally, until the pieces are lightly browned on all sides and no longer pink in the center.
3. Tip: Resist the urge to overcrowd the pot to ensure the chicken develops a nice sear instead of steaming.
4. Transfer the cooked chicken to a clean plate and set it aside.
5. In the same pot, add the finely diced yellow onion, sliced carrots, and thinly sliced celery, cooking for 4–5 minutes until the vegetables soften and the onion turns translucent.
6. Stir in the minced garlic and cook for 1 minute more, just until fragrant.
7. Pour in the rich, low-sodium chicken broth, then add the dried thyme leaves and finely ground black pepper, bringing the mixture to a gentle boil over medium-high heat.
8. Reduce the heat to low, cover the pot, and let it simmer for 10 minutes to allow the flavors to meld.
9. While the broth simmers, prepare the dumpling dough: In a medium mixing bowl, whisk together the all-purpose flour, baking powder, and fine sea salt.
10. Tip: For tender dumplings, avoid overmixing the dough—stir just until the ingredients are combined and no dry flour remains.
11. Gradually pour in the whole milk, stirring gently with a fork until a soft, shaggy dough forms.
12. Return the cooked chicken to the pot with the simmering broth and vegetables.
13. Using a tablespoon, drop rounded scoops of the dumpling dough directly into the hot broth, spacing them evenly apart.
14. Tip: Work quickly to keep the broth hot, which helps the dumplings cook evenly and rise properly.
15. Cover the pot tightly and let it simmer on low heat for 10 minutes without lifting the lid—the dumplings will puff up and become fluffy.
16. After 10 minutes, check that the dumplings are cooked through by inserting a toothpick into the center; it should come out clean.
17. Remove the pot from the heat and gently stir in the finely chopped fresh parsley.
18. Serve immediately while hot, ladling the stew into deep bowls to capture all the savory broth and tender dumplings.
Velvety and rich, this dish cradles soft, pillowy dumplings in a savory broth that’s deepened by the sweetness of carrots and the earthy hint of thyme. Each spoonful offers a comforting blend of textures, from the tender chicken to the fluffy dumplings that soak up the flavorful liquid. For a creative twist, garnish with a sprinkle of crispy fried onions or serve alongside a simple green salad to balance the heartiness.
Spaghetti Aglio e Olio with Spinach
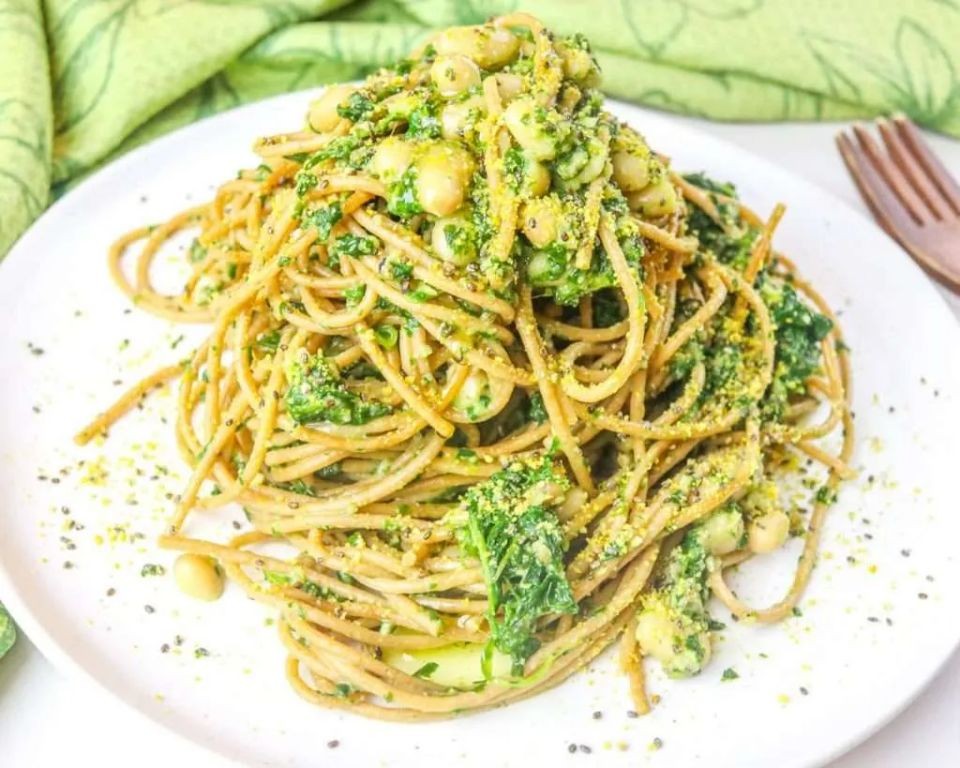
Under the soft glow of the kitchen light, there’s a quiet comfort in the simplicity of a few humble ingredients coming together. This dish, with its roots in Italian cucina povera, transforms pantry staples into something deeply satisfying and nourishing. It’s a gentle reminder that the most profound meals often require the least fuss.
Serving: 4 | Pre Time: 10 minutes | Cooking Time: 15 minutes
Ingredients
– 1 pound of dried spaghetti
– 1/2 cup of rich extra virgin olive oil
– 8 large cloves of garlic, thinly sliced
– 1/2 teaspoon of crushed red pepper flakes
– 10 ounces of fresh baby spinach leaves
– 1/2 cup of freshly grated Parmesan cheese
– 1 teaspoon of fine sea salt
– 1/4 teaspoon of finely ground black pepper
– 1/4 cup of chopped fresh Italian parsley
Instructions
1. Bring a large pot of generously salted water to a rolling boil over high heat.
2. Add the dried spaghetti and cook according to package directions for al dente, typically 9-11 minutes, stirring occasionally to prevent sticking.
3. While the pasta cooks, heat the rich extra virgin olive oil in a large skillet over medium-low heat for about 2 minutes until it shimmers.
4. Add the thinly sliced garlic and cook for 3-4 minutes, stirring frequently, until it becomes fragrant and just begins to turn a pale golden color, being careful not to let it burn.
5. Stir in the crushed red pepper flakes and cook for 30 seconds to infuse the oil.
6. Add the fresh baby spinach leaves in batches, wilting each addition for about 1-2 minutes before adding more, until all spinach is incorporated and just wilted.
7. Reserve 1 cup of the starchy pasta cooking water, then drain the cooked spaghetti.
8. Add the drained spaghetti directly to the skillet with the spinach and garlic oil.
9. Toss everything together thoroughly, adding splashes of the reserved pasta water, 2 tablespoons at a time, until a light, glossy sauce coats the strands.
10. Remove the skillet from the heat and stir in the freshly grated Parmesan cheese, fine sea salt, and finely ground black pepper.
11. Finish by tossing in the chopped fresh Italian parsley until evenly distributed.
Let the finished dish rest for a minute, allowing the flavors to meld. The spaghetti will be perfectly al dente, coated in a silky, garlic-infused oil that clings to each strand, with pops of vibrant green spinach and a gentle warmth from the pepper flakes. For a delightful twist, serve it topped with a softly fried egg, letting the golden yolk mingle with the pasta to create an even richer, more luxurious sauce.
Summary
Ultimately, these 18 quick dinners are your secret weapon for stress-free weeknights. I hope you find some new family favorites! Give a recipe a try this week, then drop a comment below to tell me which one you loved. If this roundup saved your evening, please share it on Pinterest to help another busy cook.


