
You know those hectic weeknights when you need something delicious on the table fast? You’re in the right place! We’ve gathered 20 quick, easy, and family-approved recipes that are perfect for busy schedules. From comforting pastas to simple skillet meals, these dishes promise flavor without the fuss. Let’s dive in and make dinner the easiest part of your day!
One-Pot Cheesy Taco Pasta

Beneath the glow of holiday lights, a comforting one-pot wonder emerges—this cheesy taco pasta melds the zesty appeal of taco night with the creamy satisfaction of a pasta bake, all simmered together in a single vessel for minimal cleanup and maximum flavor. Imagine ground beef infused with smoky spices, tender pasta, and a velvety cheese sauce coming together in under 30 minutes, perfect for a festive yet fuss-free December evening. It’s a dish that feels both indulgent and effortless, offering a warm embrace on a chilly winter night.
Serving: 6 | Pre Time: 10 minutes | Cooking Time: 20 minutes
Ingredients
– A pound of ground beef (I like 80/20 for flavor)
– A small yellow onion, diced up
– A couple of cloves of garlic, minced
– A tablespoon of olive oil
– A packet of taco seasoning (about 2 tablespoons)
– A 15-ounce can of diced tomatoes with green chilies, undrained
– 4 cups of beef broth
– 8 ounces of rotini pasta
– A cup of shredded cheddar cheese
– A half cup of shredded Monterey Jack cheese
– A splash of milk (about ¼ cup)
– A handful of fresh cilantro, chopped
– Salt and pepper, just a pinch each
Instructions
1. Heat a tablespoon of olive oil in a large pot or Dutch oven over medium-high heat until it shimmers, about 1 minute.
2. Add the diced onion and cook, stirring occasionally, until softened and translucent, about 3-4 minutes.
3. Stir in the minced garlic and cook for 30 seconds until fragrant, being careful not to let it burn.
4. Add the ground beef to the pot, breaking it up with a spoon, and cook until no pink remains, about 5-7 minutes; tip: drain any excess fat for a lighter dish.
5. Sprinkle the taco seasoning over the beef and stir to coat evenly, cooking for 1 minute to toast the spices.
6. Pour in the undrained can of diced tomatoes with green chilies and the 4 cups of beef broth, stirring to combine.
7. Bring the mixture to a boil over high heat, then reduce to a simmer and let it bubble gently for 2 minutes.
8. Add the 8 ounces of rotini pasta to the pot, ensuring it’s submerged in the liquid.
9. Cover the pot and simmer over medium-low heat for 10-12 minutes, stirring halfway through, until the pasta is al dente; tip: check doneness by tasting a piece—it should be tender but firm.
10. Reduce the heat to low and stir in the cup of cheddar cheese, half cup of Monterey Jack cheese, and splash of milk until the cheeses melt into a smooth sauce, about 2-3 minutes.
11. Season with a pinch of salt and pepper, then remove from heat and let it sit for 2 minutes to thicken slightly; tip: if the sauce seems too thick, add a tablespoon more broth or milk.
12. Garnish with the chopped fresh cilantro before serving.
The finished dish boasts a creamy, clingy cheese sauce that coats each noodle, with the smoky taco spices providing a gentle heat that lingers pleasantly. Serve it straight from the pot for a cozy family meal, or top with extra cilantro and a dollop of sour cream for added freshness—it’s versatile enough to shine as a weeknight dinner or a casual holiday gathering centerpiece.
Sheet Pan Sausage and Veggies

Luminous with roasted caramelization and bursting with savory flavors, this Sheet Pan Sausage and Veggies transforms humble ingredients into a stunning one-pan meal. Perfect for busy weeknights or casual gatherings, it delivers minimal cleanup with maximum satisfaction as the oven works its magic.
Serving: 4 | Pre Time: 15 minutes | Cooking Time: 25 minutes
Ingredients
– A pound of Italian sausage links, either sweet or hot depending on your mood
– A couple of bell peppers, one red and one yellow, sliced into strips
– A large red onion, cut into wedges
– A pound of baby potatoes, halved if they’re on the larger side
– A whole head of broccoli, cut into florets
– A generous glug of olive oil, about 3 tablespoons
– A big pinch of kosher salt and a few cracks of black pepper
– A teaspoon of dried Italian seasoning
– A couple of cloves of garlic, minced
– A splash of balsamic vinegar for a touch of brightness
Instructions
1. Preheat your oven to 425°F and line a large, rimmed baking sheet with parchment paper for easy cleanup.
2. Place the halved baby potatoes in a large mixing bowl, drizzle with 1 tablespoon of olive oil, and toss to coat evenly.
3. Spread the potatoes in a single layer on one half of the prepared baking sheet and roast for 10 minutes to give them a head start.
4. While the potatoes roast, add the sliced bell peppers, onion wedges, and broccoli florets to the same mixing bowl.
5. Drizzle the vegetables with the remaining 2 tablespoons of olive oil and sprinkle with the kosher salt, black pepper, dried Italian seasoning, and minced garlic, then toss until everything is well coated.
6. Arrange the Italian sausage links on the empty half of the baking sheet next to the potatoes.
7. After the initial 10 minutes, remove the pan from the oven and carefully add the seasoned vegetable mixture around the sausages and potatoes, spreading everything into a single layer without overcrowding.
8. Return the pan to the oven and roast for 15 minutes, then flip the sausages and stir the vegetables to ensure even browning.
9. Continue roasting for another 10-15 minutes, until the sausages are cooked through with an internal temperature of 160°F and the vegetables are tender with crispy, caramelized edges.
10. Remove the pan from the oven and immediately drizzle the entire dish with a splash of balsamic vinegar, tossing gently to combine.
What emerges is a harmonious blend of juicy, well-seasoned sausage and deeply roasted vegetables, where the potatoes turn creamy inside with a crisp exterior and the broccoli develops delightful charred tips. Serve it straight from the pan for a rustic family-style meal, or spoon it over a bed of creamy polenta or quinoa to soak up the flavorful juices.
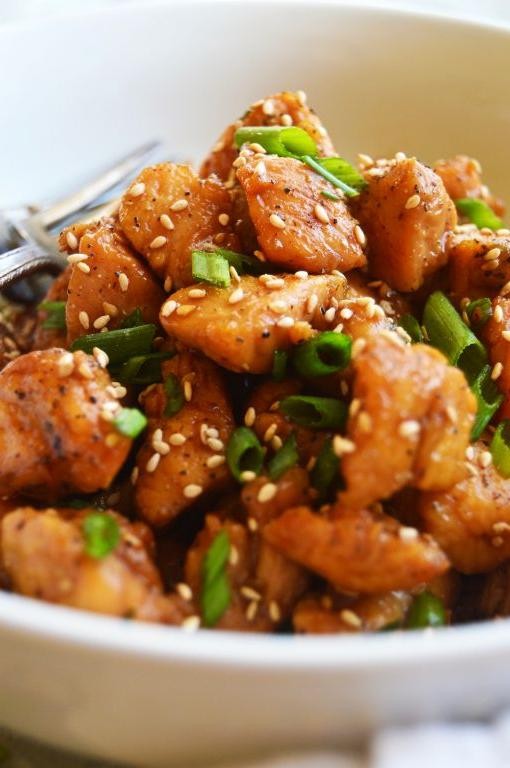
Easy Beef and Broccoli Stir-Fry
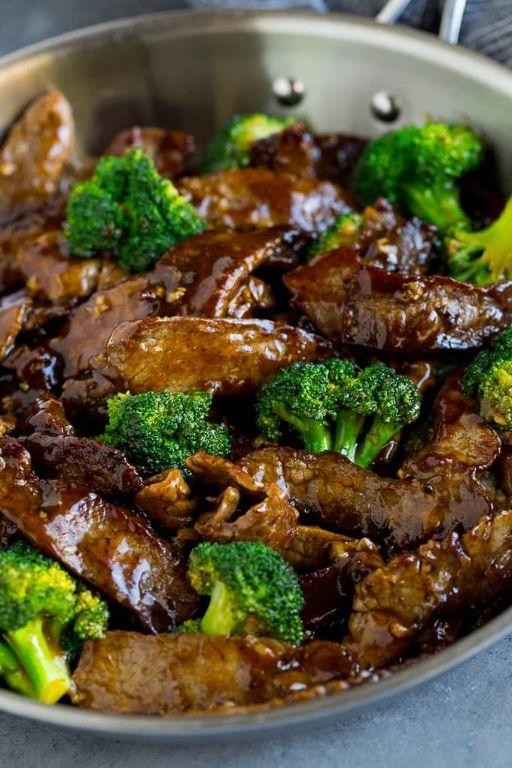
Zestfully balancing tender beef with crisp broccoli florets, this Easy Beef and Broccoli Stir-Fry transforms simple ingredients into a restaurant-worthy meal in under thirty minutes. With a savory-sweet sauce clinging to every bite, it’s the perfect weeknight dinner that feels both nourishing and indulgent. Let’s create a dish that’s as vibrant on the plate as it is on the palate.
Serving: 4 | Pre Time: 15 minutes | Cooking Time: 12 minutes
Ingredients
– 1 pound of flank steak, sliced super thin against the grain
– A big head of broccoli, cut into florets (about 4 cups)
– 3 cloves of garlic, minced
– A thumb of fresh ginger, grated (about 1 tablespoon)
– 1/2 cup of low-sodium soy sauce
– 1/4 cup of honey
– 2 tablespoons of rice vinegar
– 1 tablespoon of sesame oil
– 1 tablespoon of cornstarch
– 1/4 cup of water
– A couple of tablespoons of vegetable oil for cooking
– A sprinkle of sesame seeds for garnish
Instructions
1. In a small bowl, whisk together the soy sauce, honey, rice vinegar, sesame oil, cornstarch, and water until smooth to create the sauce. Tip: Mixing the cornstarch with cold water first prevents lumps in your sauce.
2. Heat 1 tablespoon of vegetable oil in a large skillet or wok over high heat until shimmering, about 1 minute.
3. Add the sliced flank steak in a single layer and cook undisturbed for 2 minutes to develop a sear, then stir-fry for 1 more minute until no longer pink. Transfer the beef to a clean plate.
4. Add the remaining tablespoon of vegetable oil to the skillet, then toss in the broccoli florets. Stir-fry for 4–5 minutes until bright green and crisp-tender. Tip: A splash of water and covering the skillet for 1 minute can help steam the broccoli if you prefer it softer.
5. Push the broccoli to the sides of the skillet, add the minced garlic and grated ginger to the center, and cook for 30 seconds until fragrant.
6. Pour the prepared sauce into the skillet, stirring constantly. Cook for 2–3 minutes until the sauce thickens and coats the back of a spoon.
7. Return the cooked beef to the skillet, tossing everything together until heated through, about 1 minute. Tip: Avoid overcooking the beef at this stage to keep it tender.
8. Remove from heat and garnish with a sprinkle of sesame seeds.
Nestled together, the velvety beef and vibrant broccoli create a delightful contrast in textures, while the glossy sauce delivers a perfect harmony of salty, sweet, and umami notes. For a creative twist, serve it over cauliflower rice or tucked into lettuce cups for a lighter take, letting the rich flavors shine without heaviness.
5-Ingredient BBQ Pulled Pork Sandwiches
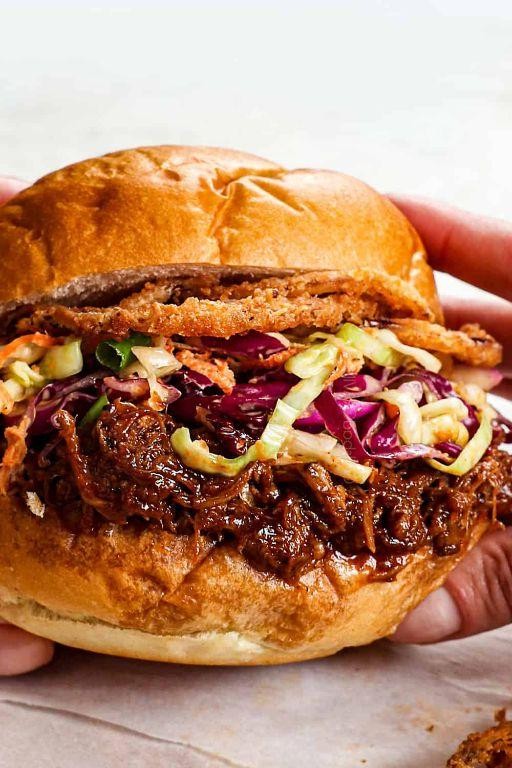
On a crisp winter evening, few dishes satisfy like tender, smoky pulled pork nestled between soft buns. Our 5-ingredient version transforms humble pork shoulder into a masterpiece of flavor with minimal effort, perfect for holiday gatherings or cozy weeknight dinners. This recipe delivers that slow-cooked depth you crave, all while keeping your kitchen time refreshingly simple.
Serving: 6 | Pre Time: 10 minutes | Cooking Time: 8 hours
Ingredients
– A 3-pound boneless pork shoulder roast
– A generous cup of your favorite BBQ sauce
– A couple of tablespoons of brown sugar
– A splash of apple cider vinegar
– A pinch of kosher salt
Instructions
1. Preheat your oven to 300°F (150°C) and place a rack in the middle position.
2. Pat the pork shoulder dry with paper towels, then rub it all over with kosher salt—this helps create a flavorful crust.
3. In a small bowl, whisk together the BBQ sauce, brown sugar, and apple cider vinegar until smooth.
4. Place the pork in a Dutch oven or oven-safe pot, and pour the sauce mixture evenly over the top.
5. Cover the pot tightly with a lid or aluminum foil to trap moisture, and transfer it to the oven.
6. Cook for 6 to 8 hours, until the pork shreds easily with a fork—check at 6 hours by pulling a piece; if it resists, continue cooking.
7. Remove the pot from the oven and let the pork rest, uncovered, for 20 minutes to allow the juices to redistribute.
8. Using two forks, shred the pork directly in the pot, mixing it with the accumulated sauce for extra flavor.
9. Toast your buns lightly in a skillet or oven for about 2 minutes until golden, which adds a nice crunch.
10. Pile the pulled pork onto the buns and serve immediately.
Keep in mind that the pork’s texture should be melt-in-your-mouth tender, with a balanced sweetness from the BBQ sauce and a subtle tang from the vinegar. For a creative twist, top these sandwiches with a crisp coleslaw or pickled onions to cut through the richness, making each bite a delightful contrast of flavors and textures.
One-Pan Lemon Garlic Salmon
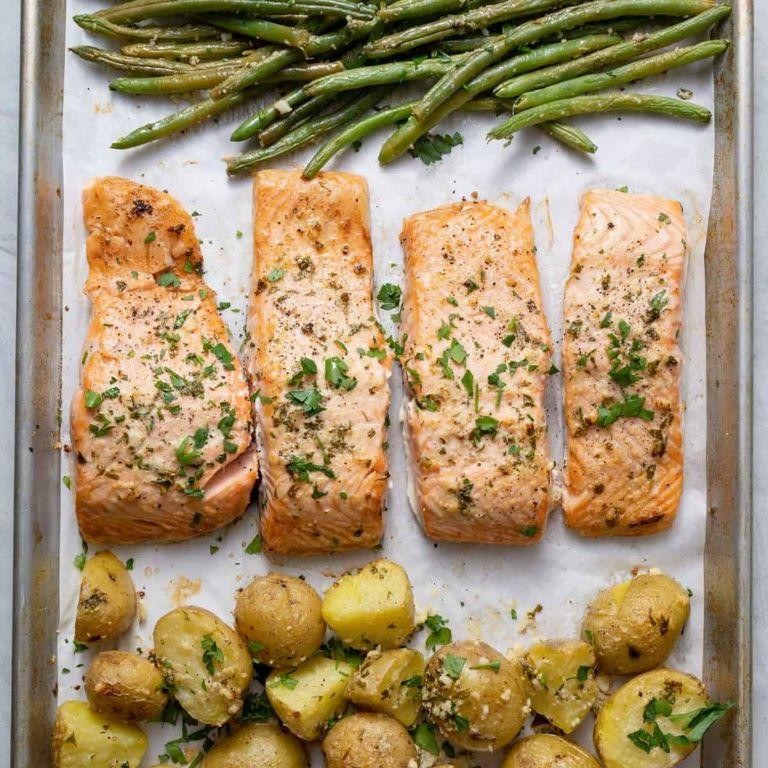
Nestled between the hustle of holiday preparations and the desire for something nourishing, this one-pan lemon garlic salmon emerges as a culinary sanctuary—a dish where vibrant citrus and aromatic garlic meld with rich, flaky fish to create a meal that feels both indulgent and effortlessly wholesome. It’s the kind of recipe that transforms a busy evening into a moment of quiet elegance, all without leaving a mountain of dishes in its wake. Perfect for a festive yet relaxed Christmas Eve dinner, it brings a touch of coastal refinement to your table with minimal fuss.
Serving: 4 | Pre Time: 10 minutes | Cooking Time: 15 minutes
Ingredients
– Four 6-ounce salmon fillets, skin-on or skinless
– A couple of lemons, one sliced thin and one juiced
– Four cloves of garlic, minced
– A quarter cup of olive oil
– A splash of dry white wine (about 1/4 cup)
– A handful of fresh parsley, chopped
– A pinch of salt and a few cracks of black pepper
Instructions
1. Preheat your oven to 400°F and pat the salmon fillets dry with paper towels to ensure a crisp exterior.
2. In a small bowl, whisk together the olive oil, lemon juice, minced garlic, salt, and pepper until well combined.
3. Arrange the salmon fillets in a single layer in a large oven-safe skillet or baking dish.
4. Pour the lemon-garlic mixture evenly over the salmon, coating each fillet thoroughly.
5. Scatter the thin lemon slices around and on top of the salmon for added flavor and presentation.
6. Place the skillet in the preheated oven and bake for 12–15 minutes, until the salmon flakes easily with a fork and reaches an internal temperature of 145°F.
7. Carefully remove the skillet from the oven and pour the white wine over the salmon, letting it sizzle and deglaze the pan for about 30 seconds.
8. Sprinkle the chopped parsley over the top as a fresh garnish.
9. Serve immediately directly from the pan for a rustic, family-style presentation.
Delicately flaky and infused with the bright zing of lemon, this salmon boasts a tender texture that practically melts on the tongue, while the garlic adds a subtle, savory depth. For a creative twist, serve it over a bed of creamy polenta or alongside roasted asparagus to soak up the flavorful pan juices, turning a simple meal into a memorable feast.
Quick and Easy Homemade Pizza

Just when you need a comforting meal that feels both special and effortless, this homemade pizza delivers restaurant-quality results with minimal fuss. Perfect for a cozy weeknight dinner or a festive gathering, its crisp crust, vibrant sauce, and melty cheese come together in under an hour. Let’s transform simple ingredients into a masterpiece that will have everyone reaching for another slice.
Serving: 4 | Pre Time: 20 minutes | Cooking Time: 15 minutes
Ingredients
– A couple of cups of all-purpose flour, plus a little extra for dusting
– A packet of active dry yeast (about 2 1/4 teaspoons)
– A cup of warm water (around 110°F—think bathwater temperature)
– A splash of olive oil, plus more for brushing
– A pinch of sugar and salt
– A can of crushed tomatoes (about 14 ounces)
– A clove of garlic, minced
– A teaspoon of dried oregano
– A couple of cups of shredded mozzarella cheese
– Your favorite toppings, like a handful of pepperoni or sliced bell peppers
Instructions
1. In a large bowl, combine the warm water, yeast, and sugar, letting it sit for 5 minutes until frothy—this ensures your dough rises properly.
2. Stir in 2 cups of flour, salt, and a splash of olive oil until a shaggy dough forms.
3. Turn the dough onto a floured surface and knead for 5 minutes, adding more flour as needed until smooth and elastic.
4. Place the dough in an oiled bowl, cover with a damp towel, and let it rise in a warm spot for 1 hour, or until doubled in size.
5. While the dough rises, make the sauce by simmering crushed tomatoes, minced garlic, and oregano in a saucepan over medium heat for 10 minutes, stirring occasionally until thickened.
6. Preheat your oven to 475°F with a pizza stone or baking sheet inside to get it piping hot for a crispier crust.
7. Punch down the risen dough and roll it out on a floured surface into a 12-inch circle, about 1/4-inch thick.
8. Transfer the dough to a piece of parchment paper, brush the edges with olive oil, and spread the sauce evenly, leaving a 1-inch border.
9. Sprinkle shredded mozzarella cheese over the sauce, then add your chosen toppings in a single layer to prevent sogginess.
10. Slide the pizza (on the parchment) onto the preheated stone or sheet and bake for 12-15 minutes, until the crust is golden and the cheese is bubbly and lightly browned.
11. Let the pizza cool for 5 minutes before slicing to allow the cheese to set slightly.
Such a delight, this pizza boasts a chewy, golden crust that crackles with each bite, balanced by the tangy, herb-infused sauce and gooey, stretchy cheese. Serve it straight from the oven with a sprinkle of fresh basil or a drizzle of chili oil for an extra kick, making it the star of any casual feast.
Cheesy Ground Beef Quesadillas

Tender, golden tortillas cradle a savory filling of seasoned ground beef and melted cheese, creating a comforting dish that’s both indulgent and effortlessly elegant. These cheesy ground beef quesadillas offer a delightful balance of textures and flavors, perfect for a cozy weeknight dinner or a festive gathering with friends. With just a handful of ingredients and straightforward steps, you can whip up a meal that feels special yet approachable.
Serving: 4 | Pre Time: 10 minutes | Cooking Time: 15 minutes
Ingredients
– 1 pound of ground beef (I like 80/20 for a bit of richness)
– A couple of large flour tortillas (about 8-inch size)
– 2 cups of shredded Monterey Jack cheese (or a mix with cheddar for extra flavor)
– 1 small onion, finely chopped
– 2 cloves of garlic, minced
– 1 tablespoon of olive oil
– 1 teaspoon of ground cumin
– 1 teaspoon of chili powder
– A splash of water (about 2 tablespoons)
– Salt, as needed
Instructions
1. Heat the olive oil in a large skillet over medium-high heat until it shimmers, about 1 minute.
2. Add the chopped onion to the skillet and cook, stirring occasionally, until softened and translucent, about 3-4 minutes.
3. Stir in the minced garlic and cook for 30 seconds until fragrant, being careful not to let it burn.
4. Add the ground beef to the skillet, breaking it up with a spatula into small crumbles.
5. Cook the beef until it’s no longer pink, about 5-6 minutes, draining any excess fat if desired for a lighter result.
6. Sprinkle the ground cumin, chili powder, and salt over the beef mixture, stirring to coat evenly.
7. Pour in the splash of water and simmer for 2 minutes to meld the flavors and create a moist filling.
8. Remove the skillet from the heat and let the beef mixture cool slightly for 2-3 minutes to prevent the tortillas from becoming soggy.
9. Place a clean skillet or griddle over medium heat and let it warm up for 1 minute.
10. Lay one flour tortilla flat in the skillet and sprinkle ½ cup of shredded cheese evenly over half of it.
11. Spoon about ⅓ cup of the beef mixture over the cheese, then top with another ½ cup of cheese.
12. Fold the empty half of the tortilla over the filling, pressing down gently with a spatula.
13. Cook the quesadilla for 2-3 minutes per side, until the tortilla is golden brown and crispy and the cheese is fully melted.
14. Transfer the cooked quesadilla to a cutting board and repeat steps 10-13 with the remaining tortillas and filling.
15. Slice each quesadilla into wedges and serve immediately.
Here, the crispy exterior gives way to a gooey, cheesy center with a hint of spice from the seasoned beef. For a creative twist, top with a dollop of sour cream or a sprinkle of fresh cilantro to brighten the rich flavors.
30-Minute Chicken Alfredo

Beneath the holiday hustle, a creamy, comforting classic emerges to save the evening. This 30-Minute Chicken Alfredo transforms pantry staples into a luxurious, silky pasta dish that feels both indulgent and effortless, perfect for a cozy December night when time is precious but flavor is paramount.
Serving: 4 | Pre Time: 10 minutes | Cooking Time: 20 minutes
Ingredients
– A 12-ounce box of fettuccine
– A couple of boneless, skinless chicken breasts (about 1 pound), cut into 1-inch pieces
– A good pinch of kosher salt and freshly ground black pepper
– A tablespoon of olive oil
– 4 cloves of garlic, minced
– A cup of heavy cream
– A half cup of grated Parmesan cheese, plus extra for serving
– A splash of fresh lemon juice (about 1 tablespoon)
– A small handful of fresh parsley, chopped
Instructions
1. Bring a large pot of salted water to a rolling boil over high heat.
2. Add the fettuccine to the boiling water and cook according to package directions until al dente, about 10-12 minutes, then drain, reserving 1 cup of the pasta water.
3. While the pasta cooks, season the chicken pieces evenly on all sides with the salt and pepper.
4. Heat the olive oil in a large skillet over medium-high heat until it shimmers, about 1 minute.
5. Add the chicken pieces in a single layer and cook without moving for 4-5 minutes, until the bottoms are golden brown.
6. Flip the chicken pieces and cook for another 4-5 minutes until cooked through and no longer pink in the center, then transfer to a plate. Tip: Avoid overcrowding the pan to ensure proper browning.
7. Reduce the skillet heat to medium-low and add the minced garlic, sautéing for 30-45 seconds until fragrant but not browned.
8. Pour in the heavy cream, bring to a gentle simmer, and let it cook for 2 minutes, stirring occasionally.
9. Whisk in the grated Parmesan cheese until completely melted and the sauce is smooth, about 1 minute. Tip: Remove the skillet from the heat briefly while whisking to prevent the cheese from clumping.
10. Stir in the cooked chicken, drained pasta, and lemon juice, tossing until everything is well coated in the sauce.
11. If the sauce seems too thick, add the reserved pasta water a few tablespoons at a time until it reaches your desired consistency. Tip: The starchy pasta water helps the sauce cling beautifully to the noodles.
12. Remove from heat and stir in the chopped parsley.
Silky strands of pasta are enveloped in a rich, garlicky cream sauce that clings perfectly, while the tender, golden chicken adds savory depth. For a festive twist, garnish with extra Parmesan and a crack of black pepper, or serve alongside a crisp green salad to cut through the richness.
Easy Breakfast Burritos

Zesty mornings deserve a breakfast that’s both effortless and satisfying, and these easy breakfast burritos deliver just that. With a harmonious blend of fluffy eggs, savory sausage, and melted cheese wrapped in a warm tortilla, they’re a customizable delight perfect for busy weekdays or leisurely weekends. Let’s whip up a batch that’ll make your kitchen smell like a cozy diner.
Serving: 4 | Pre Time: 10 minutes | Cooking Time: 15 minutes
Ingredients
– 4 large flour tortillas (about 10-inch size)
– 8 large eggs
– A splash of whole milk, about 2 tablespoons
– A couple of tablespoons of unsalted butter
– 1 pound of breakfast sausage, casings removed if needed
– 1 cup of shredded cheddar cheese
– A pinch of salt and black pepper
– Optional: a handful of diced bell peppers or onions for extra crunch
Instructions
1. Heat a large non-stick skillet over medium heat and add the breakfast sausage, breaking it into small pieces with a spatula as it cooks for 6–8 minutes until browned and no longer pink. Tip: Drain any excess grease for a lighter texture.
2. In a medium bowl, whisk together the 8 eggs, 2 tablespoons of whole milk, and a pinch of salt and pepper until frothy.
3. Melt 2 tablespoons of unsalted butter in the same skillet over medium-low heat, then pour in the egg mixture. Cook for 3–4 minutes, gently stirring with a spatula until soft curds form and the eggs are just set. Tip: Avoid overcooking to keep the eggs tender.
4. Warm the 4 flour tortillas in a dry skillet over low heat for 30 seconds per side or wrap them in a damp paper towel and microwave for 20 seconds until pliable.
5. Assemble each burrito by placing a tortilla flat, then layering a quarter of the cooked sausage, a quarter of the scrambled eggs, and ¼ cup of shredded cheddar cheese in the center. Tip: Leave a 2-inch border at the edges for easy rolling.
6. Fold the sides of the tortilla inward, then roll tightly from the bottom to enclose the filling, pressing gently to seal.
7. If desired, return the burritos to the skillet over medium heat for 1–2 minutes per side to crisp the tortilla and melt the cheese further.
The result is a burrito with a golden, slightly crisp exterior giving way to a creamy, savory interior where the eggs meld with the juicy sausage and gooey cheese. Serve them sliced in half to showcase the layers, or pair with a dollop of salsa or avocado for a fresh contrast that elevates this humble breakfast into something special.
One-Pot Spaghetti Bolognese
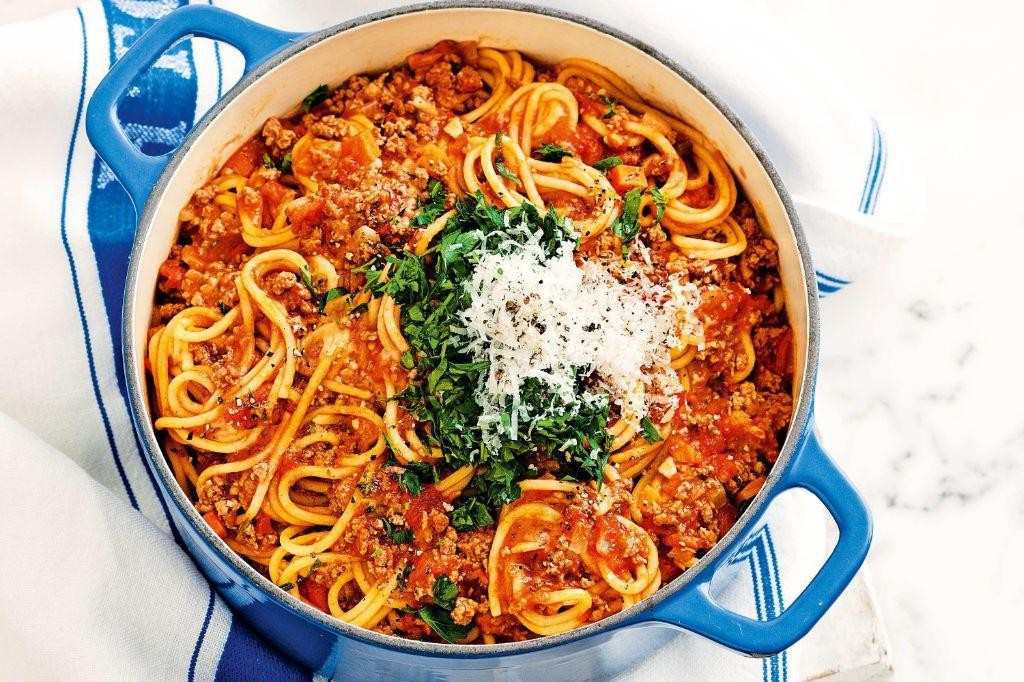
Nestled among the cherished classics of comfort cuisine, this One-Pot Spaghetti Bolognese transforms a weeknight staple into an elegant, hands-off affair. By simmering the pasta directly in the rich, savory sauce, every strand becomes infused with deep, meaty flavor, resulting in a remarkably cohesive and luxurious dish. It’s the ultimate expression of simplicity meeting sophistication, perfect for a cozy evening or an impressive casual gathering.
Serving: 4 | Pre Time: 15 minutes | Cooking Time: 30 minutes
Ingredients
– A glug of olive oil
– One yellow onion, finely diced
– A couple of carrots, finely diced
– A couple of celery stalks, finely diced
– 3 cloves of garlic, minced
– 1 pound of ground beef (85% lean works great)
– A generous splash of dry red wine (about 1/2 cup)
– One 28-ounce can of crushed tomatoes
– 2 cups of beef broth
– 1 teaspoon of dried oregano
– A big pinch of salt and a few cracks of black pepper
– 12 ounces of dried spaghetti
– A handful of fresh basil, chopped
– A generous 1/2 cup of grated Parmesan cheese
Instructions
1. Heat a large, heavy-bottomed pot or Dutch oven over medium-high heat and add the glug of olive oil.
2. Add the diced onion, carrots, and celery to the pot and cook, stirring occasionally, for about 8 minutes until the vegetables have softened and the onion is translucent.
3. Stir in the minced garlic and cook for 1 more minute until fragrant.
4. Add the ground beef to the pot, breaking it up with a wooden spoon, and cook for 6-7 minutes until it is no longer pink and is nicely browned.
5. Pour in the splash of red wine, using the spoon to scrape up any browned bits from the bottom of the pot—this adds incredible depth of flavor.
6. Add the can of crushed tomatoes, beef broth, dried oregano, salt, and pepper to the pot, and stir everything together until well combined.
7. Bring the sauce to a steady simmer, then reduce the heat to maintain a gentle bubble.
8. Break the dried spaghetti in half and submerge all the pieces into the simmering sauce, stirring gently to ensure they are fully covered.
9. Cover the pot with a lid and let it cook for 12-14 minutes, stirring every 4 minutes to prevent sticking, until the pasta is al dente and has absorbed most of the liquid.
10. Remove the pot from the heat and stir in the chopped fresh basil and the grated Parmesan cheese until the cheese is melted and the basil is wilted.
For a truly sublime finish, the sauce should cling luxuriously to each tender strand of pasta, creating a velvety, unified texture. The long simmer melds the sweet tomatoes, savory beef, and aromatic vegetables into a profoundly rich and complex flavor profile. Consider serving it in shallow bowls with an extra sprinkle of Parmesan and a final drizzle of your best olive oil for a restaurant-worthy presentation.
Easy Homemade Mac and Cheese

Nestled between holiday feasts and cozy winter evenings, this Easy Homemade Mac and Cheese offers a comforting classic with a touch of elegance. Its creamy, velvety sauce clings to every tender elbow noodle, creating a dish that feels both nostalgic and freshly delightful. Perfect for a festive side or a simple, satisfying supper, it transforms basic pantry staples into a warm, cheesy masterpiece.
Serving: 6 | Pre Time: 10 minutes | Cooking Time: 25 minutes
Ingredients
– A pound of elbow macaroni
– 4 tablespoons of unsalted butter
– 1/4 cup of all-purpose flour
– 3 cups of whole milk, warmed to about 100°F
– 2 cups of shredded sharp cheddar cheese
– 1 cup of shredded Gruyère cheese
– A pinch of freshly grated nutmeg
– A couple of dashes of Worcestershire sauce
– A splash of heavy cream
– Salt and freshly ground black pepper
Instructions
1. Bring a large pot of salted water to a rolling boil over high heat.
2. Add the elbow macaroni and cook for 8-10 minutes, stirring occasionally, until al dente (tender but firm).
3. Drain the pasta in a colander and set it aside; do not rinse to help the sauce adhere better.
4. In the same pot, melt the unsalted butter over medium heat until foamy.
5. Whisk in the all-purpose flour and cook for 2 minutes, stirring constantly, to form a smooth roux without browning.
6. Gradually pour in the warmed whole milk, whisking continuously to prevent lumps, and bring to a gentle simmer.
7. Reduce the heat to low and let the sauce thicken for 5 minutes, stirring often, until it coats the back of a spoon.
8. Remove the pot from the heat and stir in the shredded sharp cheddar and Gruyère cheeses until fully melted and smooth.
9. Add a pinch of freshly grated nutmeg, a couple of dashes of Worcestershire sauce, and a splash of heavy cream, mixing well.
10. Season with salt and freshly ground black pepper to your preference.
11. Fold the drained elbow macaroni into the cheese sauce until evenly coated.
12. Serve immediately while hot and creamy.
Buttery and rich, this mac and cheese boasts a luxuriously smooth texture with a subtle tang from the sharp cheddar. For a creative twist, top it with crispy breadcrumbs or serve alongside roasted vegetables to balance the decadence.
5-Ingredient Teriyaki Chicken
Unfussy yet undeniably elegant, this 5-Ingredient Teriyaki Chicken transforms humble pantry staples into a glossy, savory-sweet masterpiece that’s perfect for weeknights yet impressive enough for guests. With just a handful of components, it delivers deep, caramelized flavor and tender, juicy meat in under thirty minutes—proof that simplicity, when executed thoughtfully, can be utterly sublime.
Serving: 4 | Pre Time: 10 minutes | Cooking Time: 15 minutes
Ingredients
– About 1.5 pounds of boneless, skinless chicken thighs (trust me, thighs stay juicier!)
– A good glug of soy sauce—roughly ½ cup
– A generous ¼ cup of honey for that sticky-sweet glaze
– A couple of minced garlic cloves
– A splash of rice vinegar, about 1 tablespoon
Instructions
1. Pat the chicken thighs completely dry with paper towels—this helps them sear beautifully instead of steaming.
2. In a small bowl, whisk together the soy sauce, honey, minced garlic, and rice vinegar until the honey is fully dissolved.
3. Heat a large skillet or non-stick pan over medium-high heat for about 2 minutes until a drop of water sizzles immediately.
4. Place the chicken thighs in the hot skillet, smooth-side down, and cook undisturbed for 5–6 minutes to develop a deep golden-brown crust.
5. Flip the chicken thighs and cook for another 4–5 minutes until they’re cooked through and register 165°F on an instant-read thermometer.
6. Pour the teriyaki sauce mixture into the skillet, scraping up any browned bits from the bottom with a wooden spoon for extra flavor.
7. Reduce the heat to medium-low and simmer the sauce for 3–4 minutes, occasionally spooning it over the chicken, until it thickens to a glossy, syrup-like consistency that coats the back of a spoon.
8. Remove the skillet from the heat and let the chicken rest in the sauce for 2–3 minutes to allow the flavors to meld and the meat to reabsorb juices.
9. Slice the chicken against the grain and serve immediately, drizzled with the reduced teriyaki sauce from the pan.
Kissed with a sticky, lacquered glaze, the chicken emerges succulent and richly flavored, with the sauce clinging to every crevice. The interplay of salty soy and floral honey, brightened by a hint of vinegar, creates a beautifully balanced depth that’s irresistible over steamed jasmine rice or tucked into lettuce cups for a fresh, crunchy contrast.
One-Pan Garlic Butter Shrimp

Savory and succulent, this One-Pan Garlic Butter Shrimp transforms simple ingredients into an elegant weeknight feast. With minimal prep and a single skillet, you’ll achieve restaurant-quality results in under 30 minutes—perfect for impromptu gatherings or a cozy dinner for two. The aromatic garlic butter sauce clings to each plump shrimp, creating a dish that’s both luxurious and effortlessly approachable.
Serving: 4 | Pre Time: 10 minutes | Cooking Time: 15 minutes
Ingredients
– 1.5 pounds of large raw shrimp, peeled and deveined
– 6 tablespoons of unsalted butter, cut into chunks
– A whole head of garlic, minced (about 8 cloves)
– A splash of dry white wine (about 1/4 cup)
– A couple of tablespoons of fresh lemon juice
– A handful of chopped fresh parsley
– A pinch of red pepper flakes
– Kosher salt and freshly ground black pepper
Instructions
1. Pat the shrimp completely dry with paper towels to ensure a good sear.
2. Season the shrimp generously on both sides with kosher salt and freshly ground black pepper.
3. Heat a large skillet over medium-high heat for 2 minutes until hot.
4. Add 2 tablespoons of butter to the skillet and let it melt until foamy.
5. Place the shrimp in a single layer in the skillet, cooking for 2 minutes per side until pink and opaque.
6. Transfer the cooked shrimp to a plate, leaving any juices in the skillet.
7. Reduce the heat to medium and add the remaining 4 tablespoons of butter to the skillet.
8. Add the minced garlic and cook for 1 minute, stirring constantly until fragrant but not browned.
9. Pour in the dry white wine, scraping up any browned bits from the bottom of the pan with a wooden spoon.
10. Simmer the sauce for 2 minutes to reduce slightly and cook off the alcohol.
11. Stir in the fresh lemon juice and red pepper flakes.
12. Return the shrimp to the skillet, tossing to coat evenly in the garlic butter sauce for 1 minute.
13. Remove from heat and sprinkle with chopped fresh parsley.
The shrimp emerge tender with a slight caramelized crust, bathed in a rich, garlicky butter sauce that’s brightened by lemon and a hint of heat. Serve it over creamy polenta or crusty bread to soak up every last drop, or toss with pasta for a quick yet sophisticated meal.
Slow Cooker BBQ Chicken Sliders

Nestled in the heart of effortless entertaining, these slow cooker BBQ chicken sliders transform humble ingredients into a crowd-pleasing masterpiece. The gentle simmer of sweet and tangy barbecue sauce melds with tender chicken, creating a filling so succulent it practically melts on toasted buns. Perfect for festive gatherings or cozy weeknights, this recipe delivers maximum flavor with minimal fuss.
Serving: 8 | Pre Time: 10 minutes | Cooking Time: 240 minutes
Ingredients
– A couple of pounds of boneless, skinless chicken breasts
– A generous cup of your favorite BBQ sauce
– A splash of apple cider vinegar
– A tablespoon of brown sugar
– A teaspoon of smoked paprika
– A pinch of salt and black pepper
– A pack of slider buns
– A handful of coleslaw mix for topping (optional)
Instructions
1. Place the boneless, skinless chicken breasts in the slow cooker.
2. In a small bowl, whisk together the BBQ sauce, apple cider vinegar, brown sugar, smoked paprika, salt, and black pepper until smooth.
3. Pour the sauce mixture evenly over the chicken in the slow cooker, ensuring all pieces are coated.
4. Cover the slow cooker with its lid and set it to cook on LOW heat for 4 hours.
5. After 4 hours, check the chicken by inserting a fork; it should shred easily with no resistance.
6. Using two forks, shred the chicken directly in the slow cooker, mixing it with the accumulated juices and sauce.
7. Let the shredded chicken sit in the slow cooker on the WARM setting for 10 minutes to absorb more flavor.
8. While the chicken rests, lightly toast the slider buns in a toaster or under a broiler set to 350°F for 2-3 minutes until golden brown.
9. Spoon the BBQ chicken mixture onto the bottom halves of the toasted buns.
10. Top with a handful of coleslaw mix if desired, then cover with the bun tops.
The shredded chicken boasts a melt-in-your-mouth tenderness, enveloped in a sticky, slightly sweet barbecue glaze with a hint of smokiness. For a creative twist, serve these sliders with pickled jalapeños or a drizzle of extra BBQ sauce, making them ideal for stacking on a platter at your next gathering.
Summary
Whether you’re juggling a busy schedule or simply craving something tasty, these 20 quick and easy family recipes are here to save the day! We hope you find some new favorites to whip up for your loved ones. Give them a try, then drop a comment below to tell us which dish you enjoyed most—and don’t forget to share this roundup on Pinterest to spread the delicious inspiration!


