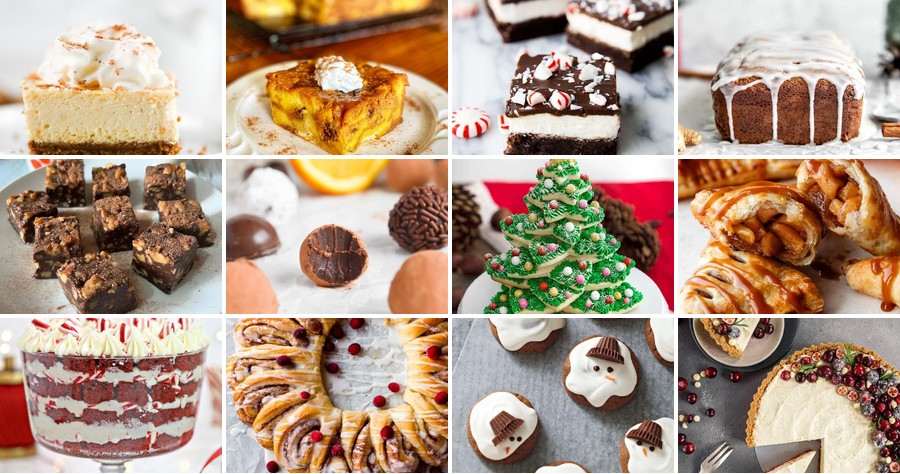
Just imagine: the scent of cinnamon and vanilla wafting through your home, a table filled with festive treats that look impressive but are surprisingly simple to make. Whether you’re hosting a holiday party or just craving some seasonal sweetness, these 20 easy dessert recipes will bring joy to your kitchen and smiles to every face. Let’s dive into these delicious creations that promise festive cheer in every bite!
Peppermint Chocolate Chip Cookies
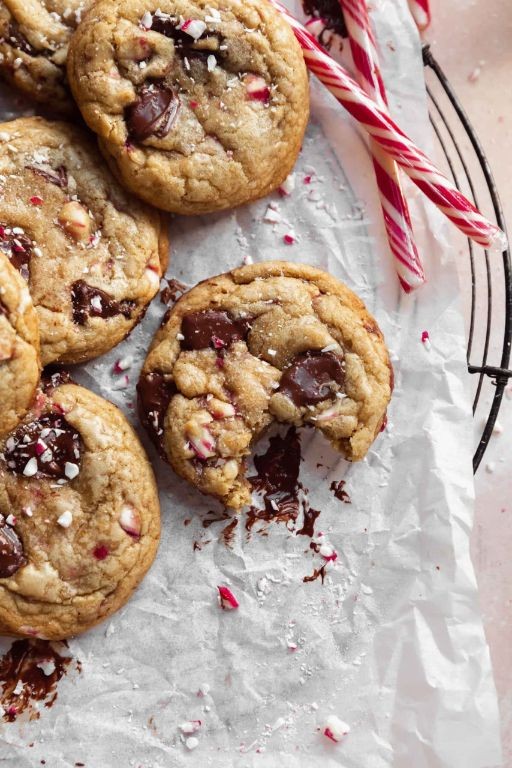
A festive twist on a classic, these peppermint chocolate chip cookies blend rich cocoa with cool mint for a holiday treat that delights both young and old. With a tender crumb and bursts of chocolate, they evoke cozy winter evenings by the fire. Perfect for gifting or savoring with a warm beverage, they capture the essence of the season in every bite.
Serving: 24 | Pre Time: 15 minutes | Cooking Time: 10 minutes
Ingredients
– 2 ¼ cups all-purpose flour, spooned and leveled for accuracy
– 1 teaspoon baking soda
– ½ teaspoon salt
– 1 cup unsalted butter, softened to room temperature
– ¾ cup granulated sugar
– ¾ cup packed brown sugar
– 2 large eggs, at room temperature for better emulsification
– 1 teaspoon pure vanilla extract
– 1 teaspoon peppermint extract, adjust to taste for stronger mint flavor
– 2 cups semisweet chocolate chips
– ½ cup crushed peppermint candies, for garnish
Instructions
1. Preheat the oven to 375°F and line two baking sheets with parchment paper.
2. In a medium bowl, whisk together the flour, baking soda, and salt until fully combined.
3. In a large bowl, use an electric mixer on medium speed to cream the butter, granulated sugar, and brown sugar until light and fluffy, about 3 minutes.
4. Add the eggs one at a time, beating well after each addition until fully incorporated.
5. Mix in the vanilla extract and peppermint extract until just blended.
6. Gradually add the dry ingredients to the wet mixture, mixing on low speed until a soft dough forms, being careful not to overmix to avoid tough cookies.
7. Fold in the chocolate chips gently with a spatula until evenly distributed throughout the dough.
8. Scoop rounded tablespoons of dough onto the prepared baking sheets, spacing them about 2 inches apart to allow for spreading.
9. Bake for 8-10 minutes, or until the edges are lightly golden but the centers are still soft; the cookies will firm up as they cool.
10. Immediately after removing from the oven, sprinkle the tops with crushed peppermint candies while still warm so they adhere.
11. Let the cookies cool on the baking sheets for 5 minutes before transferring to a wire rack to cool completely.
Warm from the oven, these cookies offer a crisp edge that gives way to a chewy center, with the peppermint providing a refreshing contrast to the deep chocolate notes. For an elegant presentation, serve them stacked on a festive platter with a dusting of powdered sugar, or pair them with a glass of cold milk for a nostalgic touch.
Easy Eggnog Cheesecake Bars

Glistening with holiday charm, these Easy Eggnog Cheesecake Bars transform the classic seasonal beverage into a decadent, no-bake dessert. A velvety eggnog-infused filling rests atop a buttery graham cracker crust, offering a festive twist that’s both elegant and effortless to prepare. Perfect for gatherings or a cozy night in, they capture the warm, spiced essence of the holidays in every creamy bite.
Serving: 16 bars | Pre Time: 25 minutes | Cooking Time: 0 minutes (no-bake)
Ingredients
– 2 cups graham cracker crumbs (about 16 whole sheets, crushed finely)
– 1/2 cup unsalted butter, melted (cooled slightly to avoid a soggy crust)
– 1/4 cup granulated sugar (for the crust, or substitute with brown sugar for a deeper flavor)
– 16 ounces cream cheese, softened to room temperature (this ensures a smooth, lump-free filling)
– 1 cup powdered sugar, sifted (to prevent clumps in the mixture)
– 1 cup prepared eggnog, chilled (use store-bought or homemade, adjusting nutmeg to taste)
– 1 teaspoon vanilla extract (pure extract recommended for best flavor)
– 1/2 teaspoon ground nutmeg, plus extra for garnish (freshly grated nutmeg adds a brighter aroma)
– 1 cup heavy whipping cream, cold (for whipping to stiff peaks)
– 1/4 teaspoon salt (enhances the sweetness and balances flavors)
Instructions
1. Line an 8×8-inch baking pan with parchment paper, leaving overhang on two sides for easy removal later.
2. In a medium bowl, combine graham cracker crumbs, melted butter, and granulated sugar until the mixture resembles wet sand and holds together when pressed.
3. Press the crumb mixture firmly and evenly into the bottom of the prepared pan using the back of a measuring cup or spoon to create a compact layer.
4. Chill the crust in the refrigerator for 15 minutes to set while preparing the filling, which helps prevent crumbling when sliced.
5. In a large mixing bowl, beat the softened cream cheese with an electric mixer on medium speed for 2 minutes until completely smooth and creamy, scraping down the sides as needed.
6. Add the sifted powdered sugar, vanilla extract, 1/2 teaspoon nutmeg, and salt to the cream cheese, and beat on low speed for 1 minute until fully incorporated and no streaks remain.
7. Gradually pour in the chilled eggnog while beating on low speed for another minute until the mixture is uniform and silky; avoid overmixing to maintain a light texture.
8. In a separate clean bowl, whip the cold heavy cream with an electric mixer on high speed for 3–4 minutes until stiff peaks form that hold their shape when the beaters are lifted.
9. Gently fold the whipped cream into the cream cheese mixture using a spatula in broad, sweeping motions until just combined, preserving airiness for a fluffy result.
10. Spread the filling evenly over the chilled crust, smoothing the top with an offset spatula or the back of a spoon.
11. Cover the pan with plastic wrap and refrigerate for at least 4 hours, or preferably overnight, to allow the bars to set firmly for clean slicing.
12. Before serving, lift the bars from the pan using the parchment overhang, sprinkle with extra ground nutmeg for garnish, and cut into 16 squares with a sharp knife wiped clean between cuts.
The bars boast a lusciously creamy texture with subtle hints of nutmeg and vanilla, melting smoothly on the palate. For a festive presentation, drizzle with caramel sauce or top with a dollop of whipped cream and a cinnamon stick as a garnish, making them a standout addition to any holiday dessert table.
Gingerbread Mug Cake

Envision a cozy evening where the rich, spiced aroma of freshly baked gingerbread fills your kitchen, yet this delightful treat is ready in mere minutes. This gingerbread mug cake captures all the warmth and nostalgia of the holiday classic in a single-serving dessert that’s both elegant and effortlessly simple. Perfect for a spontaneous indulgence or a festive solo celebration, it transforms humble pantry staples into a comforting, spice-kissed masterpiece.
Serving: 1 | Pre Time: 2 minutes | Cooking Time: 1 minute
Ingredients
– 3 tablespoons all-purpose flour
– 2 tablespoons light brown sugar, packed
– 1/4 teaspoon baking powder
– 1/4 teaspoon ground ginger
– 1/8 teaspoon ground cinnamon
– 1/8 teaspoon ground nutmeg
– Pinch of salt
– 2 tablespoons milk, whole or 2% recommended for richness
– 1 tablespoon unsalted butter, melted and slightly cooled
– 1/2 teaspoon pure vanilla extract
– 1 tablespoon molasses, for deep flavor (or substitute with maple syrup for a lighter taste)
Instructions
1. In a 12-ounce microwave-safe mug, whisk together the all-purpose flour, light brown sugar, baking powder, ground ginger, ground cinnamon, ground nutmeg, and salt until no lumps remain.
2. Add the milk, melted unsalted butter, pure vanilla extract, and molasses to the dry ingredients.
3. Stir the mixture vigorously with a fork for about 30 seconds until a smooth, thick batter forms, ensuring no dry pockets remain at the bottom of the mug.
4. Tap the mug gently on the counter to settle the batter and eliminate any air bubbles for an even texture.
5. Microwave the mug on high power for 60 seconds, watching as the cake rises to nearly fill the mug and a toothpick inserted into the center comes out clean.
6. Let the mug cake rest at room temperature for 2 minutes to set properly and cool slightly for the best flavor development.
7. Serve warm directly from the mug, optionally topping with a dollop of whipped cream or a dusting of powdered sugar for added elegance.
Mug cake emerges tender and moist, with a soft crumb that melts on the tongue, infused with the warm, aromatic blend of ginger, cinnamon, and nutmeg. The molasses lends a deep, caramel-like sweetness that balances the spices beautifully, making each bite a cozy, festive delight. For a creative twist, drizzle with a simple glaze or pair with a scoop of vanilla ice cream to contrast the warm spices with cool creaminess.
No-Bake Cranberry White Chocolate Tart
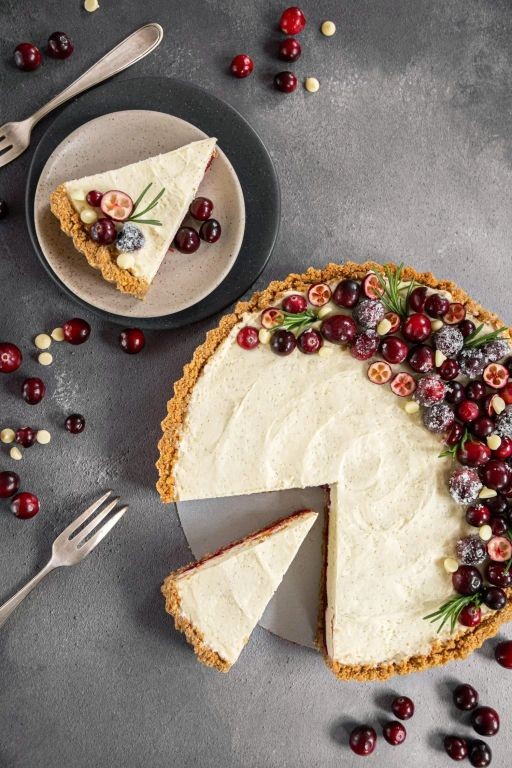
Beneath a festive snowfall of powdered sugar, this no-bake cranberry white chocolate tart emerges as a showstopping centerpiece, marrying the bright, tart pop of cranberries with the creamy sweetness of white chocolate in a buttery, crumbly crust. It’s an elegant dessert that requires no oven, making it perfect for hectic holiday gatherings or a sophisticated weeknight treat. The vibrant red filling against the snowy white chocolate ganache creates a visually stunning contrast that’s as delightful to behold as it is to savor.
Serving: 8 | Pre Time: 25 minutes | Cooking Time: 0 minutes
Ingredients
– 1 ½ cups graham cracker crumbs (about 12 full sheets, crushed finely)
– 6 tablespoons unsalted butter, melted (cooled slightly)
– ¼ cup granulated sugar
– 12 ounces fresh or frozen cranberries (thawed if frozen)
– ¾ cup granulated sugar
– ¼ cup water
– 1 teaspoon pure vanilla extract
– 1 cup heavy cream
– 8 ounces high-quality white chocolate, finely chopped (use chips for easier melting)
– Pinch of salt (adjust to taste)
Instructions
1. Combine 1 ½ cups graham cracker crumbs, 6 tablespoons melted butter, and ¼ cup granulated sugar in a medium bowl until the mixture resembles wet sand.
2. Firmly press the crumb mixture evenly into the bottom and up the sides of a 9-inch tart pan with a removable bottom, using the bottom of a measuring cup to compact it.
3. Chill the crust in the refrigerator for at least 15 minutes to set while preparing the filling.
4. In a medium saucepan over medium heat, combine 12 ounces cranberries, ¾ cup granulated sugar, and ¼ cup water, stirring occasionally.
5. Cook the cranberry mixture for 10–12 minutes, until the berries have burst and the sauce has thickened to a jam-like consistency, then remove from heat.
6. Stir 1 teaspoon vanilla extract into the cranberry sauce and let it cool to room temperature, about 20 minutes.
7. Pour the cooled cranberry filling into the chilled crust, spreading it evenly with an offset spatula.
8. In a small saucepan, heat 1 cup heavy cream over medium heat until it just begins to simmer around the edges, about 3–4 minutes.
9. Immediately pour the hot cream over 8 ounces chopped white chocolate in a heatproof bowl, let it sit for 1 minute, then whisk until smooth and glossy.
10. Add a pinch of salt to the white chocolate ganache and whisk to combine.
11. Gently pour the ganache over the cranberry layer, tilting the tart pan to cover it completely.
12. Refrigerate the tart for at least 4 hours, or until the ganache is fully set and firm to the touch.
13. Carefully remove the tart from the pan by pressing up the bottom, slice with a warm knife for clean cuts, and serve chilled.
Meticulously layered, this tart offers a delightful textural play: the crisp, buttery crust gives way to the tangy, jammy cranberry center, all enveloped in a silky-smooth white chocolate ganache. For a festive flourish, garnish each slice with fresh cranberries, mint leaves, or a drizzle of reduced cranberry sauce just before serving, enhancing both its visual appeal and burst of flavor.
Festive Red Velvet Trifle
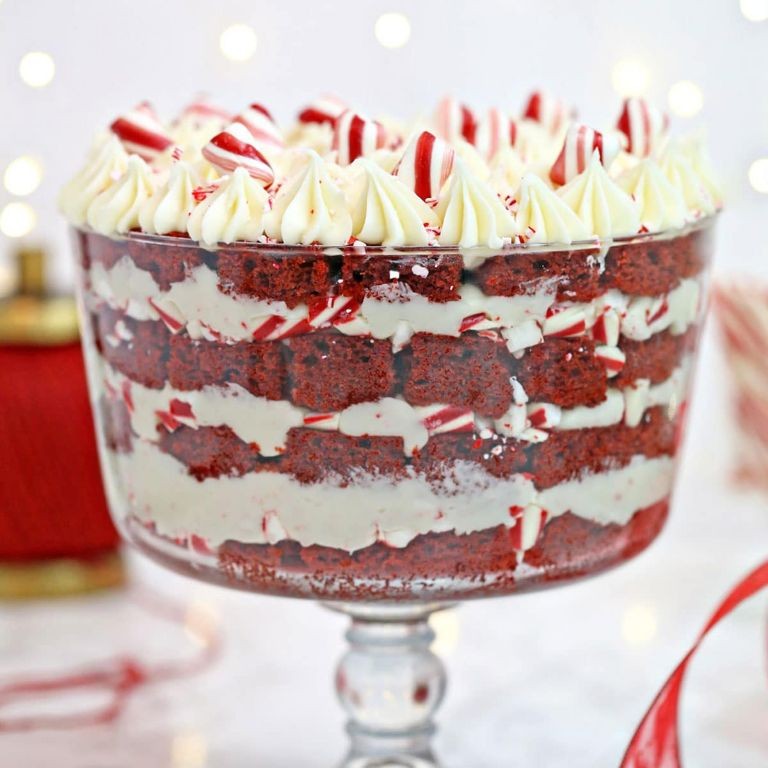
Kindly imagine a dessert that captures the magic of the holidays in every spoonful—a stunning red velvet trifle layered with velvety cake, rich cream cheese frosting, and festive garnishes. This elegant yet approachable centerpiece transforms classic flavors into a show-stopping creation perfect for celebrations, offering a delightful contrast of textures and a visually captivating presentation that will impress guests. With its vibrant colors and harmonious balance of sweet and tangy notes, it’s a dessert that feels both indulgent and comforting, ideal for sharing around the table.
Serving: 8 | Pre Time: 25 minutes | Cooking Time: 30 minutes
Ingredients
– 1 box red velvet cake mix (or homemade equivalent, about 15.25 ounces)
– 3 large eggs, at room temperature for better incorporation
– 1/2 cup vegetable oil, or any neutral oil like canola
– 1 cup water
– 8 ounces cream cheese, softened to room temperature for smooth blending
– 1 cup powdered sugar, sifted to avoid lumps
– 2 cups heavy whipping cream, chilled for optimal whipping
– 1 teaspoon vanilla extract, pure for best flavor
– 1/2 cup crushed peppermint candies, for garnish and a festive crunch
– Fresh raspberries, for a tart contrast and vibrant color
Instructions
1. Preheat your oven to 350°F (175°C) and grease a 9×13-inch baking pan lightly with oil or non-stick spray.
2. In a large mixing bowl, combine the red velvet cake mix, eggs, vegetable oil, and water, whisking until just smooth without overmixing to keep the cake tender.
3. Pour the batter into the prepared pan and bake for 25-30 minutes, or until a toothpick inserted into the center comes out clean with no wet crumbs.
4. Remove the cake from the oven and let it cool completely on a wire rack for about 1 hour to prevent sogginess in the trifle.
5. While the cake cools, make the cream cheese frosting: in a medium bowl, beat the softened cream cheese with an electric mixer on medium speed until creamy, about 2 minutes.
6. Gradually add the sifted powdered sugar to the cream cheese, beating on low speed until fully incorporated and smooth, scraping down the sides as needed.
7. In a separate chilled bowl, whip the heavy cream and vanilla extract on high speed until stiff peaks form, about 3-4 minutes, being careful not to over-whip to avoid curdling.
8. Gently fold the whipped cream into the cream cheese mixture until just combined, creating a light and fluffy frosting.
9. Once the cake is cool, cut it into 1-inch cubes using a serrated knife for clean edges.
10. In a large trifle bowl or individual glasses, layer half of the cake cubes at the bottom, pressing them down slightly.
11. Spread half of the cream cheese frosting evenly over the cake layer, using a spatula to smooth it out.
12. Repeat with the remaining cake cubes and frosting, ending with a final layer of frosting on top.
13. Garnish the trifle by sprinkling the crushed peppermint candies over the frosting and arranging fresh raspberries around the edges for a pop of color.
14. Chill the assembled trifle in the refrigerator for at least 2 hours before serving to allow the flavors to meld and the layers to set firmly.
Overall, this trifle delights with its moist cake layers melting into the creamy frosting, offering a luxurious texture that’s both airy and decadent. The peppermint adds a refreshing crunch that contrasts beautifully with the tangy raspberries, making each bite a festive symphony. For a creative twist, serve it in individual mason jars for a portable treat or drizzle with a chocolate ganache just before serving to enhance the richness.
Quick Pumpkin Spice Bread Pudding
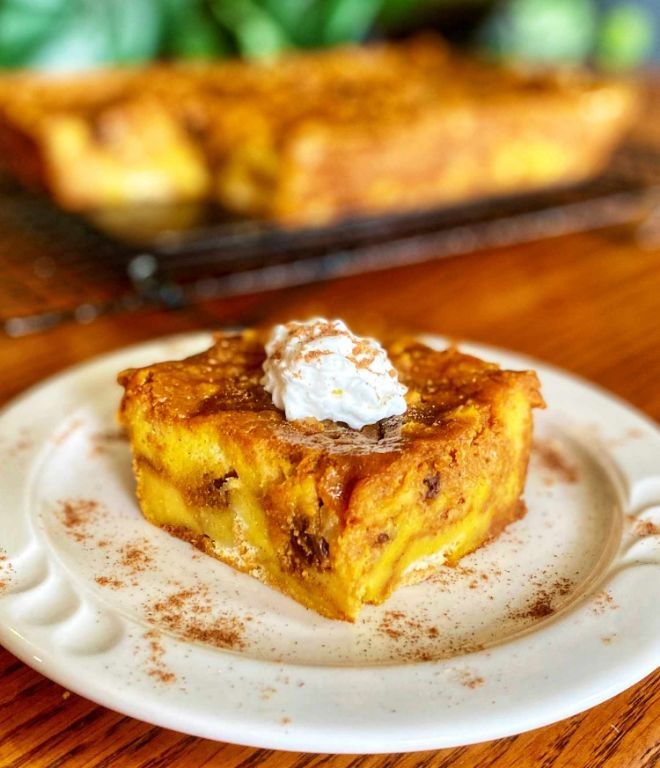
Glistening with autumnal warmth, this Quick Pumpkin Spice Bread Pudding transforms humble pantry staples into a decadent, custard-soaked dessert. Effortlessly elegant, it captures the cozy essence of the season in a single, comforting bake. Perfect for impromptu gatherings or a quiet evening treat, its rich aroma will fill your kitchen with holiday cheer.
Serving: 8 | Pre Time: 15 minutes | Cooking Time: 45 minutes
Ingredients
– 6 cups day-old challah or brioche, torn into 1-inch pieces (stale bread absorbs custard better)
– 1 (15-ounce) can pure pumpkin purée (not pumpkin pie filling)
– 1 ½ cups whole milk, at room temperature
– ¾ cup granulated sugar
– 3 large eggs, at room temperature
– 2 teaspoons pure vanilla extract
– 1 ½ teaspoons pumpkin pie spice blend (or a mix of cinnamon, ginger, nutmeg, and cloves)
– ½ teaspoon fine sea salt
– ½ cup heavy cream, for serving (optional, but recommended)
– 2 tablespoons unsalted butter, for greasing the baking dish
Instructions
1. Preheat your oven to 350°F (175°C) and generously grease an 8×8-inch or 9×9-inch baking dish with the unsalted butter, ensuring all sides are coated to prevent sticking.
2. In a large mixing bowl, whisk together the pure pumpkin purée, whole milk, granulated sugar, large eggs, pure vanilla extract, pumpkin pie spice blend, and fine sea salt until the mixture is completely smooth and homogenous, about 2 minutes.
3. Tip: For a silkier custard, strain the mixture through a fine-mesh sieve to remove any potential lumps from the pumpkin.
4. Add the torn day-old challah or brioche pieces to the custard mixture, gently folding with a spatula until every piece is evenly coated and saturated, which should take about 3–4 minutes.
5. Allow the mixture to rest for 10 minutes at room temperature, pressing down occasionally, so the bread fully absorbs the liquid for a moist, cohesive pudding.
6. Transfer the soaked bread mixture into the prepared baking dish, spreading it into an even layer and lightly pressing down to eliminate air pockets.
7. Bake in the preheated oven for 40–45 minutes, or until the top is golden brown, the edges are slightly crisp, and a toothpick inserted into the center comes out clean with no wet custard.
8. Tip: If the top browns too quickly, loosely tent the dish with aluminum foil after 30 minutes to prevent over-browning while the center sets.
9. Remove the pudding from the oven and let it cool on a wire rack for at least 15 minutes before serving to allow the custard to firm up slightly for easier slicing.
10. Tip: For an extra indulgent touch, warm the heavy cream slightly and drizzle it over individual servings just before eating to enhance the richness.
Warm from the oven, this bread pudding boasts a luxuriously soft, almost spoonable interior with caramelized, crisp edges that offer a delightful textural contrast. Each bite is infused with the deep, spiced sweetness of pumpkin, balanced by the subtle richness of the custard. Serve it alongside a scoop of vanilla ice cream for a decadent twist, or enjoy it simply with a dusting of powdered sugar for a cozy, effortless finish.
Holiday Rice Krispie Treats with Sprinkles
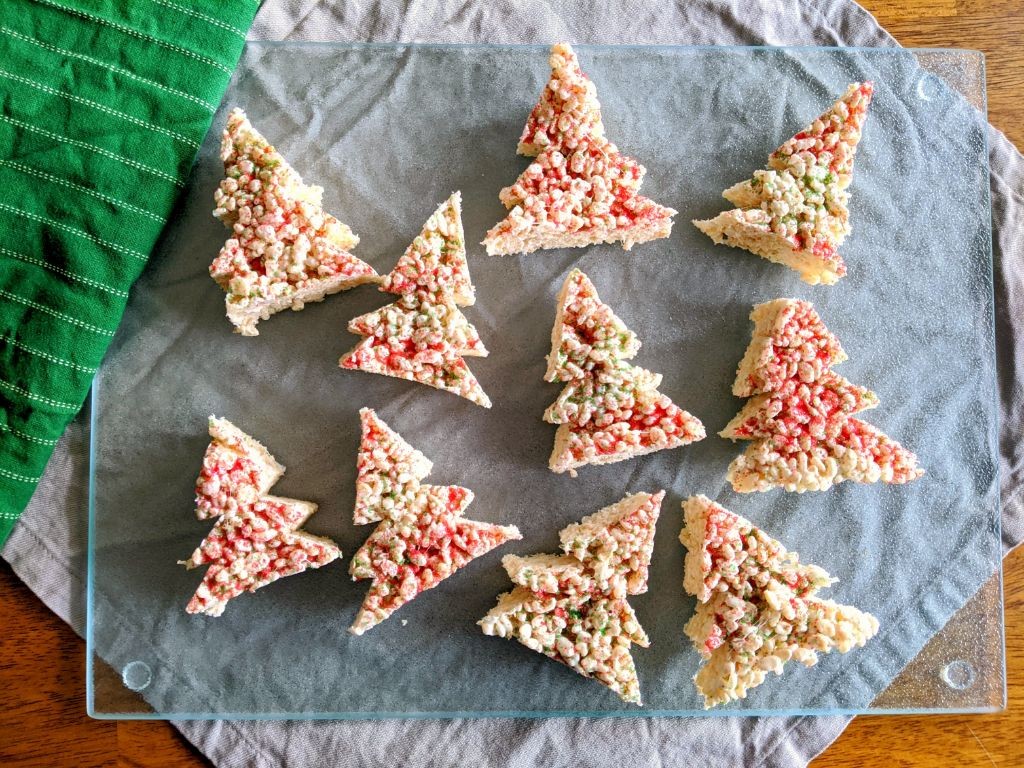
Meticulously crafted yet delightfully simple, these Holiday Rice Krispie Treats with Sprinkles transform a childhood classic into a festive centerpiece. Their shimmering, colorful exterior and chewy, buttery interior evoke the magic of the season, offering a nostalgic treat that feels both elegant and effortless to prepare.
Serving: 16 | Pre Time: 10 minutes | Cooking Time: 5 minutes
Ingredients
– 6 cups Rice Krispies cereal
– 10 oz marshmallows (mini marshmallows melt faster)
– 3 tbsp unsalted butter (for a richer flavor)
– 1/4 tsp fine sea salt (to balance the sweetness)
– 1/2 cup rainbow sprinkles (jimmies hold their shape best)
Instructions
1. Line a 9×13-inch baking pan with parchment paper, allowing overhang on two sides for easy removal.
2. Measure 6 cups of Rice Krispies cereal into a large heatproof bowl and set it aside.
3. In a large pot, melt 3 tablespoons of unsalted butter over low heat, swirling the pot occasionally to prevent browning.
4. Add 10 ounces of marshmallows and 1/4 teaspoon of fine sea salt to the melted butter, stirring constantly with a silicone spatula until the marshmallows are completely melted and smooth, about 3-5 minutes.
5. Immediately pour the hot marshmallow mixture over the Rice Krispies cereal in the bowl.
6. Gently fold the mixture together with the spatula until the cereal is evenly coated, working quickly before the marshmallow sets.
7. Transfer the mixture to the prepared baking pan, spreading it into an even layer with lightly buttered hands or the spatula.
8. While the mixture is still warm and sticky, evenly press 1/2 cup of rainbow sprinkles over the top, using the back of a spoon to gently adhere them.
9. Let the treats cool at room temperature until completely set and firm, about 1-2 hours.
10. Use the parchment overhang to lift the slab from the pan, then cut it into 16 squares with a sharp knife wiped clean between cuts for neat edges.
Dazzling in their simplicity, these treats offer a satisfyingly crisp snap that gives way to a soft, pillowy chew, with the butter and salt enhancing the vanilla sweetness. For a festive presentation, stack them on a tiered stand or wrap individual squares in cellophane with a ribbon as edible gifts.
Simple Apple Cinnamon Turnovers
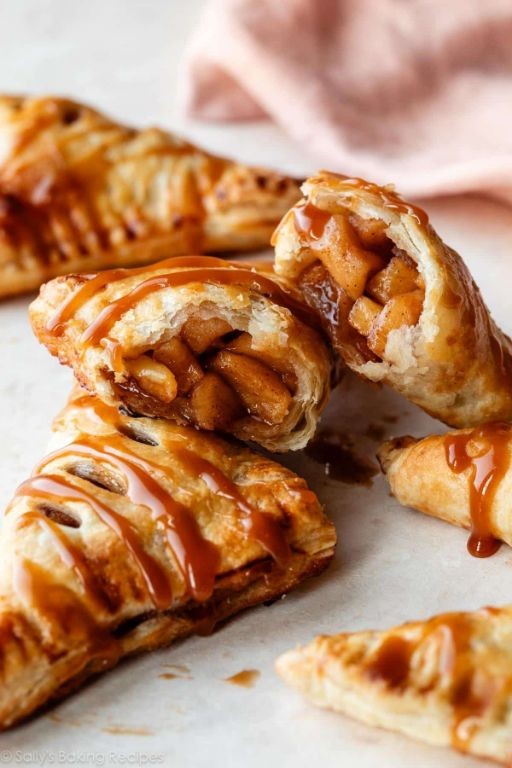
Savor the cozy embrace of winter with these elegant apple cinnamon turnovers, where flaky, golden pastry envelops a warmly spiced filling for a dessert that feels both nostalgic and sophisticated. This streamlined recipe transforms humble ingredients into an impressive treat, perfect for holiday gatherings or a quiet afternoon indulgence.
Serving: 8 | Pre Time: 20 minutes | Cooking Time: 25 minutes
Ingredients
– 1 sheet frozen puff pastry, thawed (keep cold until ready to use)
– 2 medium apples, peeled and finely diced (about 2 cups; Granny Smith or Honeycrisp recommended for balance)
– ¼ cup granulated sugar
– 1 tsp ground cinnamon
– 1 tbsp unsalted butter, melted (for brushing)
– 1 tbsp coarse sugar, for sprinkling (optional, for extra crunch)
– 1 large egg, beaten (for egg wash)
Instructions
1. Preheat your oven to 400°F (200°C) and line a baking sheet with parchment paper.
2. In a medium bowl, combine the diced apples, granulated sugar, and cinnamon, tossing gently to coat evenly.
3. Unfold the thawed puff pastry sheet on a lightly floured surface and roll it into a 10-inch square.
4. Cut the pastry into 4 equal squares, then cut each square diagonally to create 8 triangles.
5. Spoon about 2 tablespoons of the apple mixture onto the center of each triangle, leaving a ½-inch border around the edges.
6. Fold each triangle in half over the filling to form a smaller triangle, pressing the edges firmly with your fingers to seal.
7. Use a fork to crimp the sealed edges, which helps prevent leakage during baking.
8. Transfer the turnovers to the prepared baking sheet, spacing them about 1 inch apart.
9. Brush the tops of each turnover evenly with the beaten egg wash using a pastry brush.
10. Sprinkle the coarse sugar over the brushed turnovers for a sparkling, crisp finish.
11. Bake in the preheated oven for 20–25 minutes, or until the pastry is puffed and deep golden brown.
12. Remove from the oven and let cool on the baking sheet for 5 minutes before serving.
You’ll delight in the contrast of the crisp, buttery layers against the tender, cinnamon-kissed apples, with a hint of caramelization from the sugar. Serve these turnovers warm with a dollop of vanilla ice cream or a drizzle of salted caramel for an extra indulgent touch.
Chocolate Peanut Butter Reindeer Cookies

Joyfully bridging holiday nostalgia with gourmet flair, these Chocolate Peanut Butter Reindeer Cookies transform classic flavors into festive, edible art. Each bite marries rich cocoa with creamy peanut butter, creating a treat that’s as delightful to make as it is to share during cozy winter gatherings.
Serving: 24 cookies | Pre Time: 20 minutes | Cooking Time: 10 minutes
Ingredients
- 1 cup unsalted butter, softened to room temperature for easy creaming
- 1 cup granulated sugar
- 1 cup creamy peanut butter, such as Jif or Skippy for consistent texture
- 2 large eggs, at room temperature to prevent curdling
- 2 teaspoons pure vanilla extract
- 2 ½ cups all-purpose flour, spooned and leveled for accuracy
- ½ cup unsweetened cocoa powder, sifted to avoid lumps
- 1 teaspoon baking soda
- ½ teaspoon fine sea salt
- 48 pretzel twists, for antlers—mini twists work best
- 48 candy eyes, available in baking aisles
- 24 red M&M’s or similar candies, for noses
Instructions
- Preheat your oven to 350°F and line two baking sheets with parchment paper to prevent sticking.
- In a large mixing bowl, cream together the softened butter and granulated sugar using an electric mixer on medium speed for 2–3 minutes, until light and fluffy—this incorporates air for a tender cookie.
- Add the creamy peanut butter, eggs, and vanilla extract to the butter mixture, and beat on medium speed for 1 minute until fully combined and smooth.
- In a separate bowl, whisk together the all-purpose flour, sifted cocoa powder, baking soda, and fine sea salt to ensure even distribution of leavening agents.
- Gradually add the dry ingredients to the wet mixture, mixing on low speed just until a soft dough forms, being careful not to overmix to avoid toughness.
- Using a 1-tablespoon cookie scoop, portion the dough into balls and place them 2 inches apart on the prepared baking sheets to allow for spreading.
- Bake one sheet at a time in the preheated oven for 8–10 minutes, until the cookies are set with slightly cracked surfaces but still soft in the center—they’ll firm up as they cool.
- Immediately after removing the cookies from the oven, while still warm and pliable, gently press two pretzel twists into the top of each cookie to form antlers, angling them outward for a whimsical look.
- Press two candy eyes and one red M&M onto each cookie below the antlers to create a reindeer face, working quickly before the cookies cool and harden.
- Let the cookies cool completely on the baking sheets for 15 minutes, then transfer to a wire rack to finish cooling and set the decorations.
Brimming with nostalgic charm, these cookies boast a soft, fudgy texture from the cocoa and a subtle salty-sweet balance from the peanut butter. Serve them on a festive platter with hot cocoa for a playful holiday centerpiece, or package them in cellophane bags as heartfelt homemade gifts that delight both children and adults alike.
Easy Pecan Pie Bites

Nestled among the festive treats of the season, these Easy Pecan Pie Bites offer a sophisticated twist on a classic dessert, delivering all the rich, caramelized flavor in a perfectly portioned, elegant package. They require minimal effort yet yield maximum reward, making them an ideal choice for holiday gatherings or a refined afternoon indulgence. Each bite is a harmonious blend of buttery crust and a decadent, nutty filling that will delight any palate.
Serving: 24 bites | Pre Time: 15 minutes | Cooking Time: 20 minutes
Ingredients
– 1 (14.1 oz) package refrigerated pie crusts, thawed according to package directions (or homemade for a flakier texture)
– 1 cup light corn syrup
– 1 cup packed light brown sugar
– 3 large eggs, at room temperature for better emulsification
– 2 tablespoons unsalted butter, melted and slightly cooled
– 1 teaspoon pure vanilla extract
– 1/4 teaspoon fine sea salt
– 2 cups pecan halves, roughly chopped (toasted pecans will deepen the flavor)
Instructions
1. Preheat your oven to 350°F (175°C) and lightly grease a 24-cup mini muffin tin with non-stick cooking spray.
2. Unroll the thawed pie crusts on a lightly floured surface and, using a 2.5-inch round cutter, stamp out 24 circles, re-rolling scraps as needed to use all the dough.
3. Gently press each dough circle into the prepared muffin cups, ensuring the edges are even and there are no air pockets.
4. In a medium mixing bowl, whisk together the light corn syrup and packed light brown sugar until well combined and smooth.
5. Add the room-temperature eggs one at a time, whisking vigorously after each addition to fully incorporate and prevent curdling.
6. Stir in the melted unsalted butter, pure vanilla extract, and fine sea salt until the mixture is homogeneous and glossy.
7. Fold in the roughly chopped pecan halves with a spatula, ensuring they are evenly distributed throughout the filling.
8. Using a small spoon or cookie scoop, divide the pecan filling evenly among the dough-lined muffin cups, filling each about three-quarters full to allow for expansion.
9. Bake in the preheated oven for 18–20 minutes, or until the filling is set and the crust edges are golden brown; a toothpick inserted into the center should come out clean.
10. Remove the tin from the oven and let the bites cool in the pan for 10 minutes to firm up before transferring them to a wire rack to cool completely.
11. Once cooled, carefully run a butter knife around the edges of each bite to loosen and lift them out of the tin.
A buttery, flaky crust gives way to a luscious, caramel-like center studded with toasted pecans, creating a delightful contrast in every mouthful. For an extra touch of elegance, drizzle the bites with melted dark chocolate or serve them alongside a dollop of bourbon-infused whipped cream, enhancing their rich, nutty profile with subtle complexity.
Snowman Hot Chocolate Cookies
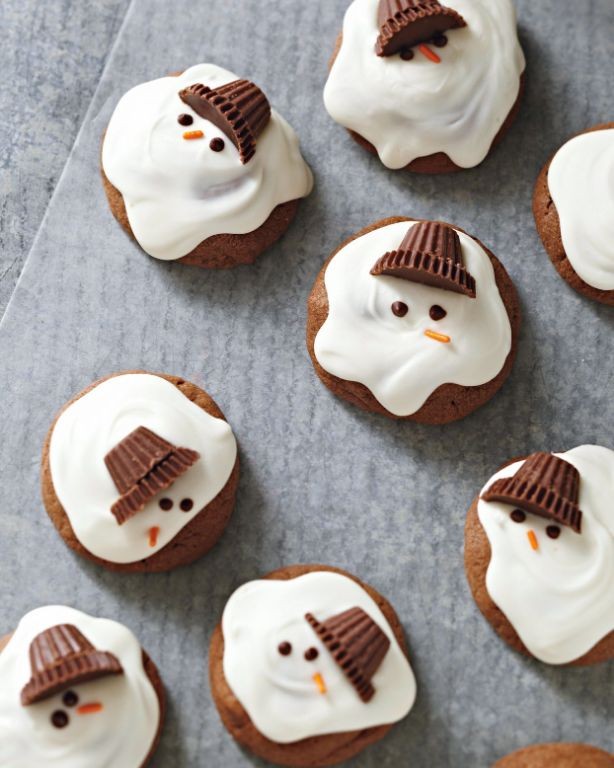
Unveiling a whimsical winter treat that marries the cozy comfort of hot chocolate with the festive charm of a snowman, these cookies are a delightful holiday confection. They feature a rich chocolate base, a gooey marshmallow center, and playful decorations that evoke the joy of the season, making them as enchanting to look at as they are to savor. Perfect for cookie exchanges, holiday gatherings, or a sweet moment by the fire, they transform simple ingredients into edible artistry.
Serving: 24 | Pre Time: 25 minutes | Cooking Time: 10 minutes
Ingredients
– 2 cups all-purpose flour (spooned and leveled for accuracy)
– 1/2 cup unsweetened cocoa powder (Dutch-processed for a deeper flavor)
– 1 teaspoon baking soda
– 1/2 teaspoon salt
– 1 cup unsalted butter, softened to room temperature (about 68°F)
– 3/4 cup granulated sugar
– 3/4 cup packed light brown sugar
– 2 large eggs, at room temperature
– 1 teaspoon pure vanilla extract
– 24 large marshmallows (for the snowman bodies)
– 1 cup semisweet chocolate chips (for melting and decorating)
– 48 mini chocolate chips (for the snowman eyes, or use edible markers)
– 24 orange candy-coated chocolates or sprinkles (for the snowman noses, cut if needed)
– 1/2 cup white chocolate chips, melted (for the snowman scarves, optional)
Instructions
1. Preheat your oven to 350°F and line two baking sheets with parchment paper.
2. In a medium bowl, whisk together the flour, cocoa powder, baking soda, and salt until fully combined.
3. In a large bowl, use an electric mixer on medium speed to cream the softened butter, granulated sugar, and brown sugar until light and fluffy, about 2-3 minutes.
4. Add the eggs one at a time to the butter mixture, beating well after each addition until incorporated.
5. Mix in the vanilla extract until just combined.
6. Gradually add the dry ingredients to the wet mixture, mixing on low speed until a soft dough forms, being careful not to overmix.
7. Scoop the dough into 24 rounded tablespoons and place them 2 inches apart on the prepared baking sheets.
8. Bake the cookies for 8-10 minutes, until the edges are set but the centers are still soft.
9. Immediately press one large marshmallow into the center of each hot cookie, allowing it to melt slightly and adhere.
10. Let the cookies cool on the baking sheets for 5 minutes, then transfer them to a wire rack to cool completely.
11. Melt the semisweet chocolate chips in a microwave-safe bowl in 30-second intervals, stirring until smooth.
12. Dip the top of each marshmallow into the melted chocolate to create the snowman’s hat, letting any excess drip off.
13. While the chocolate is still wet, place two mini chocolate chips on the marshmallow for eyes and one orange candy for the nose.
14. If using, drizzle melted white chocolate over the marshmallow to resemble a scarf, then allow all decorations to set fully at room temperature for about 30 minutes.
From the first bite, these cookies offer a delightful contrast: a crisp exterior gives way to a chewy, chocolatey center, while the melted marshmallow adds a gooey sweetness that mimics sipping hot cocoa. Serve them stacked like a snowman family on a platter or alongside a mug of actual hot chocolate for a doubly cozy experience, where the playful decorations invite smiles and the rich flavor satisfies any winter craving.
3-Ingredient Fudge with Walnuts
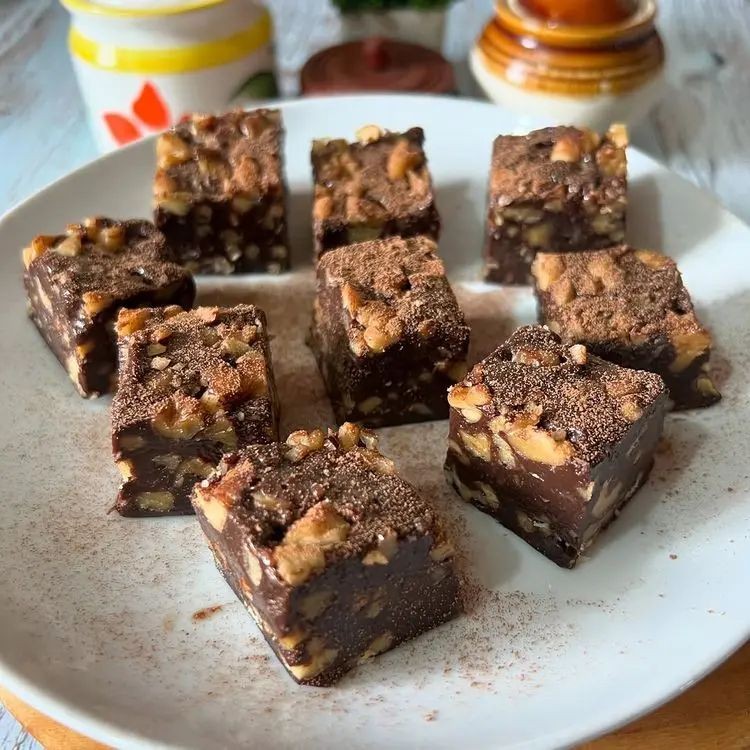
Zesty yet refined, this 3-Ingredient Fudge with Walnuts offers a luxurious treat that marries simplicity with elegance, perfect for holiday gatherings or a sophisticated homemade gift. With just a trio of pantry staples, it delivers a rich, velvety texture and a delightful crunch, making it an effortlessly impressive dessert. Its uncomplicated nature belies the decadent experience it provides, appealing to both novice bakers and seasoned confectioners alike.
Serving: 16 pieces | Pre Time: 10 minutes | Cooking Time: 5 minutes
Ingredients
– 2 cups (12 oz) semi-sweet chocolate chips, high-quality for best melting
– 1 can (14 oz) sweetened condensed milk, full-fat recommended for creaminess
– 1 cup chopped walnuts, toasted lightly for enhanced flavor (optional: substitute with pecans)
Instructions
1. Line an 8×8-inch baking pan with parchment paper, allowing overhang on two sides for easy removal later.
2. In a medium saucepan, combine the 2 cups of semi-sweet chocolate chips and the entire can of sweetened condensed milk.
3. Heat the mixture over low heat, stirring constantly with a silicone spatula to prevent scorching, until the chocolate is fully melted and the mixture is smooth—this should take about 3-5 minutes.
4. Tip: Avoid high heat to ensure the chocolate doesn’t seize; if needed, remove from heat briefly if it starts to thicken too quickly.
5. Once smooth, remove the saucepan from the heat and immediately stir in the 1 cup of chopped walnuts until evenly distributed throughout the fudge.
6. Tip: For extra crunch and depth, toast the walnuts in a 350°F oven for 5-7 minutes before chopping and adding them.
7. Pour the fudge mixture into the prepared baking pan, using the spatula to spread it into an even layer.
8. Tap the pan gently on the countertop to release any air bubbles and create a smooth surface.
9. Refrigerate the fudge, uncovered, for at least 2 hours or until it is completely firm and set.
10. Tip: For clean cuts, use a sharp knife dipped in hot water and wiped dry between slices.
11. Once set, lift the fudge from the pan using the parchment overhang and transfer it to a cutting board.
12. Cut the fudge into 16 equal squares, approximately 2×2 inches each.
13. Store the fudge in an airtight container in the refrigerator for up to one week.
Oozing with a glossy sheen, this fudge boasts a dense, melt-in-your-mouth texture punctuated by the earthy crunch of walnuts. Serve it chilled on a decorative platter for a festive touch, or wrap individual pieces in wax paper as thoughtful homemade gifts. Its deep chocolate flavor, subtly sweetened by the condensed milk, makes it an irresistible indulgence that elevates any occasion with minimal effort.
Festive Chocolate-Dipped Shortbread
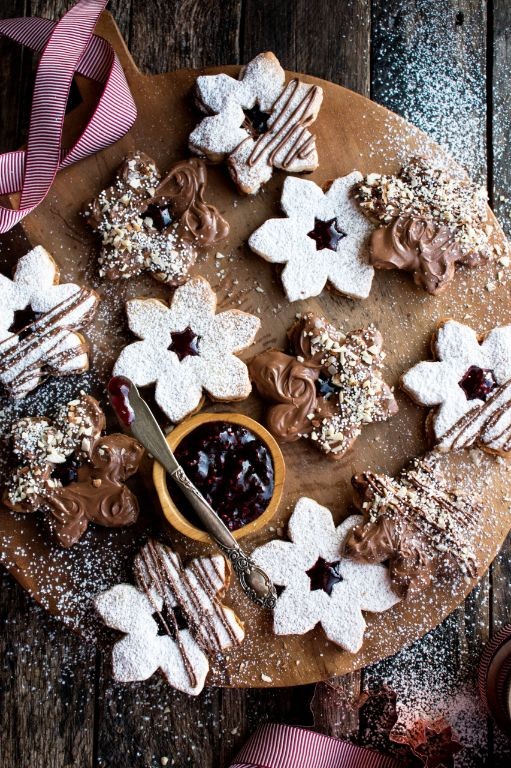
Joyful holiday baking reaches new heights with this sophisticated twist on a classic treat. Festive chocolate-dipped shortbread offers a delightful contrast of buttery, crumbly cookie and rich, glossy chocolate, making it an elegant yet approachable addition to any seasonal gathering. Its simple preparation belies the impressive final result, perfect for gifting or serving alongside afternoon tea.
Serving: 24 cookies | Pre Time: 20 minutes | Cooking Time: 25 minutes
Ingredients
– 1 cup (2 sticks) unsalted butter, softened to room temperature (for easier creaming)
– 1/2 cup granulated sugar
– 2 cups all-purpose flour, spooned and leveled (for accurate measurement)
– 1/4 teaspoon fine sea salt
– 8 ounces semi-sweet chocolate chips or baking bars, chopped (high-quality chocolate yields a superior finish)
– 1 teaspoon coconut oil or vegetable shortening (to thin the chocolate for smooth dipping)
– Holiday sprinkles or crushed candy canes, for decorating (optional)
Instructions
1. Preheat your oven to 325°F (163°C) and line two baking sheets with parchment paper.
2. In a large mixing bowl, use an electric mixer on medium speed to cream the softened butter and granulated sugar together for 3-4 minutes, until light and fluffy; this incorporates air for a tender texture.
3. Add the all-purpose flour and fine sea salt to the butter mixture, mixing on low speed just until a cohesive dough forms and no dry streaks remain, about 1-2 minutes; avoid overmixing to prevent toughness.
4. Turn the dough out onto a lightly floured surface and roll it to a 1/4-inch thickness using a rolling pin.
5. Cut the dough into 2-inch squares or desired shapes with a sharp cookie cutter, re-rolling scraps once.
6. Place the cut cookies 1 inch apart on the prepared baking sheets and prick each cookie 2-3 times with a fork to prevent puffing.
7. Bake one sheet at a time in the preheated oven for 18-22 minutes, until the edges are lightly golden and the centers are set.
8. Transfer the baked cookies to a wire rack and let them cool completely, about 30 minutes; they will firm up as they cool.
9. In a heatproof bowl set over a saucepan of simmering water (double boiler method), melt the chocolate chips and coconut oil together, stirring frequently until smooth and fluid, about 5 minutes; ensure no water gets into the chocolate to prevent seizing.
10. Dip half of each cooled cookie into the melted chocolate, allowing excess to drip back into the bowl.
11. Immediately sprinkle the dipped portion with holiday sprinkles or crushed candy canes, if using, before the chocolate sets.
12. Place the dipped cookies on a parchment-lined tray and let them sit at room temperature until the chocolate hardens, about 1 hour.
Luxuriously crisp and buttery, these shortbread cookies melt in your mouth, balanced by the deep, velvety chocolate coating. For a festive presentation, arrange them on a tiered stand with fresh cranberries or rosemary sprigs, or package them in clear cellophane bags tied with ribbon for thoughtful homemade gifts.
Slow Cooker Spiced Apple Cobbler
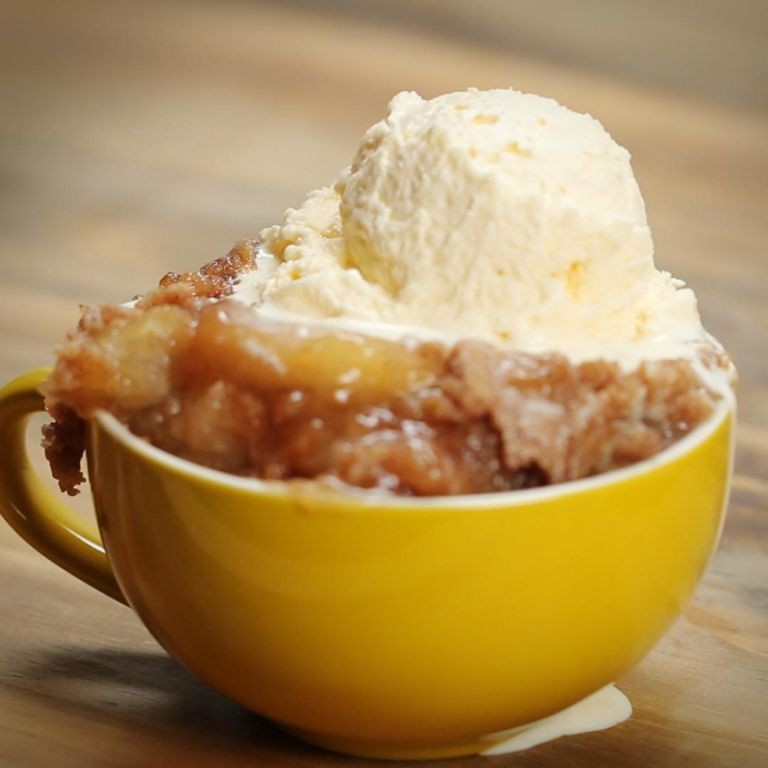
Picture a dessert that transforms humble apples into a warm, fragrant masterpiece, effortlessly melding the cozy spices of the season with the tender, buttery comfort of a classic cobbler—all achieved with the gentle, hands-off magic of your slow cooker. This spiced apple cobbler simplifies holiday baking, allowing the deep, caramelized flavors to develop slowly while filling your home with an irresistible, cinnamon-laced aroma. It’s the perfect make-ahead treat for festive gatherings, promising a dessert that feels both elegantly rustic and wonderfully indulgent.
Serving: 8 | Pre Time: 20 minutes | Cooking Time: 3 hours 30 minutes
Ingredients
– 6 large Granny Smith apples, peeled, cored, and sliced ¼-inch thick (about 8 cups)
– ¾ cup granulated sugar
– ¼ cup light brown sugar, packed
– 2 tablespoons all-purpose flour
– 1 teaspoon ground cinnamon
– ¼ teaspoon ground nutmeg
– ¼ teaspoon ground allspice
– ¼ teaspoon fine sea salt
– 1 tablespoon fresh lemon juice
– 1 cup all-purpose flour
– ¼ cup granulated sugar
– ¼ cup light brown sugar, packed
– 1 teaspoon baking powder
– ¼ teaspoon fine sea salt
– 6 tablespoons cold unsalted butter, cut into small cubes
– ¼ cup whole milk
– 1 teaspoon pure vanilla extract
– Vanilla ice cream or whipped cream, for serving (optional)
Instructions
1. Lightly grease the insert of a 6-quart slow cooker with butter or cooking spray.
2. In a large mixing bowl, combine the sliced apples, ¾ cup granulated sugar, ¼ cup light brown sugar, 2 tablespoons flour, cinnamon, nutmeg, allspice, and ¼ teaspoon salt.
3. Toss the apple mixture gently until the apples are evenly coated with the sugars and spices.
4. Drizzle the lemon juice over the apple mixture and toss again to incorporate.
5. Transfer the spiced apple mixture to the prepared slow cooker, spreading it into an even layer.
6. In a separate medium bowl, whisk together 1 cup flour, ¼ cup granulated sugar, ¼ cup light brown sugar, baking powder, and ¼ teaspoon salt until well combined.
7. Add the cold butter cubes to the flour mixture.
8. Using a pastry cutter or your fingertips, work the butter into the dry ingredients until the mixture resembles coarse crumbs with some pea-sized butter pieces remaining.
9. In a small bowl, stir together the milk and vanilla extract.
10. Pour the milk mixture into the flour-butter mixture.
11. Use a fork to gently stir just until a soft, shaggy dough forms, being careful not to overmix.
12. Drop tablespoon-sized portions of the dough evenly over the top of the apples in the slow cooker, leaving small gaps between them to allow steam to escape.
13. Place a clean kitchen towel or several layers of paper towels over the top of the slow cooker insert, then secure the lid on top.
14. Cook on the HIGH setting for 3 hours 30 minutes, or until the apple filling is bubbling around the edges and the topping is golden and set.
15. Carefully remove the lid and towel, being cautious of the hot steam.
16. Let the cobbler cool in the slow cooker for at least 30 minutes before serving to allow the filling to thicken slightly.
Creating a perfectly tender cobbler topping relies on keeping the butter cold and handling the dough minimally to avoid toughness. The kitchen towel under the lid is crucial—it absorbs condensation, preventing a soggy topping and ensuring a beautifully golden, biscuit-like finish. For deeper flavor, use a mix of apple varieties like Honeycrisp and Granny Smith for a balance of sweetness and tartness.
Cooled slightly, this cobbler offers a sublime contrast: the spiced apples soften into a lush, jammy compote, while the buttery topping bakes up tender and cake-like, with crisp edges where it meets the fruit. Serve it warm in bowls, perhaps with a scoop of vanilla ice cream that melts into the fragrant juices, or enjoy it at room temperature as a sweet ending to a holiday meal, where its comforting spices evoke the very essence of the season.
Mini Cherry Cheesecake Tarts
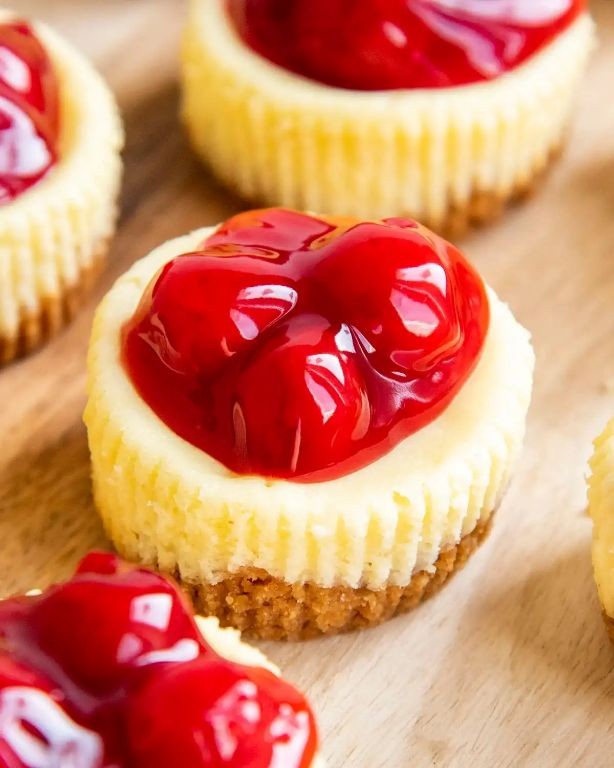
Delightfully elegant yet approachable, these Mini Cherry Cheesecake Tarts offer a sophisticated twist on a classic dessert, perfect for holiday gatherings or an indulgent afternoon treat. Featuring a buttery graham cracker crust, a velvety smooth cream cheese filling, and a glossy cherry topping, each bite-sized tart delivers a harmonious balance of sweet and tangy flavors. Their individual presentation makes them ideal for effortless entertaining, ensuring every guest enjoys a perfectly portioned, visually stunning finale to any meal.
Serving: 12 | Pre Time: 25 minutes | Cooking Time: 18 minutes
Ingredients
– 1 1/2 cups graham cracker crumbs (about 12 full sheets, finely crushed)
– 1/4 cup unsalted butter, melted (cooled slightly)
– 8 oz cream cheese, softened to room temperature
– 1/3 cup granulated sugar
– 1 large egg, at room temperature
– 1 tsp pure vanilla extract
– 1/2 cup sour cream
– 1 cup cherry pie filling (or homemade compote for a fresher taste)
Instructions
1. Preheat your oven to 350°F (175°C) and line a 12-cup muffin tin with paper liners.
2. In a medium bowl, combine the graham cracker crumbs and melted butter until the mixture resembles wet sand and holds together when pressed.
3. Firmly press about 1 1/2 tablespoons of the crumb mixture into the bottom of each muffin cup, using the back of a spoon to create an even, compact layer.
4. Bake the crusts for 8 minutes, then remove from the oven and let cool slightly on a wire rack; this pre-baking helps prevent a soggy base.
5. In a large mixing bowl, beat the softened cream cheese with an electric mixer on medium speed until completely smooth and lump-free, about 2 minutes.
6. Gradually add the granulated sugar while continuing to beat, scraping down the sides of the bowl as needed to ensure even incorporation.
7. Beat in the egg and vanilla extract until just combined, then gently fold in the sour cream with a spatula to avoid overmixing, which can cause cracking.
8. Spoon or pipe the cream cheese filling evenly into the cooled crusts, filling each about 3/4 full to allow room for the topping.
9. Bake for 18-20 minutes, until the edges are set but the centers still have a slight jiggle when gently shaken; avoid overbaking to maintain a creamy texture.
10. Let the tarts cool completely in the tin on a wire rack, then refrigerate for at least 4 hours or overnight to firm up.
11. Just before serving, top each tart with about 1 tablespoon of cherry pie filling, spreading it gently to cover the surface.
Meticulously crafted, these tarts boast a crisp, buttery crust that contrasts beautifully with the luxuriously smooth, tangy-sweet filling, all crowned by vibrant cherries. For a festive touch, garnish with a dusting of powdered sugar or a dollop of whipped cream, or serve them alongside a drizzle of dark chocolate for an extra layer of decadence.
Peppermint Bark Brownies
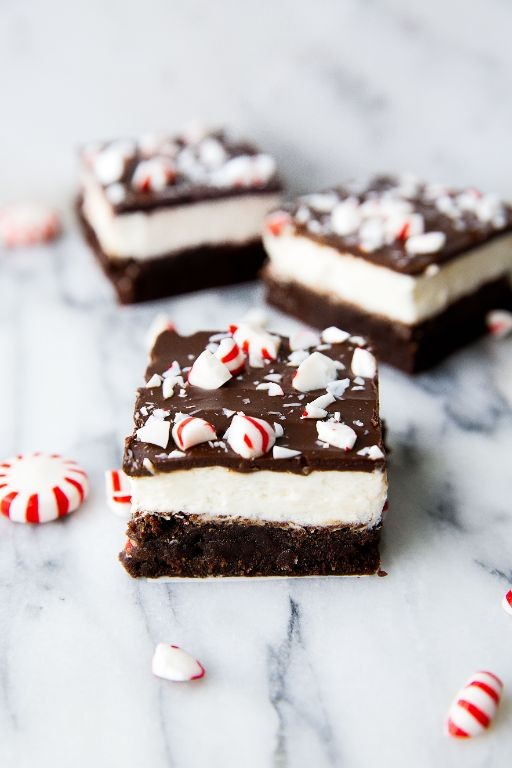
Pristine layers of rich chocolate and refreshing peppermint unite in these decadent brownies, transforming a classic dessert into a festive holiday masterpiece. The deep, fudgy base provides a luxurious canvas for the crisp, snowy topping, creating a delightful contrast in both texture and flavor that is sure to enchant any gathering. This elegant treat marries the comforting warmth of brownies with the cool, invigorating essence of the season, offering a sophisticated twist on beloved traditions.
Serving: 16 | Pre Time: 20 minutes | Cooking Time: 35 minutes
Ingredients
– 1 cup unsalted butter (melted and slightly cooled)
– 2 cups granulated sugar
– 4 large eggs (at room temperature for better incorporation)
– 1 tsp vanilla extract
– 1 cup all-purpose flour (spooned and leveled for accuracy)
– ¾ cup unsweetened cocoa powder (sifted to prevent lumps)
– ½ tsp salt
– 12 oz semisweet chocolate chips (divided, for both batter and topping)
– 1 tsp peppermint extract (use pure extract for best flavor)
– 8 oz white chocolate baking bars (chopped, not chips, for smoother melting)
– ½ cup crushed candy canes or peppermint candies (for garnish)
Instructions
1. Preheat your oven to 350°F (175°C) and line a 9×13-inch baking pan with parchment paper, leaving an overhang on two sides for easy removal.
2. In a large mixing bowl, whisk together the melted butter and granulated sugar until fully combined and smooth.
3. Add the eggs one at a time to the butter mixture, whisking vigorously after each addition until the mixture is glossy and slightly thickened.
4. Stir in the vanilla extract and peppermint extract until evenly distributed throughout the wet ingredients.
5. In a separate medium bowl, sift together the all-purpose flour, cocoa powder, and salt to ensure no lumps remain.
6. Gently fold the dry ingredients into the wet mixture using a spatula, mixing just until no flour streaks are visible to avoid overmixing, which can lead to tough brownies.
7. Fold in 1 cup of the semisweet chocolate chips until they are evenly dispersed throughout the batter.
8. Pour the batter into the prepared baking pan and use an offset spatula to spread it into an even layer, reaching all corners.
9. Bake in the preheated oven for 30-35 minutes, or until a toothpick inserted into the center comes out with a few moist crumbs attached, indicating fudgy doneness rather than overbaking.
10. Remove the pan from the oven and place it on a wire rack; immediately sprinkle the remaining chocolate chips over the hot brownies, allowing them to melt for 2-3 minutes before spreading into a thin, glossy layer with a spatula.
11. In a heatproof bowl set over a pot of simmering water (a double boiler), melt the chopped white chocolate, stirring frequently until smooth and completely liquid, taking care not to overheat it to prevent seizing.
12. Drizzle the melted white chocolate over the semisweet layer in a zigzag pattern, then quickly sprinkle the crushed candy canes on top before the chocolate sets to ensure they adhere properly.
13. Allow the brownies to cool completely in the pan on the wire rack for at least 2 hours, then use the parchment overhang to lift them out and transfer to a cutting board.
14. Using a sharp knife dipped in hot water and wiped dry between cuts, slice the brownies into 16 even squares for clean edges.
The resulting brownies boast a dense, fudgy interior that yields to a satisfying snap from the dual chocolate layers and peppermint garnish. This dessert shines when served slightly chilled, allowing the flavors to meld and the textures to firm up beautifully. For an extra festive touch, arrange the squares on a platter dusted with powdered sugar or alongside a scoop of vanilla ice cream to balance the richness.
Easy Gingerbread Loaf with Glaze
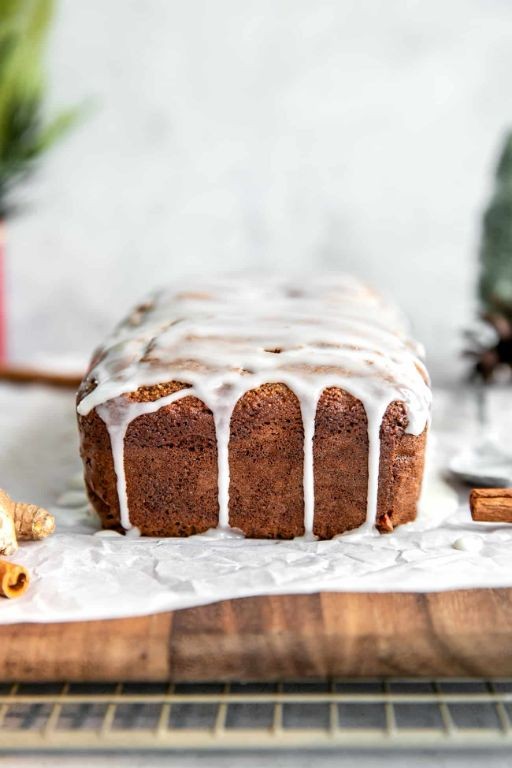
Yearning for a festive treat that fills your kitchen with the warm, nostalgic aroma of the holidays? This easy gingerbread loaf with glaze delivers all the cozy spices and moist texture of traditional gingerbread in a simple, foolproof loaf form. Perfect for gifting, brunch, or a quiet afternoon with tea, it’s a seasonal classic made effortlessly elegant.
Serving: 8 | Pre Time: 15 minutes | Cooking Time: 55 minutes
Ingredients
– 1 ½ cups all-purpose flour (spooned and leveled for accuracy)
– 1 tsp baking soda
– 1 tsp ground ginger
– 1 tsp ground cinnamon
– ½ tsp ground cloves
– ¼ tsp salt
– ½ cup unsalted butter, softened to room temperature (or use vegetable oil for a dairy-free option)
– ½ cup granulated sugar
– ½ cup molasses (not blackstrap for best flavor)
– 1 large egg, at room temperature
– ½ cup buttermilk, at room temperature (or substitute with ½ cup milk mixed with 1 ½ tsp lemon juice)
– 1 cup powdered sugar, sifted to remove lumps
– 2–3 tbsp milk or cream, as needed for glaze consistency
Instructions
1. Preheat your oven to 350°F (175°C) and grease a 9×5-inch loaf pan, then line it with parchment paper for easy removal.
2. In a medium bowl, whisk together the all-purpose flour, baking soda, ground ginger, ground cinnamon, ground cloves, and salt until fully combined.
3. In a large bowl, use an electric mixer on medium speed to beat the softened unsalted butter and granulated sugar for 2–3 minutes until light and fluffy.
4. Add the molasses and large egg to the butter mixture, beating for 1 minute until smooth and incorporated.
5. Tip: Scrape down the sides of the bowl with a spatula to ensure even mixing and prevent lumps.
6. Alternately add the dry ingredients and buttermilk to the wet mixture in three additions, starting and ending with the dry ingredients, mixing on low speed just until combined after each addition.
7. Pour the batter into the prepared loaf pan and smooth the top with a spatula.
8. Bake in the preheated oven for 50–55 minutes, or until a toothpick inserted into the center comes out clean with no wet batter.
9. Tip: Avoid opening the oven door during the first 40 minutes of baking to prevent the loaf from sinking.
10. Remove the loaf from the oven and let it cool in the pan on a wire rack for 15 minutes.
11. Carefully lift the loaf out of the pan using the parchment paper and transfer it to the wire rack to cool completely for about 1 hour.
12. In a small bowl, whisk together the sifted powdered sugar and 2 tablespoons of milk or cream until smooth, adding more liquid 1 teaspoon at a time if needed for a pourable glaze.
13. Tip: For a thicker glaze, use less liquid; drizzle it over the cooled loaf with a spoon or piping bag for decorative control.
14. Let the glaze set for 20–30 minutes before slicing and serving.
Finally, this gingerbread loaf boasts a tender, moist crumb infused with deep spices, balanced by a sweet, glossy glaze that adds a festive touch. Serve it warm with a dollop of whipped cream for a decadent dessert or slice it thin to accompany your morning coffee—it’s a versatile treat that captures the essence of the season in every bite.
Christmas Tree Sugar Cookies

Magical and festive, these Christmas Tree Sugar Cookies capture the holiday spirit with their delicate shapes and sweet, buttery flavor. Perfect for decorating with loved ones, they offer a charming centerpiece for cookie platters or thoughtful homemade gifts. Crafted with simple ingredients, they bake to a tender, melt-in-your-mouth texture that delights both children and adults alike.
Serving: 24 cookies | Pre Time: 30 minutes | Cooking Time: 10 minutes
Ingredients
– 2 ¼ cups all-purpose flour, plus extra for dusting
– 1 cup unsalted butter, softened to room temperature (about 68°F)
– ¾ cup granulated sugar
– 1 large egg, at room temperature for easier mixing
– 1 teaspoon vanilla extract, or almond extract for a nutty twist
– ½ teaspoon baking powder
– ¼ teaspoon salt
– Green food coloring, gel-based for vibrant hue without thinning dough
– Royal icing or sprinkles for decorating, as desired
Instructions
1. In a medium bowl, whisk together 2 ¼ cups all-purpose flour, ½ teaspoon baking powder, and ¼ teaspoon salt until fully combined; set aside.
2. Using a stand mixer fitted with the paddle attachment, beat 1 cup softened unsalted butter and ¾ cup granulated sugar on medium speed for 3 minutes, until light and fluffy, scraping down the bowl halfway through.
3. Add 1 large egg and 1 teaspoon vanilla extract to the butter mixture, beating on low speed for 1 minute until just incorporated.
4. Gradually add the dry ingredients to the wet mixture, mixing on low speed for 2 minutes until a soft dough forms, being careful not to overmix.
5. Divide the dough in half, adding green food coloring to one portion and kneading by hand for 1 minute until evenly tinted; leave the other half plain for optional details.
6. Wrap both dough portions tightly in plastic wrap and refrigerate for at least 1 hour, or until firm to the touch, to prevent spreading during baking.
7. Preheat the oven to 350°F and line two baking sheets with parchment paper.
8. On a lightly floured surface, roll out the green dough to ¼-inch thickness, using Christmas tree-shaped cookie cutters to stamp out shapes, re-rolling scraps as needed.
9. Place the cut-out cookies 1 inch apart on the prepared baking sheets and bake for 8–10 minutes, until the edges are lightly golden but centers remain soft.
10. Transfer the cookies to a wire rack to cool completely for 30 minutes before decorating with royal icing or sprinkles.
Joyful and crisp, these cookies boast a tender crumb with a subtle vanilla sweetness that pairs beautifully with festive decorations. Serve them stacked like a miniature forest on a platter, or package them in clear bags tied with ribbon for charming holiday favors.
Quick Chocolate Orange Truffles
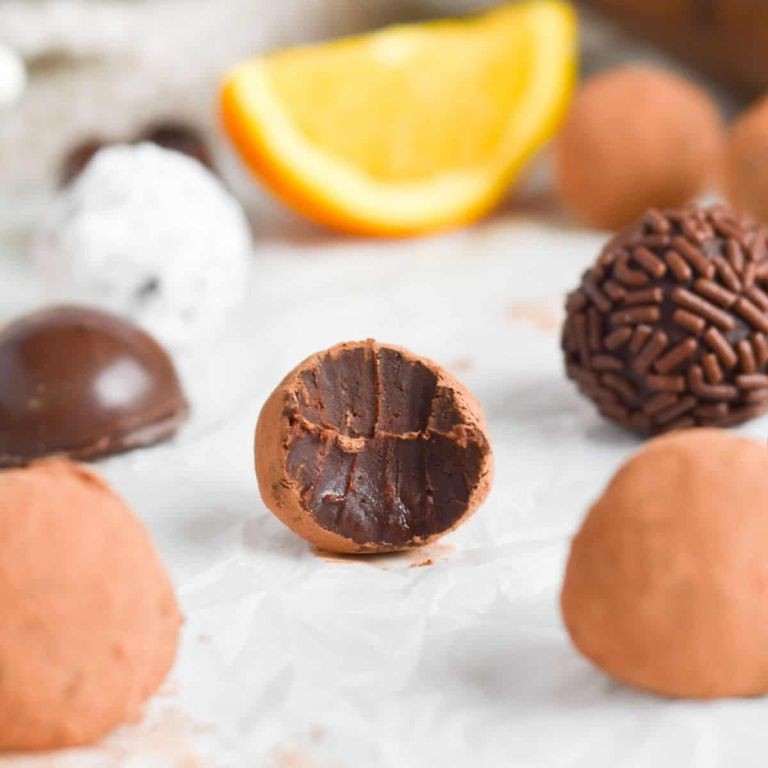
Kick off your holiday festivities with these exquisite Quick Chocolate Orange Truffles, a decadent confection that masterfully balances rich, dark chocolate with the vibrant, citrusy notes of fresh orange. Elegant yet surprisingly simple to prepare, these bite-sized delights are perfect for gifting, entertaining, or indulging in a moment of pure, chocolatey bliss. Their sophisticated flavor profile and velvety texture make them an irresistible addition to any dessert table or cozy evening in.
Serving: 24 truffles | Pre Time: 15 minutes | Cooking Time: 5 minutes
Ingredients
– 8 ounces high-quality dark chocolate (70% cacao), finely chopped for even melting
– 1/2 cup heavy cream
– 2 tablespoons unsalted butter, at room temperature for easy incorporation
– 2 tablespoons finely grated orange zest (from about 1 large orange), avoiding the bitter white pith
– 1 teaspoon pure vanilla extract
– 1/4 teaspoon fine sea salt, to enhance the chocolate flavor
– 1 cup unsweetened cocoa powder, for rolling, sifted to remove lumps
Instructions
1. Place the finely chopped dark chocolate in a medium heatproof bowl.
2. In a small saucepan, heat the heavy cream over medium heat until it just begins to simmer around the edges, about 3-4 minutes; do not let it boil.
3. Immediately pour the hot cream over the chopped chocolate and let it stand undisturbed for 1 minute to allow the chocolate to soften.
4. Gently whisk the chocolate and cream mixture from the center outward until completely smooth and glossy, about 1-2 minutes. Tip: If any chocolate pieces remain unmelted, place the bowl over a pot of barely simmering water (double boiler) and stir until smooth, taking care not to overheat.
5. Whisk in the room-temperature butter, grated orange zest, vanilla extract, and fine sea salt until fully combined and the mixture is uniform.
6. Cover the bowl tightly with plastic wrap, pressing it directly onto the surface of the chocolate mixture to prevent a skin from forming.
7. Refrigerate the mixture until it is firm enough to scoop and hold its shape, about 2 hours. Tip: For faster setting, you can place it in the freezer for 30-40 minutes, checking every 10 minutes to avoid over-hardening.
8. Line a baking sheet with parchment paper. Using a small cookie scoop or a teaspoon, portion the chilled chocolate mixture into 24 roughly 1-inch balls, rolling them quickly between your palms. Tip: If the mixture becomes too soft to handle, return it to the refrigerator for 10 minutes to firm up again.
9. Place the sifted cocoa powder in a shallow bowl. Roll each chocolate ball in the cocoa powder until evenly coated, shaking off any excess.
10. Arrange the finished truffles on the prepared baking sheet. For best texture and flavor, let them sit at room temperature for 10-15 minutes before serving.
Gloriously smooth and rich, these truffles offer a luxurious melt-in-your-mouth experience with a bright, aromatic finish from the orange zest. Their deep chocolate flavor is perfectly complemented by the subtle citrus tang, creating a sophisticated treat that feels both festive and refined. For an elegant presentation, arrange them in mini paper liners or pair with a glass of dessert wine to elevate your holiday gathering.
Simple Cinnamon Roll Christmas Wreath
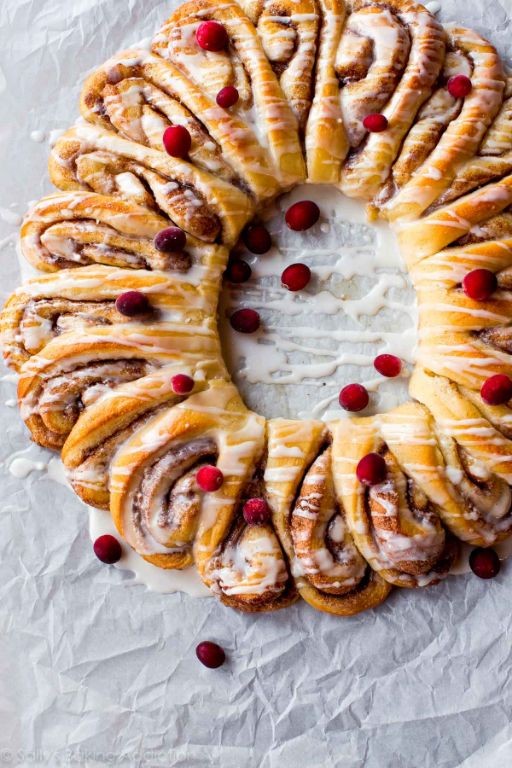
Magical and fragrant, this Simple Cinnamon Roll Christmas Wreath transforms store-bought dough into a stunning, edible centerpiece, perfect for holiday mornings or festive brunches. Its warm, spiced aroma will fill your kitchen with the cozy essence of the season, while the elegant wreath shape makes it as beautiful to behold as it is delicious to eat. With minimal effort and maximum impact, this recipe is a delightful way to celebrate Christmas morning.
Serving: 8 | Pre Time: 15 minutes | Cooking Time: 25 minutes
Ingredients
– 1 (16.3 oz) can refrigerated cinnamon roll dough (with included icing)
– 2 tbsp unsalted butter, melted (for brushing)
– 1/4 cup granulated sugar
– 2 tsp ground cinnamon
– 1/4 cup chopped pecans (optional, for added crunch)
– Cooking spray (for greasing the pan)
Instructions
1. Preheat your oven to 375°F (190°C) and lightly grease a large baking sheet with cooking spray.
2. Unroll the cinnamon roll dough from the can, separating the pre-cut rolls, and set the included icing packet aside.
3. Arrange the dough pieces in a circle on the prepared baking sheet, slightly overlapping the ends to form a wreath shape, leaving a 3-inch hole in the center.
4. In a small bowl, combine the granulated sugar and ground cinnamon thoroughly.
5. Brush the top of the dough wreath evenly with the melted butter using a pastry brush.
6. Sprinkle the cinnamon-sugar mixture generously over the buttered dough, ensuring full coverage.
7. Scatter the chopped pecans evenly over the wreath if using, pressing them lightly into the dough.
8. Bake in the preheated oven for 20-25 minutes, or until the wreath is golden brown and the dough is cooked through.
9. Remove from the oven and let cool on the baking sheet for 5 minutes to set slightly.
10. Drizzle the reserved icing over the warm wreath in a zigzag pattern for a festive finish.
11. Transfer the wreath to a serving platter using a spatula, slice into portions, and serve immediately.
Perfectly tender and flaky, this wreath offers a buttery, cinnamon-spiced flavor with a hint of sweetness from the icing. For a creative twist, serve it warm with a dollop of whipped cream or alongside a mug of hot cocoa, making it a memorable addition to your holiday table.
Summary
Savor the joy of the season with these 20 easy, festive desserts! They’re perfect for creating sweet memories without the stress. We hope you find a new favorite to bake. Try a recipe, then let us know which one you loved in the comments below. If you enjoyed this roundup, please share it on Pinterest to spread the holiday cheer!