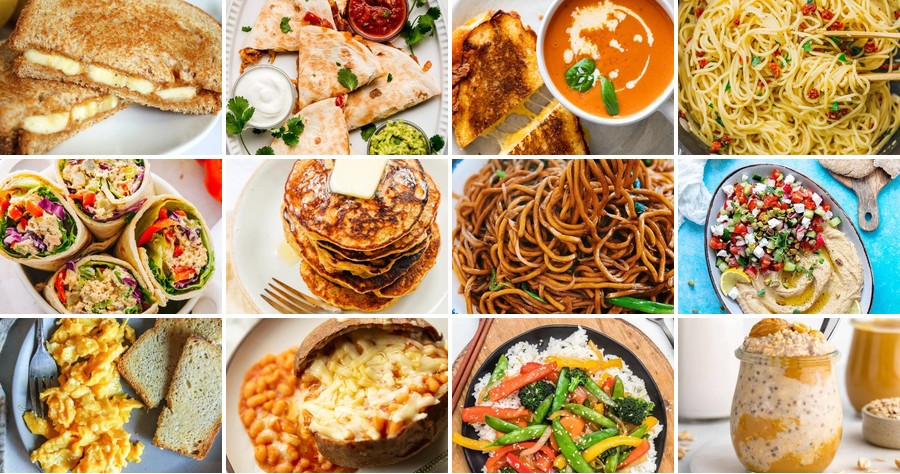
Busy student life doesn’t have to mean boring meals or breaking the bank! We’ve gathered 20 quick, easy, and budget-friendly recipes perfect for those tight on time and money. From satisfying dinners to simple comfort foods, these dishes will keep you fueled without the stress. Ready to eat well on a student budget? Let’s dive into these delicious, wallet-friendly ideas!
Microwave Mug Mac and Cheese

Feeling that late-night mac and cheese craving but don’t want to deal with a big pot? You’ve come to the right place. This microwave mug version is your perfect, cheesy savior, ready in just a few minutes.
Serving: 1 | Pre Time: 2 minutes | Cooking Time: 3 minutes
Ingredients
– A 1/2 cup of elbow macaroni
– A 1/2 cup of water
– A splash of milk (about 2 tbsp)
– A generous 1/4 cup of shredded cheddar cheese
– A small pat of butter (about 1 tsp)
– A tiny pinch of salt
Instructions
1. Grab a large, microwave-safe mug that holds at least 12 ounces.
2. Pour the 1/2 cup of elbow macaroni into the mug.
3. Add the 1/2 cup of water to the mug with the pasta.
4. Microwave the mug on high power for 2 minutes and 30 seconds. (Tip: The mug will be hot, so use an oven mitt to handle it).
5. Carefully remove the mug from the microwave. The water should be mostly absorbed.
6. Stir the pasta in the mug with a fork to check the texture. It should be tender but still have a slight bite.
7. If the pasta isn’t quite tender, add another tablespoon of water and microwave for an additional 30 seconds.
8. Drain any excess water from the mug by carefully tipping it over the sink.
9. Add the small pat of butter to the hot pasta in the mug and stir until it melts.
10. Pour the splash of milk into the mug and stir to combine.
11. Add the generous 1/4 cup of shredded cheddar cheese to the mug. (Tip: Freshly shredded cheese melts smoother than pre-shredded).
12. Stir vigorously until the cheese is completely melted and forms a creamy sauce, about 30 seconds.
13. Add the tiny pinch of salt and stir one final time to season. (Tip: Taste it first—the cheese already adds saltiness).
14. Let the mug sit for 1 minute to thicken slightly before eating.
Kick back and enjoy that creamy, gooey cheese clinging to every noodle. The texture is wonderfully rich and comforting, just like the stovetop version. For a fun twist, try mixing in a spoonful of salsa or crumbling some cooked bacon on top right before you dig in.
5-Minute Avocado Toast
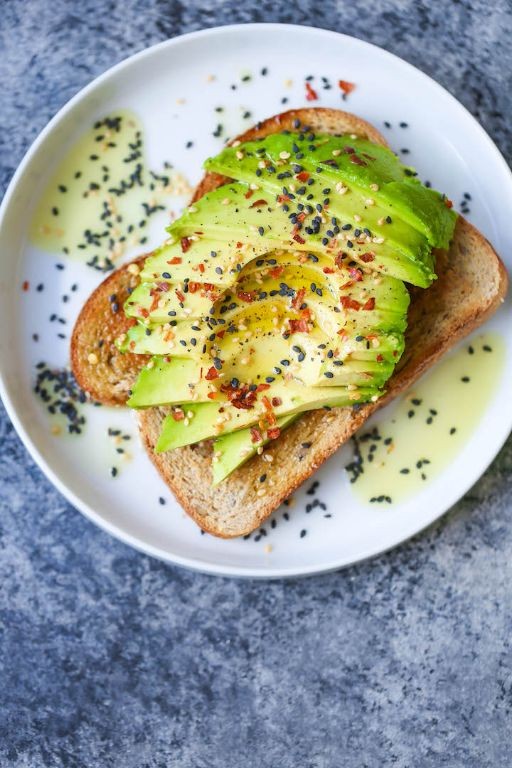
Craving something quick, delicious, and packed with good-for-you fats? This 5-minute avocado toast is your new go-to for a speedy breakfast or snack. It’s so simple you can whip it up even on the busiest mornings.
Serving: 1 | Pre Time: 2 minutes | Cooking Time: 3 minutes
Ingredients
– A couple of slices of your favorite bread (I love sourdough!)
– 1 ripe avocado
– A squeeze of fresh lemon juice (about 1 tbsp)
– A pinch of red pepper flakes
– A sprinkle of flaky sea salt
– A drizzle of extra virgin olive oil
Instructions
1. Pop your bread slices into the toaster and toast them until they’re golden brown and crisp.
2. While the bread toasts, cut your ripe avocado in half, remove the pit, and scoop the flesh into a small bowl.
3. Add the fresh lemon juice to the avocado in the bowl. Tip: The lemon juice adds brightness and helps prevent the avocado from browning too quickly.
4. Use a fork to mash the avocado and lemon juice together until it’s mostly smooth but still has a few small chunks for texture.
5. Once the toast is ready, spread the mashed avocado evenly over each warm slice.
6. Drizzle a little extra virgin olive oil over the top of the avocado on each toast.
7. Sprinkle a pinch of red pepper flakes and a generous sprinkle of flaky sea salt over each toast. Tip: The warm toast helps the salt and pepper flakes stick and bloom with flavor.
8. Serve immediately. Tip: For an extra kick, you can add a crack of black pepper right before eating.
Ready to dig in? The creamy, cool avocado against the warm, crunchy toast is pure comfort, with the lemon and red pepper flakes giving it a perfect zesty kick. Try topping it with a fried egg for a heartier meal, or add some sliced radishes for an extra crunch.
One-Pot Spaghetti Aglio e Olio
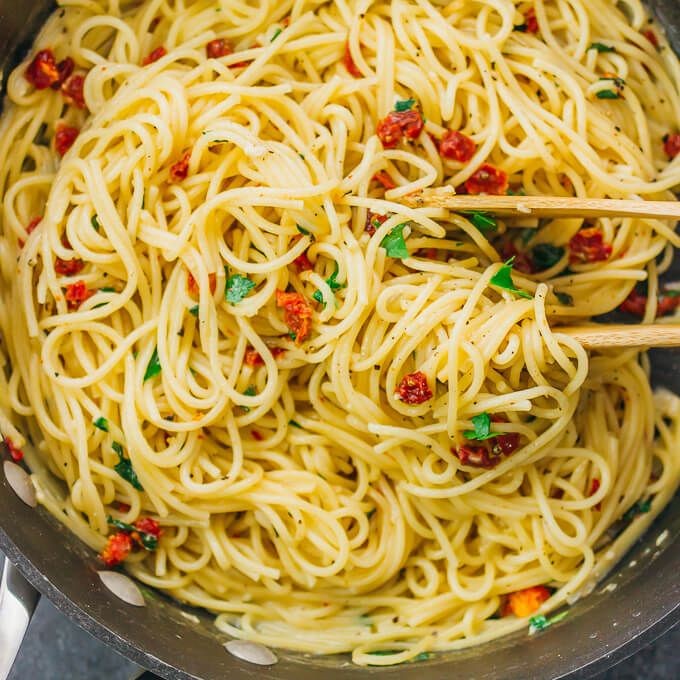
Remember those nights when you just want something delicious without a mountain of dishes? This one-pot spaghetti aglio e olio is your new best friend—it’s garlicky, simple, and ready in about 20 minutes.
Serving: 4 | Pre Time: 5 minutes | Cooking Time: 15 minutes
Ingredients
– A 12-ounce box of spaghetti
– A generous ¼ cup of olive oil
– 4 cloves of garlic, thinly sliced
– A couple of pinches of red pepper flakes
– A big handful of fresh parsley, chopped
– A squeeze of fresh lemon juice
– A sprinkle of salt
Instructions
1. Fill your large pot with about 4 quarts of water and bring it to a rolling boil over high heat.
2. Add a generous sprinkle of salt to the boiling water, then add the spaghetti, stirring immediately to prevent sticking.
3. Cook the spaghetti for 8–10 minutes, stirring occasionally, until it’s al dente (tender but still has a slight bite).
4. While the pasta cooks, heat the olive oil in a large skillet over medium-low heat until it shimmers, about 2 minutes.
5. Add the sliced garlic and red pepper flakes to the skillet, cooking for 1–2 minutes until the garlic is fragrant and just starting to turn golden—watch closely so it doesn’t burn.
6. Drain the cooked spaghetti, reserving about ½ cup of the pasta water, then add the spaghetti directly to the skillet with the garlic oil.
7. Toss everything together, adding a splash of the reserved pasta water to help the sauce cling to the pasta.
8. Turn off the heat and stir in the chopped parsley and a squeeze of lemon juice, tossing until evenly coated.
9. Taste and adjust with a little more salt if needed, then serve immediately.
Mmm, you’ll love how the spaghetti soaks up that garlicky oil, with a hint of heat from the pepper flakes and a fresh zing from the lemon. For a fun twist, top it with grated Parmesan or serve alongside a crisp green salad—it’s perfect for a cozy weeknight dinner.
Easy Veggie Stir-Fry with Rice
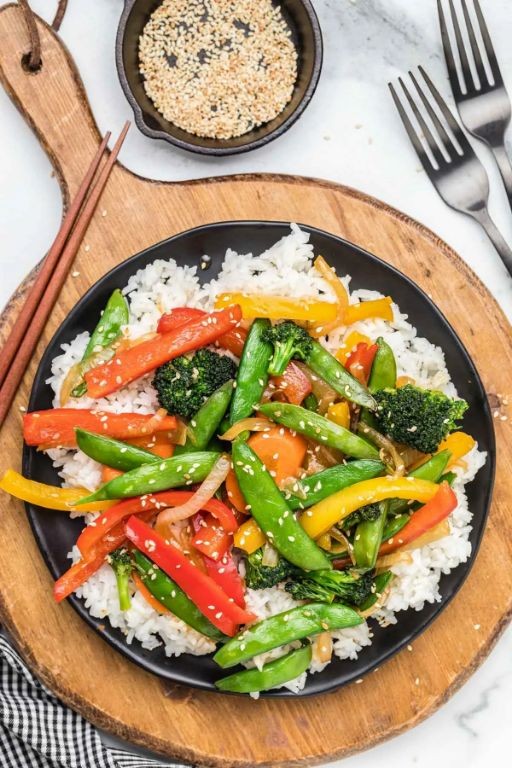
Perfect for those busy weeknights when you want something healthy and delicious without a fuss, this easy veggie stir-fry comes together in a flash. You’ll love how the crisp-tender vegetables and savory sauce pair with fluffy rice—it’s a complete meal that feels both comforting and light. Let’s get cooking!
Serving: 4 | Pre Time: 15 minutes | Cooking Time: 15 minutes
Ingredients
– 2 cups of uncooked long-grain white rice
– 1 tablespoon of vegetable oil
– 1 onion, thinly sliced
– 2 bell peppers (any color), cut into strips
– 2 carrots, peeled and sliced into thin rounds
– 1 cup of broccoli florets
– 3 cloves of garlic, minced
– 1 tablespoon of grated fresh ginger
– ¼ cup of soy sauce
– 2 tablespoons of rice vinegar
– 1 tablespoon of honey
– A splash of sesame oil
– A couple of green onions, chopped for garnish
Instructions
1. Rinse 2 cups of uncooked long-grain white rice under cold water until the water runs clear to remove excess starch for fluffier results.
2. Cook the rice according to package directions, usually with 4 cups of water, bringing to a boil, then reducing to a simmer and covering for 15–20 minutes until tender.
3. While the rice cooks, heat 1 tablespoon of vegetable oil in a large skillet or wok over medium-high heat until it shimmers.
4. Add 1 thinly sliced onion and sauté for 3–4 minutes until softened and slightly translucent.
5. Toss in 2 bell peppers cut into strips, 2 sliced carrots, and 1 cup of broccoli florets, stirring frequently for 5–7 minutes until crisp-tender—keep the veggies moving to prevent burning.
6. Push the vegetables to the sides of the skillet and add 3 minced garlic cloves and 1 tablespoon of grated ginger to the center, cooking for 30 seconds until fragrant to avoid bitterness.
7. In a small bowl, whisk together ¼ cup of soy sauce, 2 tablespoons of rice vinegar, 1 tablespoon of honey, and a splash of sesame oil until smooth.
8. Pour the sauce over the vegetables in the skillet, stirring to coat evenly, and cook for 1–2 minutes until heated through and slightly thickened.
9. Remove from heat and sprinkle with a couple of chopped green onions for a fresh finish.
10. Serve the stir-fry hot over the cooked rice.
This dish delivers a satisfying crunch from the veggies balanced by a sweet-savory sauce that clings perfectly to each bite. Try topping it with extra green onions or a sprinkle of sesame seeds for added texture, or pair it with a side of steamed edamame for a protein boost—it’s versatile enough to become your new go-to dinner!
3-Ingredient Banana Pancakes

Let’s be real—some mornings you just need breakfast to be fast, easy, and delicious. That’s where these 3-ingredient banana pancakes come in. They’re the perfect solution for when you’re short on time but still want something homemade and satisfying.
Serving: 2 | Pre Time: 5 minutes | Cooking Time: 10 minutes
Ingredients
– 2 ripe bananas (the spottier, the sweeter!)
– 2 large eggs
– A couple of tablespoons of all-purpose flour (about ¼ cup)
– A splash of vanilla extract (optional, but it adds a nice aroma)
– A pinch of salt
– A little butter or oil for the pan
Instructions
1. Peel the 2 ripe bananas and place them in a medium bowl.
2. Use a fork to mash the bananas until they’re mostly smooth with just a few small lumps.
3. Crack the 2 large eggs into the bowl with the mashed bananas.
4. Whisk the eggs and bananas together until well combined—this should take about 30 seconds. Tip: A quick whisk helps create a fluffy texture without overmixing.
5. Add the couple of tablespoons of all-purpose flour (about ¼ cup) to the bowl.
6. If using, pour in a splash of vanilla extract and add a pinch of salt.
7. Gently stir everything together until just combined; stop as soon as you don’t see dry flour. Tip: Overmixing can make the pancakes dense, so a few lumps are totally fine.
8. Heat a non-stick skillet or griddle over medium heat (about 350°F if you have a thermometer).
9. Add a little butter or oil to the pan and let it melt, swirling to coat the surface.
10. Pour about ¼ cup of batter onto the skillet for each pancake, leaving space between them.
11. Cook for 2-3 minutes, or until you see bubbles forming on the surface and the edges look set.
12. Carefully flip each pancake with a spatula. Tip: Wait for those bubbles—it’s your cue that the bottom is golden and ready to flip.
13. Cook for another 1-2 minutes on the other side, until golden brown and cooked through.
14. Transfer the pancakes to a plate and repeat with the remaining batter, adding more butter or oil to the pan as needed.
15. Serve immediately while warm. Enjoy these pancakes as is, or get creative with toppings like fresh berries, a drizzle of honey, or a dollop of yogurt. They’re naturally sweet from the bananas and have a soft, tender texture that’s just right for a cozy morning. Easy to whip up and even easier to love, they’re sure to become a go-to in your kitchen.
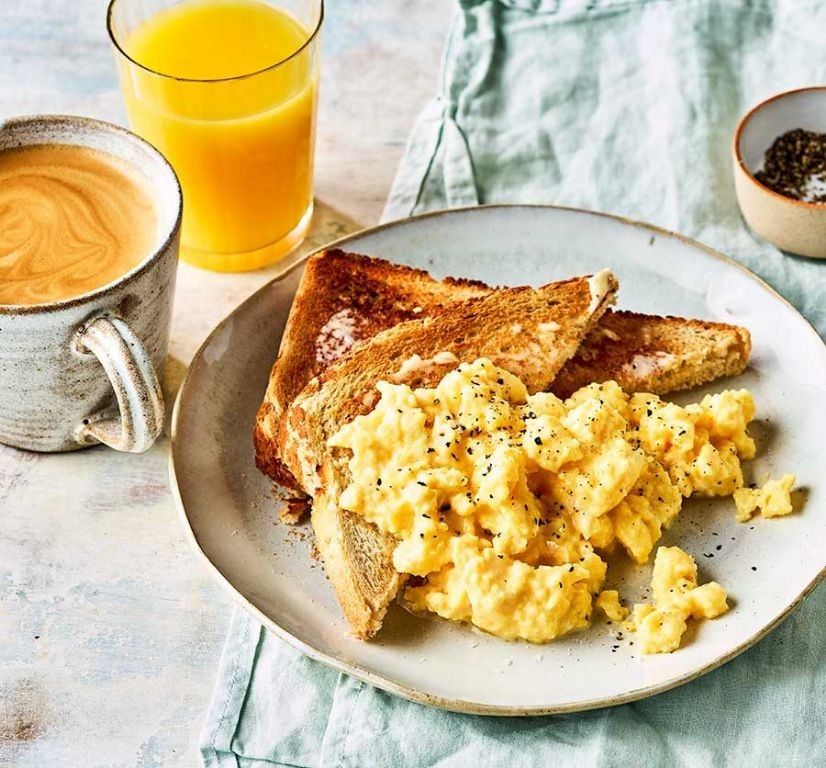
Scrambled Eggs with Toast

Sometimes you just need something simple, comforting, and ready in minutes. Scrambled eggs with toast is that perfect, no-fuss meal that feels like a warm hug on a busy morning or a lazy weekend afternoon.
Serving: 1 | Pre Time: 2 minutes | Cooking Time: 5 minutes
Ingredients
– A couple of large eggs
– A splash of whole milk or cream
– A small pat of unsalted butter
– A pinch of kosher salt
– A couple of cracks of freshly ground black pepper
– A slice of your favorite bread (sourdough is great!)
– A little more butter for the toast
Instructions
1. Crack your two eggs into a small bowl.
2. Add that splash of milk and whisk everything together with a fork until the yolks and whites are just combined.
3. Place a non-stick skillet over medium-low heat and let it warm up for about 30 seconds.
4. Add your small pat of butter to the skillet and let it melt completely, swirling it around to coat the pan.
5. Pour the egg mixture into the center of the skillet. Tip: Cooking over low heat gives you creamier, softer curds.
6. Let the eggs sit undisturbed for about 20 seconds until the edges just start to set.
7. Using a silicone spatula, gently push the set edges toward the center, letting the liquid egg run to the edges. Repeat this process every 15-20 seconds.
8. When the eggs are mostly set but still look a bit wet and glossy (this takes about 2-3 minutes total), remove the skillet from the heat immediately. Tip: The residual heat will finish cooking them perfectly.
9. Season the eggs right in the pan with your pinch of salt and a couple of cracks of pepper, then give them one final, gentle fold.
10. While the eggs are cooking, pop your slice of bread into the toaster and toast it to your preferred level of doneness.
11. As soon as the toast pops up, spread a little butter over the hot surface so it melts right in. Tip: Buttering hot toast makes all the difference for flavor!
12. Transfer your creamy scrambled eggs onto the buttered toast plate.
Craving something more? The eggs should be soft, creamy, and rich from the butter, contrasting beautifully with the crisp, buttery toast. For a fun twist, top it all with a sprinkle of sharp cheddar or a few slices of creamy avocado right before serving.
Instant Ramen Upgrade with Egg and Veggies

Hey, you know those nights when you’re craving something comforting but don’t want to spend hours in the kitchen? Here’s how to turn that basic instant ramen into a satisfying meal that feels homemade.
Serving: 1 | Pre Time: 5 minutes | Cooking Time: 10 minutes
Ingredients
– 1 package of your favorite instant ramen (save the seasoning packet for later)
– 1 large egg
– A handful of baby spinach (about 1 cup)
– Half a carrot, thinly sliced into coins
– A couple of green onions, sliced
– 1 tablespoon of soy sauce
– A splash of sesame oil
– 2 cups of water
Instructions
1. Bring 2 cups of water to a boil in a small pot over medium-high heat.
2. Add the thinly sliced carrot coins to the boiling water and cook for 2 minutes to soften them slightly.
3. Tip: This pre-cooking step ensures the carrots are tender without overcooking the noodles later.
4. Add the ramen noodles (without the seasoning packet) to the pot and cook according to the package directions, usually about 3 minutes.
5. While the noodles cook, crack the egg into a small bowl and whisk it lightly with a fork.
6. Tip: Whisking the egg first helps it blend smoothly into the broth for a silky texture.
7. Once the noodles are almost done, reduce the heat to low and slowly pour the whisked egg into the pot, stirring constantly for about 30 seconds to create ribbons.
8. Add the handful of baby spinach and sliced green onions, stirring until the spinach wilts, which takes about 1 minute.
9. Stir in the seasoning packet from the ramen, 1 tablespoon of soy sauce, and a splash of sesame oil, mixing well for another 30 seconds.
10. Tip: Adding the sesame oil at the end preserves its aromatic flavor instead of cooking it out.
11. Remove the pot from the heat and let it sit for 1 minute to allow the flavors to meld.
12. Pour everything into a large bowl, being careful as it will be hot.
But the real magic happens when you dig in—the creamy egg ribbons mix with the savory broth, while the veggies add a fresh crunch. Try topping it with a sprinkle of extra green onions or a dash of chili flakes for a spicy kick, making it a cozy bowl that’s way better than the original.
Grilled Cheese Sandwich with Tomato Soup

Visions of cozy winter afternoons come to life with this classic combo. You know the one—that perfect grilled cheese sandwich dipped into a warm, tangy tomato soup. It’s the ultimate comfort food for when you need a little pick-me-up.
Serving: 2 | Pre Time: 10 minutes | Cooking Time: 20 minutes
Ingredients
– 4 slices of your favorite bread (like sourdough or white)
– 4 slices of sharp cheddar cheese
– 2 tablespoons of butter, softened
– A 14.5-ounce can of crushed tomatoes
– 1 cup of vegetable broth
– A splash of heavy cream (about ¼ cup)
– A couple of cloves of garlic, minced
– 1 tablespoon of olive oil
– A pinch of dried basil
– A pinch of salt and black pepper
Instructions
1. Heat the olive oil in a medium pot over medium heat.
2. Add the minced garlic and cook for about 1 minute, until fragrant—be careful not to burn it!
3. Pour in the can of crushed tomatoes and vegetable broth, stirring to combine.
4. Bring the soup to a simmer, then reduce the heat to low and let it cook for 15 minutes, stirring occasionally.
5. While the soup simmers, spread the softened butter evenly on one side of each bread slice.
6. Place two bread slices, buttered-side down, in a large skillet over medium-low heat.
7. Top each with two slices of cheddar cheese, then cover with the remaining bread slices, buttered-side up.
8. Cook the sandwiches for 3–4 minutes per side, until golden brown and the cheese is melted—press gently with a spatula for even browning.
9. Stir the heavy cream into the soup, then season with dried basil, salt, and black pepper.
10. Ladle the soup into bowls and serve immediately with the grilled cheese sandwiches on the side.
What makes this duo so special is the crispy, buttery bread giving way to gooey cheese, paired with the soup’s creamy, tangy kick. Try dunking the sandwich right in for that perfect bite, or add a sprinkle of fresh herbs on top for a pop of color.
Overnight Oats with Peanut Butter
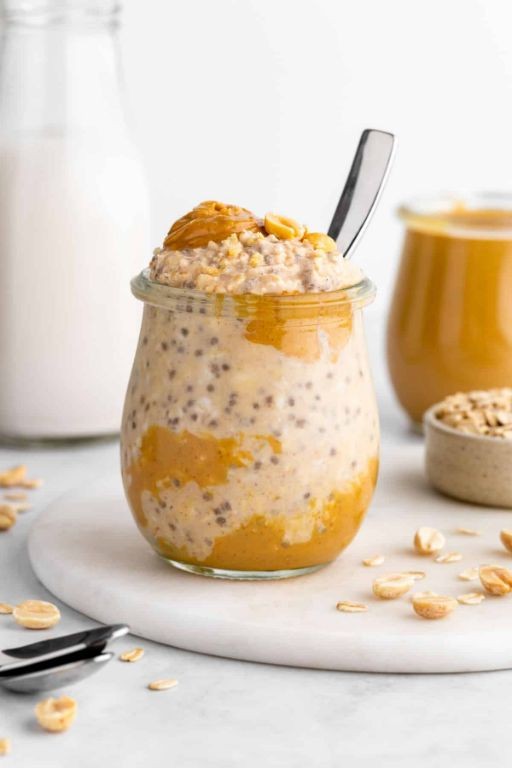
Overnight oats are the ultimate breakfast hack for busy mornings. You just mix a few ingredients before bed, and wake up to a creamy, ready-to-eat meal. It’s like magic, but with peanut butter.
Serving: 1 | Pre Time: 5 minutes | Cooking Time: 0 minutes
Ingredients
– 1/2 cup of old-fashioned rolled oats
– 1/2 cup of milk (any kind you like)
– 1 tablespoon of creamy peanut butter
– 1 teaspoon of maple syrup or honey
– A pinch of salt
– A handful of your favorite toppings, like sliced banana or chocolate chips
Instructions
1. Grab a mason jar or any container with a lid.
2. Add 1/2 cup of old-fashioned rolled oats to the jar.
3. Pour in 1/2 cup of milk—tip: using a liquid measuring cup helps avoid spills.
4. Spoon 1 tablespoon of creamy peanut butter into the jar.
5. Drizzle 1 teaspoon of maple syrup or honey over the mixture.
6. Sprinkle a pinch of salt to balance the sweetness.
7. Secure the lid tightly and shake the jar vigorously for about 30 seconds until everything is well combined—tip: shaking ensures the peanut butter blends smoothly without clumps.
8. Place the jar in the refrigerator for at least 6 hours, or overnight.
9. In the morning, give the oats a good stir with a spoon—tip: if it seems too thick, add a splash more milk to reach your desired consistency.
10. Top with a handful of your favorite toppings, like sliced banana or chocolate chips, and enjoy immediately.
You’ll love the thick, pudding-like texture that’s both filling and refreshing. The peanut butter adds a rich, nutty flavor that pairs perfectly with sweet toppings—try drizzling extra syrup on top for a decadent twist.
Quesadilla with Salsa and Sour Cream

Craving something cheesy and satisfying? This quesadilla with salsa and sour cream is your answer. It’s quick, customizable, and perfect for a busy weeknight or a casual snack. You’ll love how the melty cheese pairs with the fresh toppings.
Serving: 2 | Pre Time: 5 minutes | Cooking Time: 10 minutes
Ingredients
– 4 large flour tortillas
– A couple of cups of shredded Monterey Jack or cheddar cheese
– A splash of vegetable oil or a pat of butter
– About half a cup of your favorite salsa
– A dollop of sour cream, for serving
Instructions
1. Heat a large skillet or griddle over medium heat (around 350°F).
2. Lightly brush one side of a tortilla with vegetable oil or spread a thin layer of butter.
3. Place the tortilla, oiled-side down, in the hot skillet.
4. Sprinkle about half a cup of shredded cheese evenly over the entire tortilla.
5. Top with another tortilla, pressing down gently.
6. Cook for 2-3 minutes, until the bottom tortilla is golden brown and crispy. Tip: Peek underneath with a spatula to check the color.
7. Carefully flip the quesadilla using a spatula.
8. Cook the other side for another 2-3 minutes, until golden and the cheese is fully melted. Tip: If the cheese isn’t melting, cover the skillet briefly with a lid to trap heat.
9. Transfer the cooked quesadilla to a cutting board and let it rest for 1 minute before slicing. Tip: This helps the cheese set so it doesn’t ooze out everywhere.
10. Repeat steps 2-9 with the remaining tortillas and cheese.
11. Cut each quesadilla into wedges with a sharp knife or pizza cutter.
12. Serve immediately with salsa and a dollop of sour cream on the side or drizzled on top.
Golden and crispy on the outside with a gooey, stretchy cheese center, this quesadilla hits all the right notes. The cool sour cream balances the warmth, while the salsa adds a tangy kick. For a fun twist, try adding leftover chicken or black beans inside before cooking.
Pasta with Garlic Butter and Parmesan

Venture into the coziest pasta night ever with this simple, flavor-packed dish. You’ll love how the garlic butter melts into the parmesan, creating a creamy sauce that clings to every noodle. It’s the kind of meal you can whip up in minutes but tastes like you spent hours.
Serving: 4 | Pre Time: 5 minutes | Cooking Time: 15 minutes
Ingredients
– A pound of your favorite pasta (like spaghetti or fettuccine)
– 8 tablespoons (1 stick) of unsalted butter
– 6 cloves of garlic, minced
– A cup of freshly grated parmesan cheese
– A splash of reserved pasta water (about 1/4 cup)
– A couple of tablespoons of chopped fresh parsley (optional)
– Salt and freshly ground black pepper
Instructions
1. Bring a large pot of salted water to a rolling boil over high heat.
2. Add the pasta and cook according to package directions until al dente, stirring occasionally to prevent sticking.
3. While the pasta cooks, melt the butter in a large skillet over medium-low heat.
4. Add the minced garlic to the skillet and cook for 1-2 minutes, stirring constantly, until fragrant but not browned—this prevents bitterness.
5. Reserve about 1/4 cup of the starchy pasta water, then drain the pasta in a colander.
6. Add the drained pasta directly to the skillet with the garlic butter.
7. Toss the pasta in the butter to coat it evenly, using tongs for easy mixing.
8. Remove the skillet from the heat to avoid scrambling the cheese in the next step.
9. Sprinkle the grated parmesan over the pasta and toss quickly until it melts into a creamy sauce, adding the reserved pasta water a splash at a time if it looks too thick—this helps the sauce cling better.
10. Season with salt and black pepper to taste, and toss in the chopped parsley if using for a fresh pop of color.
Buttery and rich, this pasta has a silky texture with a bold garlic kick that mellows as it cooks. Serve it straight from the skillet for a rustic feel, or top with extra parmesan and a sprinkle of red pepper flakes for a spicy twist. It’s perfect for a quick weeknight dinner or a cozy date night in.
Microwave Scrambled Eggs
Fancy a quick breakfast without the fuss? Microwave scrambled eggs are your new best friend—they’re fast, fluffy, and perfect for busy mornings. You’ll be eating in minutes, with minimal cleanup.
Serving: 1 | Pre Time: 2 minutes | Cooking Time: 2 minutes
Ingredients
– A couple of large eggs
– A splash of milk (about 1 tbsp)
– A pinch of salt
– A little butter (about 1/2 tbsp)
– A sprinkle of black pepper (optional)
Instructions
1. Crack two large eggs into a microwave-safe bowl.
2. Add a splash of milk (about 1 tbsp) to the eggs.
3. Sprinkle in a pinch of salt and a little black pepper if you like.
4. Whisk everything together with a fork until well combined and slightly frothy.
5. Add a little butter (about 1/2 tbsp) to the bowl.
6. Microwave the mixture on high for 30 seconds.
7. Remove the bowl and stir the eggs with a fork, scraping the edges to prevent sticking—this helps them cook evenly.
8. Microwave for another 30 seconds on high.
9. Check the eggs; they should look mostly set but still slightly wet. If needed, microwave in 15-second intervals, stirring after each, until fluffy and cooked through—avoid overcooking to keep them tender.
10. Let the eggs sit in the bowl for 30 seconds to finish cooking from residual heat, which prevents them from drying out.
Ultra-fluffy and creamy, these eggs have a soft texture that’s just right for a quick bite. Toss in some shredded cheese or herbs after cooking for extra flavor, or pile them onto toast for a satisfying meal.
Simple Tuna Salad Wrap

Maybe you’re looking for a quick, satisfying lunch that won’t leave you feeling sluggish. This simple tuna salad wrap is just the thing—it’s fresh, easy to throw together, and perfect for a busy day. You’ll love how the creamy filling pairs with the crisp veggies.
Serving: 2 | Pre Time: 10 minutes | Cooking Time: 0 minutes
Ingredients
- Two 5-ounce cans of solid white tuna in water, drained well
- A big spoonful (about 1/4 cup) of mayonnaise
- A squeeze of fresh lemon juice (about 1 tablespoon)
- A couple of celery stalks, finely chopped
- A quarter of a red onion, diced nice and small
- A handful of fresh dill, chopped (or a teaspoon of dried dill if that’s what you have)
- Salt and freshly ground black pepper
- Two large flour tortillas (the burrito-sized ones work great)
- A big handful of fresh spinach or lettuce leaves
Instructions
- Place the drained tuna in a medium mixing bowl and flake it apart with a fork until no large chunks remain.
- Add the mayonnaise, fresh lemon juice, chopped celery, diced red onion, and chopped dill to the bowl with the tuna.
- Gently stir everything together until it’s evenly combined. Tip: For the best flavor, let this mixture chill in the fridge for at least 15 minutes if you have time—it lets the flavors really meld.
- Season the tuna salad with a pinch of salt and a few grinds of black pepper, then give it one final stir to incorporate.
- Lay a flour tortilla flat on a clean surface or plate.
- Place a layer of fresh spinach or lettuce leaves in the center of the tortilla, leaving about a 2-inch border around the edges.
- Spoon half of the tuna salad mixture evenly over the bed of greens. Tip: Don’t overfill it, or the wrap will be tricky to roll up neatly.
- Fold the sides of the tortilla inward over the filling, then tightly roll it up from the bottom to form a secure wrap. Tip: If you’re making these ahead, wrap them tightly in parchment paper or foil to keep them fresh.
- Repeat steps 5 through 8 with the second tortilla and the remaining tuna salad.
- Slice each wrap in half diagonally with a sharp knife for easier serving.
Zesty lemon and fresh dill make this tuna salad incredibly bright, while the celery and onion add a satisfying crunch. The creamy filling against the soft tortilla is just perfect. Try serving these wraps with a side of pickles or carrot sticks for a complete, no-fuss meal.
Baked Potato with Cheese and Beans
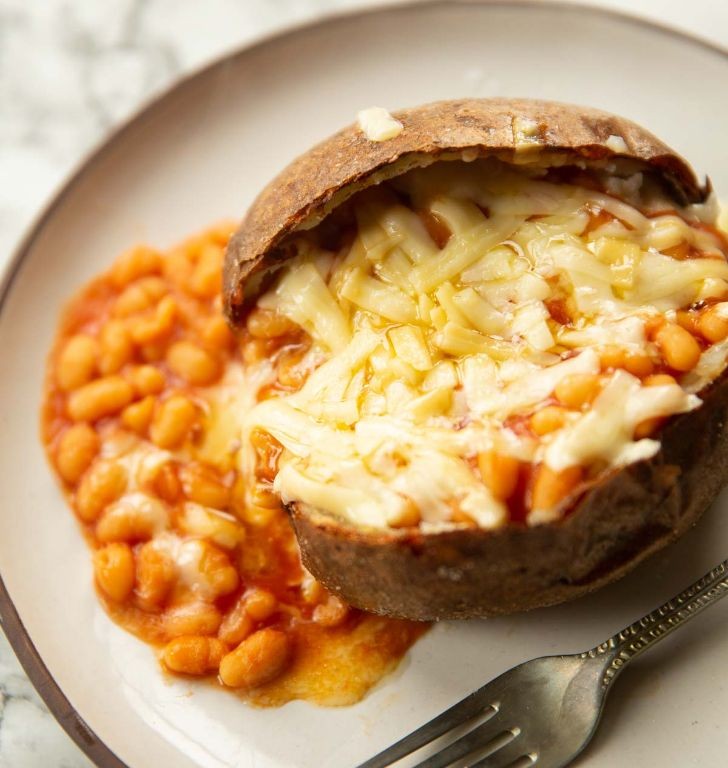
Sometimes you just need a cozy, no-fuss meal that feels like a hug in a bowl. This baked potato with cheese and beans is exactly that—a simple, satisfying combo that’s perfect for a lazy dinner or a quick lunch when you’re craving something hearty and comforting.
Serving: 2 | Pre Time: 10 minutes | Cooking Time: 60 minutes
Ingredients
– A couple of large russet potatoes
– A drizzle of olive oil
– A good pinch of salt
– A can (15 oz) of black beans, rinsed and drained
– A cup of shredded cheddar cheese
– A dollop of sour cream
– A handful of chopped green onions
– A splash of hot sauce (optional)
Instructions
1. Preheat your oven to 400°F (200°C).
2. Scrub the russet potatoes under cold water to remove any dirt, then pat them dry with a paper towel.
3. Prick each potato all over with a fork to let steam escape during baking and prevent bursting.
4. Drizzle the potatoes with olive oil and rub it all over the skins, then sprinkle with salt for a crispy exterior.
5. Place the potatoes directly on the oven rack and bake for 50-60 minutes, until they’re tender when pierced with a fork.
6. While the potatoes bake, rinse and drain the black beans in a colander to remove excess liquid.
7. Once the potatoes are done, carefully remove them from the oven and let them cool for 5 minutes until they’re safe to handle.
8. Slice each potato open lengthwise and fluff the insides with a fork to create a fluffy texture.
9. Top each potato with the black beans, then sprinkle the shredded cheddar cheese evenly over the beans.
10. Return the potatoes to the oven for 5 minutes, just until the cheese is melted and bubbly.
11. Remove from the oven and add a dollop of sour cream, a handful of chopped green onions, and a splash of hot sauce if you like some heat.
12. Serve immediately while warm and gooey.
Ultimate comfort food alert! The fluffy potato pairs perfectly with the creamy beans and melted cheese, creating a rich, savory bite every time. Try serving it with a side salad for a balanced meal, or get creative by adding crispy bacon bits for extra crunch—it’s totally customizable to whatever you’re craving tonight.
Easy Homemade Hummus with Pita
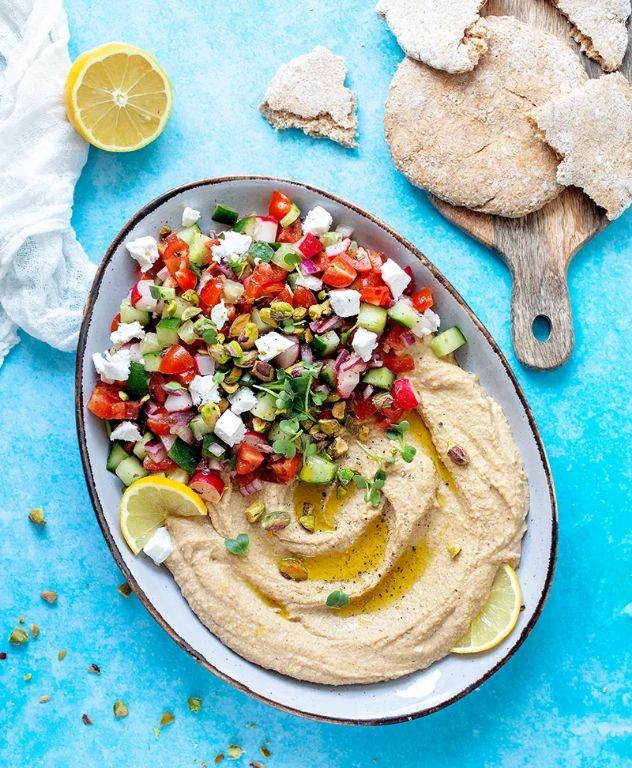
Zipping through holiday prep? You need this easy homemade hummus with pita in your life. It’s creamy, dreamy, and ready in minutes—perfect for last-minute guests or a quick snack while wrapping gifts.
Serving: 4 | Pre Time: 10 minutes | Cooking Time: 0 minutes
Ingredients
– A couple of 15-ounce cans of chickpeas, drained but save that liquid!
– A big squeeze of lemon juice, about ¼ cup
– A generous ¼ cup of tahini
– A couple of garlic cloves, peeled
– A good glug of extra-virgin olive oil, about 2 tablespoons
– A big pinch of salt
– A splash of that reserved chickpea liquid (aquafaba)
– A sprinkle of paprika for serving
– A package of pita bread, warmed
Instructions
1. Drain the chickpeas over a bowl to catch the liquid (aquafaba), then set the liquid aside.
2. Toss the drained chickpeas, lemon juice, tahini, garlic cloves, olive oil, and salt into a food processor.
3. Blend everything on high speed for about 1 minute until it starts to look chunky.
4. Tip: For extra-smooth hummus, peel the chickpea skins by rubbing them in a towel—it’s a game-changer!
5. With the processor running, slowly drizzle in 2-3 tablespoons of the reserved aquafaba until the mixture is creamy, about 30 seconds more.
6. Tip: If it’s too thick, add another splash of aquafaba; if too thin, blend in a bit more tahini.
7. Stop and scrape down the sides of the processor with a spatula to get everything mixed evenly.
8. Taste and adjust the salt or lemon juice if needed, blending for another 10 seconds.
9. Tip: Let it sit for 5 minutes before serving—the flavors meld beautifully!
10. Spoon the hummus into a bowl, drizzle with a little extra olive oil, and sprinkle paprika on top.
11. Warm the pita bread in a toaster or oven at 350°F for 3-5 minutes until soft.
12. Serve immediately with the warm pita for dipping.
Enjoy that velvety texture with a bright, garlicky kick—it’s so good, you might skip the store-bought stuff forever. Try scooping it up with veggie sticks or spreading it on sandwiches for a tasty twist.
Stir-Fried Noodles with Soy Sauce

Zipping through holiday prep and craving something quick yet satisfying? Stir-fried noodles with soy sauce is your answer—it’s a one-pan wonder that comes together in minutes, perfect for when you’re short on time but big on flavor. You’ll love how the savory sauce clings to every noodle, making each bite irresistible.
Serving: 4 | Pre Time: 10 minutes | Cooking Time: 15 minutes
Ingredients
– 8 ounces of dried noodles (like lo mein or spaghetti)
– 2 tablespoons of vegetable oil
– 3 cloves of garlic, minced
– 1 small onion, thinly sliced
– 2 carrots, julienned
– 1 bell pepper, sliced
– 2 tablespoons of soy sauce
– 1 tablespoon of oyster sauce (optional for extra umami)
– A splash of sesame oil
– A couple of green onions, chopped for garnish
Instructions
1. Bring a large pot of water to a boil over high heat.
2. Add the dried noodles and cook according to the package directions, usually for 8–10 minutes, until al dente.
3. Drain the noodles in a colander and rinse them under cold water to stop the cooking process; this prevents them from getting mushy later.
4. Heat the vegetable oil in a large skillet or wok over medium-high heat until it shimmers, about 1–2 minutes.
5. Add the minced garlic and sliced onion to the skillet, stirring constantly for 1–2 minutes until fragrant and slightly softened.
6. Toss in the julienned carrots and sliced bell pepper, cooking for 3–4 minutes until they start to soften but still have a bit of crunch.
7. Push the vegetables to one side of the skillet and add the drained noodles to the other side.
8. Pour the soy sauce and oyster sauce over the noodles, then toss everything together to coat evenly, cooking for 2–3 minutes until heated through.
9. Drizzle with a splash of sesame oil and stir for another 30 seconds to enhance the aroma.
10. Remove from heat and sprinkle with chopped green onions for garnish.
Now, dig into those tender noodles coated in a savory, slightly sweet sauce—the veggies add a nice crunch that balances it all out. Try serving it with a fried egg on top for a protein boost, or pack it cold for a tasty next-day lunch.
Egg Fried Rice with Frozen Veggies
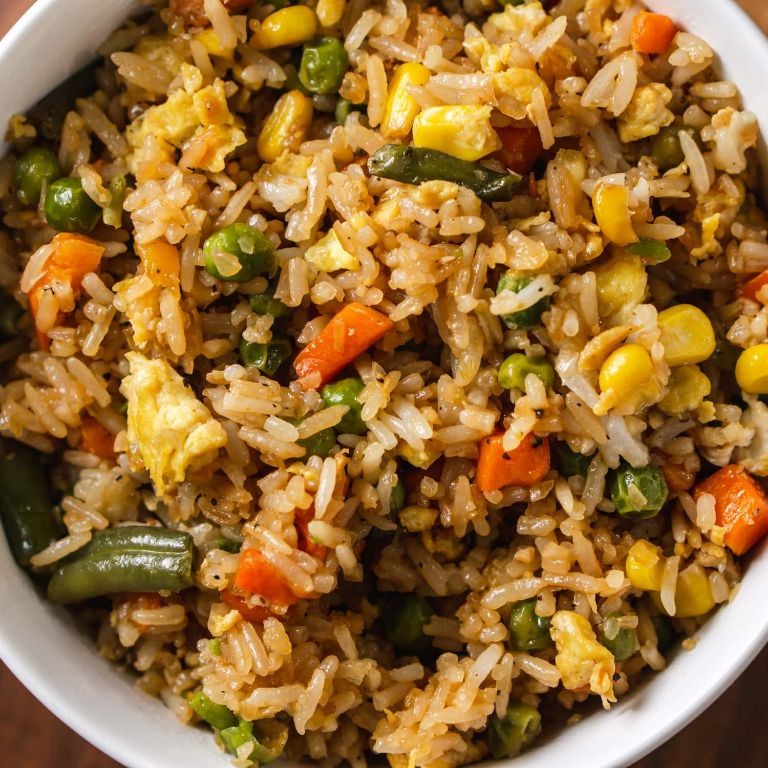
Perfect for those nights when you need dinner fast but still want something satisfying—this egg fried rice with frozen veggies is your new go-to. It comes together in minutes using pantry staples, and you can customize it however you like. Let’s get cooking!
Serving: 4 | Pre Time: 5 minutes | Cooking Time: 15 minutes
Ingredients
- 3 cups of cooked white rice (day-old works best!)
- 2 cups of frozen mixed veggies (like peas, carrots, and corn)
- 3 large eggs
- 3 tablespoons of vegetable oil
- 3 cloves of garlic, minced
- 2 tablespoons of soy sauce
- 1 tablespoon of sesame oil
- A splash of rice vinegar
- A couple of green onions, sliced
Instructions
- Heat 1 tablespoon of vegetable oil in a large skillet or wok over medium-high heat until it shimmers, about 1 minute.
- Add the frozen mixed veggies to the skillet and cook, stirring occasionally, until they’re thawed and slightly softened, about 3-4 minutes. Tip: Don’t overcrowd the pan—this helps them cook evenly without steaming.
- Push the veggies to one side of the skillet and pour in the remaining 2 tablespoons of vegetable oil on the empty side.
- Crack the 3 eggs directly into the oil and scramble them with a spatula until just set, about 1-2 minutes. Tip: Scramble the eggs quickly to keep them fluffy and avoid overcooking.
- Mix the scrambled eggs with the veggies in the skillet.
- Add the minced garlic to the skillet and stir for about 30 seconds until fragrant—be careful not to burn it.
- Add the 3 cups of cooked white rice to the skillet, breaking up any clumps with your spatula.
- Pour in the 2 tablespoons of soy sauce, 1 tablespoon of sesame oil, and a splash of rice vinegar over the rice.
- Stir everything together until the rice is evenly coated and heated through, about 2-3 minutes. Tip: Use day-old rice for the best texture—it fries up nicely without getting mushy.
- Turn off the heat and stir in the sliced green onions.
Craving something cozy? This fried rice turns out fluffy with little crispy bits from the high-heat cooking, and the sesame oil adds a nutty depth that pairs perfectly with the savory soy sauce. Serve it straight from the skillet for a casual meal, or top it with extra green onions and a fried egg for a heartier twist—it’s so versatile, you’ll want to make it every week!
Microwave Mug Omelette

Got a busy morning but still want something tasty and protein-packed? This microwave mug omelette is your new best friend—it’s ready in minutes with minimal cleanup. Perfect for those rushed weekday breakfasts or a quick lunch when you’re working from home.
Serving: 1 | Pre Time: 2 minutes | Cooking Time: 2 minutes
Ingredients
– A couple of large eggs
– A splash of milk (about 1 tablespoon)
– A small handful of shredded cheddar cheese (about 2 tablespoons)
– A pinch of salt and black pepper
– A teaspoon of butter or a quick spray of cooking oil
Instructions
1. Crack two large eggs into a microwave-safe mug that holds at least 12 ounces.
2. Add a splash of milk (about 1 tablespoon) to the mug with the eggs.
3. Sprinkle in a pinch of salt and black pepper.
4. Use a fork to whisk the eggs, milk, salt, and pepper together until well combined and slightly frothy.
5. Stir in a small handful of shredded cheddar cheese (about 2 tablespoons).
6. Add a teaspoon of butter to the mug or give it a quick spray with cooking oil to prevent sticking.
7. Microwave the mug on high for 45 seconds.
8. Remove the mug carefully—it’ll be hot—and stir the mixture with a fork to break up any cooked parts.
9. Microwave for another 45 to 60 seconds, checking at 45 seconds. The omelette is done when the center is fully set and no liquid egg remains.
10. Let it sit in the mug for 30 seconds to finish cooking from residual heat and firm up.
What you get is a fluffy, cheesy omelette with a tender texture that’s surprisingly satisfying. The cheddar melts beautifully into the eggs, giving it a rich flavor. Try topping it with salsa or fresh herbs for an extra kick, or pair it with toast for a more complete meal.
Summary
Tasty, budget-friendly meals are within reach with these 20 quick recipes for students. We hope this list makes cooking easier and more enjoyable. Give a recipe a try, leave a comment with your favorite, and share your creations on Pinterest. Happy cooking!


