
Ever feel like weeknight dinners are a race against the clock? You’re not alone! We’ve gathered 18 quick and easy recipes that are both delicious and doable, perfect for those busy evenings. From comforting pastas to fresh salads, these ideas will have you serving up satisfying meals without the stress. Let’s dive in and make your weeknights a whole lot tastier!
One-Pot Garlic Parmesan Pasta

Just last Tuesday, after a long day of holiday shopping, I found myself craving something comforting yet easy to whip up—enter this magical one-pot wonder. It’s the kind of dish that feels indulgent but comes together with minimal fuss, perfect for those busy weeknights when you want maximum flavor with minimal cleanup.
Serving: 4 | Pre Time: 5 minutes | Cooking Time: 20 minutes
Ingredients
- For the pasta base:
- 12 oz fettuccine pasta
- 4 cups chicken broth
- 1 cup heavy cream
- For the garlic and seasoning:
- 4 tbsp unsalted butter
- 6 cloves garlic, minced
- 1 tsp dried Italian seasoning
- 1/2 tsp black pepper
- 1/2 tsp salt
- For the cheesy finish:
- 1 cup grated Parmesan cheese
- 2 tbsp chopped fresh parsley
Instructions
- Place a large pot or Dutch oven over medium-high heat.
- Add 4 tbsp unsalted butter to the pot and let it melt completely, about 1 minute.
- Add 6 cloves minced garlic to the melted butter and sauté until fragrant, about 30 seconds, stirring constantly to prevent burning—this quick step builds a flavorful base.
- Pour in 4 cups chicken broth and 1 cup heavy cream, then stir to combine.
- Add 12 oz fettuccine pasta to the liquid, ensuring it’s fully submerged; if needed, gently press it down with a spoon.
- Season the mixture with 1 tsp dried Italian seasoning, 1/2 tsp black pepper, and 1/2 tsp salt.
- Bring the liquid to a boil over high heat, then immediately reduce the heat to medium-low to maintain a gentle simmer.
- Cover the pot and let it simmer for 12–15 minutes, stirring occasionally to prevent sticking, until the pasta is al dente and most of the liquid is absorbed—tip: check at 12 minutes to avoid overcooking.
- Remove the pot from the heat and stir in 1 cup grated Parmesan cheese until it melts smoothly into the sauce, creating a creamy texture.
- Let the pasta sit off the heat for 2 minutes to thicken slightly, which helps the sauce cling better to the noodles.
- Garnish with 2 tbsp chopped fresh parsley just before serving for a fresh, colorful touch.
Kind of incredible how this transforms into a luxuriously creamy pasta with deep garlic and Parmesan notes, all from one pot! The texture is rich and velvety, with the fettuccine holding onto every bit of sauce. Try topping it with grilled chicken or sautéed mushrooms for a heartier meal, or serve it alongside a crisp salad to balance the richness—it’s versatile enough for any occasion.
Sheet Pan Chicken Fajitas

Holiday chaos has me craving simple, flavorful meals that don’t dirty every dish in the kitchen, and these sheet pan chicken fajitas are my weeknight savior. I love how the vibrant peppers and onions roast alongside the chicken, filling the house with that irresistible sizzling aroma that promises a fuss-free feast. It’s the kind of meal that feels celebratory without the cleanup stress, perfect for a busy December evening like tonight.
Serving: 4 | Pre Time: 15 minutes | Cooking Time: 25 minutes
Ingredients
For the chicken and vegetables:
– 1.5 lbs boneless, skinless chicken breasts, sliced into 1/2-inch strips
– 1 large red bell pepper, sliced into 1/4-inch strips
– 1 large green bell pepper, sliced into 1/4-inch strips
– 1 large yellow onion, sliced into 1/4-inch strips
– 2 tbsp olive oil
For the seasoning blend:
– 2 tsp chili powder
– 1 tsp ground cumin
– 1 tsp smoked paprika
– 1/2 tsp garlic powder
– 1/2 tsp onion powder
– 1/2 tsp salt
– 1/4 tsp black pepper
For serving:
– 8 small flour tortillas
– 1/2 cup sour cream
– 1/4 cup chopped fresh cilantro
– 1 lime, cut into wedges
Instructions
1. Preheat your oven to 425°F and line a large sheet pan with parchment paper for easy cleanup—trust me, this saves scrubbing later.
2. In a small bowl, combine 2 tsp chili powder, 1 tsp ground cumin, 1 tsp smoked paprika, 1/2 tsp garlic powder, 1/2 tsp onion powder, 1/2 tsp salt, and 1/4 tsp black pepper to make the seasoning blend.
3. Place 1.5 lbs sliced chicken breasts, 1 sliced red bell pepper, 1 sliced green bell pepper, and 1 sliced yellow onion on the prepared sheet pan.
4. Drizzle 2 tbsp olive oil over the chicken and vegetables, then sprinkle the seasoning blend evenly on top.
5. Use your hands or tongs to toss everything until the chicken and vegetables are fully coated with the oil and seasoning.
6. Spread the mixture into a single layer on the sheet pan, ensuring nothing is overlapping so it roasts evenly instead of steaming.
7. Bake at 425°F for 20–25 minutes, until the chicken reaches an internal temperature of 165°F and the vegetables are tender with lightly charred edges.
8. While baking, warm 8 small flour tortillas in a dry skillet over medium heat for 30 seconds per side or wrap them in foil and place in the oven for the last 5 minutes.
9. Remove the sheet pan from the oven and let it rest for 2–3 minutes—this allows the juices to redistribute, keeping the chicken moist.
10. Serve the chicken and vegetables with the warmed tortillas, 1/2 cup sour cream, 1/4 cup chopped fresh cilantro, and lime wedges for squeezing.
Kick back and enjoy the tender, juicy chicken paired with those sweet, smoky peppers and onions, all wrapped in a warm tortilla. The squeeze of lime brightens every bite, and I love adding extra cilantro for a fresh pop—it’s a colorful, satisfying meal that’s as fun to assemble as it is to eat.
15-Minute Beef Stir Fry
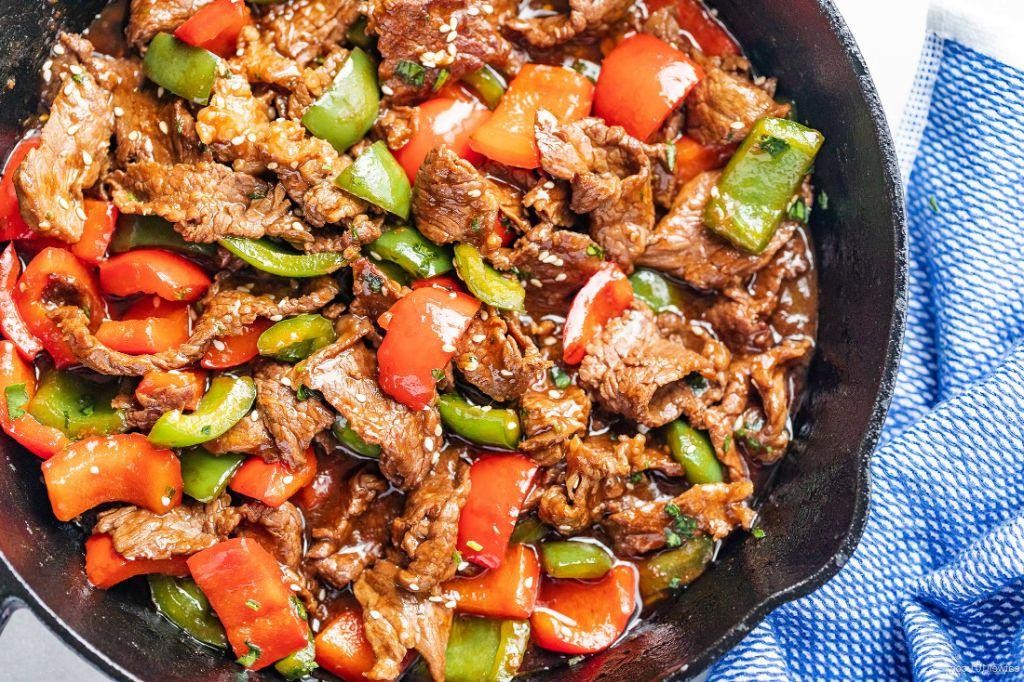
Finally, after a long day of holiday shopping and wrapping gifts, I needed something fast, flavorful, and filling. This 15-minute beef stir fry is my weeknight savior—it’s the dish I make when I’m too tired to think but still want a proper meal that feels like a treat. I love how the sizzle of the beef hitting the hot pan instantly makes the kitchen smell like a restaurant.
Serving: 4 | Pre Time: 5 minutes | Cooking Time: 10 minutes
Ingredients
For the Beef & Marinade:
– 1 lb flank steak, thinly sliced against the grain
– 2 tbsp soy sauce
– 1 tbsp cornstarch
– 1 tbsp vegetable oil
For the Vegetables:
– 1 tbsp vegetable oil
– 1 red bell pepper, thinly sliced
– 1 cup broccoli florets
– 1/2 cup sliced carrots
– 2 cloves garlic, minced
For the Sauce:
– 1/4 cup soy sauce
– 2 tbsp oyster sauce
– 1 tbsp brown sugar
– 1 tsp sesame oil
– 1/2 cup water
– 1 tbsp cornstarch
Instructions
1. In a medium bowl, combine 1 lb flank steak, 2 tbsp soy sauce, and 1 tbsp cornstarch. Toss until the beef is evenly coated and let it sit for 5 minutes. Tip: Slicing the steak against the grain ensures it stays tender after quick cooking.
2. Heat 1 tbsp vegetable oil in a large wok or skillet over high heat until it shimmers, about 1 minute.
3. Add the marinated beef to the hot wok in a single layer. Cook without stirring for 1 minute to allow a sear to form.
4. Stir the beef and cook for an additional 1-2 minutes, until it is no longer pink. Transfer the cooked beef to a clean plate.
5. Add 1 tbsp vegetable oil to the same wok over high heat.
6. Add 1 red bell pepper, 1 cup broccoli florets, and 1/2 cup sliced carrots. Stir-fry for 3-4 minutes, until the vegetables are crisp-tender. Tip: Keep the heat high and stir constantly to get a nice char without overcooking the veggies.
7. Add 2 cloves minced garlic and stir-fry for 30 seconds, until fragrant.
8. In a small bowl, whisk together 1/4 cup soy sauce, 2 tbsp oyster sauce, 1 tbsp brown sugar, 1 tsp sesame oil, 1/2 cup water, and 1 tbsp cornstarch until smooth.
9. Pour the sauce mixture into the wok with the vegetables. Cook, stirring constantly, for 1-2 minutes until the sauce thickens and becomes glossy. Tip: The cornstarch needs to cook for a full minute to lose its raw flavor and thicken properly.
10. Return the cooked beef and any accumulated juices to the wok. Toss everything together for 1 minute until the beef is heated through and coated in sauce.
Hearty and satisfying, this stir fry has perfectly seared, tender beef and vegetables with a crisp bite, all coated in a rich, savory-sweet sauce that clings to every piece. I love serving it over a mound of fluffy white rice to soak up all that delicious sauce, or for a low-carb option, try it with cauliflower rice—it’s just as good!
Easy Baked Lemon Butter Salmon
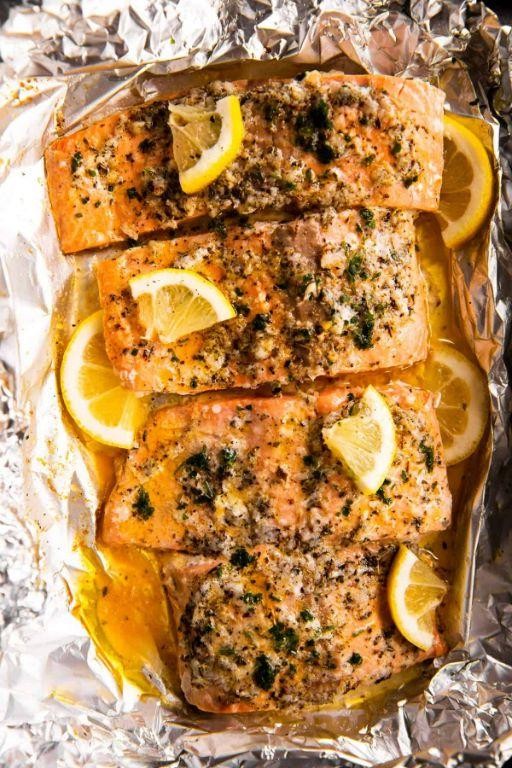
Sometimes, after a long day, I crave something fancy but don’t want to spend hours in the kitchen—that’s where this Easy Baked Lemon Butter Salmon comes in. It’s my go‑to for a quick, impressive dinner that feels special without the fuss, and the bright, tangy lemon butter sauce is always a crowd‑pleaser. I love how the salmon stays moist and flaky, and it’s become a staple in our house, especially when I’m short on time but still want to treat myself.
Serving: 4 | Pre Time: 10 minutes | Cooking Time: 15 minutes
Ingredients
For the salmon:
– 4 salmon fillets (about 6 ounces each), skin‑on or skinless
– 1 tablespoon olive oil
– ½ teaspoon salt
– ¼ teaspoon black pepper
For the lemon butter sauce:
– 4 tablespoons unsalted butter
– 3 tablespoons fresh lemon juice (from about 1 lemon)
– 2 cloves garlic, minced
– 1 tablespoon chopped fresh parsley
– ¼ teaspoon salt
Instructions
1. Preheat your oven to 400°F and line a baking sheet with parchment paper or aluminum foil for easy cleanup.
2. Pat the salmon fillets dry with paper towels to remove excess moisture—this helps the skin crisp up if using skin‑on.
3. Place the salmon fillets on the prepared baking sheet, drizzle with 1 tablespoon olive oil, and season evenly with ½ teaspoon salt and ¼ teaspoon black pepper.
4. Bake the salmon in the preheated oven for 12–15 minutes, until the flesh flakes easily with a fork and reaches an internal temperature of 145°F.
5. While the salmon bakes, melt 4 tablespoons unsalted butter in a small saucepan over medium heat.
6. Add 2 cloves minced garlic to the melted butter and cook for 1–2 minutes, stirring constantly, until fragrant but not browned.
7. Remove the saucepan from the heat and stir in 3 tablespoons fresh lemon juice, 1 tablespoon chopped fresh parsley, and ¼ teaspoon salt until well combined.
8. Once the salmon is done baking, transfer it to a serving platter and spoon the warm lemon butter sauce over the top.
That tender, flaky salmon soaked in that zesty lemon butter sauce is pure comfort food magic. Try serving it over a bed of quinoa or with roasted asparagus for a complete meal—it’s so versatile and always disappears fast!
Vegetable Fried Rice

A s I was cleaning out my fridge last night, I realized I had a rainbow of leftover veggies begging to be used—this fried rice is my go-to solution for those “what’s for dinner?” moments. It’s quick, customizable, and always hits the spot, especially when you’re craving something cozy without a ton of effort. I love that it comes together in one pan, which means less cleanup and more time to enjoy the meal with my family.
Serving: 4 | Pre Time: 15 minutes | Cooking Time: 15 minutes
Ingredients
For the rice and vegetables:
– 3 cups cooked and cooled white rice (preferably day-old)
– 1 cup frozen mixed vegetables (peas, carrots, corn)
– 1/2 cup diced onion
– 1/2 cup diced bell pepper
– 2 cloves garlic, minced
For the sauce and eggs:
– 2 large eggs
– 3 tablespoons soy sauce
– 1 tablespoon vegetable oil
– 1/2 teaspoon sesame oil
Instructions
1. Heat 1 tablespoon vegetable oil in a large skillet or wok over medium-high heat until it shimmers, about 1 minute.
2. Add the diced onion and bell pepper to the skillet, and stir-fry for 3–4 minutes until they start to soften and turn slightly golden.
3. Stir in the minced garlic and cook for 30 seconds until fragrant, being careful not to burn it—this releases the flavor without bitterness.
4. Push the vegetables to one side of the skillet, then crack the 2 eggs into the empty space and scramble them with a spatula until fully cooked, about 1–2 minutes.
5. Add the 3 cups cooked white rice and 1 cup frozen mixed vegetables to the skillet, breaking up any clumps of rice with the spatula.
6. Pour 3 tablespoons soy sauce and 1/2 teaspoon sesame oil evenly over the rice mixture, and stir everything together until well combined and heated through, about 3–4 minutes.
7. Remove the skillet from the heat and let it sit for 1 minute to allow the flavors to meld—this resting time makes a big difference in taste.
M y favorite part is the slightly crispy bits of rice that form against the hot pan, giving each bite a wonderful texture contrast. The savory soy sauce and hint of sesame oil make it deeply satisfying, and I often top it with a fried egg or a sprinkle of green onions for an extra touch. It’s perfect as a quick weeknight dinner or packed for lunch the next day.
Slow Cooker BBQ Pulled Pork

Nothing beats the aroma of slow-cooked pulled pork filling the house on a lazy weekend—it’s my go-to for feeding a crowd without spending all day in the kitchen. I love how the slow cooker does the heavy lifting while I tackle other tasks, and this BBQ version is a family favorite that always disappears fast.
Serving: 8 | Pre Time: 15 minutes | Cooking Time: 480 minutes
Ingredients
For the pork:
– 4 pounds pork shoulder, trimmed of excess fat
– 1 tablespoon kosher salt
– 1 teaspoon black pepper
– 1 teaspoon garlic powder
– 1 teaspoon smoked paprika
– 1 cup low-sodium chicken broth
For the BBQ sauce:
– 1 cup ketchup
– 1/4 cup apple cider vinegar
– 1/4 cup brown sugar
– 2 tablespoons Worcestershire sauce
– 1 tablespoon Dijon mustard
– 1 teaspoon onion powder
Instructions
1. Pat the 4 pounds of pork shoulder dry with paper towels to help the seasoning stick better.
2. In a small bowl, combine 1 tablespoon kosher salt, 1 teaspoon black pepper, 1 teaspoon garlic powder, and 1 teaspoon smoked paprika.
3. Rub the seasoning mixture evenly over all sides of the pork shoulder.
4. Place the seasoned pork shoulder into a 6-quart slow cooker.
5. Pour 1 cup of low-sodium chicken broth around the pork, not over it, to keep the meat moist without washing off the spices.
6. Cover the slow cooker with its lid and cook on low heat for 8 hours, until the pork shreds easily with a fork.
7. While the pork cooks, make the BBQ sauce by whisking together 1 cup ketchup, 1/4 cup apple cider vinegar, 1/4 cup brown sugar, 2 tablespoons Worcestershire sauce, 1 tablespoon Dijon mustard, and 1 teaspoon onion powder in a medium saucepan.
8. Bring the sauce mixture to a simmer over medium heat, then reduce to low and let it cook for 10 minutes, stirring occasionally to prevent burning.
9. Once the pork is done, carefully transfer it to a large bowl using tongs, reserving 1/2 cup of the cooking liquid from the slow cooker.
10. Shred the pork with two forks, discarding any large fat pieces—this should take about 5 minutes.
11. Stir the reserved 1/2 cup of cooking liquid into the shredded pork to add moisture and flavor.
12. Pour the prepared BBQ sauce over the shredded pork and mix until well coated.
Juicy and tender, this pulled pork has a perfect balance of smoky sweetness from the sauce and savory depth from the slow cooking. Serve it piled high on buns with a side of coleslaw, or get creative by using it as a topping for loaded nachos or stuffed into baked potatoes for a hearty twist.
Caprese Stuffed Chicken

Perfect for a cozy holiday dinner or a special weeknight treat, this Caprese Stuffed Chicken has become my go-to impressive-yet-simple dish. I first made it for a last-minute Christmas Eve gathering a few years ago when I realized I’d forgotten to buy a main course—now it’s a tradition! The combination of juicy chicken, melted cheese, and fresh basil always feels like a little celebration.
Serving: 4 | Pre Time: 15 minutes | Cooking Time: 25 minutes
Ingredients
- For the chicken and stuffing:
- 4 boneless, skinless chicken breasts (about 6 ounces each)
- 1 cup fresh mozzarella cheese, cut into ½-inch cubes
- 1 cup cherry tomatoes, halved
- ¼ cup fresh basil leaves, chopped
- 2 tablespoons olive oil
- 1 teaspoon salt
- ½ teaspoon black pepper
- For the balsamic glaze:
- ½ cup balsamic vinegar
- 1 tablespoon honey
Instructions
- Preheat your oven to 375°F and line a baking sheet with parchment paper.
- Place one chicken breast on a cutting board and use a sharp knife to cut a horizontal pocket through the thickest part, being careful not to cut all the way through. Tip: I like to hold the chicken flat with my non-dominant hand for better control.
- Repeat step 2 with the remaining three chicken breasts.
- In a medium bowl, combine the mozzarella cheese cubes, halved cherry tomatoes, and chopped basil leaves.
- Stuff each chicken pocket evenly with the mozzarella, tomato, and basil mixture, pressing gently to close.
- Brush the outside of each stuffed chicken breast with olive oil, then sprinkle evenly with salt and black pepper.
- Place the chicken breasts on the prepared baking sheet, leaving about 2 inches between them.
- Bake in the preheated oven for 22–25 minutes, until the internal temperature reaches 165°F when checked with a meat thermometer. Tip: Insert the thermometer into the thickest part of the chicken, avoiding the stuffing for an accurate read.
- While the chicken bakes, prepare the balsamic glaze by combining the balsamic vinegar and honey in a small saucepan over medium heat.
- Bring the mixture to a simmer, then reduce the heat to low and cook for 8–10 minutes, stirring occasionally, until it thickens enough to coat the back of a spoon. Tip: Watch it closely toward the end to prevent burning—it can go from perfect to scorched quickly!
- Remove the chicken from the oven and let it rest on the baking sheet for 5 minutes before serving.
- Drizzle the balsamic glaze over the chicken just before serving.
Cutting into this chicken reveals a gorgeous, melty center with bright pops of tomato and basil. Creamy, tangy, and savory, it’s wonderful served over a bed of garlicky sautéed spinach or with a simple arugula salad on the side for a complete meal.
Instant Pot Beef Stew
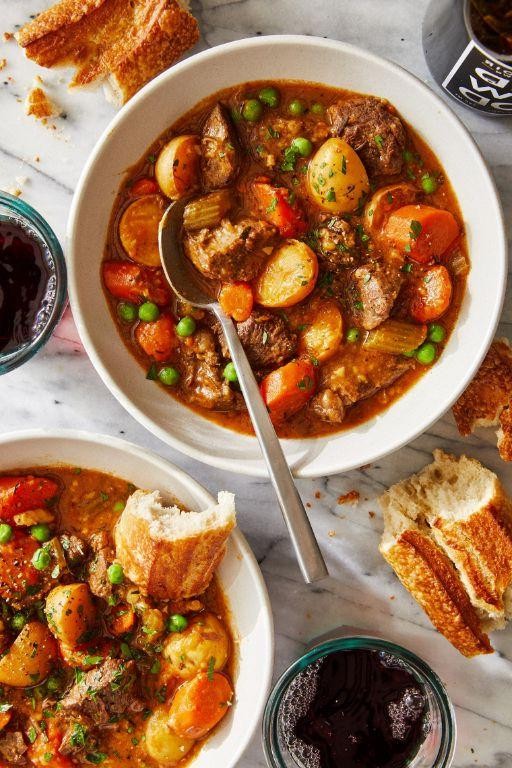
Finally, after a long day of holiday shopping in the chilly December air, nothing warms my soul like a hearty beef stew—and my Instant Pot makes it possible on even the busiest weeknight. I love how the pressure cooker tenderizes the beef in a fraction of the time, filling my kitchen with those cozy, savory aromas that remind me of my grandma’s kitchen. Let’s dive into this simple, comforting recipe that’s become my go-to for feeding a crowd or just enjoying leftovers all week.
Serving: 6 | Pre Time: 15 minutes | Cooking Time: 35 minutes
Ingredients
For Browning the Beef:
– 2 lbs beef chuck, cut into 1-inch cubes
– 2 tbsp olive oil
– 1 tsp salt
– 1/2 tsp black pepper
For the Aromatics and Vegetables:
– 1 large yellow onion, diced
– 3 cloves garlic, minced
– 4 medium carrots, peeled and sliced into 1/2-inch rounds
– 3 medium Yukon Gold potatoes, peeled and cut into 1-inch chunks
For the Liquid and Seasoning:
– 4 cups beef broth
– 1/4 cup tomato paste
– 2 tbsp Worcestershire sauce
– 1 tsp dried thyme
– 2 bay leaves
For Thickening:
– 3 tbsp all-purpose flour
– 1/4 cup cold water
Instructions
1. Set your Instant Pot to “Sauté” mode on “More” for high heat and let it preheat for 2 minutes until the display reads “Hot.”
2. Pat the beef chuck cubes dry with paper towels—this helps them brown better without steaming.
3. Add the olive oil to the pot, then season the beef with salt and pepper and add it in a single layer, working in batches if needed to avoid overcrowding.
4. Sear the beef for 3–4 minutes per side until deeply browned on all sides, then transfer it to a plate using a slotted spoon.
5. Tip: Don’t skip searing the beef, as it builds a rich flavor base for the stew.
6. Add the diced onion to the pot and sauté for 3 minutes, stirring occasionally, until softened and translucent.
7. Stir in the minced garlic and cook for 1 minute until fragrant, being careful not to let it burn.
8. Add the tomato paste and cook for 1 minute, stirring constantly to caramelize it slightly and deepen its flavor.
9. Pour in the beef broth and use a wooden spoon to scrape up any browned bits from the bottom of the pot—this deglazing step adds tons of flavor.
10. Return the seared beef and any accumulated juices to the pot, then add the Worcestershire sauce, dried thyme, and bay leaves.
11. Tip: For a thicker stew, mix the all-purpose flour with cold water in a small bowl until smooth to create a slurry, then stir it in now.
12. Add the carrots and potatoes, ensuring they’re submerged in the liquid.
13. Secure the lid, set the valve to “Sealing,” and pressure cook on “Manual” or “Stew” mode for 35 minutes at high pressure.
14. Once done, allow a natural pressure release for 10 minutes, then carefully turn the valve to “Venting” to release any remaining steam.
15. Tip: Let the stew rest for 5 minutes after opening the lid to allow the flavors to meld and the broth to thicken slightly.
16. Remove the bay leaves, taste and adjust seasoning if needed, then ladle into bowls.
Just imagine spooning into this stew: the beef is fall-apart tender, the vegetables are perfectly soft but not mushy, and the broth is rich and savory with a hint of sweetness from the carrots. I love serving it over a slice of crusty bread to soak up every last drop, or pairing it with a simple green salad for a complete meal that feels like a warm hug on a cold winter day.
Avocado Toast with Poached Egg

There’s something so comforting about a perfectly creamy avocado smashed onto crisp toast, topped with a silky poached egg that oozes golden yolk with every bite—it’s my go-to lazy weekend brunch that always feels like a treat. I first fell in love with this combo after a cozy café visit in Portland, and now I make it almost every Saturday, tweaking it with whatever herbs I have on hand. Honestly, it’s foolproof once you get the poaching down, and I’ll share my little tricks to make it stress-free!
Serving: 1 | Pre Time: 5 minutes | Cooking Time: 10 minutes
Ingredients
For the toast and avocado:
– 1 slice sourdough bread (about 1/2 inch thick)
– 1/2 ripe avocado
– 1 tsp fresh lemon juice
– Pinch of salt
– Pinch of black pepper
For the poached egg:
– 1 large egg
– 1 tbsp white vinegar
– 4 cups water
For garnish:
– 1 tbsp chopped fresh chives
– 1/4 tsp red pepper flakes
Instructions
1. Fill a medium saucepan with 4 cups of water and bring it to a gentle simmer over medium-high heat, where small bubbles form but it’s not boiling vigorously.
2. Add 1 tbsp white vinegar to the simmering water—this helps the egg white coagulate faster for a neater poach.
3. Crack 1 large egg into a small ramekin or cup to make transferring easier and avoid shell fragments.
4. Create a gentle whirlpool in the water with a spoon, then slowly slide the egg from the ramekin into the center of the whirlpool.
5. Poach the egg for exactly 3 minutes for a runny yolk, using a timer to prevent overcooking.
6. While the egg poaches, toast 1 slice sourdough bread in a toaster or skillet until golden and crisp, about 2-3 minutes.
7. In a small bowl, mash 1/2 ripe avocado with 1 tsp fresh lemon juice, a pinch of salt, and a pinch of black pepper until slightly chunky.
8. Remove the poached egg with a slotted spoon and drain it on a paper towel to absorb excess water.
9. Spread the mashed avocado evenly onto the toasted sourdough bread.
10. Carefully place the poached egg on top of the avocado.
11. Garnish with 1 tbsp chopped fresh chives and 1/4 tsp red pepper flakes for a pop of color and mild heat.
Let’s dig in! The contrast between the crunchy toast, creamy avocado, and velvety egg yolk is pure magic, with the chives adding a fresh bite and red pepper flakes giving a subtle kick. I love serving this with a side of cherry tomatoes or a drizzle of hot sauce for an extra layer of flavor—it’s simple but always impresses.
Greek Yogurt Chicken Salad Wrap
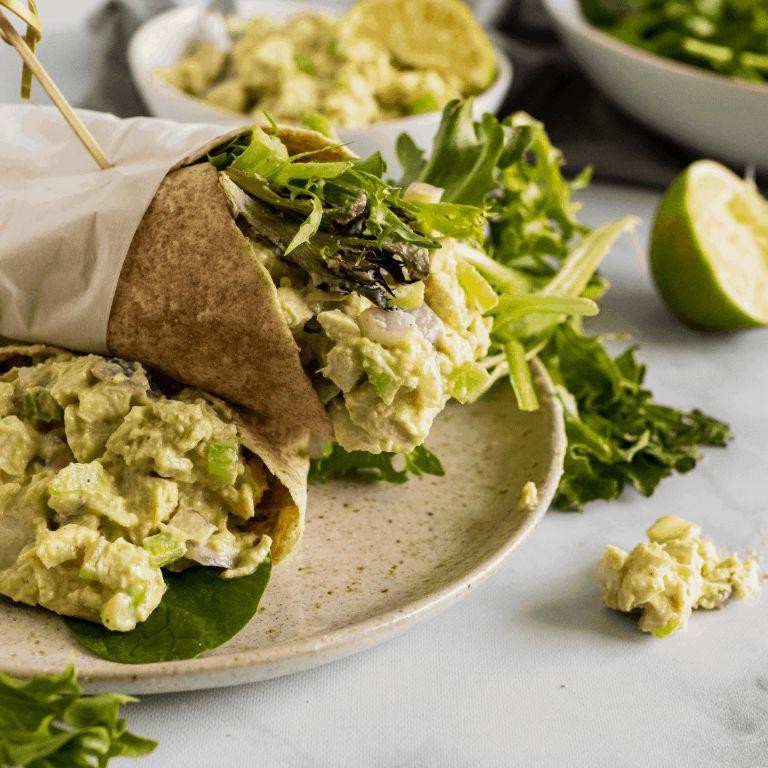
Venturing into my kitchen on a busy weekday, I often crave something fresh yet satisfying—this Greek Yogurt Chicken Salad Wrap is my go-to solution, inspired by a quick lunch I had at a local farmers’ market last summer. It’s a light, protein-packed twist on the classic, perfect for meal prep or a speedy dinner when time is tight, and I love how the tangy yogurt keeps it feeling wholesome without the heaviness of mayo.
Serving: 4 | Pre Time: 15 minutes | Cooking Time: 10 minutes
Ingredients
– For the chicken: 1 lb boneless, skinless chicken breasts, 1 tbsp olive oil, 1/2 tsp salt, 1/4 tsp black pepper
– For the salad mixture: 1/2 cup plain Greek yogurt, 1/4 cup diced red onion, 1/4 cup diced celery, 1/4 cup chopped fresh dill, 1 tbsp lemon juice
– For assembling: 4 large flour tortillas, 2 cups shredded romaine lettuce
Instructions
1. Preheat a skillet over medium-high heat to 350°F. 2. Pat the 1 lb boneless, skinless chicken breasts dry with paper towels. 3. Rub the chicken with 1 tbsp olive oil, then season evenly with 1/2 tsp salt and 1/4 tsp black pepper. 4. Place the chicken in the preheated skillet and cook for 5 minutes per side, or until the internal temperature reaches 165°F and the exterior is golden brown. 5. Transfer the cooked chicken to a cutting board and let it rest for 5 minutes to retain juiciness. 6. While the chicken rests, in a medium bowl, combine 1/2 cup plain Greek yogurt, 1/4 cup diced red onion, 1/4 cup diced celery, 1/4 cup chopped fresh dill, and 1 tbsp lemon juice. 7. Dice the rested chicken into 1/2-inch pieces. 8. Fold the diced chicken into the yogurt mixture until evenly coated. 9. Lay out 4 large flour tortillas on a clean surface. 10. Divide 2 cups shredded romaine lettuce evenly among the tortillas, placing it in the center of each. 11. Spoon the chicken salad mixture over the lettuce on each tortilla. 12. Fold the sides of each tortilla inward, then roll tightly from the bottom to enclose the filling. 13. Slice each wrap in half diagonally for easier serving.
Every bite delivers a creamy crunch from the yogurt and veggies, balanced by the tender chicken—it’s a refreshing take that never feels bland. I sometimes add a sprinkle of feta or serve it with a side of sweet potato fries for an extra cozy touch.
Spaghetti Aglio e Olio

You know those nights when you’re craving something comforting but don’t want to spend hours in the kitchen? Spaghetti Aglio e Olio has been my go‑to for years—it’s simple, garlicky, and always hits the spot. I first learned it from my Italian neighbor, who swore by using the best olive oil you have on hand.
Serving: 4 | Pre Time: 10 minutes | Cooking Time: 15 minutes
Ingredients
For the pasta:
– 1 lb dried spaghetti
– 1 tbsp kosher salt
For the sauce:
– ½ cup extra‑virgin olive oil
– 8 cloves garlic, thinly sliced
– 1 tsp red pepper flakes
– ¼ cup fresh parsley, finely chopped
– ½ tsp black pepper
Instructions
1. Fill a large pot with 4 quarts of water and bring it to a rolling boil over high heat.
2. Add 1 tbsp kosher salt to the boiling water, then stir in 1 lb dried spaghetti.
3. Cook the spaghetti for 8–10 minutes, stirring occasionally, until it is al dente (tender but still firm to the bite).
4. While the pasta cooks, heat ½ cup extra‑virgin olive oil in a large skillet over medium‑low heat.
5. Add 8 thinly sliced garlic cloves to the skillet and cook for 3–4 minutes, stirring frequently, until the garlic is fragrant and lightly golden.
6. Stir in 1 tsp red pepper flakes and cook for 30 seconds to infuse the oil.
7. Reserve 1 cup of the pasta cooking water, then drain the spaghetti in a colander.
8. Immediately transfer the drained spaghetti to the skillet with the garlic oil.
9. Toss the spaghetti in the skillet for 1–2 minutes, adding splashes of the reserved pasta water as needed to create a glossy sauce that coats the strands.
10. Remove the skillet from the heat and stir in ¼ cup chopped fresh parsley and ½ tsp black pepper until evenly distributed.
11. Divide the spaghetti among four plates and serve right away.
My favorite part is how the spaghetti turns out silky and slick with that punchy garlic‑oil coating. For a twist, I sometimes top it with a fried egg or a handful of toasted breadcrumbs for extra crunch.
Black Bean Quesadillas

Holiday season or not, I’m always looking for a quick, satisfying meal that doesn’t skimp on flavor—these black bean quesadillas are my go-to. Honestly, I started making them during a busy week when my fridge was nearly empty, and now they’re a staple in my house because they come together in minutes and please everyone, even my picky nephew.
Serving: 4 | Pre Time: 10 minutes | Cooking Time: 15 minutes
Ingredients
For the filling:
– 1 (15-ounce) can black beans, rinsed and drained
– 1 cup shredded Monterey Jack cheese
– 1/2 cup corn kernels (fresh, frozen, or canned)
– 1/4 cup finely chopped red onion
– 1 teaspoon ground cumin
– 1/2 teaspoon chili powder
For assembly:
– 4 large (10-inch) flour tortillas
– 2 tablespoons olive oil, divided
– 1/2 cup salsa, for serving
Instructions
1. In a medium bowl, combine the rinsed and drained black beans, shredded Monterey Jack cheese, corn kernels, finely chopped red onion, ground cumin, and chili powder. Mix gently until evenly distributed—overmixing can crush the beans, so I use a folding motion with a spatula.
2. Heat a large non-stick skillet or griddle over medium heat (about 350°F) for 1-2 minutes until hot. Tip: Test the heat by sprinkling a few drops of water; if they sizzle and evaporate quickly, it’s ready.
3. Brush one side of a flour tortilla lightly with about 1/2 tablespoon of olive oil using a pastry brush or your fingers.
4. Place the tortilla oil-side down in the heated skillet. Immediately spoon one-quarter of the black bean mixture evenly over half of the tortilla, leaving a 1/2-inch border around the edges to prevent spillage.
5. Fold the empty half of the tortilla over the filling to create a half-moon shape. Press down gently with a spatula to seal.
6. Cook the quesadilla for 2-3 minutes until the bottom is golden brown and crispy. Tip: Peek underneath by lifting an edge with the spatula; it should have dark golden spots.
7. Carefully flip the quesadilla using the spatula. Cook for another 2-3 minutes until the second side is golden brown and the cheese inside is fully melted. Tip: If the cheese isn’t melting quickly, reduce the heat to medium-low to avoid burning the tortilla.
8. Transfer the cooked quesadilla to a cutting board. Repeat steps 3–7 with the remaining tortillas, black bean mixture, and olive oil, wiping the skillet clean between batches if needed to prevent sticking.
9. Let each quesadilla rest for 1 minute on the cutting board before slicing into wedges with a sharp knife or pizza cutter—this helps the filling set slightly so it doesn’t ooze out.
10. Serve immediately with salsa on the side for dipping.
Zesty and hearty, these quesadillas have a satisfying crunch from the toasted tortilla that gives way to a creamy, spiced bean filling. I love pairing them with a cool avocado crema or topping them with pickled jalapeños for an extra kick—perfect for a casual dinner or slicing into smaller pieces as a party appetizer.
Teriyaki Shrimp and Broccoli
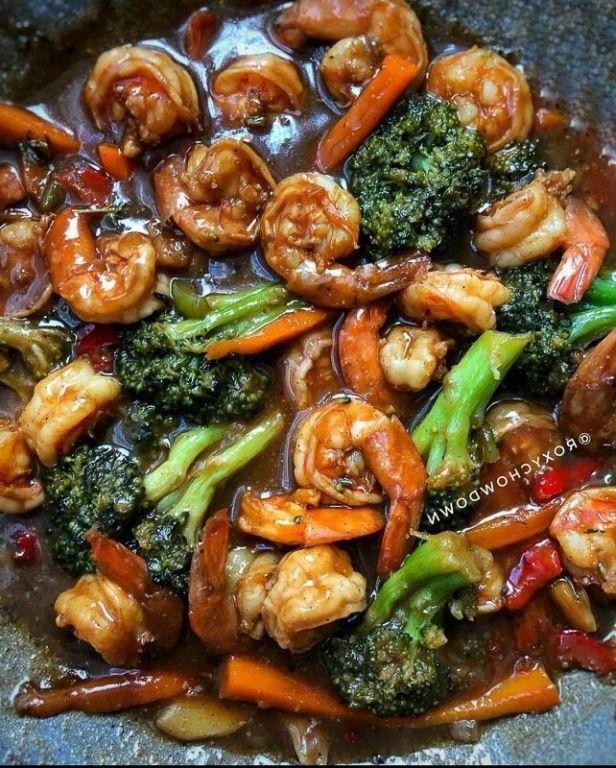
Pulling together a quick weeknight dinner that feels special is my favorite kitchen challenge, and this Teriyaki Shrimp and Broccoli is my go-to solution. It’s a one-pan wonder that comes together faster than takeout, and the sweet-savory sauce is so good you’ll want to lick the spoon—I usually do!
Serving: 4 | Pre Time: 15 minutes | Cooking Time: 10 minutes
Ingredients
For the Sauce:
– 1/2 cup low-sodium soy sauce
– 1/4 cup honey
– 2 tablespoons rice vinegar
– 1 tablespoon minced fresh ginger
– 2 cloves garlic, minced
– 1 tablespoon cornstarch
– 2 tablespoons water
For the Shrimp and Broccoli:
– 1 1/2 pounds large shrimp, peeled and deveined
– 4 cups broccoli florets
– 2 tablespoons vegetable oil
– 1 teaspoon sesame oil
– 2 green onions, thinly sliced
– 1 tablespoon toasted sesame seeds
Instructions
1. Pat the shrimp completely dry with paper towels to ensure a good sear.
2. In a small bowl, whisk together the soy sauce, honey, rice vinegar, ginger, and garlic until the honey is fully dissolved.
3. In a separate small bowl, make a slurry by stirring the cornstarch into the 2 tablespoons of water until smooth.
4. Heat 1 tablespoon of vegetable oil in a large skillet or wok over medium-high heat until shimmering, about 1 minute.
5. Add the broccoli florets to the skillet and cook, stirring occasionally, for 4-5 minutes until bright green and slightly tender.
6. Transfer the broccoli to a plate and set aside.
7. Add the remaining 1 tablespoon of vegetable oil to the same skillet.
8. Add the shrimp in a single layer and cook for 1-2 minutes per side until pink and opaque.
9. Push the shrimp to the sides of the skillet and pour the prepared sauce into the center.
10. Bring the sauce to a simmer, then whisk in the cornstarch slurry.
11. Cook the sauce, stirring constantly, for 1-2 minutes until it thickens and becomes glossy.
12. Return the cooked broccoli to the skillet and toss everything together to coat in the sauce.
13. Drizzle the sesame oil over the mixture and toss once more.
14. Remove the skillet from the heat and garnish with the sliced green onions and toasted sesame seeds.
What I love most is the perfect contrast of the tender, juicy shrimp against the crisp-tender broccoli, all enveloped in that sticky, glossy teriyaki glaze. It’s fantastic served over a bed of steamed jasmine rice to soak up every last drop of sauce, or for a low-carb option, try it with cauliflower rice—it’s just as satisfying!
Eggplant Parmesan Pasta

Over the holidays, I always crave something cozy yet impressive, and this Eggplant Parmesan Pasta is my go-to—it’s like a hug in a bowl that’s surprisingly easy to pull off, even when I’m juggling gift-wrapping and last-minute shopping. I love how it combines the crispy, savory goodness of eggplant parmesan with the comfort of pasta, making it a crowd-pleaser that feels special without being fussy. Honestly, I’ve made this so many times that my family now requests it for our Christmas Eve dinner, and it’s become a little tradition of our own.
Serving: 6 | Pre Time: 20 minutes | Cooking Time: 40 minutes
Ingredients
For the eggplant:
– 1 large eggplant, sliced into 1/2-inch rounds
– 1 cup all-purpose flour
– 2 large eggs, beaten
– 1 cup Italian-style breadcrumbs
– 1/2 cup grated Parmesan cheese
– 1/4 cup olive oil
For the sauce and pasta:
– 1 tablespoon olive oil
– 3 cloves garlic, minced
– 1 (28-ounce) can crushed tomatoes
– 1 teaspoon dried oregano
– 1/2 teaspoon salt
– 1/4 teaspoon black pepper
– 12 ounces penne pasta
– 1 cup shredded mozzarella cheese
– Fresh basil leaves for garnish
Instructions
1. Preheat your oven to 400°F and line a baking sheet with parchment paper.
2. Place the eggplant slices on paper towels and sprinkle with salt to draw out moisture; let them sit for 10 minutes, then pat dry thoroughly—this helps prevent sogginess.
3. Set up a breading station with three shallow bowls: one with the flour, one with the beaten eggs, and one with a mixture of breadcrumbs and Parmesan cheese.
4. Dredge each eggplant slice first in the flour, shaking off excess, then dip in the eggs, and finally coat in the breadcrumb mixture, pressing gently to adhere.
5. Heat 1/4 cup olive oil in a large skillet over medium-high heat until shimmering, about 2 minutes.
6. Fry the breaded eggplant slices in batches for 3-4 minutes per side until golden brown and crispy, transferring them to the prepared baking sheet.
7. Bake the eggplant in the preheated oven for 10 minutes to ensure they’re cooked through and extra crisp.
8. While the eggplant bakes, heat 1 tablespoon olive oil in a large pot over medium heat and sauté the minced garlic for 1 minute until fragrant.
9. Add the crushed tomatoes, oregano, salt, and black pepper to the pot, stirring to combine, then simmer uncovered for 15 minutes, stirring occasionally—this deepens the flavor.
10. In a separate pot, cook the penne pasta according to package directions until al dente, about 10 minutes, then drain and set aside.
11. Toss the cooked pasta with the tomato sauce in the pot until well coated.
12. Layer half of the pasta mixture in a 9×13-inch baking dish, top with half of the baked eggplant slices, sprinkle with 1/2 cup mozzarella cheese, then repeat with the remaining pasta, eggplant, and mozzarella.
13. Bake the assembled dish in the oven at 400°F for 15 minutes until the cheese is melted and bubbly, then let it rest for 5 minutes before serving to set the layers.
14. Garnish with fresh basil leaves just before serving for a pop of color and freshness.
The result is a delightful contrast of textures—crispy eggplant against tender pasta, all enveloped in a rich, herby tomato sauce. I love how the melted mozzarella adds a gooey pull that makes every bite irresistible. For a fun twist, try serving it with a side of garlic bread to soak up any extra sauce, or top it with extra Parmesan for an even cheesier finish.
Turkey and Cheese Panini

Gathering around the kitchen island with my kids on a chilly December evening, I realized we needed a quick, comforting dinner that felt special but wouldn’t keep us from wrapping presents. That’s how our beloved Turkey and Cheese Panini was born—a crispy, melty sandwich that’s become our go-to for busy nights and cozy gatherings alike.
Serving: 2 | Pre Time: 10 minutes | Cooking Time: 8 minutes
Ingredients
For the Panini:
– 4 slices sourdough bread
– 2 tbsp mayonnaise
– 4 slices deli turkey breast (about 4 oz total)
– 4 slices sharp cheddar cheese
– 2 tbsp unsalted butter, softened
Instructions
1. Preheat a panini press or a large skillet over medium heat to 375°F.
2. Lay out the 4 slices of sourdough bread on a clean cutting board.
3. Spread 1/2 tbsp of mayonnaise evenly onto one side of each bread slice.
4. Place 2 slices of deli turkey breast onto the mayonnaise-side of two bread slices.
5. Top the turkey on each slice with 2 slices of sharp cheddar cheese.
6. Assemble the sandwiches by placing the remaining bread slices on top, mayonnaise-side down.
7. Spread 1/2 tbsp of softened unsalted butter evenly on the outer side of each sandwich slice.
8. Place the sandwiches, butter-side down, onto the preheated panini press or skillet.
9. If using a skillet, place a heavy pan on top of the sandwiches to press them down.
10. Cook for 4 minutes, or until the bread is golden brown and crispy.
11. Carefully flip the sandwiches using a spatula.
12. Cook for another 4 minutes, or until the cheese is fully melted and the second side is golden brown.
13. Remove the panini from the heat and let them rest for 1 minute on a cutting board.
14. Slice each panini in half diagonally with a sharp knife.
Buttery, crisp sourdough gives way to gooey cheddar and savory turkey in every bite—it’s the perfect balance of textures. I love serving these with a side of tomato soup for dipping, or slicing them into smaller pieces for a festive holiday appetizer platter.
Lemon Garlic Butter Shrimp Scampi
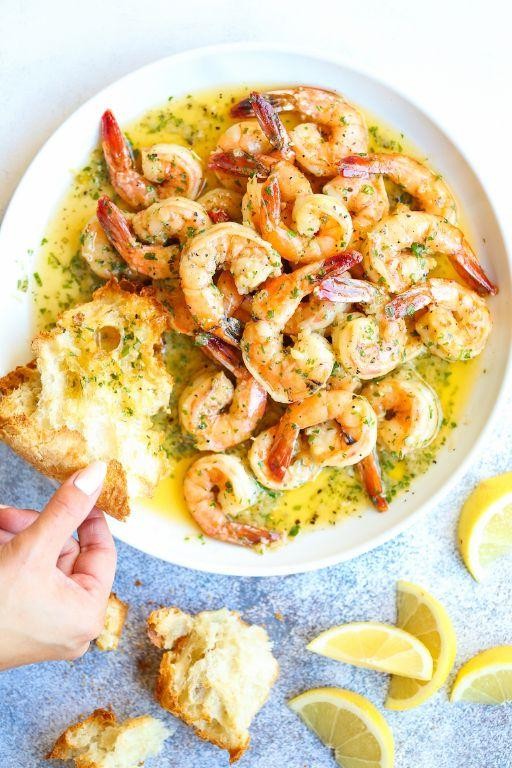
During the holiday rush last December, I found myself craving something bright and quick after a long day of shopping—enter this lemon garlic butter shrimp scampi, a lifesaver that comes together in minutes but tastes like a restaurant treat. It’s become my go‑in for busy weeknights, and I love how the zesty lemon cuts through the rich butter.
Serving: 4 | Pre Time: 10 minutes | Cooking Time: 15 minutes
Ingredients
For the shrimp and base:
– 1 lb large shrimp, peeled and deveined
– 2 tbsp olive oil
– 4 cloves garlic, minced
– 1/4 tsp red pepper flakes
For the sauce:
– 1/2 cup unsalted butter
– 1/4 cup dry white wine
– 1/4 cup fresh lemon juice
– 1/4 cup chopped fresh parsley
– Salt and black pepper
For serving:
– 8 oz linguine pasta, cooked according to package directions
Instructions
- Pat the shrimp dry with paper towels to ensure they sear properly instead of steaming.
- Heat olive oil in a large skillet over medium‑high heat until shimmering, about 2 minutes.
- Add the shrimp in a single layer and cook for 2 minutes per side until pink and opaque, then transfer to a plate.
- Reduce heat to medium and add minced garlic and red pepper flakes to the skillet; sauté for 1 minute until fragrant, being careful not to burn the garlic.
- Pour in the white wine to deglaze the pan, scraping up any browned bits with a wooden spoon for extra flavor.
- Add butter and stir until melted and bubbly, about 1 minute.
- Whisk in fresh lemon juice and let the sauce simmer for 2 minutes to reduce slightly and thicken.
- Return the cooked shrimp to the skillet and toss to coat in the sauce for 1 minute.
- Stir in chopped parsley and season with salt and black pepper, adjusting as needed.
- Serve immediately over cooked linguine pasta.
Vibrant and buttery, this scampi has tender shrimp with a glossy sauce that clings perfectly to the pasta. The lemon adds a bright tang that balances the richness, making it feel indulgent yet light—try it with a sprinkle of extra parsley or a side of crusty bread to soak up every last drop.
Vegetable Stir Fry with Tofu

Vegetable stir fry with tofu is one of those weeknight heroes I turn to when I need something healthy, fast, and satisfying. I love how versatile it is—you can use whatever veggies you have in the crisper drawer, and the crispy tofu adds a wonderful, protein-packed bite that makes it feel like a proper meal. It’s become my go-to for clearing out the fridge on a busy evening.
Serving: 4 | Prep Time: 20 minutes | Cooking Time: 15 minutes
Ingredients
For the Tofu:
– 1 (14 oz) block extra-firm tofu, pressed for 15 minutes and cubed
– 2 tbsp cornstarch
– 1/4 tsp salt
– 2 tbsp vegetable oil
For the Sauce:
– 1/4 cup low-sodium soy sauce
– 2 tbsp rice vinegar
– 1 tbsp maple syrup
– 1 tbsp sriracha
– 2 tsp toasted sesame oil
– 1 tsp grated fresh ginger
– 2 cloves garlic, minced
For the Stir Fry:
– 1 tbsp vegetable oil
– 1 red bell pepper, thinly sliced
– 1 cup broccoli florets
– 1 large carrot, julienned
– 1/2 red onion, thinly sliced
– 2 green onions, sliced (for garnish)
– 1 tbsp sesame seeds (for garnish)
Instructions
1. Pat the pressed tofu cubes completely dry with paper towels. 2. In a medium bowl, toss the dried tofu cubes with 2 tbsp cornstarch and 1/4 tsp salt until evenly coated. 3. Heat 2 tbsp vegetable oil in a large skillet or wok over medium-high heat until it shimmers, about 1 minute. 4. Add the coated tofu in a single layer and cook without stirring for 4-5 minutes, until the bottom is golden brown and crispy. 5. Flip each tofu piece and cook for another 4-5 minutes until all sides are crispy, then transfer to a plate. 6. In a small bowl, whisk together 1/4 cup soy sauce, 2 tbsp rice vinegar, 1 tbsp maple syrup, 1 tbsp sriracha, 2 tsp sesame oil, 1 tsp grated ginger, and 2 minced garlic cloves to make the sauce. 7. Heat 1 tbsp vegetable oil in the same skillet over medium-high heat. 8. Add 1 sliced red bell pepper, 1 cup broccoli florets, 1 julienned carrot, and 1/2 sliced red onion to the skillet. 9. Stir-fry the vegetables for 5-7 minutes, until they are tender-crisp and bright in color. 10. Pour the prepared sauce over the vegetables and stir to coat, cooking for 1 minute until the sauce bubbles and thickens slightly. 11. Return the crispy tofu to the skillet and gently toss everything together until the tofu is heated through and coated in sauce, about 1 minute. 12. Remove the skillet from the heat. 13. Garnish the stir fry with 2 sliced green onions and 1 tbsp sesame seeds.
Ultimately, this dish is all about contrast: the crispy, chewy tofu against the tender-crisp vegetables, all coated in that savory, slightly sweet, and spicy sauce. I love serving it over a bed of fluffy jasmine rice or even with some crunchy lettuce cups for a low-carb option—it’s so adaptable and always hits the spot.
Cheesy Broccoli Rice Casserole

Unbelievably cozy and perfect for a chilly December evening like tonight, this cheesy broccoli rice casserole has been my go-to comfort food since my college days. I love how the creamy sauce hugs every grain of rice and broccoli floret, making it feel like a warm hug in a dish—plus, it’s a lifesaver when I’m craving something hearty without spending hours in the kitchen.
Serving: 6 | Pre Time: 15 minutes | Cooking Time: 45 minutes
Ingredients
For the base:
– 1 ½ cups uncooked long-grain white rice
– 3 cups fresh broccoli florets, chopped into bite-sized pieces
– 1 medium yellow onion, finely diced
– 2 cloves garlic, minced
For the sauce:
– 2 cups whole milk
– 1 cup chicken broth
– ¼ cup unsalted butter
– ¼ cup all-purpose flour
– 1 teaspoon salt
– ½ teaspoon black pepper
– ¼ teaspoon ground nutmeg
For the topping:
– 2 cups shredded sharp cheddar cheese
– ½ cup grated Parmesan cheese
– ½ cup panko breadcrumbs
Instructions
1. Preheat your oven to 375°F and grease a 9×13-inch baking dish with butter or non-stick spray.
2. Cook the rice according to package directions until tender, then set it aside in a large mixing bowl—I always fluff it with a fork to prevent clumping.
3. Steam the broccoli florets for 4–5 minutes until bright green and slightly tender, then drain and add them to the bowl with the rice.
4. In a large skillet over medium heat, melt the butter and sauté the diced onion for 5 minutes until translucent, then add the minced garlic and cook for 1 more minute until fragrant.
5. Sprinkle the flour over the onion mixture and whisk continuously for 2 minutes to form a roux—this helps thicken the sauce without lumps.
6. Gradually pour in the milk and chicken broth while whisking, then add the salt, pepper, and nutmeg, and simmer for 5–7 minutes until the sauce thickens enough to coat the back of a spoon.
7. Remove the sauce from heat and stir in 1 ½ cups of the cheddar cheese until melted and smooth.
8. Pour the cheese sauce over the rice and broccoli in the bowl, mixing gently until everything is evenly coated, then transfer the mixture to the prepared baking dish.
9. In a small bowl, combine the remaining ½ cup cheddar cheese, Parmesan cheese, and panko breadcrumbs, then sprinkle this topping evenly over the casserole.
10. Bake uncovered at 375°F for 25–30 minutes until the top is golden brown and the edges are bubbly—if the top browns too quickly, loosely tent it with foil.
11. Let the casserole rest for 10 minutes before serving to allow the flavors to meld and make slicing easier.
Zesty and utterly satisfying, this casserole emerges from the oven with a crispy, cheesy crust that gives way to a creamy, tender interior. The nutmeg adds a subtle warmth that pairs beautifully with the sharp cheddar, and I love serving it alongside a simple green salad or as a hearty main dish on its own—leftovers reheat wonderfully for lunch the next day!
Summary
A fantastic collection of 18 quick, easy recipes perfect for busy weeknights! We hope these delicious ideas make your meal planning simpler and more enjoyable. Give them a try, and let us know which ones become your new favorites in the comments below. Don’t forget to share this roundup on Pinterest to help other home cooks discover these tasty solutions!


