
Nights racing by? Your electric skillet is the secret weapon for delicious dinners in a flash. We’ve gathered 17 quick, satisfying recipes—from sizzling stir-fries to cozy one-pan pastas—that turn hectic evenings into tasty triumphs. Get ready to reclaim your weeknights with minimal fuss and maximum flavor. Let’s dive into these lifesaving meals!
Skillet Chicken Fajitas
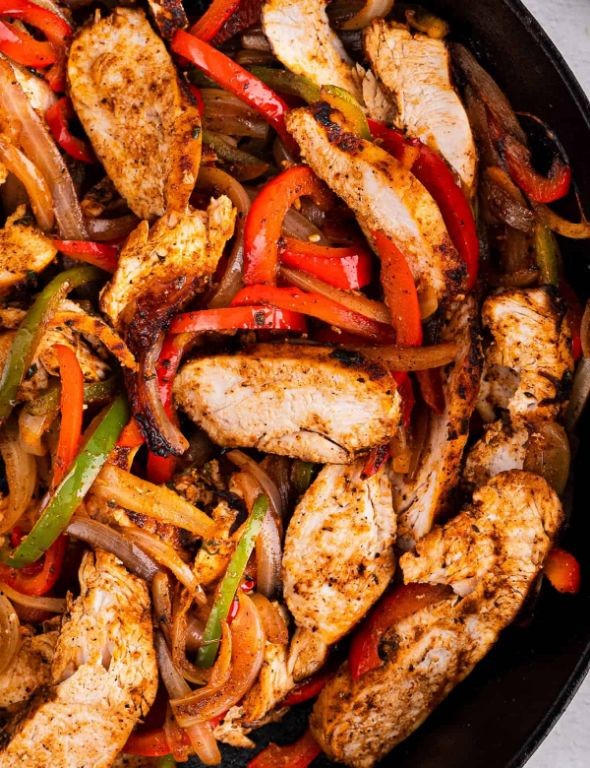
Savor the sizzle of perfectly seared chicken and vibrant peppers in this one-pan wonder that transforms weeknight dinners into festive occasions. Skillet chicken fajitas deliver restaurant-quality flair with minimal cleanup, marrying smoky spices with fresh, crisp vegetables for a meal that’s as colorful as it is comforting. This streamlined version captures all the classic flavors in under 30 minutes, making it ideal for busy evenings when you crave something special without the fuss.
Serving: 4 | Pre Time: 10 minutes | Cooking Time: 15 minutes
Ingredients
– 1.5 lbs boneless, skinless chicken breasts, sliced into ½-inch strips (I find thinner slices cook more evenly and absorb the marinade better)
– 2 bell peppers (one red, one green), cored and sliced into ¼-inch strips (the color contrast makes the dish pop visually)
– 1 medium yellow onion, thinly sliced (sweet varieties like Vidalia add a lovely caramelized note)
– 3 tbsp extra virgin olive oil, divided (my go-to for its fruity aroma and high smoke point)
– 2 tbsp fresh lime juice (about 1 lime, squeezed just before using for maximum brightness)
– 2 tsp chili powder
– 1 tsp ground cumin
– 1 tsp smoked paprika (this adds a subtle depth that regular paprika lacks)
– ½ tsp garlic powder
– ½ tsp kosher salt
– 8 small flour tortillas, warmed (I prefer the pliable kind that don’t crack when folded)
– Fresh cilantro leaves, for garnish (a handful torn right at the end preserves their vibrant flavor)
– Sour cream, for serving (a dollop on top cools the spices beautifully)
Instructions
1. In a medium bowl, combine the chicken strips, 1 tablespoon of olive oil, lime juice, chili powder, cumin, smoked paprika, garlic powder, and kosher salt. Toss until the chicken is evenly coated, then let it marinate at room temperature for 10 minutes—this brief rest allows the flavors to penetrate without drying out the meat.
2. Heat a large cast-iron or heavy-bottomed skillet over medium-high heat until a drop of water sizzles upon contact, about 2 minutes. Add the remaining 2 tablespoons of olive oil and swirl to coat the pan.
3. Add the marinated chicken to the hot skillet in a single layer, ensuring the pieces aren’t crowded. Cook undisturbed for 4–5 minutes, until the bottom develops a golden-brown sear and releases easily from the pan.
4. Flip each chicken strip using tongs and cook for another 3–4 minutes, until the chicken is cooked through and registers 165°F on an instant-read thermometer. Transfer the chicken to a clean plate and tent loosely with foil to keep warm.
5. In the same skillet, add the sliced bell peppers and onion. Cook over medium-high heat, stirring occasionally, for 6–8 minutes until the vegetables are tender-crisp and lightly charred at the edges—this char adds a smoky sweetness that elevates the dish.
6. Return the cooked chicken to the skillet with the vegetables. Toss everything together gently and cook for 1 minute to reheat and blend the flavors.
7. Remove the skillet from the heat. Sprinkle the fresh cilantro leaves over the mixture.
8. Serve immediately with warmed flour tortillas and sour cream on the side.
Wrapped in a warm tortilla, these fajitas offer a delightful contrast of textures: the chicken remains juicy and tender, while the peppers and onion provide a satisfying crunch. The smoky spices meld with the bright lime and fresh cilantro for a flavor profile that’s both robust and refreshing. For a creative twist, try serving the mixture over a bed of crisp lettuce as a salad or alongside a scoop of cilantro-lime rice for a heartier meal.
One-Pot Electric Skillet Pasta
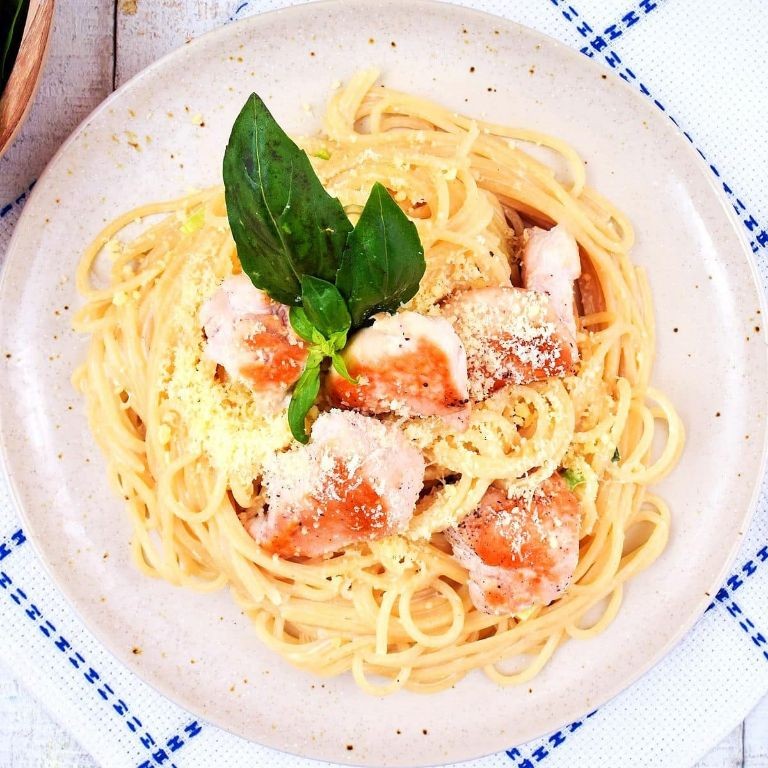
Revered for its effortless elegance, this One-Pot Electric Skillet Pasta transforms a humble weeknight staple into a sophisticated, hands-off meal. Imagine plump pasta and vibrant vegetables simmering together in a rich, garlicky tomato sauce, all melding into a cohesive dish with minimal cleanup. It’s the perfect union of convenience and culinary delight, ready to grace your table in under thirty minutes.
Serving: 4 | Pre Time: 10 minutes | Cooking Time: 20 minutes
Ingredients
- 1 tablespoon extra virgin olive oil, my go-to for its fruity depth
- 3 cloves garlic, minced—freshly minced releases the most aromatic oils
- 1 small yellow onion, finely diced (I find a fine dice ensures it melts into the sauce)
- 1 red bell pepper, sliced into thin strips for a sweet, colorful crunch
- 12 ounces dried penne pasta, a shape that cradles sauce beautifully
- 1 (28-ounce) can crushed tomatoes, preferably San Marzano for their sweet, low-acid profile
- 2 cups vegetable broth, using a low-sodium variety lets you control the seasoning
- 1 teaspoon dried oregano, crushed between your fingers to awaken its oils
- ½ teaspoon red pepper flakes, adjust to your preferred level of warmth
- 4 ounces fresh baby spinach, added at the end for a vibrant green pop
- ½ cup grated Parmesan cheese, plus more for serving—I always use freshly grated for superior melt
- Salt and freshly ground black pepper, to season each layer as you build the dish
Instructions
- Plug in your electric skillet and set the temperature to 350°F to preheat for 3 minutes.
- Add 1 tablespoon of extra virgin olive oil to the preheated skillet, swirling to coat the surface evenly.
- Sauté 3 cloves of minced garlic and 1 finely diced yellow onion for 3–4 minutes, until the onion turns translucent and fragrant. Tip: Avoid browning the garlic here to prevent any bitter notes.
- Stir in 1 sliced red bell pepper and cook for an additional 2 minutes, just until it begins to soften.
- Add 12 ounces of dried penne pasta, 1 can of crushed tomatoes, 2 cups of vegetable broth, 1 teaspoon of dried oregano, and ½ teaspoon of red pepper flakes directly to the skillet. Stir thoroughly to combine all ingredients.
- Increase the skillet temperature to 400°F and bring the mixture to a vigorous simmer, which should take about 2–3 minutes.
- Once simmering, reduce the temperature to 325°F, cover the skillet with its lid, and let it cook undisturbed for 12 minutes. Tip: Resist the urge to stir during this time to allow the pasta to cook evenly in the simmering liquid.
- After 12 minutes, remove the lid. The pasta should be al dente and most of the liquid absorbed. Stir in 4 ounces of fresh baby spinach and ½ cup of grated Parmesan cheese until the spinach wilts and the cheese melts, about 1–2 minutes.
- Season the finished dish with salt and freshly ground black pepper, tasting to ensure the balance is perfect. Tip: Season in this final step after the cheese has been incorporated, as Parmesan adds its own saltiness.
Captivating in its simplicity, the finished pasta boasts a luxuriously thick sauce that clings to each tender-yet-firm penne tube. The sweet tomatoes and savory Parmesan create a rich base, punctuated by the gentle heat of pepper flakes and the fresh brightness of wilted spinach. For a stunning presentation, serve it directly from the skillet at the table, garnished with an extra sprinkle of Parmesan and a drizzle of your best olive oil.
Electric Skillet Beef Stir-Fry

Meticulously balancing savory, sweet, and umami, this Electric Skillet Beef Stir-Fry transforms a weeknight staple into an elegant, restaurant-worthy meal with minimal effort and maximum flavor. Its sizzling, aromatic allure promises a quick yet deeply satisfying dinner, perfect for those evenings when time is precious but a craving for something special is not.
Serving: 4 | Pre Time: 15 minutes | Cooking Time: 12 minutes
Ingredients
– 1.5 lbs flank steak, thinly sliced against the grain for ultimate tenderness
– 3 tbsp soy sauce, my pantry staple for that essential salty depth
– 2 tbsp honey, for a touch of caramelized sweetness that balances the soy
– 1 tbsp rice vinegar, to add a bright, clean acidity
– 2 tsp toasted sesame oil, my secret for a rich, nutty fragrance
– 3 cloves garlic, minced (I always use fresh—it makes all the difference)
– 1 tbsp fresh ginger, grated (keep the peel on while grating for easier handling)
– 1 red bell pepper, thinly sliced into vibrant strips
– 1 cup broccoli florets, cut into bite-sized pieces for quick cooking
– 2 tbsp vegetable oil, with a high smoke point perfect for searing
– 2 green onions, thinly sliced, for a fresh, colorful finish
– Cooked white rice, for serving (I prefer jasmine rice for its floral aroma)
Instructions
1. In a medium bowl, combine the soy sauce, honey, rice vinegar, and sesame oil, whisking until the honey is fully dissolved to create a cohesive sauce.
2. Add the sliced flank steak to the bowl, tossing thoroughly to ensure every piece is coated in the marinade; let it sit at room temperature for 10 minutes to allow the flavors to penetrate.
3. While the beef marinates, prep the vegetables: mince the garlic, grate the ginger, and slice the bell pepper and broccoli.
4. Heat the electric skillet to 375°F and add 1 tablespoon of vegetable oil, swirling to coat the surface evenly.
5. Using tongs, remove the beef from the marinade, letting excess drip off, and add it to the skillet in a single layer without overcrowding; reserve the remaining marinade.
6. Sear the beef for 2–3 minutes without stirring until it develops a deep brown crust on one side, then flip and cook for another 1–2 minutes until just cooked through but still tender.
7. Transfer the cooked beef to a clean plate, covering loosely with foil to keep warm.
8. Add the remaining 1 tablespoon of vegetable oil to the skillet, still at 375°F.
9. Add the garlic and ginger, stirring constantly for 30 seconds until fragrant but not browned to avoid bitterness.
10. Add the bell pepper and broccoli, stirring to combine, and cook for 4–5 minutes until the vegetables are crisp-tender and bright in color.
11. Pour the reserved marinade into the skillet, bringing it to a simmer for 1–2 minutes until slightly thickened and bubbling.
12. Return the beef and any accumulated juices to the skillet, tossing everything together to coat evenly and heat through for about 1 minute.
13. Remove the skillet from heat and stir in the sliced green onions just before serving.
Lusciously tender beef mingles with crisp-tender vegetables in a glossy, well-balanced sauce that clings perfectly to each bite. For a creative twist, serve it over cauliflower rice for a low-carb option or wrap it in warm lettuce cups for a hands-on, interactive meal that delights the senses.
Cheesy Skillet Hash Browns

Savor the comforting embrace of crispy, golden hash browns, elevated with a decadent layer of melted cheese that transforms this humble breakfast staple into a show-stopping skillet meal. Perfect for a leisurely weekend brunch or a cozy holiday morning, this dish marries simplicity with indulgence in every bite. Its golden crust and gooey center promise to become an instant favorite at any table.
Serving: 4 | Pre Time: 15 minutes | Cooking Time: 25 minutes
Ingredients
– 1.5 pounds russet potatoes, peeled and shredded (I find a box grater works best for uniform shreds)
– 1 small yellow onion, finely diced (this adds a subtle sweetness)
– 3 tablespoons unsalted butter, divided (I always keep it cold for better browning)
– 2 tablespoons extra virgin olive oil, my go-to for its fruity notes
– 1 teaspoon kosher salt
– 1/2 teaspoon freshly ground black pepper
– 1 cup shredded sharp cheddar cheese (I prefer a block shredded fresh for superior melt)
– 2 large eggs, lightly beaten (room temperature eggs incorporate more smoothly)
– 2 tablespoons chopped fresh chives, for garnish
Instructions
1. Place the shredded potatoes in a clean kitchen towel and wring firmly to remove excess moisture, which is key for achieving maximum crispiness.
2. In a 10-inch cast-iron skillet, heat 2 tablespoons of butter and the olive oil over medium heat until the butter melts and foams slightly, about 2 minutes.
3. Add the shredded potatoes and diced onion to the skillet, spreading them into an even layer, and season with the salt and pepper.
4. Cook without stirring for 8-10 minutes, until the bottom forms a deep golden-brown crust that releases easily when lifted with a spatula.
5. Flip the hash browns in sections using the spatula to turn over large portions, then cook for another 8-10 minutes until the second side is equally crispy and golden.
6. Reduce the heat to low and evenly sprinkle the shredded cheddar cheese over the entire surface of the hash browns.
7. Cover the skillet with a lid or aluminum foil and let it sit for 3-4 minutes, just until the cheese is fully melted and bubbly.
8. In a small bowl, lightly beat the eggs, then pour them in a thin stream over the cheesy hash browns, tilting the skillet slightly to distribute them evenly.
9. Cook uncovered for 2-3 minutes, until the eggs are just set but still slightly soft, then remove from heat.
10. Dot the top with the remaining 1 tablespoon of butter and sprinkle with the chopped fresh chives for a bright finish.
Buttery and crisp on the outside with a tender, cheesy interior, these hash browns offer a delightful textural contrast. Serve them directly from the skillet, perhaps topped with a dollop of sour cream or alongside smoky bacon for a hearty meal that feels both rustic and refined.
Electric Skillet Pancakes

Dazzlingly simple yet profoundly satisfying, electric skillet pancakes transform the humble breakfast staple into an effortlessly elegant affair. With their perfectly golden surfaces and fluffy interiors, these pancakes achieve a consistency that’s both comforting and refined, making them ideal for leisurely weekend brunches or impromptu gatherings where culinary finesse is desired without the fuss. The electric skillet’s consistent heat ensures each batch emerges with uniform doneness, elevating the experience from ordinary to extraordinary.
Serving: 4 | Pre Time: 10 minutes | Cooking Time: 15 minutes
Ingredients
– 1 ½ cups all-purpose flour, sifted for a lighter texture—I always sift to avoid lumps.
– 2 tablespoons granulated sugar, which adds a subtle sweetness without overpowering.
– 1 tablespoon baking powder, the key to achieving those airy, fluffy pancakes.
– ½ teaspoon fine sea salt, to balance the flavors perfectly.
– 1 large egg, at room temperature for better incorporation into the batter.
– 1 ¼ cups whole milk, which I prefer for its richness and creamy consistency.
– 3 tablespoons unsalted butter, melted and slightly cooled to prevent curdling.
– 1 teaspoon pure vanilla extract, my go-to for a warm, aromatic note.
– Cooking spray or additional butter for greasing the skillet.
Instructions
1. Preheat your electric skillet to 375°F, ensuring it reaches the exact temperature for even cooking.
2. In a large mixing bowl, whisk together the sifted all-purpose flour, granulated sugar, baking powder, and fine sea salt until fully combined.
3. In a separate medium bowl, beat the room-temperature egg lightly, then whisk in the whole milk, melted unsalted butter, and pure vanilla extract until smooth.
4. Pour the wet ingredients into the dry ingredients and stir gently with a spatula until just combined, being careful not to overmix—a few lumps are fine for tender pancakes.
5. Lightly grease the preheated electric skillet with cooking spray or a small amount of butter, using a paper towel to spread it evenly.
6. For each pancake, ladle about ¼ cup of batter onto the skillet, spacing them at least 2 inches apart to allow for spreading.
7. Cook the pancakes for 2 to 3 minutes, or until bubbles form on the surface and the edges look set, indicating it’s time to flip.
8. Carefully flip each pancake with a spatula and cook for an additional 1 to 2 minutes, until golden brown and cooked through—check by pressing lightly; they should spring back.
9. Transfer the cooked pancakes to a warm plate and repeat with the remaining batter, regreasing the skillet as needed to prevent sticking.
10. Serve the pancakes immediately while hot for the best texture and flavor.
Airy and delicate, these pancakes boast a tender crumb that melts in your mouth, with hints of vanilla and butter shining through each bite. For a creative twist, layer them with fresh berries and a drizzle of maple syrup, or stack them high with a dollop of whipped cream for an indulgent presentation that’s as visually appealing as it is delicious.
Electric Skillet Fried Rice
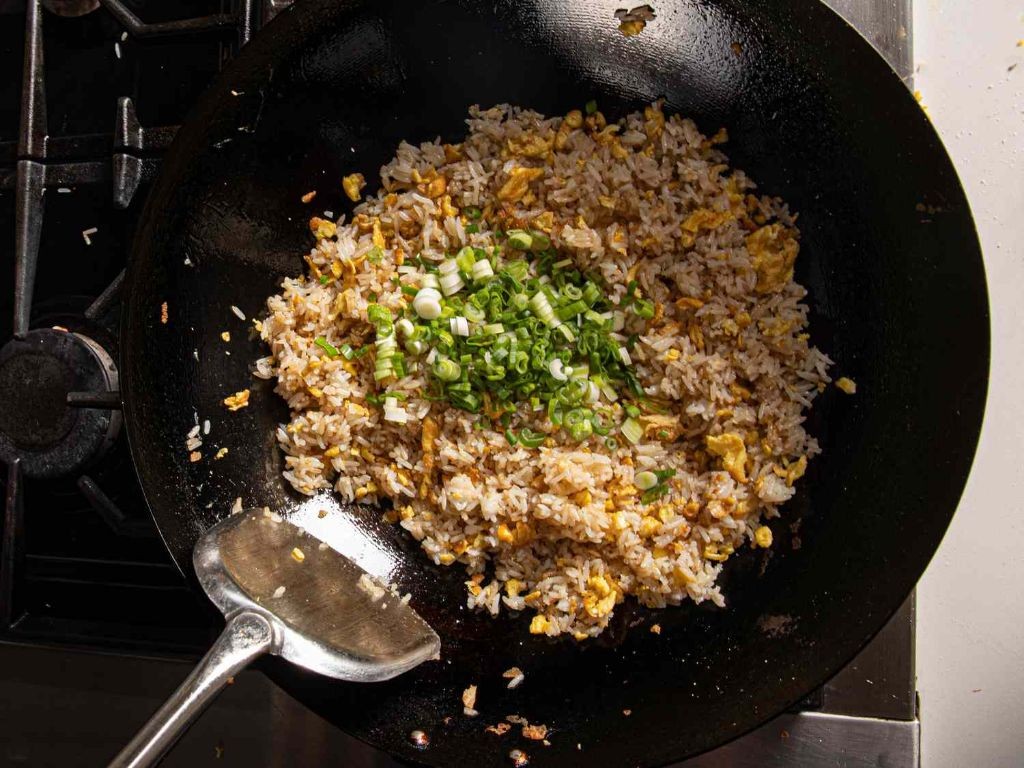
Heralding a new era of effortless elegance in home cooking, this electric skillet fried rice transforms humble ingredients into a symphony of textures and flavors. Perfect for busy weeknights or impromptu gatherings, it delivers restaurant-quality results with minimal fuss, proving that sophisticated meals need not be complicated. The electric skillet’s consistent heat distribution ensures every grain of rice achieves that coveted golden crispness while maintaining a tender interior.
Serving: 4 | Pre Time: 15 minutes | Cooking Time: 20 minutes
Ingredients
– 3 cups cold, day-old jasmine rice (the secret to perfect fried rice—fresh rice turns mushy)
– 2 large eggs, brought to room temperature for better incorporation
– ½ cup frozen peas and carrots blend (no need to thaw—they steam perfectly during cooking)
– ¼ cup finely diced yellow onion (I prefer yellow for its subtle sweetness)
– 2 cloves garlic, minced (freshly minced makes all the difference)
– 3 tablespoons vegetable oil (a neutral oil with a high smoke point is essential)
– 2 tablespoons soy sauce (I use reduced-sodium to control saltiness)
– 1 tablespoon toasted sesame oil (my go-to for that authentic finishing aroma)
– ½ teaspoon white pepper (more nuanced than black pepper here)
– 2 green onions, thinly sliced (reserve the green tops for garnish)
Instructions
1. Set your electric skillet to 350°F and add 1 tablespoon of vegetable oil, swirling to coat the surface evenly.
2. Crack the room-temperature eggs directly into the skillet and scramble them for 45–60 seconds until just set but still slightly runny; transfer to a plate immediately to prevent overcooking.
3. Increase the skillet temperature to 375°F and add the remaining 2 tablespoons of vegetable oil.
4. Add the diced yellow onion and cook for 3–4 minutes, stirring occasionally, until translucent and fragrant.
5. Stir in the minced garlic and cook for exactly 30 seconds to release its aroma without burning.
6. Add the cold jasmine rice, breaking up any clumps with a spatula, and spread it into an even layer; let it cook undisturbed for 2 minutes to develop a golden crust on the bottom.
7. Flip and stir the rice, then add the frozen peas and carrots blend, distributing them evenly throughout.
8. Pour the soy sauce and toasted sesame oil over the rice, stirring vigorously to coat every grain uniformly.
9. Return the scrambled eggs to the skillet, along with the white pepper and the white parts of the sliced green onions; toss everything together for 1–2 minutes until fully combined and heated through.
10. Remove the skillet from heat and garnish with the reserved green onion tops.
Captivating in its simplicity, this dish delights with contrasting textures—crispy rice edges against tender vegetables and fluffy eggs. The subtle nuttiness of sesame oil complements the savory soy sauce, creating a balanced flavor profile that pairs beautifully with grilled proteins or stands alone as a satisfying meal. For a creative twist, serve it in lettuce cups with a drizzle of chili crisp or top with a fried egg for added richness.
Skillet Cornbread

Yielded from the simplest of ingredients, skillet cornbread emerges as a rustic yet refined staple, its golden crust and tender crumb offering warmth and comfort. This classic American quick bread, baked in a well-seasoned cast iron skillet, achieves a perfect balance of sweet corn flavor and savory depth, making it an indispensable companion to chili, barbecue, or a simple pat of butter. Its straightforward preparation belies the elegant results, transforming humble pantry items into a centerpiece worthy of any table.
Serving: 8 | Pre Time: 10 minutes | Cooking Time: 25 minutes
Ingredients
– 1 ½ cups fine yellow cornmeal, which I find gives the best traditional texture
– ½ cup all-purpose flour, for just enough structure without heaviness
– 1 tablespoon baking powder, to ensure a lofty rise
– 1 teaspoon kosher salt, my preferred for its clean flavor
– 1 ¼ cups whole milk, at room temperature for even mixing
– 2 large eggs, also at room temperature to blend smoothly
– ¼ cup granulated sugar, for a subtle sweetness that doesn’t overpower
– ¼ cup unsalted butter, melted and slightly cooled, plus 1 tablespoon for the skillet
Instructions
1. Preheat your oven to 425°F (218°C) and place a 10-inch cast iron skillet inside to heat for 10 minutes—this preheating creates an instant crust.
2. In a large bowl, whisk together 1 ½ cups fine yellow cornmeal, ½ cup all-purpose flour, 1 tablespoon baking powder, and 1 teaspoon kosher salt until fully combined.
3. In a separate medium bowl, whisk 1 ¼ cups whole milk, 2 large eggs, and ¼ cup granulated sugar until the mixture is smooth and homogeneous.
4. Pour the wet ingredients into the dry ingredients and stir gently with a spatula until just incorporated; avoid overmixing to keep the bread tender.
5. Carefully remove the hot skillet from the oven using oven mitts, add 1 tablespoon of unsalted butter, and swirl it to coat the bottom and sides evenly.
6. Immediately pour the batter into the hot skillet—it should sizzle slightly, which helps form that coveted crispy edge.
7. Bake at 425°F (218°C) for 20–25 minutes, or until the top is golden brown and a toothpick inserted into the center comes out clean.
8. Let the cornbread cool in the skillet for 5 minutes before slicing to allow it to set properly.
Generously slice this cornbread while still warm to reveal its moist, crumbly interior contrasted by a crisp, buttery crust. The subtle sweetness from the sugar enhances the corn’s natural flavor, making it versatile enough to pair with spicy dishes or enjoy drizzled with honey. For a creative twist, crumble leftovers into a breakfast strata or use as a base for savory bread pudding, extending its comfort beyond the first serving.
Electric Skillet Quesadillas

Unveiling a modern twist on a beloved classic, these Electric Skillet Quesadillas transform simple ingredients into a crisp, golden delight perfect for effortless entertaining. Using an electric skillet ensures even, consistent heat, yielding that ideal melt-in-your-mouth texture with minimal fuss. This approachable recipe promises a crowd-pleasing dish that’s both elegant and utterly satisfying.
Serving: 4 | Pre Time: 10 minutes | Cooking Time: 15 minutes
Ingredients
- 4 large flour tortillas (I always use the burrito-size for maximum filling)
- 2 cups shredded Monterey Jack cheese, freshly grated for the best melt
- 1 cup cooked, shredded chicken breast (leftover rotisserie chicken works beautifully here)
- 1/2 cup canned black beans, rinsed and drained to remove excess sodium
- 1/4 cup finely diced red onion, which adds a lovely sharp bite
- 2 tablespoons unsalted butter, my go-to for achieving that perfect golden crust
- 1/2 teaspoon ground cumin, toasting it briefly enhances its earthy aroma
- 1/4 teaspoon kosher salt, I find it seasons more evenly than table salt
Instructions
- Plug in your electric skillet and set the temperature to 350°F, allowing it to preheat fully for about 5 minutes—this ensures even cooking from the start.
- While the skillet heats, combine the shredded chicken, black beans, red onion, cumin, and kosher salt in a medium bowl, tossing gently to distribute the spices evenly.
- Place one tortilla flat on a clean surface and sprinkle 1/2 cup of the shredded Monterey Jack cheese evenly over half of it, leaving a 1-inch border around the edge.
- Spoon a quarter of the chicken mixture (about 1/2 cup) over the cheese, then fold the empty half of the tortilla over the filling, pressing down lightly to seal.
- Add 1/2 tablespoon of unsalted butter to the preheated skillet, swirling it to coat the surface completely as it melts and bubbles slightly.
- Carefully place one folded quesadilla in the skillet and cook for 3–4 minutes, until the bottom is golden brown and crisp—peek gently with a spatula to check.
- Flip the quesadilla using a wide spatula and cook for another 3–4 minutes, until the second side is equally golden and the cheese inside is fully melted and oozy.
- Transfer the cooked quesadilla to a cutting board and repeat steps 5–7 with the remaining butter and quesadillas, wiping the skillet clean between batches if needed to prevent burning.
- Let each quesadilla rest for 1 minute before slicing into wedges with a sharp knife—this allows the filling to set slightly for cleaner cuts.
Yielded by this method, the quesadillas boast a shatteringly crisp exterior that gives way to a molten, savory interior, with the cumin lending a warm, aromatic depth. For a creative flourish, serve them alongside a vibrant salsa verde or a dollop of cool sour cream to balance the richness, making each bite a harmonious blend of textures and flavors.
Skillet Philly Cheesesteak
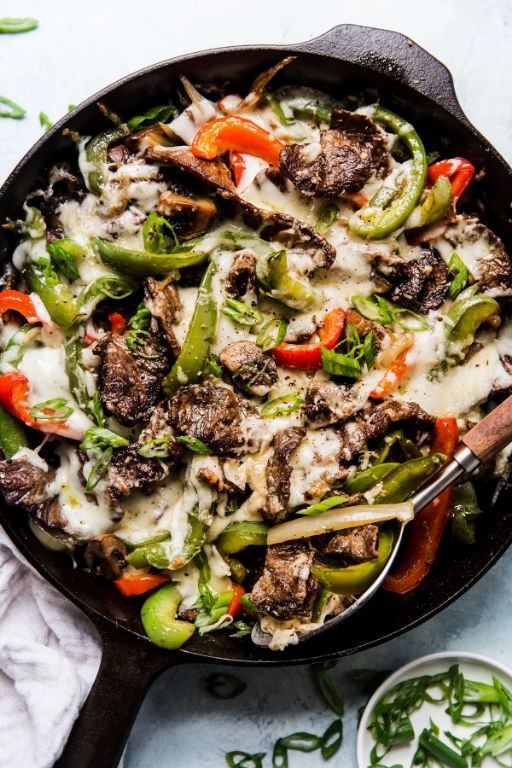
On a crisp winter evening, few dishes satisfy like a classic Philly cheesesteak, and this skillet version brings all the beloved flavors home with minimal fuss. Imagine thinly sliced ribeye sizzling with onions and peppers, all blanketed in melted provolone—it’s a comforting, crowd-pleasing meal that comes together in one pan. Perfect for a quick weeknight dinner or a casual gathering, this recipe delivers the essence of the iconic sandwich without the need for a griddle.
Serving: 4 | Pre Time: 15 minutes | Cooking Time: 20 minutes
Ingredients
– 1.5 lbs ribeye steak, thinly sliced against the grain (I ask my butcher to do this for tenderness)
– 2 tbsp extra virgin olive oil, my go-to for its fruity notes
– 1 large yellow onion, thinly sliced into half-moons
– 2 bell peppers (I use one red and one green for color), seeded and sliced into strips
– 4 slices provolone cheese, preferably deli-style for better melt
– 2 tbsp Worcestershire sauce, which adds a savory depth
– Salt and freshly ground black pepper, to season as you go
– 4 hoagie rolls, lightly toasted for a crisp exterior
Instructions
1. Heat 1 tbsp olive oil in a large skillet over medium-high heat until shimmering, about 2 minutes.
2. Add the sliced onions and bell peppers, cooking for 8–10 minutes until softened and lightly charred, stirring occasionally; this builds a sweet, caramelized base.
3. Transfer the vegetables to a plate and set aside, wiping the skillet clean with a paper towel to prevent burning.
4. Increase the heat to high and add the remaining 1 tbsp olive oil, heating for 1 minute until hot.
5. Add the sliced ribeye in a single layer, seasoning with salt and pepper, and cook for 3–4 minutes without stirring to achieve a good sear.
6. Stir the steak and cook for another 2–3 minutes until no pink remains, then drizzle with Worcestershire sauce for an umami boost.
7. Return the cooked vegetables to the skillet, tossing everything together over medium heat for 1 minute to combine flavors.
8. Arrange the steak and vegetable mixture evenly in the skillet, then lay the provolone slices on top, covering the surface.
9. Cover the skillet with a lid and reduce the heat to low, letting the cheese melt for 2–3 minutes until gooey and fully incorporated.
10. While the cheese melts, toast the hoagie rolls in a toaster or under a broiler for 1–2 minutes until golden and crisp.
11. Spoon the cheesesteak mixture into the toasted rolls, dividing it evenly among the four servings.
Perfectly balanced, this skillet Philly cheesesteak offers tender, juicy steak with sweet peppers and onions, all enveloped in creamy provolone. The toasted roll adds a satisfying crunch that contrasts the rich filling, making each bite a harmonious blend of textures. For a creative twist, serve it open-faced with a side of crispy fries or top it with a fried egg for a hearty brunch option.
Electric Skillet Apple Crisp

Venturing beyond the traditional oven-baked dessert, this electric skillet apple crisp transforms humble ingredients into a warmly spiced, caramel-kissed delight that’s both rustic and refined. Its bubbling fruit filling and golden oat topping come together effortlessly in a single pan, making it an ideal centerpiece for cozy gatherings or a spontaneous sweet treat. The method captures all the comforting aromas of a classic crisp while offering the convenience of stovetop preparation—perfect for when the oven is occupied or you simply crave a quicker route to dessert.
Serving: 6 | Pre Time: 15 minutes | Cooking Time: 25 minutes
Ingredients
– 6 medium Granny Smith apples, peeled and sliced ¼-inch thick (I find their tartness balances the sweetness beautifully)
– ¾ cup all-purpose flour
– ¾ cup old-fashioned rolled oats (not quick-cooking—they provide the best texture)
– ⅔ cup packed light brown sugar
– ½ cup granulated sugar
– 1 teaspoon ground cinnamon
– ½ teaspoon ground nutmeg (freshly grated if you have it, for a brighter aroma)
– ¼ teaspoon fine sea salt
– ½ cup unsalted butter, cold and cut into small cubes (I always keep mine chilled until the last moment)
– 1 tablespoon lemon juice (a squeeze from half a lemon works perfectly)
– 1 teaspoon pure vanilla extract
Instructions
1. In a large bowl, combine the sliced apples, lemon juice, and vanilla extract, tossing gently to coat evenly—this prevents browning and adds a subtle brightness.
2. In a separate bowl, whisk together the flour, oats, both sugars, cinnamon, nutmeg, and salt until fully blended.
3. Add the cold butter cubes to the dry mixture, and use your fingers or a pastry cutter to work it in until the mixture resembles coarse crumbs with some pea-sized bits remaining; chilling the bowl beforehand can help keep the butter firm.
4. Preheat your electric skillet to 325°F over medium heat, ensuring it’s evenly warmed before adding ingredients.
5. Spread the apple mixture in an even layer across the bottom of the skillet, arranging the slices so they lie flat without overcrowding.
6. Sprinkle the oat topping evenly over the apples, covering them completely but gently—avoid pressing down, which can compact the layers.
7. Cover the skillet with its lid and cook for 20 minutes, resisting the urge to peek, as this traps steam and helps the apples soften properly.
8. After 20 minutes, remove the lid and continue cooking uncovered for 5 more minutes, or until the topping is golden brown and the filling is bubbling vigorously around the edges.
9. Turn off the heat and let the crisp rest in the skillet for 10 minutes to allow the juices to thicken slightly.
Oozing with tender, cinnamon-laced apples and crowned by a buttery, crisp streusel, this dessert offers a delightful contrast of textures in every spoonful. Serve it warm, perhaps with a scoop of vanilla bean ice cream melting into the crevices, or enjoy it at room temperature as a sweet afternoon snack with a drizzle of caramel for an extra indulgent touch.
Skillet Garlic Butter Chicken
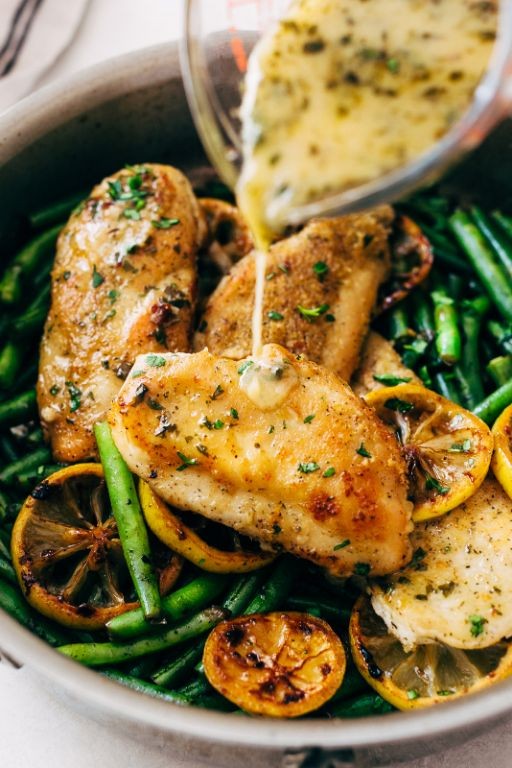
Luxuriously simple yet deeply flavorful, this Skillet Garlic Butter Chicken transforms humble ingredients into an elegant weeknight dinner. Imagine golden-brown chicken thighs bathed in a rich, aromatic garlic butter sauce that’s ready to impress in under an hour. It’s the kind of dish that feels both comforting and sophisticated, perfect for a cozy evening or an impromptu gathering.
Serving: 4 | Pre Time: 15 minutes | Cooking Time: 25 minutes
Ingredients
– 4 boneless, skin-on chicken thighs (about 1.5 lbs total)—I find skin-on adds incredible crispness and flavor.
– 1 tsp kosher salt, plus more for seasoning—I always use Diamond Crystal for its light, even texture.
– ½ tsp freshly ground black pepper, freshly cracked for the best aroma.
– 2 tbsp extra virgin olive oil, my go-to for its fruity notes that complement the butter.
– 4 tbsp unsalted butter, divided—I prefer unsalted to control the seasoning perfectly.
– 6 garlic cloves, minced—freshly minced garlic is essential here for that pungent, sweet flavor.
– ¼ cup dry white wine, such as Sauvignon Blanc, which adds a bright acidity to balance the richness.
– ½ cup low-sodium chicken broth, to build a silky sauce base.
– 1 tbsp fresh lemon juice, squeezed just before using for maximum zing.
– 2 tbsp chopped fresh parsley, for a vibrant, herbaceous finish.
Instructions
1. Pat the chicken thighs completely dry with paper towels to ensure a crisp sear, then season both sides evenly with the 1 tsp kosher salt and ½ tsp black pepper.
2. Heat the 2 tbsp olive oil in a large skillet over medium-high heat until it shimmers, about 2 minutes.
3. Place the chicken thighs skin-side down in the skillet and cook undisturbed for 6–8 minutes, until the skin is golden-brown and crispy—resist the urge to move them for the best crust.
4. Flip the chicken thighs and cook for another 4–5 minutes until the internal temperature reaches 165°F when checked with an instant-read thermometer, then transfer to a plate.
5. Reduce the heat to medium and add 2 tbsp of the butter to the skillet, letting it melt and foam slightly.
6. Add the 6 minced garlic cloves and cook for 30–45 seconds, stirring constantly until fragrant but not browned to avoid bitterness.
7. Pour in the ¼ cup white wine to deglaze the pan, scraping up any browned bits from the bottom for extra flavor, and simmer for 1–2 minutes until reduced by half.
8. Stir in the ½ cup chicken broth and simmer for 3–4 minutes until the sauce slightly thickens.
9. Whisk in the remaining 2 tbsp butter, one tablespoon at a time, until fully melted and emulsified into a glossy sauce.
10. Remove the skillet from heat and stir in the 1 tbsp lemon juice and 2 tbsp chopped parsley.
11. Return the chicken thighs to the skillet, spooning the sauce over them to coat evenly, and let rest for 2–3 minutes to absorb the flavors.
An irresistible crispness gives way to tender, juicy chicken infused with the savory depth of garlic and butter. The sauce, brightened with lemon and herbs, clings beautifully to each bite, making it ideal served over creamy mashed potatoes or alongside crusty bread to soak up every last drop.
Electric Skillet French Toast

Kindly imagine a winter morning where the aroma of cinnamon and vanilla dances through your kitchen, transforming humble bread into golden, custard-soaked slices of comfort. This electric skillet French toast elevates the classic breakfast with consistent heat and effortless preparation, creating a dish that feels both nostalgic and elegantly simple.
Serving: 4 | Pre Time: 10 minutes | Cooking Time: 15 minutes
Ingredients
– 4 large eggs, preferably at room temperature for better emulsification
– 1 cup whole milk, which adds a rich creaminess I adore
– 2 tablespoons granulated sugar, for a subtle sweetness that caramelizes beautifully
– 1 teaspoon pure vanilla extract, my go-to for its warm, aromatic notes
– 1/2 teaspoon ground cinnamon, a fragrant spice that whispers of cozy mornings
– 1/4 teaspoon fine sea salt, to balance the flavors perfectly
– 8 slices of thick-cut brioche or challah bread, about 1-inch thick for optimal texture
– 2 tablespoons unsalted butter, divided, for a golden, buttery crust
– Maple syrup and fresh berries, for serving as desired
Instructions
1. Preheat your electric skillet to 325°F, ensuring even cooking from the start.
2. In a shallow baking dish, whisk together the 4 large eggs until smooth and pale yellow.
3. Add the 1 cup whole milk, 2 tablespoons granulated sugar, 1 teaspoon pure vanilla extract, 1/2 teaspoon ground cinnamon, and 1/4 teaspoon fine sea salt to the eggs, whisking vigorously for 30 seconds until fully combined and slightly frothy.
4. Dip one slice of the 8 slices of thick-cut brioche bread into the egg mixture, allowing it to soak for 20 seconds per side until saturated but not falling apart.
5. Melt 1 tablespoon of the 2 tablespoons unsalted butter in the preheated skillet, swirling to coat the surface evenly.
6. Place 2-3 soaked bread slices in the skillet, cooking for 3-4 minutes per side until deeply golden brown and crisp at the edges.
7. Transfer the cooked slices to a wire rack set over a baking sheet to prevent sogginess, repeating steps 4-6 with the remaining bread, adding the second tablespoon of butter as needed.
8. Serve immediately while warm and crisp.
Fluffy and custard-rich on the inside with a delicately crisp exterior, this French toast offers a symphony of vanilla and cinnamon notes. For a creative twist, layer slices with whipped cream and seasonal berries, or drizzle with a bourbon-infused syrup to elevate it into a decadent brunch centerpiece.
Skillet Sausage and Peppers

Crafted for effortless elegance, Skillet Sausage and Peppers transforms humble ingredients into a vibrant, one-pan masterpiece. This dish, with its sizzling aromas and colorful medley, offers both rustic comfort and refined simplicity, perfect for a cozy weeknight or an impressive casual gathering. Its beauty lies in the harmonious blend of sweet, savory, and smoky notes that develop effortlessly in the skillet.
Serving: 4 | Pre Time: 15 minutes | Cooking Time: 25 minutes
Ingredients
– 1 tablespoon extra virgin olive oil (my go-to for its fruity depth)
– 1 pound Italian sausage links, sweet or hot based on your preference—I often use a mix
– 1 large yellow onion, thinly sliced into half-moons for even cooking
– 2 large bell peppers (I love one red and one yellow for color), cored and sliced into ¼-inch strips
– 3 cloves garlic, minced (freshly minced makes all the difference)
– 1 teaspoon dried oregano, crushed between your fingers to release its oils
– ½ teaspoon red pepper flakes, optional for a subtle kick
– ½ cup low-sodium chicken broth, which helps deglaze the pan beautifully
– Salt, as needed for layering flavor throughout
– Fresh parsley, chopped, for a bright finish right before serving
Instructions
1. Heat 1 tablespoon extra virgin olive oil in a large skillet over medium-high heat until it shimmers, about 1 minute.
2. Add 1 pound Italian sausage links to the skillet and cook until browned on all sides, approximately 6–8 minutes, turning occasionally with tongs for even color.
3. Transfer the sausage to a plate, leaving the rendered fat in the skillet—this adds rich flavor for the vegetables.
4. Reduce the heat to medium and add 1 large thinly sliced yellow onion to the skillet, seasoning lightly with salt to draw out moisture.
5. Cook the onion, stirring occasionally, until softened and translucent, about 5 minutes, adjusting heat if it browns too quickly.
6. Add 2 large sliced bell peppers to the skillet and cook until they begin to soften, approximately 4–5 minutes, stirring to combine with the onions.
7. Stir in 3 cloves minced garlic, 1 teaspoon crushed dried oregano, and ½ teaspoon red pepper flakes (if using), cooking for 1 minute until fragrant to avoid burning the garlic.
8. Pour in ½ cup low-sodium chicken broth, scraping up any browned bits from the bottom of the skillet with a wooden spoon to incorporate those flavorful fond.
9. Return the browned sausage to the skillet, nestling it into the vegetable mixture, and bring the broth to a gentle simmer.
10. Cover the skillet with a lid, reduce the heat to low, and let it simmer for 10 minutes to allow the flavors to meld and the sausage to cook through.
11. Uncover and cook for an additional 2–3 minutes to reduce the liquid slightly, until the peppers are tender but still have a slight bite.
12. Remove from heat and sprinkle with chopped fresh parsley for a fresh, herbal note.
With each bite, you’ll experience the juicy snap of sausage against the tender-crisp peppers, all enveloped in a savory, aromatic broth. Serve it straight from the skillet over creamy polenta or tucked into crusty rolls for a hearty sandwich, letting the vibrant colors and rustic charm shine.
Electric Skillet Teriyaki Salmon

Heralding the arrival of a dish that masterfully balances sweet, savory, and umami, this electric skillet teriyaki salmon transforms a weeknight staple into an elegant centerpiece. Its glossy glaze clings to tender, flaky fillets, creating a restaurant-quality meal with minimal fuss and maximum flavor. Perfect for a festive dinner or a sophisticated yet simple family meal, it’s a recipe that promises to impress.
Serving: 4 | Pre Time: 10 minutes | Cooking Time: 15 minutes
Ingredients
– 4 (6-ounce) skin-on salmon fillets, patted completely dry with paper towels—this is crucial for a beautiful sear.
– 1/4 cup low-sodium soy sauce, my preferred base for better control over saltiness.
– 3 tablespoons honey, for a rich, floral sweetness that balances the soy.
– 2 tablespoons mirin, a sweet rice wine that adds authentic depth.
– 1 tablespoon freshly grated ginger, about a 1-inch knob—I always keep a knob in the freezer for easy grating.
– 2 cloves garlic, minced finely to disperse flavor evenly.
– 1 tablespoon sesame oil, for its distinctive nutty aroma.
– 1 tablespoon neutral oil (like avocado or grapeseed), my go-to for high-heat searing.
– 1 teaspoon cornstarch, mixed with 1 tablespoon cold water to create a smooth slurry for thickening.
– 2 green onions, thinly sliced, for a fresh, vibrant garnish.
– 1 teaspoon toasted sesame seeds, for a final crunch.
Instructions
1. In a medium bowl, whisk together 1/4 cup low-sodium soy sauce, 3 tablespoons honey, 2 tablespoons mirin, 1 tablespoon freshly grated ginger, and 2 cloves minced garlic until fully combined.
2. In a small separate bowl, create a slurry by stirring 1 teaspoon cornstarch with 1 tablespoon cold water until no lumps remain; set this aside.
3. Pat 4 (6-ounce) skin-on salmon fillets thoroughly dry with paper towels on all sides—this prevents steaming and ensures a crisp skin.
4. Set your electric skillet to 400°F and add 1 tablespoon neutral oil, heating until it shimmers, about 2 minutes.
5. Carefully place the salmon fillets skin-side down in the hot skillet; they should sizzle immediately upon contact.
6. Cook the salmon undisturbed for 5–6 minutes, until the skin is golden brown and crisp and the flesh is opaque about halfway up the sides.
7. Gently flip each fillet using a thin spatula and cook for another 3–4 minutes, until the internal temperature reaches 125°F for medium-rare or 135°F for medium.
8. Transfer the cooked salmon to a clean plate, skin-side up to keep it crisp, and tent loosely with foil.
9. Reduce the skillet heat to 300°F and pour in the prepared soy-honey mixture, scraping up any browned bits from the salmon with a wooden spoon.
10. Bring the sauce to a gentle simmer and let it bubble for 1 minute to meld the flavors.
11. Give the cornstarch slurry a quick stir and slowly drizzle it into the simmering sauce while whisking constantly to prevent clumps.
12. Continue cooking and whisking for 1–2 minutes, until the sauce thickens to a glossy, syrup-like consistency that coats the back of a spoon.
13. Return the salmon fillets to the skillet, skin-side up, and spoon the thickened teriyaki sauce over them to coat evenly.
14. Garnish the finished dish with 2 thinly sliced green onions and 1 teaspoon toasted sesame seeds before serving.
Elevating the humble salmon fillet, this dish offers a sublime contrast of textures: the crackling crisp skin gives way to moist, buttery flesh, all enveloped in a sticky-sweet glaze with hints of ginger and garlic. Serve it over a bed of steamed jasmine rice to soak up the extra sauce, or alongside crisp-tender broccoli for a complete, colorful plate. Its balanced richness makes it equally suited for a quiet dinner at home or as the star of a festive gathering.
Skillet BBQ Pulled Pork
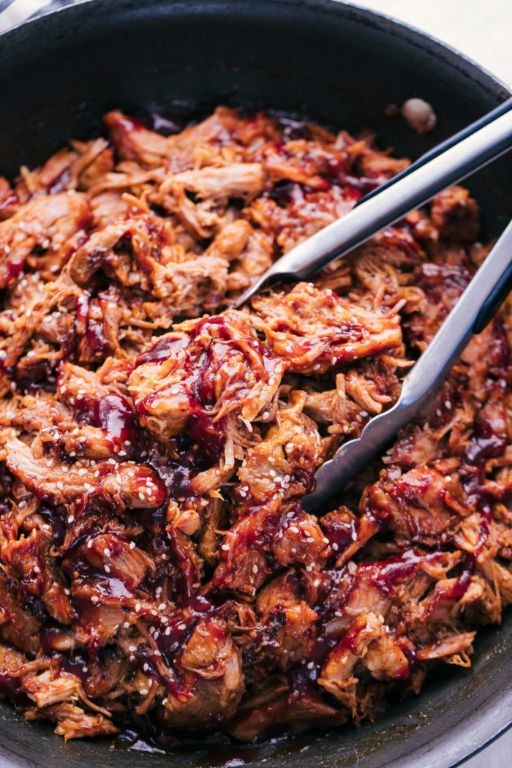
On a crisp winter day, few dishes offer the same soul-warming satisfaction as tender, smoky pulled pork, and this skillet version delivers all that rich flavor with a fraction of the usual effort. By using a trusty cast-iron skillet, we achieve a beautiful sear and a deeply caramelized barbecue glaze that clings to every succulent shred. It’s the perfect centerpiece for a festive gathering or a cozy family dinner, promising to fill your kitchen with an irresistible, savory aroma.
Serving: 6 | Pre Time: 15 minutes | Cooking Time: 2 hours 30 minutes
Ingredients
– 3 pounds pork shoulder (Boston butt), cut into 3-inch chunks—I find this size ensures even cooking and maximum tenderness.
– 2 tablespoons avocado oil, my high-smoke-point favorite for a perfect sear.
– 1 large yellow onion, finely diced; its sweetness balances the smoky sauce beautifully.
– 4 cloves garlic, minced—freshly minced releases the most aromatic oils.
– 1 cup ketchup, the classic base for that tangy-sweet glaze we all love.
– 1/2 cup apple cider vinegar, which tenderizes the pork and adds a bright, fruity note.
– 1/4 cup packed dark brown sugar, for a deep molasses richness.
– 2 tablespoons Worcestershire sauce, my secret umami booster in many sauces.
– 1 tablespoon smoked paprika, which imparts that essential smoky depth without a grill.
– 1 teaspoon dry mustard powder, to enhance the other spices subtly.
– 1/2 teaspoon cayenne pepper, just enough for a gentle warmth that lingers.
– 1 1/2 cups low-sodium chicken broth, to keep the pork moist as it braises.
– Kosher salt and freshly ground black pepper, to season every layer of flavor.
Instructions
1. Pat the pork shoulder chunks completely dry with paper towels, then season generously on all sides with kosher salt and black pepper—this helps form a flavorful crust.
2. Heat the avocado oil in a large cast-iron skillet over medium-high heat until shimmering, about 2 minutes.
3. Add the pork chunks in a single layer, searing until deeply browned on all sides, 3–4 minutes per side; work in batches if needed to avoid crowding, which steams the meat.
4. Transfer the seared pork to a plate and reduce the heat to medium.
5. Add the diced onion to the skillet and cook, stirring occasionally, until softened and translucent, about 5 minutes.
6. Stir in the minced garlic and cook until fragrant, about 30 seconds, being careful not to let it burn.
7. Pour in the chicken broth to deglaze the skillet, scraping up any browned bits from the bottom with a wooden spoon—this adds incredible depth to the sauce.
8. Whisk in the ketchup, apple cider vinegar, dark brown sugar, Worcestershire sauce, smoked paprika, dry mustard, and cayenne pepper until fully combined.
9. Return the seared pork and any accumulated juices to the skillet, nestling the chunks into the sauce.
10. Bring the mixture to a gentle simmer, then cover the skillet tightly with a lid or aluminum foil.
11. Reduce the heat to low and braise the pork until it is fork-tender and easily shreds, about 2 hours to 2 hours 15 minutes; check halfway to ensure it’s simmering gently, not boiling.
12. Remove the skillet from the heat and transfer the pork chunks to a cutting board, letting them rest for 10 minutes to redistribute their juices.
13. Use two forks to shred the pork into bite-sized pieces, discarding any large pieces of fat.
14. Return the shredded pork to the skillet and stir to coat thoroughly with the reduced, glossy sauce.
15. Simmer uncovered over medium-low heat for 5–10 minutes, until the sauce thickens slightly and clings to the meat.
16. Taste and adjust seasoning with additional salt or pepper if desired.
Each bite offers a perfect harmony of textures—meltingly tender pork with a slight caramelized chew from the sear, all enveloped in a sticky, smoky-sweet glaze. Elevate this dish by piling it onto toasted brioche buns with a tangy cabbage slaw, or serve it over creamy polenta for a comforting, elegant twist that highlights its rich, complex flavors.
Electric Skillet Veggie Stir-Fry
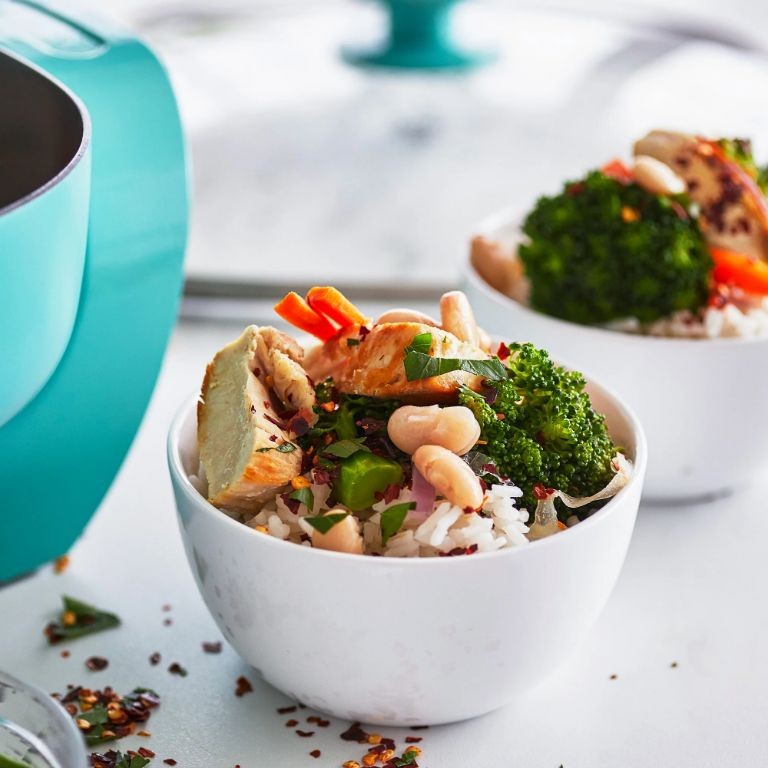
A vibrant medley of crisp vegetables and savory aromatics comes together in this effortless electric skillet stir-fry, perfect for a quick yet elegant weeknight dinner that celebrates fresh produce with minimal fuss. As the sizzle fills your kitchen, you’ll appreciate how this versatile dish adapts to whatever seasonal vegetables you have on hand, delivering a colorful, nutrient-packed meal in mere minutes.
Serving: 4 | Pre Time: 15 minutes | Cooking Time: 10 minutes
Ingredients
– 2 tablespoons extra virgin olive oil, my go-to for its fruity notes that enhance the vegetables
– 1 large yellow onion, thinly sliced—I find this adds a subtle sweetness when cooked slowly
– 3 cloves garlic, minced, for that essential aromatic punch
– 1 red bell pepper, cut into thin strips, which I prefer for their vibrant color and crisp texture
– 1 cup broccoli florets, trimmed to bite-sized pieces for even cooking
– 1 cup sliced carrots, about 1/4-inch thick, to retain a pleasant crunch
– 1/4 cup low-sodium soy sauce, which I use to control saltiness without sacrificing flavor
– 1 tablespoon rice vinegar, for a bright, tangy finish
– 1 teaspoon sesame oil, just a drizzle to add depth and aroma
– 1/4 teaspoon red pepper flakes, optional but I love the gentle heat they provide
Instructions
1. Plug in your electric skillet and set the temperature to 350°F, allowing it to preheat for about 3 minutes until the surface is evenly hot.
2. Pour 2 tablespoons of extra virgin olive oil into the skillet, swirling it to coat the bottom completely.
3. Add 1 large thinly sliced yellow onion to the skillet, stirring occasionally with a spatula for 4-5 minutes until softened and lightly golden—this slow cooking builds a sweet foundation.
4. Stir in 3 cloves of minced garlic and cook for exactly 1 minute until fragrant, being careful not to burn it to avoid bitterness.
5. Add 1 red bell pepper cut into thin strips, 1 cup of broccoli florets, and 1 cup of sliced carrots to the skillet, spreading them in a single layer.
6. Cook the vegetables for 5-6 minutes, stirring every 2 minutes, until the broccoli turns bright green and the carrots are tender-crisp when pierced with a fork.
7. In a small bowl, whisk together 1/4 cup of low-sodium soy sauce, 1 tablespoon of rice vinegar, 1 teaspoon of sesame oil, and 1/4 teaspoon of red pepper flakes until well combined.
8. Pour the sauce mixture over the vegetables in the skillet, tossing gently to coat everything evenly.
9. Continue cooking for 2-3 minutes, stirring constantly, until the sauce thickens slightly and clings to the vegetables.
10. Turn off the electric skillet and remove it from the heat source to prevent overcooking.
You’ll delight in the symphony of textures, from the crisp-tender vegetables to the glossy, savory sauce that clings to each bite. For a creative twist, serve it over a bed of fluffy jasmine rice or toss with cooked soba noodles, garnished with toasted sesame seeds for an extra nutty crunch that elevates this simple dish into a memorable meal.
Skillet Chocolate Lava Cake

Dazzling yet deceptively simple, this skillet chocolate lava cake transforms humble ingredients into an elegant dessert that feels both indulgent and effortless. With a molten center that flows like liquid gold beneath a delicate cake crust, it’s the perfect finale for a festive gathering or a cozy night in. Crafted in a single pan, it minimizes cleanup while maximizing rich, chocolatey satisfaction.
Serving: 4 | Pre Time: 15 minutes | Cooking Time: 12 minutes
Ingredients
– ½ cup (1 stick) unsalted butter, plus extra for greasing—I always use high-quality butter for a silkier texture.
– 4 ounces semisweet chocolate, chopped (a good bar like Ghirardelli works wonders).
– ½ cup granulated sugar, which balances the bitterness of the chocolate beautifully.
– 2 large eggs, at room temperature—this helps them incorporate smoothly into the batter.
– ¼ cup all-purpose flour, sifted to avoid lumps.
– ¼ teaspoon salt, a pinch to enhance all the flavors.
– 1 teaspoon pure vanilla extract, my secret for adding depth.
– Powdered sugar and fresh berries for serving, optional but highly recommended for a touch of brightness.
Instructions
1. Preheat your oven to 425°F and generously grease a 10-inch cast-iron skillet with butter, ensuring the sides are coated to prevent sticking.
2. In a medium microwave-safe bowl, combine the butter and chopped chocolate, then microwave in 30-second intervals, stirring between each, until fully melted and smooth—this usually takes about 1 minute total.
3. Whisk the granulated sugar into the melted chocolate mixture until well combined and glossy.
4. Add the room-temperature eggs one at a time, whisking vigorously after each addition until the batter is homogeneous; this incorporates air for a lighter cake.
5. Gently fold in the sifted flour and salt with a spatula until just incorporated, being careful not to overmix to keep the texture tender.
6. Stir in the vanilla extract until evenly distributed throughout the batter.
7. Pour the batter into the prepared skillet, spreading it evenly with the spatula.
8. Bake in the preheated oven for exactly 10–12 minutes, until the edges are set and the center is slightly jiggly but not liquid—this is key for that molten core.
9. Remove the skillet from the oven and let it cool on a wire rack for 2–3 minutes to allow the cake to set slightly.
10. Dust the top with powdered sugar and garnish with fresh berries if desired, then serve warm directly from the skillet.
Oozing with warm, velvety chocolate, this cake offers a delightful contrast between the firm outer layer and the gooey interior. Its rich flavor pairs wonderfully with a scoop of vanilla ice cream or a drizzle of caramel, making it a versatile treat that’s sure to impress guests or satisfy a solo chocolate craving.
Summary
Kick dinner stress to the curb with these 18 quick electric skillet recipes! Perfect for busy nights, they offer easy, delicious meals in a flash. I hope you find a new family favorite. Give one a try, leave a comment below with what you loved, and don’t forget to share this roundup on Pinterest to help other busy cooks!


