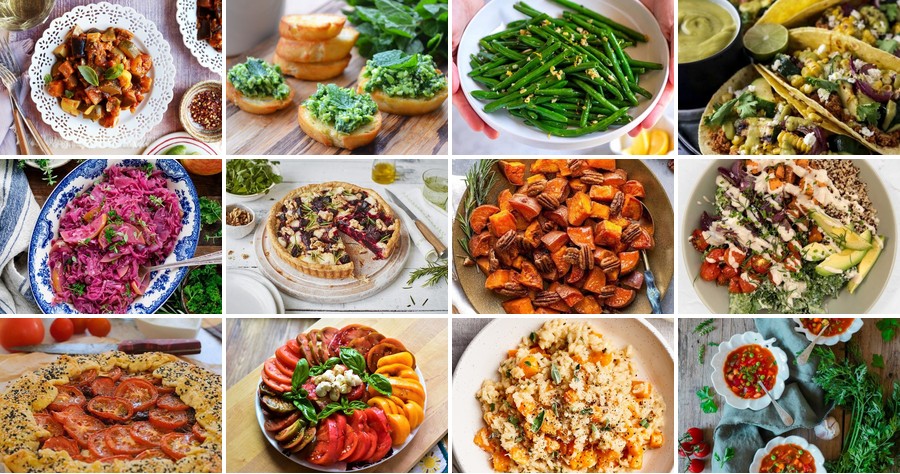
Picture this: vibrant, just-picked produce transforming into delicious meals that celebrate each season’s unique flavors. Whether you’re a seasoned home cook or just starting your farm-to-table journey, these 20 fresh recipes will inspire you to make the most of nature’s bounty. From quick weeknight dinners to weekend feasts, get ready to savor the taste of the season—let’s dive in!
Roasted Heirloom Tomato and Basil Salad
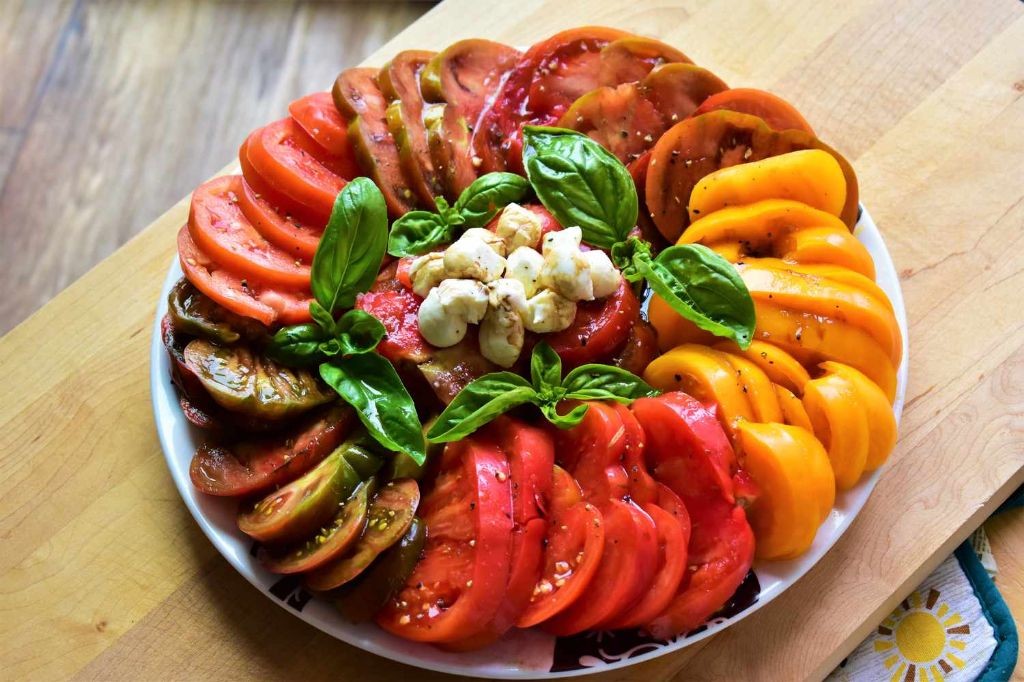
Begin by gathering the freshest heirloom tomatoes you can find—their vibrant colors and irregular shapes make this salad visually stunning. This simple yet elegant dish celebrates summer produce at its peak, and I’ll guide you through each step methodically to ensure perfect results every time.
Serving: 4 | Pre Time: 15 minutes | Cooking Time: 25 minutes
Ingredients
- 2 lbs mixed heirloom tomatoes, sliced ¼-inch thick—I look for a rainbow of colors at the farmers’ market
- ¼ cup extra virgin olive oil, my go-to for its fruity flavor
- 3 garlic cloves, minced—freshly minced releases the best aroma
- 1 tsp kosher salt, which dissolves more evenly than table salt
- ½ tsp freshly ground black pepper, ground just before using for maximum flavor
- 1 cup fresh basil leaves, torn by hand to prevent bruising
- 2 tbsp balsamic vinegar, aged varieties add wonderful depth
- 4 oz fresh mozzarella balls (ciliegine), drained—room temperature blends better
Instructions
- Preheat your oven to 400°F and line a rimmed baking sheet with parchment paper.
- Arrange the sliced heirloom tomatoes in a single layer on the prepared baking sheet.
- Drizzle 2 tablespoons of extra virgin olive oil evenly over the tomatoes.
- Sprinkle the minced garlic cloves evenly across the tomatoes.
- Season with 1 teaspoon kosher salt and ½ teaspoon freshly ground black pepper.
- Roast the tomatoes at 400°F for 20-25 minutes until they’re slightly shriveled but still hold their shape.
- Remove the baking sheet from the oven and let the tomatoes cool to room temperature for 10 minutes. Tip: This cooling step allows the flavors to concentrate.
- Transfer the cooled roasted tomatoes to a large serving bowl.
- Add the torn fresh basil leaves to the bowl with the tomatoes.
- Drizzle the remaining 2 tablespoons of extra virgin olive oil over the salad.
- Add 2 tablespoons of balsamic vinegar to the bowl.
- Gently toss all ingredients together until evenly combined. Tip: Use a folding motion with a rubber spatula to prevent crushing the tomatoes.
- Add the drained fresh mozzarella balls to the salad.
- Give the salad one final gentle toss to distribute the mozzarella. Tip: Let the salad sit for 5 minutes before serving so the mozzarella absorbs the dressing.
Marvel at how the roasting transforms the tomatoes—they become wonderfully concentrated and slightly sweet, while the fresh basil and creamy mozzarella provide bright and rich counterpoints. The textures play beautifully together, with tender tomatoes, silky cheese, and fragrant basil in every bite. For a creative twist, serve this salad over grilled crusty bread to soak up the delicious juices, or alongside grilled chicken for a complete meal.
Grilled Corn and Zucchini Tacos

Let’s create a vibrant summer meal that celebrates seasonal produce with minimal fuss. Grilled corn and zucchini tacos are my go-to when I want something fresh, colorful, and satisfying without spending hours in the kitchen—they’re perfect for a casual weeknight dinner or a festive gathering where everyone can build their own.
Serving: 4 | Pre Time: 15 minutes | Cooking Time: 15 minutes
Ingredients
– 2 ears of fresh corn, husked (I always look for bright green husks and plump kernels)
– 2 medium zucchini, sliced lengthwise into ¼-inch thick planks (these grill up beautifully without falling apart)
– 1 tablespoon extra virgin olive oil, my go-to for its fruity flavor
– ½ teaspoon kosher salt, plus more for sprinkling
– ¼ teaspoon freshly ground black pepper
– 8 small corn tortillas (I warm them directly on the grill for a smoky touch)
– ½ cup crumbled cotija cheese (its salty tang balances the veggies perfectly)
– ¼ cup chopped fresh cilantro, stems removed for a cleaner taste
– 1 lime, cut into wedges for squeezing over the top
Instructions
1. Preheat your grill to medium-high heat, about 400°F, and lightly oil the grates to prevent sticking.
2. Brush the corn and zucchini planks evenly with the extra virgin olive oil on all sides.
3. Sprinkle the vegetables with the ½ teaspoon kosher salt and ¼ teaspoon black pepper, rubbing gently to coat.
4. Place the corn directly on the grill and cook for 10–12 minutes, turning every 2–3 minutes with tongs until kernels are lightly charred and tender.
5. Tip: Grill the zucchini at the same time, laying the planks perpendicular to the grates to avoid falling through, for 3–4 minutes per side until grill marks appear and they soften slightly.
6. Remove the vegetables from the grill and let them rest on a cutting board for 2 minutes to cool slightly.
7. Stand each ear of corn upright and use a sharp knife to slice downward, cutting the kernels off the cob into a medium bowl.
8. Chop the grilled zucchini into bite-sized pieces and add them to the bowl with the corn, tossing gently to combine.
9. Tip: Warm the corn tortillas on the grill for 30 seconds per side until pliable and lightly toasted, stacking them in a clean kitchen towel to keep warm.
10. Assemble each taco by spooning the corn and zucchini mixture onto a warmed tortilla.
11. Top evenly with the crumbled cotija cheese and chopped fresh cilantro.
12. Tip: Serve immediately with lime wedges on the side, encouraging everyone to squeeze fresh juice over their tacos just before eating for a bright, zesty finish.
Unwrap these tacos and savor the contrast of smoky, sweet corn against the tender zucchini, all hugged by a warm tortilla. The cotija adds a creamy saltiness that melds with the fresh cilantro and lime—try piling them high with extra veggies or pairing with a simple avocado salsa for a heartier twist.
Farmhouse Vegetable and Herb Soup

On a chilly December day like today, there’s nothing more comforting than a steaming bowl of homemade soup. This Farmhouse Vegetable and Herb Soup is a rustic, nourishing dish that’s surprisingly simple to make, even for beginners—let’s walk through it together step-by-step.
Serving: 6 | Pre Time: 15 minutes | Cooking Time: 45 minutes
Ingredients
– 2 tablespoons extra virgin olive oil (my go-to for its fruity depth)
– 1 large yellow onion, diced (I like the sweetness it adds)
– 3 cloves garlic, minced (freshly minced makes all the difference)
– 3 medium carrots, peeled and sliced into ¼-inch rounds
– 2 celery stalks, chopped (use the inner stalks for tenderness)
– 1 medium potato, peeled and diced into ½-inch cubes
– 4 cups vegetable broth (low-sodium lets you control the salt)
– 1 (14.5-ounce) can diced tomatoes, undrained
– 1 teaspoon dried thyme
– 1 teaspoon dried rosemary, crumbled (rub it between your palms to release the oils)
– 1 bay leaf
– Salt and black pepper (I start with ½ teaspoon salt and adjust later)
– 2 cups fresh spinach, roughly chopped (adds a vibrant green pop)
– ¼ cup fresh parsley, chopped (for a bright finish)
Instructions
1. Heat the extra virgin olive oil in a large pot over medium heat until it shimmers, about 1 minute.
2. Add the diced yellow onion and cook, stirring occasionally, until translucent and soft, 5–7 minutes.
3. Stir in the minced garlic and cook for 30 seconds until fragrant—don’t let it brown.
4. Add the sliced carrots and chopped celery, cooking for 5 minutes to soften slightly.
5. Tip: Sautéing the vegetables first builds a flavorful base, so take your time here.
6. Add the diced potato, vegetable broth, diced tomatoes with their juices, dried thyme, crumbled rosemary, and bay leaf.
7. Bring the mixture to a boil over high heat, then reduce to a low simmer.
8. Cover the pot and let it simmer for 25 minutes, or until the potatoes are fork-tender.
9. Tip: Simmering with the lid on helps retain moisture and meld the herb flavors.
10. Season with salt and black pepper, starting with ½ teaspoon salt and tasting to adjust.
11. Remove the bay leaf and discard it.
12. Stir in the fresh spinach and cook for 2 minutes until just wilted.
13. Tip: Adding spinach at the end keeps it vibrant and prevents overcooking.
14. Turn off the heat and stir in the fresh parsley.
This soup emerges with a hearty, chunky texture and a rich, herb-infused broth that’s both soothing and satisfying. Try serving it with a crusty bread for dipping, or garnish with a sprinkle of Parmesan for an extra savory twist.
Pan-Seared Rainbow Carrots with Honey Glaze
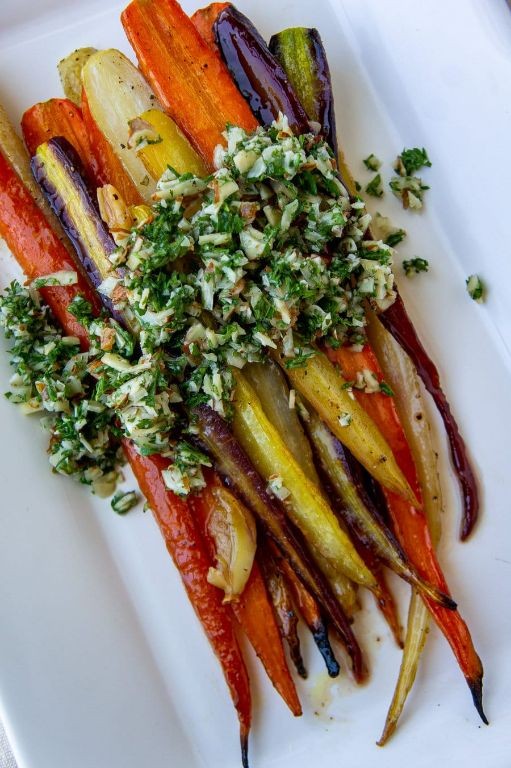
A vibrant side dish that transforms humble carrots into a stunning, sweet-and-savory centerpiece, perfect for holiday tables or weeknight dinners. This recipe uses a simple pan-sear and honey glaze technique to create caramelized edges and tender interiors. Let’s walk through each step together to ensure your carrots turn out beautifully every time.
Serving: 4 | Pre Time: 10 minutes | Cooking Time: 15 minutes
Ingredients
– 1 pound rainbow carrots, scrubbed and trimmed (I leave a bit of the green tops for a rustic look)
– 2 tablespoons extra virgin olive oil, my go-to for its fruity flavor
– 2 tablespoons honey, preferably local for a floral note
– 1 tablespoon unsalted butter, cold
– 1/2 teaspoon kosher salt
– 1/4 teaspoon freshly ground black pepper
– 1 tablespoon fresh lemon juice, squeezed right before using
– 2 tablespoons chopped fresh parsley, for a bright finish
Instructions
1. Pat the scrubbed rainbow carrots completely dry with paper towels to ensure a proper sear.
2. Heat the extra virgin olive oil in a large skillet over medium-high heat until it shimmers, about 2 minutes.
3. Add the carrots in a single layer, working in batches if needed to avoid crowding the pan.
4. Cook the carrots without moving them for 4 minutes to develop a deep golden-brown sear on one side.
5. Flip each carrot using tongs and cook for another 4 minutes until tender when pierced with a fork.
6. Reduce the heat to medium-low and push the carrots to one side of the skillet.
7. Add the honey and cold unsalted butter to the empty side of the skillet.
8. Stir the honey and butter constantly with a wooden spoon for 1 minute until melted and bubbly.
9. Toss the carrots in the glaze to coat evenly, cooking for 1 more minute.
10. Remove the skillet from the heat and sprinkle with kosher salt and freshly ground black pepper.
11. Drizzle the fresh lemon juice over the carrots and toss once more.
12. Transfer the glazed carrots to a serving platter and garnish with chopped fresh parsley.
Perfectly seared carrots offer a delightful contrast: crisp-tender interiors with sticky, caramelized exteriors. The honey glaze adds a glossy sweetness that balances the earthy carrot flavor, while the lemon juice cuts through the richness. Serve them warm alongside roasted chicken or as a colorful addition to a grain bowl for a complete meal.
Garlic Butter Sauteed Green Beans
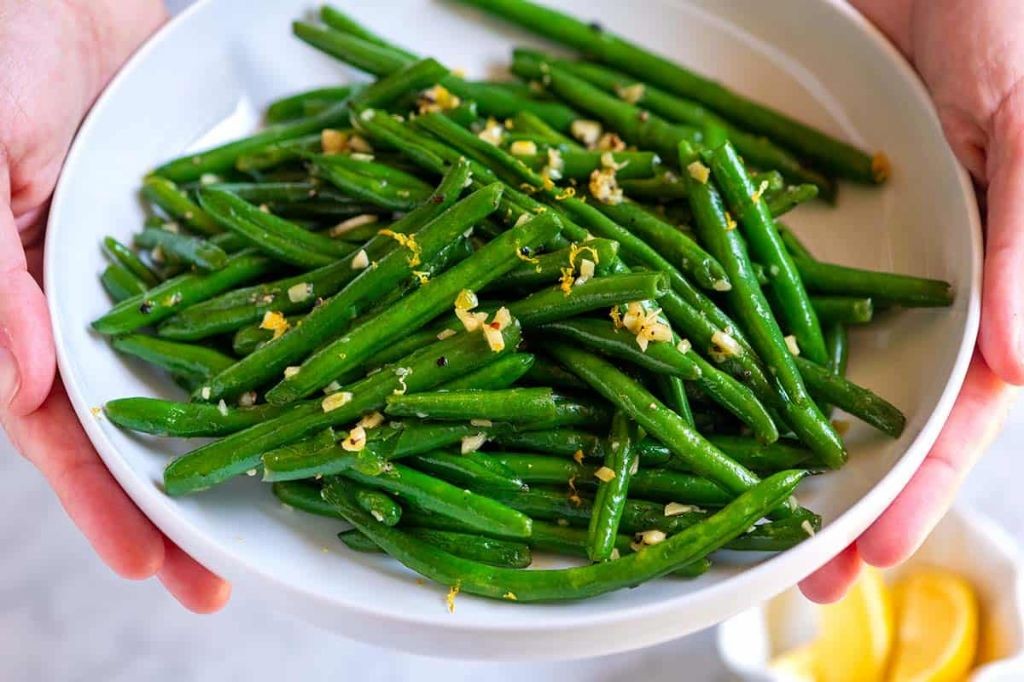
Venturing into holiday side dishes doesn’t have to be intimidating, and this garlic butter sautéed green beans recipe is the perfect place to start. It transforms a simple vegetable into a vibrant, flavorful dish with just a few key ingredients and straightforward techniques, making it ideal for a festive table or a quick weeknight upgrade. Let’s walk through each step together to ensure your beans are crisp-tender and packed with savory goodness.
Serving: 4 | Pre Time: 10 minutes | Cooking Time: 10 minutes
Ingredients
– 1 pound fresh green beans, trimmed (I look for slender, bright green beans—they cook more evenly and have a sweeter flavor)
– 4 tablespoons unsalted butter (using unsalted lets you control the seasoning perfectly)
– 4 cloves garlic, minced (freshly minced garlic releases the most aromatic oils, so avoid pre-minced jars here)
– ½ teaspoon kosher salt (I prefer kosher for its clean, even distribution)
– ¼ teaspoon freshly ground black pepper (freshly ground adds a brighter kick than pre-ground)
– 2 tablespoons water (a splash helps steam the beans to tenderness without overcooking)
Instructions
1. Rinse 1 pound of fresh green beans under cold water in a colander, then pat them completely dry with a clean kitchen towel to prevent splattering during sautéing.
2. Trim the stem ends from each green bean by lining up a small handful and slicing them off with a sharp knife for efficiency.
3. Place a large skillet or sauté pan over medium-high heat and let it preheat for 2 minutes until hot to the touch.
4. Add 4 tablespoons of unsalted butter to the hot skillet and let it melt completely, swirling the pan to coat the bottom evenly.
5. Once the butter is melted and starts to foam slightly, add the trimmed green beans in a single layer, spreading them out with tongs.
6. Sauté the green beans for 4 minutes, stirring occasionally with the tongs, until they develop light brown spots and become brighter in color.
7. Add 2 tablespoons of water to the skillet, then immediately cover it with a tight-fitting lid to trap the steam, cooking for 3 minutes to tenderize the beans.
8. Uncover the skillet and push the green beans to one side with the tongs, creating a small empty space in the center of the pan.
9. Add 4 cloves of minced garlic to the empty space and sauté it for 30 seconds, stirring constantly with a spatula until fragrant but not browned.
10. Toss the green beans with the garlic using the tongs until evenly combined, then sprinkle with ½ teaspoon kosher salt and ¼ teaspoon freshly ground black pepper.
11. Sauté everything together for 1 final minute, stirring continuously, to blend the flavors and ensure the beans are coated in the garlic butter.
12. Remove the skillet from the heat and transfer the green beans to a serving dish using the tongs, scraping any remaining garlic butter from the pan over the top.
Perfection is in the details: these beans emerge with a crisp-tender bite, glistening with rich, savory garlic butter that clings to every strand. Serve them warm alongside roasted meats for a holiday feast, or toss with toasted almonds for added crunch—either way, they’re sure to become a repeat favorite.
Herb-Roasted Chicken with Root Vegetables
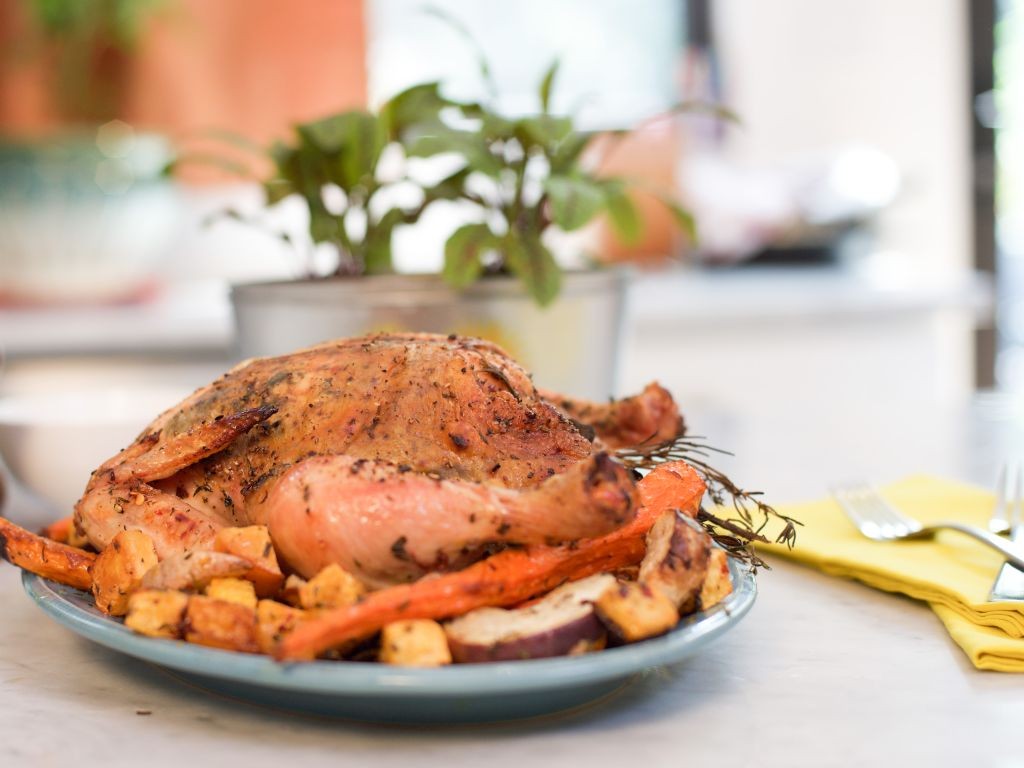
Kick off your holiday cooking with this comforting one-pan meal that fills your kitchen with the most inviting aromas. This herb-roasted chicken with root vegetables is perfect for busy weeknights or special gatherings—it’s surprisingly simple to prepare yet delivers restaurant-quality results. Let’s walk through each step together to ensure your dish turns out beautifully.
Serving: 4 | Pre Time: 20 minutes | Cooking Time: 75 minutes
Ingredients
– 1 whole chicken (about 4 pounds)—I always pat mine dry thoroughly for crispier skin
– 2 tablespoons extra virgin olive oil—my go-to for its fruity flavor
– 1 tablespoon kosher salt—coarse salt sticks better to the chicken
– 2 teaspoons freshly ground black pepper—freshly cracked makes all the difference
– 4 sprigs fresh rosemary—I grow mine in a windowsill pot
– 6 cloves garlic, smashed—smashing releases more flavor than mincing
– 1 pound carrots, peeled and cut into 2-inch chunks—rainbow carrots add lovely color
– 1 pound parsnips, peeled and cut into 2-inch chunks—their natural sweetness caramelizes beautifully
– 1 pound Yukon Gold potatoes, cut into 2-inch chunks—these hold their shape better than russets
– 1 large yellow onion, cut into 8 wedges—keep the root end intact so they don’t fall apart
Instructions
1. Preheat your oven to 425°F (218°C) and position a rack in the center.
2. Place the dried chicken in a large roasting pan or rimmed baking sheet.
3. Rub the chicken all over with 1 tablespoon of olive oil using your hands.
4. Sprinkle the salt and pepper evenly over the entire chicken, including inside the cavity.
5. Stuff the cavity with 2 rosemary sprigs and 3 smashed garlic cloves.
6. Tie the chicken legs together with kitchen twine—this helps it cook evenly.
7. In a large bowl, combine carrots, parsnips, potatoes, and onion wedges.
8. Drizzle the remaining 1 tablespoon of olive oil over the vegetables and toss to coat.
9. Scatter the vegetables around the chicken in the pan in a single layer.
10. Tuck the remaining 2 rosemary sprigs and 3 smashed garlic cloves among the vegetables.
11. Roast for 30 minutes at 425°F, then reduce the oven temperature to 375°F (190°C).
12. Continue roasting for 45 minutes, or until the chicken skin is golden brown and crispy.
13. Check for doneness by inserting a meat thermometer into the thickest part of the thigh—it should read 165°F (74°C).
14. Remove the pan from the oven and let the chicken rest for 15 minutes before carving.
15. While the chicken rests, give the vegetables a gentle stir to coat them in the pan juices.
Every bite offers juicy, herb-infused chicken with skin that shatters delightfully. The vegetables become tender and caramelized, soaking up all the savory pan drippings. For a creative twist, shred any leftover chicken and toss it with the roasted vegetables for a hearty next-day salad.
Summer Berry and Spinach Salad

Perfect for a light summer lunch or a vibrant side dish, this Summer Berry and Spinach Salad combines fresh flavors with minimal effort. Preparing it is straightforward—just follow these steps to assemble a colorful, nutritious bowl that’s as pleasing to the eye as it is to the palate.
Serving: 4 | Pre Time: 15 minutes | Cooking Time: 0 minutes
Ingredients
– 6 cups fresh baby spinach, washed and thoroughly dried—I like to spin it in a salad spinner to avoid soggy greens.
– 1 cup fresh strawberries, hulled and sliced; ripe berries add natural sweetness.
– 1 cup fresh blueberries, picked over for any stems—these little bursts of flavor are essential.
– 1/2 cup crumbled feta cheese; I prefer the creamy variety for a tangy contrast.
– 1/4 cup sliced almonds, toasted for extra crunch—toast them yourself for the best aroma.
– 1/4 cup extra virgin olive oil, my go-to for its fruity notes.
– 2 tablespoons balsamic vinegar, aged if you have it for a richer taste.
– 1 tablespoon honey, to balance the acidity; local honey adds a lovely touch.
– 1/4 teaspoon salt, just enough to enhance the flavors without overpowering.
– 1/8 teaspoon black pepper, freshly ground for a subtle kick.
Instructions
1. Place the 6 cups of baby spinach in a large mixing bowl, ensuring it’s dry to prevent a watery salad.
2. Add the 1 cup of sliced strawberries and 1 cup of blueberries to the bowl with the spinach.
3. Sprinkle the 1/2 cup of crumbled feta cheese evenly over the spinach and berries.
4. Scatter the 1/4 cup of toasted sliced almonds on top for added texture.
5. In a small bowl, whisk together the 1/4 cup of extra virgin olive oil and 2 tablespoons of balsamic vinegar until emulsified—tip: whisk vigorously for about 30 seconds to create a smooth dressing.
6. Stir in the 1 tablespoon of honey, 1/4 teaspoon of salt, and 1/8 teaspoon of black pepper into the dressing until fully combined.
7. Pour the dressing over the salad in the large bowl, using a gentle tossing motion to coat all ingredients evenly—tip: avoid over-mixing to keep the berries intact.
8. Divide the salad among 4 serving plates immediately to maintain freshness.
9. Serve right away for the best flavor and crispness—tip: if preparing ahead, store the dressing separately and toss just before serving to keep the greens from wilting.
What makes this salad special is the contrast between the juicy berries and the crisp spinach, with the creamy feta and crunchy almonds adding layers of texture. For a creative twist, try serving it alongside grilled chicken or as a topping for toasted crostini—it’s versatile enough to shine in any summer meal.
Creamy Butternut Squash Risotto

Zesty fall flavors come alive in this comforting risotto that transforms humble butternut squash into a creamy, luxurious meal. Perfect for a cozy December evening, this dish walks you through each stage with clear guidance, ensuring even first-timers achieve restaurant-quality results.
Serving: 4 | Pre Time: 15 minutes | Cooking Time: 40 minutes
Ingredients
– 1 medium butternut squash, peeled and cubed into ½-inch pieces (about 4 cups—I find smaller cubes cook more evenly)
– 1½ cups Arborio rice (this short-grain variety is essential for creaminess)
– 4 cups low-sodium vegetable broth, kept warm on a separate burner (hot broth prevents the rice from cooling)
– 1 medium yellow onion, finely diced (take your time here—a fine dice ensures it melts into the risotto)
– 3 cloves garlic, minced (freshly minced garlic adds a brighter flavor than pre-minced)
– ½ cup dry white wine, like Sauvignon Blanc (a splash deglazes the pan beautifully)
– ½ cup grated Parmesan cheese, plus extra for serving (I prefer freshly grated—it melts smoother)
– 3 tbsp unsalted butter, divided (using unsalted lets you control the salt level)
– 2 tbsp extra virgin olive oil (my go-to for its fruity notes)
– ½ tsp freshly ground black pepper
– ¼ tsp salt, adjusted later (start light since broth and cheese add salt)
Instructions
1. Heat the vegetable broth in a medium saucepan over low heat until it simmers gently, then reduce to the lowest setting to keep warm.
2. In a large, heavy-bottomed pot or Dutch oven, heat the extra virgin olive oil and 1 tablespoon of butter over medium heat until the butter melts and foams slightly.
3. Add the diced onion and cook for 5–7 minutes, stirring occasionally, until translucent and soft but not browned.
4. Stir in the minced garlic and cook for 1 minute until fragrant, being careful not to let it burn.
5. Add the Arborio rice to the pot and toast it for 2 minutes, stirring constantly, until the grains turn slightly translucent at the edges—this helps them absorb liquid better.
6. Pour in the white wine and cook, stirring, until it is fully absorbed, about 2–3 minutes.
7. Add 1 cup of the warm vegetable broth to the rice and stir continuously until the liquid is nearly absorbed, about 4–5 minutes.
8. Repeat adding broth in ½-cup increments, stirring after each addition until absorbed, for about 20–25 minutes total; the rice should be al dente with a creamy sauce.
9. While the risotto cooks, steam the cubed butternut squash in a separate pot with ¼ cup water for 10–12 minutes until fork-tender, then mash half of it roughly with a fork for texture.
10. Once the risotto is done, remove it from the heat and stir in the remaining 2 tablespoons of butter, grated Parmesan cheese, mashed squash, salt, and black pepper until creamy and combined.
11. Let the risotto rest off the heat for 2 minutes to thicken slightly before serving.
Mellow and velvety, this risotto boasts a rich, sweet-savory balance from the squash, with a slight chew from the al dente rice. Serve it immediately in shallow bowls, topped with an extra sprinkle of Parmesan and a drizzle of olive oil for a glossy finish, or pair it with a crisp green salad to cut through the creaminess.
Fresh Pea and Mint Crostini

Fresh pea and mint crostini is a vibrant, spring-inspired appetizer that’s as simple to make as it is impressive to serve. Follow along step-by-step, and you’ll have a bright, herby spread ready to top crisp, golden bread in no time.
Serving: 6 | Pre Time: 15 minutes | Cooking Time: 10 minutes
Ingredients
– 1 baguette, sliced into ½-inch thick pieces (I like a rustic, crusty loaf for better texture)
– 2 cups fresh or frozen peas (thawed if frozen—fresh peas in season are a real treat)
– ½ cup fresh mint leaves, packed (extra mint adds a lovely aromatic punch)
– ¼ cup extra virgin olive oil, plus extra for drizzling (my go-to for its fruity flavor)
– 2 tbsp fresh lemon juice (from about 1 lemon, squeezed fresh for brightness)
– 1 small garlic clove, minced (adjust to your taste, but I find one clove perfect)
– ¼ tsp kosher salt, plus more for seasoning
– ¼ tsp freshly ground black pepper
– ½ cup ricotta cheese (full-fat ricotta gives a creamier, richer result)
Instructions
1. Preheat your oven to 375°F (190°C) and line a baking sheet with parchment paper.
2. Arrange the baguette slices in a single layer on the prepared baking sheet.
3. Lightly brush or drizzle each slice with about 1 tbsp of the extra virgin olive oil total.
4. Bake the bread for 8–10 minutes, until the edges are golden brown and crisp. Tip: Check at 8 minutes to avoid burning—ovens can vary.
5. While the bread bakes, combine the peas, mint leaves, remaining 3 tbsp olive oil, lemon juice, minced garlic, ¼ tsp salt, and pepper in a food processor.
6. Pulse the mixture for about 30–45 seconds, until it forms a coarse, spreadable paste. Tip: Don’t over-process; a bit of texture makes it more interesting.
7. Taste the pea mixture and adjust seasoning with more salt if needed, then set aside.
8. Once the bread is out of the oven, let it cool on the baking sheet for 2–3 minutes until warm but not hot.
9. Spread about 1 tbsp of ricotta cheese evenly onto each toasted baguette slice.
10. Top the ricotta with a generous spoonful of the pea and mint mixture, spreading it gently. Tip: Use the back of the spoon for an even layer without crushing the bread.
11. Drizzle a little extra olive oil over the assembled crostini and serve immediately.
Using just-baked bread ensures a satisfying crunch against the creamy ricotta and vibrant pea spread. The mint adds a refreshing, garden-fresh note that pairs beautifully with the subtle sweetness of the peas—try serving these on a platter garnished with extra mint leaves for a pop of color at your next gathering.
Farmers Market Ratatouille
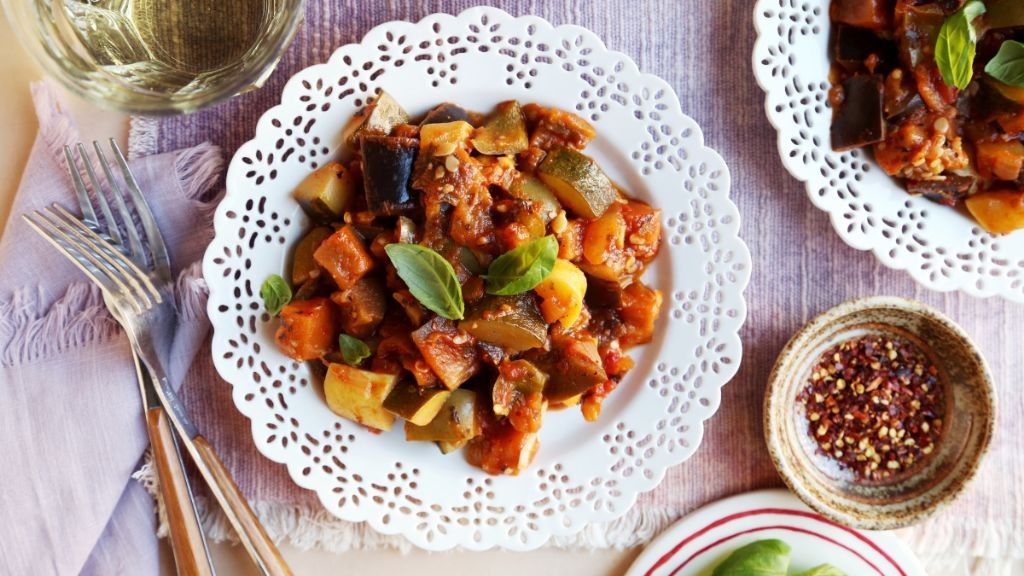
Often, the best dishes come from letting seasonal produce shine with minimal fuss. Our Farmers Market Ratatouille does just that—layering summer vegetables into a vibrant, comforting bake that’s as beautiful as it is delicious. Let’s walk through each step together, so you can confidently bring this rustic French classic to your table.
Serving: 6 | Pre Time: 25 minutes | Cooking Time: 45 minutes
Ingredients
– 2 tablespoons extra virgin olive oil (my go-to for its fruity depth)
– 1 medium yellow onion, diced (I like a sweet variety for balance)
– 3 cloves garlic, minced (freshly minced makes all the difference)
– 1 large eggplant, cut into ½-inch cubes (salting it first reduces bitterness)
– 2 medium zucchini, sliced into ¼-inch rounds
– 2 bell peppers (I use one red and one yellow for color), seeded and chopped
– 4 ripe tomatoes, cored and diced (in-season heirlooms are ideal)
– 1 teaspoon dried thyme (or 1 tablespoon fresh if you have it)
– ½ teaspoon kosher salt (adjust later as needed)
– ¼ teaspoon black pepper
Instructions
1. Preheat your oven to 375°F (190°C) to ensure even baking later.
2. Heat 2 tablespoons of extra virgin olive oil in a large oven-safe skillet or Dutch oven over medium heat for 1 minute until shimmering.
3. Add 1 diced yellow onion and cook for 5 minutes, stirring occasionally, until translucent and fragrant.
4. Stir in 3 minced garlic cloves and cook for 30 seconds until aromatic but not browned.
5. Add 1 cubed eggplant to the skillet and cook for 8 minutes, stirring every 2 minutes, until it begins to soften.
6. Tip: Salting eggplant beforehand draws out moisture, preventing a soggy texture—just pat it dry after 10 minutes.
7. Incorporate 2 sliced zucchini, 2 chopped bell peppers, and 4 diced tomatoes into the skillet.
8. Sprinkle in 1 teaspoon dried thyme, ½ teaspoon kosher salt, and ¼ teaspoon black pepper, then stir to combine all ingredients evenly.
9. Transfer the skillet to the preheated oven and bake uncovered for 30 minutes.
10. Tip: Check at 20 minutes; the vegetables should be tender but not mushy, with juices bubbling slightly.
11. Remove from the oven and let rest for 5 minutes to allow flavors to meld.
12. Tip: A splash of balsamic vinegar stirred in after baking adds a bright, tangy note if desired.
Just out of the oven, this ratatouille boasts a tender-crisp texture with sweet, caramelized edges from the roasted vegetables. Its rich, herb-infused tomato base makes it perfect spooned over creamy polenta or alongside crusty bread for soaking up every last bit. For a creative twist, top it with a fried egg or crumbled feta cheese to elevate it into a hearty main course.
Apple and Kale Stuffed Pork Chops
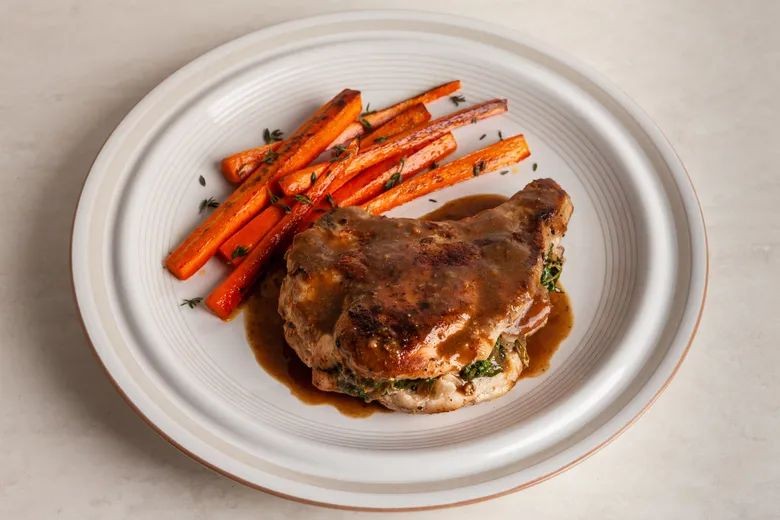
Zesty and wholesome, this Apple and Kale Stuffed Pork Chops recipe is a perfect holiday or weeknight meal that combines savory pork with sweet, earthy fillings. Let’s walk through each step together, ensuring you achieve a juicy chop with a flavorful stuffing every time. You’ll find the process straightforward and rewarding, even if you’re new to stuffing meats.
Serving: 4 | Pre Time: 20 minutes | Cooking Time: 35 minutes
Ingredients
– 4 boneless pork chops, about 1-inch thick (I like to pat them dry with paper towels for better browning)
– 1 tablespoon extra virgin olive oil, my go-to for its fruity notes
– 1 medium apple, cored and finely diced (I prefer a tart Granny Smith for balance)
– 2 cups kale, stems removed and chopped (massage it briefly with your hands to soften it)
– 1/2 cup breadcrumbs (I use panko for extra crunch)
– 1/4 cup chicken broth, low-sodium to control saltiness
– 1 teaspoon dried thyme
– 1/2 teaspoon salt
– 1/4 teaspoon black pepper
Instructions
1. Preheat your oven to 375°F to ensure it’s ready for baking later.
2. In a medium skillet over medium heat, heat 1 tablespoon of extra virgin olive oil until it shimmers, about 1 minute.
3. Add the diced apple and chopped kale to the skillet, cooking for 5 minutes until the kale wilts and the apple softens slightly.
4. Stir in 1/2 cup breadcrumbs, 1/4 cup chicken broth, 1 teaspoon dried thyme, 1/2 teaspoon salt, and 1/4 teaspoon black pepper, mixing until combined, then remove from heat to cool slightly.
5. Using a sharp knife, cut a horizontal pocket into each pork chop, being careful not to cut through the edges.
6. Stuff each pork chop pocket evenly with the apple-kale mixture, pressing gently to pack it in.
7. Heat the same skillet over medium-high heat and sear the stuffed pork chops for 3 minutes per side until golden brown.
8. Transfer the pork chops to a baking dish and bake in the preheated oven at 375°F for 20 minutes, or until the internal temperature reaches 145°F on a meat thermometer.
9. Remove from the oven and let the pork chops rest for 5 minutes before serving to retain juices.
Rich and satisfying, these chops offer a tender bite with a crisp stuffing that melds sweet apple and earthy kale flavors. Serve them sliced over a bed of mashed potatoes or with a side of roasted vegetables for a complete, comforting meal that’s sure to impress.
Roasted Beet and Goat Cheese Tart
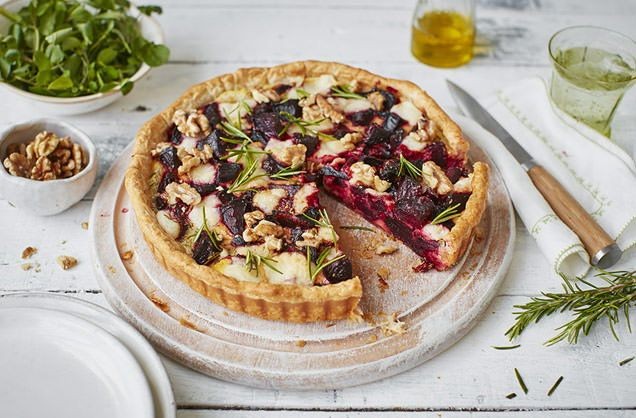
You’ll find this roasted beet and goat cheese tart to be a stunning yet approachable centerpiece that balances earthy sweetness with creamy tang. Let’s walk through each step together, starting with preparing the beets, so you can confidently create this vibrant dish for any gathering.
Serving: 6 | Pre Time: 20 minutes | Cooking Time: 45 minutes
Ingredients
– 1 sheet frozen puff pastry, thawed (I keep mine in the fridge overnight for even thawing)
– 3 medium beets, peeled and thinly sliced (about 1/8-inch thick—use a mandoline if you have one for uniform slices)
– 4 oz goat cheese, crumbled (I prefer a creamy, mild log for smooth spreading)
– 1/4 cup extra virgin olive oil (my go-to for its fruity notes)
– 1 tbsp fresh thyme leaves (plucked from stems—dried works in a pinch, but fresh adds brightness)
– 1/2 tsp kosher salt
– 1/4 tsp black pepper, freshly ground
– 1 egg, beaten (room temp eggs blend more easily for the egg wash)
Instructions
1. Preheat your oven to 400°F and line a baking sheet with parchment paper.
2. Unfold the thawed puff pastry sheet onto the prepared baking sheet, gently pressing it flat with your hands.
3. Use a fork to prick the pastry all over, leaving a 1-inch border unpricked around the edges—this prevents the center from puffing up too much.
4. Brush the beaten egg evenly over the 1-inch border of the pastry to help it brown nicely.
5. In a medium bowl, toss the sliced beets with olive oil, thyme, salt, and pepper until well coated.
6. Arrange the beet slices in a single, slightly overlapping layer on the pastry, staying within the egg-washed border.
7. Crumble the goat cheese evenly over the beets, aiming for about 1/4-inch chunks for pockets of creamy flavor.
8. Bake the tart at 400°F for 35–40 minutes, until the pastry edges are golden brown and puffed, and the beets are tender when pierced with a fork.
9. Remove the tart from the oven and let it cool on the baking sheet for 10 minutes before slicing—this helps the cheese set slightly.
10. Slice the tart into 6 pieces using a sharp knife for clean cuts.
Warm from the oven, this tart offers a crisp, flaky crust that contrasts with the tender, caramelized beets and melty goat cheese. Serve it as a rustic appetizer with a drizzle of balsamic glaze or alongside a simple arugula salad for a light lunch—the vibrant colors make it a feast for the eyes too.
Grilled Peach and Arugula Pizza

Discover how to transform simple ingredients into a stunning summer pizza that balances sweet, savory, and peppery notes perfectly. During grilling, the peaches caramelize beautifully, while the arugula adds a fresh, vibrant finish that makes this dish feel both gourmet and approachable.
Serving: 4 | Pre Time: 20 minutes | Cooking Time: 15 minutes
Ingredients
– 1 pound pizza dough, store-bought or homemade (I like to let mine rest at room temp for 30 minutes for easier stretching)
– 2 ripe peaches, pitted and sliced into ½-inch wedges (firm peaches hold up better on the grill)
– 4 ounces fresh mozzarella cheese, torn into small pieces (the creamy texture melts wonderfully)
– 2 cups baby arugula, loosely packed (I prefer the tender leaves for a milder pepperiness)
– ¼ cup extra virgin olive oil, divided (my go-to for its fruity flavor)
– 2 tablespoons balsamic glaze (a thick, syrupy version clings better than vinegar)
– ¼ teaspoon flaky sea salt (it adds a nice crunch compared to table salt)
– ¼ teaspoon freshly ground black pepper
Instructions
1. Preheat your grill to medium-high heat, about 450°F, and lightly oil the grates with 1 tablespoon of olive oil to prevent sticking.
2. On a lightly floured surface, stretch the pizza dough into a 12-inch round, about ¼-inch thick, using your hands or a rolling pin.
3. Brush the top of the dough with 1 tablespoon of olive oil, then carefully place it oil-side down on the preheated grill.
4. Grill the dough for 3–4 minutes, until the bottom develops dark grill marks and firms up.
5. Flip the dough using tongs, then immediately scatter the torn mozzarella evenly over the surface.
6. Arrange the peach slices in a single layer on top of the cheese, leaving small gaps between them.
7. Close the grill lid and cook for 5–7 minutes, until the cheese is fully melted and bubbly and the peaches are lightly charred at the edges.
8. Transfer the pizza to a cutting board using a large spatula, then let it cool for 2 minutes to set the cheese slightly.
9. Top the pizza evenly with the baby arugula, then drizzle with the remaining 2 tablespoons of olive oil and the balsamic glaze.
10. Sprinkle the flaky sea salt and black pepper over the entire pizza just before serving.
This pizza offers a delightful contrast of textures, from the crisp, smoky crust to the juicy peaches and creamy cheese. The peppery arugula adds a fresh bite that cuts through the richness, making it ideal for a light summer dinner or appetizer. Try serving it with a chilled rosé or alongside a simple green salad for a complete meal.
Harvest Grain Bowl with Tahini Dressing

Now that winter’s chill has settled in, there’s something deeply comforting about a nourishing grain bowl that celebrates seasonal produce. This Harvest Grain Bowl with Tahini Dressing brings together roasted vegetables, hearty grains, and a creamy sauce in a balanced meal that’s as satisfying to make as it is to eat.
Serving: 4 | Pre Time: 15 minutes | Cooking Time: 35 minutes
Ingredients
– 1 cup quinoa, rinsed well to remove any bitterness—I find this makes all the difference
– 2 cups water for cooking the quinoa
– 1 medium sweet potato, peeled and diced into ½-inch cubes
– 2 cups broccoli florets, cut into bite-sized pieces
– 2 tablespoons extra virgin olive oil, my go-to for roasting
– ½ teaspoon kosher salt
– ¼ teaspoon black pepper
– ⅓ cup tahini, well-stirred to incorporate any separated oil
– 2 tablespoons fresh lemon juice, about half a large lemon
– 1 tablespoon maple syrup for a touch of sweetness
– 3 tablespoons warm water to thin the dressing
– ¼ teaspoon garlic powder
– Optional: ¼ cup toasted pumpkin seeds for crunch
Instructions
1. Preheat your oven to 425°F and line a baking sheet with parchment paper.
2. In a medium saucepan, combine the rinsed quinoa and 2 cups water, then bring to a boil over high heat.
3. Once boiling, reduce the heat to low, cover the saucepan, and simmer the quinoa for 15 minutes until all water is absorbed.
4. While the quinoa cooks, place the diced sweet potato and broccoli florets on the prepared baking sheet.
5. Drizzle the vegetables with 2 tablespoons olive oil, then sprinkle with ½ teaspoon kosher salt and ¼ teaspoon black pepper, tossing to coat evenly.
6. Roast the vegetables in the preheated oven for 20-25 minutes, flipping halfway through, until the sweet potato is fork-tender and the broccoli edges are lightly browned.
7. In a small bowl, whisk together ⅓ cup tahini, 2 tablespoons lemon juice, 1 tablespoon maple syrup, ¼ teaspoon garlic powder, and 3 tablespoons warm water until smooth and creamy.
8. Fluff the cooked quinoa with a fork, then divide it evenly among four bowls.
9. Top each bowl with equal portions of the roasted sweet potato and broccoli.
10. Drizzle 2-3 tablespoons of the tahini dressing over each bowl, then sprinkle with toasted pumpkin seeds if using.
Out of the oven, the roasted vegetables offer a caramelized sweetness that contrasts beautifully with the fluffy quinoa. The tahini dressing ties everything together with its nutty, tangy creaminess, while optional pumpkin seeds add a delightful crunch. For a creative twist, try serving this bowl over a bed of massaged kale or with a side of warm pita bread to scoop up every last bite.
Braised Cabbage with Bacon and Apples
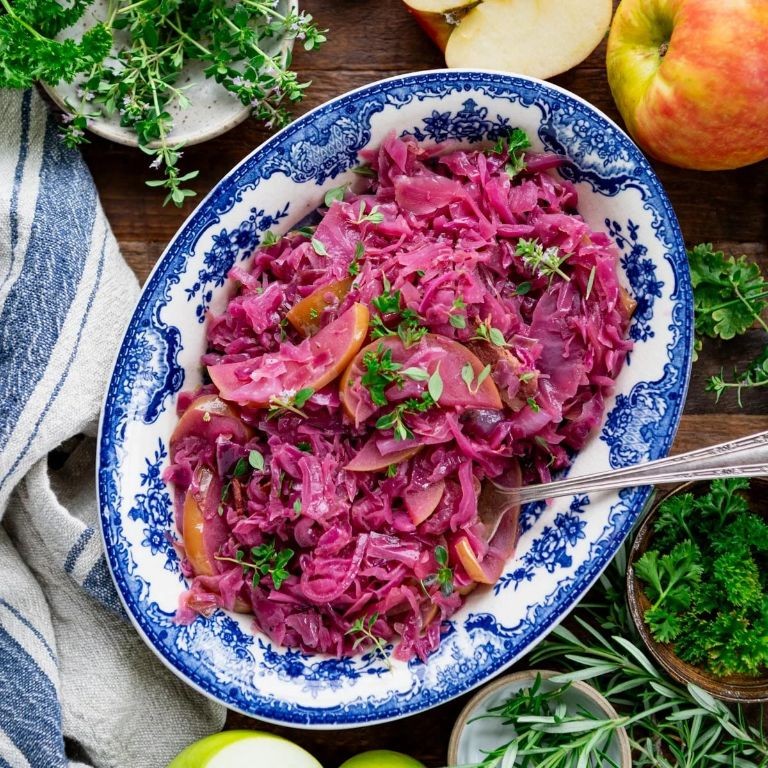
Gently coaxing humble cabbage into a sweet, savory, and smoky side dish is easier than you think. This braised cabbage with bacon and apples transforms simple ingredients into a comforting, caramelized delight perfect for chilly evenings. Let’s walk through each step together to build layers of flavor.
Serving: 4 | Pre Time: 15 minutes | Cooking Time: 45 minutes
Ingredients
– 4 slices thick-cut bacon, chopped (I find the smoky flavor from thick-cut renders the best fat for cooking)
– 1 medium yellow onion, thinly sliced
– 1 large head green cabbage (about 2 lbs), cored and cut into 1-inch wedges
– 2 crisp apples, such as Honeycrisp or Granny Smith, cored and sliced into ½-inch pieces (I prefer a mix for sweet-tart balance)
– 2 tablespoons apple cider vinegar
– 1 cup low-sodium chicken broth
– 1 tablespoon unsalted butter
– ½ teaspoon kosher salt
– ¼ teaspoon freshly ground black pepper
Instructions
1. Place a large Dutch oven or heavy-bottomed pot over medium heat and add the chopped bacon.
2. Cook the bacon, stirring occasionally, for 6–8 minutes until it is crispy and the fat has rendered. Use a slotted spoon to transfer the bacon to a paper towel-lined plate, leaving the fat in the pot.
3. Add the thinly sliced onion to the bacon fat in the pot. Cook, stirring frequently, for 5–7 minutes until the onion is soft and translucent.
4. Arrange the cabbage wedges in a single layer over the onions, cutting them if necessary to fit. Let them cook undisturbed for 4–5 minutes to develop a light golden sear on one side. Tip: Resist stirring too early—this sear adds depth.
5. Carefully flip each cabbage wedge to sear the other side for another 4–5 minutes.
6. Add the sliced apples, apple cider vinegar, chicken broth, kosher salt, and black pepper to the pot. Stir gently to combine.
7. Bring the liquid to a simmer, then reduce the heat to low. Cover the pot with a lid.
8. Braise the cabbage and apples for 25–30 minutes, checking once halfway, until the cabbage is tender when pierced with a fork but still holds its shape. Tip: If the liquid reduces too quickly, add a splash more broth.
9. Remove the lid and stir in the reserved crispy bacon and unsalted butter. Cook uncovered for 3–5 minutes to allow the sauce to thicken slightly. Tip: The butter adds a lovely gloss and richness to finish.
10. Remove the pot from the heat.
Melt-in-your-mouth cabbage, sweet apples, and salty bacon come together in a harmony that’s both rustic and elegant. The braising liquid reduces to a glossy, lightly tangy glaze that clings to every wedge. Serve this warm alongside roasted pork chops or fold any leftovers into a morning frittata for a delicious second act.
Homesteader’s Skillet Cornbread

Remember those chilly evenings when you crave something warm, comforting, and deeply satisfying? This skillet cornbread delivers exactly that—a rustic, golden-brown staple that comes together in one pan with minimal fuss, perfect for beginners and seasoned cooks alike.
Serving: 8 | Pre Time: 10 minutes | Cooking Time: 25 minutes
Ingredients
– 1 cup yellow cornmeal (I always use stone-ground for its hearty texture)
– 1 cup all-purpose flour
– 1 tablespoon baking powder
– 1 teaspoon salt (I prefer fine sea salt for even distribution)
– 1 cup buttermilk (this adds a lovely tang—shake the carton well before measuring)
– 1/4 cup honey (local honey is my go-to for a subtle sweetness)
– 1 large egg, at room temperature (it blends more smoothly into the batter)
– 1/4 cup unsalted butter, melted (I use a high-quality brand for rich flavor)
– 2 tablespoons vegetable oil (for greasing the skillet)
Instructions
1. Preheat your oven to 400°F (200°C) and place a 10-inch cast-iron skillet inside to heat up—this ensures a crispy crust.
2. In a large mixing bowl, whisk together the yellow cornmeal, all-purpose flour, baking powder, and salt until fully combined.
3. In a separate medium bowl, whisk the buttermilk, honey, and room-temperature egg until smooth and uniform in color.
4. Pour the melted unsalted butter into the buttermilk mixture, whisking continuously to incorporate it without curdling.
5. Tip: Add the wet ingredients to the dry ingredients all at once, then gently fold with a spatula until just combined—overmixing can lead to a tough texture.
6. Carefully remove the hot skillet from the oven using oven mitts, and immediately add the vegetable oil, swirling it to coat the bottom and sides evenly.
7. Pour the batter into the hot skillet; it should sizzle slightly, which helps form that golden crust.
8. Tip: Smooth the top of the batter with the spatula for an even bake, then place the skillet in the oven.
9. Bake at 400°F for 20–25 minutes, or until the top is golden brown and a toothpick inserted into the center comes out clean.
10. Tip: Let the cornbread cool in the skillet for 5 minutes before slicing—this allows it to set and makes it easier to handle.
11. Slice into wedges and serve warm.
Out of the oven, this cornbread boasts a crisp, buttery exterior that gives way to a tender, moist crumb with a hint of honey sweetness. Serve it alongside a bowl of chili for a classic pairing, or get creative by crumbling it over a fresh salad for added texture. It’s versatile enough to shine at any meal, from breakfast to dinner.
Farm-Fresh Egg and Herb Frittata

Let’s make a simple, satisfying frittata that’s perfect for using up fresh herbs and eggs. This one-pan dish is my go-to for a lazy weekend brunch or a quick weeknight dinner, and it comes together with minimal fuss. Follow these steps for a fluffy, flavorful result every time.
Serving: 4 | Pre Time: 10 minutes | Cooking Time: 20 minutes
Ingredients
- 8 large eggs (I prefer room temperature eggs here for a more even cook)
- 1/4 cup whole milk or heavy cream (heavy cream makes it extra rich)
- 1/2 teaspoon kosher salt
- 1/4 teaspoon freshly ground black pepper
- 2 tablespoons extra virgin olive oil (my go-to for its fruity flavor)
- 1 small yellow onion, finely diced
- 1 cup chopped fresh herbs like parsley, chives, and dill (use whatever’s thriving in your garden)
- 1/2 cup shredded sharp cheddar cheese
Instructions
- Preheat your oven to 375°F (190°C).
- Crack the 8 large eggs into a large mixing bowl.
- Add the 1/4 cup whole milk or heavy cream to the bowl.
- Whisk the eggs and milk together vigorously for about 1 minute until fully combined and slightly frothy.
- Whisk in the 1/2 teaspoon kosher salt and 1/4 teaspoon freshly ground black pepper. Tip: Seasoning the eggs now ensures flavor in every bite.
- Heat the 2 tablespoons extra virgin olive oil in a 10-inch oven-safe skillet over medium heat for 1 minute.
- Add the 1 small finely diced yellow onion to the skillet.
- Cook the onion, stirring occasionally, for 5-7 minutes until soft and translucent.
- Remove the skillet from the heat and let it cool for 1 minute. Tip: This prevents the eggs from scrambling on contact.
- Pour the whisked egg mixture into the skillet over the onions.
- Scatter the 1 cup chopped fresh herbs evenly over the eggs.
- Sprinkle the 1/2 cup shredded sharp cheddar cheese evenly over the top.
- Transfer the skillet to the preheated oven.
- Bake for 12-15 minutes until the center is just set and the edges are lightly golden. Tip: The frittata will continue to cook slightly after removal, so don’t overbake.
- Remove the skillet from the oven using oven mitts.
- Let the frittata rest in the skillet for 5 minutes before slicing.
Zesty with herbs and rich from the cheese, this frittata emerges tender and golden. Serve it warm with a simple arugula salad for a bright contrast, or slice it cold for a picnic—it’s wonderfully versatile.
Maple-Glazed Roasted Sweet Potatoes
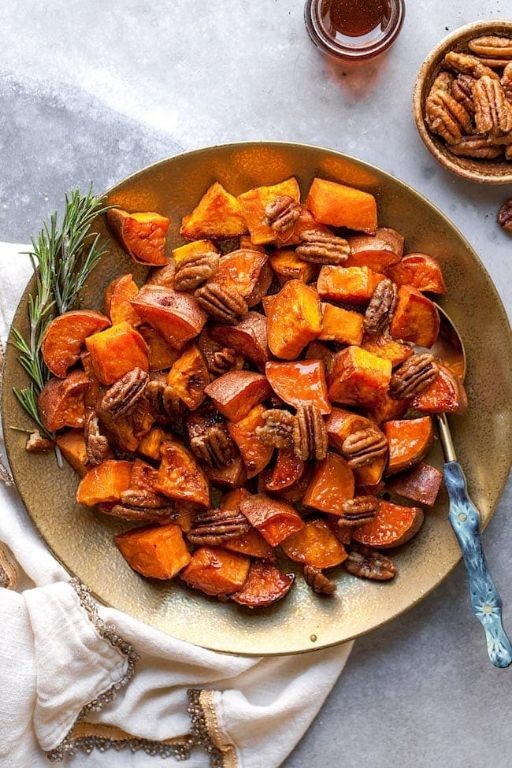
You’ll find these maple-glazed roasted sweet potatoes are the perfect balance of sweet, savory, and caramelized—ideal for holiday dinners or a cozy weeknight side. Let’s walk through each step together to ensure they turn out tender inside with a beautifully glossy, sticky glaze.
Serving: 6 | Pre Time: 15 minutes | Cooking Time: 40 minutes
Ingredients
– 3 large sweet potatoes, peeled and cubed into 1-inch pieces (I like to leave a few pieces slightly larger for varied texture)
– 3 tablespoons pure maple syrup (the real stuff makes all the difference—avoid pancake syrup for best flavor)
– 2 tablespoons extra virgin olive oil (my go‑to for roasting; it helps the potatoes crisp up nicely)
– 1 tablespoon unsalted butter, melted (this adds a rich, velvety finish to the glaze)
– 1 teaspoon kosher salt (I prefer it over table salt for more even seasoning)
– ½ teaspoon ground cinnamon (a warm spice that pairs beautifully with the maple)
– ¼ teaspoon freshly ground black pepper (just a hint to balance the sweetness)
Instructions
1. Preheat your oven to 400°F and line a large baking sheet with parchment paper or aluminum foil for easy cleanup.
2. In a large mixing bowl, combine the peeled and cubed sweet potatoes, extra virgin olive oil, kosher salt, ground cinnamon, and freshly ground black pepper. Toss everything with your hands or a spoon until the potatoes are evenly coated. (Tip: Make sure the potatoes are dry before tossing to help them roast rather than steam.)
3. Spread the seasoned sweet potatoes in a single layer on the prepared baking sheet, leaving a little space between pieces so they caramelize properly.
4. Roast the sweet potatoes in the preheated oven for 25 minutes, or until they start to become tender and lightly browned at the edges.
5. While the potatoes roast, whisk together the pure maple syrup and melted unsalted butter in a small bowl until smooth.
6. After 25 minutes, remove the baking sheet from the oven and drizzle the maple-butter mixture evenly over the partially roasted sweet potatoes. Use a spatula to gently toss and coat them. (Tip: Work quickly here to keep the oven heat from escaping.)
7. Return the baking sheet to the oven and roast for another 12–15 minutes, until the sweet potatoes are fork-tender and the glaze is bubbly and slightly thickened. (Tip: Check at 12 minutes—if the glaze isn’t sticky enough, give it another 2–3 minutes, but watch closely to prevent burning.)
8. Carefully remove the baking sheet from the oven and let the sweet potatoes cool for 5 minutes on the sheet before serving.
Zesty and comforting, these sweet potatoes emerge with a tender, almost creamy interior beneath that sticky-sweet maple glaze. For a creative twist, sprinkle them with toasted pecans or crumbled goat cheese just before serving to add crunch or tangy contrast.
Rustic Tomato and Herb Galette

During the holiday rush, a simple yet impressive dish like this rustic tomato and herb galette is a true lifesaver. It’s a free-form tart that celebrates summer’s bounty with minimal fuss, perfect for a relaxed dinner or a festive appetizer. Let’s walk through each step together to create a beautiful, flavorful centerpiece.
Serving: 6 | Pre Time: 30 minutes | Cooking Time: 40 minutes
Ingredients
– 1 ¼ cups all-purpose flour, plus extra for dusting—I always keep mine in an airtight container to stay fresh.
– ½ teaspoon salt, for balancing the flavors in the crust.
– ½ cup (1 stick) unsalted butter, cold and cubed—chilling it well ensures a flaky texture.
– ¼ cup ice water, added gradually until the dough just comes together.
– 2 large tomatoes, sliced ¼-inch thick—I prefer heirloom varieties for their vibrant colors and sweet taste.
– 1 tablespoon extra virgin olive oil, my go-to for its fruity notes that enhance the tomatoes.
– 1 tablespoon fresh thyme leaves, stripped from the stems for an aromatic touch.
– ½ teaspoon black pepper, freshly ground for a bit of warmth.
– 1 large egg, beaten—I let it sit at room temperature for a few minutes to make brushing easier.
Instructions
1. In a large mixing bowl, combine 1 ¼ cups all-purpose flour and ½ teaspoon salt using a fork.
2. Add ½ cup cold, cubed unsalted butter to the bowl, and use a pastry cutter or your fingers to work it into the flour until the mixture resembles coarse crumbs with some pea-sized butter pieces remaining.
3. Gradually drizzle in ¼ cup ice water, 1 tablespoon at a time, stirring with a fork until the dough just holds together when pressed—avoid overmixing to keep the crust tender.
4. Tip: If the dough feels too dry, add another teaspoon of ice water, but be cautious to prevent a tough crust.
5. Shape the dough into a disk, wrap it tightly in plastic wrap, and refrigerate for at least 30 minutes to allow the gluten to relax and the butter to firm up.
6. While the dough chills, preheat your oven to 400°F (200°C) and line a baking sheet with parchment paper.
7. Slice 2 large tomatoes into ¼-inch thick rounds, and pat them dry with paper towels to remove excess moisture, which helps prevent a soggy crust.
8. In a small bowl, toss the tomato slices with 1 tablespoon extra virgin olive oil, 1 tablespoon fresh thyme leaves, and ½ teaspoon black pepper until evenly coated.
9. On a lightly floured surface, roll the chilled dough into a 12-inch circle about ⅛-inch thick, transferring it carefully to the prepared baking sheet.
10. Tip: If the dough cracks, gently press it back together—it’s meant to be rustic, so perfection isn’t necessary.
11. Arrange the seasoned tomato slices in a single layer over the dough, leaving a 2-inch border around the edges.
12. Fold the dough border over the tomatoes, pleating it as you go to create a rustic, free-form edge.
13. Brush the folded dough edges with 1 large beaten egg using a pastry brush—this will give the crust a golden, shiny finish when baked.
14. Tip: For even browning, make sure the egg wash covers the dough completely but doesn’t pool.
15. Bake the galette in the preheated oven at 400°F for 35-40 minutes, until the crust is golden brown and the tomatoes are tender and slightly caramelized.
16. Remove from the oven and let it cool on the baking sheet for 10 minutes before slicing to allow the juices to set.
The galette emerges with a buttery, flaky crust that shatters with each bite, contrasting beautifully with the juicy, herb-infused tomatoes. Serve it warm with a dollop of creamy goat cheese or alongside a crisp green salad for a complete meal that feels both elegant and effortlessly homemade.
Spiced Pumpkin and Sage Pasta
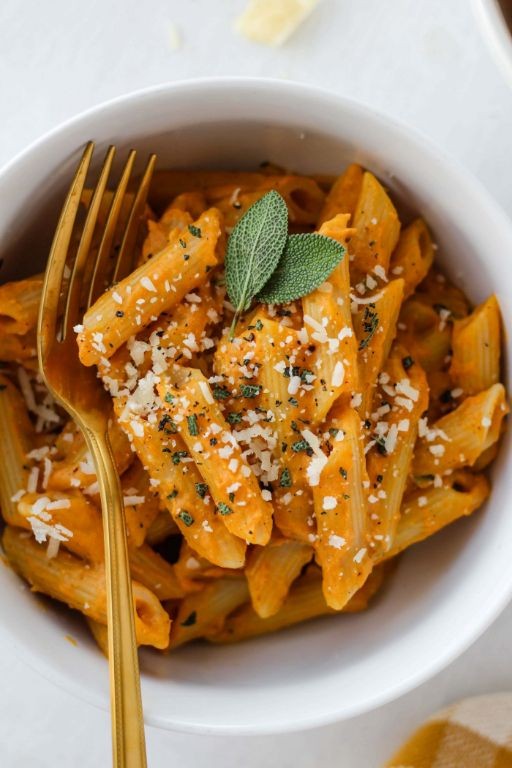
Savor the cozy flavors of fall with this creamy pasta dish that’s perfect for a festive dinner or a comforting weeknight meal. This Spiced Pumpkin and Sage Pasta combines sweet pumpkin, aromatic sage, and warm spices into a velvety sauce that clings beautifully to pasta. Follow these methodical steps to create a dish that’s both impressive and approachable, even for beginners.
Serving: 4 | Pre Time: 15 minutes | Cooking Time: 25 minutes
Ingredients
– 12 ounces dried fettuccine pasta (I like using a sturdy shape to hold the sauce)
– 2 tablespoons extra virgin olive oil (my go‑to for its fruity flavor)
– 4 fresh sage leaves, plus 1 tablespoon finely chopped sage (fresh makes all the difference)
– 3 cloves garlic, minced (I prefer mincing them just before cooking for maximum aroma)
– 1 cup canned pumpkin purée (not pumpkin pie filling)
– 1 cup heavy cream (room temperature helps it blend smoothly)
– ½ teaspoon ground nutmeg (freshly grated if you have it)
– ¼ teaspoon ground cinnamon
– ½ cup grated Parmesan cheese, plus more for serving
– Salt and black pepper to taste
Instructions
1. Bring a large pot of salted water to a rolling boil over high heat.
2. Add the fettuccine to the boiling water and cook according to package directions until al dente, about 10–12 minutes, stirring occasionally to prevent sticking.
3. While the pasta cooks, heat the olive oil in a large skillet over medium heat until it shimmers, about 2 minutes.
4. Add the whole sage leaves to the skillet and fry for 30–45 seconds until crisp, then remove them with a slotted spoon and set aside on a paper towel—they’ll be your garnish.
5. Tip: Keep the heat at medium to avoid burning the sage, which can turn bitter.
6. Add the minced garlic and chopped sage to the same skillet and sauté for 1 minute until fragrant but not browned.
7. Stir in the pumpkin purée, heavy cream, nutmeg, and cinnamon, mixing until fully combined and smooth.
8. Reduce the heat to low and let the sauce simmer gently for 5 minutes, stirring occasionally to prevent sticking.
9. Tip: Simmering on low allows the flavors to meld without curdling the cream.
10. Drain the cooked pasta, reserving ½ cup of the pasta water.
11. Add the drained pasta directly to the skillet with the pumpkin sauce.
12. Toss the pasta with the sauce over low heat for 2–3 minutes, adding splashes of the reserved pasta water as needed to reach a creamy consistency that coats the noodles.
13. Tip: The starchy pasta water helps bind the sauce and pasta beautifully.
14. Remove the skillet from the heat and stir in the grated Parmesan cheese until melted and incorporated.
15. Season with salt and black pepper to taste, adjusting as desired.
16. Divide the pasta among serving bowls and top with the crispy sage leaves and extra Parmesan.
The sauce should be luxuriously creamy, clinging to each strand of pasta with a subtle sweetness from the pumpkin and a warm, earthy note from the sage. For a creative twist, try serving it with toasted walnuts for crunch or a drizzle of balsamic glaze to balance the richness.
Summary
Zesty seasonal cooking is at your fingertips with these 20 fresh farm-to-table recipes! We hope this collection inspires you to savor the best of each season. Give a few a try, then pop back to the comments and tell us which dish was your favorite. If you loved this roundup, please share it with fellow food lovers on Pinterest. Happy cooking!


