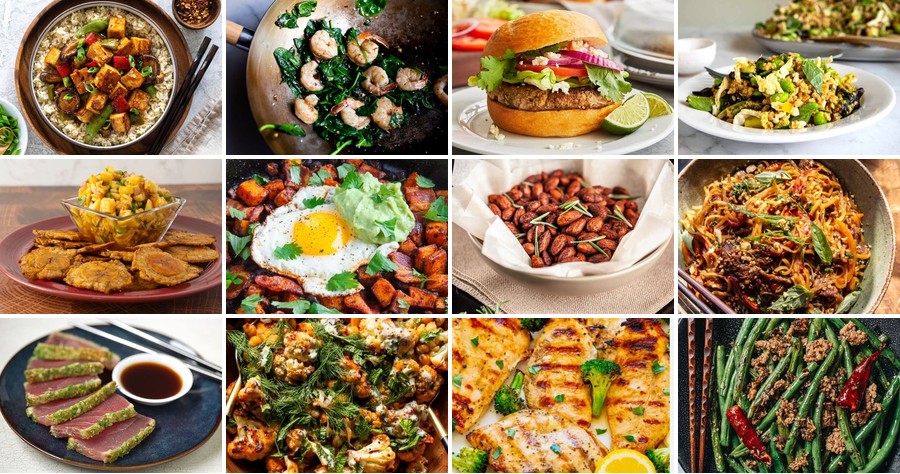
Just when you thought your metabolism needed a jumpstart, we’ve gathered 19 fiery recipes that deliver both heat and energy! Perfect for busy home cooks craving quick, flavorful meals, these spicy dishes are designed to rev up your day. Ready to turn up the temperature on your diet? Dive into our roundup and discover how a little spice can lead to a big boost.
Spicy Turkey and Quinoa Stuffed Peppers
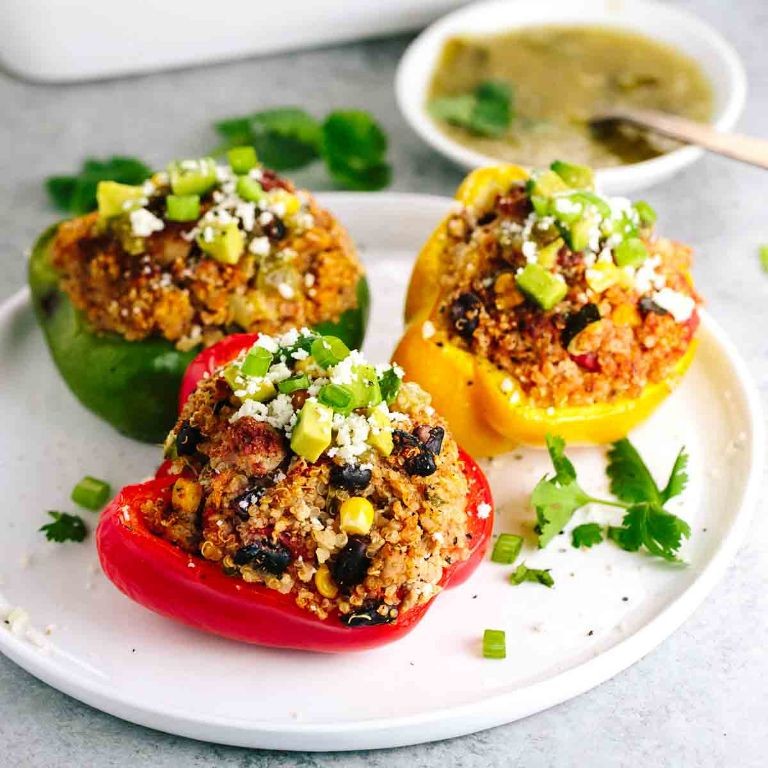
Filling bell peppers with a spicy turkey and quinoa mixture makes for a satisfying one-dish meal. This recipe delivers bold flavor and lean protein in a colorful package. It’s perfect for meal prep or a weeknight dinner.
Serving: 4 | Pre Time: 15 minutes | Cooking Time: 35 minutes
Ingredients
– Bell peppers – 4 large
– Ground turkey – 1 lb
– Quinoa – 1 cup
– Chicken broth – 2 cups
– Canned diced tomatoes – 1 (14.5 oz) can
– Onion – 1 medium, diced
– Garlic – 3 cloves, minced
– Chili powder – 2 tsp
– Cumin – 1 tsp
– Salt – 1 tsp
– Black pepper – ½ tsp
– Shredded cheddar cheese – 1 cup
Instructions
1. Preheat your oven to 375°F.
2. Slice the tops off the bell peppers and remove the seeds and membranes.
3. Place the hollowed peppers upright in a baking dish.
4. Heat a large skillet over medium-high heat.
5. Add the ground turkey and cook for 5-7 minutes, breaking it up with a spoon until no longer pink.
6. Add the diced onion and minced garlic to the skillet.
7. Cook for 3-4 minutes until the onion is translucent.
8. Stir in the quinoa, chicken broth, canned diced tomatoes, chili powder, cumin, salt, and black pepper. Tip: Rinsing the quinoa before cooking removes its natural bitter coating.
9. Bring the mixture to a boil.
10. Reduce the heat to low, cover the skillet, and simmer for 15 minutes until the quinoa is tender and the liquid is absorbed. Tip: Let the filling sit off the heat for 5 minutes to allow the quinoa to fully absorb any remaining moisture.
11. Spoon the turkey and quinoa filling evenly into the prepared bell peppers.
12. Top each pepper with shredded cheddar cheese.
13. Cover the baking dish with aluminum foil.
14. Bake at 375°F for 20 minutes.
15. Remove the foil and bake for an additional 5-10 minutes until the cheese is bubbly and slightly browned. Tip: For extra crispiness, broil for the final 1-2 minutes, watching closely to prevent burning.
16. Remove from the oven and let cool for 5 minutes before serving.
Now these peppers offer a delightful contrast between the tender, slightly crisp pepper shell and the hearty, spiced filling. Naturally, the melted cheese adds a creamy richness that balances the heat. Try serving them over a bed of greens or with a dollop of cool sour cream for a complete meal.
Lemon Garlic Grilled Chicken with Steamed Broccoli

Zesty lemon and garlic transform simple chicken into a vibrant weeknight meal. This grilled chicken pairs perfectly with steamed broccoli for a balanced plate. You’ll have dinner ready in under 30 minutes.
Serving: 4 | Pre Time: 10 minutes | Cooking Time: 15 minutes
Ingredients
– Boneless, skinless chicken breasts – 4 (about 6 oz each)
– Lemon – 1
– Garlic cloves – 4
– Olive oil – 2 tbsp
– Salt – 1 tsp
– Black pepper – ½ tsp
– Broccoli florets – 4 cups
Instructions
1. Preheat a gas or charcoal grill to medium-high heat (400°F).
2. Zest the entire lemon into a small bowl.
3. Juice the lemon into the same bowl.
4. Mince the garlic cloves finely and add to the lemon mixture.
5. Whisk in the olive oil, salt, and black pepper until combined.
6. Place the chicken breasts in a shallow dish and pour the marinade over them, coating evenly.
7. Let the chicken marinate at room temperature for 10 minutes (tip: this short marinate infuses flavor without making the texture mushy).
8. Place the chicken on the preheated grill and cook for 6-7 minutes.
9. Flip the chicken using tongs and cook for another 6-7 minutes, or until the internal temperature reaches 165°F (tip: use a meat thermometer for perfect doneness every time).
10. While the chicken cooks, bring 1 inch of water to a boil in a large pot fitted with a steamer basket.
11. Add the broccoli florets to the steamer basket, cover, and steam for 4-5 minutes until bright green and tender-crisp (tip: avoid overcooking to preserve nutrients and texture).
12. Remove the chicken from the grill and let it rest for 3 minutes before slicing.
Oven-roasted potatoes or a quinoa pilaf make excellent sides. The chicken stays juicy with a crisp, charred exterior, while the broccoli adds a fresh crunch. For a twist, slice the chicken and serve over a bed of mixed greens with the remaining lemon juice as a light dressing.
Cajun Shrimp and Spinach Stir-Fry
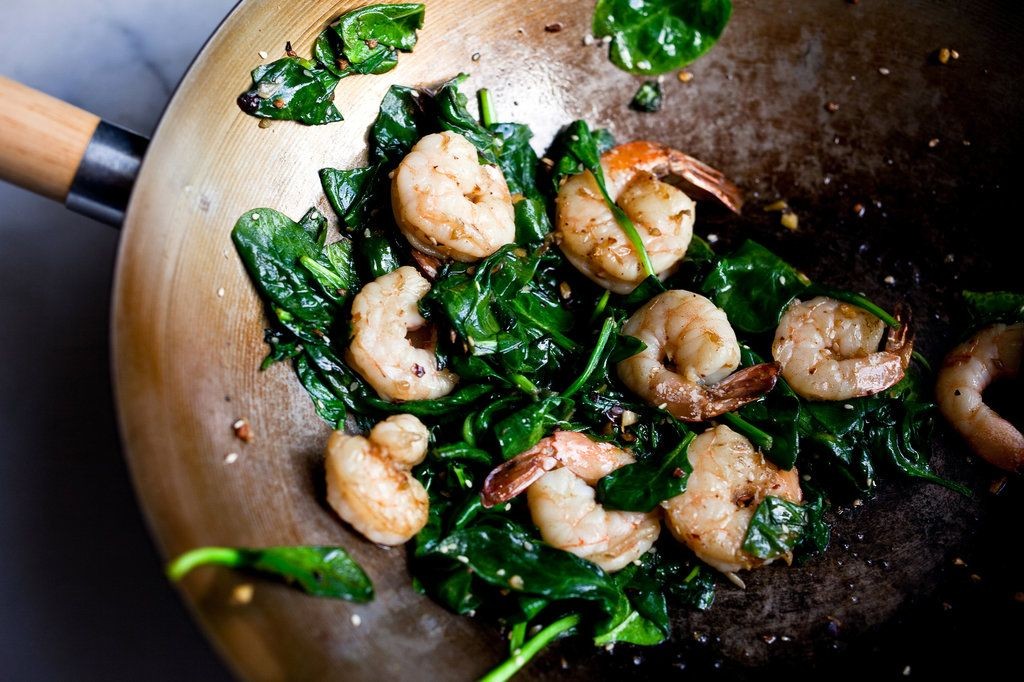
Ready for a quick, flavorful weeknight dinner? This Cajun Shrimp and Spinach Stir-Fry delivers bold spice and fresh greens in under 30 minutes. It’s a one-pan wonder that’s both satisfying and simple to pull together.
Serving: 4 | Pre Time: 10 minutes | Cooking Time: 15 minutes
Ingredients
– Olive oil – 2 tbsp
– Raw large shrimp, peeled and deveined – 1 lb
– Cajun seasoning – 2 tbsp
– Garlic cloves, minced – 3
– Fresh spinach – 5 oz
– Lemon juice – 1 tbsp
Instructions
1. Pat the shrimp completely dry with paper towels to ensure a good sear.
2. Toss the shrimp with 1 tbsp of Cajun seasoning in a bowl until evenly coated.
3. Heat 1 tbsp of olive oil in a large skillet or wok over medium-high heat until shimmering, about 2 minutes.
4. Add the shrimp in a single layer and cook undisturbed for 2 minutes to develop a crust.
5. Flip each shrimp and cook for another 1–2 minutes until opaque and pink throughout. Transfer to a plate.
6. Reduce heat to medium and add the remaining 1 tbsp of olive oil to the same skillet.
7. Add the minced garlic and sauté for 30 seconds until fragrant, being careful not to burn it.
8. Add the fresh spinach and cook, stirring constantly, for 2–3 minutes until just wilted.
9. Return the cooked shrimp to the skillet and sprinkle with the remaining 1 tbsp of Cajun seasoning.
10. Drizzle the lemon juice over everything and toss to combine for 30 seconds to let the flavors meld.
11. Serve immediately. Succulent shrimp coated in a spicy, aromatic Cajun blend contrast beautifully with the tender, slightly wilted spinach. For a complete meal, spoon it over steamed rice or cauliflower rice to soak up the flavorful juices.
Turmeric Ginger Lentil Soup

You’ll find this turmeric ginger lentil soup is a vibrant, immune-boosting meal perfect for chilly evenings. Its earthy flavors come together quickly with minimal effort. Serving: 4 | Pre Time: 10 minutes | Cooking Time: 30 minutes
Ingredients
– Olive oil – 2 tbsp
– Yellow onion – 1 medium, diced
– Garlic – 3 cloves, minced
– Fresh ginger – 1 tbsp, grated
– Ground turmeric – 1 tsp
– Red lentils – 1 cup
– Vegetable broth – 4 cups
– Full-fat coconut milk – 1 cup
– Lemon – 1, juiced
– Salt – 1 tsp
Instructions
1. Heat olive oil in a large pot over medium heat.
2. Add diced onion and cook for 5 minutes until translucent, stirring occasionally.
3. Stir in minced garlic, grated ginger, and ground turmeric; cook for 1 minute until fragrant.
4. Add red lentils and vegetable broth; bring to a boil.
5. Reduce heat to low, cover, and simmer for 20 minutes until lentils are tender.
6. Stir in coconut milk and simmer uncovered for 5 minutes to thicken slightly.
7. Remove from heat and stir in lemon juice and salt.
8. Blend half the soup with an immersion blender for a creamier texture, if desired.
9. Ladle into bowls and serve immediately.
Dense with protein and fiber, this soup has a velvety, slightly chunky texture from the softened lentils. The ginger provides a warm kick that balances the earthy turmeric, while coconut milk adds richness without heaviness. For a creative twist, top with crispy chickpeas or a swirl of yogurt.
Chipotle Black Bean and Sweet Potato Hash

Let’s get straight to this hearty, smoky hash that’s perfect for any meal. Loaded with protein and fiber, it comes together quickly with minimal prep. You’ll love how the sweet potatoes caramelize against the spicy chipotle.
Serving: 4 | Pre Time: 15 minutes | Cooking Time: 25 minutes
Ingredients
– Olive oil – 2 tbsp
– Yellow onion – 1, diced
– Garlic – 3 cloves, minced
– Sweet potatoes – 2 large, peeled and diced into ½-inch cubes
– Chipotle peppers in adobo sauce – 2 peppers, minced, plus 1 tbsp sauce
– Black beans – 1 (15-oz) can, drained and rinsed
– Ground cumin – 1 tsp
– Salt – ½ tsp
– Black pepper – ¼ tsp
– Fresh cilantro – ¼ cup, chopped
– Lime – 1, cut into wedges
Instructions
1. Heat olive oil in a large skillet over medium-high heat until shimmering, about 1 minute.
2. Add diced onion and cook, stirring occasionally, until translucent, about 5 minutes.
3. Stir in minced garlic and cook until fragrant, about 30 seconds.
4. Add sweet potato cubes in a single layer—don’t overcrowd the pan to ensure even browning.
5. Cook sweet potatoes undisturbed for 5 minutes to develop a golden crust on one side.
6. Stir potatoes and continue cooking until tender when pierced with a fork, about 10 more minutes.
7. Mix in minced chipotle peppers, adobo sauce, cumin, salt, and black pepper until evenly coated.
8. Fold in black beans and cook until heated through, about 3 minutes.
9. Remove skillet from heat and stir in chopped cilantro.
10. Serve immediately with lime wedges for squeezing over the top—the acid brightens all the flavors.
Vibrant and satisfying, this hash features tender sweet potatoes with crispy edges against creamy black beans. The chipotle adds a smoky heat that’s balanced by fresh cilantro and lime. Try topping it with a fried egg for breakfast or stuffing it into warm tortillas with avocado for a quick dinner.
Miso-Glazed Salmon with Asparagus
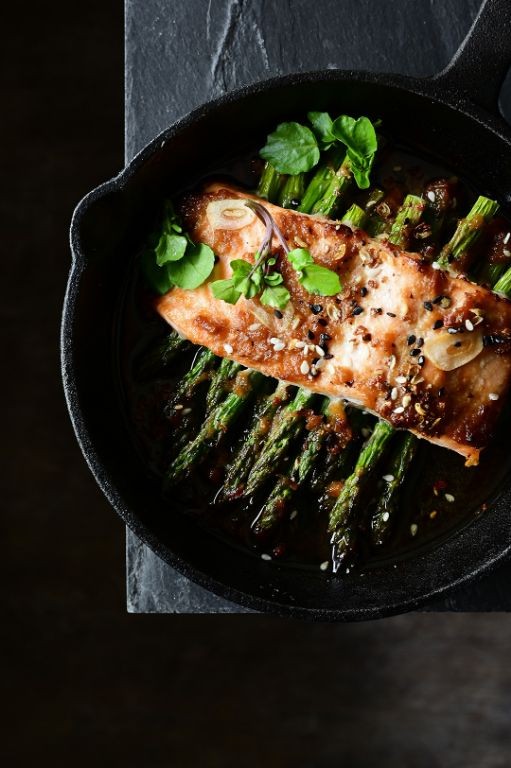
Unlock restaurant-quality flavor at home with this simple miso-glazed salmon. Using just a handful of ingredients, it delivers a perfect balance of sweet, savory, and umami. Pair it with roasted asparagus for a complete, healthy meal in under 30 minutes.
Serving: 2 | Pre Time: 10 minutes | Cooking Time: 15 minutes
Ingredients
– Salmon fillets – 2 (6 oz each)
– White miso paste – 3 tbsp
– Honey – 1 tbsp
– Soy sauce – 1 tbsp
– Asparagus spears – 1 bunch
– Olive oil – 1 tbsp
– Black pepper – ¼ tsp
Instructions
1. Preheat your oven to 400°F and line a baking sheet with parchment paper.
2. Pat the salmon fillets completely dry with paper towels to ensure a crisp skin.
3. In a small bowl, whisk together the white miso paste, honey, and soy sauce until smooth.
4. Brush the miso glaze generously over the top and sides of each salmon fillet.
5. Trim the tough ends from the asparagus spears and place them on the baking sheet.
6. Drizzle the asparagus with olive oil and season with black pepper, tossing to coat.
7. Arrange the glazed salmon fillets on the baking sheet next to the asparagus.
8. Roast in the preheated oven for 12–15 minutes, until the salmon flakes easily with a fork and the asparagus is tender-crisp.
9. For extra caramelization, broil for the final 1–2 minutes, watching closely to prevent burning.
10. Remove from the oven and let the salmon rest for 3 minutes before serving to allow juices to redistribute.
Juicy salmon flakes apart with a buttery texture, coated in a sticky, savory-sweet crust. The roasted asparagus adds a fresh, crisp contrast. Serve over steamed rice or with a squeeze of lemon for brightness.
Thai Basil Beef with Brown Rice Noodles
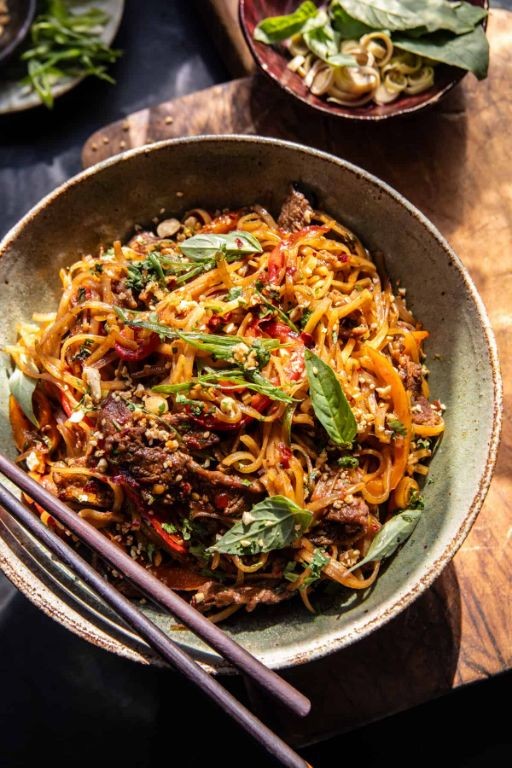
Perfect for a busy weeknight, this Thai Basil Beef with Brown Rice Noodles comes together in under 30 minutes. Packed with savory, spicy, and aromatic flavors, it’s a satisfying one-pan meal that beats takeout every time.
Serving: 4 | Pre Time: 10 minutes | Cooking Time: 15 minutes
Ingredients
– Brown rice noodles – 8 oz
– Vegetable oil – 2 tbsp
– Garlic – 4 cloves
– Ground beef – 1 lb
– Fish sauce – 2 tbsp
– Soy sauce – 2 tbsp
– Oyster sauce – 1 tbsp
– Brown sugar – 1 tbsp
– Thai chilies – 2
– Thai basil – 1 cup
Instructions
1. Soak brown rice noodles in hot water for 8 minutes until pliable but still firm, then drain completely.
2. Mince garlic and thinly slice Thai chilies.
3. Heat vegetable oil in a large wok or skillet over high heat until shimmering, about 1 minute.
4. Add minced garlic and sliced chilies, stir-fry for 30 seconds until fragrant.
5. Crumble ground beef into the pan, breaking it up with a spatula.
6. Cook beef for 5-7 minutes until no pink remains and it begins to brown.
7. Add fish sauce, soy sauce, oyster sauce, and brown sugar directly to the beef.
8. Stir sauce into beef and cook for 2 minutes until slightly thickened.
9. Add drained noodles to the pan, tossing constantly to coat in sauce for 2 minutes.
10. Remove from heat and immediately stir in Thai basil leaves until just wilted.
11. Let rest for 2 minutes before serving to allow flavors to meld.
Lively textures contrast tender beef with chewy noodles, all coated in a glossy, umami-rich sauce. The Thai basil adds a fresh, peppery finish that cuts through the richness beautifully. For a creative twist, serve it in lettuce cups or top with a fried egg for extra protein.
Chili Lime Baked Cod with Kale Salad
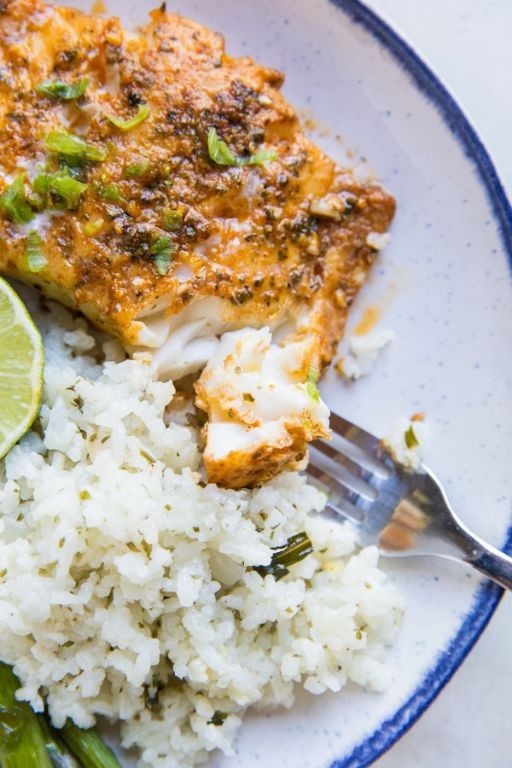
Whip up a zesty, healthy dinner in under 30 minutes with this simple baked cod. The chili-lime marinade adds a bright kick, perfectly complementing the fresh kale salad for a complete meal. It’s a foolproof weeknight dish that feels special without the fuss.
Serving: 2 | Pre Time: 10 minutes | Cooking Time: 15 minutes
Ingredients
– Cod fillets – 2 (6 oz each)
– Olive oil – 2 tbsp
– Lime juice – 2 tbsp
– Chili powder – 1 tsp
– Garlic powder – ½ tsp
– Salt – ½ tsp
– Kale – 4 cups, chopped
– Avocado – 1, sliced
– Red onion – ¼ cup, thinly sliced
Instructions
1. Preheat your oven to 400°F.
2. Pat the cod fillets completely dry with paper towels to ensure a crisp crust.
3. In a small bowl, whisk together 1 tbsp olive oil, lime juice, chili powder, garlic powder, and salt.
4. Place the cod fillets in a baking dish and pour the marinade over them, coating evenly.
5. Bake the cod for 12–15 minutes, until it flakes easily with a fork and reaches an internal temperature of 145°F.
6. While the cod bakes, massage the chopped kale with the remaining 1 tbsp olive oil for 1–2 minutes to soften it.
7. Toss the massaged kale with the sliced avocado and red onion in a large bowl.
8. Remove the cod from the oven and let it rest for 2 minutes before serving. Tip: For extra flavor, squeeze fresh lime juice over the cod right after baking.
9. Divide the kale salad between two plates and top each with a baked cod fillet.
10. Lightly drizzle any remaining marinade from the baking dish over the salad for added zest.
Lightly flaky and moist, the cod pairs beautifully with the crunchy, massaged kale. The chili-lime marinade caramelizes slightly in the oven, creating a tangy glaze. Serve it immediately with extra lime wedges for a burst of freshness, or add quinoa to the salad for a heartier meal.
Jerk Spiced Grilled Pineapple Chicken
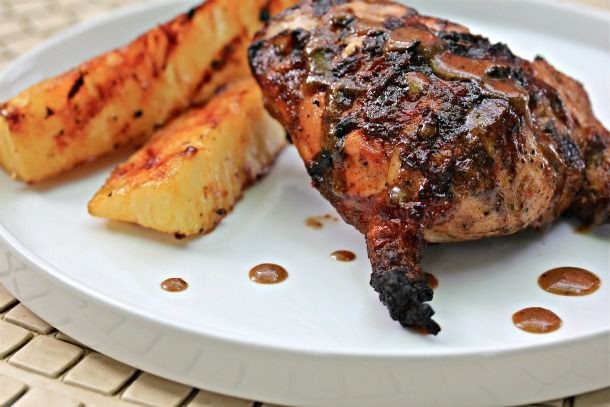
Every holiday season needs a bold, tropical escape from heavy comfort foods. This jerk-spiced grilled pineapple chicken delivers fiery warmth and sweet brightness in under 30 minutes—perfect for shaking up weeknight dinners or impressing last-minute guests.
Serving: 4 | Pre Time: 10 minutes | Cooking Time: 15 minutes
Ingredients
– Boneless, skinless chicken breasts – 1½ lbs
– Pineapple – 1 cup, cubed
– Jerk seasoning – 2 tbsp
– Olive oil – 2 tbsp
– Lime – 1, juiced
– Salt – ½ tsp
Instructions
1. Preheat a grill or grill pan to 400°F.
2. Pat chicken breasts completely dry with paper towels to ensure even searing.
3. Rub chicken with 1 tbsp olive oil, then coat evenly with jerk seasoning and salt.
4. Toss pineapple cubes with remaining 1 tbsp olive oil in a bowl.
5. Place chicken on the hot grill and cook for 6 minutes without moving to develop grill marks.
6. Flip chicken and add pineapple cubes to the grill, arranging them in a single layer.
7. Grill chicken for another 6 minutes until internal temperature reaches 165°F when checked with a meat thermometer.
8. Grill pineapple for 3–4 minutes total, turning once, until caramelized with charred edges.
9. Transfer chicken and pineapple to a platter and drizzle immediately with fresh lime juice to brighten the spices.
10. Let chicken rest for 5 minutes before slicing against the grain for maximum tenderness.
The chicken emerges juicy with a smoky, spicy crust, while the pineapple caramelizes into sticky-sweet bites. Serve it over coconut rice to balance the heat, or chop leftovers for vibrant tacos with avocado crema.
Harissa Roasted Cauliflower and Chickpeas
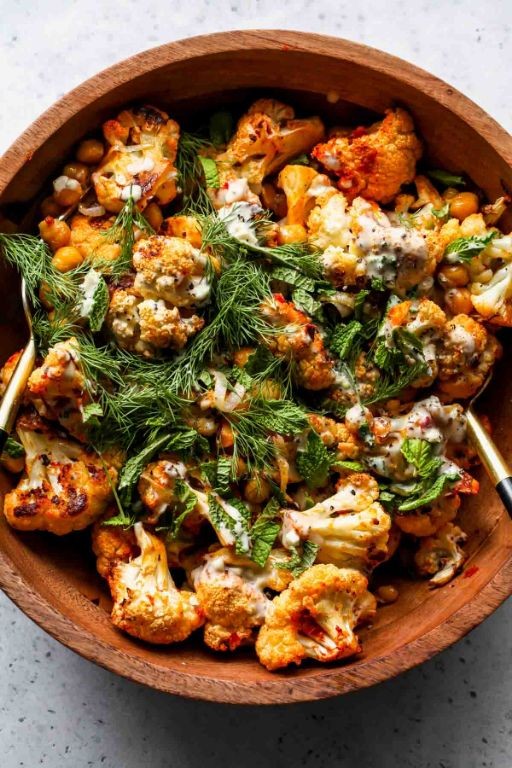
Tired of bland vegetable sides? This harissa roasted cauliflower and chickpeas delivers bold flavor with minimal effort. It’s a perfect weeknight dish that’s both satisfying and simple to prepare.
Serving: 4 | Pre Time: 10 minutes | Cooking Time: 30 minutes
Ingredients
– Cauliflower – 1 large head
– Chickpeas – 1 (15 oz) can
– Olive oil – 3 tbsp
– Harissa paste – 2 tbsp
– Garlic – 2 cloves, minced
– Lemon – 1
– Salt – 1 tsp
– Black pepper – ½ tsp
Instructions
1. Preheat your oven to 425°F.
2. Drain and rinse the chickpeas, then pat them completely dry with a paper towel to ensure crispiness.
3. Cut the cauliflower into 1-inch florets.
4. In a large bowl, whisk together the olive oil, harissa paste, minced garlic, salt, and black pepper.
5. Add the cauliflower florets and dried chickpeas to the bowl, tossing thoroughly to coat evenly.
6. Spread the mixture in a single layer on a large baking sheet, avoiding overcrowding for better roasting.
7. Roast in the preheated oven for 25-30 minutes, stirring halfway through, until the cauliflower is tender and edges are charred.
8. While roasting, zest and juice the lemon.
9. Remove the baking sheet from the oven and immediately toss with the lemon zest and juice to brighten the flavors.
10. Serve hot directly from the oven.
Just out of the oven, this dish offers a smoky, spicy kick from the harissa, balanced by the nutty chickpeas and tender cauliflower. The lemon adds a fresh zing that cuts through the richness. For a creative twist, serve it over creamy polenta or stuff it into warm pitas with a dollop of yogurt.
Cilantro Lime Turkey Burgers with Avocado
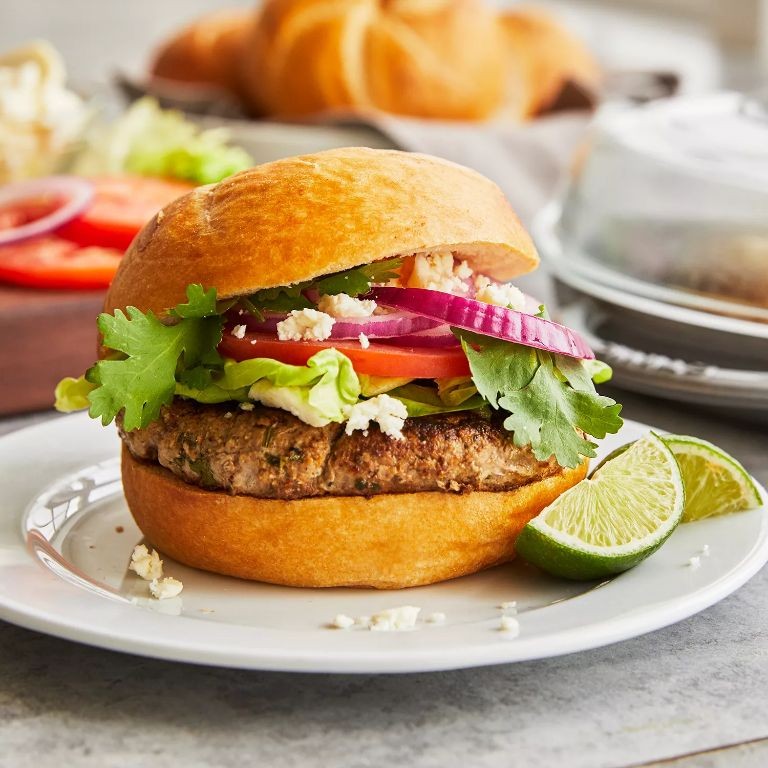
Ditch the bland turkey burger routine with these zesty patties. They’re packed with fresh cilantro and lime, topped with creamy avocado for a satisfying meal that’s anything but boring. Perfect for a quick weeknight dinner or summer grilling.
Serving: 4 | Pre Time: 15 minutes | Cooking Time: 12 minutes
Ingredients
– Ground turkey – 1 lb
– Fresh cilantro – ¼ cup, chopped
– Lime – 1, zested and juiced
– Garlic – 2 cloves, minced
– Salt – 1 tsp
– Black pepper – ½ tsp
– Olive oil – 1 tbsp
– Avocado – 1, sliced
– Hamburger buns – 4
Instructions
1. In a large bowl, combine 1 lb ground turkey, ¼ cup chopped cilantro, zest and juice of 1 lime, 2 minced garlic cloves, 1 tsp salt, and ½ tsp black pepper.
2. Mix gently with your hands until just combined; overmixing can make the burgers tough.
3. Divide the mixture into 4 equal portions and shape into ¾-inch thick patties.
4. Heat 1 tbsp olive oil in a large skillet or grill pan over medium-high heat until shimmering.
5. Place the patties in the pan and cook for 5-6 minutes without moving to form a crust.
6. Flip the patties and cook for another 5-6 minutes until the internal temperature reaches 165°F.
7. Toast 4 hamburger buns in the same pan for 1-2 minutes until lightly golden.
8. Place a cooked patty on each bun bottom and top with sliced avocado from 1 avocado.
9. Serve immediately.
The burgers are juicy with a bright, herby kick from the cilantro and lime. The creamy avocado adds a cool contrast to the savory patty. Try serving them with a side of sweet potato fries or a crisp cabbage slaw for a complete meal.
Green Tea Infused Quinoa and Edamame Bowl
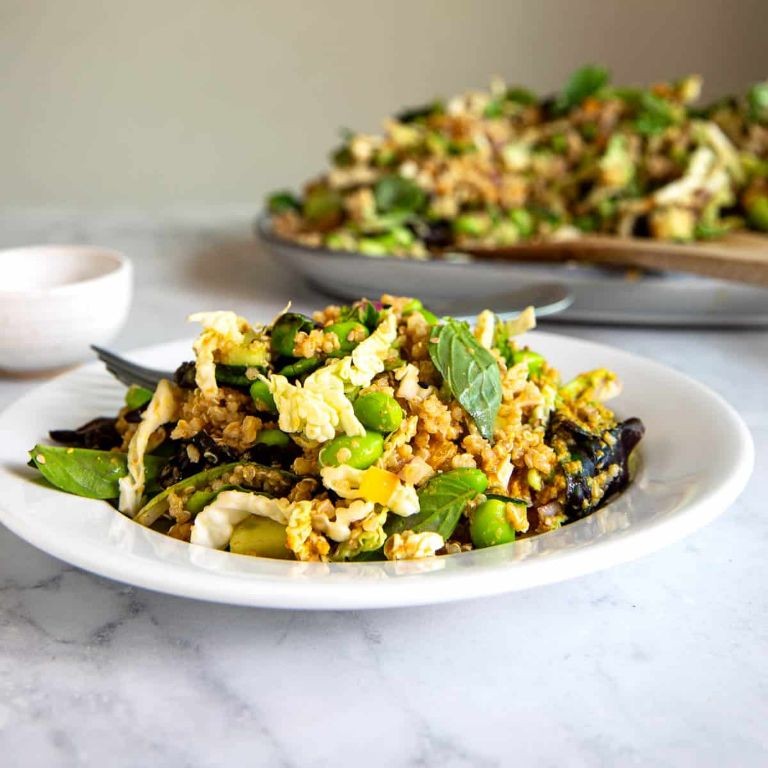
Escape the ordinary with this vibrant, nutrient-packed bowl that combines earthy quinoa with bright edamame, all infused with subtle green tea notes. It’s a quick, satisfying meal that comes together in under 30 minutes, perfect for a healthy lunch or light dinner. The green tea adds a unique aromatic depth without overpowering the fresh ingredients.
Serving: 2 | Pre Time: 5 minutes | Cooking Time: 20 minutes
Ingredients
– Quinoa – 1 cup
– Green tea bag – 1
– Water – 2 cups
– Edamame (shelled) – 1 cup
– Soy sauce – 2 tbsp
– Sesame oil – 1 tbsp
– Rice vinegar – 1 tbsp
– Green onions – 2, sliced
– Sesame seeds – 1 tsp
Instructions
1. Bring 2 cups of water to a boil in a small saucepan over high heat.
2. Remove the saucepan from heat, add the green tea bag, and steep for 3 minutes to infuse the water.
3. Remove and discard the tea bag, then return the green tea-infused water to a boil over high heat.
4. Add 1 cup of quinoa to the boiling water, reduce heat to low, cover, and simmer for 15 minutes until the quinoa is tender and water is absorbed.
5. While the quinoa cooks, heat a skillet over medium-high heat and add 1 cup of shelled edamame.
6. Toast the edamame in the dry skillet for 3–4 minutes, stirring frequently, until lightly browned and heated through.
7. In a small bowl, whisk together 2 tbsp soy sauce, 1 tbsp sesame oil, and 1 tbsp rice vinegar to make the dressing.
8. Fluff the cooked quinoa with a fork and transfer it to a large mixing bowl.
9. Add the toasted edamame to the quinoa in the mixing bowl.
10. Pour the dressing over the quinoa and edamame, and toss gently to combine evenly.
11. Fold in the sliced green onions and sprinkle with 1 tsp sesame seeds.
12. Serve immediately while warm, or chill for a cold salad option.
Perfectly balanced, this bowl offers a chewy texture from the quinoa paired with the slight crunch of edamame, all coated in a savory, tangy dressing. The green tea infusion lends a subtle, earthy undertone that complements the umami flavors. For a creative twist, top it with sliced avocado or a soft-boiled egg to add creaminess and protein.
Ginger-Turmeric Smoothie with Chia Seeds
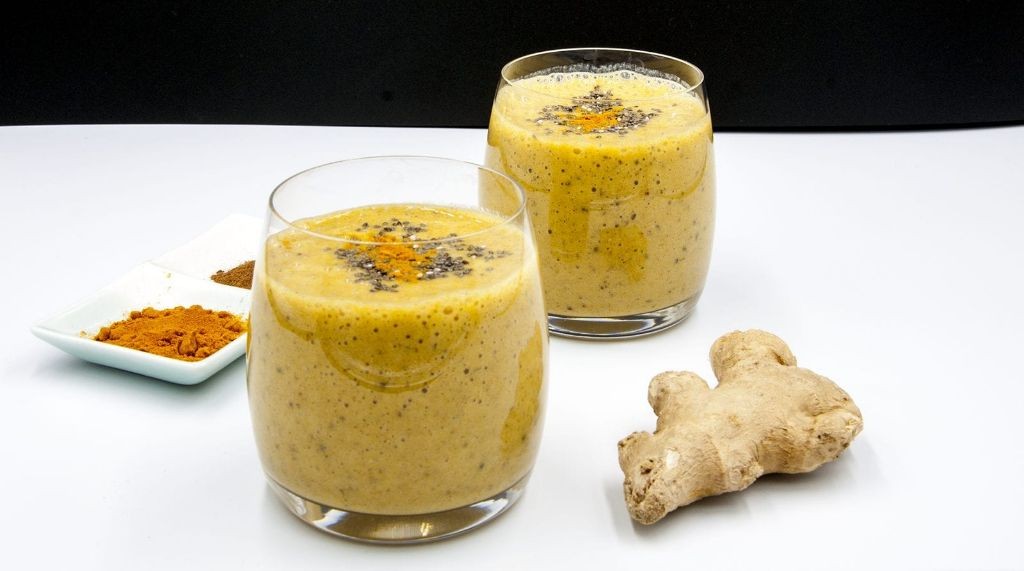
Rise and shine with a vibrant, anti-inflammatory smoothie that packs a powerful punch. Ginger and turmeric combine for a zesty kick, while chia seeds add a satisfying texture. This quick blend delivers nutrients without the fuss.
Serving: 1 | Pre Time: 5 minutes | Cooking Time: 0 minutes
Ingredients
– Frozen banana – 1
– Fresh ginger – 1 inch piece
– Fresh turmeric – ½ inch piece
– Chia seeds – 1 tbsp
– Almond milk – 1 cup
– Honey – 1 tsp
– Ice cubes – ½ cup
Instructions
1. Peel and roughly chop the frozen banana into chunks.
2. Peel the fresh ginger and fresh turmeric, then grate them finely using a microplane for maximum flavor extraction.
3. Measure 1 tbsp of chia seeds and set them aside in a small bowl.
4. Pour 1 cup of almond milk into a high-speed blender.
5. Add the banana chunks, grated ginger, grated turmeric, and ½ cup of ice cubes to the blender.
6. Blend on high speed for 45–60 seconds until the mixture is completely smooth and no chunks remain.
7. Add 1 tsp of honey to the blender and blend for an additional 10 seconds to incorporate evenly.
8. Stir in the chia seeds by hand with a spoon to prevent them from clumping, then let the smoothie sit for 2 minutes to allow the seeds to swell slightly.
9. Pour the smoothie into a tall glass immediately for serving.
Now, enjoy this creamy, golden-hued drink with a pleasant warmth from the spices. The chia seeds create a subtle gel-like texture that makes it feel indulgent. For a creative twist, top it with a sprinkle of extra chia seeds or a slice of fresh ginger as garnish.
Spicy Tofu and Veggie Stir-Fry
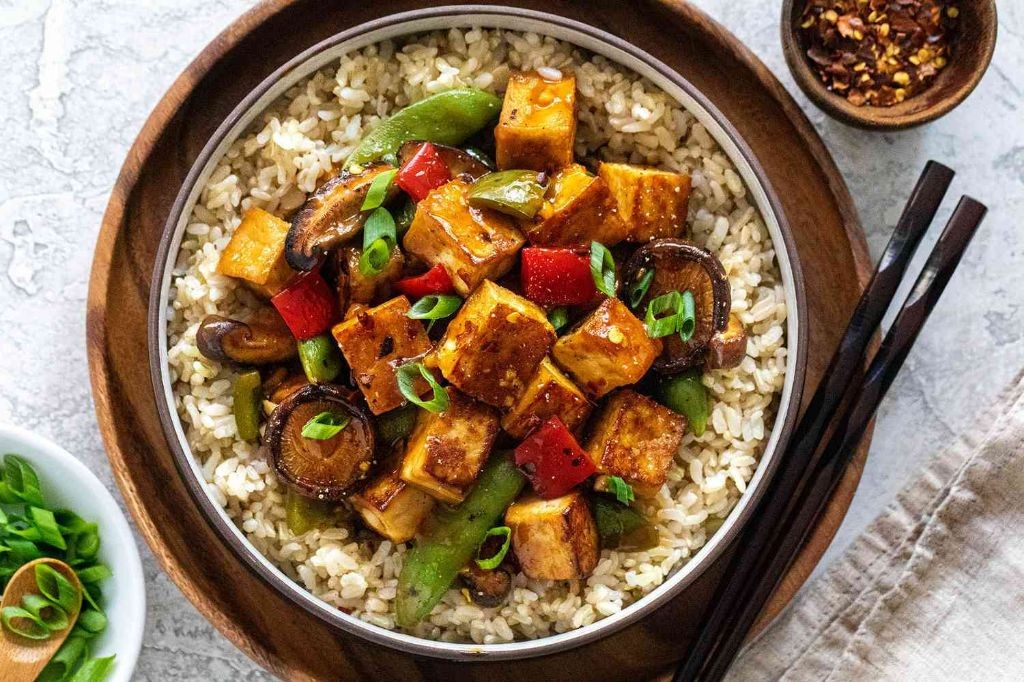
Unlock a quick, satisfying dinner with this spicy tofu and veggie stir-fry that packs bold flavor and comes together fast. Using firm tofu ensures it holds its shape while absorbing the sauce, and a hot pan gives everything a perfect sear.
Serving: 4 | Pre Time: 15 minutes | Cooking Time: 15 minutes
Ingredients
– Firm tofu – 14 oz
– Vegetable oil – 2 tbsp
– Soy sauce – 3 tbsp
– Sriracha – 2 tbsp
– Bell pepper – 1 large, sliced
– Broccoli florets – 2 cups
– Garlic – 3 cloves, minced
– Ginger – 1 tbsp, grated
– Cornstarch – 1 tbsp
– Water – ¼ cup
Instructions
1. Press the tofu between paper towels for 10 minutes to remove excess water, then cut into 1-inch cubes.
2. Heat 1 tbsp vegetable oil in a large skillet or wok over medium-high heat until shimmering.
3. Add tofu cubes in a single layer and cook for 3–4 minutes per side until golden brown and crispy.
4. Remove tofu from the skillet and set aside on a plate.
5. Add remaining 1 tbsp vegetable oil to the same skillet and heat for 30 seconds.
6. Add sliced bell pepper and broccoli florets, stirring constantly for 4–5 minutes until slightly softened but still crisp.
7. Stir in minced garlic and grated ginger, cooking for 1 minute until fragrant.
8. In a small bowl, whisk together soy sauce, sriracha, cornstarch, and water until smooth.
9. Pour the sauce mixture into the skillet with the vegetables, stirring immediately to prevent clumping.
10. Return the cooked tofu to the skillet and toss everything together for 2–3 minutes until the sauce thickens and coats all ingredients evenly.
11. Remove from heat and serve immediately.
Expect a vibrant dish with crispy tofu and tender-crisp vegetables coated in a glossy, spicy sauce. For a creative twist, serve it over quinoa or stuff it into warm tortillas with a squeeze of lime.
Roasted Brussels Sprouts with Hot Honey Glaze
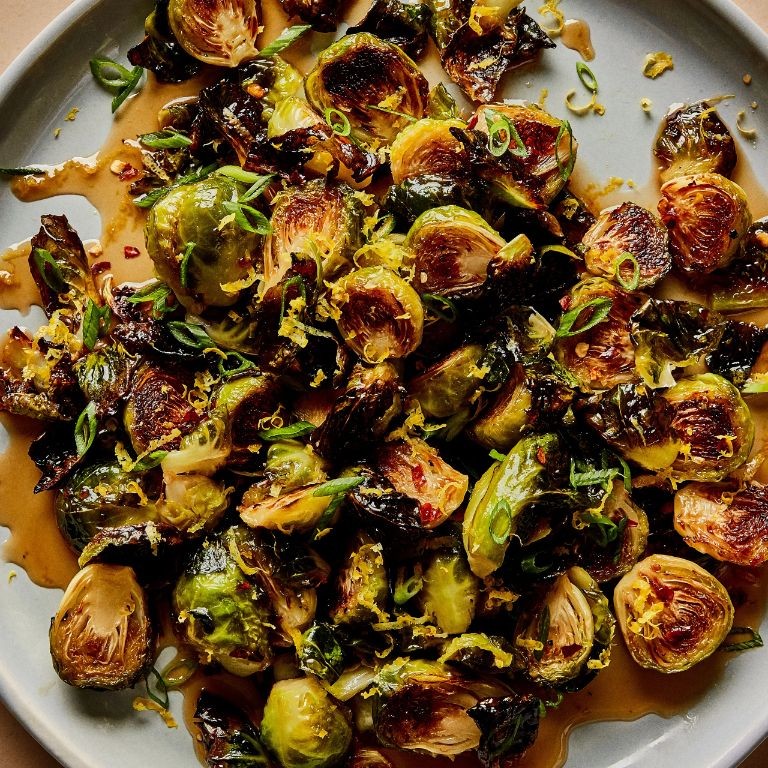
Unlock the secret to making Brussels sprouts irresistible with this simple roasted version. A hot honey glaze transforms them into a sweet, spicy, and caramelized side dish that even skeptics will love. It’s the perfect balance of flavors with minimal effort.
Serving: 4 | Pre Time: 10 minutes | Cooking Time: 25 minutes
Ingredients
– Brussels sprouts – 1 lb
– Olive oil – 2 tbsp
– Salt – ½ tsp
– Black pepper – ¼ tsp
– Honey – ¼ cup
– Hot sauce – 1 tbsp
– Apple cider vinegar – 1 tsp
Instructions
1. Preheat the oven to 425°F and line a baking sheet with parchment paper.
2. Trim the stems off the Brussels sprouts and halve them lengthwise.
3. Toss the Brussels sprouts with olive oil, salt, and black pepper in a large bowl until evenly coated.
4. Spread the Brussels sprouts in a single layer on the baking sheet, cut-side down, to maximize caramelization.
5. Roast for 20–25 minutes, flipping halfway through, until tender and deeply browned at the edges.
6. While roasting, combine honey, hot sauce, and apple cider vinegar in a small saucepan over medium heat.
7. Simmer the glaze for 2–3 minutes, stirring constantly, until it thickens slightly and becomes glossy.
8. Remove the Brussels sprouts from the oven and immediately drizzle the hot honey glaze over them, tossing to coat evenly while still hot for better adhesion.
9. Transfer the glazed Brussels sprouts to a serving dish and let them cool for 2–3 minutes before serving to allow the glaze to set.
10. Serve warm as a side dish or over grains for a hearty meal.
Perfectly caramelized edges give way to tender centers, with the glaze adding a sticky-sweet heat that lingers pleasantly. Try serving them alongside grilled chicken or tossing them into a grain bowl for a quick, flavorful upgrade.
Cayenne-Spiced Roasted Almonds
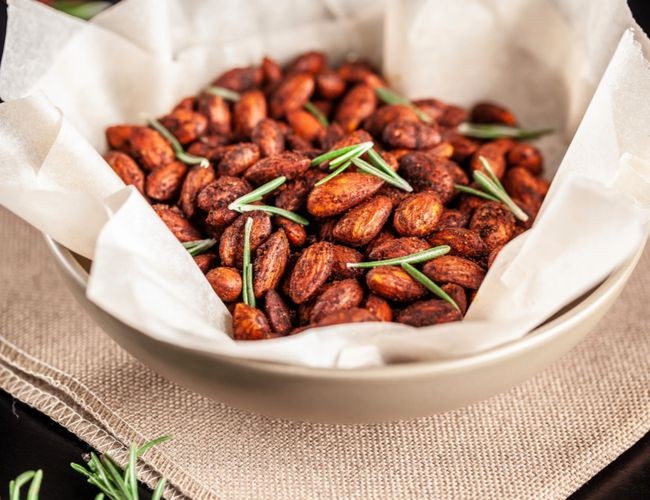
Every holiday gathering needs a snack that packs a punch. These cayenne-spiced almonds are that snack—fiery, savory, and dangerously addictive. They’re perfect for last-minute guests or a homemade gift.
Serving: 8 | Pre Time: 5 minutes | Cooking Time: 15 minutes
Ingredients
– Raw almonds – 2 cups
– Olive oil – 1 tbsp
– Cayenne pepper – ½ tsp
– Garlic powder – ½ tsp
– Salt – ½ tsp
Instructions
1. Preheat your oven to 350°F and line a baking sheet with parchment paper.
2. In a medium bowl, combine the raw almonds and olive oil, tossing until evenly coated.
3. Sprinkle the cayenne pepper, garlic powder, and salt over the almonds, then toss again to distribute the spices thoroughly.
4. Spread the almonds in a single layer on the prepared baking sheet, ensuring they don’t overlap for even roasting.
5. Roast the almonds in the preheated oven for 12–15 minutes, shaking the pan halfway through to prevent burning.
6. Remove the almonds from the oven when they are fragrant and lightly golden brown, then let them cool completely on the baking sheet to crisp up.
7. Transfer the cooled almonds to an airtight container for storage, or serve immediately.
Fresh from the oven, these almonds offer a satisfying crunch with a bold, spicy kick from the cayenne. For a creative twist, toss them into a salad for extra texture or pair with cheese on a charcuterie board. They’ll keep well for up to two weeks, making them a versatile staple.
Pineapple Jalapeño Salsa with Baked Plantains

Ditch the predictable dips and try this vibrant salsa with baked plantains. The sweet pineapple balances the jalapeño heat perfectly. It’s a crowd-pleaser that comes together quickly.
Serving: 4 | Pre Time: 15 minutes | Cooking Time: 25 minutes
Ingredients
– Fresh pineapple – 2 cups, diced
– Jalapeño – 1, seeded and minced
– Red onion – ¼ cup, finely chopped
– Lime – 1, juiced
– Cilantro – ¼ cup, chopped
– Salt – ½ tsp
– Ripe plantains – 2
– Olive oil – 1 tbsp
Instructions
1. Preheat your oven to 400°F.
2. Peel the 2 ripe plantains and slice them into ½-inch thick rounds.
3. Toss the plantain rounds with 1 tbsp of olive oil on a baking sheet.
4. Arrange the plantain rounds in a single layer on the baking sheet.
5. Bake the plantains at 400°F for 20-25 minutes, flipping them halfway through, until they are golden brown and tender.
6. While the plantains bake, dice 2 cups of fresh pineapple.
7. Mince 1 seeded jalapeño.
8. Finely chop ¼ cup of red onion.
9. Chop ¼ cup of fresh cilantro leaves.
10. Juice 1 lime to get about 2 tbsp of fresh lime juice.
11. In a medium bowl, combine the diced pineapple, minced jalapeño, chopped red onion, and chopped cilantro.
12. Pour the 2 tbsp of fresh lime juice over the pineapple mixture.
13. Sprinkle ½ tsp of salt over the mixture.
14. Gently toss all the salsa ingredients together until well combined.
15. Let the salsa sit for at least 10 minutes to allow the flavors to meld.
16. Remove the baked plantains from the oven and let them cool for 2-3 minutes.
17. Serve the warm baked plantains alongside the pineapple jalapeño salsa.
Great texture contrast comes from the soft, caramelized plantains against the chunky, juicy salsa. The flavor is a dynamic mix of sweet, spicy, and tangy. Try scooping the salsa with the plantain chips or layering them for a quick appetizer.
Wasabi Pea Crusted Tuna Steak
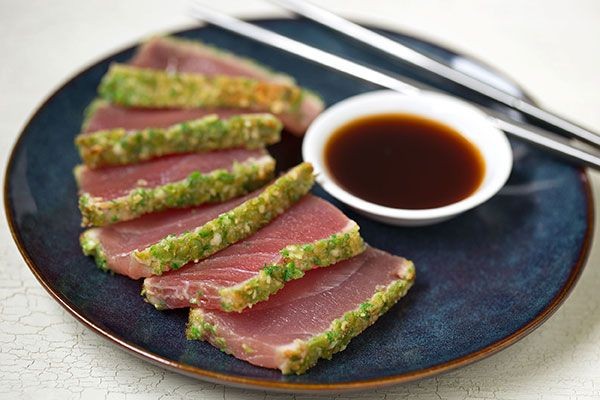
Ready for a bold, crunchy twist on tuna? This wasabi pea crusted tuna steak delivers a spicy kick and satisfying texture in minutes. It’s a restaurant-worthy dish you can make at home with minimal fuss.
Serving: 2 | Pre Time: 10 minutes | Cooking Time: 6 minutes
Ingredients
– Tuna steaks – 2 (6 oz each)
– Wasabi peas – 1 cup
– Panko breadcrumbs – ¼ cup
– Egg – 1
– Soy sauce – 1 tbsp
– Sesame oil – 1 tbsp
– Vegetable oil – 1 tbsp
– Salt – ¼ tsp
Instructions
1. Pat the 2 tuna steaks completely dry with paper towels.
2. Season both sides of the tuna steaks evenly with ¼ tsp salt.
3. Place 1 cup wasabi peas in a zip-top bag and crush them into coarse crumbs using a rolling pin.
4. Pour the crushed wasabi peas into a shallow dish and mix with ¼ cup panko breadcrumbs.
5. In a separate shallow dish, whisk 1 egg with 1 tbsp soy sauce and 1 tbsp sesame oil until fully combined.
6. Dip each tuna steak into the egg mixture, coating all sides.
7. Press each tuna steak firmly into the wasabi pea mixture, ensuring an even crust adheres to all sides.
8. Heat 1 tbsp vegetable oil in a skillet over medium-high heat until it shimmers, about 2 minutes.
9. Place the crusted tuna steaks in the skillet and sear for 2 minutes without moving them to develop a golden crust.
10. Carefully flip the tuna steaks using tongs and sear the other side for 2 minutes.
11. For medium-rare, remove the tuna steaks from the skillet immediately; for more doneness, cook an additional 1–2 minutes per side.
12. Let the tuna steaks rest on a cutting board for 3 minutes before slicing against the grain.
Keep the crust crunchy by not overcrowding the skillet. The spicy wasabi peas contrast beautifully with the rich, tender tuna inside. Serve sliced over a simple salad or with a drizzle of soy-ginger sauce for extra flavor.
Szechuan-Style Stir-Fried Green Beans
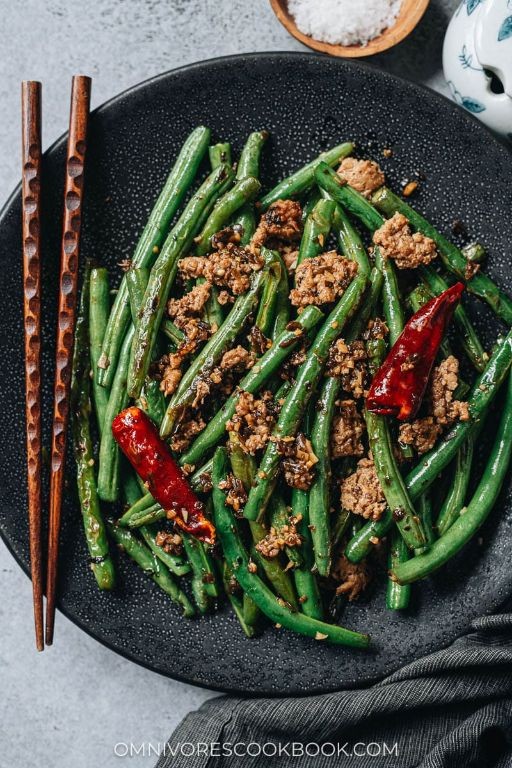
Kick off your weeknight dinner with these fiery, garlicky Szechuan-style green beans. They’re ready in under 20 minutes and pack a serious punch of flavor. This dry-fry method gives them a blistered, tender-crisp texture you’ll crave.
Serving: 4 | Pre Time: 10 minutes | Cooking Time: 8 minutes
Ingredients
– Green beans – 1 lb
– Vegetable oil – 3 tbsp
– Garlic – 4 cloves, minced
– Ginger – 1 tbsp, minced
– Soy sauce – 2 tbsp
– Rice vinegar – 1 tbsp
– Sugar – 1 tsp
– Szechuan peppercorns – 1 tsp, crushed
– Red pepper flakes – ½ tsp
Instructions
1. Trim the ends from 1 lb of green beans and pat them completely dry with paper towels. (Tip: Dry beans prevent oil splatter and help them blister.)
2. Heat 3 tbsp vegetable oil in a large skillet or wok over high heat until it shimmers, about 1 minute.
3. Add the green beans in a single layer. Cook without stirring for 2 minutes to blister one side.
4. Stir-fry the beans for 4–5 minutes total until they are tender-crisp with dark brown spots. (Tip: Listen for a sizzle—if it stops, your heat is too low.)
5. Push the beans to the side of the pan. Add 4 cloves minced garlic and 1 tbsp minced ginger to the center. Cook for 30 seconds until fragrant.
6. Stir in 2 tbsp soy sauce, 1 tbsp rice vinegar, 1 tsp sugar, 1 tsp crushed Szechuan peppercorns, and ½ tsp red pepper flakes.
7. Toss everything together for 1 minute until the sauce thickens slightly and coats the beans evenly. (Tip: Crush the Szechuan peppercorns just before using for maximum tingling aroma.)
8. Remove from heat and transfer to a serving plate immediately.
Delight in the beans’ signature blistered skin and tender interior, which soaks up the pungent garlic-ginger sauce. The Szechuan peppercorns deliver a tingling numbness that balances the heat from the pepper flakes. For a complete meal, serve them over steamed jasmine rice with a fried egg on top.


