
Planning a party and need crowd-pleasing bites? You’ve come to the right place! We’ve gathered 20 creative finger food recipes that are perfect for entertaining—from easy appetizers to impressive small plates. Whether you’re hosting a casual get-together or a festive celebration, these ideas will make your party unforgettable. Get ready to wow your guests and keep them coming back for more!
Mini Caprese Skewers with Balsamic Glaze
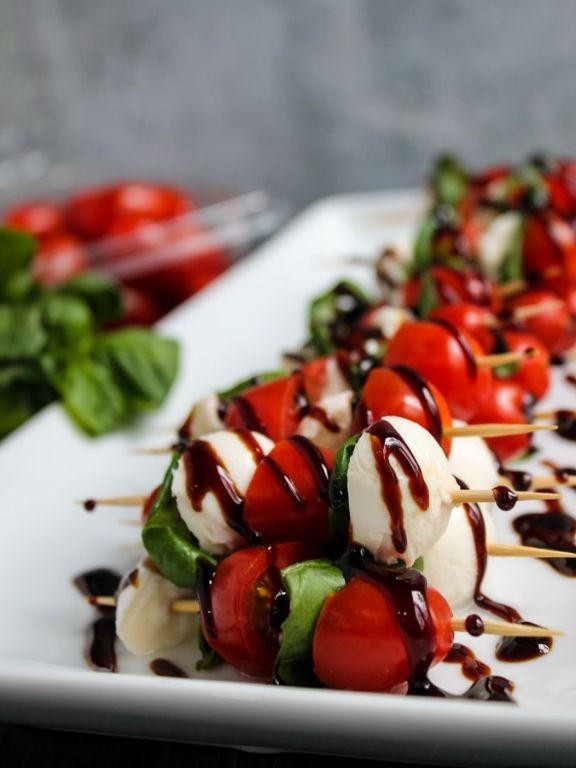
Yesterday, as I was rushing to prep for my holiday party, I realized I needed something elegant yet effortless—enter these Mini Caprese Skewers with Balsamic Glaze. They’re my go-to for impressing guests without spending hours in the kitchen, and the sweet-tangy glaze always brings back memories of my first trip to Italy, where I fell in love with simple, fresh flavors.
Serving: 12 | Pre Time: 15 minutes | Cooking Time: 5 minutes
Ingredients
– 1 pint of sweet cherry tomatoes, rinsed and patted dry
– 8 ounces of fresh mozzarella balls (ciliegine size), drained
– 1 bunch of fragrant fresh basil leaves, stems removed
– 1/2 cup of aged balsamic vinegar
– 2 tablespoons of rich honey
– 1 tablespoon of extra virgin olive oil
– 1/4 teaspoon of flaky sea salt
– 1/4 teaspoon of freshly cracked black pepper
Instructions
1. In a small saucepan over medium heat, combine the aged balsamic vinegar and rich honey, stirring gently with a wooden spoon. Tip: Use a non-reactive pan to prevent any metallic taste in the glaze.
2. Bring the mixture to a simmer, then reduce the heat to low and let it cook for 5 minutes, stirring occasionally, until it thickens to a syrup-like consistency that coats the back of a spoon. Tip: Watch closely to avoid burning—the glaze should bubble lightly, not boil vigorously.
3. Remove the saucepan from the heat and let the balsamic glaze cool completely at room temperature for about 10 minutes; it will thicken further as it cools.
4. While the glaze cools, thread one sweet cherry tomato, one fresh mozzarella ball, and one fragrant fresh basil leaf onto each of 12 small skewers, repeating until all ingredients are used.
5. Arrange the skewers on a serving platter in a single layer.
6. Drizzle the skewers evenly with the cooled balsamic glaze using a spoon or squeeze bottle.
7. Finish by drizzling with extra virgin olive oil and sprinkling with flaky sea salt and freshly cracked black pepper. Tip: Add the salt and pepper just before serving to keep the textures crisp and vibrant.
8. Serve immediately or chill in the refrigerator for up to 30 minutes to let the flavors meld.
Out of the oven? Not needed here! These skewers offer a delightful contrast: the juicy burst of tomatoes against the creamy mozzarella, all tied together with that glossy, sweet-tangy glaze. I love serving them on a rustic wooden board for a casual gathering or as a starter at dinner parties—they disappear fast, so I always make extra!
Spinach and Artichoke Stuffed Mushrooms
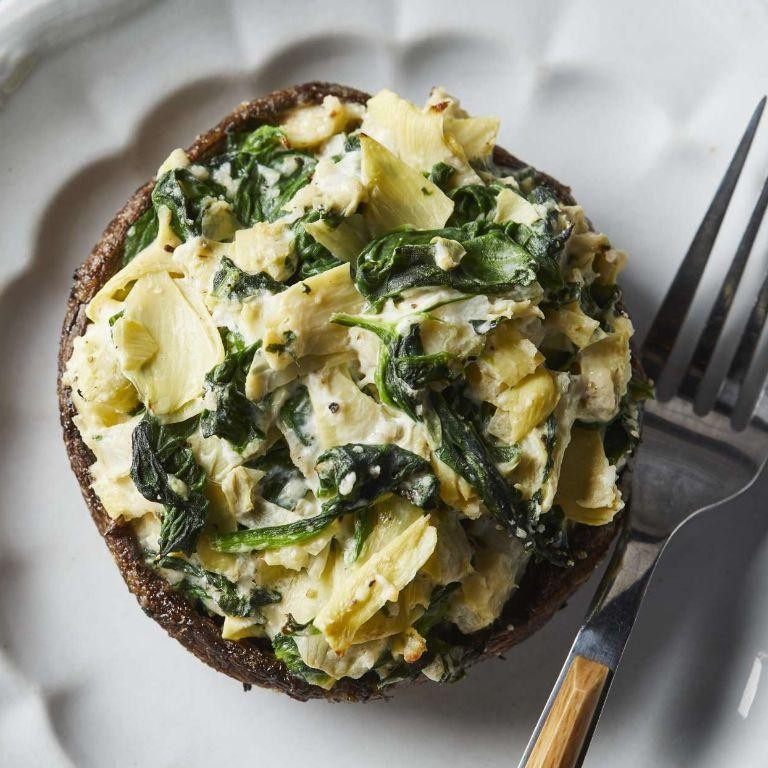
Diving into holiday appetizers always reminds me of my first potluck, where I nervously brought a store-bought dip—now I make these stuffed mushrooms to impress with minimal fuss. They’re creamy, savory, and disappear faster than you can say “seconds,” perfect for cozy gatherings or a quick weeknight treat.
Serving: 12 | Pre Time: 15 minutes | Cooking Time: 20 minutes
Ingredients
– 12 large cremini mushrooms, stems removed and caps cleaned
– 1 cup fresh baby spinach, roughly chopped
– 1/2 cup canned artichoke hearts, drained and finely chopped
– 4 oz cream cheese, softened at room temperature
– 1/4 cup grated Parmesan cheese, freshly shredded
– 1/4 cup mayonnaise, full-fat for richness
– 1 clove garlic, minced to a fine paste
– 1/4 tsp smoked paprika, for a subtle warmth
– 1/4 tsp kosher salt, for balanced seasoning
– 1/8 tsp freshly ground black pepper, finely ground
– 1 tbsp extra virgin olive oil, for drizzling
Instructions
1. Preheat your oven to 375°F (190°C) and line a baking sheet with parchment paper.
2. Place the cleaned mushroom caps on the prepared sheet, hollow side up.
3. In a medium mixing bowl, combine the softened cream cheese, mayonnaise, minced garlic, smoked paprika, kosher salt, and black pepper, stirring until smooth—this ensures no lumps in the filling.
4. Fold in the chopped baby spinach and artichoke hearts until evenly distributed throughout the mixture.
5. Spoon the filling generously into each mushroom cap, mounding it slightly for a plump appearance.
6. Sprinkle the grated Parmesan cheese evenly over the top of each stuffed mushroom.
7. Drizzle the extra virgin olive oil lightly over the mushrooms to help them brown and prevent drying.
8. Bake in the preheated oven for 18–20 minutes, until the mushrooms are tender and the tops are golden brown with bubbling edges.
9. Remove from the oven and let cool for 5 minutes on the baking sheet to set the filling—this tip prevents a messy bite.
10. Serve warm directly from the sheet for easy cleanup.
Ready to enjoy? These mushrooms offer a delightful contrast: the earthy, tender caps give way to a creamy, tangy filling with pops of artichoke and spinach. For a festive twist, garnish with a sprinkle of fresh parsley or serve alongside a zesty marinara sauce for dipping—they’re so addictive, you might want to double the batch!
Buffalo Chicken Meatballs

Mmm, there’s something about the tangy, spicy kick of buffalo sauce that just screams game day or cozy weeknight dinner to me—I’ve been whipping up these Buffalo Chicken Meatballs for years, and they never fail to disappear fast from the plate. They’re a fun twist on classic wings, perfect for sharing or piling high on a salad, and honestly, they’re way less messy to eat while you’re cheering on your team. I love making a big batch on Sundays to have ready for quick meals throughout the week; trust me, your family will thank you!
Serving: 4 | Pre Time: 15 minutes | Cooking Time: 20 minutes
Ingredients
– 1 pound of ground chicken (I prefer lean, fresh-ground chicken for a tender bite)
– 1/2 cup of panko breadcrumbs (for a light, crispy texture)
– 1 large farm-fresh egg, lightly beaten
– 1/4 cup of finely chopped celery (adds a refreshing crunch)
– 2 tablespoons of creamy blue cheese dressing (use a rich, tangy brand for depth)
– 1/2 teaspoon of garlic powder (for a warm, aromatic note)
– 1/2 teaspoon of onion powder (to enhance savory flavors)
– 1/4 teaspoon of finely ground black pepper (for a subtle heat)
– 1/4 teaspoon of sea salt (to balance the spices)
– 1 cup of buffalo sauce (I go for a medium-spicy, vinegar-forward sauce)
– 2 tablespoons of unsalted butter (melted, for a glossy, rich finish)
Instructions
1. Preheat your oven to 400°F and line a baking sheet with parchment paper to prevent sticking.
2. In a large mixing bowl, combine the ground chicken, panko breadcrumbs, beaten egg, chopped celery, blue cheese dressing, garlic powder, onion powder, black pepper, and sea salt.
3. Use your hands to gently mix everything until just combined—overmixing can make the meatballs tough, so stop as soon as it’s uniform.
4. Scoop out about 1 tablespoon of the mixture per meatball and roll it into a smooth ball between your palms, placing each one on the prepared baking sheet.
5. Bake the meatballs in the preheated oven for 18–20 minutes, or until they’re golden brown and reach an internal temperature of 165°F when checked with a meat thermometer.
6. While the meatballs bake, whisk together the buffalo sauce and melted butter in a medium bowl until smooth and well-blended.
7. Remove the meatballs from the oven and immediately toss them in the buffalo sauce mixture until evenly coated—this helps the sauce cling better while they’re still hot.
8. Return the coated meatballs to the baking sheet and bake for an additional 2–3 minutes to let the sauce set slightly.
9. Carefully transfer the meatballs to a serving platter using tongs to avoid breaking them.
Crunchy on the outside and juicy inside, these meatballs pack a punch of spicy, tangy flavor that’s mellowed by the creamy blue cheese hint. I love serving them over a bed of crisp romaine lettuce with extra dressing for a hearty salad, or skewered with toothpicks as an irresistible appetizer that always gets rave reviews at parties.
Prosciutto-Wrapped Asparagus Spears
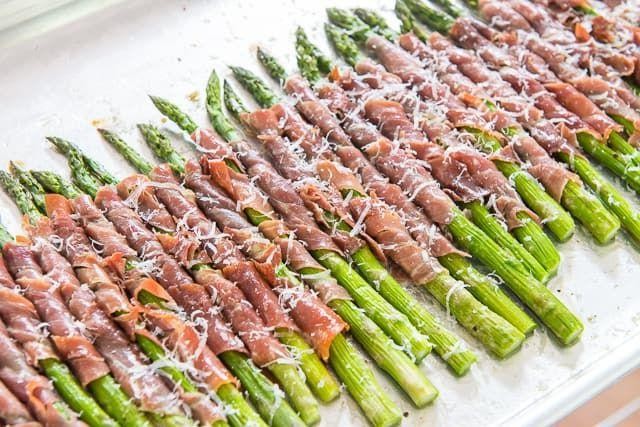
Just last week, as I was prepping for my holiday party, I realized I needed an elegant yet simple appetizer that wouldn’t keep me in the kitchen all night. These prosciutto-wrapped asparagus spears have become my go-to solution—they’re impressive looking but surprisingly easy to make, and they always disappear first from the platter.
Serving: 6 | Pre Time: 15 minutes | Cooking Time: 15 minutes
Ingredients
– 1 pound fresh, crisp asparagus spears (ends trimmed)
– 8 ounces thinly sliced, high-quality prosciutto
– 2 tablespoons rich extra virgin olive oil
– 1 tablespoon freshly squeezed lemon juice
– 1 teaspoon finely ground black pepper
– ½ teaspoon coarse sea salt
Instructions
1. Preheat your oven to 400°F and line a large baking sheet with parchment paper.
2. Rinse 1 pound of fresh, crisp asparagus spears under cold water and pat them completely dry with paper towels—this helps the prosciutto stick better.
3. Trim the tough, woody ends from the asparagus spears by snapping them off where they naturally break.
4. In a small bowl, whisk together 2 tablespoons of rich extra virgin olive oil and 1 tablespoon of freshly squeezed lemon juice until emulsified.
5. Drizzle the olive oil-lemon mixture evenly over the asparagus spears, using your hands to coat each spear thoroughly.
6. Sprinkle ½ teaspoon of coarse sea salt and 1 teaspoon of finely ground black pepper over the asparagus, rolling the spears to distribute the seasoning evenly.
7. Take one slice of thinly sliced, high-quality prosciutto and wrap it tightly around the middle of an asparagus spear, overlapping slightly—tip: if your prosciutto slices are large, you can tear them in half lengthwise for better coverage.
8. Repeat step 7 with all asparagus spears, placing each wrapped spear on the prepared baking sheet in a single layer without touching.
9. Bake at 400°F for 12-15 minutes, or until the prosciutto is crispy and the asparagus is tender when pierced with a fork—keep an eye on them after 10 minutes as oven temperatures can vary.
10. Remove from the oven and let cool on the baking sheet for 2-3 minutes before serving—this allows the prosciutto to crisp up further and makes them easier to handle.
You’ll love how the salty, crispy prosciutto contrasts with the tender, slightly sweet asparagus inside. I sometimes serve these with a quick aioli for dipping, or arrange them around a bowl of soft cheese for a stunning holiday platter.
Cheesy Bacon-Wrapped Jalapeño Poppers

Mmm, is there anything more satisfying than the perfect bite of spicy, creamy, and crispy all at once? I’ve been making these for years, and they’re always the first to disappear at game day parties—my husband swears they’re the reason we get invited! Let’s get these beauties rolling.
Serving: 12 | Pre Time: 20 minutes | Cooking Time: 25 minutes
Ingredients
– 6 large, firm jalapeño peppers
– 8 ounces of full-fat cream cheese, softened to room temperature
– 1 cup of sharp cheddar cheese, freshly shredded
– 12 slices of thin-cut bacon
– 1 tablespoon of smoky paprika
– ½ teaspoon of garlic powder
– ¼ teaspoon of fine sea salt
Instructions
1. Preheat your oven to 400°F and line a baking sheet with aluminum foil for easy cleanup.
2. Slice each jalapeño in half lengthwise and use a small spoon to scrape out all the seeds and membranes—wear gloves if you’re sensitive to spice!
3. In a medium bowl, combine the softened cream cheese, shredded cheddar, smoky paprika, garlic powder, and fine sea salt until smooth and well-blended.
4. Spoon the cheese mixture generously into each jalapeño half, mounding it slightly above the edges.
5. Wrap each stuffed jalapeño half tightly with one slice of bacon, securing the ends underneath to prevent unraveling during baking.
6. Arrange the bacon-wrapped poppers seam-side down on the prepared baking sheet, spacing them about an inch apart.
7. Bake in the preheated oven for 20–25 minutes, until the bacon is crispy and golden brown and the cheese is bubbly.
8. Let the poppers cool on the sheet for 5 minutes before serving—they’ll be molten hot straight out of the oven!
What makes these irresistible is that crackle of bacon giving way to a creamy, tangy filling with just the right kick. I love serving them with a cold beer or drizzling a bit of honey over the top for a sweet-and-spicy twist that always surprises guests.
Sweet and Spicy Honey Sriracha Chicken Wings

Sometimes the best recipes come from happy accidents in the kitchen, like the time I tried to jazz up my usual wing night and ended up with these addictive Sweet and Spicy Honey Sriracha Chicken Wings. They’re the perfect balance of sticky-sweet and fiery heat, guaranteed to be the star of any game day spread or cozy dinner.
Serving: 4 | Pre Time: 15 minutes | Cooking Time: 45 minutes
Ingredients
– 2 pounds of fresh, plump chicken wings, separated into drumettes and flats
– 1/4 cup of pure, golden honey
– 3 tablespoons of vibrant Sriracha sauce
– 2 tablespoons of rich, low-sodium soy sauce
– 2 tablespoons of unsalted butter
– 1 tablespoon of finely grated fresh ginger
– 2 cloves of aromatic garlic, minced
– 1/2 teaspoon of coarse kosher salt
– 1/2 teaspoon of finely ground black pepper
– 1 tablespoon of neutral vegetable oil
– 2 tablespoons of thinly sliced green onions for garnish
Instructions
1. Preheat your oven to 400°F and line a large, rimmed baking sheet with aluminum foil for easy cleanup.
2. Pat the fresh chicken wings completely dry with paper towels—this helps them crisp up beautifully.
3. In a large bowl, toss the dried wings with the vegetable oil, coarse kosher salt, and finely ground black pepper until evenly coated.
4. Arrange the wings in a single layer on the prepared baking sheet, ensuring they aren’t touching.
5. Bake the wings at 400°F for 40-45 minutes, flipping them halfway through, until the skin is golden brown and crispy.
6. While the wings bake, combine the pure honey, vibrant Sriracha, rich soy sauce, unsalted butter, finely grated ginger, and minced garlic in a small saucepan over medium heat.
7. Whisk the sauce constantly for 3-4 minutes until it’s smooth, slightly thickened, and bubbling gently—don’t let it boil vigorously to avoid burning the honey.
8. Once the wings are done baking, transfer them to a clean, large bowl.
9. Pour the warm honey-Sriracha sauce over the hot wings and toss vigorously until every wing is generously and evenly coated.
10. Transfer the sauced wings to a serving platter and immediately sprinkle with the thinly sliced green onions for a fresh, colorful finish.
Let these wings rest for just a minute so the sauce can cling perfectly, creating a glossy, sticky exterior that gives way to tender, juicy meat inside. I love serving them with extra napkins and a cool, creamy blue cheese dip to tame the heat, making each bite an irresistible mix of sweet, spicy, and savory.
Crispy Coconut Shrimp with Mango Dipping Sauce

Sometimes the best recipes come from happy accidents in the kitchen, like the time I tried to recreate a tropical vacation memory with whatever I had on hand. This crispy coconut shrimp with its sweet-tangy mango dipping sauce has become my go-to appetizer for summer gatherings—it’s surprisingly simple to make but always feels like a special treat.
Serving: 4 | Pre Time: 20 minutes | Cooking Time: 10 minutes
Ingredients
– 1 pound large wild-caught shrimp, peeled and deveined with tails on
– ½ cup all-purpose flour
– 2 farm-fresh large eggs, lightly beaten
– 1 cup panko breadcrumbs
– 1 cup sweetened shredded coconut
– ½ teaspoon finely ground sea salt
– ¼ teaspoon freshly cracked black pepper
– 2 cups vegetable oil for frying
– 1 ripe mango, peeled and diced
– ¼ cup plain Greek yogurt
– 1 tablespoon fresh lime juice
– 1 teaspoon raw honey
– 1 small jalapeño, seeded and minced
Instructions
1. Pat the shrimp completely dry with paper towels to ensure maximum crispiness.
2. Set up three shallow bowls: place flour in the first, beaten eggs in the second, and combine panko, shredded coconut, salt, and pepper in the third.
3. Dredge each shrimp in flour, shaking off any excess.
4. Dip the floured shrimp into the beaten eggs, letting any extra drip off.
5. Press the shrimp firmly into the coconut-panko mixture, coating evenly on all sides.
6. Place breaded shrimp on a parchment-lined baking sheet in a single layer.
7. Heat vegetable oil in a deep skillet to 350°F, using a thermometer for accuracy.
8. Fry shrimp in batches for 2–3 minutes per side until golden brown and crispy.
9. Transfer cooked shrimp to a wire rack set over paper towels to drain.
10. For the sauce, blend mango, Greek yogurt, lime juice, honey, and jalapeño in a food processor until smooth.
11. Chill the sauce in the refrigerator for 10 minutes to let flavors meld.
12. Serve shrimp immediately with the mango dipping sauce on the side.
Crunchy on the outside with juicy shrimp inside, the coconut adds a subtle sweetness that pairs perfectly with the bright, spicy mango sauce. I love serving these on a platter with extra lime wedges for squeezing, and they’re fantastic alongside a simple cabbage slaw for a complete meal.
Mini Crab Cakes with Lemon Aioli

Nothing says holiday entertaining quite like these elegant yet approachable Mini Crab Cakes with Lemon Aioli. I first fell in love with them at a cozy coastal restaurant years ago, and after countless attempts, I’ve perfected a version that’s become my go-to for festive gatherings. They’re surprisingly simple to make, and the bright, creamy aioli is the perfect zesty counterpoint to the sweet, delicate crab.
Serving: 4 | Pre Time: 20 minutes | Cooking Time: 10 minutes
Ingredients
– 1 pound fresh jumbo lump crabmeat, carefully picked over for shells
– 1/3 cup panko breadcrumbs, for a light, crispy texture
– 1/4 cup finely chopped fresh parsley
– 2 tablespoons finely chopped fresh chives
– 1 large farm-fresh egg, lightly beaten
– 2 tablespoons high-quality mayonnaise
– 1 tablespoon Dijon mustard with a sharp, tangy kick
– 1 teaspoon Old Bay seasoning
– 1/2 teaspoon finely ground black pepper
– 1/4 teaspoon kosher salt
– 1/2 cup all-purpose flour, for dredging
– 3 tablespoons rich extra virgin olive oil, for pan-frying
– 1/2 cup high-quality mayonnaise, for the aioli
– 1 tablespoon freshly squeezed lemon juice, from a bright, juicy lemon
– 1 teaspoon finely grated lemon zest
– 1 small garlic clove, finely minced to a paste
Instructions
1. In a large mixing bowl, gently combine the fresh jumbo lump crabmeat, panko breadcrumbs, chopped fresh parsley, and chopped fresh chives, being careful not to break up the crab lumps.
2. In a small bowl, whisk together the lightly beaten farm-fresh egg, 2 tablespoons of high-quality mayonnaise, the tangy Dijon mustard, Old Bay seasoning, finely ground black pepper, and kosher salt until smooth. Tip: Mix the wet ingredients separately first to ensure even seasoning throughout the cakes.
3. Pour the wet mixture over the crab mixture and fold gently with a spatula until just combined.
4. Using your hands, form the mixture into 12 small patties, about 1 1/2 inches in diameter and 3/4-inch thick. Place them on a parchment-lined baking sheet.
5. Place the all-purpose flour in a shallow dish. Lightly dredge each crab cake in the flour, shaking off any excess, and return them to the baking sheet. Tip: A light flour coating helps create a beautifully golden, crisp exterior when frying.
6. Heat the rich extra virgin olive oil in a large non-stick skillet over medium heat until it shimmers, about 350°F.
7. Carefully place the crab cakes in the hot oil, working in batches to avoid overcrowding. Cook for 3-4 minutes per side, or until deeply golden brown and crispy. Tip: Resist the urge to move them too soon; letting them sear undisturbed ensures a perfect crust.
8. Transfer the cooked crab cakes to a paper towel-lined plate to drain any excess oil.
9. While the crab cakes cook, make the lemon aioli: in a small bowl, whisk together the remaining 1/2 cup of high-quality mayonnaise, the freshly squeezed lemon juice, finely grated lemon zest, and finely minced garlic clove until completely smooth.
10. Serve the warm mini crab cakes immediately with the lemon aioli on the side for dipping.
Delightfully crisp on the outside and tender, flaky, and packed with sweet crab flavor on the inside, these little bites are pure joy. The lemon aioli adds a creamy, garlicky brightness that cuts through the richness perfectly. For a stunning presentation, arrange them on a platter with lemon wedges and extra fresh herbs, or serve them atop a simple arugula salad for a light, complete appetizer.
Puff Pastry Brie Bites with Cranberry Sauce

Vividly festive and effortlessly elegant, these puff pastry brie bites with cranberry sauce are my go-to holiday appetizer that always steals the show. I love how they look like little edible gifts, and they come together so quickly that I can actually enjoy my own party. Honestly, I’ve been known to sneak a few straight from the baking sheet before guests arrive—they’re that irresistible.
Serving: 24 bites | Pre Time: 15 minutes | Cooking Time: 15 minutes
Ingredients
– 1 sheet of frozen puff pastry, thawed but still cold
– 8 ounces of creamy, triple-cream brie cheese, rind removed
– 1/2 cup of vibrant, homemade cranberry sauce (or high-quality store-bought)
– 1 large egg, farm-fresh and at room temperature
– 1 tablespoon of whole milk or heavy cream
– 1 tablespoon of coarse, sparkling sugar for garnish
– All-purpose flour, for dusting the work surface
Instructions
1. Preheat your oven to 400°F (200°C) and line a large baking sheet with parchment paper.
2. Lightly dust a clean work surface with all-purpose flour and unfold the thawed puff pastry sheet onto it.
3. Using a sharp knife or pizza cutter, cut the puff pastry sheet into 24 equal squares, each about 2 inches wide. (Tip: Keep the pastry cold for the flakiest results—if it gets too soft, pop it in the fridge for 5 minutes.)
4. Place half of the puff pastry squares onto the prepared baking sheet, spacing them about 1 inch apart.
5. Cut the creamy brie cheese into 24 small cubes, roughly 1/2-inch each, and place one cube in the center of each pastry square on the baking sheet.
6. Spoon about 1 teaspoon of the vibrant cranberry sauce directly on top of each brie cube.
7. In a small bowl, whisk together the farm-fresh egg and whole milk to create an egg wash.
8. Lightly brush the edges of each pastry square with the egg wash using a pastry brush.
9. Place the remaining puff pastry squares over the filled ones, gently pressing the edges with your fingers to seal.
10. Use a fork to crimp the edges firmly all around, ensuring a tight seal to prevent leaking. (Tip: Don’t overfill with cranberry sauce, or it might bubble out during baking.)
11. Brush the tops of each pastry bite with the remaining egg wash and sprinkle with coarse sugar for a sweet, glittery finish.
12. Bake in the preheated oven for 12-15 minutes, or until the pastries are puffed and golden brown. (Tip: Rotate the baking sheet halfway through for even browning.)
13. Remove from the oven and let cool on the baking sheet for 5 minutes before serving.
Just out of the oven, these bites offer a delightful contrast: the flaky, buttery pastry shatters to reveal the molten, creamy brie and tangy-sweet cranberry center. I love serving them warm on a rustic wooden board, garnished with fresh rosemary sprigs for a festive touch—they disappear in minutes, so I always make a double batch!
Teriyaki Glazed Meatball Skewers
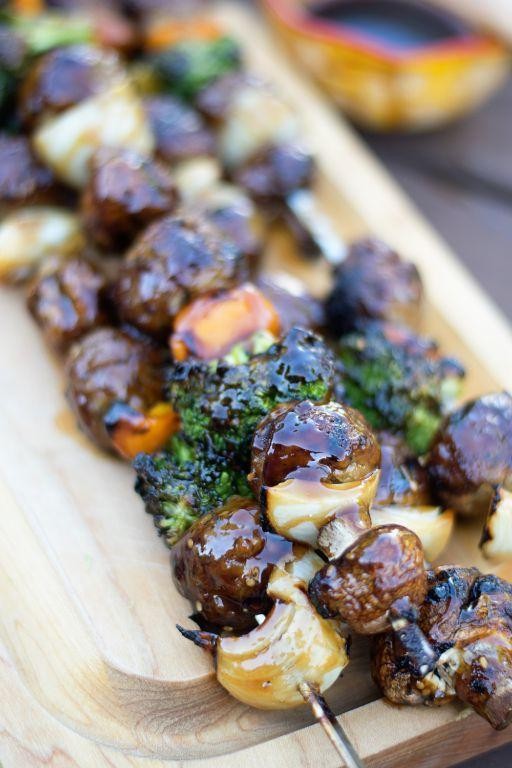
A few years ago, I stumbled upon the magic of teriyaki-glazed meatballs at a bustling street fair in Seattle, and I’ve been hooked ever since—these skewers are my go-to for effortless entertaining, blending sweet, savory, and smoky flavors in every bite. I love how they come together quickly, letting me focus on chatting with guests instead of slaving over the stove, and they always disappear from the platter in minutes, a sure sign of a crowd-pleaser.
Serving: 4 | Pre Time: 15 minutes | Cooking Time: 20 minutes
Ingredients
– 1 pound of ground pork with a rich, fatty marbling
– 1 large farm-fresh egg, lightly beaten
– 1/2 cup of panko breadcrumbs for a crispy, airy texture
– 2 tablespoons of finely grated fresh ginger, releasing a zesty aroma
– 2 cloves of garlic, minced to a fragrant paste
– 1/4 cup of low-sodium soy sauce for balanced saltiness
– 1/4 cup of mirin, a sweet Japanese rice wine
– 2 tablespoons of honey for a glossy, caramelized glaze
– 1 tablespoon of toasted sesame oil with a nutty depth
– 1 tablespoon of vegetable oil for high-heat searing
– 2 thinly sliced green onions for a fresh, crisp garnish
– 1 teaspoon of toasted sesame seeds for a crunchy finish
Instructions
1. In a large mixing bowl, combine the ground pork, beaten farm-fresh egg, panko breadcrumbs, grated fresh ginger, and minced garlic cloves, mixing gently with your hands until just incorporated to avoid tough meatballs.
2. Shape the mixture into 16 evenly sized meatballs, about 1 inch in diameter, and thread 4 meatballs onto each of 4 pre-soaked wooden skewers to prevent burning.
3. Heat the vegetable oil in a large skillet over medium-high heat until it shimmers, about 2 minutes, then add the skewers in a single layer without crowding.
4. Sear the meatballs for 3–4 minutes per side, turning with tongs, until they develop a golden-brown crust and register 165°F internally on an instant-read thermometer.
5. While the meatballs cook, whisk together the low-sodium soy sauce, mirin, honey, and toasted sesame oil in a small saucepan over medium heat.
6. Bring the sauce to a gentle simmer, stirring constantly, and let it reduce for 5–7 minutes until it thickens to a syrupy consistency that coats the back of a spoon.
7. Brush the reduced teriyaki glaze generously over the cooked meatball skewers, using a pastry brush for even coverage, and let them rest for 2 minutes to absorb the flavors.
8. Garnish the skewers with thinly sliced green onions and a sprinkle of toasted sesame seeds just before serving.
Glazed to perfection, these skewers boast a sticky-sweet exterior that gives way to juicy, tender meatballs with a hint of ginger warmth. I love serving them over a bed of fluffy jasmine rice to soak up any extra sauce, or pairing them with a crisp cucumber salad for a refreshing contrast—they’re versatile enough for weeknight dinners or festive gatherings, always leaving everyone asking for the recipe.
Loaded Potato Skin Bites with Sour Cream

Back when I was hosting my first holiday party, I wanted something that felt festive but wouldn’t keep me in the kitchen all night—that’s when I discovered the magic of these loaded potato skin bites. They’re the perfect little crowd-pleaser, crispy on the outside, fluffy and cheesy on the inside, and always the first thing to disappear from the platter.
Serving: 24 bites | Pre Time: 20 minutes | Cooking Time: 45 minutes
Ingredients
– 3 large russet potatoes, scrubbed clean with firm skins
– 2 tablespoons rich extra virgin olive oil
– 1 teaspoon coarse kosher salt
– 1/2 teaspoon freshly ground black pepper
– 1 cup sharp cheddar cheese, freshly shredded from a block
– 6 slices thick-cut bacon, cooked until crisp and crumbled
– 2 green onions, thinly sliced with vibrant green tops
– 1/2 cup full-fat sour cream, chilled
– Fresh chives, finely chopped for garnish
Instructions
1. Preheat your oven to 400°F (200°C) and line a large baking sheet with parchment paper.
2. Pierce each russet potato several times with a fork to allow steam to escape during baking.
3. Rub the potatoes all over with 1 tablespoon of rich extra virgin olive oil, then sprinkle evenly with 1/2 teaspoon of coarse kosher salt.
4. Place the potatoes directly on the oven rack and bake for 45 minutes, or until the skins are crisp and a knife inserts easily into the center.
5. Remove the potatoes from the oven and let them cool on a wire rack for 10 minutes—this makes them easier to handle without burning your fingers.
6. Slice each potato in half lengthwise, then use a spoon to carefully scoop out most of the fluffy interior, leaving about 1/4-inch of potato attached to the skin to maintain structure.
7. Cut each potato half into 4 even wedges to create bite-sized pieces.
8. Arrange the potato wedges skin-side down on the prepared baking sheet and brush the tops lightly with the remaining 1 tablespoon of rich extra virgin olive oil.
9. Season the wedges evenly with the remaining 1/2 teaspoon of coarse kosher salt and 1/2 teaspoon of freshly ground black pepper.
10. Return the baking sheet to the oven and bake at 400°F for 15 minutes, until the edges are golden and crispy.
11. Remove the baking sheet from the oven and evenly top each wedge with freshly shredded sharp cheddar cheese and crumbled crisp bacon.
12. Bake for an additional 5 minutes at 400°F, just until the cheese is fully melted and bubbly.
13. Transfer the bites to a serving platter and immediately top each with a small dollop of chilled full-fat sour cream.
14. Garnish generously with thinly sliced vibrant green onions and finely chopped fresh chives.
15. Serve warm right away for the best texture and flavor.
Out of the oven, these bites offer a fantastic contrast: the potato skin becomes shatteringly crisp, while the interior stays tender against the gooey, melted cheese. I love how the cool, tangy sour cream cuts through the richness of the bacon and cheddar, making each bite perfectly balanced. For a fun twist, try serving them with a side of spicy ranch or stacking them on a board with other appetizers for a festive snack spread.
Garlic Parmesan Zucchini Fries

Remember those summer evenings when your garden overflows with zucchini, and you’re scrambling for new ways to enjoy them? I’ve been there—my countertops piled high with glossy green squash, inspiring me to create a crispy, savory snack that’s become a family favorite. These Garlic Parmesan Zucchini Fries are my go-to for turning humble veggies into a crave-worthy treat that even picky eaters devour.
Serving: 4 | Pre Time: 15 minutes | Cooking Time: 20 minutes
Ingredients
– 4 medium-sized firm zucchini, washed and trimmed
– 1 cup all-purpose flour, sifted for lightness
– 2 large farm-fresh eggs, lightly beaten
– 1 cup seasoned Italian breadcrumbs, finely ground
– 1/2 cup freshly grated Parmesan cheese, with a sharp, nutty aroma
– 3 cloves garlic, minced to a fragrant paste
– 1/2 teaspoon kosher salt, for balanced seasoning
– 1/4 teaspoon freshly ground black pepper, with a warm, pungent kick
– 1/4 cup rich extra virgin olive oil, for drizzling
– 1/2 cup creamy marinara sauce, warmed for dipping
Instructions
1. Preheat your oven to 425°F and line a large baking sheet with parchment paper.
2. Cut each zucchini into 1/2-inch thick fry-shaped sticks, patting them completely dry with paper towels to ensure crispiness—this prevents sogginess.
3. In a shallow bowl, combine the sifted all-purpose flour, kosher salt, and freshly ground black pepper.
4. In a second shallow bowl, whisk the lightly beaten farm-fresh eggs until smooth.
5. In a third shallow bowl, mix the finely ground seasoned Italian breadcrumbs, freshly grated Parmesan cheese, and minced garlic paste thoroughly.
6. Dredge each zucchini stick first in the flour mixture, shaking off any excess.
7. Dip the floured zucchini into the beaten eggs, coating it evenly.
8. Roll the zucchini in the breadcrumb-Parmesan mixture, pressing gently to adhere a thick, even layer—this creates a golden crust.
9. Arrange the coated zucchini fries in a single layer on the prepared baking sheet, leaving space between them for air circulation.
10. Drizzle the rich extra virgin olive oil evenly over the fries.
11. Bake at 425°F for 18–20 minutes, flipping halfway through, until the fries are deeply golden brown and crispy to the touch.
12. Serve immediately with the warmed creamy marinara sauce for dipping.
As you bite into these fries, you’ll love the contrast of the crunchy, garlicky coating against the tender, slightly sweet zucchini inside. Try piling them high on a platter with a sprinkle of extra Parmesan and fresh herbs for a party appetizer, or pair them with a cool ranch dip for a fun twist on game day snacks.
Mini Beef Sliders with Caramelized Onions
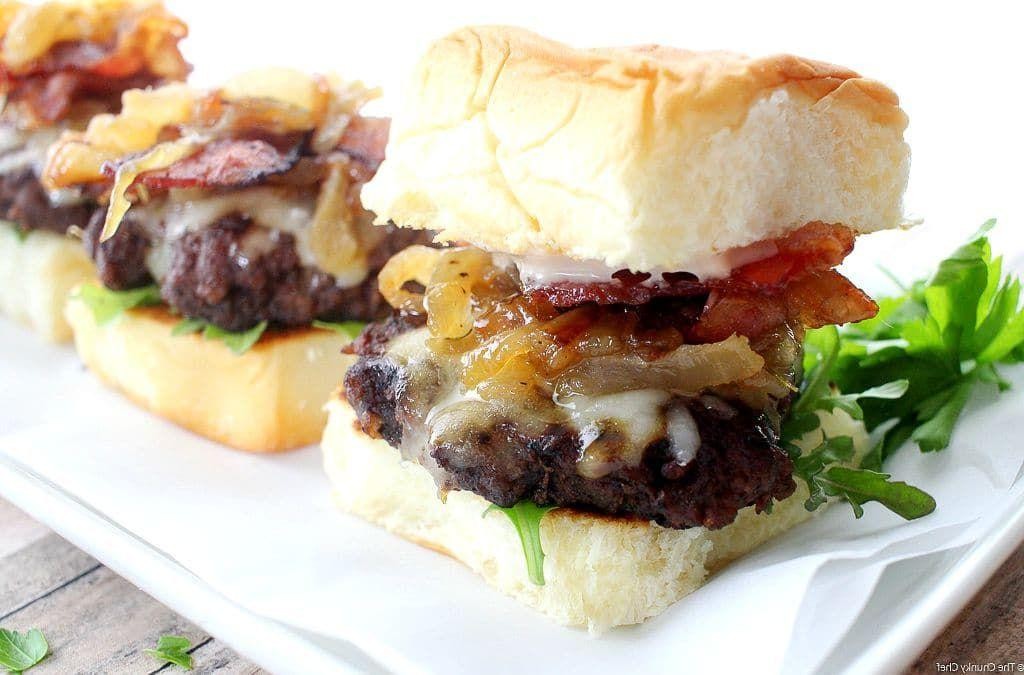
There’s something about bite-sized food that just makes a gathering feel more festive, and these mini beef sliders with caramelized onions have become my go‑at for holiday parties and game‑day spreads. I love how the sweet, jammy onions melt into the juicy patties—it’s a little trick I picked up from my uncle, who always insisted onions make everything better. Trust me, once you try these, you’ll be making them all season long.
Serving: 12 sliders | Pre Time: 20 minutes | Cooking Time: 25 minutes
Ingredients
– 1 lb 80/20 ground beef chuck
– 2 large yellow onions, thinly sliced
– 2 tbsp unsalted butter
– 1 tbsp extra virgin olive oil
– 1 tsp Worcestershire sauce
– 1 tsp Dijon mustard
– ½ tsp garlic powder
– ½ tsp kosher salt
– ¼ tsp freshly ground black pepper
– 12 mini slider buns
– 6 slices sharp cheddar cheese, cut in half
Instructions
1. In a large skillet over medium‑low heat, melt 1 tbsp unsalted butter with 1 tbsp extra virgin olive oil.
2. Add 2 large thinly sliced yellow onions and cook, stirring occasionally, for 20–25 minutes until deeply golden and caramelized. (Tip: Don’t rush this—low and slow is key for sweet, tender onions.)
3. While onions cook, combine 1 lb 80/20 ground beef chuck, 1 tsp Worcestershire sauce, 1 tsp Dijon mustard, ½ tsp garlic powder, ½ tsp kosher salt, and ¼ tsp freshly ground black pepper in a bowl; mix gently with your hands until just combined.
4. Divide the mixture into 12 equal portions and shape into ½‑inch‑thick patties slightly wider than the buns. (Tip: Press a shallow dimple in the center of each patty to prevent puffing during cooking.)
5. Heat a grill or skillet over medium‑high heat and cook patties for 3–4 minutes per side until internal temperature reaches 160°F.
6. Place a half‑slice of sharp cheddar cheese on each patty during the last minute of cooking to melt.
7. Toast 12 mini slider buns lightly in the oven or on the grill for 1–2 minutes until warm and crisp.
8. Assemble sliders by placing a cheesy patty on each bun bottom, topping with a generous spoonful of caramelized onions, and adding the bun top. (Tip: If making ahead, keep components separate and assemble just before serving to avoid soggy buns.)
Soft, warm buns give way to juicy, well‑seasoned beef and a blanket of melted cheddar, while the onions add a sweet, savory depth that ties it all together. Serve them stacked on a platter with pickles and spicy mustard for dipping, or pack them up for a picnic—they’re just as good at room temperature.
Smoked Salmon Cucumber Bites with Dill Cream Cheese

Every holiday season, I find myself scrambling for a last-minute appetizer that feels festive but doesn’t require hours in the kitchen—these smoked salmon cucumber bites are my go-to lifesaver. They’re the perfect blend of elegant and easy, and I love how the cool cucumber plays off the rich salmon.
Serving: 24 bites | Pre Time: 20 minutes | Cooking Time: 0 minutes
Ingredients
- 2 large, crisp English cucumbers
- 8 ounces of high-quality cold-smoked salmon, thinly sliced
- 8 ounces of full-fat cream cheese, softened at room temperature
- 2 tablespoons of fresh dill, finely chopped
- 1 tablespoon of fresh lemon juice, freshly squeezed
- 1/2 teaspoon of finely ground black pepper
- 1/4 teaspoon of flaky sea salt
Instructions
- Place the softened cream cheese in a medium mixing bowl.
- Add the finely chopped fresh dill, freshly squeezed lemon juice, finely ground black pepper, and flaky sea salt to the bowl. Tip: Letting the cream cheese soften for 30 minutes at room temperature makes it much easier to mix smoothly without lumps.
- Using a hand mixer or a sturdy whisk, beat the mixture on medium speed for about 1-2 minutes until it is completely smooth, light, and all ingredients are fully incorporated.
- Wash the two large English cucumbers thoroughly under cold running water and pat them completely dry with a clean kitchen towel.
- Using a sharp knife, slice each cucumber into approximately 1/4-inch thick rounds, aiming for about 24 uniform pieces. Tip: For stability, slice a tiny piece off the bottom of each round so it sits flat on your serving platter without wobbling.
- Lay out all the cucumber rounds on your work surface or a large tray.
- Using a small spoon or a piping bag fitted with a star tip, place about 1 teaspoon of the dill cream cheese mixture onto the center of each cucumber round.
- Gently separate the thinly sliced cold-smoked salmon into small, bite-sized pieces.
- Carefully drape or place one piece of smoked salmon over the cream cheese on each cucumber bite. Tip: If the salmon is very delicate, use the back of a spoon to gently press it into the cream cheese so it adheres nicely.
- Arrange all the finished bites on a clean serving platter.
You’ll love the fantastic contrast between the cool, crisp cucumber and the creamy, herby cheese, all topped with that signature smoky salmon flavor. They’re perfect passed around on a tray or arranged beautifully as the centerpiece of your appetizer spread.
Cheesy Pull-Apart Garlic Bread
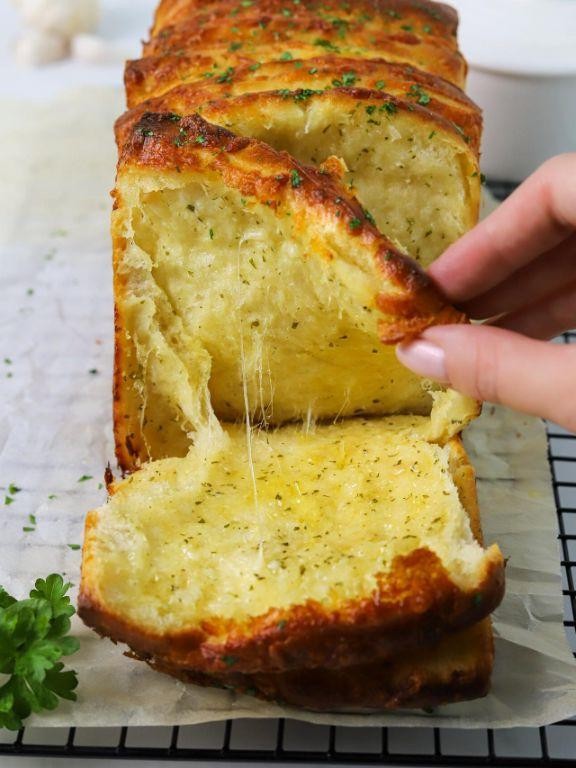
Whenever I’m hosting a holiday gathering or just craving the ultimate comfort food, this cheesy pull-apart garlic bread is my go-to showstopper. I love how the golden, buttery layers pull apart effortlessly, filling the kitchen with that irresistible garlic aroma that always brings everyone running. It’s the kind of recipe that feels indulgent yet approachable—perfect for sharing stories over while it bakes.
Serving: 6 | Pre Time: 20 minutes | Cooking Time: 25 minutes
Ingredients
– 1 large loaf of crusty artisan sourdough bread
– ½ cup of rich unsalted butter, softened
– 4 cloves of fresh garlic, finely minced
– 2 tablespoons of finely chopped fresh parsley
– 1 teaspoon of kosher salt
– ½ teaspoon of freshly ground black pepper
– 1 ½ cups of shredded sharp cheddar cheese
– ½ cup of shredded mozzarella cheese
Instructions
1. Preheat your oven to 375°F and line a baking sheet with parchment paper.
2. Slice the crusty artisan sourdough bread into 1-inch thick slices, cutting almost to the bottom but leaving the base intact to form a pull-apart loaf.
3. In a small bowl, combine the softened unsalted butter, finely minced fresh garlic, finely chopped fresh parsley, kosher salt, and freshly ground black pepper until smooth.
4. Generously spread the garlic butter mixture between every slice of the sourdough bread, using a butter knife to ensure even coverage.
5. Tip: For extra flavor, let the buttered bread sit for 5 minutes to allow the garlic to infuse.
6. Evenly sprinkle the shredded sharp cheddar cheese and shredded mozzarella cheese into the crevices between the bread slices.
7. Wrap the entire loaf loosely in aluminum foil, sealing the edges to trap steam.
8. Bake the wrapped loaf on the prepared baking sheet in the preheated oven for 15 minutes.
9. Remove the foil and continue baking for an additional 10 minutes, or until the cheese is fully melted and bubbly and the bread edges turn golden brown.
10. Tip: Check for doneness by ensuring the internal temperature reaches 165°F with an instant-read thermometer.
11. Let the bread cool on the baking sheet for 5 minutes before serving to allow the cheese to set slightly.
12. Tip: For a crispier top, broil for 1-2 minutes at the end, watching closely to prevent burning.
Buttery and aromatic, this bread emerges with a satisfying crunch on the outside and a soft, gooey center that oozes with melted cheese. I love serving it alongside a hearty soup or as a festive appetizer—it’s always the first dish to disappear at any gathering!
Chicken Satay Skewers with Peanut Sauce

Perfect for a summer barbecue or a cozy indoor gathering, these Chicken Satay Skewers with Peanut Sauce are a crowd-pleaser I’ve been making for years. I first fell in love with them at a street food market, and after countless trials, I’ve perfected this simple, flavorful version that always reminds me of those vibrant flavors. Let’s get those skewers soaking and the grill fired up!
Serving: 4 | Pre Time: 30 minutes | Cooking Time: 10 minutes
Ingredients
– 1.5 pounds of boneless, skinless chicken breasts, cut into 1-inch strips
– 1/4 cup of creamy, all-natural peanut butter
– 1/4 cup of rich, full-fat coconut milk
– 2 tablespoons of fresh-squeezed lime juice
– 2 tablespoons of fragrant, low-sodium soy sauce
– 1 tablespoon of fragrant, toasted sesame oil
– 2 cloves of pungent, freshly minced garlic
– 1 teaspoon of warm, finely ground ginger
– 1/2 teaspoon of aromatic, ground turmeric
– 8 wooden skewers, soaked in water for 30 minutes
– 2 tablespoons of golden, chopped roasted peanuts for garnish
– 2 tablespoons of vibrant, freshly chopped cilantro for garnish
Instructions
1. In a medium mixing bowl, whisk together the creamy, all-natural peanut butter, rich, full-fat coconut milk, fresh-squeezed lime juice, fragrant, low-sodium soy sauce, fragrant, toasted sesame oil, pungent, freshly minced garlic, warm, finely ground ginger, and aromatic, ground turmeric until smooth. (Tip: If the sauce is too thick, add a splash of water to reach a drizzling consistency.)
2. Place the 1.5 pounds of boneless, skinless chicken breasts, cut into 1-inch strips, in a large resealable bag or shallow dish.
3. Pour half of the peanut sauce mixture over the chicken, reserving the other half for serving.
4. Seal the bag or cover the dish, and marinate the chicken in the refrigerator for at least 20 minutes, or up to 2 hours for deeper flavor.
5. While the chicken marinates, soak the 8 wooden skewers in water for 30 minutes to prevent burning on the grill.
6. Preheat a grill or grill pan to medium-high heat, about 400°F.
7. Thread the marinated chicken strips onto the soaked wooden skewers, leaving a small space between pieces for even cooking.
8. Grill the skewers for 4-5 minutes per side, or until the chicken is cooked through and has visible grill marks, reaching an internal temperature of 165°F. (Tip: Avoid overcrowding the grill to ensure proper heat circulation.)
9. Remove the skewers from the grill and let them rest for 2-3 minutes before serving. (Tip: Resting allows the juices to redistribute, keeping the chicken tender.)
10. Drizzle the reserved peanut sauce over the skewers, and garnish with the golden, chopped roasted peanuts and vibrant, freshly chopped cilantro.
My favorite part is the contrast between the tender, juicy chicken and the creamy, slightly tangy peanut sauce. Serve these skewers over a bed of fluffy jasmine rice or with crisp cucumber slices for a refreshing crunch that balances the rich flavors perfectly.
Goat Cheese and Fig Crostini

A holiday party last year left me scrambling for a last-minute appetizer, and that’s when I discovered the magic of goat cheese and fig together. As a food blogger who often hosts impromptu gatherings, I now keep a baguette and a jar of fig jam in my pantry at all times for this very reason—it’s my go-to when friends drop by unexpectedly.
Serving: 12 crostini | Pre Time: 10 minutes | Cooking Time: 10 minutes
Ingredients
– 1 French baguette, sliced into 12 half-inch thick pieces
– 2 tablespoons rich extra virgin olive oil
– 4 ounces creamy goat cheese, at room temperature for easy spreading
– 1/4 cup sweet and sticky fig jam
– 2 tablespoons raw honey for drizzling
– 1/4 cup chopped toasted walnuts
– A pinch of flaky sea salt
Instructions
1. Preheat your oven to 375°F and line a baking sheet with parchment paper.
2. Arrange the baguette slices in a single layer on the prepared baking sheet.
3. Brush the top of each slice generously with the rich extra virgin olive oil using a pastry brush.
4. Bake the slices for 8-10 minutes, or until they turn golden brown and crisp around the edges.
5. Remove the baking sheet from the oven and let the crostini cool for 5 minutes to prevent the cheese from melting too quickly—this is my favorite tip for keeping that perfect texture.
6. Spread a generous layer of the creamy goat cheese evenly onto each cooled crostini with a butter knife.
7. Spoon about 1 teaspoon of the sweet and sticky fig jam over the goat cheese on each crostini.
8. Sprinkle the chopped toasted walnuts evenly over the top for a crunchy contrast.
9. Drizzle each crostini lightly with the raw honey using a spoon for a touch of natural sweetness.
10. Finish by sprinkling a pinch of flaky sea salt over all the crostini to enhance the flavors—this little step makes a big difference, trust me!
Just out of the oven, these crostini offer a delightful crunch that gives way to the creamy, tangy goat cheese and the jam’s fruity sweetness. I love how the walnuts add a nutty depth, and serving them on a rustic wooden board with extra honey on the side lets guests customize each bite to their liking.
Spicy Tuna Tartare on Crispy Wontons

Sometimes the best party appetizers are born from pantry raids and happy accidents—this spicy tuna tartare on crispy wontons came together when I needed a quick, impressive bite for last-minute guests. I love how the cool, zesty tuna contrasts with the shatteringly crisp wonton cups, and it’s become my go-to for holiday gatherings because everyone can grab one and mingle. Plus, it’s way easier than it looks, especially if you prep the tuna mixture ahead (my secret for stress-free entertaining).
Serving: 12 | Pre Time: 20 minutes | Cooking Time: 10 minutes
Ingredients
– 12 square wonton wrappers
– 1 tablespoon rich toasted sesame oil
– 8 ounces sushi-grade fresh tuna steak, finely diced
– 2 tablespoons smooth mayonnaise
– 1 tablespoon fiery Sriracha sauce
– 1 teaspoon fragrant toasted sesame seeds
– 1 tablespoon bright lime juice
– 1 tablespoon finely chopped fresh cilantro
– 1 teaspoon finely grated fresh ginger
– ½ teaspoon flaky sea salt
– ¼ teaspoon finely ground black pepper
Instructions
1. Preheat your oven to 375°F and line a baking sheet with parchment paper.
2. Lightly brush each wonton wrapper on both sides with the rich toasted sesame oil using a pastry brush.
3. Press each oiled wonton wrapper into the cups of a mini muffin tin to form small cups.
4. Bake the wonton cups in the preheated oven for 8–10 minutes, until they turn golden brown and crisp.
5. Remove the baked wonton cups from the oven and let them cool completely on a wire rack—they’ll crisp up further as they cool, so don’t skip this step.
6. While the wonton cups cool, place the finely diced sushi-grade fresh tuna in a medium mixing bowl.
7. Add the smooth mayonnaise, fiery Sriracha sauce, fragrant toasted sesame seeds, bright lime juice, finely chopped fresh cilantro, and finely grated fresh ginger to the bowl with the tuna.
8. Gently fold all the ingredients together with a spatula until just combined to keep the tuna tender.
9. Season the mixture with the flaky sea salt and finely ground black pepper, mixing lightly.
10. Spoon about 1 tablespoon of the spicy tuna mixture into each cooled crispy wonton cup just before serving to prevent sogginess.
Just assembled, these bites offer a delightful play of textures: the cool, creamy tuna with its spicy kick melts against the shatteringly crisp wonton base. I sometimes garnish them with extra cilantro or a tiny dot of Sriracha for color, and they’re perfect passed on a platter with cocktails—trust me, they disappear fast!
Mini Spanakopita Triangles with Feta and Spinach

Whenever I’m hosting a holiday gathering or just craving a savory bite, these Mini Spanakopita Triangles are my go‑to. They’re the perfect blend of flaky, buttery phyllo and a vibrant spinach‑and‑feta filling—a little taste of Greece that always disappears fast from the platter. I love making a big batch to stash in the freezer; they bake up crisp and golden whenever guests drop by.
Serving: 24 triangles | Pre Time: 25 minutes | Cooking Time: 20 minutes
Ingredients
– 1 package (16 ounces) frozen chopped spinach, thawed and squeezed completely dry
– 8 ounces crumbled feta cheese, preferably creamy and tangy
– 1/2 cup finely chopped fresh dill, fragrant and bright green
– 1/4 cup finely chopped fresh parsley, with its clean, herbal notes
– 1/4 cup rich extra‑virgin olive oil
– 1 large farm‑fresh egg, lightly beaten
– 1/2 teaspoon finely ground black pepper
– 1/4 teaspoon freshly grated nutmeg, for warm, aromatic depth
– 1/2 cup (1 stick) unsalted butter, melted and slightly cooled
– 1 package (16 ounces) phyllo dough, thawed in the refrigerator overnight
Instructions
1. Preheat your oven to 375°F and line two large baking sheets with parchment paper.
2. In a large mixing bowl, combine the thoroughly dried spinach, crumbled feta cheese, chopped fresh dill, chopped fresh parsley, extra‑virgin olive oil, lightly beaten egg, finely ground black pepper, and freshly grated nutmeg. Mix with a fork until evenly blended—the filling should hold together when pinched.
3. Unwrap the thawed phyllo dough and place it on a clean work surface; immediately cover it with a damp kitchen towel to prevent drying out.
4. Carefully remove one sheet of phyllo and lay it flat. Brush the entire surface lightly with melted unsalted butter using a pastry brush.
5. Place a second sheet of phyllo directly on top and brush it lightly with more melted butter.
6. Cut the buttered phyllo stack lengthwise into 4 equal strips, each about 3 inches wide.
7. Place 1 heaping teaspoon of the spinach‑feta filling at the bottom end of one phyllo strip.
8. Fold the bottom corner of the strip over the filling to form a triangle, then continue folding the triangle up the strip—like folding a flag—until you reach the end. Tip: Press gently as you fold to seal the edges and prevent filling from leaking.
9. Place the completed triangle seam‑side down on the prepared baking sheet. Repeat with the remaining phyllo strips and filling, keeping unused phyllo covered.
10. Brush the tops of all triangles lightly with the remaining melted butter. Tip: For extra crispness, avoid over‑brushing—just a thin coat is enough.
11. Bake in the preheated oven for 18–20 minutes, rotating the pans halfway through, until the triangles are deeply golden brown and flaky. Tip: Watch closely near the end, as phyllo can burn quickly.
12. Transfer the baked triangles to a wire rack and let cool for 5 minutes before serving.
Here’s what makes these irresistible: the phyllo shatters into buttery layers, giving way to a creamy, herb‑flecked filling that’s tangy from the feta and earthy from the spinach. I love serving them warm with a dollop of tzatziki or alongside a crisp Greek salad for a light meal—they’re always the first to vanish from the table.
Caramelized Onion and Gruyère Tartlets

My kitchen always smells like a cozy French bistro whenever I make these little tarts—they’re my go‑to for holiday gatherings or a fancy weeknight treat. I love how the sweet, slow‑cooked onions melt into the nutty Gruyère, all nestled in a buttery, flaky crust that practically shatters with each bite.
Serving: 12 tartlets | Pre Time: 25 minutes | Cooking Time: 30 minutes
Ingredients
– 2 large yellow onions, thinly sliced
– 2 tablespoons rich unsalted butter
– 1 tablespoon golden honey
– 1 teaspoon fine sea salt
– ½ teaspoon freshly ground black pepper
– 1 cup freshly grated nutty Gruyère cheese
– 2 sheets frozen puff pastry, thawed
– 1 large farm‑fresh egg, lightly beaten
– 1 tablespoon creamy whole milk
Instructions
1. Preheat your oven to 400°F (200°C) and line two baking sheets with parchment paper.
2. Melt the unsalted butter in a large skillet over medium‑low heat.
3. Add the thinly sliced yellow onions and cook, stirring occasionally, for 20–25 minutes until deeply golden and caramelized. (Tip: Don’t rush this—low heat is key for sweet, jammy onions.)
4. Stir in the golden honey, fine sea salt, and freshly ground black pepper, then remove the skillet from the heat and let cool slightly.
5. Unfold the thawed puff pastry sheets on a lightly floured surface and roll each out to a 10‑inch square.
6. Use a 3‑inch round cutter to cut 12 circles from the pastry, re‑rolling scraps as needed.
7. Place the pastry circles on the prepared baking sheets, spacing them 1 inch apart.
8. In a small bowl, whisk together the beaten farm‑fresh egg and creamy whole milk to make an egg wash.
9. Brush a thin layer of the egg wash over each pastry circle, avoiding the very edges. (Tip: This gives the crust a gorgeous golden shine.)
10. Divide the caramelized onion mixture evenly among the pastry circles, leaving a ¼‑inch border.
11. Top each with a generous sprinkle of the freshly grated nutty Gruyère cheese.
12. Bake for 18–22 minutes, or until the pastry is puffed and deep golden brown and the cheese is bubbly. (Tip: Rotate the sheets halfway through for even baking.)
13. Let the tartlets cool on the baking sheets for 5 minutes before serving.
Vibrant and utterly irresistible, these tartlets offer a perfect contrast of textures: the crisp, buttery crust gives way to the soft, sweet onions and gooey, savory cheese. I love serving them warm with a simple arugula salad dressed in lemon vinaigrette, or as a standout appetizer at parties—they always disappear within minutes!
Summary
Hosting just got easier! This collection of 20 creative finger foods offers endless inspiration for your next party, from elegant appetizers to crowd-pleasing bites. We hope you find a new favorite to wow your guests. Give a recipe a try, then let us know which one you loved in the comments below! Don’t forget to share this roundup on Pinterest to save these ideas for later.


