Let’s beat the heat with some frosty fun! Frozen fruit is your secret weapon for quick, vibrant treats that are as delicious as they are refreshing. From smoothies to sorbets, these 20 recipes will turn your freezer into a summer oasis. Ready to blend, freeze, and enjoy? Dive in—your taste buds will thank you!
Tropical Frozen Fruit Smoothie Bowl
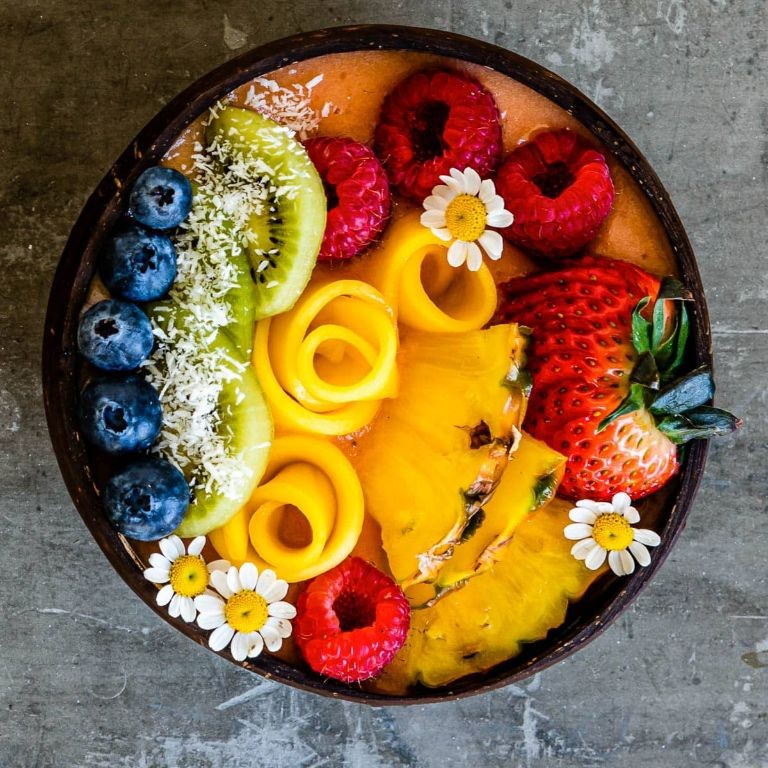
Phew, is it just me, or is the summer heat cranking up to “tropical vacation” levels? Let’s skip the plane ticket and whip up a frosty escape instead—a vibrant, spoonable smoothie bowl that’s basically a fruit fiesta in a dish. Think of it as your blender’s best attempt at a beach day, no sunscreen required.
Serving: 2 | Pre Time: 10 minutes | Cooking Time: 0 minutes
Ingredients
– A couple of frozen bananas, sliced
– A heaping cup of frozen mango chunks
– A heaping cup of frozen pineapple chunks
– A splash of coconut milk (about 1/2 cup)
– A drizzle of honey (about 1 tablespoon)
– A handful of granola for crunch
– A few fresh berries (like strawberries or blueberries) for topping
– A sprinkle of shredded coconut
Instructions
1. Grab your blender and toss in the frozen banana slices, frozen mango chunks, and frozen pineapple chunks.
2. Pour in the splash of coconut milk—start with 1/2 cup, but add a bit more if your blender struggles to get things moving. (Tip: For a thicker bowl, use less liquid; it should be scoopable, not drinkable!)
3. Drizzle in the honey to sweeten the deal, then secure the lid tightly.
4. Blend on high speed for about 45-60 seconds, stopping to scrape down the sides with a spatula if needed, until the mixture is completely smooth and creamy with no fruit chunks left. (Tip: If it’s too thick, add coconut milk a tablespoon at a time; too thin? Toss in a few more frozen fruit pieces.)
5. Divide the blended mixture evenly between two bowls, using a spoon to spread it out into a nice, even layer.
6. Sprinkle the handful of granola over the top for that essential crunch factor.
7. Scatter the fresh berries across the bowls—get artsy with it!
8. Finish with a sprinkle of shredded coconut for a tropical flair. (Tip: Toast the coconut in a dry pan over medium heat for 2-3 minutes until golden for an extra flavor boost.)
Zesty and frosty, this bowl delivers a creamy, almost ice-cream-like texture that’s packed with sweet mango and tangy pineapple vibes. Serve it immediately for maximum chill, or get playful by arranging the toppings in fun patterns—it’s almost too pretty to eat (almost!).
Mixed Berry Frozen Fruit Sorbet
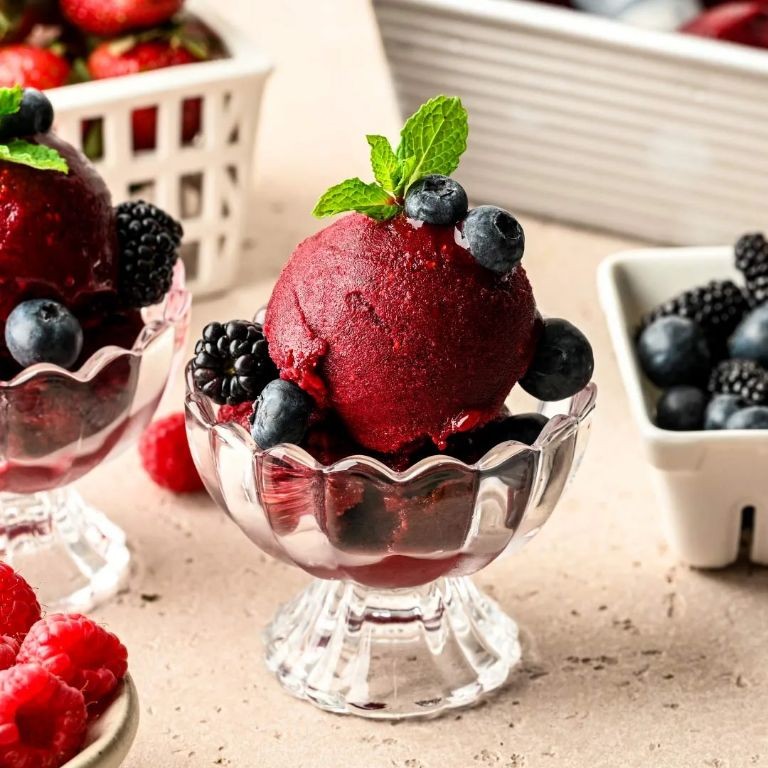
Picture this: you’re staring at a freezer full of forgotten berries, and instead of a sad smoothie, you’re about to whip up a frosty, fruity masterpiece that’ll make your taste buds do a happy dance. Let’s turn those chilly gems into a sorbet so refreshing, it might just become your new summer obsession.
Serving: 4 | Pre Time: 15 minutes | Cooking Time: 0 minutes
Ingredients
- A couple of cups of mixed frozen berries (like strawberries, blueberries, and raspberries)
- A good squeeze of fresh lemon juice (about 2 tablespoons)
- A generous 1/2 cup of granulated sugar
- A splash of cold water (roughly 1/4 cup)
- A tiny pinch of salt (trust me on this one)
Instructions
- Grab your food processor or high-powered blender and make sure it’s ready to rock.
- Dump all those frozen mixed berries right into the processor bowl.
- Add the 1/2 cup of granulated sugar directly over the berries. Tip: Using frozen fruit means you don’t need extra ice, so the flavor stays super concentrated!
- Squeeze in the 2 tablespoons of fresh lemon juice.
- Pour in the 1/4 cup of cold water.
- Don’t forget that tiny pinch of salt—it makes all the fruity flavors pop.
- Secure the lid tightly on your processor.
- Pulse the mixture 5-6 times to break up the big berry chunks.
- Then, let it run continuously for 1-2 minutes until it looks completely smooth, like a thick, vibrant slushie. Tip: If it’s struggling, stop and scrape down the sides with a spatula to help it along.
- Check the texture; it should be soft-serve consistency. If it’s too icy, blend for another 30 seconds.
- Serve immediately for a soft sorbet. Tip: For a firmer scoop, spread it into a loaf pan and freeze for 1 hour before serving.
Vibrant and velvety, this sorbet bursts with pure berry essence and has a delightfully smooth, almost creamy texture from the quick blend. Serve it in chilled glasses for an instant refresher, or get fancy by layering it with fresh mint and a drizzle of honey for a stunning dessert parfait.
Peach and Mango Frozen Fruit Popsicles

Zap those boring store-bought popsicles from your memory—these Peach and Mango Frozen Fruit Popsicles are about to become your freezer’s new VIP guests, blending summer’s sweetest fruits into a frosty, irresistible treat that’ll have you side-eyeing the ice cream aisle forever.
Serving: 6 | Pre Time: 15 minutes | Cooking Time: 0 minutes
Ingredients
– 2 cups of fresh or frozen peaches, peeled and chopped (about 3 medium peaches)
– 2 cups of fresh or frozen mango chunks (about 2 large mangoes)
– 1/2 cup of plain Greek yogurt for a creamy kick
– 1/4 cup of honey or maple syrup, because we’re sweet but not too sweet
– A splash of fresh lime juice (about 1 tablespoon) to brighten things up
– A tiny pinch of salt to make those flavors pop
Instructions
1. Grab your blender and toss in the 2 cups of chopped peaches, 2 cups of mango chunks, 1/2 cup of Greek yogurt, 1/4 cup of honey, 1 tablespoon of lime juice, and that pinch of salt.
2. Blend everything on high speed for 1–2 minutes until it’s super smooth and no chunks are left—tip: if using frozen fruit, let it thaw for 10 minutes first to avoid blender burnout.
3. Pour the mixture evenly into 6 popsicle molds, leaving about 1/4 inch of space at the top since it’ll expand as it freezes.
4. Insert popsicle sticks into each mold, making sure they’re centered and straight so they don’t wobble later.
5. Freeze the molds for at least 6 hours, or overnight for best results—tip: cover the tops with a bit of foil to keep sticks in place if your molds don’t have lids.
6. Once fully frozen, run the molds under warm water for 10–15 seconds to loosen the popsicles, then gently pull them out.
7. Serve immediately or store in a freezer bag for up to 2 months—tip: lay them flat in the bag to prevent sticking and breakage.
Delightfully creamy with a tropical tang, these popsicles boast a smooth texture that melts just right on a hot day. Try drizzling them with extra honey or crumbling graham crackers on top for a fun, crunchy twist that’ll make you feel like a dessert wizard.
Frozen Fruit Yogurt Parfait
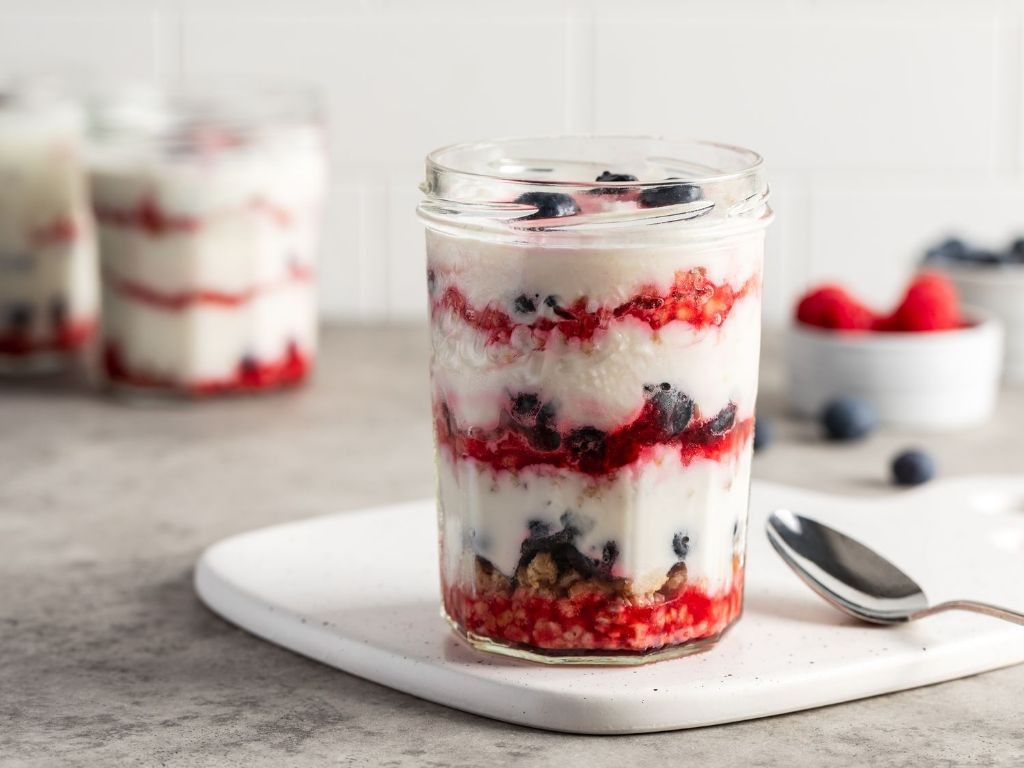
Who says you need a fancy dessert to impress? This frozen fruit yogurt parfait is the ultimate no-bake treat that’ll make you feel like a kitchen wizard without breaking a sweat—perfect for those ‘I need something sweet, stat!’ moments. Let’s dive in and get layering!
Serving: 4 | Pre Time: 15 minutes | Cooking Time: 0 minutes
Ingredients
– 2 cups of vanilla Greek yogurt (the thick, creamy kind)
– 1 cup of frozen mixed berries (like strawberries, blueberries, and raspberries—straight from the freezer)
– 1/2 cup of granola (go for a crunchy, honey-sweetened one)
– A splash of honey (about 2 tablespoons, for a touch of sweetness)
– A couple of fresh mint leaves (optional, but they add a pop of color and freshness)
Instructions
1. Grab four clear glasses or jars—seeing those pretty layers is half the fun!
2. Spoon 1/4 cup of vanilla Greek yogurt into the bottom of each glass, spreading it evenly with the back of a spoon. Tip: Use Greek yogurt for extra creaminess that won’t turn icy.
3. Add 2 tablespoons of frozen mixed berries on top of the yogurt in each glass. Tip: Frozen berries keep the parfait chilled without extra freezing time.
4. Sprinkle 1 tablespoon of granola over the berries in each glass for a satisfying crunch.
5. Repeat the layers: add another 1/4 cup of yogurt, 2 tablespoons of berries, and 1 tablespoon of granola to each glass.
6. Drizzle 1/2 tablespoon of honey over the top of each parfait. Tip: Warm the honey slightly for easier pouring—just 10 seconds in the microwave does the trick.
7. Garnish each parfait with a fresh mint leaf if using, pressing it gently into the top layer.
8. Serve immediately or chill in the refrigerator for up to 30 minutes to let the flavors meld. Just don’t wait too long, or the granola might get soggy!
Joyfully creamy with bursts of tart berries and a honey-kissed crunch, this parfait is a textural dream. Try swapping in tropical frozen fruit or a drizzle of chocolate sauce for a fun twist—it’s your dessert canvas!
Strawberry Banana Frozen Fruit Smoothie

Who needs a fancy blender when you’ve got a craving for something frosty, fruity, and downright delightful? This strawberry-banana frozen fruit smoothie is your ticket to a brain-freeze-worthy treat that’s as easy as tossing stuff in a blender and hitting ‘go’—no culinary degree required. It’s the ultimate cool-down for a hot day or a sneaky way to pretend you’re having dessert for breakfast.
Serving: 2 | Pre Time: 5 minutes | Cooking Time: 0 minutes
Ingredients
– A couple of frozen bananas, broken into chunks
– A generous cup of frozen strawberries
– A big splash of milk (about ¾ cup)
– A hearty drizzle of honey (around 2 tablespoons)
– A tiny splash of vanilla extract (½ teaspoon)
– A handful of ice cubes (about ½ cup)
Instructions
1. Grab your blender and toss in the frozen banana chunks and frozen strawberries.
2. Pour in the milk, honey, and vanilla extract—no need to measure perfectly, just eyeball it for a fun, laid-back vibe.
3. Add the handful of ice cubes to give it that extra frosty kick.
4. Secure the blender lid tightly (trust me, you don’t want a pink explosion on your counter).
5. Start blending on low speed for 30 seconds to break down the big chunks, then crank it up to high for another 60 seconds until totally smooth and creamy.
6. Stop and scrape down the sides with a spatula if needed—this ensures no sneaky fruit bits get left behind.
7. Blend again for 15-20 seconds on high to make sure everything is perfectly incorporated and silky.
8. Pour the smoothie into two glasses immediately, as it’ll start to melt fast if you dawdle.
Kick back and savor that velvety, sweet-tart blend that’s thick enough to eat with a spoon but drinkable enough to slurp through a straw. For a fun twist, top it with fresh strawberry slices or a sprinkle of granola for a crunchy contrast—it’s like a party in a glass, no RSVP needed.
Blueberry Frozen Fruit Chia Pudding
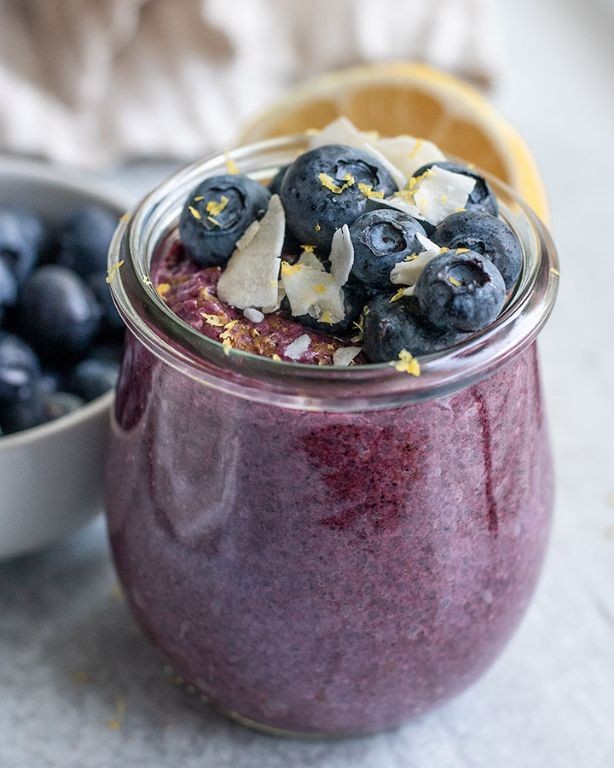
Ready to ditch the morning scramble? This blueberry frozen fruit chia pudding is your new best friend—a creamy, dreamy breakfast that practically makes itself while you sleep. Think of it as the lazy genius of meal prep, delivering a burst of berry bliss without any fuss.
Serving: 2 | Pre Time: 5 minutes | Cooking Time: 0 minutes
Ingredients
– A cup of frozen blueberries (no need to thaw—they’re the chill heroes here)
– A cup of unsweetened almond milk (or whatever milk makes you happy)
– A quarter cup of chia seeds (the tiny powerhouses that work all night)
– A tablespoon of maple syrup (for that sweet, cozy hug)
– A splash of vanilla extract (because vanilla makes everything better)
– A pinch of salt (to make those flavors pop)
Instructions
1. Grab a medium-sized bowl or a jar with a lid—something you can shake or stir without making a mess.
2. Pour in the cup of almond milk, followed by the tablespoon of maple syrup, splash of vanilla extract, and pinch of salt. Tip: Give it a quick whisk to dissolve the salt and syrup evenly; no one wants a salty surprise!
3. Add the quarter cup of chia seeds to the liquid mixture and stir vigorously for about 30 seconds to prevent clumping. Tip: Keep stirring until it looks like a speckled galaxy—this ensures every seed gets coated and swells up nicely.
4. Toss in the cup of frozen blueberries directly from the freezer; they’ll chill the mixture and slowly thaw as it sets.
5. Cover the bowl or jar tightly and pop it in the refrigerator for at least 4 hours, but ideally overnight. Tip: If you’re impatient, give it a stir after 2 hours to check the texture—it should be thick like pudding, not soupy.
6. After chilling, give it one final stir to mix in any settled chia seeds and break up the blueberries slightly for a marbled effect.
This pudding sets into a luscious, spoonable texture with bursts of juicy blueberries in every bite. The chia seeds create a delightful gel-like consistency that’s both filling and refreshing—perfect for topping with granola or a dollop of yogurt for extra crunch. Try layering it in a glass with fresh fruit for a breakfast parfait that’ll make your mornings feel like a celebration!
Raspberry Frozen Fruit Ice Cream
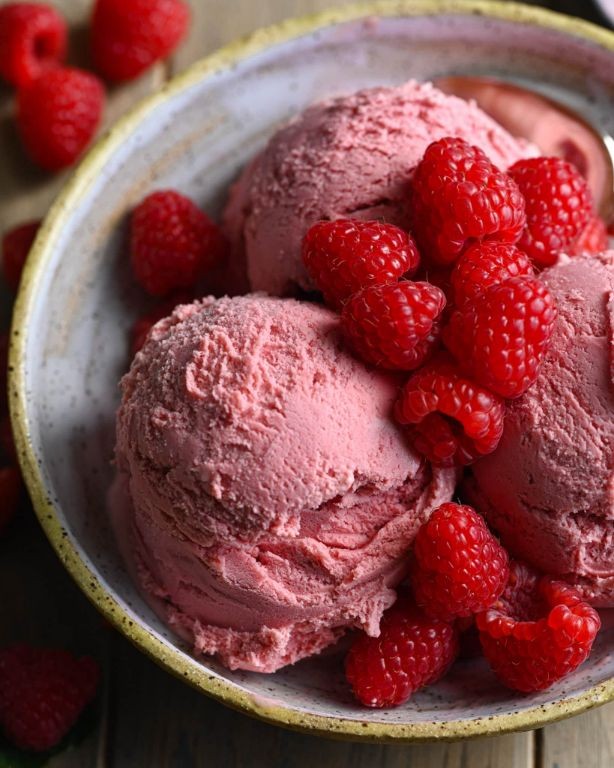
Frozen fruit fantasies just got a major upgrade, folks! Forget the fuss of traditional ice cream makers—this Raspberry Frozen Fruit Ice Cream is a no-churn miracle that’ll have you dancing in your kitchen. It’s the perfect sweet-tart escape for those sweltering days when you need a frosty treat, stat.
Serving: 4 | Pre Time: 10 minutes | Cooking Time: 0 minutes
Ingredients
– A couple of cups of frozen raspberries (about 16 ounces)
– A generous ½ cup of granulated sugar
– A splash of fresh lemon juice (about 1 tablespoon)
– A 14-ounce can of full-fat coconut milk, well-shaken
– A pinch of fine sea salt
Instructions
1. Grab your food processor or high-speed blender—this is where the magic happens.
2. Toss in the frozen raspberries, granulated sugar, lemon juice, coconut milk, and that pinch of sea salt.
3. Blend everything on high speed for about 1–2 minutes, stopping to scrape down the sides with a spatula halfway through, until the mixture is completely smooth and creamy. (Tip: If it’s too thick, let it sit for 5 minutes to soften slightly before blending again.)
4. Pour the vibrant pink mixture into a 9×5-inch loaf pan lined with parchment paper for easy removal.
5. Smooth the top with your spatula to create an even layer.
6. Cover the pan tightly with plastic wrap, pressing it directly onto the surface of the ice cream to prevent ice crystals from forming. (Tip: This step is key for that dreamy, scoopable texture!)
7. Freeze the pan for at least 6 hours, or ideally overnight, until the ice cream is firm and set.
8. About 10 minutes before serving, transfer the loaf pan from the freezer to your counter to let it soften slightly for easier scooping. (Tip: This makes all the difference—no wrestling with rock-hard ice cream!)
9. Use an ice cream scoop to serve it into bowls or cones, and enjoy immediately.
Outrageously creamy and bursting with bright raspberry flavor, this treat has a soft, scoopable texture that melts dreamily on your tongue. Try it sandwiched between two chewy cookies for an epic ice cream sandwich, or drizzle it with dark chocolate sauce for a decadent twist—it’s a summer game-changer!
Pineapple Coconut Frozen Fruit Slush
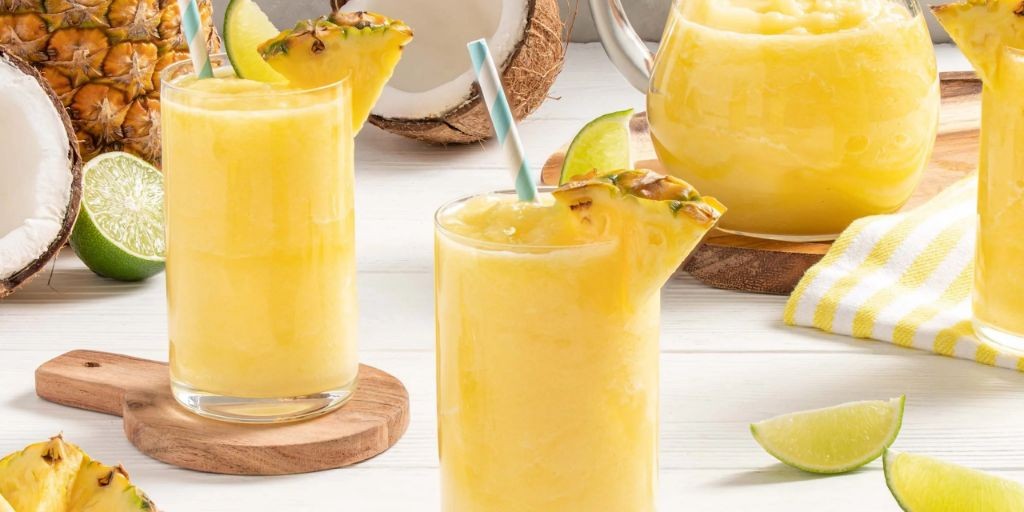
Alright, here’s a little sunshine in a glass for those scorching afternoons when the AC just can’t keep up. This Pineapple Coconut Frozen Fruit Slush is basically a tropical vacation you can sip through a straw—no passport required, just a blender and a serious craving for something frosty and fabulous.
Serving: 4 | Pre Time: 10 minutes | Cooking Time: 0 minutes
Ingredients
– A couple of cups of frozen pineapple chunks (about 3 cups)
– A generous splash of coconut milk (around 1 cup)
– A big squeeze of lime juice (from 1 lime, about 2 tbsp)
– A drizzle of honey or agave (about 2 tbsp, depending on your sweet tooth)
– A handful of ice cubes (about 1 cup)
Instructions
1. Grab your blender and toss in the frozen pineapple chunks—no need to thaw, they’re the secret to that slushy texture.
2. Pour in the coconut milk, aiming for that creamy, tropical vibe.
3. Squeeze the lime juice right over the top to add a zesty kick that balances the sweetness.
4. Drizzle in the honey or agave; this is your chance to adjust the sweetness, so start with 2 tbsp and add more if you’re feeling extra indulgent.
5. Toss in the ice cubes to bulk it up and get that perfect frosty consistency.
6. Blend on high speed for 30-45 seconds, or until everything is smooth and slushy—no big chunks allowed!
7. Pause and scrape down the sides with a spatula if needed, then blend for another 10 seconds to make sure it’s perfectly mixed.
8. Pour the slush into glasses immediately; it melts fast, so don’t dawdle!
9. Garnish with a pineapple wedge or a sprinkle of shredded coconut if you’re feeling fancy, and serve right away.
Fresh from the blender, this slush is a frosty dream with a creamy coconut base and tangy pineapple punch—it’s like a piña colada’s cooler, non-alcoholic cousin. For a fun twist, try serving it in hollowed-out pineapple halves or top it with a drizzle of melted dark chocolate for a decadent touch.
Cherry Frozen Fruit Granita
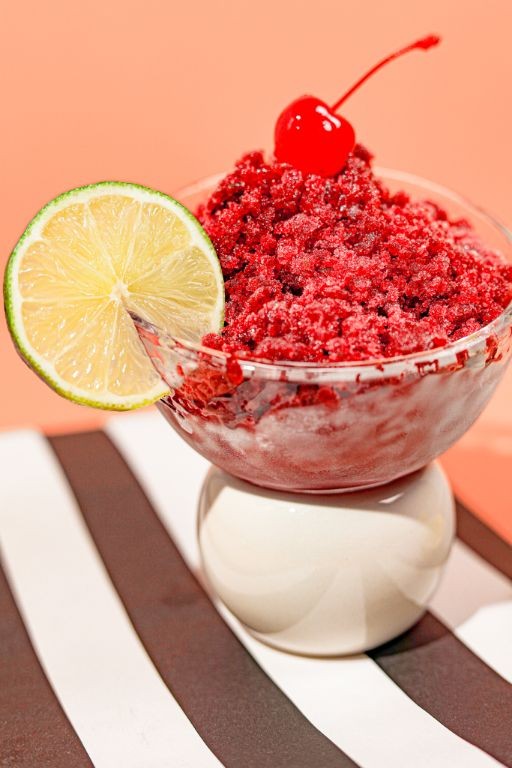
Let’s be real—when the holiday hustle hits and you’re juggling wrapping paper and cookie trays, a fuss-free, frosty treat is a total lifesaver. This cherry frozen fruit granita is your sweet, tangy escape, blending juicy cherries with a zesty citrus kick for a dessert that’s as refreshing as a snowball fight in July (but way tastier).
Serving: 4 | Pre Time: 10 minutes | Cooking Time: 0 minutes
Ingredients
– 2 cups of frozen pitted cherries (straight from the bag—no thawing needed!)
– 1/4 cup of granulated sugar (just enough to sweeten the deal)
– 1/2 cup of water (to get things blending smoothly)
– A splash of fresh lemon juice (about 1 tablespoon, for that bright zing)
– A couple of fresh mint leaves (optional, for a herby garnish)
Instructions
1. Grab your blender and toss in the 2 cups of frozen pitted cherries, 1/4 cup of granulated sugar, 1/2 cup of water, and that splash of fresh lemon juice (about 1 tablespoon).
2. Blend everything on high speed for 1–2 minutes until it’s completely smooth, with no cherry chunks left—tip: scrape down the sides halfway through to ensure even mixing.
3. Pour the blended mixture into a shallow, freezer-safe dish (like a 9×9-inch baking pan) so it spreads out thinly.
4. Place the dish in the freezer, uncovered, and let it sit for 30 minutes to start firming up.
5. After 30 minutes, use a fork to scrape and stir the mixture, breaking up any ice crystals that have formed—tip: do this every 30 minutes for about 2–3 hours total to get that perfect fluffy texture.
6. Once the granita is fully frozen and has a light, crystalline consistency (it should look like coarse snow), scoop it into serving bowls or glasses.
7. Garnish with a couple of fresh mint leaves if you’re feeling fancy—tip: for an extra burst of flavor, drizzle a little honey over the top just before serving.
Dazzlingly simple, this granita boasts a vibrant cherry flavor with a tart lemon twist, creating a texture that’s delightfully icy yet melts on your tongue. Serve it in chilled glasses for a festive touch, or layer it with a dollop of whipped cream for an indulgent twist—either way, it’s the coolest way to beat the holiday heat!
Mixed Frozen Fruit Salad with Honey Lime Dressing
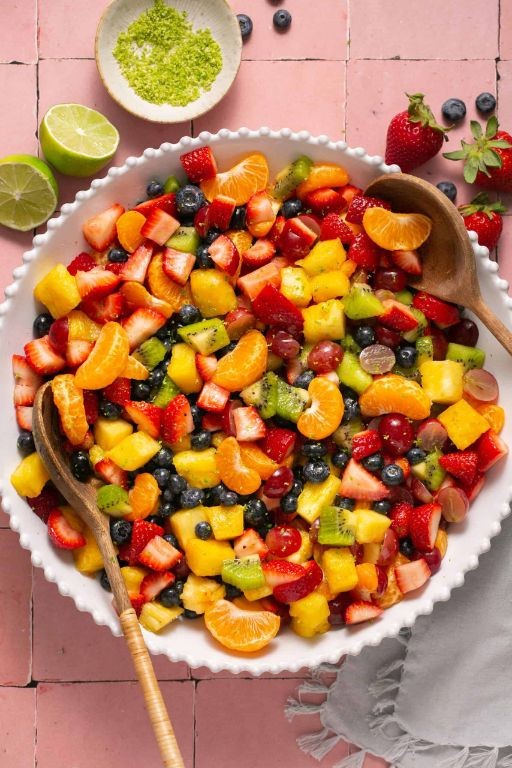
Venture beyond boring fruit cups and meet your new favorite make-ahead marvel—a vibrant, frosty fruit salad that’s basically a party in a bowl, dressed in a zippy honey-lime glaze that’ll make your taste buds do a happy dance. It’s the ultimate no-cook, dump-and-stir situation that’s perfect for when you want something refreshingly sweet without turning on the oven (or your brain).
Serving: 6 | Pre Time: 15 minutes | Cooking Time: 0 minutes
Ingredients
– 4 cups of frozen mixed fruit (like a colorful medley of berries, peaches, and mango chunks—straight from the bag)
– 2 tablespoons of honey (the good, runny stuff)
– 2 tablespoons of fresh lime juice (squeezed from about 1 lime, none of that bottled nonsense)
– A splash of water (just a tablespoon or so to loosen things up)
– A tiny pinch of salt (trust me, it makes the flavors pop)
Instructions
1. Grab a large mixing bowl and dump in 4 cups of frozen mixed fruit straight from the freezer—no thawing needed yet, as it’ll help keep everything chilled. (Tip: Use a mix with berries and tropical fruits for a fun texture contrast.)
2. In a small bowl or measuring cup, whisk together 2 tablespoons of honey and 2 tablespoons of fresh lime juice until they’re fully combined and smooth.
3. Add a splash of water (about 1 tablespoon) to the honey-lime mixture and whisk again to thin it out slightly, making it easier to drizzle.
4. Stir a tiny pinch of salt into the dressing—this little secret boosts the sweet and tangy flavors without making it salty.
5. Pour the honey-lime dressing over the frozen fruit in the large bowl, using a spatula to gently toss everything until the fruit is evenly coated. (Tip: Work quickly here to prevent the fruit from thawing too much and getting mushy.)
6. Let the salad sit at room temperature for 5-10 minutes, just until the fruit softens slightly but still has a frosty bite—poke a piece to check; it should be cold and firm, not icy-hard.
7. Give it one final gentle toss to redistribute the dressing, then serve immediately. (Tip: For a fancier touch, garnish with fresh mint leaves or a sprinkle of toasted coconut.)
Who knew something so simple could taste so spectacular? The fruit stays refreshingly crisp with a slight thaw, while the honey-lime dressing clings to every piece in a sweet-tart glaze that’s downright addictive. Try scooping it over vanilla ice cream for a quick dessert or packing it in a jar for a picnic—it’s the cool, colorful upgrade your summer spread desperately needs.
Frozen Fruit and Spinach Green Smoothie
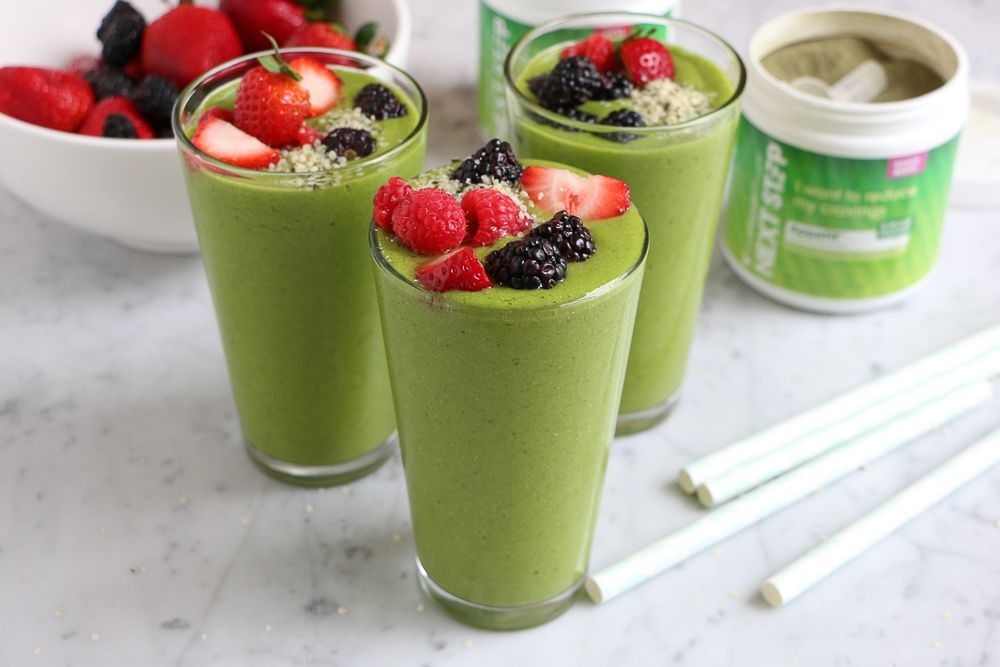
Let’s be real—some mornings, you need a superhero in a glass, and this Frozen Fruit and Spinach Green Smoothie is here to save the day without any cape-required drama. It’s the ultimate blend of sweet, frosty fruit and sneaky greens that’ll make you feel like a wellness wizard, even if you’re still in your pajamas. Trust me, it’s so deliciously deceptive, you’ll forget there’s spinach in there at all!
Serving: 2 | Pre Time: 5 minutes | Cooking Time: 0 minutes
Ingredients
– A couple of cups of frozen mixed berries (like strawberries and blueberries)
– A big handful of fresh spinach leaves (about 2 cups packed)
– One ripe banana, peeled and sliced
– A splash of orange juice (about 1/2 cup)
– A dollop of Greek yogurt (about 1/4 cup)
– A drizzle of honey (about 1 tablespoon)
– A cup of ice cubes
Instructions
1. Grab your blender and toss in the frozen mixed berries—no need to thaw them, as they’ll keep things frosty and thick.
2. Add the fresh spinach leaves right on top; packing them down helps them blend smoothly without leafy chunks.
3. Drop in the sliced banana, which adds natural sweetness and creaminess to balance the tart berries.
4. Pour in the orange juice, using it to help loosen everything up and add a zesty kick.
5. Spoon in the Greek yogurt for a protein boost and extra creaminess—it’s like a secret weapon for texture.
6. Drizzle the honey over the mix; this sweetens it just enough without overpowering the fruit flavors.
7. Toss in the ice cubes last to ensure they crush evenly and don’t dull your blender blades.
8. Secure the lid tightly and blend on high speed for about 45-60 seconds, until the mixture is completely smooth and vibrant green with no visible chunks.
9. Stop the blender and check the consistency; if it’s too thick, add another splash of orange juice and blend for 10 more seconds.
10. Pour the smoothie immediately into two glasses to enjoy it at its frosty best—waiting lets it separate and lose that creamy magic.
After all that blending, you’re left with a lusciously thick and vibrantly green smoothie that’s cold enough to wake you up but sweet enough to feel like a treat. Its flavor is a fruity dance party with a subtle earthy note from the spinach, making it perfect for sipping straight or jazzing up with a sprinkle of chia seeds on top for extra crunch.
Watermelon Frozen Fruit Margarita
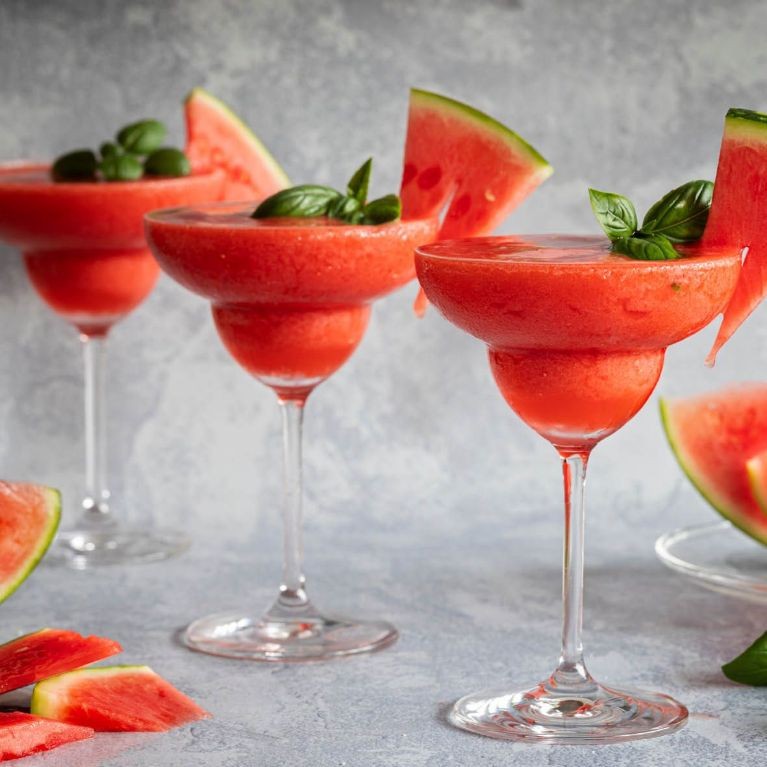
Brace yourself for a brain freeze of pure joy—this Watermelon Frozen Fruit Margarita is the ultimate summer escape in a glass, blending juicy sweetness with a zesty kick that’ll make you forget the heatwave ever existed. It’s the frosty hero your backyard barbecue desperately needs, and honestly, it’s so refreshing you might just start calling it ‘liquid air conditioning.’
Serving: 2 | Pre Time: 10 minutes | Cooking Time: 0 minutes
Ingredients
– About 2 cups of frozen watermelon chunks (trust me, freezing them first is a game-changer for that slushy texture)
– A good glug of silver tequila, around 1/4 cup
– A couple of tablespoons of fresh lime juice, because fresh is always best
– A splash of orange liqueur, roughly 2 tablespoons
– A handful of ice cubes, maybe 1 cup
– A pinch of salt for the rim, because sweet and salty is a match made in heaven
– Optional: a lime wedge or two for garnish, if you’re feeling fancy
Instructions
1. Grab your blender and toss in the frozen watermelon chunks, tequila, lime juice, orange liqueur, and ice cubes.
2. Blend everything on high speed for about 30–45 seconds, until it’s smooth and slushy—no icy chunks allowed!
3. While it blends, rub a lime wedge around the rim of two glasses and dip them into the salt on a small plate to coat evenly.
4. Pour the blended mixture evenly into the salted glasses, filling them to the top.
5. Garnish each glass with a lime wedge on the rim for that extra pop of color.
6. Serve immediately with a straw, and maybe a napkin because things might get messy (in the best way).
This frosty delight boasts a velvety, slushy texture that melts on your tongue, with the watermelon’s natural sweetness perfectly balanced by the tangy lime and smooth tequila. Try serving it in hollowed-out watermelon halves for a show-stopping party centerpiece, or add a sprinkle of Tajín on the rim to kick up the heat—it’s like a fiesta in every sip!
Apple Cinnamon Frozen Fruit Crumble
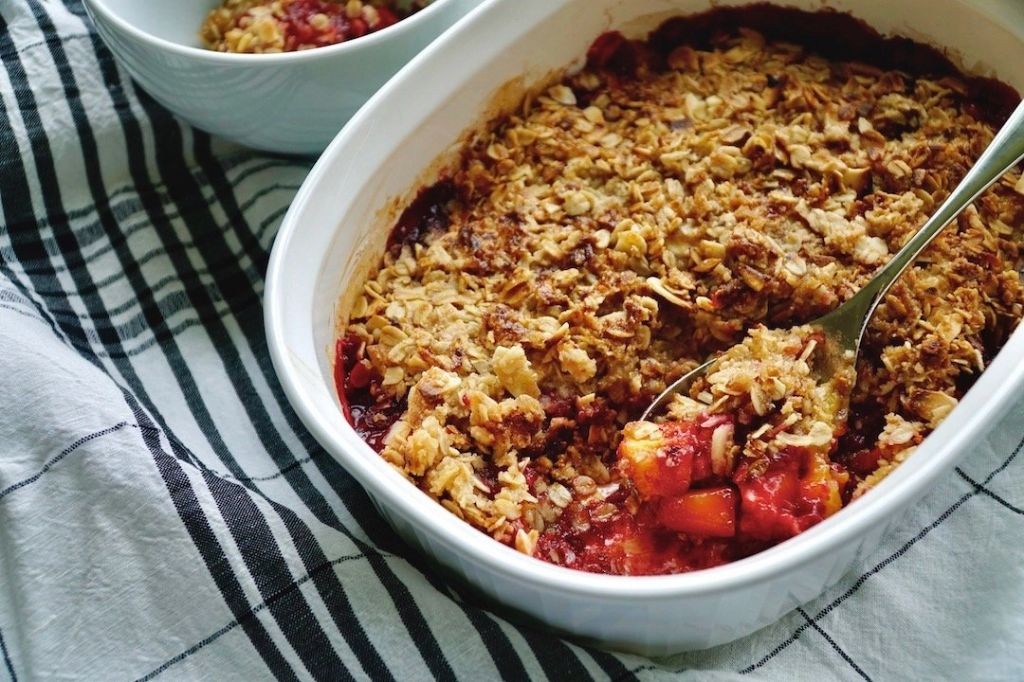
Ready to turn your freezer into the hottest dessert destination this side of the North Pole? This Apple Cinnamon Frozen Fruit Crumble is the chilly, chunky, no-bake miracle you didn’t know your summer (or let’s be real, your Tuesday) was missing—think cozy apple pie vibes, but with the refreshing kick of a frozen treat that won’t heat up your kitchen.
Serving: 6 | Pre Time: 20 minutes | Cooking Time: 0 minutes (it’s frozen, you clever thing!)
Ingredients
– 4 cups of those crisp, sweet apples (like Honeycrisp or Fuji), peeled and chopped into little bite-sized buddies
– A hearty 1/2 cup of old-fashioned rolled oats (the kind that holds its crunch)
– 1/3 cup of all-purpose flour (just enough to bind the fun)
– 1/4 cup of packed brown sugar (for that caramel-y whisper)
– 1/4 cup of cold unsalted butter, cut into tiny cubes (keep it chilly!)
– 1 teaspoon of ground cinnamon (the cozy spice hero)
– A generous pinch of salt (to make all the flavors pop)
– A splash of vanilla extract (about 1 teaspoon, because vanilla makes everything better)
Instructions
1. Grab a large mixing bowl and toss in your chopped apples, cinnamon, and that splash of vanilla extract until the apples are evenly coated in spiced goodness.
2. In a separate medium bowl, combine the rolled oats, flour, brown sugar, and that pinch of salt—give it a quick stir with a fork to break up any sugar lumps.
3. Add the cold, cubed butter to the oat mixture. Using your fingers or a pastry cutter, work the butter into the dry ingredients until it resembles coarse crumbs with some pea-sized bits remaining. (Tip: Cold butter is key here for a flaky crumble topping that won’t turn soggy!)
4. Lightly grease an 8×8-inch baking dish or a similar freezer-safe container with a dab of butter or cooking spray.
5. Spread the cinnamon-coated apple mixture evenly across the bottom of the prepared dish.
6. Sprinkle the oat crumble topping evenly over the apples, covering them completely for maximum crunch in every bite.
7. Place the dish, uncovered, in the freezer. Let it freeze solid for at least 4 hours, or ideally overnight. (Tip: Freezing it uncovered first helps prevent ice crystals from forming on top, keeping the texture perfect.)
8. Once fully frozen, cover the dish tightly with plastic wrap or a lid to store. (Tip: For easy serving, you can portion it into squares before freezing—just slice after about 1 hour in the freezer when it’s partially set.)
9. To serve, let it sit at room temperature for 5-10 minutes to soften slightly, then scoop or slice into portions.
You’ll be greeted with a fabulously firm yet scoopable texture—the apples stay tender with a subtle icy bite, while the crumble topping adds a satisfying, crunchy contrast that defies its frozen state. The cinnamon warmth shines through the chill, making it taste like a deconstructed apple pie that decided to take a polar plunge. Try serving it in bowls with a drizzle of caramel sauce or a dollop of whipped cream for an extra-indulgent twist, or crumble it over vanilla ice cream for a next-level sundae situation that’ll have everyone asking for the ‘recipe’ to your frosty magic.
Frozen Fruit Kabobs with Chocolate Drizzle

Let’s be real—sometimes you want a dessert that feels fancy but requires exactly zero oven time. These Frozen Fruit Kabobs with Chocolate Drizzle are your new secret weapon: they’re refreshing, ridiculously easy, and look like you hired a pastry chef. Perfect for beating the heat or impressing last-minute guests without breaking a sweat.
Serving: 6 | Pre Time: 15 minutes | Cooking Time: 0 minutes
Ingredients
- A couple of cups of mixed frozen fruit (like strawberries, pineapple chunks, and mango pieces—go wild!)
- About 1/2 cup of semi-sweet chocolate chips
- A splash of coconut oil (around 1 teaspoon)
- 6 wooden skewers (soak ’em first to avoid splinters!)
Instructions
- Grab your wooden skewers and soak them in a bowl of water for 10 minutes to prevent burning—trust me, this tip saves kabob disasters.
- While they soak, pull out your frozen fruit from the freezer; no need to thaw, as it’ll keep everything firm and frosty.
- Thread the frozen fruit onto the soaked skewers in a colorful pattern, alternating types for a fun look, and set them on a parchment-lined baking sheet.
- Pop the baking sheet into the freezer for 5 minutes to let the kabobs chill out and firm up further—this helps the chocolate stick better later.
- In a microwave-safe bowl, combine the chocolate chips and coconut oil, then microwave in 30-second bursts, stirring after each, until smooth and melted (about 1–2 minutes total).
- Tip: If the chocolate seizes, add a tiny bit more coconut oil and stir vigorously to rescue it.
- Pull the kabobs from the freezer and drizzle the melted chocolate over them in zigzags or swirls, working quickly before it sets.
- Return the kabobs to the freezer for another 5–10 minutes, until the chocolate is fully hardened and shiny.
- Serve immediately or store in an airtight container in the freezer for up to a week—just grab and go!
Vibrant and frosty, these kabobs deliver a juicy crunch from the fruit with a rich chocolate shell that cracks delightfully. Try serving them at a summer BBQ for a cool, handheld treat that’ll have everyone asking for the recipe—or layer them in a glass with yogurt for an instant parfait upgrade.
Blackberry Frozen Fruit Lemonade
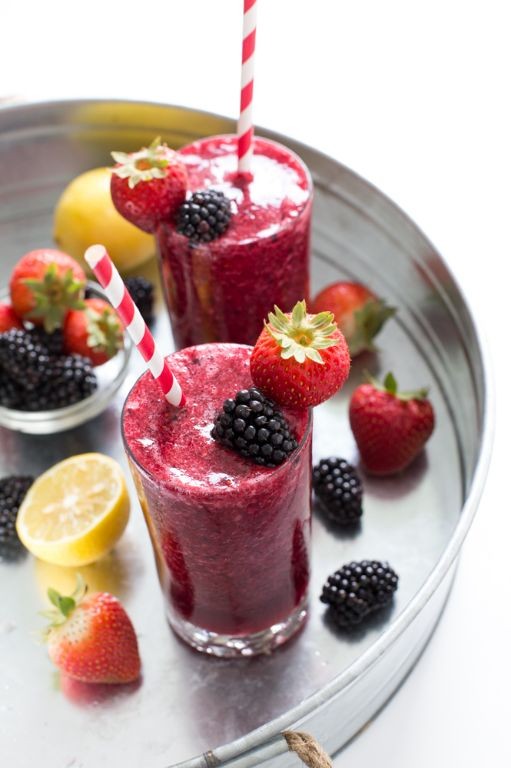
Zesty as a summer afternoon and cooler than your air conditioner on full blast, this Blackberry Frozen Fruit Lemonade is about to become your new favorite way to beat the heat. Imagine a sweet-tart berry blast and puckery lemon tang, all whirled into a slushy, sip-worthy masterpiece that’s basically a vacation in a glass. Trust me, your blender has never been this excited.
Serving: 4 | Pre Time: 10 minutes | Cooking Time: 0 minutes
Ingredients
- A heaping 2 cups of frozen blackberries (the star of the show!)
- 1 cup of fresh lemon juice (about 4–5 lemons, squeezed with gusto)
- 1/2 cup of granulated sugar (for that perfect sweet balance)
- 3 cups of cold water (ice-cold is best)
- A big handful of ice cubes (to get that fabulous frozen texture)
- A splash of vanilla extract (our secret flavor booster)
- Fresh mint leaves or lemon slices for garnish (optional, but so pretty)
Instructions
- Grab your blender and add the 2 cups of frozen blackberries, 1 cup of fresh lemon juice, and 1/2 cup of granulated sugar.
- Pour in the 3 cups of cold water—tip: using chilled water helps everything blend faster without watering down the flavor.
- Add a big handful of ice cubes and that splash of vanilla extract for a subtle depth.
- Secure the blender lid tightly (safety first to avoid a purple kitchen disaster!) and blend on high speed for 45–60 seconds, or until the mixture is completely smooth with no berry chunks.
- Stop and scrape down the sides with a spatula if needed, then blend again for another 15 seconds to ensure it’s perfectly combined—tip: this extra step guarantees no sugary pockets are left behind.
- Pour the lemonade immediately into glasses. For a fun twist, rim the glasses with sugar by dipping them in lemon juice first, then in a plate of sugar.
- Garnish with fresh mint leaves or a lemon slice if you’re feeling fancy, and serve right away with a straw.
- Tip: If it sits too long, give it a quick stir or re-blend for a few seconds to revive that frosty texture.
Heavenly and refreshing, this lemonade boasts a vibrant purple hue and a slushy consistency that melts on your tongue with each sip. The blackberries lend a jammy sweetness that plays perfectly against the sharp lemon zing, while the vanilla adds a whisper of warmth. Try serving it in mason jars with colorful paper straws for a picnic, or pour it into popsicle molds for a frozen treat that’ll have everyone begging for the recipe!
Frozen Fruit and Oat Breakfast Bars
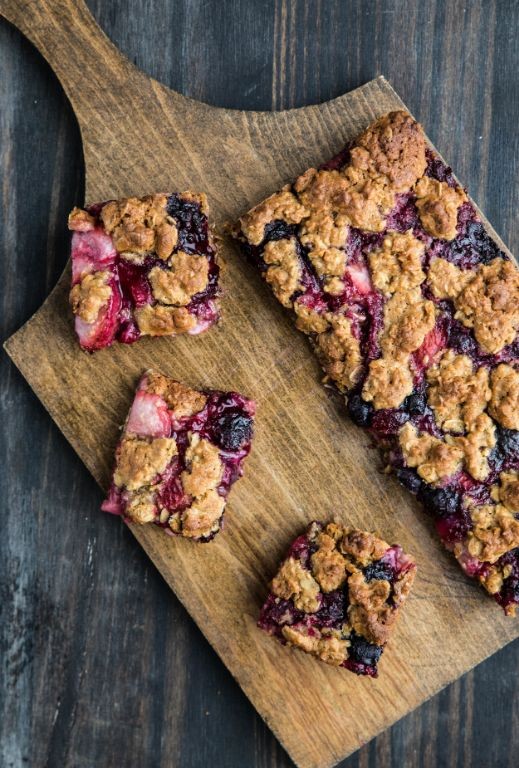
Oh, the eternal morning struggle: you want something healthy, but your brain is screaming for sugar. Let’s solve that with a make-ahead marvel that’s part breakfast, part dessert, and entirely no-fuss. These frozen bars are your secret weapon against chaotic mornings, packing fruit and oats into a grab-and-go treat that actually tastes good.
Serving: 9 bars | Pre Time: 15 minutes | Cooking Time: 0 minutes (but freezing time is key!)
Ingredients
– 2 cups of old-fashioned rolled oats (the hearty kind, not instant)
– A heaping cup of mixed frozen berries (straight from the bag, no thawing!)
– A generous half-cup of creamy almond butter (or any nut butter you’re obsessed with)
– A good glug of maple syrup, about ⅓ cup
– A big pinch of salt
– A splash of vanilla extract
– A couple of tablespoons of chia seeds (for that extra nutrition boost)
Instructions
1. Grab an 8×8 inch baking dish and line it with parchment paper, letting some hang over the sides for easy lifting later.
2. In a large mixing bowl, combine the 2 cups of old-fashioned rolled oats, the heaping cup of frozen berries, and the couple of tablespoons of chia seeds. Tip: Using frozen berries helps keep the mixture firm and prevents a soggy bar.
3. In a smaller microwave-safe bowl, warm the generous half-cup of almond butter and the good glug of maple syrup together for about 30 seconds, just until they’re easily stir-able and smooth.
4. Stir the big pinch of salt and the splash of vanilla extract into the warm almond butter mixture until fully combined.
5. Pour the wet mixture over the oat and berry mixture in the large bowl. Tip: A sturdy spatula is your best friend here to mix everything thoroughly without crushing the berries too much.
6. Press the mixture very firmly and evenly into your prepared baking dish. Tip: Use the bottom of a flat glass or measuring cup to press down hard—this ensures the bars won’t crumble later.
7. Pop the dish into the freezer for at least 4 hours, or ideally overnight, until the bars are completely solid.
8. Once frozen, use the parchment paper overhang to lift the whole slab out of the dish. Place it on a cutting board and slice into 9 even bars with a sharp knife.
9. Keep the bars stored in a freezer-safe bag or container, separating layers with parchment paper if stacking.
Kind of magical, right? These bars emerge from the freezer with a chewy, firm texture that softens just slightly as you eat, offering little bursts of tart berry against the sweet, nutty base. Try crumbling one over Greek yogurt for a parfait situation, or simply let it thaw for 5 minutes on the counter for a softer, more cookie-like bite.
Kiwi Strawberry Frozen Fruit Tart
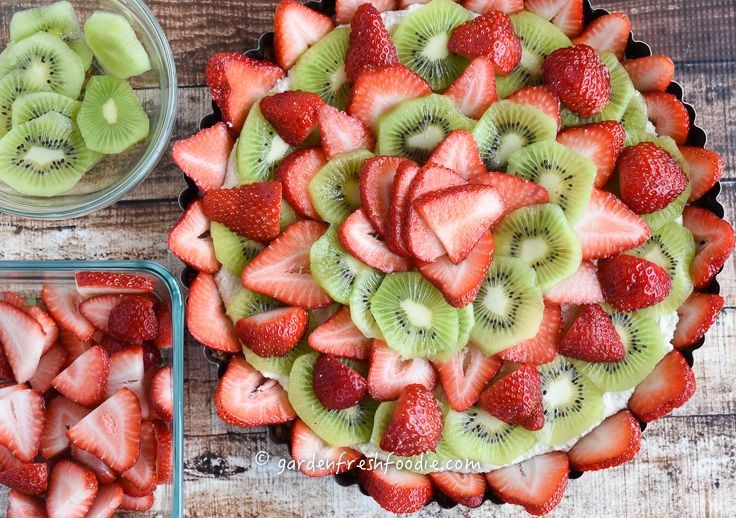
Frozen desserts just got a major upgrade, folks! Forget the same-old ice cream—this vibrant tart is like a tropical vacation for your taste buds, with a buttery crust that’ll make you want to do a happy dance. It’s the perfect make-ahead showstopper for any summer gathering (or, let’s be real, a solo Tuesday night treat).
Serving: 8 | Pre Time: 25 minutes | Cooking Time: 0 minutes
Ingredients
– A sleeve of those classic graham crackers (about 9 full sheets)
– A generous 1/3 cup of melted butter
– A big pinch of salt
– A 14-ounce can of sweetened condensed milk (the secret weapon!)
– A hefty cup of heavy whipping cream
– A teaspoon of pure vanilla extract
– A couple of ripe kiwis, peeled and thinly sliced
– A pint of fresh strawberries, hulled and sliced
Instructions
1. Crumble the graham crackers into fine crumbs using a food processor or by sealing them in a bag and rolling with a rolling pin.
2. In a medium bowl, mix the graham cracker crumbs with the melted butter and salt until it resembles wet sand.
3. Firmly press the crumb mixture into the bottom and up the sides of a 9-inch tart pan with a removable bottom. Tip: Use the bottom of a measuring cup to get an even, compact layer.
4. Place the crust in the freezer for 15 minutes to set.
5. While the crust chills, pour the heavy whipping cream into a large bowl and whip it with a hand mixer on high speed until stiff peaks form, about 3-4 minutes.
6. In a separate bowl, gently fold the sweetened condensed milk and vanilla extract into the whipped cream until just combined. Tip: Don’t overmix here—you want to keep that fluffy texture!
7. Remove the crust from the freezer and spread the creamy filling evenly inside.
8. Arrange the sliced kiwis and strawberries in a decorative pattern over the top of the filling, pressing them in slightly. Tip: Start from the outside edge and work your way in for a gorgeous, professional look.
9. Cover the tart tightly with plastic wrap and freeze for at least 6 hours, or overnight until completely firm.
10. To serve, let the tart sit at room temperature for 5-10 minutes before carefully removing the outer ring of the pan and slicing.
Seriously, the contrast between the crisp, salty crust and the lush, creamy filling is pure magic. Each bite delivers a bright pop of kiwi and sweet strawberry that’s incredibly refreshing. Slice it up for a party, or just grab a fork and dig in straight from the pan—we won’t judge!
Frozen Fruit and Almond Butter Toast
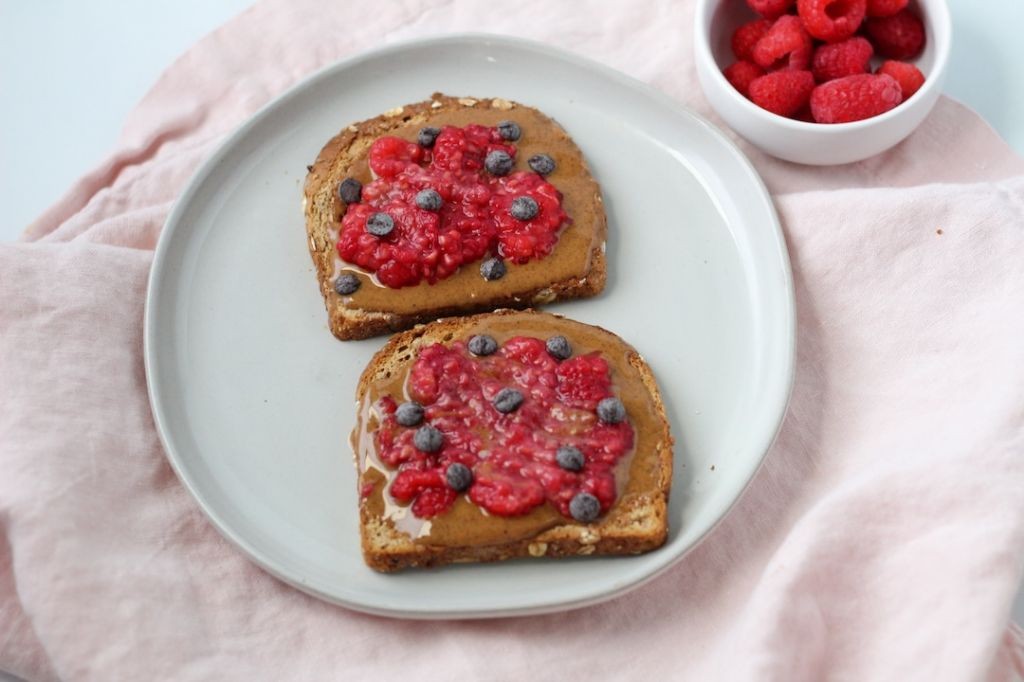
Oh, the breakfast struggle is real, isn’t it? You’re staring at the same old toast, dreaming of something that feels like a treat but won’t send you into a sugar coma before 9 a.m. Enter this genius mash-up: frozen fruit and almond butter toast—your new go-to for a morning that’s equal parts refreshing and indulgent, no fancy skills required.
Serving: 1 | Pre Time: 5 minutes | Cooking Time: 0 minutes
Ingredients
– 1 slice of your favorite bread (I’m team sourdough, but you do you)
– A generous slather of creamy almond butter (about 2 tablespoons)
– A handful of frozen mixed berries (around ½ cup—think strawberries, blueberries, the whole colorful crew)
– A tiny drizzle of honey (just 1 teaspoon, for that golden touch)
– A pinch of flaky sea salt (trust me, it’s the secret weapon)
Instructions
1. Pop your bread slice into the toaster and toast it until it’s golden-brown and crispy, about 2–3 minutes on a medium setting—no sad, pale bread allowed here!
2. Immediately spread the almond butter all over the warm toast in an even layer; the heat helps it melt slightly for extra creaminess (tip: warm almond butter is a game-changer for texture).
3. Scatter the frozen mixed berries directly on top of the almond butter, letting them cling to the surface—they’ll start to thaw from the toast’s warmth, creating a juicy contrast.
4. Drizzle the honey evenly over the berries in a zigzag pattern for a sweet kiss without overpowering the nutty base.
5. Finish with a light sprinkle of flaky sea salt to balance the sweetness and enhance all the flavors (tip: a pinch of salt makes everything taste more vibrant, promise!).
6. Let it sit for 1–2 minutes so the berries soften just enough to bite into easily but still retain a slight chill—this keeps things refreshing (tip: patience here prevents a messy berry avalanche!).
Zesty and cool, this toast delivers a playful crunch from the bread against the creamy almond butter and burst-in-your-mouth berries. Serve it alongside a hot coffee for the ultimate cozy-vibes breakfast, or get fancy by swapping in frozen peaches for a summery twist—it’s basically a party on a plate!
Mango Lime Frozen Fruit Mocktail

Yikes, is it just me or is this heatwave trying to turn us all into puddles? Good thing I’ve got the ultimate chill pill—a frosty, fruity mocktail that’s basically a vacation in a glass. Let’s make this Mango Lime Frozen Fruit Mocktail your new best friend.
Serving: 2 | Pre Time: 10 minutes | Cooking Time: 0 minutes
Ingredients
– 2 cups of frozen mango chunks (trust me, frozen is key for that slushy texture)
– A big squeeze of fresh lime juice from about 2 limes
– A splash of cold water, maybe 1/4 cup to get things moving
– A couple of ice cubes, just to amp up the frost factor
– A drizzle of honey, about 1 tablespoon for that sweet kiss
– A pinch of salt (yes, really—it makes the flavors pop!)
Instructions
1. Grab your blender and toss in the 2 cups of frozen mango chunks.
2. Squeeze the juice from 2 limes directly into the blender—no seeds, please!
3. Add a splash of cold water, about 1/4 cup, to help the blending process along.
4. Drop in a couple of ice cubes for extra chilliness.
5. Drizzle in 1 tablespoon of honey for sweetness.
6. Sprinkle in a pinch of salt to balance all those bright flavors.
7. Secure the blender lid tightly and blend on high speed for 30-45 seconds, until the mixture is completely smooth and slushy. Tip: If it’s struggling, pause and scrape down the sides with a spatula.
8. Pour the mocktail evenly into two glasses. Tip: For a fun twist, rim the glasses with a little extra lime juice and coarse sugar before pouring.
9. Serve immediately with a straw and a lime wedge on the rim. Tip: Want it boozy? A splash of rum turns this into a killer cocktail—just sayin’.
Kick back and sip this vibrant mocktail—it’s got a creamy, slushy texture that melts on your tongue, with tangy lime cutting through the sweet mango. Perfect for poolside lounging or pretending your backyard is a tropical paradise!
Frozen Fruit and Greek Yogurt Bark
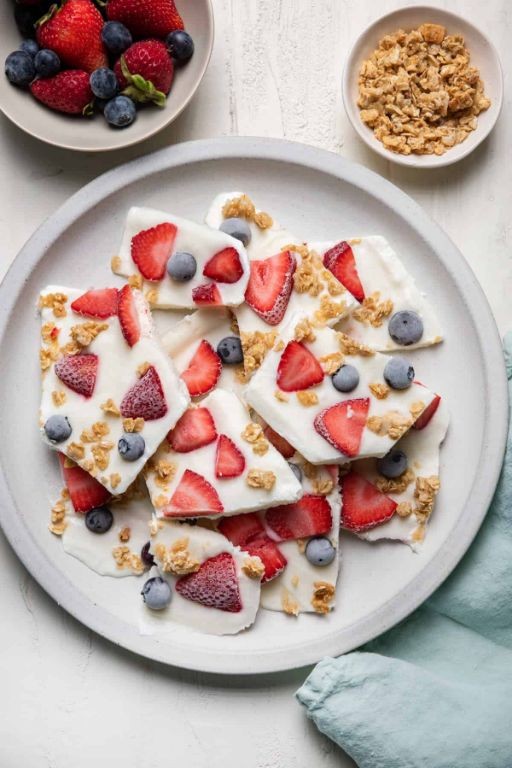
Kick those boring snacks to the curb, because we’re about to make a frozen treat so easy, it practically assembles itself while you binge-watch your favorite show. This Frozen Fruit and Greek Yogurt Bark is the ultimate cool-down hero—no oven required, just a freezer and a serious craving for something sweet, tangy, and ridiculously refreshing.
Serving: 8 | Pre Time: 10 minutes | Cooking Time: 4 hours
Ingredients
– 2 cups of plain Greek yogurt (the thick, creamy kind that doesn’t mess around)
– A good glug of honey, about 2 tablespoons
– A splash of vanilla extract, roughly 1 teaspoon
– A couple of handfuls of mixed frozen berries (think blueberries, raspberries, and sliced strawberries—about 1.5 cups total)
– A small handful of chopped nuts, like almonds or pistachios, for a crunchy surprise (around ¼ cup)
Instructions
1. Grab a medium mixing bowl and plop in the 2 cups of Greek yogurt.
2. Drizzle in the 2 tablespoons of honey and the 1 teaspoon of vanilla extract.
3. Stir everything together with a spatula until it’s smooth and well-combined—no streaks of honey left behind!
4. Line a baking sheet with parchment paper or a silicone mat to prevent sticking later.
5. Pour the yogurt mixture onto the prepared sheet and spread it into an even layer about ¼-inch thick using the back of a spoon.
6. Scatter the 1.5 cups of frozen berries evenly over the yogurt layer, pressing them in lightly so they stick.
7. Sprinkle the ¼ cup of chopped nuts over the top for that extra crunch.
8. Pop the baking sheet into the freezer and let it chill for at least 4 hours, or until it’s completely firm and easy to break.
9. Once frozen solid, remove the sheet from the freezer and break the bark into rustic, irregular pieces with your hands or a knife.
10. Serve immediately or store the pieces in an airtight container in the freezer for up to 2 weeks.
Vibrant and bursting with flavor, this bark delivers a delightful contrast between the creamy, tangy yogurt base and the juicy, frozen berries that pop with every bite. Get creative by drizzling melted dark chocolate over the top before freezing, or swap in tropical fruits like mango and pineapple for a sunny twist—it’s your snack, so make it wildly delicious!
Summary
From smoothies to sorbets, these 20 frozen fruit recipes are your ticket to easy, healthy, and delicious treats all year round. We hope you find a new favorite! Give one a try, then drop a comment below to tell us which you loved. Don’t forget to share this roundup on Pinterest to spread the fruity inspiration. Happy cooking!