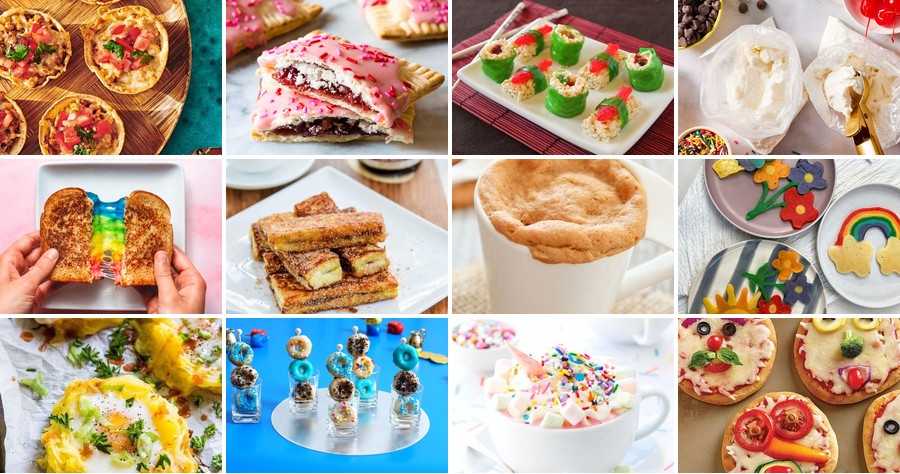
Sick of the same old snacks? Get ready to transform your kitchen into a playground with these 20 creative, fun cooking recipes for kids! We’ve gathered playful, easy-to-make dishes that turn meal prep into family fun, encouraging little chefs to explore flavors and get hands-on. From whimsical breakfasts to silly snacks, these ideas are sure to spark joy—and maybe even a few giggles. Let’s dive in and cook up some fun!
Rainbow Pancake Art

There’s something quietly magical about turning a simple breakfast into a canvas, where each swirl of color feels like a small, personal celebration. This rainbow pancake art lets you play with food in the most joyful way, transforming a morning routine into a moment of creative calm.
Serving: 4 | Pre Time: 20 minutes | Cooking Time: 15 minutes
Ingredients
– 2 cups all-purpose flour, sifted for a lighter batter
– 2 tablespoons granulated sugar, or a bit more if you prefer sweeter pancakes
– 2 teaspoons baking powder
– 1/2 teaspoon salt
– 2 large eggs, at room temperature for better mixing
– 1 3/4 cups whole milk, or buttermilk for a tangier flavor
– 1/4 cup unsalted butter, melted and cooled slightly, or any neutral oil
– 1 teaspoon vanilla extract
– Gel food coloring in red, orange, yellow, green, blue, and purple, as liquid colors can thin the batter too much
– Nonstick cooking spray or extra butter for greasing the pan
Instructions
1. In a large mixing bowl, whisk together the flour, sugar, baking powder, and salt until fully combined.
2. In a separate bowl, beat the eggs lightly, then stir in the milk, melted butter, and vanilla extract until smooth.
3. Pour the wet ingredients into the dry ingredients and gently fold with a spatula until just mixed, being careful not to overmix to avoid tough pancakes.
4. Divide the batter evenly among six small bowls, about 1/2 cup each.
5. Add a small drop of gel food coloring to each bowl—red to one, orange to the next, and so on through purple—and stir until the color is uniform, using separate spoons to prevent cross-coloring.
6. Heat a nonstick skillet or griddle over medium-low heat (about 325°F) and lightly grease it with cooking spray or butter.
7. Spoon small amounts of colored batter onto the skillet in rainbow patterns, such as arcs or swirls, working quickly so the batter cooks evenly; keep the heat low to prevent burning while the art sets.
8. Cook for 2–3 minutes until bubbles form on the surface and the edges look set, then flip carefully with a spatula.
9. Cook for another 1–2 minutes on the second side until golden brown and cooked through, adjusting heat as needed if pancakes brown too fast.
10. Repeat with the remaining batter, regreasing the skillet lightly between batches to ensure easy flipping.
11. Serve the pancakes warm, stacking them to showcase the rainbow layers. Vibrant and fluffy, these pancakes offer a tender bite with a hint of vanilla sweetness, perfect for drizzling with maple syrup or topping with fresh berries to let the colors shine through a quiet breakfast.
DIY Pizza Faces

Years ago, I found myself in a quiet kitchen on a snowy evening like this one, the world outside hushed and still, and I realized that sometimes the simplest meals—the ones we make with our hands, shaping and dreaming—are the ones that truly nourish us. This playful, personal pizza, where each slice becomes a canvas, is a gentle reminder that cooking can be a quiet, creative act, a way to gather warmth and joy even when you’re alone.
Serving: 4 | Pre Time: 20 minutes | Cooking Time: 15 minutes
Ingredients
– 1 pound store-bought pizza dough, at room temperature for easier stretching
– 1/2 cup pizza sauce, or marinara sauce for a smoother base
– 8 ounces low-moisture mozzarella cheese, shredded (about 2 cups)
– 1/4 cup sliced black olives, for eyes or smiles
– 1/4 cup sliced pepperoni, cut into small shapes for features
– 1/4 cup sliced bell peppers, any color, for colorful accents
– 1 tablespoon olive oil, for brushing the crust
– 1/2 teaspoon dried oregano, for a subtle herb note
– All-purpose flour, for dusting the work surface to prevent sticking
Instructions
1. Preheat your oven to 475°F (245°C) and place a pizza stone or baking sheet inside to heat up for at least 30 minutes, which helps create a crispier crust.
2. Lightly dust a clean countertop with all-purpose flour, then gently stretch the pizza dough into a 12-inch circle, taking care not to tear it—if it springs back, let it rest for 5 minutes before continuing.
3. Spread the pizza sauce evenly over the dough, leaving a 1-inch border around the edges for the crust.
4. Sprinkle the shredded mozzarella cheese over the sauce in a thin, even layer to ensure it melts uniformly without pooling.
5. Arrange the sliced black olives, pepperoni, and bell peppers on top to create fun faces or designs, pressing them lightly into the cheese so they adhere during baking.
6. Brush the exposed crust edges with olive oil and sprinkle with dried oregano for added flavor and a golden finish.
7. Carefully transfer the pizza to the preheated stone or baking sheet and bake for 12-15 minutes, until the cheese is bubbly and the crust is golden brown.
8. Remove the pizza from the oven and let it cool on a wire rack for 5 minutes before slicing to allow the cheese to set slightly, preventing a messy cut.
Soft and chewy with a slight crisp at the edges, each bite offers a savory blend of tangy sauce and melted cheese, punctuated by the salty pop of olives and pepperoni. Serve it warm, perhaps with a side salad for balance, or let guests customize their own faces for a shared, interactive meal that sparks laughter and connection.
Monkey Bread Bites

Perhaps there’s no better way to welcome the morning than with the warm, sweet pull of freshly baked dough, especially when it comes in these cozy, shareable bites that feel like a hug from the kitchen.
Serving: 12 | Pre Time: 20 minutes | Cooking Time: 30 minutes
Ingredients
- 2 (16-ounce) cans refrigerated biscuit dough, cut into 1-inch pieces (or homemade dough for a richer flavor)
- 1 cup granulated sugar
- 2 teaspoons ground cinnamon
- 1/2 cup unsalted butter, melted (or use salted butter and reduce added salt)
- 1/2 cup packed light brown sugar
- 1 teaspoon pure vanilla extract
- Non-stick cooking spray, for greasing the pan
Instructions
- Preheat your oven to 350°F and generously grease a 9×13-inch baking pan with non-stick cooking spray.
- In a medium bowl, whisk together the granulated sugar and cinnamon until fully combined.
- Roll each piece of biscuit dough in the cinnamon-sugar mixture until evenly coated, then arrange them in a single layer in the prepared pan.
- In a small saucepan over medium heat, combine the melted butter, brown sugar, and vanilla extract, stirring constantly until the brown sugar dissolves completely, about 3–4 minutes.
- Pour the butter-sugar mixture evenly over the dough pieces in the pan, ensuring all pieces are lightly coated.
- Bake in the preheated oven for 25–30 minutes, or until the top is golden brown and the sauce is bubbling around the edges.
- Remove the pan from the oven and let it cool on a wire rack for 10 minutes to allow the sauce to thicken slightly.
- Tip: For easier serving, run a knife around the edges of the pan before inverting it onto a plate, but be careful as the sauce will be hot.
- Gently pull apart the bites while warm, using forks or your hands, and serve immediately.
Here, each bite offers a soft, pillowy interior with a caramelized, sticky-sweet crust that clings delightfully to your fingers. The warmth of cinnamon melds with the buttery richness, making these perfect for a leisurely brunch or as a sweet treat to pass around with coffee. For a creative twist, drizzle them with a simple glaze or sprinkle with chopped nuts before baking for added texture.
Edible Cookie Dough Pops

Dipping into memories of childhood afternoons, I find myself craving the simple joy of cookie dough—but safe to eat, transformed into something special. These edible cookie dough pops capture that nostalgic sweetness in a playful, shareable form, perfect for holiday gatherings or quiet moments of indulgence. They require no baking, just a bit of patience as they set into delightful little treats.
Serving: 12 pops | Pre Time: 20 minutes | Cooking Time: 0 minutes
Ingredients
– 1 cup all-purpose flour, heat-treated to 165°F for safety (or use pre-toasted flour)
– ½ cup unsalted butter, softened at room temperature for easy mixing
– ½ cup granulated sugar, for sweetness (adjust slightly if preferred)
– ¼ cup brown sugar, packed for a caramel-like depth
– 2 tbsp milk, any type works (or non-dairy alternative)
– 1 tsp vanilla extract, pure for best flavor
– ½ cup mini chocolate chips, or chopped chocolate for texture
– 12 lollipop sticks, for assembling the pops
– ½ cup melting chocolate, dark or milk chocolate for coating (temper for shine)
Instructions
1. Heat-treat the flour by spreading 1 cup all-purpose flour evenly on a baking sheet and baking at 350°F for 5-7 minutes until it reaches 165°F on an instant-read thermometer, then let it cool completely to room temperature to avoid clumping in the dough.
2. In a medium mixing bowl, cream together ½ cup softened unsalted butter, ½ cup granulated sugar, and ¼ cup packed brown sugar using a hand mixer on medium speed for 2-3 minutes until light and fluffy, scraping down the sides with a spatula to ensure even mixing.
3. Add 2 tbsp milk and 1 tsp vanilla extract to the butter-sugar mixture, then mix on low speed for 30 seconds until fully incorporated and smooth.
4. Gradually add the cooled, heat-treated flour to the wet ingredients, mixing on low speed just until combined to avoid overworking the dough, which can make it tough.
5. Fold in ½ cup mini chocolate chips with a spatula until evenly distributed throughout the dough, being gentle to prevent crushing the chips.
6. Scoop the dough into 12 equal portions, about 1.5 tablespoons each, and roll them into smooth balls between your palms, placing them on a parchment-lined baking sheet.
7. Insert a lollipop stick into the center of each dough ball, pushing it about halfway through to secure it firmly without breaking the pop.
8. Freeze the pops on the baking sheet for 15-20 minutes until firm to the touch, which helps the coating adhere better and prevents melting.
9. Melt ½ cup melting chocolate in a microwave-safe bowl in 30-second intervals, stirring between each, until smooth and fluid, being careful not to overheat it to avoid seizing.
10. Dip each frozen pop into the melted chocolate, swirling gently to coat evenly, then let excess drip off by holding it over the bowl for a few seconds.
11. Place the coated pops back on the parchment-lined sheet and let them set at room temperature for 30-60 minutes until the chocolate hardens completely, avoiding refrigeration to prevent condensation.
Oozing with rich, buttery flavor and studded with melty chocolate bits, these pops offer a soft, chewy texture that’s irresistibly nostalgic. Serve them as a fun dessert at parties, or wrap them in clear bags for homemade gifts—they’re sure to bring smiles with every bite.
Fruit Kabob Rainbows
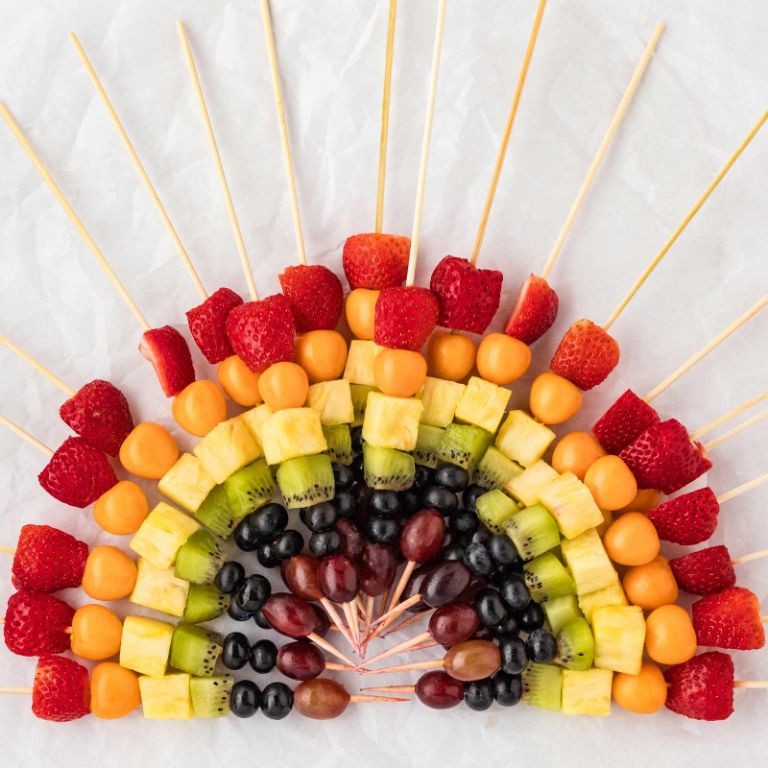
Catching the afternoon light through my kitchen window, I remember how these simple skewers first appeared in my life—a child’s craft turned into a quiet, colorful ritual. They’re less a recipe and more a gentle pause, a way to arrange sweetness with intention.
Serving: 4 | Pre Time: 15 minutes | Cooking Time: 0 minutes
Ingredients
– 1 cup fresh strawberries, hulled and halved (or raspberries for a tart twist)
– 1 cup pineapple chunks, about 1-inch pieces (fresh or canned in juice, drained)
– 1 cup green grapes, whole (seedless varieties work best)
– 1 cup blueberries, whole (rinsed and patted dry)
– 1 cup orange segments, peeled and membranes removed (or mandarin oranges for ease)
– 8 wooden skewers, 6-inch length (soaked in water for 10 minutes to prevent burning if grilling)
– 2 tbsp honey, warmed slightly (or maple syrup for a vegan option)
– 1 tbsp fresh lime juice, from about half a lime (adjust to brighten the flavor)
Instructions
1. Soak 8 wooden skewers in a shallow dish of water for 10 minutes to prevent splintering or charring if you plan to grill them later; pat dry with a towel if using immediately for assembly.
2. Arrange all prepared fruits—strawberry halves, pineapple chunks, green grapes, blueberries, and orange segments—in separate bowls on a clean counter for easy access during skewering.
3. Thread fruits onto each skewer in a repeating rainbow pattern: start with a strawberry half, followed by a pineapple chunk, a green grape, a blueberry, and an orange segment, repeating until the skewer is full but leaving 1 inch bare at the bottom for handling.
4. Tip: For visual appeal, vary the order slightly on some skewers to create a more organic, less uniform look that feels handmade.
5. In a small bowl, warm 2 tbsp of honey in the microwave for 10–15 seconds until it becomes pourable but not hot, then stir in 1 tbsp of fresh lime juice until fully combined.
6. Tip: Test the honey-lime glaze on a fruit piece first; if it’s too thick, add a teaspoon of water to thin it for easier drizzling.
7. Place the assembled kabobs on a serving platter and evenly drizzle the honey-lime mixture over them using a spoon, coating the fruits lightly to avoid sogginess.
8. Tip: Serve immediately or refrigerate for up to 30 minutes to chill slightly, which can enhance the crispness of the fruits without making them mushy.
9. Gently wipe any excess glaze from the platter edges with a damp cloth for a neat presentation.
Vivid and jewel-like, these kabobs offer a crisp, juicy bite with a subtle sweetness from the honey that mellows the bright citrus tang. Serve them nestled on a bed of crushed ice for a festive touch, or pack them in a container for a picnic where their colors seem to glow against green grass.
Mini Taco Cups

Just now, as the afternoon light fades on this quiet December day, I find myself drawn to the kitchen, craving something small, festive, and deeply satisfying—a little handheld celebration. These mini taco cups are that perfect project, a way to turn simple ingredients into playful, shareable bites that feel both nostalgic and new.
Serving: 24 cups | Pre Time: 20 minutes | Cooking Time: 15 minutes
Ingredients
– 24 small flour tortillas (about 6-inch diameter, or corn tortillas for a gluten-free option)
– 1 tablespoon olive oil (or any neutral oil)
– 1 pound ground beef (85% lean, or ground turkey for a lighter version)
– 1 packet (1 oz) taco seasoning
– 1/2 cup water
– 1 cup shredded cheddar cheese (or a Mexican blend for more flavor)
– 1 cup diced tomatoes (fresh or canned, drained well to prevent sogginess)
– 1/2 cup sour cream (or Greek yogurt as a tangy substitute)
– 1/4 cup chopped fresh cilantro (optional, omit if you dislike it)
Instructions
1. Preheat your oven to 375°F (190°C) and lightly grease a 24-cup mini muffin tin with cooking spray or a brush of olive oil.
2. Using a 3-inch round cookie cutter or a glass, cut circles from each flour tortilla—you should get about 24 circles total, re-rolling scraps if needed.
3. Gently press each tortilla circle into a cup of the prepared muffin tin, forming a small cup shape; if they crack slightly, that’s okay, as they’ll hold together when baked.
4. Brush the inside of each tortilla cup lightly with 1 tablespoon of olive oil to help them crisp up in the oven.
5. Bake the tortilla cups in the preheated oven for 8-10 minutes, or until they are golden brown and firm to the touch; remove from the oven and let them cool in the tin for 5 minutes before carefully transferring to a wire rack.
6. While the cups bake, heat a large skillet over medium-high heat and add the ground beef, breaking it up with a spatula as it cooks for 5-7 minutes until no pink remains.
7. Drain any excess fat from the skillet, then stir in the taco seasoning packet and 1/2 cup of water, reducing the heat to medium-low and simmering for 3-4 minutes until the mixture thickens slightly.
8. Spoon about 1 tablespoon of the cooked taco meat into each cooled tortilla cup, filling them about three-quarters full to leave room for toppings.
9. Sprinkle 1 cup of shredded cheddar cheese evenly over the filled cups, using the residual heat to melt it slightly.
10. Top each cup with a teaspoon of diced tomatoes, a small dollop of sour cream, and a pinch of chopped fresh cilantro if using.
11. Serve the mini taco cups immediately while warm, arranging them on a platter for easy grabbing.
Momentarily, as you bite into one, the crisp shell gives way to the savory, spiced beef and gooey cheese, with the cool tomatoes and sour cream adding a refreshing contrast. For a fun twist, set out extra toppings like sliced jalapeños or avocado for guests to customize their own—these little cups are as versatile as they are delightful, perfect for holiday gatherings or a cozy night in.
Spaghetti Squash Nests with Eggs

Yesterday, as winter light faded through my kitchen window, I found myself craving something warm and wholesome—a dish that felt like a quiet morning ritual. Spaghetti squash nests with eggs became that gentle comfort, transforming simple strands into delicate cups cradling softly set yolks. It’s a recipe that moves slowly, inviting you to savor each step like pages in a journal.
Serving: 4 | Pre Time: 15 minutes | Cooking Time: 45 minutes
Ingredients
– 1 medium spaghetti squash (about 3 pounds), halved lengthwise and seeded
– 4 large eggs
– 2 tablespoons olive oil, or any neutral oil
– 1/2 teaspoon salt, adjust to taste
– 1/4 teaspoon black pepper, freshly ground if possible
– 1/4 cup grated Parmesan cheese, plus extra for serving
– 2 tablespoons chopped fresh parsley, for garnish
Instructions
1. Preheat your oven to 400°F (200°C) and line a baking sheet with parchment paper.
2. Brush the cut sides of the spaghetti squash halves evenly with 1 tablespoon of olive oil, then sprinkle with 1/4 teaspoon of salt and 1/8 teaspoon of black pepper.
3. Place the squash halves cut-side down on the prepared baking sheet and roast for 30–35 minutes, until the flesh is tender when pierced with a fork.
4. Remove the squash from the oven and let it cool for 5 minutes, just until it’s safe to handle.
5. Use a fork to scrape the squash flesh into strands, transferring them to a medium bowl while keeping the squash shells intact—this creates your “nests.”
6. In the bowl, toss the squash strands with the remaining 1 tablespoon of olive oil, 1/4 teaspoon of salt, 1/8 teaspoon of black pepper, and 1/4 cup of grated Parmesan cheese until well combined.
7. Divide the seasoned squash mixture evenly among the four squash shells, pressing gently to form nest-like indentations in the center of each.
8. Crack one egg into the center of each squash nest, being careful not to break the yolk.
9. Return the filled nests to the baking sheet and bake at 400°F (200°C) for 10–12 minutes, until the egg whites are fully set but the yolks remain slightly runny.
10. Remove from the oven and let rest for 2 minutes before garnishing with chopped fresh parsley and extra Parmesan cheese if desired.
Now, as you lift a fork, notice how the tender squash strands cradle the creamy egg yolk, creating a texture that’s both light and satisfying. The subtle sweetness of the squash pairs beautifully with the savory Parmesan, making each bite a quiet celebration of simple ingredients. For a creative twist, serve these nests alongside a crisp green salad or top with a drizzle of hot sauce to add a gentle kick.
Homemade Pop-Tarts
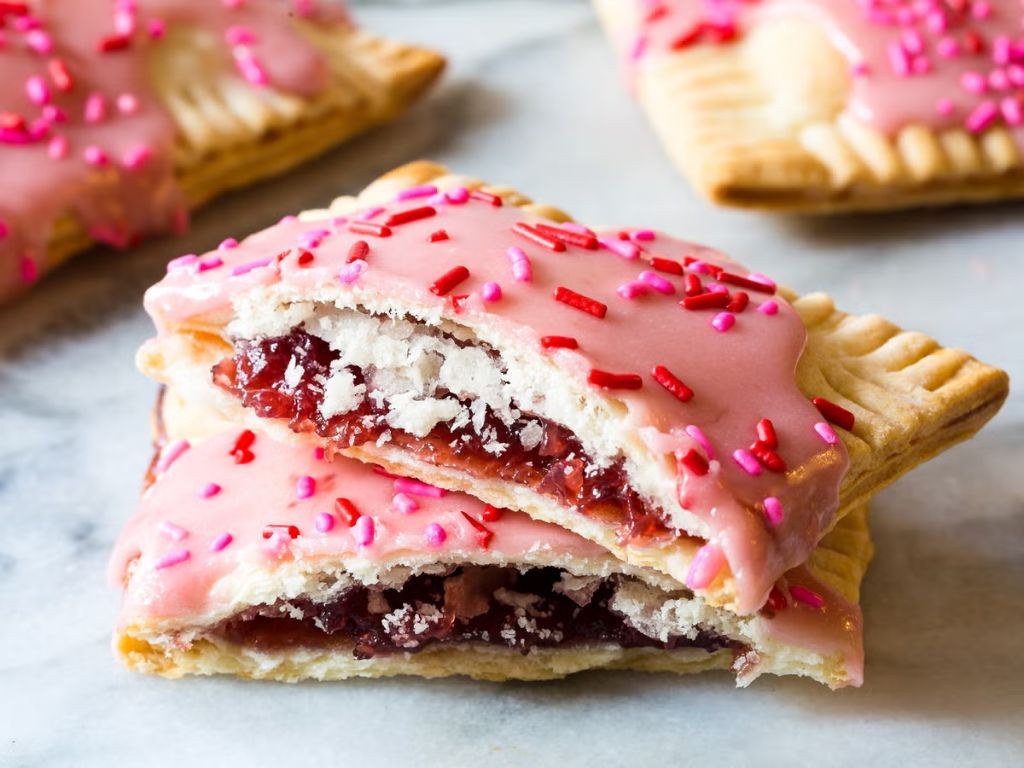
Evenings like this, when the kitchen light casts a soft glow and the world outside feels still, I find myself reaching for the simple comfort of making something sweet from scratch. There’s a quiet joy in rolling out dough and filling it with jam, a small act of creation that feels both nostalgic and deeply personal. Today, let’s make homemade pop-tarts—a treat that’s far more tender and flavorful than anything from a box.
Serving: 8 | Pre Time: 30 minutes | Cooking Time: 20 minutes
Ingredients
– 2 cups all-purpose flour, plus extra for dusting
– 1/2 teaspoon salt
– 1 cup (2 sticks) unsalted butter, cold and cubed
– 1/4 cup cold water
– 1/2 cup strawberry jam, or any fruit preserve you prefer
– 1 large egg, lightly beaten for egg wash
– 1 cup powdered sugar
– 2 tablespoons milk, adjust for desired glaze consistency
– 1/2 teaspoon vanilla extract
Instructions
1. In a large bowl, whisk together 2 cups of all-purpose flour and 1/2 teaspoon salt until combined.
2. Add 1 cup of cold, cubed unsalted butter to the flour mixture, using a pastry cutter or your fingers to work it in until the mixture resembles coarse crumbs.
3. Gradually drizzle in 1/4 cup of cold water, stirring with a fork until the dough just comes together into a shaggy ball.
4. Turn the dough out onto a lightly floured surface and gently knead it 2-3 times to form a smooth disk. Wrap in plastic wrap and refrigerate for 30 minutes to chill.
5. Preheat your oven to 375°F and line a baking sheet with parchment paper.
6. On a floured surface, roll the chilled dough into a rectangle about 1/8-inch thick. Use a knife or pastry wheel to cut it into 16 equal rectangles, approximately 3×4 inches each.
7. Place 8 of the dough rectangles on the prepared baking sheet, spacing them about 1 inch apart.
8. Spoon about 1 tablespoon of strawberry jam onto the center of each rectangle on the baking sheet, leaving a 1/2-inch border around the edges.
9. Brush the edges of the jam-covered rectangles lightly with the beaten egg wash.
10. Place the remaining 8 dough rectangles on top of the jam-filled ones, gently pressing the edges with a fork to seal them completely.
11. Use a fork to prick the top of each pop-tart 3-4 times to allow steam to escape during baking.
12. Bake in the preheated oven at 375°F for 18-20 minutes, or until the pastries are golden brown and crisp. Let them cool on the baking sheet for 10 minutes.
13. While the pop-tarts cool, whisk together 1 cup of powdered sugar, 2 tablespoons of milk, and 1/2 teaspoon of vanilla extract in a small bowl until smooth to make the glaze.
14. Drizzle the glaze over the cooled pop-tarts, letting it set for 5 minutes before serving.
Nothing beats the flaky, buttery layers that shatter with each bite, giving way to the sweet, jammy center. The vanilla glaze adds a delicate sweetness that complements the fruit without overwhelming it. For a fun twist, try serving them warm with a scoop of vanilla ice cream or dusting them with cinnamon sugar before baking for a spiced variation.
Unicorn Hot Chocolate

Evenings like this, when the world outside quiets and the kitchen light glows softly, call for something magical to stir the soul. Unicorn hot chocolate transforms a simple winter ritual into a whimsical, colorful escape, blending creamy comfort with playful hues that feel like a gentle hug in a mug.
Serving: 2 | Pre Time: 5 minutes | Cooking Time: 10 minutes
Ingredients
– 2 cups whole milk (or dairy-free alternative like almond milk, for richness)
– 1/4 cup white chocolate chips (or chopped bar, for a smooth base)
– 1/4 cup heavy cream (optional, for extra creaminess)
– 1/4 teaspoon vanilla extract (pure, not imitation, for best flavor)
– 1/8 teaspoon almond extract (adjust to taste, adds subtle depth)
– Pink, blue, and purple gel food coloring (a drop each, for vibrant swirls)
– Whipped cream, for topping (homemade or store-bought)
– Rainbow sprinkles, for garnish (or edible glitter, for extra sparkle)
Instructions
1. Pour 2 cups of whole milk into a small saucepan and heat over medium-low heat until it reaches 160°F, stirring occasionally to prevent scorching—use a kitchen thermometer for accuracy.
2. Add 1/4 cup white chocolate chips to the warmed milk, stirring constantly with a whisk until fully melted and smooth, about 2–3 minutes; this creates a silky base without lumps.
3. Stir in 1/4 cup heavy cream, 1/4 teaspoon vanilla extract, and 1/8 teaspoon almond extract, mixing well to combine all flavors evenly.
4. Remove the saucepan from heat and divide the hot chocolate equally between two mugs, filling each about three-quarters full to leave room for toppings.
5. Add one drop each of pink, blue, and purple gel food coloring to different sections of each mug, then gently swirl with a spoon or skewer to create marbled patterns without overmixing—this keeps the colors distinct.
6. Top each mug with a generous dollop of whipped cream, spreading it evenly to cover the surface.
7. Sprinkle rainbow sprinkles over the whipped cream, aiming for a colorful, even distribution.
8. Serve immediately while warm, using a spoon to stir lightly if desired to blend the swirls as you drink.
Zesty yet soothing, this hot chocolate offers a velvety texture that melts on the tongue, with the almond extract adding a whisper of nuttiness beneath the sweet creaminess. For a festive twist, serve it alongside sugar cookies dusted with edible glitter, letting the colors shimmer under soft candlelight as a cozy centerpiece for quiet winter nights.
Stuffed French Toast Sticks
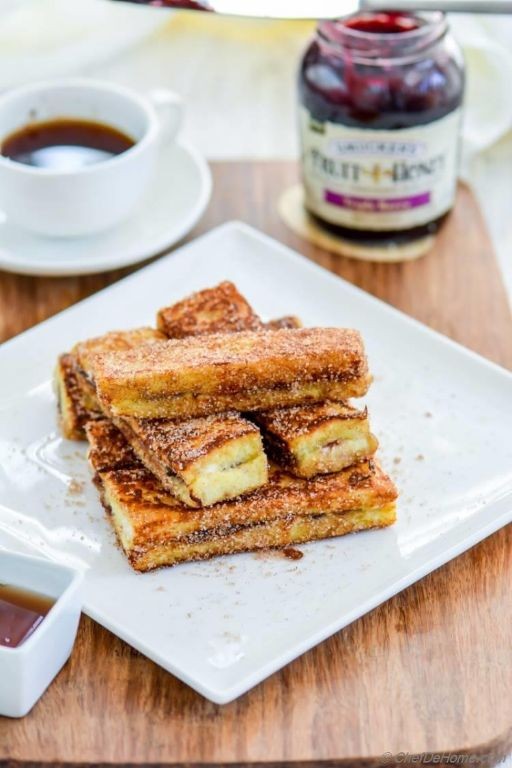
Unwrapping the morning slowly, I find myself craving something that feels both indulgent and comforting, a little pocket of sweetness to hold in your hands. These stuffed French toast sticks are just that—a familiar breakfast treat turned into a portable, shareable delight, perfect for a lazy weekend or a festive brunch.
Serving: 4 | Pre Time: 15 minutes | Cooking Time: 10 minutes
Ingredients
– 8 slices of thick-cut brioche bread, about 1 inch thick (stale bread works best for soaking)
– 4 oz cream cheese, softened to room temperature for easy mixing
– 1/4 cup strawberry jam, or any fruit preserve you prefer
– 3 large eggs
– 1/2 cup whole milk
– 1 tsp vanilla extract
– 1/2 tsp ground cinnamon
– 2 tbsp unsalted butter, for frying (or more as needed)
– Maple syrup, for serving (warm it slightly for a better drizzle)
Instructions
1. In a small bowl, combine the softened cream cheese and strawberry jam until smooth, using a fork or spatula. 2. Lay out the brioche slices on a cutting board. 3. Spread about 1 tablespoon of the cream cheese mixture evenly onto one slice of bread, leaving a small border around the edges. 4. Place another slice of bread on top to form a sandwich, pressing gently to seal. 5. Cut each sandwich into three equal sticks, about 1 inch wide. 6. In a shallow dish, whisk together the eggs, whole milk, vanilla extract, and ground cinnamon until fully combined and frothy. 7. Dip each bread stick into the egg mixture, turning to coat all sides evenly, and let it soak for about 10 seconds per side—avoid over-soaking to prevent sogginess. 8. Heat a large skillet or griddle over medium heat (around 350°F) and melt 1 tablespoon of butter until it bubbles slightly. 9. Place the coated sticks in the skillet in a single layer, cooking for 2-3 minutes per side until golden brown and crisp. 10. Add more butter as needed for subsequent batches, adjusting the heat to medium-low if they brown too quickly. 11. Transfer the cooked sticks to a wire rack or paper towel-lined plate to drain any excess butter. 12. Repeat steps 7-11 with the remaining sticks. 13. Serve immediately while warm.
Golden and crisp on the outside, these sticks give way to a soft, creamy center that melts with each bite. Drizzle with warm maple syrup for extra sweetness, or get creative by dusting with powdered sugar and serving with fresh berries on the side for a burst of color and freshness.
Cookie Butter Mug Cake
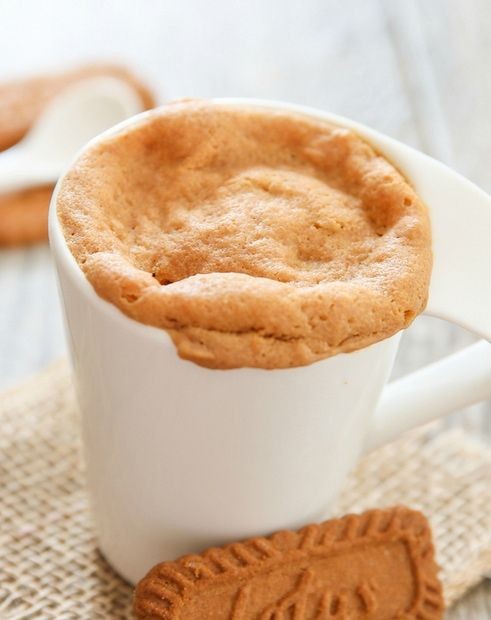
Lately, I’ve been craving something sweet and comforting, a little treat that feels like a warm hug on a quiet evening. This cookie butter mug cake is just that—a single-serving delight that comes together in minutes, filling the kitchen with the cozy, spiced aroma of speculoos. It’s the perfect indulgence for when you need a moment of gentle sweetness all to yourself.
Serving: 1 | Pre Time: 2 minutes | Cooking Time: 1 minute
Ingredients
– 3 tbsp all-purpose flour
– 2 tbsp granulated sugar
– ¼ tsp baking powder
– 2 tbsp milk (or any non-dairy alternative)
– 1 tbsp vegetable oil (or any neutral oil)
– 2 tbsp cookie butter (speculoos spread), plus extra for topping if desired
– A pinch of salt
Instructions
1. In a microwave-safe mug, whisk together 3 tbsp all-purpose flour, 2 tbsp granulated sugar, ¼ tsp baking powder, and a pinch of salt until no lumps remain.
2. Add 2 tbsp milk and 1 tbsp vegetable oil to the dry ingredients, stirring gently until just combined to avoid overmixing, which can make the cake tough.
3. Spoon 2 tbsp cookie butter into the center of the batter, pushing it down slightly with the back of a spoon so it’s submerged but not fully mixed in—this creates a gooey, molten core as it cooks.
4. Microwave the mug on high for 60 seconds, checking at 50 seconds; the cake is done when the top looks set and springs back lightly to the touch, as microwaves vary in power.
5. Let the mug cake cool for 1-2 minutes to allow it to firm up slightly and avoid burning your mouth, then enjoy warm.
Buttery and rich, this mug cake emerges with a tender crumb that gives way to a luscious, molten cookie butter center. The subtle spice from the speculoos melds beautifully with the sweet batter, making each spoonful a cozy delight. For an extra touch, drizzle a little more cookie butter on top or serve with a scoop of vanilla ice cream to contrast the warmth.
Rainbow Grilled Cheese
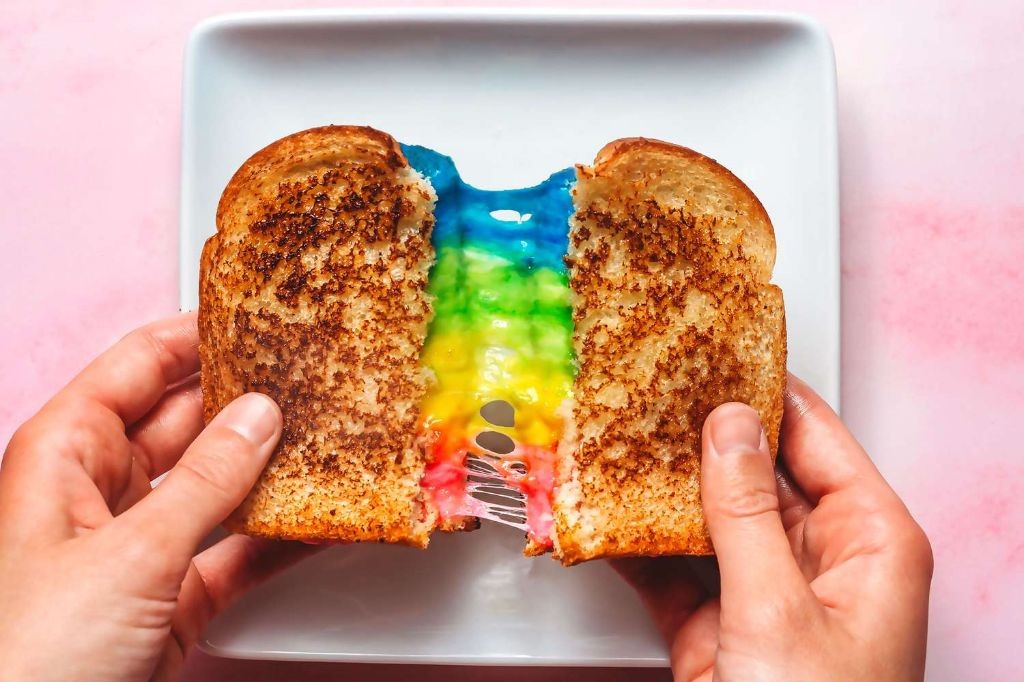
Beneath the quiet hum of the kitchen light, there’s a simple comfort in transforming humble slices into something that feels like a celebration. This rainbow grilled cheese is a gentle twist on a classic, layering colors and flavors for a sandwich that’s as joyful to make as it is to eat. It’s a small, warm project for a slow afternoon, turning basic ingredients into a canvas of melted goodness.
Serving: 2 | Pre Time: 10 minutes | Cooking Time: 10 minutes
Ingredients
– 4 slices white sandwich bread, such as brioche or sourdough for better structure
– 4 tbsp unsalted butter, softened to room temperature for easy spreading
– 4 slices mild cheddar cheese, about 1 oz each, or American cheese for extra melt
– 4 slices provolone cheese, about 1 oz each
– 1/4 cup finely chopped red bell pepper, for a sweet crunch
– 1/4 cup finely chopped yellow bell pepper, for a bright note
– 1/4 cup finely chopped orange bell pepper, or substitute with carrot for color
– 1/4 cup baby spinach leaves, roughly torn, packed lightly
– 1/8 tsp garlic powder, optional for a subtle savory hint
Instructions
1. Place the red, yellow, and orange bell peppers in a small bowl and toss them gently with the garlic powder, if using, to coat evenly.
2. Lay out the 4 slices of bread on a clean work surface and spread 1/2 tbsp of softened butter evenly over one side of each slice, covering the entire surface to prevent burning.
3. Flip 2 slices of bread over so the unbuttered sides face up, then place 1 slice of cheddar cheese on each, followed by a layer of the mixed bell peppers, dividing them equally between the slices.
4. Add the torn baby spinach leaves on top of the peppers, pressing them down lightly to create an even layer that won’t shift during cooking.
5. Place 1 slice of provolone cheese over the spinach on each sandwich, then top with the remaining 2 slices of bread, buttered sides facing out to form two complete sandwiches.
6. Heat a large skillet or griddle over medium-low heat, about 300°F, and let it warm for 2 minutes until a drop of water sizzles gently—this lower heat ensures the cheese melts fully without burning the bread.
7. Carefully place both sandwiches in the skillet and cook for 4-5 minutes, pressing down lightly with a spatula occasionally, until the bottom bread is golden brown and crisp.
8. Flip the sandwiches using the spatula and cook for another 3-4 minutes on the second side, until equally golden and the cheese is visibly melted and oozing slightly at the edges.
9. Transfer the sandwiches to a cutting board, let them rest for 1 minute to set the layers, then slice each in half diagonally with a sharp knife for clean cuts.
Unwrapping this sandwich reveals a gooey, layered center where the mild cheeses blend into a creamy pool, punctuated by the sweet crunch of peppers and the fresh whisper of spinach. Serve it warm with a side of tomato soup for dipping, or let it cool slightly to appreciate the contrast between the crisp, buttery exterior and the soft, colorful interior—a simple meal that feels like a quiet moment of joy.
DIY Ice Cream in a Bag
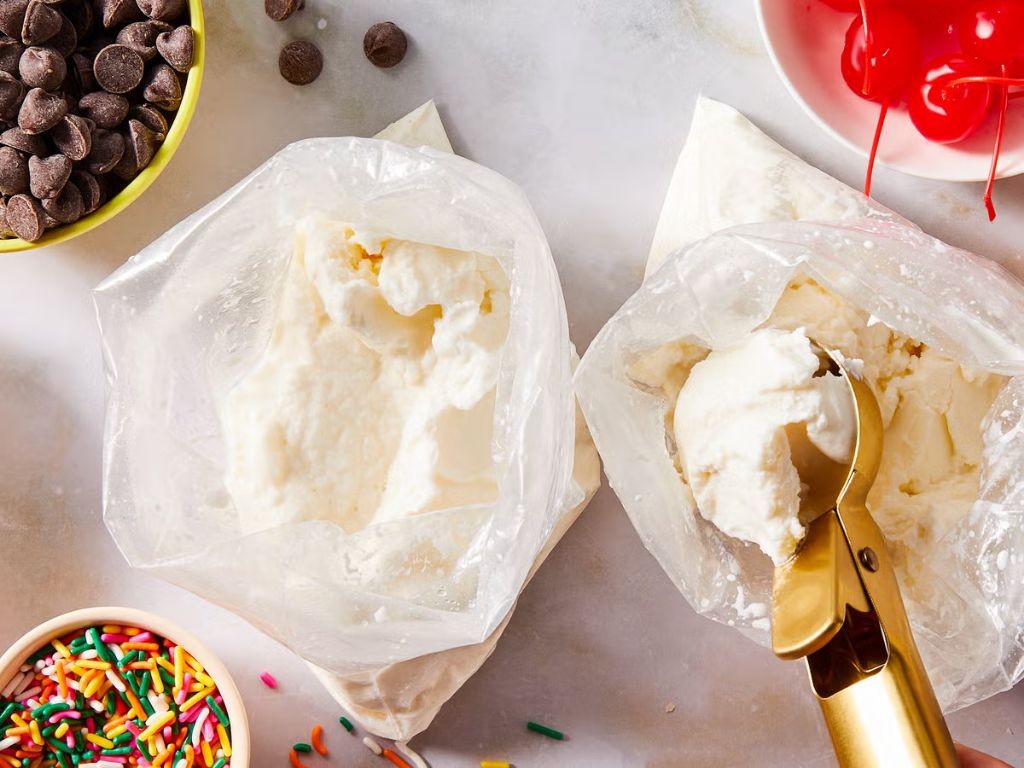
Maybe it’s the quiet hum of the afternoon, or the way the light slants through the kitchen window, but there’s something deeply soothing about making ice cream with your own two hands. It feels less like a recipe and more like a small, edible miracle—a bit of science and a lot of joy, all shaken up in a bag.
Serving: 2 | Pre Time: 5 minutes | Cooking Time: 10 minutes
Ingredients
– 1 cup heavy cream (chilled for at least 30 minutes)
– 2 tablespoons granulated sugar
– 1 teaspoon pure vanilla extract
– 3 cups ice cubes
– ⅓ cup kosher salt or rock salt (for lowering the freezing point)
Instructions
1. In a small, sealable plastic bag (like a quart-sized freezer bag), combine the heavy cream, granulated sugar, and vanilla extract.
2. Press out any excess air from the bag and seal it tightly, ensuring no liquid can escape.
3. Fill a large, gallon-sized sealable plastic bag halfway with the ice cubes.
4. Sprinkle the kosher salt evenly over the ice cubes in the large bag. The salt will cause the ice to melt slightly and create a super-cold brine.
5. Place the sealed small bag containing the cream mixture inside the large bag with the ice and salt.
6. Seal the large bag tightly, again pressing out as much air as possible.
7. Wrap the sealed large bag in a kitchen towel or wear oven mitts to protect your hands from the cold.
8. Shake the bag vigorously for 5 full minutes. You’ll feel the cream mixture begin to thicken and pull away from the sides of the inner bag.
9. After 5 minutes, carefully open the large bag and remove the small inner bag. Wipe any salt water from its exterior with a dry towel.
10. Open the small bag and check the consistency. The mixture should be thick and creamy, like soft-serve ice cream. If it’s still too liquid, reseal it, return it to the ice bath, and shake for another 2-3 minutes.
11. Scoop the ice cream directly from the bag into bowls or cones for serving.
A soft, dreamy texture emerges, rich from the cream and fragrant with vanilla. It’s best eaten immediately, still slightly soft, perhaps drizzled with a ribbon of chocolate sauce or topped with a handful of crushed cookies for a playful crunch.
Mini Donut Kabobs
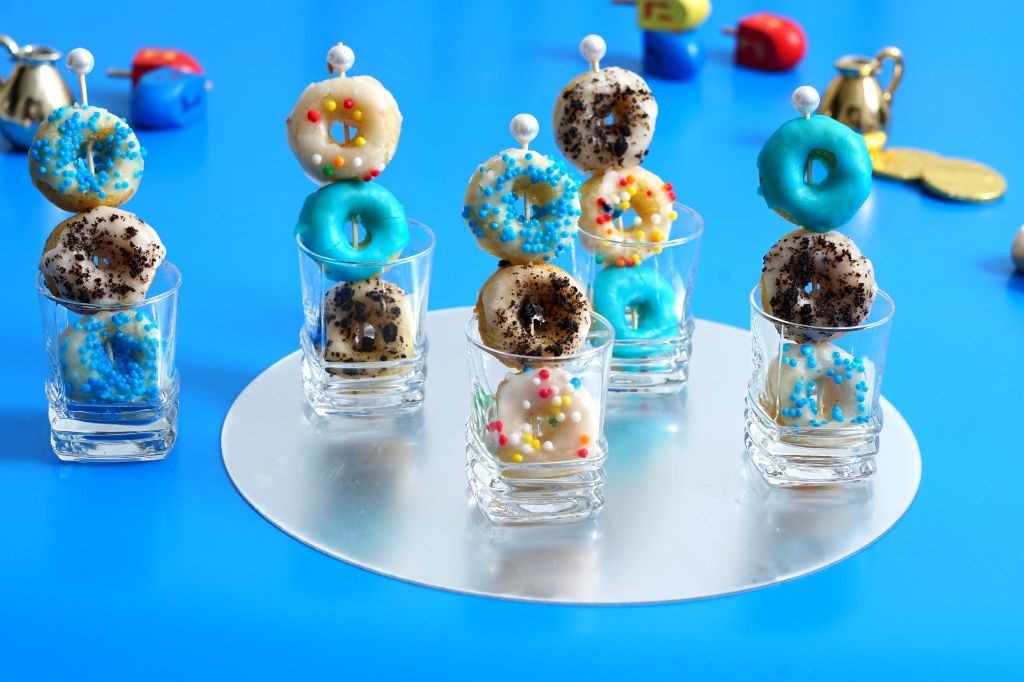
Now, as the afternoon light fades on this quiet December day, I find myself drawn to the simple joy of assembling these little treats. There’s something deeply comforting about threading miniature donuts onto skewers, a small, hands-on ritual that feels both festive and personal.
Serving: 12 kabobs | Pre Time: 15 minutes | Cooking Time: 10 minutes
Ingredients
– 24 mini cake donuts, store-bought or homemade
– 1 cup semisweet chocolate chips
– 2 tbsp coconut oil, or any neutral oil for thinning
– 1/2 cup rainbow sprinkles, adjust for more color if desired
– 12 wooden skewers, 6-inch size works well
Instructions
1. Line a baking sheet with parchment paper and set it aside.
2. Thread two mini donuts onto each wooden skewer, leaving about 1 inch at the bottom for holding.
3. Place the chocolate chips and coconut oil in a microwave-safe bowl.
4. Microwave the mixture on high for 30 seconds, then stir until smooth; if needed, heat in 15-second intervals, stirring each time, to avoid burning.
5. Hold a donut kabob over the bowl and use a spoon to drizzle the melted chocolate evenly over the donuts, rotating the skewer for full coverage.
6. Immediately after drizzling, hold the kabob over a plate and sprinkle rainbow sprinkles over the chocolate before it sets, tapping lightly to remove excess.
7. Place each finished kabob on the prepared baking sheet.
8. Let the kabobs sit at room temperature for 20 minutes, or until the chocolate hardens completely; for faster setting, you can refrigerate them for 10 minutes.
9. Serve the kabobs on a platter, arranging them in a circular pattern for a festive display.
Each bite offers a delightful contrast: the soft, cakey donut gives way to a crisp chocolate shell that melts on the tongue, punctuated by the subtle crunch of sprinkles. For a playful twist, try alternating donuts with fresh berries on the skewers, or drizzle with white chocolate for a snowy winter effect.
Cheesy Pull-Apart Bread Snakes
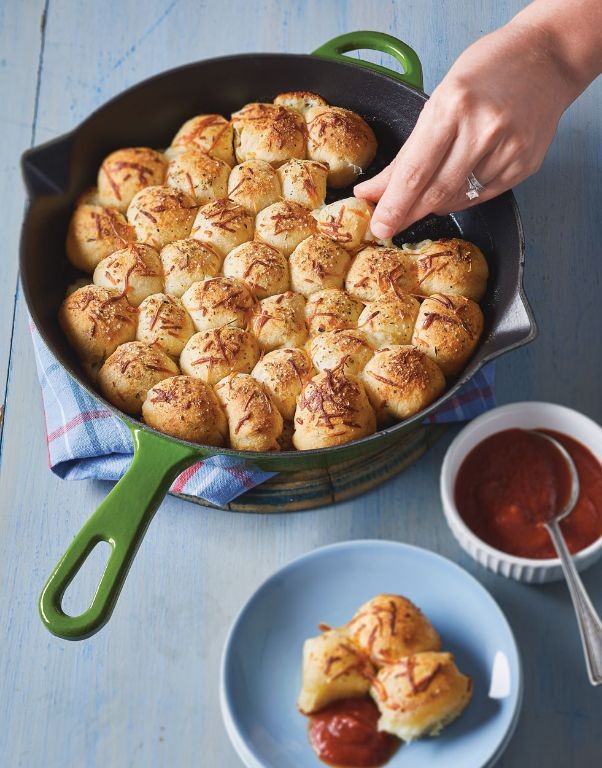
Under the soft glow of the kitchen light, there’s a quiet magic in transforming simple dough into something playful and warm. It’s a process that invites patience, the gentle stretch and fold of the hands creating a canvas for gooey pockets of cheese. This recipe is a cozy project for a slow afternoon, yielding a shareable treat that feels both nostalgic and new.
Serving: 8 | Pre Time: 20 minutes | Cooking Time: 25 minutes
Ingredients
– 1 (16-ounce) tube refrigerated pizza dough, at room temperature for 30 minutes
– 1 cup shredded mozzarella cheese, or a blend for more flavor
– 1/2 cup shredded cheddar cheese
– 1/4 cup grated Parmesan cheese
– 2 tablespoons unsalted butter, melted
– 1 teaspoon garlic powder, adjust to taste
– 1 teaspoon dried parsley, or fresh if available
– 1/4 teaspoon salt, optional for extra seasoning
Instructions
1. Preheat your oven to 375°F (190°C) and line a baking sheet with parchment paper.
2. On a lightly floured surface, roll out the pizza dough into a 12×8-inch rectangle, about 1/4-inch thick.
3. In a medium bowl, combine the mozzarella, cheddar, and Parmesan cheeses evenly.
4. Sprinkle the cheese mixture evenly over the entire surface of the dough, leaving a 1/2-inch border on all sides.
5. Starting from a long side, tightly roll the dough into a log, pinching the seam to seal it closed.
6. Using a sharp knife, cut the log in half lengthwise, exposing the layers of cheese inside.
7. Twist the two halves together gently, keeping the cut sides facing up to form a braided snake shape.
8. Transfer the twisted dough to the prepared baking sheet, coiling it slightly to fit.
9. In a small bowl, mix the melted butter, garlic powder, dried parsley, and salt until smooth.
10. Brush the butter mixture generously over the entire surface of the dough snake.
11. Bake in the preheated oven for 22-25 minutes, until the bread is golden brown and the cheese is bubbly.
12. Remove from the oven and let it cool on the baking sheet for 5 minutes before serving.
Much like a warm hug, this bread emerges from the oven with a crisp, golden exterior that gives way to soft, pillowy layers inside. The melted cheeses create stretchy, savory pockets that mingle with the buttery garlic aroma, making each pull-apart piece irresistibly gooey. Serve it alongside a bowl of marinara sauce for dipping, or tear it apart straight from the coil for a casual, hands-on snack that brings everyone together.
Chocolate-Covered Banana Pops
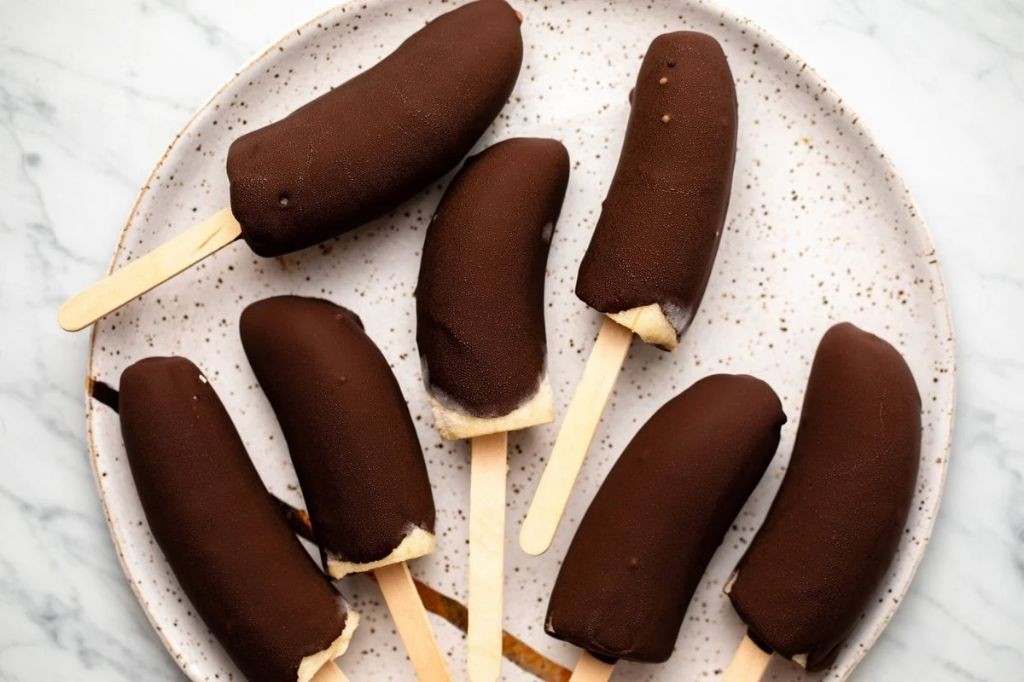
Yesterday, as the afternoon light faded into a soft December glow, I found myself craving something simple yet celebratory—a treat that felt both nostalgic and new, like a quiet moment of sweetness in the bustling season. It’s in these gentle pauses that I turn to the kitchen, where a few humble ingredients can transform into something magical, like these chocolate-covered banana pops that remind me of childhood fairs and cozy winter evenings.
Serving: 8 | Pre Time: 20 minutes | Cooking Time: 0 minutes
Ingredients
– 4 ripe bananas, peeled and cut in half crosswise (choose firm ones to prevent mushiness)
– 8 wooden popsicle sticks
– 2 cups semisweet chocolate chips (or dark chocolate for a richer flavor)
– 1 tablespoon coconut oil (or any neutral oil to help thin the chocolate)
– ½ cup chopped peanuts (optional, for a crunchy topping)
– ¼ cup rainbow sprinkles (optional, for a festive touch)
Instructions
1. Line a baking sheet with parchment paper and set it aside on a flat surface.
2. Insert a wooden popsicle stick into the cut end of each banana half, pushing it about halfway through to secure it firmly.
3. Place the banana pops on the prepared baking sheet and freeze them for 15 minutes to firm up, which helps the chocolate coat evenly without sliding off.
4. In a microwave-safe bowl, combine the chocolate chips and coconut oil, then microwave in 30-second intervals, stirring between each, until fully melted and smooth—this prevents burning and ensures a glossy finish.
5. Remove the banana pops from the freezer and hold one by the stick, dipping it into the melted chocolate to coat completely, allowing any excess to drip back into the bowl.
6. Immediately sprinkle the chocolate-coated banana with chopped peanuts or rainbow sprinkles, if using, before the chocolate sets to ensure the toppings adhere well.
7. Return each coated banana pop to the parchment-lined baking sheet and repeat with the remaining bananas.
8. Freeze the banana pops for at least 1 hour, or until the chocolate is fully hardened and firm to the touch.
9. Serve directly from the freezer, storing any leftovers in an airtight container to maintain texture.
Soft and creamy on the inside with a crisp chocolate shell, these pops offer a delightful contrast that melts slowly on the tongue. Sometimes, I like to drizzle them with a bit of caramel or serve alongside a scoop of vanilla ice cream for an extra indulgent twist, making them perfect for sharing on a chilly evening or as a sweet surprise after dinner.
Breakfast Sushi Rolls

Unrolling the morning, I find myself craving something playful yet nourishing—a quiet kitchen experiment that turns the ordinary into a small, handheld celebration. Breakfast sushi rolls invite a gentle start, wrapping familiar comforts in a new, whimsical form that feels both comforting and curiously inventive.
Serving: 2 | Pre Time: 15 minutes | Cooking Time: 10 minutes
Ingredients
– 2 large eggs, beaten (for a fluffier texture)
– 1/4 cup whole milk or cream (adds richness)
– 1/4 tsp salt, plus more for seasoning
– 1 tbsp unsalted butter (or a neutral oil like avocado oil)
– 2 slices whole-wheat bread, crusts removed (white bread works too)
– 2 tbsp cream cheese, softened (for easy spreading)
– 4 slices cooked bacon, crispy (turkey bacon is a lighter option)
– 1/4 avocado, thinly sliced (ripe but firm)
– 1 tbsp maple syrup (for drizzling, adjust to sweetness preference)
Instructions
1. In a small bowl, whisk together the beaten eggs, milk, and 1/4 tsp salt until fully combined and slightly frothy.
2. Heat a non-stick skillet over medium-low heat (about 300°F) and melt the butter, swirling to coat the surface evenly.
3. Pour the egg mixture into the skillet and let it cook undisturbed for 2-3 minutes, until the edges set and the center is mostly firm but still slightly wet.
4. Gently flip the egg sheet using a spatula and cook for another 1-2 minutes until fully set and lightly golden, then transfer to a plate to cool slightly—this prevents tearing when rolling.
5. Lay the egg sheet flat on a clean surface and place the bread slices side by side on top, pressing lightly to adhere.
6. Spread the softened cream cheese evenly over the bread, leaving a 1/2-inch border at the top edge to prevent overflow.
7. Arrange the crispy bacon slices and avocado slices in a line along the bottom edge of the bread.
8. Starting from the bottom, tightly roll the assembly upward, using the egg sheet to encase everything, and press gently to seal the edge.
9. Slice the roll into 1-inch pieces with a sharp knife, wiping it clean between cuts for neat edges.
10. Drizzle the maple syrup over the slices just before serving to add a touch of sweetness that balances the savory notes.
This yields rolls with a soft, pillowy texture from the egg-wrapped bread, contrasting with the crisp bacon and creamy avocado inside. The subtle sweetness of the maple syrup ties it all together, making these perfect for a leisurely weekend brunch or as a fun, packable treat for on-the-go mornings.
Rainbow Veggie Pinwheels

Kindly, as the afternoon light softens on this December day, I find myself drawn to the kitchen counter, where colors and textures invite a quiet moment of creation. These pinwheels are less a recipe and more a gentle assembly, a way to gather the season’s bright offerings into something both playful and nourishing, perfect for sharing or savoring alone.
Serving: 8 | Pre Time: 25 minutes | Cooking Time: 0 minutes
Ingredients
– 2 large flour tortillas (10-inch, burrito-size)
– 4 oz cream cheese, softened to room temperature for easy spreading
– 2 tbsp mayonnaise
– 1/4 tsp garlic powder
– 1/4 tsp onion powder
– 1/4 tsp dried dill
– 1/8 tsp salt
– 1/2 cup shredded carrots
– 1/2 cup thinly sliced red bell pepper
– 1/2 cup thinly sliced yellow bell pepper
– 1 cup fresh baby spinach leaves, packed
– 4 large slices deli turkey, thinly sliced
Instructions
1. Lay one flour tortilla flat on a clean cutting board.
2. In a small bowl, combine the softened cream cheese, mayonnaise, garlic powder, onion powder, dried dill, and salt until smooth and fully incorporated.
3. Using a spatula or the back of a spoon, spread the cream cheese mixture evenly over the entire surface of the tortilla, leaving a 1/2-inch border around the edges.
4. Sprinkle the shredded carrots in a horizontal line across the center third of the tortilla.
5. Arrange the thinly sliced red and yellow bell peppers in alternating strips next to the carrot line.
6. Layer the fresh baby spinach leaves evenly over the bell peppers.
7. Place the slices of deli turkey flat on top of the spinach layer, covering it completely.
8. Starting from the edge closest to you, tightly roll the tortilla away from you, applying gentle pressure to keep the fillings compact.
9. Wrap the rolled tortilla snugly in plastic wrap.
10. Repeat steps 1 through 9 with the second tortilla and remaining ingredients.
11. Place both wrapped rolls in the refrigerator for at least 1 hour, or until firm, which makes slicing cleaner and prevents crumbling.
12. Unwrap the chilled rolls and place them on the cutting board.
13. Using a sharp serrated knife, trim off the uneven ends of each roll, about 1/2 inch from each side.
14. Slice each roll into 1-inch thick pinwheels, wiping the knife blade clean between cuts for neat edges.
15. Arrange the pinwheels on a serving platter.
The chilled cream cheese binds the crisp vegetables and tender turkey into a satisfying, cool bite, with the dill and garlic whispering in the background. Serve them nestled on a bed of extra spinach for a lush presentation, or pack them in a lunchbox where their vibrant spirals will feel like a secret gift.
DIY Candy Sushi
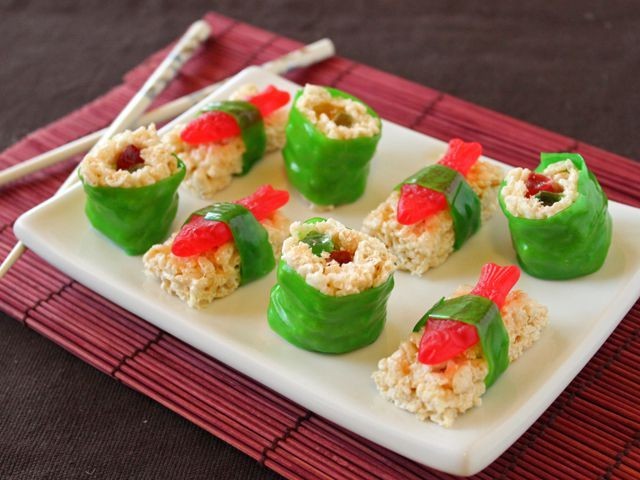
Beneath the quiet hum of the kitchen light, there’s a simple joy in transforming the ordinary into something whimsical and sweet, a playful twist on tradition that feels like crafting edible art. This DIY candy sushi invites you to slow down and create, using familiar treats to build something delightfully unexpected, perfect for a calm afternoon or a festive gathering where imagination takes the lead.
Serving: 8 pieces | Pre Time: 20 minutes | Cooking Time: 0 minutes
Ingredients
– 1 cup Rice Krispies cereal
– 3 tbsp unsalted butter, melted (or use vegan butter for a dairy-free option)
– 2 cups mini marshmallows
– 1/4 cup green fruit leather, cut into thin strips (like Fruit by the Foot, for a seaweed wrap effect)
– 1/2 cup gummy fish or worms, chopped into small pieces (such as Swedish Fish, for a sushi filling)
– 1 tbsp rainbow sprinkles (optional, for extra color and crunch)
– Cooking spray, for greasing hands and surfaces
Instructions
1. Lightly spray a medium mixing bowl and your hands with cooking spray to prevent sticking.
2. In a large microwave-safe bowl, combine the Rice Krispies cereal and melted butter, stirring gently to coat evenly.
3. Add the mini marshmallows to the same bowl and microwave on high for 30 seconds, then stir until the marshmallows are fully melted and the mixture is sticky and combined—if needed, microwave in 10-second intervals, but avoid overheating to prevent a tough texture.
4. Allow the mixture to cool for 2-3 minutes until it’s safe to handle but still pliable, then use your greased hands to shape it into 8 small, oblong rice mounds, each about 1 inch long and 1/2 inch thick.
5. Press a few pieces of chopped gummy fish into the top of each rice mound, embedding them slightly to mimic sushi fillings like fish or roe.
6. Wrap a thin strip of green fruit leather around each mound, overlapping the ends to secure it like a nori seaweed wrap—if it doesn’t stick, lightly dampen the edge with a drop of water.
7. Roll the assembled candy sushi pieces in rainbow sprinkles, if using, for a festive touch that adds a subtle crunch.
8. Arrange the finished pieces on a serving plate and let them set at room temperature for 5 minutes to firm up slightly before serving.
As you arrange these playful bites, notice how the chewy marshmallow base yields to the soft gummy filling, with the fruit leather adding a tangy contrast that balances the sweetness. Serve them on a platter with chopsticks for a fun, interactive treat, or pack them in a bento box for a whimsical lunch surprise that’s sure to spark smiles and conversation.
Mini Pancake Skewers with Dip
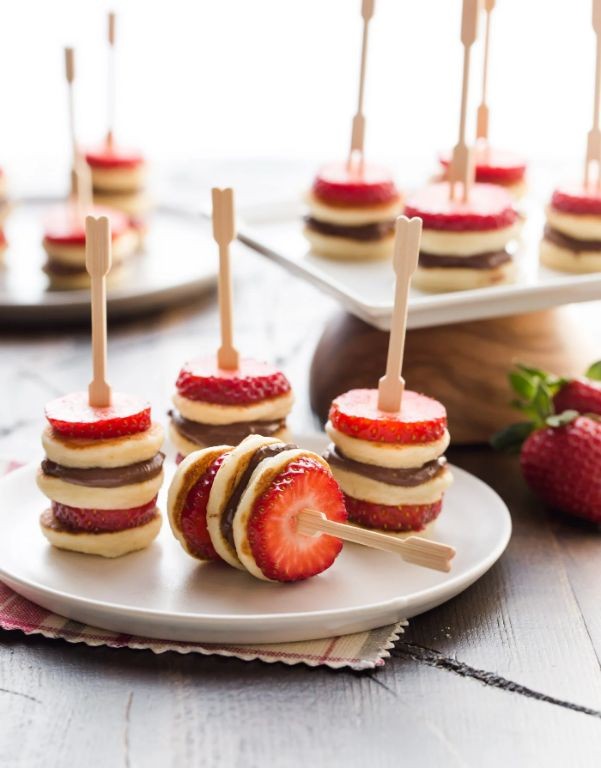
Dipping into the quiet of a winter afternoon, I find myself craving something both playful and comforting—a treat that feels like a small celebration, even on the quietest of days. These mini pancake skewers, with their soft, golden bites and a creamy dip, are just that: a simple joy to assemble and a delight to share.
Serving: 4 | Pre Time: 15 minutes | Cooking Time: 10 minutes
Ingredients
– 1 cup all-purpose flour
– 1 tbsp granulated sugar
– 1 tsp baking powder
– 1/4 tsp salt
– 1 cup milk (whole or 2%, for richness)
– 1 large egg
– 2 tbsp unsalted butter, melted (or any neutral oil)
– 1/2 cup maple syrup (adjust to taste)
– 1/2 cup plain Greek yogurt (full-fat for creamier dip)
– 1 tsp vanilla extract
– 8 wooden skewers (soaked in water for 10 minutes to prevent burning)
Instructions
1. In a medium bowl, whisk together 1 cup all-purpose flour, 1 tbsp granulated sugar, 1 tsp baking powder, and 1/4 tsp salt until fully combined.
2. In a separate bowl, lightly beat 1 large egg, then stir in 1 cup milk and 2 tbsp melted unsalted butter until smooth.
3. Pour the wet ingredients into the dry ingredients and gently mix just until no large flour streaks remain; a few small lumps are fine to avoid overmixing, which can make pancakes tough.
4. Heat a non-stick skillet or griddle over medium heat (about 350°F) and lightly grease it with a bit of butter or oil.
5. Drop tablespoon-sized portions of batter onto the skillet, cooking for 1-2 minutes until bubbles form on the surface and edges look set.
6. Flip each mini pancake and cook for another 1-2 minutes until golden brown and cooked through; test by pressing lightly—they should spring back.
7. Transfer cooked pancakes to a plate and repeat with remaining batter, keeping them warm by covering loosely with a towel.
8. While pancakes cool slightly, make the dip: in a small bowl, combine 1/2 cup plain Greek yogurt, 1/2 cup maple syrup, and 1 tsp vanilla extract, whisking until smooth and creamy.
9. Thread 3-4 cooled mini pancakes onto each of the 8 pre-soaked wooden skewers, spacing them evenly.
10. Arrange skewers on a serving platter with the dip bowl alongside.
Remembering how these skewers come together, I love the contrast of the fluffy, warm pancakes against the cool, tangy dip—each bite is a blend of sweet maple and subtle vanilla that melts softly on the tongue. For a festive twist, drizzle extra syrup over the skewers or sprinkle with powdered sugar just before serving, letting the simple act of dipping feel like a quiet moment of indulgence.
Summary
Zesty and imaginative, these recipes turn cooking into a joyful adventure for kids and families. We hope you find inspiration to create delicious memories together! Give a recipe a try, leave a comment with your family’s favorite, and if you enjoyed this roundup, please share it on Pinterest to spread the fun. Happy cooking!


