
You’re in for a treat! Whether you’re gluten-free by choice or necessity, dessert cravings don’t have to be denied. We’ve gathered 18 irresistible baking recipes that prove gluten-free can be just as decadent and delicious. From rich chocolate cakes to delicate pastries, get ready to discover sweet creations that’ll satisfy every dessert lover. Let’s dive into these mouthwatering treats!
Tangy Gluten-Free Lemon Bars
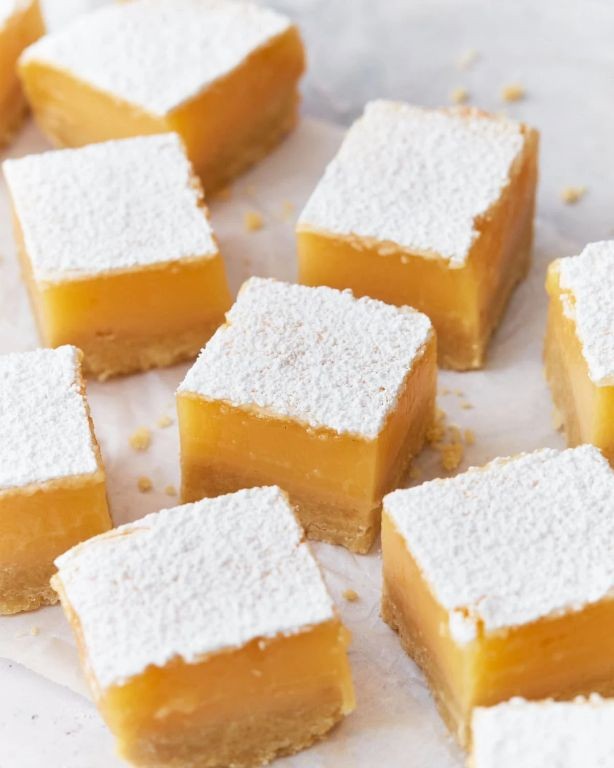
Viral-worthy lemon bars just got a gluten-free glow-up. These tangy squares deliver that perfect sweet-tart punch without the wheat—ideal for potlucks, picnics, or a solo treat. Trust me, they disappear fast.
Serving: 16 | Pre Time: 20 minutes | Cooking Time: 35 minutes
Ingredients
- For the crust: 1½ cups almond flour (I love the nutty depth it adds), ¼ cup coconut sugar, ½ cup unsalted butter (melted and cooled slightly—hot butter can make the crust greasy), 1 large egg (room temp eggs blend smoother), 1 tsp vanilla extract
- For the filling: 4 large eggs (room temp again for even mixing), 1½ cups granulated sugar, ⅔ cup fresh lemon juice (about 4–5 lemons—bottled just doesn’t hit the same), ¼ cup gluten-free all-purpose flour (I use Bob’s Red Mill for reliability), 1 tbsp lemon zest (the secret to that bright aroma)
Instructions
- Preheat your oven to 350°F (175°C) and line an 8×8-inch baking pan with parchment paper, leaving overhang for easy removal.
- In a medium bowl, combine 1½ cups almond flour, ¼ cup coconut sugar, ½ cup melted butter, 1 egg, and 1 tsp vanilla extract—mix until a crumbly dough forms. Tip: Press the dough firmly into the pan to prevent a loose crust.
- Bake the crust for 15 minutes at 350°F until lightly golden at the edges; remove and let cool slightly while you prep the filling.
- In another bowl, whisk 4 eggs and 1½ cups granulated sugar until smooth and slightly frothy, about 2 minutes.
- Add ⅔ cup lemon juice, ¼ cup gluten-free flour, and 1 tbsp lemon zest to the egg mixture, whisking vigorously until fully combined with no lumps. Tip: Strain the filling through a fine-mesh sieve to catch any zest clumps for a silky texture.
- Pour the filling over the warm crust, spreading it evenly with a spatula.
- Bake at 350°F for 20–25 minutes, until the center is set and jiggles slightly—it firms as it cools. Tip: Avoid overbaking to keep the filling creamy, not rubbery.
- Let cool completely in the pan on a wire rack for at least 2 hours, then refrigerate for 1 hour to set fully.
- Use the parchment overhang to lift the bars out, dust with powdered sugar if desired, and cut into 16 squares with a sharp knife wiped clean between cuts.
Keep these chilled for that firm-yet-creamy bite—the almond crust adds a subtle crunch against the zesty, smooth filling. Serve them straight from the fridge with a dollop of whipped cream or crumbled over vanilla ice cream for a next-level dessert hack.
Crunchy Gluten-Free Almond Biscotti

You need a gluten-free cookie that actually satisfies. This crunchy almond biscotti delivers bold flavor and serious snap—perfect for dunking in coffee or gifting to friends.
Serving: 24 | Pre Time: 15 minutes | Cooking Time: 50 minutes
Ingredients
– 2 cups almond flour (I always use blanched for a smoother texture)
– 1 cup granulated sugar
– 3 large eggs (room temp eggs blend better here)
– 1 cup whole raw almonds (toasted first for maximum crunch)
– 1 tsp pure vanilla extract (the real stuff makes a difference)
– 1 tsp baking powder
– ½ tsp fine sea salt (I prefer this over table salt)
Instructions
1. Preheat your oven to 325°F and line a baking sheet with parchment paper.
2. In a large bowl, whisk together the almond flour, sugar, baking powder, and salt until fully combined.
3. Crack the eggs into a separate bowl, add the vanilla extract, and whisk vigorously for 30 seconds until frothy.
4. Pour the wet ingredients into the dry ingredients and stir with a spatula until a thick dough forms—it will be sticky.
5. Fold in the whole raw almonds until evenly distributed throughout the dough.
6. Lightly wet your hands to prevent sticking, then shape the dough into a 12-inch log on the prepared baking sheet, flattening it to about 1-inch thick.
7. Bake for 25 minutes at 325°F until the log is firm and lightly golden around the edges.
8. Remove from oven and let cool on the sheet for 10 minutes—this prevents crumbling when slicing.
9. Using a serrated knife, slice the log diagonally into ½-inch thick pieces while still warm.
10. Arrange slices cut-side down on the baking sheet and bake for 10 minutes at 325°F.
11. Flip each slice and bake another 10 minutes until crisp and deep golden brown.
12. Transfer biscotti to a wire rack to cool completely—they’ll crisp up further as they cool.
Perfectly crunchy with a nutty almond flavor that deepens as they cool. These hold up beautifully in hot coffee or crumbled over vanilla ice cream for an elegant dessert.
Rich Gluten-Free Chocolate Cake
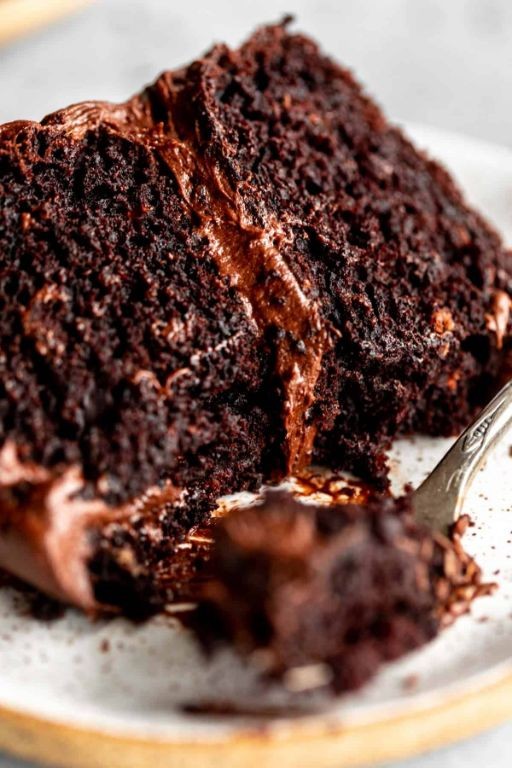
You’re about to make the fudgiest, most decadent gluten-free chocolate cake that’ll have everyone asking for seconds. Yes, it’s that good—moist, rich, and impossible to resist. Let’s bake.
Serving: 8 | Pre Time: 15 minutes | Cooking Time: 35 minutes
Ingredients
– 1 cup almond flour (I love the nutty depth it adds)
– ¾ cup cocoa powder (go for Dutch-processed—it’s richer)
– 1 cup granulated sugar (I prefer organic cane sugar for a subtle caramel note)
– 3 large eggs, at room temperature (this helps them blend smoothly)
– ½ cup unsalted butter, melted (extra creamy is my go-to)
– 1 tsp vanilla extract (pure vanilla makes all the difference)
– 1 tsp baking powder (aluminum-free for no bitter aftertaste)
– ½ tsp salt (a pinch of sea salt balances the sweetness)
– ½ cup hot coffee (it intensifies the chocolate flavor—trust me)
Instructions
1. Preheat your oven to 350°F and grease an 8-inch round cake pan.
2. In a large bowl, whisk together the almond flour, cocoa powder, sugar, baking powder, and salt until fully combined.
3. Add the eggs one at a time, whisking after each addition until the batter is smooth.
4. Pour in the melted butter and vanilla extract, stirring vigorously to incorporate.
5. Slowly mix in the hot coffee until the batter is glossy and uniform—tip: the coffee should be just off the boil to bloom the cocoa.
6. Pour the batter into the prepared pan and tap it gently on the counter to remove air bubbles.
7. Bake for 30–35 minutes, or until a toothpick inserted into the center comes out with a few moist crumbs—tip: avoid overbaking to keep it fudgy.
8. Let the cake cool in the pan for 10 minutes, then transfer it to a wire rack to cool completely.
9. Slice and serve as is, or dust with powdered sugar for a simple finish.
Velvety and dense, this cake boasts a deep chocolate flavor with a tender crumb that melts in your mouth. Try it warm with a scoop of vanilla ice cream for an indulgent twist, or layer it with whipped cream for a stunning dessert centerpiece.
Airy Gluten-Free Angel Food Cake
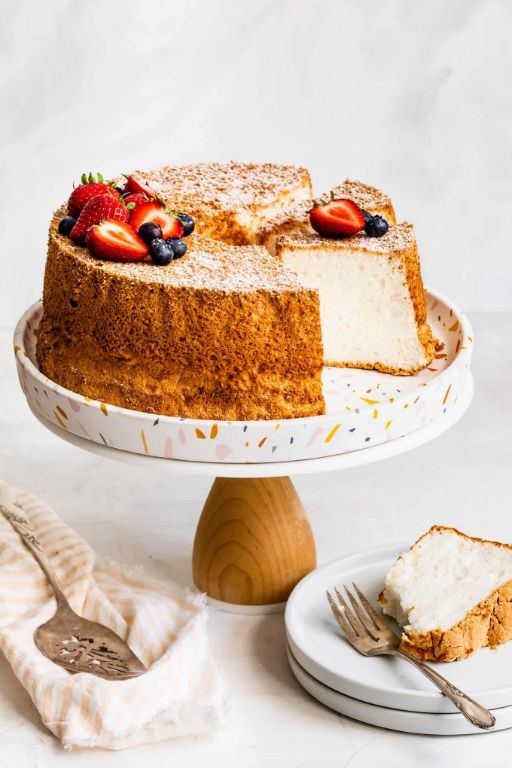
Skip the dense gluten-free desserts—this cloud-like cake proves light and airy is totally possible. Seriously, you won’t miss the gluten for a second when you taste this perfect, springy slice.
Serving: 10 | Pre Time: 20 minutes | Cooking Time: 35 minutes
Ingredients
- 1 cup superfine sugar, divided (trust me, the fine texture makes all the difference for that smooth crumb)
- ¾ cup potato starch (my secret weapon for the fluffiest texture—don’t substitute cornstarch here)
- ½ cup tapioca flour (this gives the cake its wonderful chew)
- 12 large egg whites, at room temperature (I always separate my eggs cold, then let the whites warm up—it helps them whip to incredible heights)
- 1 ½ tsp cream of tartar (this stabilizer is non-negotiable for stiff peaks)
- 1 tsp pure vanilla extract (splurge on the good stuff—it shines through)
- ¼ tsp fine sea salt (just a pinch to balance the sweetness perfectly)
Instructions
- Preheat your oven to 350°F. Place an oven rack in the lower third position—this prevents over-browning on top.
- Sift together ¾ cup of the superfine sugar, the potato starch, and the tapioca flour twice into a medium bowl. (Tip: Double-sifting is key for a lump-free, airy batter.)
- In the spotlessly clean bowl of a stand mixer fitted with the whisk attachment, combine the room-temperature egg whites and cream of tartar.
- Beat the egg whites on medium speed until foamy, about 1 minute.
- With the mixer running, gradually add the remaining ¼ cup of superfine sugar. Increase speed to medium-high and whip until you achieve stiff, glossy peaks, about 5-7 minutes. (Tip: The peaks should stand straight up when you lift the whisk.)
- Beat in the vanilla extract and fine sea salt just until combined, about 30 seconds.
- Gently fold the sifted dry ingredients into the egg white mixture in three additions using a large rubber spatula. (Tip: Fold carefully to keep as much air in the batter as possible—no stirring!)
- Pour the batter into an ungreased 10-inch tube pan. Smooth the top gently with your spatula.
- Bake for 35 minutes, or until the top is golden brown and springs back lightly when touched.
- Immediately invert the pan onto its legs or over a bottle. Let the cake cool completely upside down, about 2 hours.
- Once completely cool, run a thin knife around the edges and center tube to release the cake. Gently remove it from the pan.
Light as a feather with a tender, melt-in-your-mouth crumb, this cake is pure magic. The vanilla sings through every airy bite. Serve it simply with fresh berries and a dusting of powdered sugar, or get fancy and use slices as a base for strawberry shortcake.
Savory Gluten-Free Cheese Biscuits
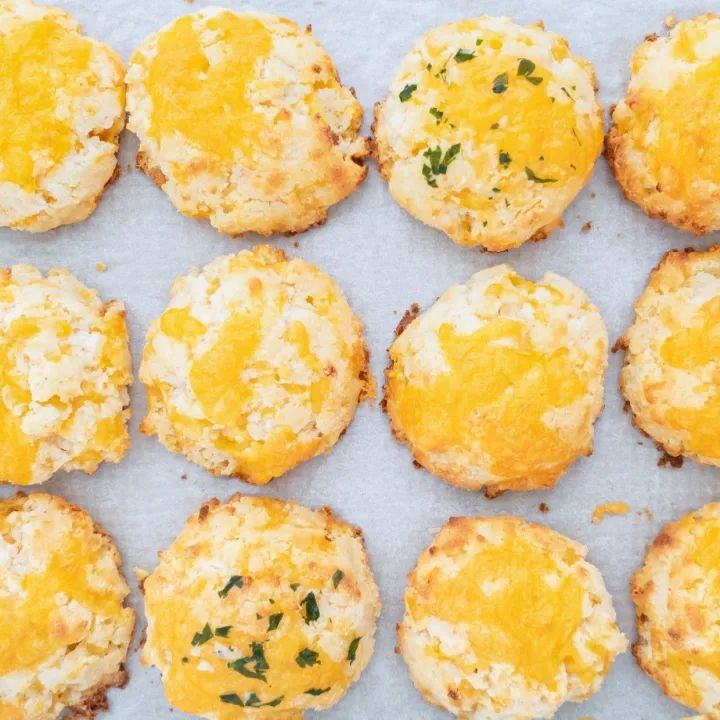
Just when you thought gluten-free baking couldn’t get more delicious—these cheese biscuits prove you wrong. Imagine golden, flaky layers packed with sharp cheddar flavor, ready in under 30 minutes. Perfect for holiday gatherings or a cozy night in, they’re the snack you’ll crave year-round.
Serving: 12 biscuits | Pre Time: 10 minutes | Cooking Time: 15 minutes
Ingredients
– 2 cups gluten-free all-purpose flour (I use Bob’s Red Mill 1-to-1 blend for reliable results)
– 1 tbsp baking powder (make sure it’s fresh for maximum rise)
– 1 tsp salt (I prefer fine sea salt for even distribution)
– ½ cup cold unsalted butter, cubed (keep it chilled—this is key for flakiness)
– 1 cup shredded sharp cheddar cheese (extra sharp adds a bold punch)
– ¾ cup buttermilk (room temp helps the dough come together smoothly)
– 1 large egg, beaten (for that golden egg wash finish)
Instructions
1. Preheat your oven to 425°F and line a baking sheet with parchment paper.
2. In a large bowl, whisk together the gluten-free flour, baking powder, and salt until fully combined.
3. Add the cold, cubed butter to the flour mixture. Use a pastry cutter or your fingers to work the butter into pea-sized crumbs—this creates those flaky layers.
4. Stir in the shredded sharp cheddar cheese until evenly distributed throughout the mixture.
5. Pour in the room-temperature buttermilk and mix gently with a fork until a shaggy dough forms. Tip: Don’t overmix to keep the biscuits tender.
6. Turn the dough onto a lightly floured surface and pat it into a 1-inch thick rectangle.
7. Fold the dough in half, then pat it back to 1-inch thickness. Repeat this folding process two more times for extra layers.
8. Use a 2-inch round cutter to stamp out biscuits, pressing straight down without twisting. Tip: Twisting can seal the edges and prevent rising.
9. Place the biscuits on the prepared baking sheet, spacing them about 1 inch apart.
10. Brush the tops of the biscuits with the beaten egg wash for a shiny, golden finish.
11. Bake in the preheated oven for 12-15 minutes, or until the biscuits are puffed and golden brown on top. Tip: Check at 12 minutes—ovens vary, and you want them just cooked through.
12. Remove from the oven and let cool on the baking sheet for 5 minutes before serving.
Serve these biscuits warm from the oven, where they’re at their flaky, cheesy best. The texture is crisp on the outside with a tender, buttery crumb inside, and the sharp cheddar adds a savory depth that pairs perfectly with soups or as a standalone snack. Try splitting them open and topping with a dollop of herb butter for an extra indulgent twist.
Crispy Gluten-Free Peanut Butter Cookies
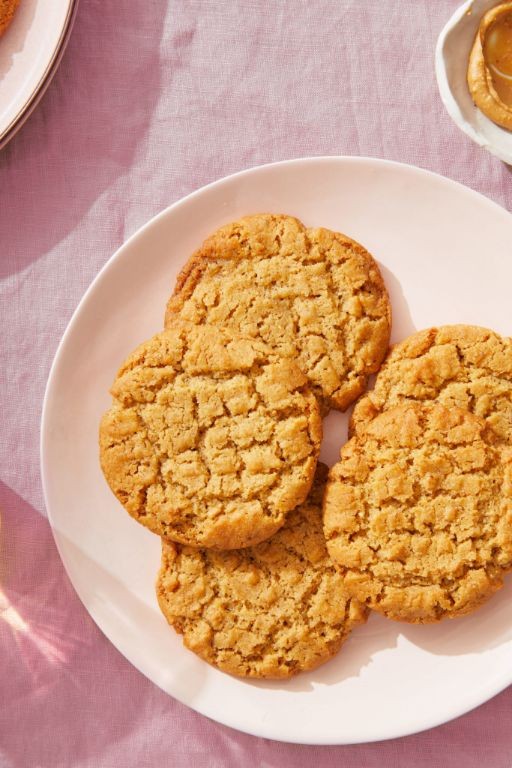
Whip up these crispy gluten-free peanut butter cookies in no time—they’re the perfect crunchy, nutty treat that’s totally dairy-free and ready to satisfy your sweet tooth. Seriously, you won’t miss the gluten one bit.
Serving: 24 | Pre Time: 15 minutes | Cooking Time: 12 minutes
Ingredients
– 1 cup creamy peanut butter (I always use the natural kind—it gives the best flavor)
– 1 cup granulated sugar
– 1 large egg (room temp eggs blend smoother, trust me)
– 1 tsp vanilla extract (pure vanilla makes all the difference)
– ½ tsp baking soda
– ¼ tsp salt (a pinch of sea salt balances the sweetness perfectly)
Instructions
1. Preheat your oven to 350°F and line two baking sheets with parchment paper.
2. In a large mixing bowl, combine 1 cup creamy peanut butter, 1 cup granulated sugar, 1 large egg, 1 tsp vanilla extract, ½ tsp baking soda, and ¼ tsp salt.
3. Mix everything with a spatula until fully incorporated and a thick dough forms—no need for a mixer here, it comes together easily.
4. Scoop the dough into 1-inch balls using a cookie scoop or tablespoon, rolling them between your palms for even shapes.
5. Place the dough balls on the prepared baking sheets, spacing them about 2 inches apart to allow for spreading.
6. Use a fork to gently press down on each ball, creating a crisscross pattern—this helps them bake evenly and gives that classic cookie look.
7. Bake in the preheated oven at 350°F for 10–12 minutes, until the edges turn golden brown and the centers look set.
8. Remove the baking sheets from the oven and let the cookies cool on the sheets for 5 minutes—they’ll firm up as they cool, so don’t move them too soon.
9. Transfer the cookies to a wire rack to cool completely, about 15–20 minutes.
Just out of the oven, these cookies have a satisfying snap with a tender, crumbly center and a rich peanut butter flavor that’s not too sweet. Crumble them over ice cream or dunk them in a cold glass of almond milk for an extra treat—they’re so good, you’ll want to double the batch next time.
Fudgy Gluten-Free Blondies
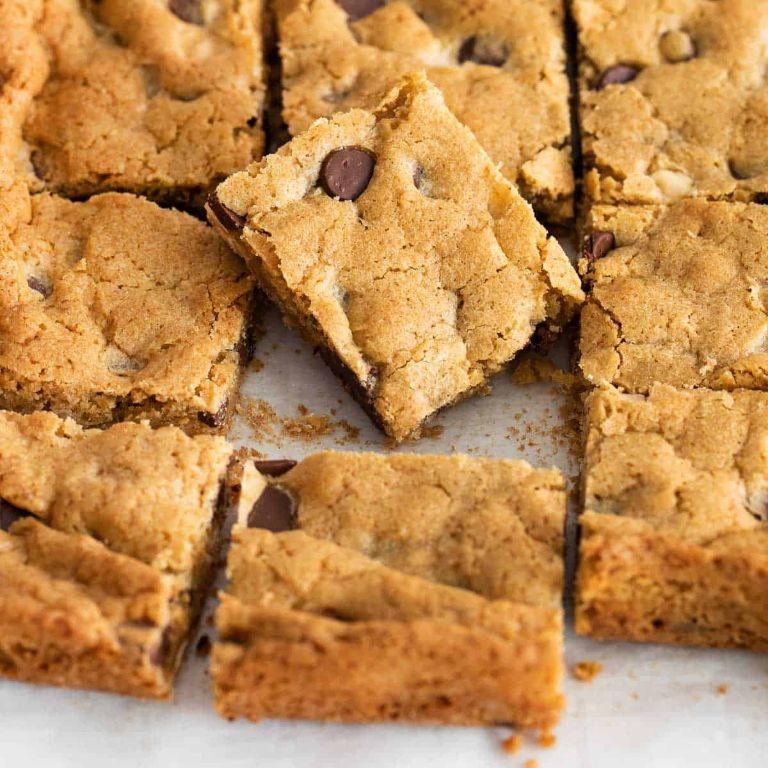
A chewy, chocolate-swirled treat that’s secretly gluten-free and ridiculously easy to make. Forget dry, crumbly bars—these blondies are fudgy, rich, and ready to satisfy any sweet tooth in under an hour. Seriously, you won’t believe they’re missing regular flour.
Serving: 9 | Pre Time: 15 minutes | Cooking Time: 25 minutes
Ingredients
– 1 cup (2 sticks) unsalted butter, melted and slightly cooled—I find this gives a better texture than softened butter.
– 1 ½ cups packed light brown sugar, for that deep molasses flavor.
– 2 large eggs, at room temperature please! It helps everything blend smoothly.
– 2 teaspoons pure vanilla extract, the good stuff makes a difference.
– 1 ½ cups gluten-free all-purpose flour blend (I swear by Bob’s Red Mill 1-to-1).
– 1 teaspoon baking powder, to give them a little lift.
– ½ teaspoon fine sea salt, to balance the sweetness.
– 1 cup semi-sweet chocolate chips, plus a handful extra for sprinkling on top because why not?
Instructions
1. Preheat your oven to 350°F (175°C) and line an 8×8-inch baking pan with parchment paper, leaving some overhang for easy removal later.
2. In a large mixing bowl, combine the melted butter and packed light brown sugar, whisking vigorously for about 1 minute until fully incorporated and smooth.
3. Add the room temperature eggs one at a time, whisking well after each addition until the mixture is glossy and slightly thickened.
4. Stir in the pure vanilla extract until just combined.
5. In a separate medium bowl, whisk together the gluten-free all-purpose flour blend, baking powder, and fine sea salt to ensure even distribution.
6. Tip: Gradually fold the dry ingredients into the wet mixture using a spatula—don’t overmix, or the blondies can become tough.
7. Gently fold in 1 cup of semi-sweet chocolate chips until evenly dispersed throughout the batter.
8. Transfer the batter to the prepared baking pan, spreading it into an even layer with the spatula.
9. Sprinkle the extra handful of chocolate chips evenly over the top of the batter for a decorative finish.
10. Bake in the preheated oven for 23–25 minutes, until the edges are golden brown and a toothpick inserted into the center comes out with a few moist crumbs (not wet batter).
11. Tip: Let the blondies cool completely in the pan on a wire rack for at least 1 hour—this step is crucial for that fudgy texture!
12. Once cooled, use the parchment overhang to lift the blondies out of the pan, then cut into 9 squares with a sharp knife.
13. Tip: For clean cuts, wipe the knife between slices.
These blondies boast a dense, melt-in-your-mouth center with crispy edges, thanks to that brown sugar base. They’re subtly sweet with bursts of chocolate in every bite—perfect warm with a scoop of vanilla ice cream or packed for a lunchbox treat.
Spiced Gluten-Free Apple Muffins
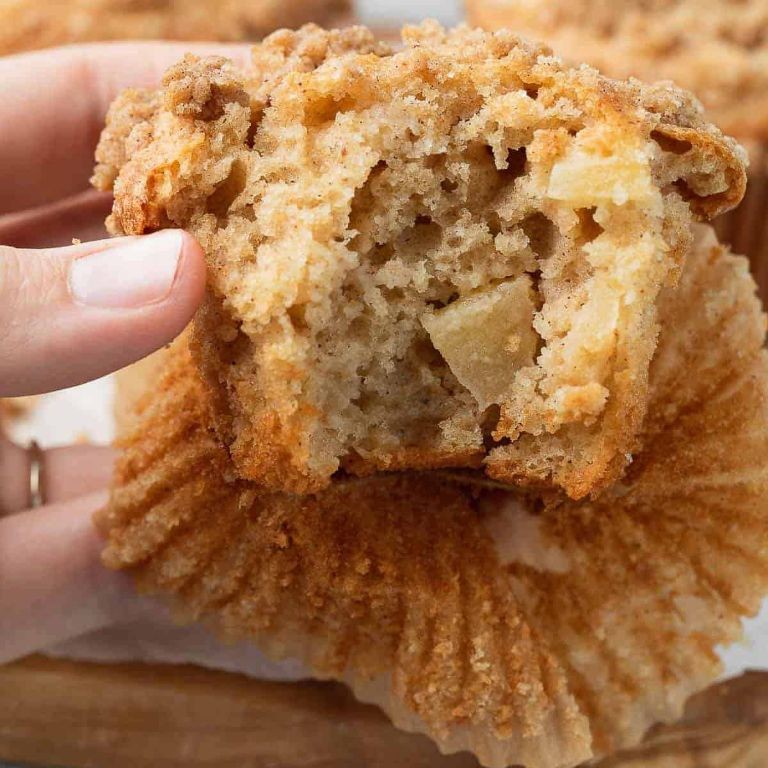
Muffins that actually taste like something? Yes, please. These Spiced Gluten-Free Apple Muffins are your new go-to—moist, flavorful, and they won’t weigh you down. Get ready to bake a batch that disappears in minutes.
Serving: 12 | Pre Time: 15 minutes | Cooking Time: 22 minutes
Ingredients
– 2 cups gluten-free 1:1 baking flour (I swear by Bob’s Red Mill for consistent texture)
– 1 cup granulated sugar (for that perfect sweetness)
– 2 tsp baking powder (fresh is key for a good rise)
– 1 tsp ground cinnamon (the star spice, don’t skimp)
– 1/2 tsp ground nutmeg (adds a warm, cozy depth)
– 1/2 tsp salt (balances all the flavors)
– 2 large eggs, at room temperature (they blend smoother, trust me)
– 1/2 cup unsweetened applesauce (my secret for extra moisture)
– 1/4 cup melted coconut oil (it gives a lovely subtle flavor)
– 1 tsp pure vanilla extract (the good stuff makes a difference)
– 1 1/2 cups finely chopped apple (I like Honeycrisp for a sweet-tart bite)
Instructions
1. Preheat your oven to 375°F and line a 12-cup muffin tin with paper liners.
2. In a large bowl, whisk together the gluten-free flour, sugar, baking powder, cinnamon, nutmeg, and salt until fully combined.
3. In a separate medium bowl, whisk the room-temperature eggs until slightly frothy.
4. Add the applesauce, melted coconut oil, and vanilla extract to the eggs, and whisk until the mixture is smooth and uniform.
5. Pour the wet ingredients into the dry ingredients and gently fold with a spatula until just combined—do not overmix to avoid dense muffins.
6. Fold in the finely chopped apple until evenly distributed throughout the batter.
7. Divide the batter evenly among the 12 muffin cups, filling each about 3/4 full.
8. Bake in the preheated oven for 20-22 minutes, or until a toothpick inserted into the center of a muffin comes out clean.
9. Let the muffins cool in the tin for 5 minutes, then transfer them to a wire rack to cool completely—this prevents sogginess.
10. Serve warm or at room temperature.
Soft, tender crumb with pockets of juicy apple in every bite. The warm spices shine through without being overpowering. For a next-level treat, split one open and slather it with cinnamon honey butter.
Gooey Gluten-Free Cinnamon Rolls
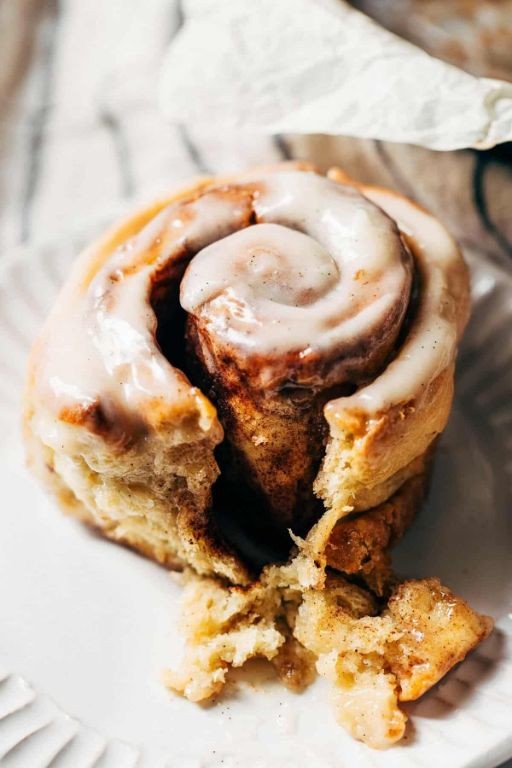
Ever craved that classic cinnamon roll pull-apart magic but need a gluten-free fix? These gooey beauties deliver—soft, sticky centers with that signature swirl, no gluten required. Get ready to make your kitchen smell like a holiday morning.
Serving: 12 | Pre Time: 20 minutes | Cooking Time: 25 minutes
Ingredients
- 2 cups gluten-free all-purpose flour blend (I swear by Bob’s Red Mill 1-to-1 for that perfect chew)
- 1 cup whole milk, warmed to about 110°F—just warm to the touch, not hot
- ¼ cup granulated sugar (a little extra never hurts for sweetness)
- 2 large eggs, at room temperature—they blend smoother into the dough
- ¼ cup unsalted butter, melted and slightly cooled
- 1 packet active dry yeast (check the expiration date for best rise)
- 1 tsp salt
- For the filling: ½ cup brown sugar, 2 tbsp ground cinnamon, ¼ cup softened butter
- For the glaze: 1 cup powdered sugar, 2 tbsp milk, 1 tsp vanilla extract
Instructions
- In a large bowl, combine the warmed whole milk, granulated sugar, and active dry yeast; let it sit for 5 minutes until frothy—this activates the yeast for a good rise.
- Add the gluten-free all-purpose flour blend, eggs, melted unsalted butter, and salt to the yeast mixture.
- Mix with a spoon until a sticky dough forms, then knead by hand on a floured surface for 3–4 minutes until smooth; tip: if it’s too sticky, add a tablespoon more flour, but don’t overdo it.
- Place the dough in a greased bowl, cover with a damp towel, and let it rise in a warm spot for 1 hour until doubled in size.
- While rising, mix the brown sugar and ground cinnamon in a small bowl for the filling.
- Roll out the dough on a floured surface into a 12×9-inch rectangle.
- Spread the softened butter evenly over the dough, then sprinkle the brown sugar-cinnamon mixture on top, leaving a ½-inch border.
- Tightly roll the dough from the long side into a log, pinching the seam to seal.
- Cut the log into 12 equal slices using a sharp knife or dental floss for clean cuts—tip: wipe the knife between slices to prevent sticking.
- Place the slices in a greased 9×13-inch baking dish, cover, and let rise again for 30 minutes.
- Preheat your oven to 350°F.
- Bake the rolls for 20–25 minutes until golden brown on top; tip: check at 20 minutes—if they brown too fast, tent with foil.
- While baking, whisk the powdered sugar, milk, and vanilla extract in a bowl until smooth for the glaze.
- Remove the rolls from the oven and let cool for 5 minutes, then drizzle the glaze over the top while still warm.
Melt-in-your-mouth soft with a gooey, cinnamon-spiced center that’s irresistibly sticky. Serve them warm straight from the pan for that ultimate pull-apart experience, or pair with a cold glass of almond milk for a cozy treat—they’re perfect for brunch or a sweet midnight snack.
Tender Gluten-Free Coconut Macaroons
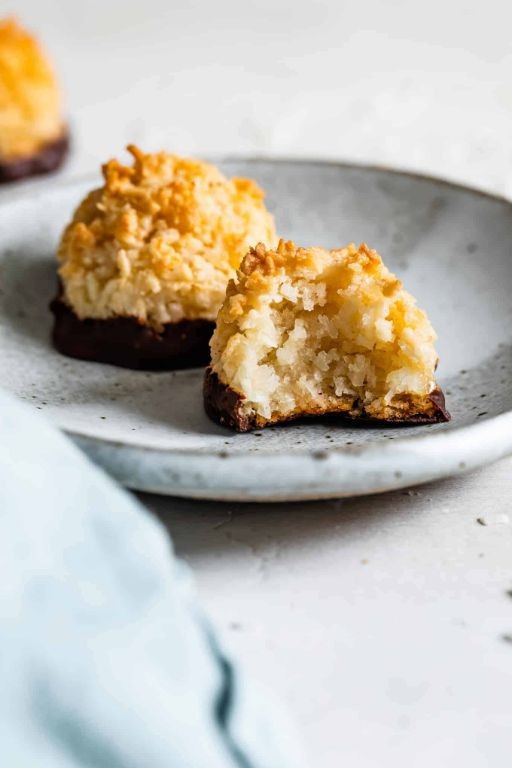
Every holiday cookie platter needs a gluten-free hero, and these coconut macaroons are it. They’re tender, chewy, and ridiculously simple—no fancy skills required. Let’s make them.
Serving: 18 | Pre Time: 10 minutes | Cooking Time: 20 minutes
Ingredients
– 4 large egg whites, at room temperature (they whip up fluffier this way)
– 1/4 teaspoon fine sea salt (I always use this for better flavor control)
– 1/2 cup granulated sugar
– 1 teaspoon pure vanilla extract (the real stuff makes all the difference)
– 14 ounces sweetened shredded coconut (one standard bag—don’t skimp!)
– 4 ounces semi-sweet chocolate chips (for drizzling, because chocolate makes everything better)
Instructions
1. Preheat your oven to 325°F and line a large baking sheet with parchment paper.
2. In a large, clean mixing bowl, combine the 4 egg whites and 1/4 teaspoon salt. Use an electric mixer on medium-high speed to beat them until soft peaks form, about 2-3 minutes.
3. Tip: Ensure your bowl and beaters are completely grease-free for maximum volume.
4. Gradually add the 1/2 cup sugar while continuing to beat, then mix in the 1 teaspoon vanilla until the mixture is glossy and holds stiff peaks, about 1-2 minutes more.
5. Gently fold in the 14 ounces shredded coconut with a spatula until it’s fully coated and no dry spots remain.
6. Tip: Fold gently to keep the egg whites airy—this gives the macaroons their light texture.
7. Use a 2-tablespoon cookie scoop or spoon to drop mounds of the mixture onto the prepared sheet, spacing them 1 inch apart.
8. Bake at 325°F for 18-20 minutes, until the edges are golden brown and the tops are set.
9. Tip: Rotate the sheet halfway through baking for even color.
10. Let the macaroons cool completely on the sheet, about 30 minutes.
11. Melt the 4 ounces chocolate chips in a microwave-safe bowl in 30-second bursts, stirring until smooth.
12. Drizzle the melted chocolate over the cooled macaroons with a fork or spoon.
13. Let the chocolate set at room temperature for 15 minutes before serving.
Done! These macaroons are crisp on the outside with a soft, chewy center that melts in your mouth. The coconut flavor shines through, balanced by that sweet chocolate drizzle. Try serving them stacked high on a platter or crumbled over ice cream for an extra-decadent treat.
Summary
From decadent cakes to chewy cookies, this collection proves gluten-free baking can be absolutely delightful. We hope these 18 recipes inspire your next sweet creation! Give one a try, then drop a comment below to tell us your favorite. If you loved this roundup, please share it on Pinterest to spread the joy. Happy baking!


