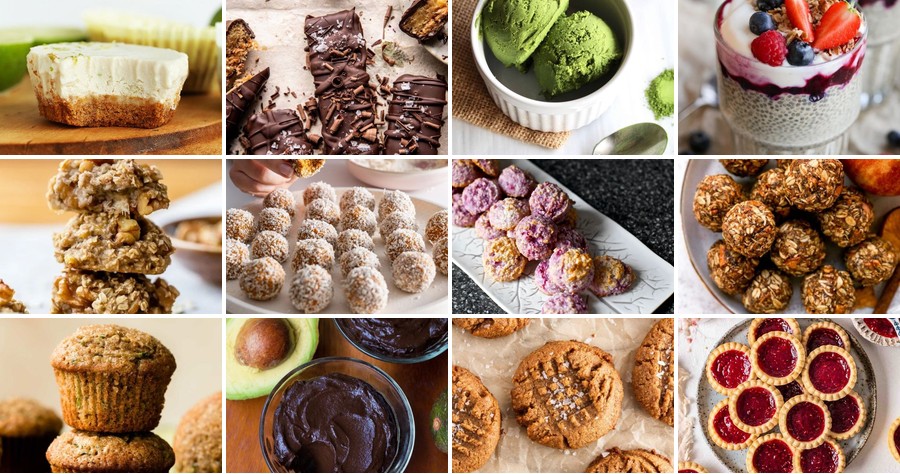
Zesty, sweet, and satisfying—who says gluten-free and dairy-free desserts have to be boring? If you’re craving something indulgent but need to skip the gluten or dairy, you’re in the right place. We’ve gathered 20 easy, decadent recipes that’ll make your taste buds dance without the hassle. Get ready to discover treats so delicious, you won’t believe they’re allergy-friendly!
Vegan Lemon Blueberry Cheesecake
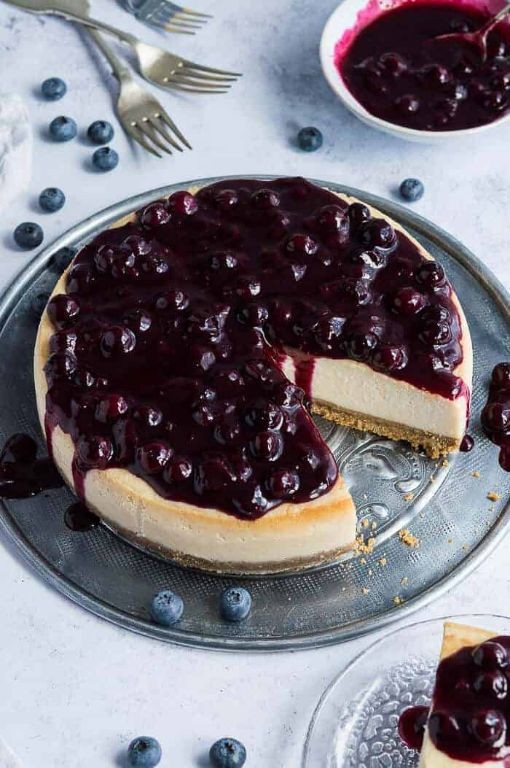
Just when you thought cheesecake couldn’t get any better, this vegan version proves otherwise. Juggling tart lemon and sweet blueberries, it’s a no-bake delight that impresses without dairy. You’ll love the creamy texture and bright flavors.
Serving: 8 | Pre Time: 25 minutes | Cooking Time: 0 minutes
Ingredients
– 2 cups raw cashews, soaked overnight
– 1/2 cup maple syrup
– 1/4 cup lemon juice
– 1 tbsp lemon zest
– 1/2 cup coconut oil, melted
– 1 tsp vanilla extract
– 1/4 tsp salt
– 1 1/2 cups graham cracker crumbs
– 5 tbsp vegan butter, melted
– 1 cup fresh blueberries
Instructions
1. Combine 1 1/2 cups graham cracker crumbs and 5 tbsp melted vegan butter in a medium bowl.
2. Press the mixture firmly into the bottom of a 9-inch springform pan using the back of a spoon.
3. Chill the crust in the refrigerator for 15 minutes to set.
4. Drain 2 cups soaked raw cashews and add them to a high-speed blender.
5. Pour in 1/2 cup maple syrup, 1/4 cup lemon juice, 1 tbsp lemon zest, 1/2 cup melted coconut oil, 1 tsp vanilla extract, and 1/4 tsp salt.
6. Blend on high for 2-3 minutes until completely smooth and creamy, scraping down the sides as needed.
7. Fold 1 cup fresh blueberries gently into the blended filling with a spatula to avoid crushing them.
8. Pour the filling over the chilled crust and spread it evenly with an offset spatula.
9. Tap the pan lightly on the counter to remove any air bubbles.
10. Cover the cheesecake with plastic wrap and freeze it for at least 6 hours or until firm.
11. Thaw the cheesecake in the refrigerator for 30 minutes before serving to soften slightly.
12. Run a knife around the edge of the pan and release the springform to unmold.
A velvety, tangy filling contrasts with the crunchy, buttery crust for a perfect bite. Garnish with extra blueberries and lemon slices for a vibrant presentation that highlights its fresh, summery essence.
Flourless Almond Butter Cookies
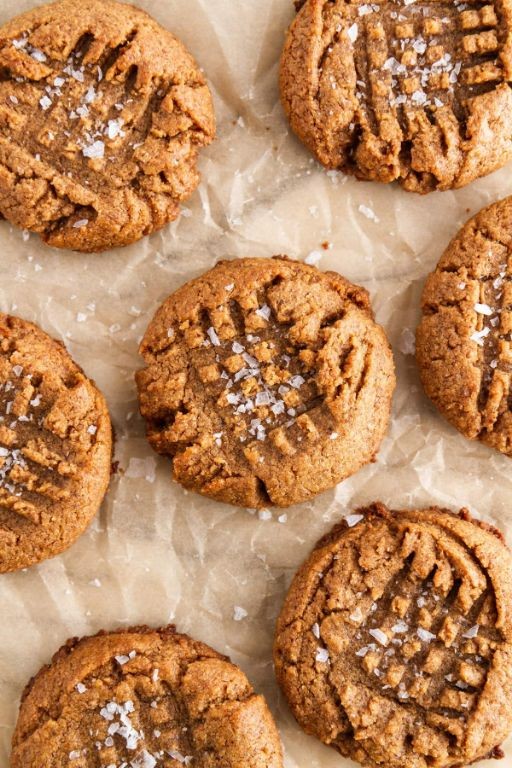
These flourless almond butter cookies are a simple, satisfying treat that come together with just a few pantry staples. They’re naturally gluten-free and packed with rich, nutty flavor, making them perfect for a quick snack or a last-minute dessert. The dough requires no chilling, so you can have warm cookies ready in under 30 minutes.
Serving: 12 | Pre Time: 10 minutes | Cooking Time: 10 minutes
Ingredients
– 1 cup creamy almond butter
– 1/2 cup granulated sugar
– 1 large egg
– 1/2 tsp baking soda
– 1/4 tsp salt
– 1/4 cup chocolate chips (optional)
Instructions
1. Preheat your oven to 350°F and line a baking sheet with parchment paper.
2. In a medium bowl, combine 1 cup creamy almond butter, 1/2 cup granulated sugar, 1 large egg, 1/2 tsp baking soda, and 1/4 tsp salt.
3. Mix the ingredients with a spatula until a thick, uniform dough forms, which should take about 1-2 minutes.
4. If using, fold in 1/4 cup chocolate chips gently to avoid overmixing the dough.
5. Scoop the dough with a tablespoon measure and roll it into 12 evenly sized balls.
6. Place the dough balls on the prepared baking sheet, spacing them 2 inches apart.
7. Flatten each ball slightly with the back of a fork, creating a crisscross pattern on top for even baking.
8. Bake the cookies at 350°F for exactly 10 minutes, or until the edges are lightly golden and set.
9. Remove the baking sheet from the oven and let the cookies cool on the sheet for 5 minutes to firm up.
10. Transfer the cookies to a wire rack to cool completely for about 15 minutes.
Fresh from the oven, these cookies have a soft, chewy center with a slightly crisp edge, offering a deep, roasted almond flavor. For a festive twist, drizzle them with melted chocolate or sprinkle with flaky sea salt before serving.
Coconut Milk Panna Cotta

Just when you thought panna cotta couldn’t get any creamier, coconut milk steps in. This dairy-free version delivers a silky, tropical dessert that’s surprisingly simple to make. You’ll need just a handful of pantry staples.
Serving: 6 | Pre Time: 15 minutes | Cooking Time: 5 minutes
Ingredients
– 2 cups full-fat coconut milk
– 1/4 cup granulated sugar
– 1 1/2 teaspoons unflavored gelatin powder
– 1 teaspoon pure vanilla extract
– 1/8 teaspoon fine sea salt
Instructions
1. Pour 1/2 cup of the coconut milk into a small bowl. Sprinkle the gelatin powder evenly over the surface and let it sit for 5 minutes to bloom.
2. Combine the remaining 1 1/2 cups coconut milk, sugar, and salt in a small saucepan over medium heat. Stir constantly until the sugar dissolves and the mixture reaches 180°F, about 3-4 minutes.
3. Remove the saucepan from the heat. Whisk in the bloomed gelatin mixture until it is completely dissolved and no granules remain.
4. Stir in the vanilla extract.
5. Divide the mixture evenly among six 4-ounce ramekins or glasses. Tip: Lightly grease the ramekins with coconut oil for easier unmolding later.
6. Let the ramekins cool to room temperature on the counter for 20 minutes.
7. Cover each ramekin with plastic wrap, pressing the wrap directly onto the surface of the panna cotta to prevent a skin from forming.
8. Refrigerate the panna cotta for at least 4 hours, or until fully set and firm to the touch.
9. To serve, run a thin knife around the edge of each ramekin. Tip: Dip the bottom of the ramekin in warm water for 5 seconds to help release it cleanly.
10. Invert each ramekin onto a serving plate and gently shake to release the panna cotta. Tip: For a rustic look, serve directly in the glass without unmolding.
This panna cotta sets with a perfectly jiggly, melt-in-your-mouth texture. The coconut flavor is rich and pure, subtly sweetened with vanilla. Try serving it with a drizzle of mango puree or a sprinkle of toasted coconut flakes for extra flair.
Banana Oatmeal Cookies
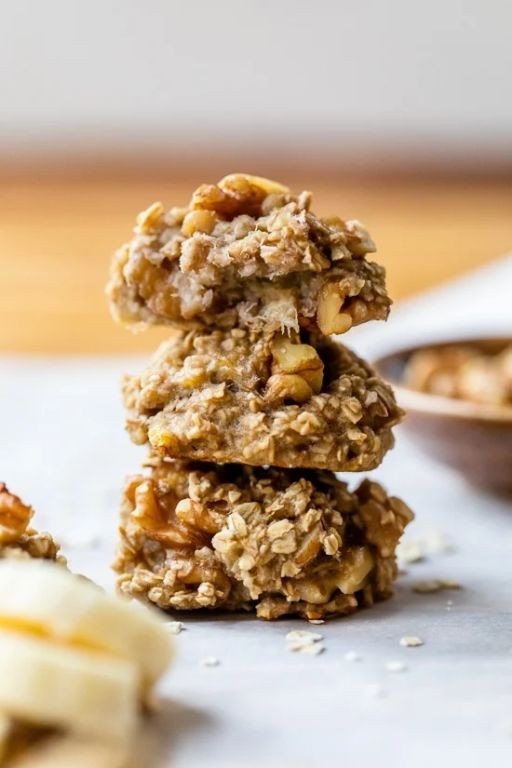
Fuss-free and wholesome, these banana oatmeal cookies come together with minimal effort. They’re naturally sweetened with ripe bananas and require no refined sugar or flour. Perfect for a quick breakfast or afternoon snack.
Serving: 12 | Pre Time: 10 minutes | Cooking Time: 15 minutes
Ingredients
– 2 cups rolled oats
– 2 ripe bananas
– 1/4 cup creamy peanut butter
– 1/4 cup honey
– 1 tsp vanilla extract
– 1/2 tsp ground cinnamon
– 1/4 tsp salt
Instructions
1. Preheat your oven to 350°F and line a baking sheet with parchment paper.
2. In a large bowl, mash the 2 ripe bananas with a fork until smooth.
3. Add the 1/4 cup peanut butter, 1/4 cup honey, and 1 tsp vanilla extract to the mashed bananas, stirring until fully combined.
4. Mix in the 2 cups rolled oats, 1/2 tsp cinnamon, and 1/4 tsp salt until a thick, uniform dough forms.
5. Using a cookie scoop or spoon, portion the dough into 12 equal balls and place them on the prepared baking sheet.
6. Flatten each ball slightly with the back of a spoon or your fingers to about 1/2-inch thickness.
7. Bake at 350°F for 12-15 minutes, or until the edges are golden brown and the tops are set.
8. Let the cookies cool on the baking sheet for 5 minutes before transferring them to a wire rack to cool completely.
Kindly soft and chewy, these cookies boast a comforting banana flavor with hints of cinnamon. Their hearty texture from the oats makes them satisfying, and they pair wonderfully with a glass of cold milk or crumbled over yogurt for added crunch.
Raw Vegan Chocolate Truffles
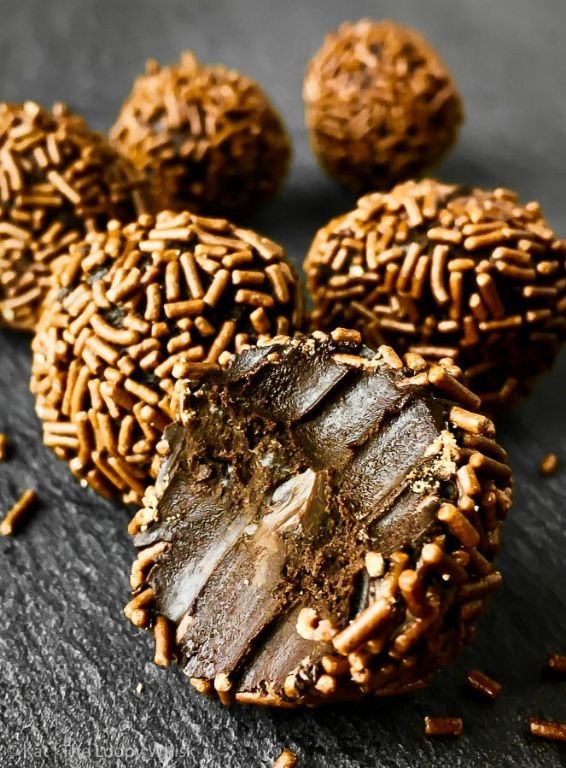
Ready for a rich, no-bake treat? Raw vegan chocolate truffles are decadent yet simple, blending dates, nuts, and cocoa into bite-sized delights. They require minimal effort and deliver maximum flavor, perfect for a quick dessert fix.
Serving: 12 | Pre Time: 15 minutes | Cooking Time: 0 minutes
Ingredients
– 1 cup pitted Medjool dates
– 1 cup raw almonds
– 1/4 cup unsweetened cocoa powder
– 1 tbsp coconut oil, melted
– 1 tsp vanilla extract
– 1/4 tsp sea salt
Instructions
1. Place 1 cup pitted Medjool dates in a food processor and pulse for 30 seconds until they form a sticky paste.
2. Add 1 cup raw almonds to the processor and blend for 1 minute until finely ground and combined with the dates.
3. Pour in 1/4 cup unsweetened cocoa powder, 1 tbsp melted coconut oil, 1 tsp vanilla extract, and 1/4 tsp sea salt.
4. Process the mixture for 2 minutes, scraping down the sides halfway through, until it forms a uniform dough that holds together when pressed.
5. Scoop out tablespoon-sized portions of the dough and roll them into 12 smooth balls between your palms.
6. Roll each ball in extra cocoa powder to coat evenly, tapping off any excess.
7. Arrange the coated truffles on a parchment-lined tray and refrigerate for at least 1 hour to firm up.
Now, these truffles boast a fudgy, melt-in-your-mouth texture with deep chocolate notes balanced by the natural sweetness of dates. For a creative twist, try rolling them in shredded coconut or crushed nuts before serving chilled.
Paleo Pumpkin Pie
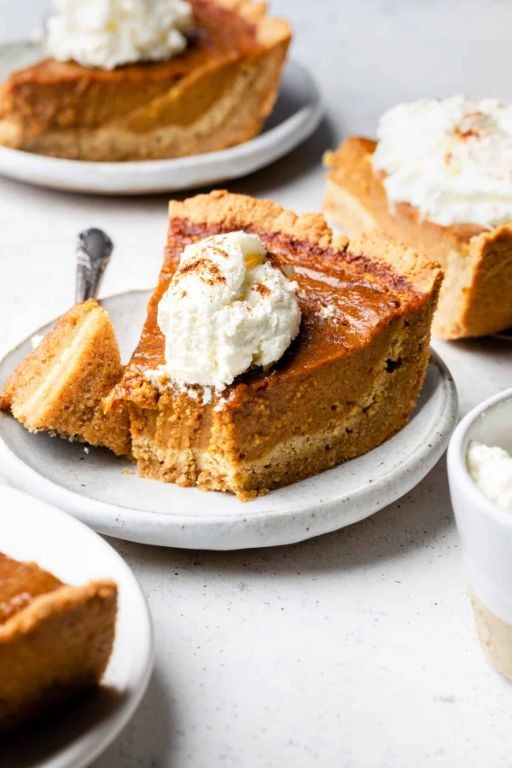
Only a few desserts capture the cozy essence of fall like a classic pumpkin pie. Our paleo version swaps traditional ingredients for wholesome alternatives, delivering the same comforting flavor without grains or refined sugar. You’ll get a rich, spiced filling nestled in a crisp almond-flour crust.
Serving: 8 | Pre Time: 20 minutes | Cooking Time: 55 minutes
Ingredients
– 1 1/2 cups almond flour
– 1/4 cup coconut oil, melted
– 1 large egg
– 1/4 tsp sea salt
– 1 (15 oz) can pumpkin puree
– 3 large eggs
– 1/2 cup pure maple syrup
– 1/2 cup full-fat coconut milk
– 1 tsp ground cinnamon
– 1/2 tsp ground ginger
– 1/4 tsp ground nutmeg
– 1/4 tsp ground cloves
Instructions
1. Preheat your oven to 350°F.
2. In a medium bowl, combine 1 1/2 cups almond flour, 1/4 cup melted coconut oil, 1 large egg, and 1/4 tsp sea salt.
3. Mix the crust ingredients until a dough forms.
4. Press the dough evenly into a 9-inch pie dish, covering the bottom and sides.
5. Bake the crust for 10 minutes, then remove it from the oven.
6. In a large bowl, whisk together 1 (15 oz) can pumpkin puree, 3 large eggs, 1/2 cup pure maple syrup, and 1/2 cup full-fat coconut milk.
7. Add 1 tsp ground cinnamon, 1/2 tsp ground ginger, 1/4 tsp ground nutmeg, and 1/4 tsp ground cloves to the pumpkin mixture.
8. Whisk all ingredients until smooth and fully combined.
9. Pour the filling into the pre-baked crust.
10. Bake the pie at 350°F for 45 minutes, or until the center is set and a knife inserted comes out clean.
11. Remove the pie from the oven and let it cool completely on a wire rack.
12. Refrigerate the pie for at least 2 hours before serving to firm up.
Just out of the fridge, this pie boasts a firm, sliceable texture with a creamy, spiced filling that’s subtly sweet. The almond-flour crust adds a nutty crunch, making it a satisfying paleo treat. For a festive touch, serve each slice with a dollop of coconut whipped cream or a sprinkle of toasted pecans.
Apple Cinnamon Energy Bites
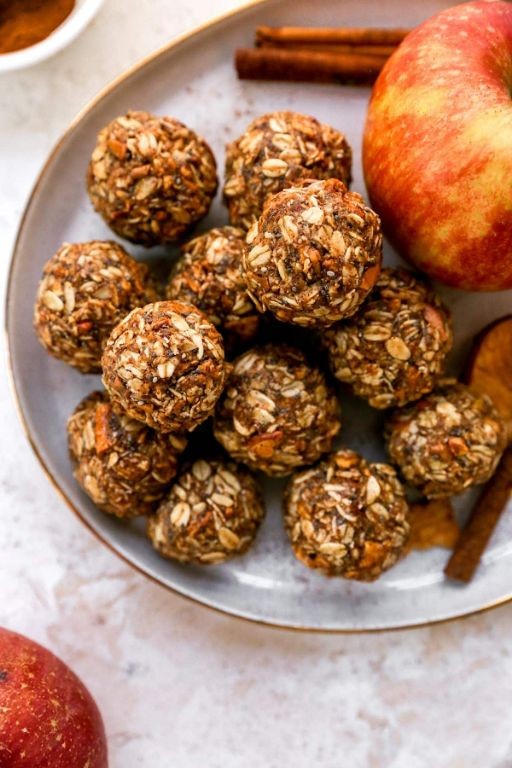
Bite-sized and bursting with flavor, these Apple Cinnamon Energy Bites are the perfect grab-and-go snack. They require no baking and come together in minutes, making them ideal for busy days. Keep a batch in the fridge for a quick energy boost anytime.
Serving: 12 | Pre Time: 15 minutes | Cooking Time: 0 minutes
Ingredients
– 1 cup rolled oats
– 1/2 cup almond butter
– 1/3 cup honey
– 1/4 cup finely chopped dried apples
– 2 tbsp ground flaxseed
– 1 tsp ground cinnamon
– 1/4 tsp salt
Instructions
1. Add 1 cup rolled oats, 1/2 cup almond butter, 1/3 cup honey, 1/4 cup finely chopped dried apples, 2 tbsp ground flaxseed, 1 tsp ground cinnamon, and 1/4 tsp salt to a large mixing bowl.
2. Stir all ingredients together with a spatula until a thick, sticky dough forms, about 2-3 minutes. Tip: If the mixture seems too dry, add 1 more tablespoon of honey to help it bind.
3. Scoop out approximately 1 tablespoon of the mixture and roll it firmly between your palms to form a 1-inch ball. Tip: Lightly wet your hands with water to prevent the dough from sticking.
4. Place the formed ball on a parchment-lined baking sheet or plate.
5. Repeat step 3 until all the mixture is used, making about 12 balls.
6. Transfer the baking sheet or plate to the refrigerator. Chill the energy bites for at least 30 minutes to firm up. Tip: For a firmer texture and longer storage, chill for 1 hour or overnight.
7. Remove the chilled energy bites from the refrigerator.
8. Serve immediately or transfer to an airtight container for storage.
Mildly sweet from the apples and honey with a warm cinnamon spice, these bites have a pleasantly chewy texture. They are perfect for packing in lunchboxes or enjoying as a post-workout snack. For a festive twist, roll the finished bites in extra cinnamon or crushed nuts before chilling.
Raspberry Coconut Macaroons
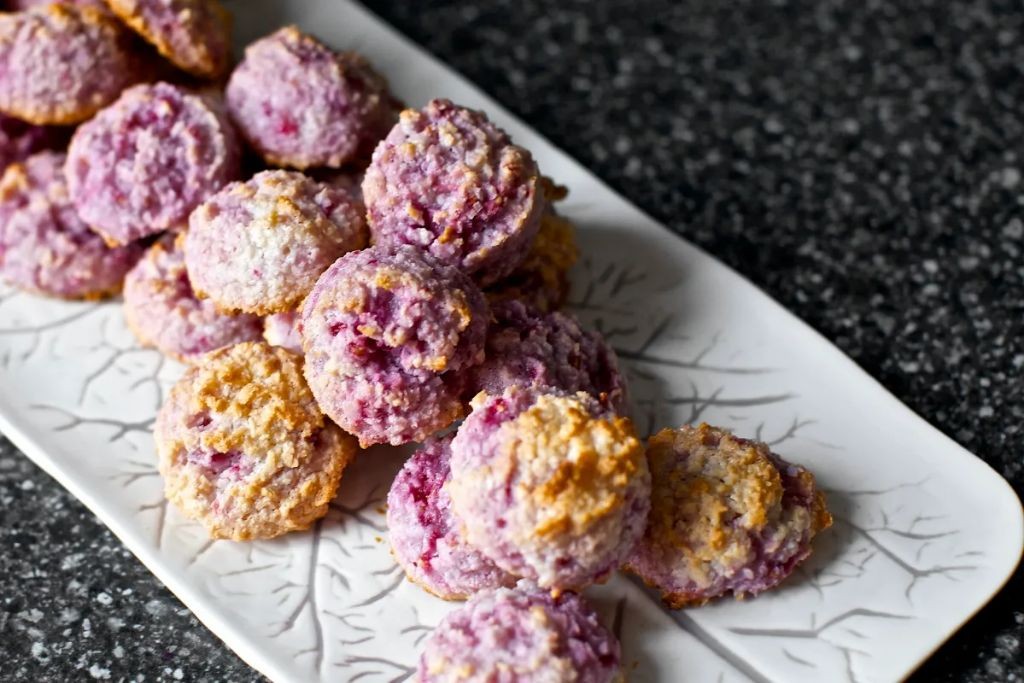
Vibrant and chewy, these raspberry coconut macaroons are a festive treat that’s surprisingly simple to make. They combine sweet coconut with tart raspberry jam for a delightful contrast. Perfect for holiday cookie trays or a quick dessert fix.
Serving: 24 | Pre Time: 15 minutes | Cooking Time: 20 minutes
Ingredients
– 14 oz sweetened shredded coconut
– 2/3 cup sweetened condensed milk
– 1 tsp vanilla extract
– 1/4 tsp salt
– 1/2 cup seedless raspberry jam
– 2 large egg whites
Instructions
1. Preheat oven to 325°F and line two baking sheets with parchment paper.
2. In a large bowl, combine 14 oz sweetened shredded coconut, 2/3 cup sweetened condensed milk, 1 tsp vanilla extract, and 1/4 tsp salt until fully mixed.
3. Use a small cookie scoop to form 1-inch balls of the coconut mixture, placing them 2 inches apart on the prepared baking sheets.
4. Make an indentation in the center of each ball with your thumb or the back of a teaspoon.
5. Fill each indentation with 1 tsp of seedless raspberry jam, being careful not to overfill.
6. In a clean, dry bowl, beat 2 large egg whites with an electric mixer on high speed until stiff peaks form, about 3-4 minutes.
7. Gently fold the beaten egg whites into the coconut mixture until just combined to keep the macaroons light and airy.
8. Bake for 18-20 minutes, or until the edges are golden brown and the tops are set.
9. Let the macaroons cool on the baking sheets for 5 minutes before transferring to a wire rack to cool completely.
Chewy and moist with a crisp exterior, these macaroons offer a burst of raspberry in every bite. The jam adds a tangy sweetness that balances the rich coconut. Try drizzling them with melted white chocolate or serving alongside coffee for an elegant touch.
Vegan Matcha Green Tea Ice Cream
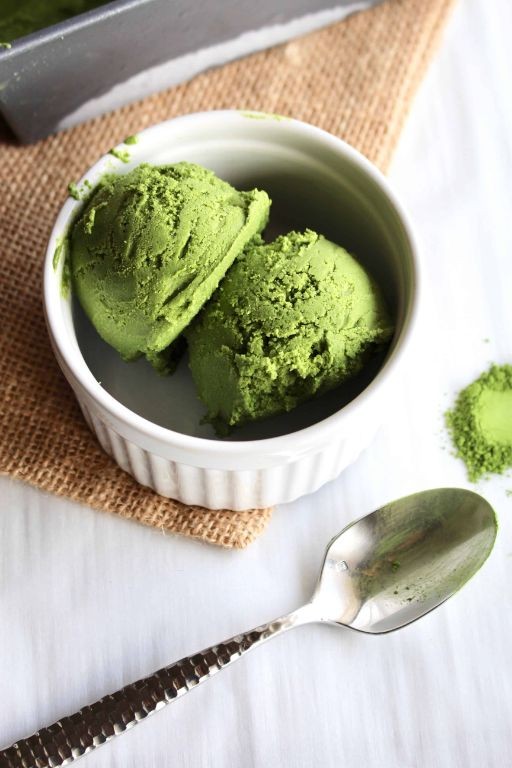
Even the most dedicated dairy lovers won’t miss the cream in this vibrant vegan matcha ice cream. Its earthy sweetness and smooth texture come from clever plant-based ingredients that churn into a perfect frozen dessert. You’ll need an ice cream maker for best results, but the simple process delivers impressive flavor.
Serving: 6 | Pre Time: 15 minutes | Cooking Time: 25 minutes
Ingredients
– 2 cups full-fat coconut milk
– 1 cup unsweetened almond milk
– ¾ cup granulated sugar
– 2 tablespoons matcha powder
– 1 teaspoon vanilla extract
– ¼ teaspoon salt
Instructions
1. Combine 2 cups full-fat coconut milk, 1 cup unsweetened almond milk, and ¾ cup granulated sugar in a medium saucepan.
2. Heat the mixture over medium heat, stirring constantly, until the sugar fully dissolves and tiny bubbles form around the edge—about 5 minutes. Do not let it boil.
3. Remove the saucepan from heat and immediately whisk in 2 tablespoons matcha powder until no green clumps remain. Tip: Sift the matcha first to prevent lumps for a smoother base.
4. Stir in 1 teaspoon vanilla extract and ¼ teaspoon salt until fully incorporated.
5. Pour the mixture through a fine-mesh sieve into a clean bowl to catch any undissolved matcha bits.
6. Cover the bowl tightly with plastic wrap, pressing it directly onto the surface of the liquid to prevent a skin from forming.
7. Refrigerate the mixture for at least 4 hours or until completely chilled to 40°F. Tip: Chilling thoroughly ensures faster freezing and a creamier texture in the ice cream maker.
8. Pour the chilled mixture into your ice cream maker and churn according to the manufacturer’s instructions until it reaches a soft-serve consistency—about 20–25 minutes.
9. Transfer the churned ice cream to an airtight container, smoothing the top with a spatula.
10. Press a piece of parchment paper directly onto the surface, then seal the container. Tip: This prevents ice crystals from forming during storage.
11. Freeze the ice cream for at least 4 hours or until firm enough to scoop.
Dense yet scoopable, this ice cream boasts a vivid green hue and a balanced bittersweet matcha flavor that lingers pleasantly. Serve it in waffle cones for a classic treat or crumble vegan shortbread cookies over the top for added crunch. The coconut milk base provides a rich mouthfeel without any dairy, making it a refreshing finale to any meal.
Almond Flour Chocolate Cake
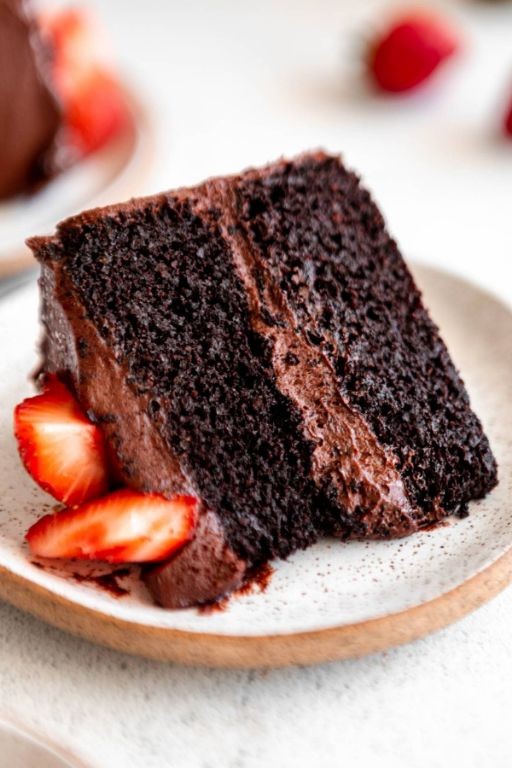
Looking for a gluten-free dessert that doesn’t compromise on rich chocolate flavor? This almond flour chocolate cake delivers intense cocoa taste with a moist, tender crumb. It’s surprisingly simple to make for any occasion.
Serving: 8 | Pre Time: 15 minutes | Cooking Time: 35 minutes
Ingredients
– 2 cups almond flour
– 1 cup granulated sugar
– 3/4 cup unsweetened cocoa powder
– 1 tsp baking soda
– 1/2 tsp salt
– 2 large eggs
– 1/2 cup vegetable oil
– 1 cup buttermilk
– 1 tsp vanilla extract
– 1/2 cup boiling water
Instructions
1. Preheat your oven to 350°F and grease a 9-inch round cake pan.
2. Whisk together 2 cups almond flour, 1 cup granulated sugar, 3/4 cup unsweetened cocoa powder, 1 tsp baking soda, and 1/2 tsp salt in a large bowl until fully combined.
3. Add 2 large eggs, 1/2 cup vegetable oil, 1 cup buttermilk, and 1 tsp vanilla extract to the dry ingredients.
4. Mix with an electric mixer on medium speed for 2 minutes until the batter is smooth and no lumps remain.
5. Carefully pour in 1/2 cup boiling water and stir gently until the batter becomes thin and glossy.
6. Tip: The boiling water enhances the cocoa flavor, so don’t skip this step.
7. Pour the batter into the prepared pan and tap it lightly on the counter to remove air bubbles.
8. Bake at 350°F for 30-35 minutes until a toothpick inserted into the center comes out clean.
9. Tip: Check at 30 minutes to prevent overbaking, as almond flour can dry out quickly.
10. Remove the cake from the oven and let it cool in the pan for 10 minutes.
11. Run a knife around the edges to loosen the cake, then invert it onto a wire rack to cool completely.
12. Tip: Cooling fully ensures the cake holds its structure when sliced.
13. Dust with powdered sugar or frost as desired before serving.
Dense yet moist, this cake boasts a deep chocolate flavor with a subtle nuttiness from the almond flour. Serve it warm with a scoop of vanilla ice cream for a decadent treat, or enjoy it plain with a cup of coffee.
Peanut Butter Banana Nice Cream
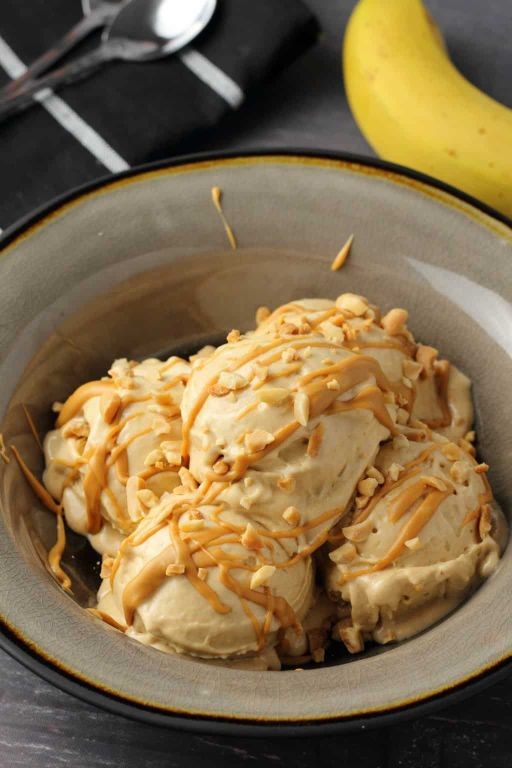
Only three ingredients transform into this creamy, dairy-free dessert. Overripe bananas provide natural sweetness, while peanut butter adds richness. This no-churn ice cream alternative comes together in minutes.
Serving: 4 | Pre Time: 5 minutes | Cooking Time: 0 minutes
Ingredients
– 4 large ripe bananas
– 1/2 cup creamy peanut butter
– 1 tbsp maple syrup
Instructions
1. Peel the 4 large ripe bananas and slice them into 1-inch chunks.
2. Arrange banana chunks in a single layer on a parchment-lined baking sheet.
3. Freeze banana chunks for at least 4 hours or until completely solid.
4. Place frozen banana chunks in a high-speed blender or food processor.
5. Add 1/2 cup creamy peanut butter and 1 tbsp maple syrup to the blender.
6. Blend on high speed for 1-2 minutes, stopping to scrape down the sides as needed.
7. Continue blending until the mixture becomes completely smooth and creamy, about 3-4 minutes total.
8. Serve immediately for soft-serve consistency, or transfer to a freezer-safe container.
9. Freeze for 2-3 hours for firmer scoopable ice cream texture.
Use a high-speed blender for the smoothest results, as frozen bananas require power to break down properly. Unlike traditional ice cream, this version stays scoopable straight from the freezer without icy crystals forming. Unbelievably creamy with prominent peanut butter flavor, it pairs perfectly with chocolate drizzle or crushed pretzels for added crunch.
Carrot Cake Bliss Balls
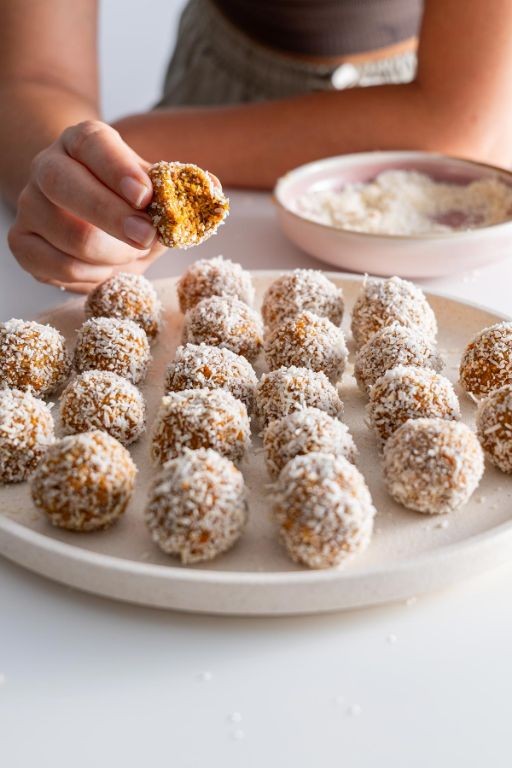
Escape holiday baking stress with these no-bake carrot cake bliss balls. They deliver classic spice flavors in a portable, healthy snack. Perfect for last-minute gifts or a quick energy boost.
Serving: 12 | Pre Time: 15 minutes | Cooking Time: 0 minutes
Ingredients
– 1 cup rolled oats
– 1 cup shredded carrots
– 1/2 cup almond butter
– 1/4 cup maple syrup
– 1/4 cup chopped walnuts
– 1 tsp ground cinnamon
– 1/2 tsp ground ginger
– 1/4 tsp ground nutmeg
– 1/4 tsp salt
– 1/2 cup shredded coconut
Instructions
1. Place rolled oats in a food processor and pulse for 15 seconds until finely ground.
2. Add shredded carrots, almond butter, maple syrup, chopped walnuts, ground cinnamon, ground ginger, ground nutmeg, and salt to the food processor.
3. Process the mixture for 45 seconds until it forms a sticky dough that holds together when pressed.
4. Scoop 1-tablespoon portions of dough and roll firmly between your palms to form 1-inch balls. Tip: Wet your hands slightly to prevent sticking.
5. Pour shredded coconut onto a small plate and roll each ball in coconut until evenly coated. Tip: Press gently to help coconut adhere.
6. Arrange coated balls on a parchment-lined baking sheet and refrigerate for 30 minutes to firm up. Tip: For firmer texture, freeze for 15 minutes instead.
7. Transfer bliss balls to an airtight container and store refrigerated for up to 1 week.
Gently spiced with warm cinnamon and nutmeg, these bliss balls offer a moist, chewy texture reminiscent of carrot cake batter. The shredded coconut adds a subtle tropical crunch that contrasts beautifully with the creamy almond butter base. For a festive presentation, serve them in mini muffin liners or drizzle with a simple powdered sugar glaze.
Chocolate Coconut Bars
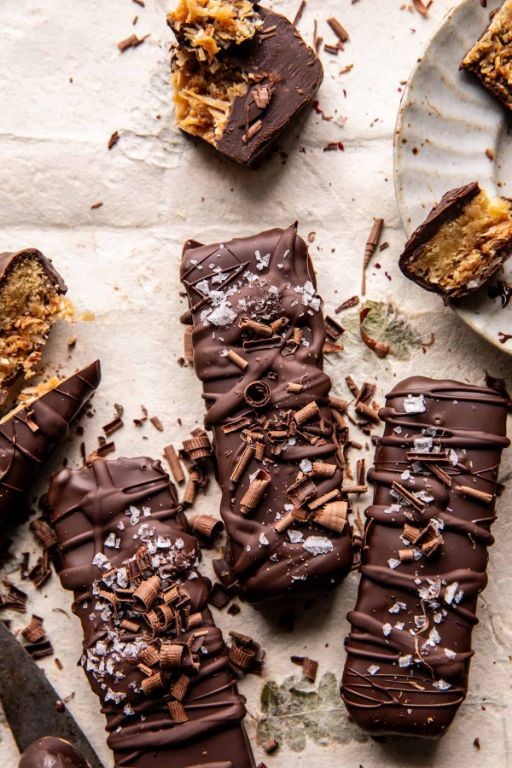
These chocolate coconut bars deliver a rich, fudgy base topped with a chewy coconut layer. They’re perfect for holiday gatherings or a simple sweet treat. You’ll need just a few pantry staples to make them.
Serving: 16 | Pre Time: 15 minutes | Cooking Time: 25 minutes
Ingredients
– 1 ½ cups all-purpose flour
– ¾ cup unsalted butter, melted
– ½ cup granulated sugar
– ¼ cup unsweetened cocoa powder
– 1 large egg
– 1 teaspoon vanilla extract
– ¼ teaspoon salt
– 1 ½ cups sweetened shredded coconut
– 1 (14-ounce) can sweetened condensed milk
– ½ cup semisweet chocolate chips
Instructions
1. Preheat your oven to 350°F and line an 8×8-inch baking pan with parchment paper, leaving overhang on two sides for easy removal.
2. In a medium bowl, combine 1 ½ cups all-purpose flour, ½ cup granulated sugar, ¼ cup unsweetened cocoa powder, and ¼ teaspoon salt.
3. Add ¾ cup melted unsalted butter, 1 large egg, and 1 teaspoon vanilla extract to the dry ingredients. Tip: Mix just until combined to avoid a tough crust.
4. Press the dough evenly into the prepared pan using your hands or the bottom of a measuring cup.
5. Bake the crust at 350°F for 10 minutes, until it looks set but not fully cooked.
6. In a separate bowl, stir together 1 ½ cups sweetened shredded coconut and the entire can of sweetened condensed milk.
7. Spread the coconut mixture over the hot crust in an even layer. Tip: Work quickly so the coconut layer adheres well to the warm base.
8. Return the pan to the oven and bake at 350°F for 15 minutes, until the coconut topping is golden brown.
9. Remove the pan from the oven and immediately sprinkle ½ cup semisweet chocolate chips evenly over the top. Tip: Let them sit for 1-2 minutes to melt slightly before spreading for a smooth finish.
10. Use a spatula to spread the melted chocolate into a thin, even layer.
11. Allow the bars to cool completely in the pan on a wire rack for at least 2 hours.
12. Lift the bars out using the parchment overhang and cut into 16 squares with a sharp knife.
Oozing with chocolate and coconut, these bars offer a delightful contrast between the firm, brownie-like base and the soft, chewy topping. For a festive twist, sprinkle with sea salt or toasted nuts before the chocolate sets. They store well in an airtight container for up to five days, making them ideal for make-ahead desserts.
Vegan Key Lime Pie

Perfect for summer gatherings, this vegan key lime pie delivers a bright, tangy flavor with a creamy, no-bake filling and a crunchy crust. It’s refreshingly simple to make, requiring just a handful of ingredients and minimal effort. You’ll have a stunning dessert ready in no time.
Serving: 8 | Pre Time: 20 minutes | Cooking Time: 0 minutes
Ingredients
– 1 1/2 cups graham cracker crumbs
– 1/3 cup vegan butter, melted
– 1/4 cup granulated sugar
– 1 (14-ounce) can full-fat coconut milk, chilled overnight
– 1/2 cup key lime juice
– 1/3 cup maple syrup
– 1 teaspoon vanilla extract
– 1/4 teaspoon salt
– 1 tablespoon cornstarch
Instructions
1. Preheat your oven to 350°F.
2. In a medium bowl, combine the graham cracker crumbs, melted vegan butter, and granulated sugar until the mixture resembles wet sand.
3. Press the mixture firmly and evenly into the bottom and up the sides of a 9-inch pie dish.
4. Bake the crust for 10 minutes, or until lightly golden and fragrant.
5. Remove the crust from the oven and let it cool completely on a wire rack.
6. Scoop only the solid coconut cream from the top of the chilled can of coconut milk into a large mixing bowl, reserving the liquid for another use.
7. Using an electric mixer on high speed, whip the coconut cream until stiff peaks form, about 2-3 minutes.
8. In a small bowl, whisk together the key lime juice, maple syrup, vanilla extract, salt, and cornstarch until smooth.
9. Gently fold the lime juice mixture into the whipped coconut cream until fully incorporated and no streaks remain.
10. Pour the filling into the cooled crust and spread it evenly with a spatula.
11. Refrigerate the pie for at least 4 hours, or until the filling is firmly set.
12. Slice and serve chilled.
Ultra-creamy and zesty, this pie boasts a smooth, velvety texture that contrasts beautifully with the crisp, buttery crust. The tangy key lime flavor shines through, balanced by subtle sweetness from the maple syrup. For a festive touch, garnish with lime zest or serve alongside fresh berries.
Strawberry Chia Jam Tart
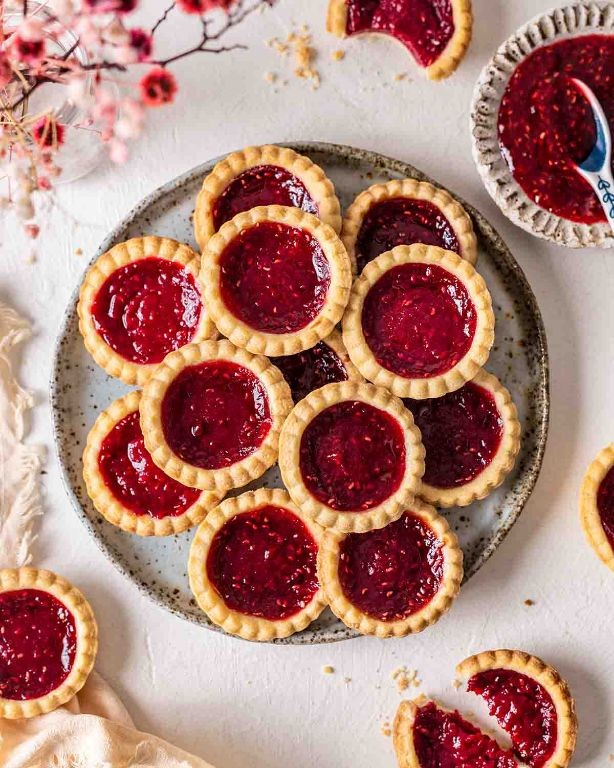
Forget store-bought jams and complicated pastries. This Strawberry Chia Jam Tart delivers vibrant flavor with a simple, press-in crust and a naturally set filling. Fresh strawberries simmer into a quick jam, thickened with chia seeds for a healthier twist that requires no pectin.
Serving: 8 | Pre Time: 20 minutes | Cooking Time: 35 minutes
Ingredients
– 1 1/2 cups all-purpose flour
– 1/2 cup granulated sugar
– 1/2 teaspoon salt
– 1/2 cup unsalted butter, cold and cubed
– 1 large egg yolk
– 1 tablespoon ice water
– 1 pound fresh strawberries, hulled and quartered
– 1/4 cup granulated sugar
– 2 tablespoons lemon juice
– 3 tablespoons chia seeds
Instructions
1. Preheat your oven to 350°F.
2. Combine 1 1/2 cups flour, 1/2 cup sugar, and 1/2 teaspoon salt in a food processor.
3. Add 1/2 cup cold, cubed butter and pulse until the mixture resembles coarse crumbs.
4. Add 1 egg yolk and 1 tablespoon ice water, then pulse just until the dough begins to clump together.
5. Press the dough evenly into a 9-inch tart pan with a removable bottom, ensuring it goes up the sides.
6. Prick the bottom of the crust all over with a fork to prevent puffing.
7. Bake the crust for 15 minutes, or until the edges are just beginning to turn light golden.
8. While the crust bakes, combine 1 pound quartered strawberries, 1/4 cup sugar, and 2 tablespoons lemon juice in a medium saucepan.
9. Cook the strawberry mixture over medium heat, stirring frequently, for 10 minutes until the berries break down and the liquid thickens slightly.
10. Remove the saucepan from the heat and immediately stir in 3 tablespoons chia seeds.
11. Let the jam mixture stand for 10 minutes to allow the chia seeds to gel and thicken the filling.
12. Pour the warm chia jam into the pre-baked tart shell, spreading it evenly with a spatula.
13. Bake the assembled tart for 20 minutes, until the jam is set and the crust is a deep golden brown.
14. Transfer the tart to a wire rack and let it cool completely to room temperature before slicing.
Slice into this tart to reveal a firm, seed-speckled jam that holds its shape without being gummy. The buttery, shortbread-like crust provides a perfect textural contrast to the bright, slightly tangy strawberry filling. Serve it slightly warm with a dollop of whipped cream or chilled for a refreshing, make-ahead dessert.
Vanilla Bean Coconut Milk Ice Cream
Bypass the dairy aisle—this creamy vanilla bean coconut milk ice cream delivers rich flavor without the cream. It’s a simple, plant-based treat that churns up smooth and satisfying, perfect for hot days or a sweet finish to any meal.
Serving: 6 | Pre Time: 15 minutes | Cooking Time: 0 minutes
Ingredients
– 2 (13.5 oz) cans full-fat coconut milk
– ¾ cup granulated sugar
– 1 vanilla bean, split and seeds scraped
– 1 tsp pure vanilla extract
– ¼ tsp kosher salt
Instructions
1. Chill a 9×5-inch loaf pan in the freezer for at least 30 minutes before starting.
2. Pour both cans of coconut milk into a medium saucepan over medium heat.
3. Add the granulated sugar, scraped vanilla bean seeds and pod, vanilla extract, and kosher salt to the saucepan.
4. Whisk the mixture constantly until the sugar fully dissolves and it is just steaming, about 3-5 minutes; do not let it boil.
5. Remove the saucepan from the heat and let the mixture cool to room temperature, about 30 minutes.
6. Strain the cooled mixture through a fine-mesh sieve into a bowl to remove the vanilla bean pod.
7. Cover the bowl tightly with plastic wrap and refrigerate until completely cold, at least 4 hours or overnight for best results.
8. Pour the chilled mixture into your ice cream maker and churn according to the manufacturer’s instructions until thick and creamy, about 20-25 minutes.
9. Transfer the churned ice cream to the pre-chilled loaf pan, smoothing the top with a spatula.
10. Press a piece of parchment paper directly onto the surface of the ice cream to prevent ice crystals.
11. Cover the pan tightly with plastic wrap and freeze until firm, at least 4-6 hours.
12. Let the ice cream sit at room temperature for 5-10 minutes before scooping to soften slightly.
Heavenly smooth and flecked with real vanilla, this ice cream has a lush, creamy texture that rivals traditional versions. Serve it in waffle cones, over warm fruit crisp, or simply by the scoop for a refreshing, dairy-free indulgence.
Summary
Gluten-free and dairy-free desserts can be absolutely indulgent, and this collection proves it! We hope these 20 easy recipes inspire your next sweet treat. Give one a try, then let us know your favorite in the comments below. If you enjoyed this roundup, please share it on Pinterest to help other home cooks discover delicious dessert options!


