
Just when you thought Halloween was all about costumes and candy, we’re here to prove that the real magic happens in the kitchen! Get ready to transform your feast into a frightfully fun experience with these 19 spooky recipes. From eerie appetizers to ghoulish desserts, we’ve got everything you need to make your Halloween party unforgettable. Let’s dive into these deliciously creepy creations!
Pumpkin-shaped Jack-o’-Lantern Cheese Balls
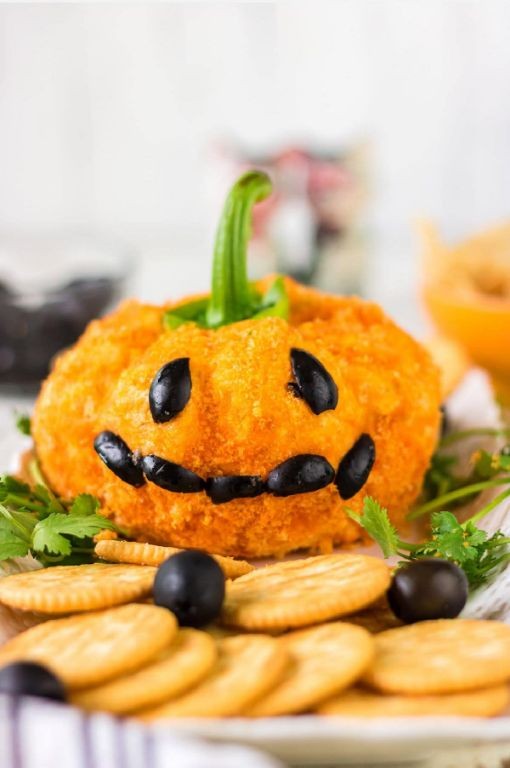
Every Halloween party needs a showstopper appetizer, and these pumpkin-shaped jack-o’-lantern cheese balls are it. You get creamy, savory cheese in a fun, festive shape that’s surprisingly simple to pull off.
Serving: 12 | Pre Time: 25 minutes | Cooking Time: 0 minutes
Ingredients
– 16 oz cream cheese, softened to room temperature (this makes mixing a breeze)
– 1 cup shredded sharp cheddar cheese, packed (I love the extra tang)
– 1/2 cup grated Parmesan cheese
– 1/2 tsp garlic powder
– 1/2 tsp onion powder
– 1/4 tsp smoked paprika, plus extra for dusting
– 1/4 cup finely chopped fresh chives
– 1 bell pepper stem, for garnish (save it when prepping veggies earlier!)
– Crackers or sliced baguette, for serving
Instructions
1. In a large mixing bowl, combine the softened cream cheese, shredded cheddar, grated Parmesan, garlic powder, onion powder, and 1/4 tsp smoked paprika.
2. Use a hand mixer on medium speed to beat the mixture for about 2 minutes, until fully combined and smooth. Tip: Scrape down the sides of the bowl halfway through to ensure everything is incorporated.
3. Fold in the finely chopped fresh chives with a spatula until evenly distributed.
4. Line a baking sheet with parchment paper. Scoop the cheese mixture into 12 equal portions, each about the size of a golf ball.
5. Roll each portion between your palms to form a smooth, round ball. Place them on the prepared baking sheet.
6. Use the handle of a wooden spoon or a chopstick to gently press a vertical indentation from the top to the bottom of each cheese ball, creating a pumpkin shape.
7. Press horizontal lines around each ball with the spoon handle to mimic pumpkin ridges, spacing them evenly. Tip: Lightly wet the handle to prevent sticking if needed.
8. Insert a small piece of bell pepper stem into the top of each cheese ball to resemble a pumpkin stem.
9. Lightly dust the cheese balls with a pinch of smoked paprika using a fine-mesh sieve for a warm, autumnal color. Tip: Do this just before serving to keep the paprika vibrant.
10. Refrigerate the cheese balls on the baking sheet for at least 1 hour to firm up before serving.
11. Arrange the chilled cheese balls on a platter with crackers or sliced baguette for dipping.
Unbelievably creamy and packed with savory cheese flavor, these little pumpkins have a firm yet spreadable texture that’s perfect on a cracker. Serve them with a side of spicy pepper jelly for a sweet kick, or let guests carve their own ‘faces’ with extra chives for a playful twist.
Witch Finger Breadsticks with Marinara Sauce

Zombie movies might give you the creeps, but these spooky breadsticks are pure fun—perfect for Halloween parties or just a playful snack night. You’ll love how easy they are to shape, and dipping them in warm marinara feels like a cozy, savory treat.
Serving: 12 | Pre Time: 20 minutes | Cooking Time: 15 minutes
Ingredients
- 1 cup warm water (around 110°F—I test it with my finger to avoid killing the yeast)
- 1 tbsp active dry yeast (that little packet works perfectly)
- 1 tsp sugar (just a pinch to wake up the yeast)
- 2 ½ cups all-purpose flour, plus extra for dusting (I always keep a bag handy for impromptu baking)
- 1 tsp salt (I use fine sea salt for even mixing)
- 2 tbsp olive oil (extra virgin is my go-to for that fruity hint)
- 1 large egg, beaten (room temp eggs here help with a smooth glaze)
- ½ cup sliced almonds (for the “fingernails”—get the whole ones for a creepier look)
- 1 cup marinara sauce, for serving (store-bought is fine, but I simmer mine with a garlic clove for extra flavor)
Instructions
- In a large bowl, combine the warm water, yeast, and sugar, and let it sit for 5 minutes until frothy.
- Add the flour, salt, and olive oil to the bowl, and mix until a shaggy dough forms. Tip: If it feels too sticky, add a tablespoon more flour gradually.
- Knead the dough on a floured surface for 5–7 minutes until smooth and elastic.
- Place the dough in a lightly oiled bowl, cover with a damp towel, and let it rise in a warm spot for 1 hour until doubled in size.
- Preheat your oven to 400°F and line a baking sheet with parchment paper.
- Punch down the dough and divide it into 12 equal pieces on a floured surface.
- Roll each piece into a 6-inch rope, then pinch one end to create a “knuckle” and taper the other end like a fingertip.
- Use a sharp knife to make three shallow cuts on each “knuckle” to resemble finger joints.
- Brush each breadstick lightly with the beaten egg. Tip: This gives a golden shine and helps the almonds stick.
- Press a sliced almond into the tapered end of each breadstick as a fingernail.
- Arrange the breadsticks on the prepared baking sheet, spacing them 1 inch apart.
- Bake for 12–15 minutes until golden brown and firm to the touch. Tip: Rotate the sheet halfway through for even browning.
- While baking, heat the marinara sauce in a small saucepan over medium heat for 5–7 minutes until warm.
- Serve the breadsticks immediately with the warm marinara sauce on the side.
Munch on these right out of the oven—they’re crisp on the outside with a soft, chewy center that pairs perfectly with the tangy marinara. For a party, arrange them on a platter with a bowl of sauce in the middle, and watch them disappear as everyone grabs a “finger” to dip.
Mummy Hot Dogs with Puff Pastry

Dreading the Halloween party prep? These mummy hot dogs are your secret weapon—they look impressive but come together in minutes with puff pastry. You’ll have the cutest spooky appetizer that both kids and adults will devour.
Serving: 8 | Pre Time: 15 minutes | Cooking Time: 20 minutes
Ingredients
– 1 package (8 count) all-beef hot dogs—I like the thicker ones for better texture
– 1 sheet frozen puff pastry, thawed but still cold (the cold dough is easier to work with)
– 1 large egg, lightly beaten (room temp eggs mix more smoothly)
– 2 tbsp whole milk (for the egg wash—it gives a nice golden color)
– 1 tsp yellow mustard (for the “eyes”—I keep a squeeze bottle handy)
Instructions
1. Preheat your oven to 400°F and line a baking sheet with parchment paper.
2. Unfold the puff pastry sheet on a lightly floured surface and cut it into ¼-inch wide strips with a sharp knife or pizza cutter.
3. Wrap each hot dog with the pastry strips, leaving a small gap near the top for the “face”—overlap them slightly like bandages.
4. Place the wrapped hot dogs on the prepared baking sheet, spacing them about 1 inch apart.
5. In a small bowl, whisk together the egg and milk until fully combined to make the egg wash.
6. Brush the egg wash evenly over all the pastry-wrapped hot dogs using a pastry brush.
7. Bake in the preheated oven for 18–20 minutes, until the pastry is puffed and golden brown.
8. Remove from the oven and let cool on the baking sheet for 2 minutes.
9. Use the mustard to dot two small “eyes” on the exposed hot dog at the top of each mummy.
10. Transfer to a serving platter and serve warm.
Very crispy and flaky on the outside with a juicy hot dog inside—these are perfect for dipping in ketchup or ranch. I love setting them on a bed of “grave” lettuce with extra mustard for a fun Halloween spread.
Bloody Eyeball Deviled Eggs

Mixing spooky fun with classic party food, these Bloody Eyeball Deviled Eggs are perfect for Halloween gatherings. You’ll love how the simple addition of red food coloring transforms ordinary deviled eggs into creepy edible eyeballs that are surprisingly delicious.
Serving: 12 | Pre Time: 15 minutes | Cooking Time: 15 minutes
Ingredients
– 6 large eggs (I prefer room temperature eggs here—they’re less likely to crack when boiling)
– ¼ cup mayonnaise (Duke’s is my go-to for that classic Southern tang)
– 1 tbsp yellow mustard
– ½ tsp white vinegar
– ¼ tsp paprika
– ¼ tsp salt
– 2-3 drops red liquid food coloring (gel works too, but liquid blends more easily)
– 12 small black olive slices (for the pupils—get the pitted kind to save time)
Instructions
1. Place the 6 eggs in a single layer in a medium saucepan and cover with cold water by 1 inch.
2. Bring the water to a rolling boil over high heat, then immediately remove the pan from heat, cover, and let sit for 12 minutes exactly (this prevents rubbery yolks).
3. Transfer the eggs to a bowl of ice water using a slotted spoon and let cool for 5 minutes to stop the cooking.
4. Peel the eggs carefully under running water to help remove the shells smoothly.
5. Slice each egg in half lengthwise with a sharp knife and gently pop out the yolks into a small bowl.
6. Arrange the 12 egg white halves on a serving plate, cut-side up.
7. Mash the yolks thoroughly with a fork until no large chunks remain.
8. Add the ¼ cup mayonnaise, 1 tbsp yellow mustard, ½ tsp white vinegar, ¼ tsp paprika, and ¼ tsp salt to the yolks.
9. Mix everything together until completely smooth and creamy (a small whisk works great here).
10. Stir in 2-3 drops of red food coloring until the mixture is evenly pink—add more drops if you want a deeper red.
11. Spoon or pipe the pink yolk filling back into the egg white halves, mounding it slightly.
12. Press one small black olive slice into the center of each filled egg to create the pupil.
13. Chill the deviled eggs in the refrigerator for at least 30 minutes before serving to let the flavors meld.
Enjoy these creepy creations! The filling is creamy with a tangy kick from the mustard and vinegar, while the egg whites add a firm bite. For an extra spooky touch, arrange them on a bed of shredded lettuce to look like eyeballs peeking out—they’re always a hit at parties!
Candy Corn Parfait with Vanilla Pudding
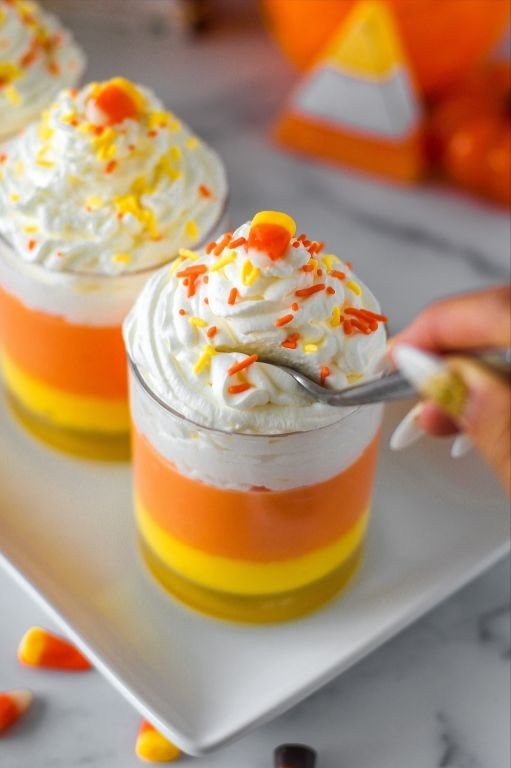
Picture this: you’re craving something sweet but don’t want to spend hours in the kitchen. This candy corn parfait with vanilla pudding is your answer—it’s festive, easy, and totally hits the spot.
Serving: 4 | Pre Time: 15 minutes | Cooking Time: 0 minutes
Ingredients
- 1 (3.4 oz) box instant vanilla pudding mix (I always grab the name brand for that classic flavor)
- 2 cups cold whole milk (trust me, whole milk makes the pudding extra creamy)
- 1 cup heavy whipping cream, chilled (cold cream whips up so much faster)
- 2 tablespoons granulated sugar
- 1 teaspoon pure vanilla extract (the real stuff makes all the difference)
- 2 cups candy corn (go for the classic orange, yellow, and white mix)
- 1 cup crushed graham crackers (about 8 full sheets—I like to crush them in a bag for less mess)
Instructions
- Pour the 2 cups of cold whole milk into a large mixing bowl.
- Add the entire box of instant vanilla pudding mix to the milk.
- Whisk the milk and pudding mix together vigorously for 2 full minutes, until completely smooth and slightly thickened. Tip: Set a timer—whisking the full 2 minutes prevents a grainy texture.
- Cover the bowl with plastic wrap and refrigerate the pudding for 5 minutes to set further.
- While the pudding chills, pour the 1 cup of chilled heavy whipping cream into a separate clean bowl.
- Add the 2 tablespoons of granulated sugar and 1 teaspoon of pure vanilla extract to the cream.
- Using a hand mixer on medium-high speed, whip the cream mixture for 3-4 minutes until stiff peaks form. Tip: Stop when the cream holds its shape when you lift the beaters—overwhipping can turn it to butter.
- Remove the pudding from the refrigerator and gently fold in half of the whipped cream until just combined to lighten it.
- Assemble the parfaits in four clear glasses: start with a layer of about 2 tablespoons of the crushed graham crackers.
- Add a layer of about ¼ cup of the lightened vanilla pudding on top of the crackers.
- Sprinkle a layer of about ¼ cup of candy corn over the pudding.
- Repeat the layers—crackers, pudding, candy corn—once more in each glass.
- Top each parfait with a dollop of the remaining whipped cream. Tip: For a pretty finish, use a piping bag or just spoon it on and swirl with the back of a spoon.
- Garnish the top with a few extra pieces of candy corn.
Grab a spoon and dive in! You’ll love the creamy, cool pudding against the crunchy graham crackers and the sweet, chewy bursts of candy corn. For a fun twist, try layering in some crushed pretzels for a salty-sweet kick or serving it in mason jars for a cute picnic treat.
Spiderweb Pizza with Black Olive Garnish
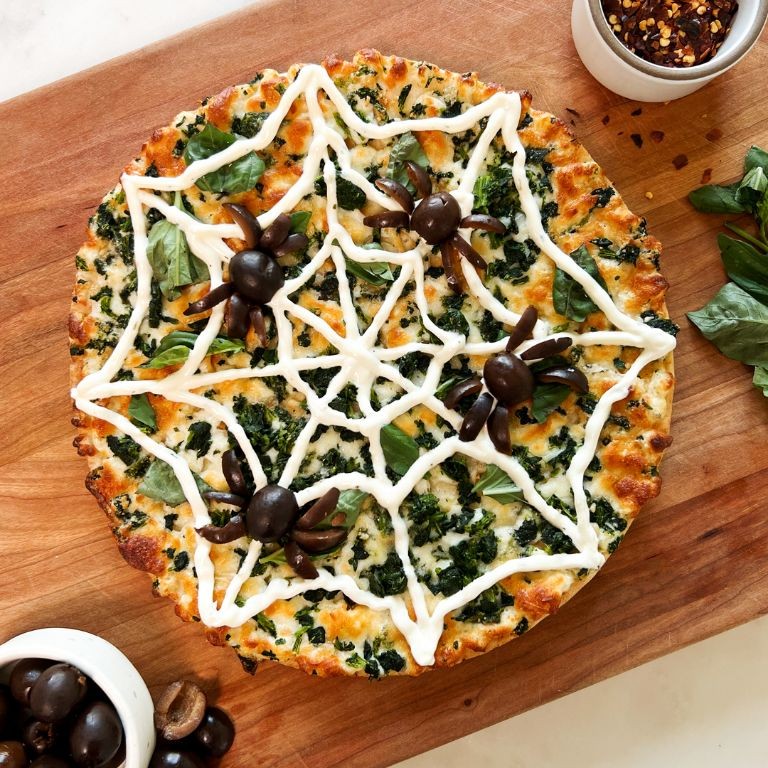
Unbelievably fun and perfect for Halloween or any spooky-themed gathering, this spiderweb pizza is a total crowd-pleaser. You’ll love how the simple black olive garnish creates that eerie web effect, and the best part? It’s way easier to make than it looks. Let’s get that oven preheating and dive in.
Serving: 4 | Pre Time: 20 minutes | Cooking Time: 15 minutes
Ingredients
– 1 lb store-bought pizza dough (I like to let it sit out for 30 minutes to make stretching easier)
– 1/2 cup pizza sauce (go for your favorite jarred brand to keep it simple)
– 2 cups shredded mozzarella cheese (the pre-shredded kind works perfectly here)
– 1/4 cup sliced black olives (drained well—nobody wants a soggy spiderweb!)
– 1 tbsp extra virgin olive oil (my go-to for brushing the crust)
– 1/2 tsp dried oregano (a little sprinkle adds classic pizza flavor)
– All-purpose flour for dusting (just a light coating to prevent sticking)
Instructions
1. Preheat your oven to 475°F and place a pizza stone or baking sheet inside to heat up.
2. Lightly dust a clean surface with all-purpose flour and stretch the 1 lb pizza dough into a 12-inch circle.
3. Carefully transfer the dough to a piece of parchment paper.
4. Spread the 1/2 cup pizza sauce evenly over the dough, leaving a 1-inch border for the crust.
5. Sprinkle the 2 cups shredded mozzarella cheese evenly over the sauce.
6. Arrange the 1/4 cup sliced black olives in a spiderweb pattern: place a small cluster in the center, then create 6-8 “lines” radiating outward, and connect them with concentric circles.
7. Brush the exposed crust edge with the 1 tbsp extra virgin olive oil and sprinkle with the 1/2 tsp dried oregano.
8. Slide the parchment paper with the pizza onto the preheated stone or baking sheet.
9. Bake at 475°F for 12-15 minutes, until the crust is golden brown and the cheese is bubbly and slightly browned.
10. Remove from the oven and let it cool on a wire rack for 5 minutes before slicing.
Now, slice it up and serve! The crust comes out crispy on the edges with a chewy center, while the gooey cheese and tangy sauce balance the salty bite of the olives. Not only does it look impressively spooky, but it’s also deliciously shareable—try pairing it with a side salad for a complete meal or cutting it into small squares for a party appetizer.
Monster Mouth Apple Slice Sandwiches
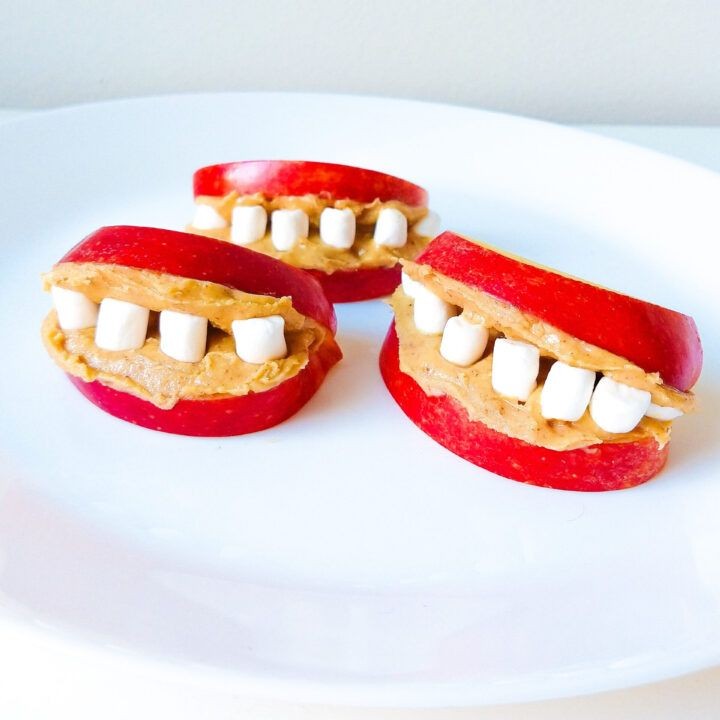
These monster mouth apple slice sandwiches are the perfect spooky-but-cute treat to make with kids—or just for yourself when you want something fun and easy. They come together in minutes with simple ingredients you probably already have, and the googly-eyed peanut butter “teeth” are guaranteed to make everyone smile.
Serving: 4 | Pre Time: 15 minutes | Cooking Time: 0 minutes
Ingredients
– 2 large crisp apples (I like Honeycrisp or Granny Smith for their firm texture)
– ½ cup creamy peanut butter (the kind that’s already smooth and spreadable—no stirring required!)
– ¼ cup mini marshmallows (these will be the “teeth”)
– 32 candy eyeballs (found in the baking aisle, or use raisins if you want a less sugary option)
– 1 tablespoon lemon juice (just a quick squeeze to keep those apple slices from browning)
Instructions
1. Wash and dry both apples thoroughly.
2. Slice each apple horizontally into 8 even rounds, about ¼-inch thick—a sharp knife helps here to get clean cuts without crushing the apple.
3. Immediately brush both sides of each apple slice with lemon juice using a pastry brush or your fingers to prevent browning.
4. Lay half of the apple slices flat on a cutting board or plate; these will be the bottom “mouths.”
5. Spread about 1 teaspoon of peanut butter evenly onto each of these bottom slices, leaving a small border around the edges so it doesn’t squish out too much.
6. Press 4 mini marshmallows into the peanut butter on each slice, spacing them apart like crooked teeth—don’t worry about perfection, the messier they look, the more monster-like!
7. Gently press 2 candy eyeballs above the marshmallows on each slice for the googly eyes.
8. Top each assembled bottom slice with a remaining plain apple slice to create a sandwich, pressing lightly to secure.
9. Serve immediately, or refrigerate for up to 1 hour if making ahead (any longer and the apples might get too soft).
Perfect for Halloween parties or after-school snacks, these little monsters deliver a satisfying crunch from the fresh apples paired with the creamy peanut butter. The sweet marshmallows add a playful texture contrast, and you can even swap in almond butter or sunflower seed butter for a nut-free version—get creative with your monster faces!
Goblin Green Guacamole with Tortilla Chips

Okay, so you know how sometimes you want a snack that’s a little spooky but totally delicious? This goblin green guacamole is exactly that—it’s vibrant, creamy, and perfect for dipping. Let’s make it together!
Serving: 4 | Pre Time: 15 minutes | Cooking Time: 0 minutes
Ingredients
– 3 ripe avocados, halved and pitted (I like them slightly soft to the touch for easy mashing)
– 1/4 cup finely chopped white onion (a sharp knife makes this quick!)
– 1/4 cup chopped fresh cilantro (I always grab a big bunch for that fresh kick)
– 2 tbsp fresh lime juice (about 1 lime squeezed—fresh is key for brightness)
– 1 jalapeño, seeds removed and finely diced (adjust for heat, but I go mild here)
– 1/2 tsp salt (I use kosher salt for even seasoning)
– 1 bag of tortilla chips (pick your favorite brand for crunch)
Instructions
1. Scoop the avocado flesh from the skins into a medium bowl.
2. Mash the avocados with a fork until mostly smooth but with some small chunks for texture.
3. Add the chopped white onion, cilantro, lime juice, diced jalapeño, and salt to the bowl.
4. Gently fold all ingredients together with a spoon until well combined.
5. Taste the guacamole and adjust salt if needed, but avoid overmixing to keep it creamy.
6. Transfer the guacamole to a serving bowl immediately to prevent browning.
7. Serve the guacamole alongside the tortilla chips on a plate or in a bowl.
Scoop a chip into that bright green dip—it’s creamy with a hint of spice from the jalapeño and a fresh zing from the lime. Try it as a topping for tacos or spread on toast for a fun twist!
Graveyard Chocolate Pudding Cups with Cookie Tombstones
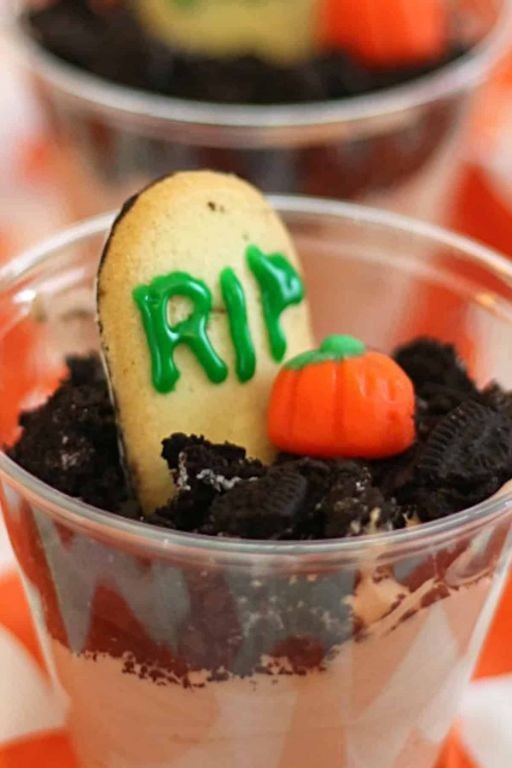
Brace yourself for a spookily delicious dessert that’s perfect for Halloween or any eerie gathering! These Graveyard Chocolate Pudding Cups with Cookie Tombstones are a playful, no-bake treat that’ll have everyone digging in. You’ll love how simple they are to whip up, with rich chocolate pudding, crunchy cookie “dirt,” and cute tombstones that make them almost too fun to eat.
Serving: 6 | Pre Time: 20 minutes | Cooking Time: 0 minutes
Ingredients
– 2 cups whole milk (I find whole milk gives the pudding a creamier texture, but 2% works in a pinch)
– 1 (3.4 oz) box instant chocolate pudding mix (go for the classic chocolate flavor—it’s a crowd-pleaser)
– 1 cup crushed chocolate sandwich cookies (about 10 cookies, crushed into fine crumbs; I use a food processor for quick, even results)
– 6 rectangular vanilla wafer cookies (for the tombstones—graham crackers work too if you prefer)
– 1/2 cup whipped cream or whipped topping (optional, for a fluffy ghost-like garnish)
– Black decorating gel or melted chocolate (just a small tube or 1/4 cup melted chocolate chips for writing on the tombstones)
Instructions
1. In a large mixing bowl, pour 2 cups of whole milk and add the entire box of instant chocolate pudding mix.
2. Whisk the milk and pudding mix together vigorously for 2 minutes, until the mixture thickens and no lumps remain—tip: whisking by hand helps avoid over-mixing, which can make the pudding runny.
3. Let the pudding sit undisturbed for 5 minutes to set further; it should be thick and spoonable.
4. While the pudding sets, place the chocolate sandwich cookies in a food processor or zip-top bag and crush them into fine crumbs to resemble dirt.
5. Spoon the set pudding evenly into 6 small cups or ramekins, filling each about 3/4 full.
6. Sprinkle a generous layer of the crushed cookie crumbs over the top of each pudding cup, covering the surface completely—tip: press lightly with a spoon to help the crumbs stick, creating a realistic “grave” look.
7. Take the vanilla wafer cookies and use the black decorating gel or a small piping bag with melted chocolate to write “RIP” or spooky messages on them as tombstones.
8. Insert one decorated cookie tombstone upright into the cookie crumbs of each pudding cup, leaning it slightly for a weathered effect—tip: if the cookies are too soft, chill them in the fridge for 10 minutes first to prevent breaking.
9. If using, top each cup with a dollop of whipped cream to mimic a ghostly apparition.
10. Serve immediately or refrigerate for up to 2 hours before serving to keep the textures intact.
All done! These cups boast a velvety chocolate pudding base that’s perfectly sweet, contrasted by the crunchy cookie dirt for a fun texture play. Arrange them on a platter with gummy worms peeking out for an extra-creepy touch, or let kids customize their own tombstones—they’re sure to be a graveyard smash at any party!
Brain-shaped Meatloaf with Ketchup Blood Drizzle

Brace yourself for a Halloween dinner that’s equal parts creepy and delicious—this brain-shaped meatloaf is the perfect centerpiece for a spooky night in. It’s surprisingly simple to pull off, and that ketchup ‘blood’ drizzle makes it look impressively gory. You’ll have everyone at the table doing a double-take before digging in.
Serving: 6 | Pre Time: 20 minutes | Cooking Time: 60 minutes
Ingredients
– 2 lbs ground beef (I like an 80/20 blend for juiciness)
– 1 cup breadcrumbs (plain works great, but panko adds a nice crunch)
– 2 large eggs, at room temp—they bind everything better that way
– 1/2 cup milk (whole milk gives it a richer texture)
– 1/4 cup ketchup, plus 1/2 cup for the drizzle
– 1 tbsp Worcestershire sauce (this adds a savory depth you’ll love)
– 1 tsp garlic powder
– 1 tsp onion powder
– 1 tsp salt
– 1/2 tsp black pepper
– 1 tbsp olive oil (extra virgin is my go-to for greasing)
Instructions
1. Preheat your oven to 375°F and lightly grease a baking sheet with olive oil.
2. In a large bowl, combine the ground beef, breadcrumbs, eggs, milk, 1/4 cup ketchup, Worcestershire sauce, garlic powder, onion powder, salt, and black pepper.
3. Use your hands to mix everything until just combined—overmixing can make the meatloaf tough.
4. Shape the mixture into a brain-like oval on the prepared baking sheet, about 10 inches long.
5. Use a butter knife to carve a deep, winding groove down the center to mimic a brain’s fissure.
6. Add smaller grooves along the sides for extra detail, pressing gently so they hold their shape.
7. Bake in the preheated oven for 55–60 minutes, until the internal temperature reaches 160°F on a meat thermometer.
8. While baking, whisk the remaining 1/2 cup ketchup with 2 tbsp water in a small bowl until smooth for the ‘blood’ drizzle.
9. Remove the meatloaf from the oven and let it rest for 10 minutes—this helps the juices redistribute.
10. Drizzle the ketchup mixture over the grooves, letting it pool naturally for a gory effect.
Rich and savory, this meatloaf stays moist thanks to the milk and eggs, with a hint of sweetness from the ketchup. Serve it sliced on a dark platter with mashed ‘ghost’ potatoes for a full Halloween spread—it’s so fun, you might just make it year-round.
Ghostly Banana Pops with White Chocolate Coating

Wondering what to do with those overripe bananas sitting on your counter? You’re about to turn them into the spookiest, sweetest treat that’s perfect for a party or just a fun kitchen project. These pops are surprisingly simple and always a hit.
Serving: 8 pops | Pre Time: 15 minutes | Cooking Time: 0 minutes
Ingredients
– 4 medium ripe bananas (the spottier, the sweeter—I always wait for those brown spots)
– 8 wooden popsicle sticks
– 1 cup white chocolate chips (I like Ghirardelli for their smooth melt)
– 1 tablespoon coconut oil (this helps the chocolate coat smoothly)
– 1/4 cup mini chocolate chips (for the ghostly eyes—semi-sweet gives a nice contrast)
Instructions
1. Peel the bananas and cut each one in half crosswise to make 8 pieces.
2. Insert a wooden popsicle stick firmly into the cut end of each banana half.
3. Place the banana pops on a baking sheet lined with parchment paper and freeze them for at least 1 hour, until solid. (Tip: Freezing them first prevents the chocolate from sliding off.)
4. In a microwave-safe bowl, combine the white chocolate chips and coconut oil.
5. Microwave the mixture in 30-second intervals, stirring well after each, until completely melted and smooth, about 1-2 minutes total. (Tip: Don’t overheat—stop when just melted to avoid seizing.)
6. Remove the frozen banana pops from the freezer.
7. Hold a banana pop by the stick and dip it into the melted white chocolate, swirling to coat completely.
8. Let any excess chocolate drip back into the bowl, then return the coated pop to the parchment-lined sheet.
9. Immediately press two mini chocolate chips into the white chocolate near the top of each pop to create eyes before the coating sets. (Tip: Work quickly here so the chips stick.)
10. Repeat steps 7-9 with all remaining banana pops.
11. Place the baking sheet back in the freezer for 10-15 minutes, until the chocolate coating is firm.
Vibrantly white and delightfully creepy, these pops have a creamy frozen banana center that contrasts with the crisp white chocolate shell. Serve them straight from the freezer for a cool, ghostly dessert that’s sure to spark smiles—try sticking them in a foam block for a spooky centerpiece!
Poisoned Caramel Apples with Black Drizzle

Unbelievably spooky and delicious, these caramel apples are perfect for Halloween or any time you want a dramatic treat. You’ll love the contrast of sweet caramel against the tart apple, finished with that mysterious black drizzle. They’re surprisingly easy to make and always impress a crowd.
Serving: 6 | Pre Time: 20 minutes | Cooking Time: 15 minutes
Ingredients
– 6 medium Granny Smith apples (their tartness cuts through the sweetness perfectly)
– 6 wooden craft sticks
– 1 cup granulated sugar (I use regular white sugar for that classic caramel color)
– 6 tbsp unsalted butter, cut into pieces (cold butter helps the caramel set better)
– 1/2 cup heavy cream, at room temperature (this prevents the caramel from seizing)
– 1 tsp vanilla extract (pure vanilla makes all the difference)
– 1/4 cup black cocoa powder (for that deep, dark drizzle—Dutch-process works great)
– 2 tbsp powdered sugar
– 1-2 tbsp milk or water (add slowly to get the right drizzle consistency)
Instructions
1. Wash and dry the 6 Granny Smith apples thoroughly, then insert a wooden craft stick firmly into the stem end of each apple.
2. Line a baking sheet with parchment paper and set it aside.
3. In a medium, heavy-bottomed saucepan over medium heat, combine 1 cup granulated sugar.
4. Cook the sugar without stirring for 5-7 minutes, until it melts into a deep amber liquid, swirling the pan occasionally for even melting.
5. Tip: Watch closely—the sugar can burn quickly once it starts to color.
6. Carefully add the 6 tbsp unsalted butter pieces to the melted sugar, stirring constantly with a heatproof spatula until fully melted and combined, about 2 minutes.
7. Slowly pour in the 1/2 cup heavy cream while stirring continuously; the mixture will bubble vigorously.
8. Tip: Keep stirring to prevent separation and ensure a smooth caramel.
9. Remove the saucepan from heat and stir in 1 tsp vanilla extract until incorporated.
10. Let the caramel cool for 1-2 minutes until slightly thickened but still pourable.
11. Working quickly, dip each apple into the caramel, tilting the pan to coat fully, then lift and twist to let excess drip off.
12. Place each coated apple on the prepared parchment paper.
13. Allow the caramel apples to set at room temperature for 10-15 minutes until firm.
14. In a small bowl, whisk together 1/4 cup black cocoa powder and 2 tbsp powdered sugar.
15. Gradually add 1-2 tbsp milk or water, whisking until you achieve a thick but drizzle-able consistency.
16. Tip: Test the drizzle on a plate—it should hold its shape but flow slowly off a spoon.
17. Drizzle the black cocoa mixture over the set caramel apples in a zigzag pattern.
18. Let the drizzle set for 5 minutes before serving.
Just imagine biting into that crisp apple, followed by the rich, buttery caramel and a hint of dark chocolate from the drizzle. The black against the golden caramel looks eerily beautiful on a dessert table. Try serving them with a sprinkle of edible glitter for an extra magical touch!
Witches’ Brew Slow Cooker Chili
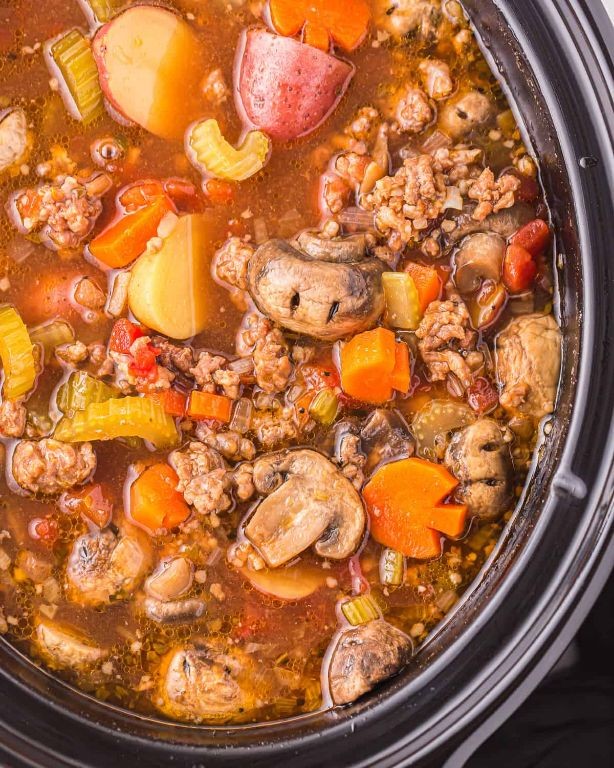
Brace yourself for the coziest, most magical chili you’ll ever make—perfect for chilly nights when you want something hearty without spending hours in the kitchen. You just toss everything in the slow cooker, let it work its magic, and come back to a bubbling pot of comfort that’ll make your whole house smell amazing. It’s my go-to for potlucks or lazy weekends because it practically cooks itself while you relax.
Serving: 6 | Pre Time: 15 minutes | Cooking Time: 6 hours
Ingredients
– 1 lb ground beef (I like 85/15 for a good balance of flavor and not too much grease)
– 1 medium yellow onion, diced (a sharp knife makes this quick—watch those fingers!)
– 2 cloves garlic, minced (fresh is best here for that punchy aroma)
– 1 (15 oz) can black beans, drained and rinsed (rinsing gets rid of that extra sodium)
– 1 (15 oz) can kidney beans, drained and rinsed
– 1 (28 oz) can crushed tomatoes (the thick kind gives a rich base)
– 1 cup beef broth (low-sodium lets you control the salt better)
– 2 tbsp chili powder (my secret is to use a blend with a bit of smokiness)
– 1 tbsp ground cumin
– 1 tsp smoked paprika (this adds a deep, almost magical warmth)
– 1/2 tsp cayenne pepper (adjust if you’re sensitive to heat—start with less)
– Salt and black pepper to taste (I add a pinch of each early on, then adjust at the end)
Instructions
1. Heat a large skillet over medium-high heat and add the ground beef, breaking it up with a spoon as it cooks for about 5-7 minutes until browned and no longer pink. Tip: Drain any excess fat for a cleaner chili—I just tilt the skillet and spoon it out.
2. Transfer the browned beef to your slow cooker insert.
3. In the same skillet, add the diced onion and cook over medium heat for 3-4 minutes until softened, stirring occasionally to prevent burning.
4. Add the minced garlic to the skillet and cook for 1 minute more until fragrant, then scrape everything into the slow cooker with the beef.
5. Pour in the drained black beans, drained kidney beans, crushed tomatoes, and beef broth into the slow cooker.
6. Sprinkle the chili powder, ground cumin, smoked paprika, cayenne pepper, salt, and black pepper over the mixture.
7. Stir all the ingredients in the slow cooker until well combined. Tip: Give it a good mix to distribute the spices evenly—no one wants a bland bite!
8. Cover the slow cooker with its lid and set it to cook on LOW for 6 hours. Tip: Resist the urge to peek too often; keeping the lid on helps maintain the temperature and moisture.
9. After 6 hours, remove the lid and give the chili a final stir. Taste and adjust seasoning with more salt or pepper if needed.
Unexpectedly rich and velvety, this chili has a deep, smoky flavor from the paprika that melds perfectly with the tender beans and beef. Serve it in big bowls topped with shredded cheese or a dollop of sour cream for a creamy contrast, or scoop it up with tortilla chips for a fun, casual twist—it’s so good, you might just brew up a second batch!
Vampire Punch with Raspberry Ice Cubes

Mixing up a spooky drink doesn’t have to be complicated. You’ll love how this vibrant punch comes together with just a few simple ingredients, and those raspberry ice cubes are the real showstopper—they keep your drink cold without watering it down. It’s perfect for Halloween parties or just a fun Friday night in.
Serving: 8 | Pre Time: 15 minutes | Cooking Time: 0 minutes
Ingredients
– 4 cups cranberry juice (I like the 100% juice kind for a tart kick)
– 2 cups ginger ale (chilled straight from the fridge works best)
– 1 cup raspberries (fresh or frozen—I grab frozen when they’re out of season)
– 1/4 cup lime juice (freshly squeezed makes a huge difference)
– 1 tbsp sugar (optional, but I add it if my cranberry juice is extra tart)
Instructions
1. Rinse 1 cup of raspberries under cold water and pat them dry with a paper towel.
2. Place the raspberries in an ice cube tray, filling each compartment about halfway—I use a standard 12-cube tray for this.
3. Pour water into the tray over the raspberries, filling each cube to the top.
4. Freeze the tray for at least 4 hours, or until the cubes are solid (overnight is even better for a firmer set).
5. In a large pitcher, combine 4 cups of cranberry juice and 1/4 cup lime juice, stirring gently with a spoon.
6. Tip: Chill the pitcher in the fridge for 10 minutes before adding the ginger ale to keep everything extra cold.
7. Slowly pour 2 cups of ginger ale into the pitcher—stirring too hard can make it flat, so I just give it a light swirl.
8. Add 1 tbsp of sugar if desired, stirring until it dissolves completely (taste a sip first to see if you need it).
9. Tip: For a stronger raspberry flavor, muddle a few extra berries in the pitcher before adding the liquids.
10. Remove the raspberry ice cubes from the freezer and pop them out of the tray.
11. Place the ice cubes into serving glasses, filling each about halfway with cubes.
12. Pour the punch mixture over the ice cubes in the glasses, dividing it evenly among 8 servings.
13. Tip: Garnish with a lime wedge or extra raspberries on the rim for a festive touch.
14. Serve immediately and enjoy!
What makes this punch so delightful is the burst of fruity flavor from those melting raspberry cubes—they infuse every sip with a sweet-tart zing. The texture stays crisp and bubbly thanks to the ginger ale, and it looks stunning in a clear glass pitcher. Try serving it with glow-in-the-dark straws for a vampire-themed party, or just sip it slowly on a cozy evening.
Frankenstein Rice Krispie Treats with Green Dye
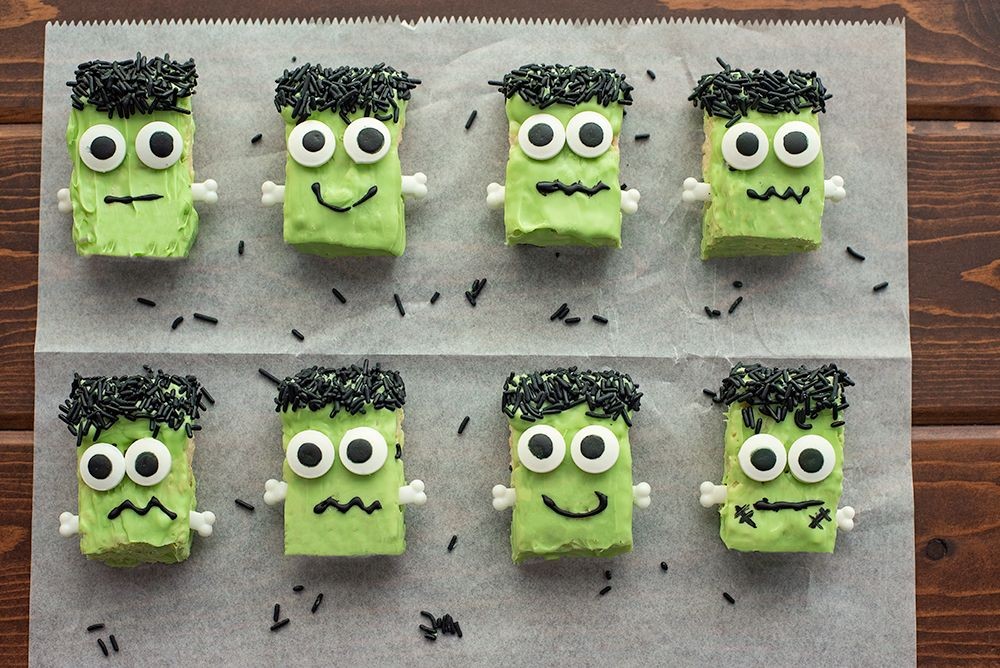
Remember those classic Rice Krispie treats from childhood? You’re about to give them a spooky, fun twist that’s perfect for Halloween parties or just a playful baking day. We’re making Frankenstein Rice Krispie Treats with a vibrant green color that’s sure to get everyone smiling.
Serving: 12 | Pre Time: 10 minutes | Cooking Time: 10 minutes
Ingredients
– 6 cups Rice Krispies cereal (the classic crispy rice cereal works best here)
– 10 oz marshmallows (I like using the mini ones—they melt faster and more evenly)
– 3 tbsp unsalted butter (go for the real stuff, not margarine, for that rich flavor)
– 1 tsp vanilla extract (a splash adds a lovely depth to balance the sweetness)
– Green food dye (I use about 10 drops of liquid dye for a bold, monster-like hue)
Instructions
1. Grease a 9×13 inch baking dish lightly with butter or cooking spray to prevent sticking.
2. In a large pot, melt the 3 tbsp unsalted butter over low heat, stirring constantly with a wooden spoon until fully liquid, about 2 minutes.
3. Add the 10 oz marshmallows to the melted butter, stirring continuously until they are completely melted and smooth, which should take 3-4 minutes. Tip: Keep the heat low to avoid burning the marshmallows.
4. Remove the pot from the heat and stir in the 1 tsp vanilla extract and 10 drops green food dye until the color is evenly distributed and vibrant.
5. Immediately pour in the 6 cups Rice Krispies cereal, folding gently with a spatula to coat every piece without crushing them. Tip: Work quickly here as the mixture starts to set fast.
6. Transfer the mixture to the prepared baking dish, pressing it down firmly and evenly with your hands or a piece of parchment paper. Tip: Wet your hands slightly to prevent sticking while pressing.
7. Let the treats cool at room temperature for at least 1 hour until firm to the touch.
8. Cut into 12 squares using a sharp knife for clean edges.
Serve these treats chilled for a firmer, chewier texture that holds its shape well. They’re delightfully sweet with a hint of vanilla, and the green color makes them a fun centerpiece for any spooky gathering—try stacking them like a Frankenstein monster for extra creativity!
Boiling Cauldron Cheese Fondue with Breadsticks

Crisp winter evenings practically beg for a cozy, communal meal, and this bubbling cheese fondue is just the ticket. You’ll love dipping warm breadsticks into that creamy, garlicky goodness—it’s the ultimate comfort food that feels fancy but couldn’t be simpler to pull together.
Serving: 4 | Pre Time: 10 minutes | Cooking Time: 15 minutes
Ingredients
– 1 cup dry white wine (I like a crisp Sauvignon Blanc here—it adds nice acidity)
– 1 clove garlic, minced (fresh is best for that punchy flavor)
– 8 oz Gruyère cheese, shredded (room temp cheese melts smoother, so I take it out 30 minutes ahead)
– 8 oz Emmental cheese, shredded (this gives that classic stretchy fondue texture)
– 1 tbsp cornstarch (to prevent separation and keep it silky)
– 1 tbsp fresh lemon juice (a squeeze brightens everything up)
– ¼ tsp ground nutmeg (just a pinch—it adds a warm, subtle depth)
– 1 lb store-bought breadsticks (I grab the soft, pre-baked ones for convenience)
Instructions
1. Rub the inside of a medium saucepan with the minced garlic clove, then discard the leftover bits—this infuses flavor without overpowering.
2. Pour 1 cup dry white wine into the saucepan and heat it over medium heat until it just begins to simmer, about 3-4 minutes; don’t let it boil hard.
3. In a medium bowl, toss 8 oz shredded Gruyère and 8 oz shredded Emmental with 1 tbsp cornstarch until evenly coated—this helps the cheese melt smoothly without clumping.
4. Reduce the heat to low and gradually add the cheese mixture to the simmering wine, stirring constantly with a wooden spoon in a figure-eight motion for even melting.
5. Once all the cheese is incorporated and the fondue is smooth, about 5-7 minutes, stir in 1 tbsp fresh lemon juice and ¼ tsp ground nutmeg.
6. Keep the fondue warm over the lowest heat setting while you prepare the breadsticks.
7. Arrange 1 lb store-bought breadsticks on a baking sheet and warm them in a preheated 350°F oven for 5 minutes, until they’re lightly toasted and fragrant.
8. Transfer the fondue to a serving cauldron or fondue pot to keep it bubbly at the table.
9. Serve immediately with the warm breadsticks for dipping.
Perfectly gooey and rich, this fondue has a velvety texture that clings to every breadstick. The nutty Gruyère and mild Emmental create a balanced flavor with a hint of garlic and wine—try adding apple slices or steamed broccoli for a fun twist!
Zombie Finger Cookies with Almond Slice Nails
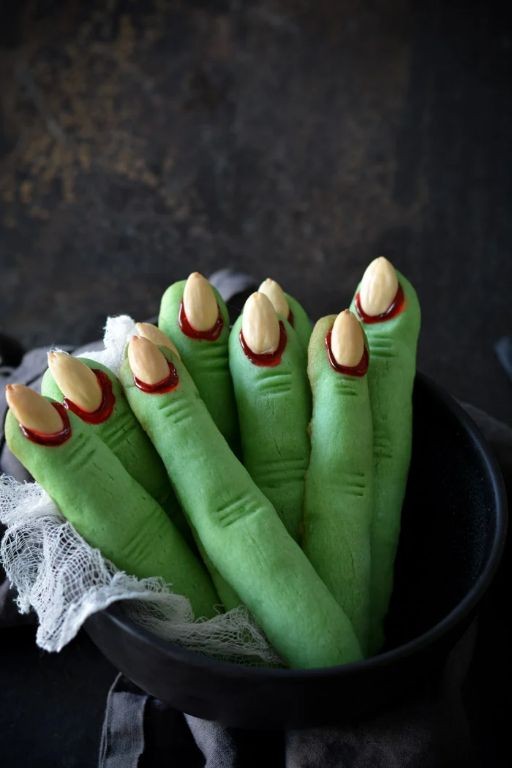
Ready for a Halloween treat that’s equal parts creepy and delicious? These zombie finger cookies are a total crowd-pleaser—they look spooky but taste like buttery, almond-y perfection. You’ll love how simple they are to throw together for a party or just a fun baking project.
Serving: 24 | Pre Time: 20 minutes | Cooking Time: 12 minutes
Ingredients
– 1 cup unsalted butter, softened (I leave mine out for an hour—room temp makes creaming easier)
– ¾ cup granulated sugar
– 1 large egg, at room temp for better mixing
– 1 tsp pure vanilla extract (the real stuff gives a warmer flavor)
– 2½ cups all-purpose flour, spooned and leveled to avoid dense cookies
– ½ tsp salt
– 24 whole almonds, for the “nails” (slivered almonds work too, but whole ones look eerier)
– Red food coloring gel, just a dab for bloody effects (I use gel because it’s more vibrant than liquid)
Instructions
1. Preheat your oven to 350°F and line two baking sheets with parchment paper.
2. In a large bowl, beat the softened butter and granulated sugar with an electric mixer on medium speed for 2–3 minutes, until light and fluffy—this creaming step adds air for tender cookies.
3. Add the room-temperature egg and vanilla extract to the butter mixture, and beat on low until fully combined, about 30 seconds.
4. In a separate bowl, whisk together the all-purpose flour and salt to distribute evenly.
5. Gradually add the flour mixture to the wet ingredients, mixing on low speed just until a dough forms and no dry streaks remain; overmixing can make cookies tough.
6. Divide the dough into 24 equal portions, each about 1 tablespoon in size.
7. Roll each portion into a 3-inch-long log, then gently press to flatten slightly and create a knuckle-like shape by pinching the dough in a few spots.
8. Place an almond at one end of each log, pressing it in firmly to act as the “nail.”
9. Use a small knife to score lines across each cookie to resemble wrinkles or bones, being careful not to cut all the way through.
10. Arrange the cookies on the prepared baking sheets, spacing them 2 inches apart to allow for spreading.
11. Bake in the preheated oven for 10–12 minutes, until the edges are lightly golden but the centers are still soft—they’ll firm up as they cool.
12. Let the cookies cool on the baking sheets for 5 minutes, then transfer to a wire rack to cool completely.
13. Once cooled, dip a toothpick into the red food coloring gel and dab it around the almond “nails” and score lines for a gory, bloody effect.
Great for Halloween parties, these cookies have a crisp edge and soft, buttery center with a hint of vanilla. The almond adds a nice crunch, and the red detailing makes them look authentically undead—try serving them on a platter with fake cobwebs for extra spooky flair!
Skeleton Veggie Tray with Ranch Dip
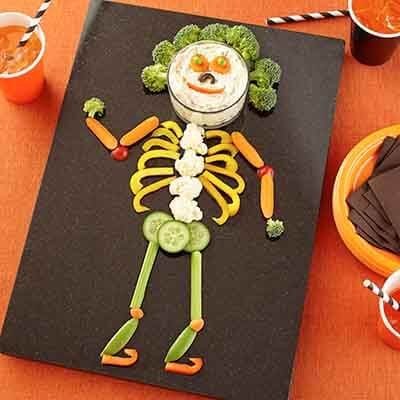
Zombies aren’t the only skeletons you’ll want at your Halloween party! This spooky veggie tray is a playful, healthy centerpiece that’s way more fun than a regular crudité platter. You’ll love how simple it is to assemble, and kids get a kick out of the creepy presentation.
Serving: 8-10 | Pre Time: 25 minutes | Cooking Time: 0 minutes
Ingredients
– 1 large head of cauliflower (for the skull—look for one with a nice round shape)
– 1 English cucumber, sliced into ¼-inch rounds (these make perfect vertebrae)
– 1 cup baby carrots (I like the rainbow ones for extra color)
– 1 cup cherry tomatoes (the red ones pop against the green)
– ½ cup black olives (pitted, for the eyes—they add a great savory bite)
– 1 bell pepper, any color, sliced into thin strips (for ribs—red peppers are my favorite here)
– 2 cups ranch dip (store-bought is fine, but I always use my homemade version with fresh dill)
Instructions
1. Place the cauliflower head in the center of a large serving platter to form the skull.
2. Arrange the cucumber slices in a curved line below the cauliflower to create the spine, overlapping them slightly.
3. Position the bell pepper strips on both sides of the spine to look like ribs, fanning them out from the center.
4. Place two black olives on the cauliflower for eyes, pressing them gently so they stick.
5. Scatter the baby carrots around the skeleton to resemble scattered bones—I like to cluster them near the ribs for a playful effect.
6. Tuck the cherry tomatoes around the edges of the platter as filler, making sure they’re evenly distributed.
7. Spoon the ranch dip into a small bowl and place it at the top of the platter near the skull, as if it’s “haunting” the scene.
8. Chill the entire tray in the refrigerator for at least 15 minutes before serving to keep everything crisp.
Gathering around this tray is half the fun—the crunchy cucumbers and peppers contrast with the creamy dip, while the olives add a salty depth. Serve it with extra dip on the side for dunking, or let guests use the veggies to “build” their own skeleton bites right on their plates.
Haunted House Gingerbread Cookies with Icing Decorations
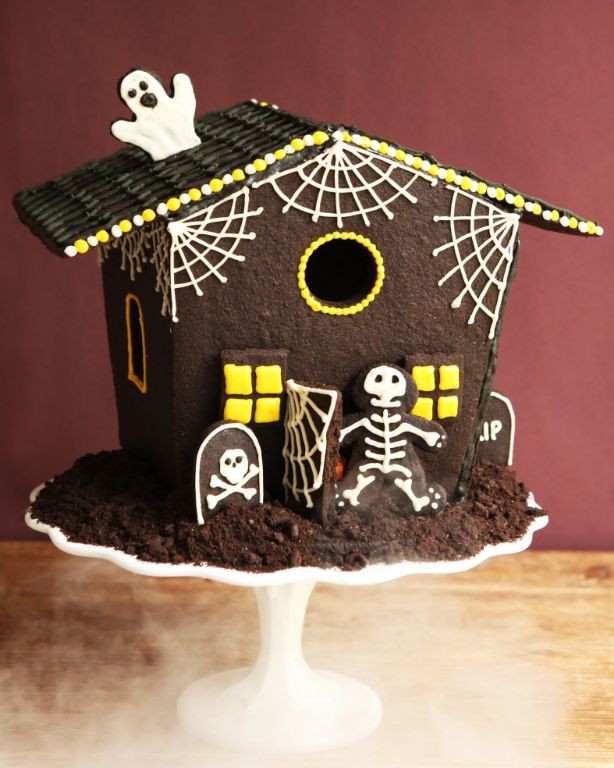
Haunted house gingerbread cookies are the perfect spooky-season treat that’ll have everyone asking for your secret recipe. They’re surprisingly simple to make, and decorating them with icing is where the real fun begins—you can get as creative or as creepy as you want!
Serving: 24 cookies | Pre Time: 30 minutes | Cooking Time: 10 minutes
Ingredients
– 3 cups all-purpose flour (I always sift mine first for smoother dough)
– 1 tsp baking soda
– 2 tsp ground ginger (freshly ground if you have it—it makes a difference!)
– 1 tsp ground cinnamon
– ½ tsp ground cloves
– ¼ tsp salt
– ¾ cup unsalted butter, softened (leave it out for an hour—room temp is key)
– ¾ cup packed dark brown sugar
– 1 large egg, at room temperature (cold eggs can make the dough tricky)
– ½ cup molasses (I use blackstrap for that deep, rich flavor)
– 2 cups powdered sugar
– 2-3 tbsp milk (whole milk gives the icing a creamier texture)
– 1 tsp vanilla extract
– Black and orange gel food coloring (gel works better than liquid for vibrant colors)
Instructions
1. Preheat your oven to 350°F and line two baking sheets with parchment paper.
2. In a medium bowl, whisk together the flour, baking soda, ginger, cinnamon, cloves, and salt until well combined.
3. In a large bowl, use an electric mixer to beat the softened butter and brown sugar on medium speed for 2-3 minutes, until light and fluffy.
4. Add the egg to the butter mixture and beat until fully incorporated, about 1 minute.
5. Pour in the molasses and mix on low speed until the dough comes together smoothly.
6. Gradually add the flour mixture to the wet ingredients, mixing on low until a soft dough forms—don’t overmix!
7. Divide the dough in half, wrap each portion in plastic wrap, and chill in the refrigerator for at least 20 minutes to make rolling easier.
8. On a lightly floured surface, roll out one dough portion to ¼-inch thickness using a rolling pin.
9. Cut out haunted house shapes with cookie cutters and place them 1 inch apart on the prepared baking sheets.
10. Bake for 8-10 minutes, until the edges are just set but the centers are still slightly soft.
11. Let the cookies cool on the baking sheets for 5 minutes, then transfer to a wire rack to cool completely.
12. For the icing, whisk together the powdered sugar, 2 tbsp milk, and vanilla extract in a small bowl until smooth—add more milk if needed for a pipeable consistency.
13. Divide the icing into two bowls and tint one with black gel food coloring and the other with orange.
14. Pipe spooky designs like ghosts, bats, or jack-o’-lanterns onto the cooled cookies using piping bags or zip-top bags with the corners snipped off.
15. Let the icing set completely before serving, about 1 hour at room temperature.
Gingerbread cookies turn out crisp on the edges with a chewy center, and the molasses gives them that warm, spicy kick. Serve them stacked like a haunted neighborhood or pair them with hot apple cider for the ultimate fall treat—they’re sure to disappear fast!