
Nestled between the Pacific waves and volcanic peaks, Hawaiian cuisine is a vibrant fusion of flavors waiting to transform your kitchen. From quick, tropical dinners to comforting island classics, these authentic recipes bring a taste of paradise right to your home. Ready to spice up your routine with some aloha spirit? Let’s dive into these 20 delicious dishes that will have you saying ‘mahalo’ with every bite!
Hawaiian Electric Kalua Pork
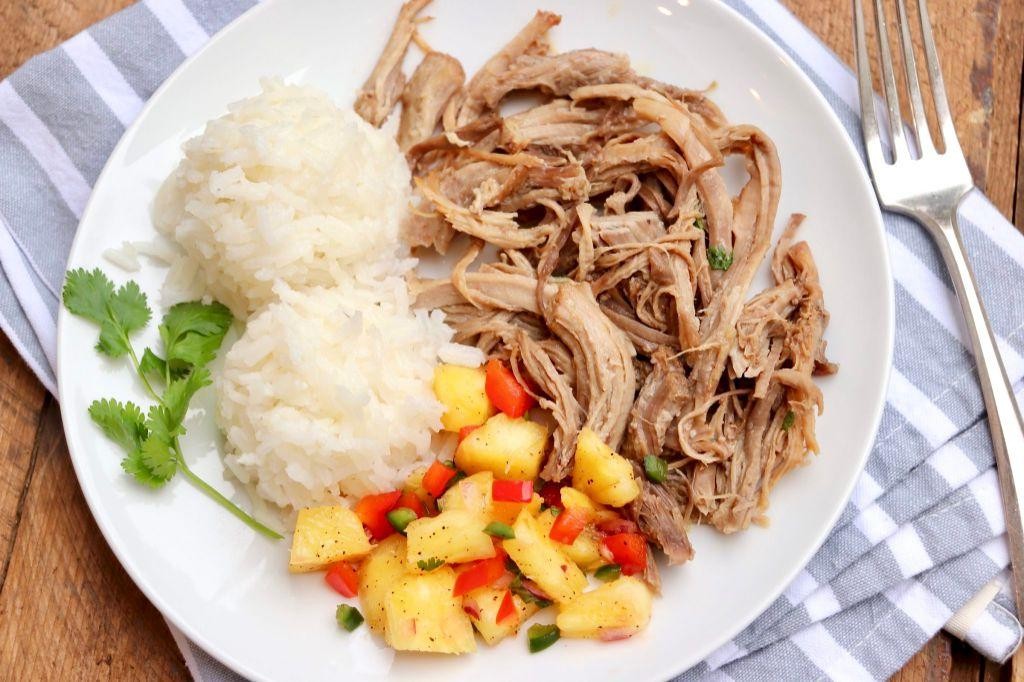
Zesty, zippy, and zapped with flavor—this Hawaiian Electric Kalua Pork is the slow-cooked, smoky sensation that’ll have your taste buds doing the hula! Forget the underground imu pit; we’re plugging into modern convenience with a pressure cooker to deliver that iconic, fall-apart tender pork in a fraction of the time. Get ready to shock your dinner guests with a dish that’s seriously electrifying.
Serving: 8 | Pre Time: 15 minutes | Cooking Time: 90 minutes
Ingredients
– Pork shoulder – 4 lbs
– Liquid smoke – 2 tbsp
– Hawaiian sea salt – 1 tbsp
– Banana leaves – 2 large leaves
– Water – 1 cup
Instructions
1. Trim excess fat from the pork shoulder, leaving a thin layer for moisture.
2. Rub the pork shoulder all over with Hawaiian sea salt, ensuring even coverage.
3. Drizzle liquid smoke evenly over the salted pork, coating all sides.
4. Place one banana leaf in the bottom of a 6-quart electric pressure cooker.
5. Set the seasoned pork shoulder on top of the banana leaf in the pressure cooker.
6. Pour water into the pressure cooker around the pork, avoiding washing off the seasoning.
7. Cover the pork with the second banana leaf, tucking it around the sides.
8. Secure the pressure cooker lid and set to high pressure for 90 minutes.
9. Allow the pressure to release naturally for 15 minutes after cooking, then quick-release any remaining pressure.
10. Carefully remove the pork from the cooker using tongs and place it on a cutting board.
11. Shred the pork with two forks, discarding any large fat pieces or bones.
12. Mix the shredded pork with the cooking juices from the pressure cooker until moistened.
Succulent and smoky, this pork pulls apart with buttery ease, infused with a deep, savory saltiness that’s pure island magic. Pile it high on fluffy rice with a side of tangy pineapple salsa, or stuff it into warm tortillas for a tropical twist on taco night—either way, it’s a voltage of flavor that’ll leave everyone buzzing for more.
Hawaiian Electric Shoyu Chicken

Picture this: you’re craving something that tastes like a tropical vacation but cooks like a weeknight hero. Enter this ridiculously easy shoyu chicken—it’s basically a hug from Hawaii, minus the flight cost and sunscreen smell.
Serving: 4 | Pre Time: 10 minutes | Cooking Time: 45 minutes
Ingredients
– Boneless, skinless chicken thighs – 2 lbs
– Soy sauce – ¾ cup
– Brown sugar – ½ cup
– Garlic cloves – 4, minced
– Fresh ginger – 1 tbsp, grated
– Water – 1 cup
– Green onions – 2, sliced
Instructions
1. Pat the chicken thighs completely dry with paper towels—this helps them brown nicely instead of steaming.
2. Place the chicken in a large, deep skillet or Dutch oven in a single layer.
3. In a medium bowl, whisk together the soy sauce, brown sugar, minced garlic, and grated ginger until the sugar dissolves.
4. Pour the soy sauce mixture and the 1 cup of water over the chicken in the skillet.
5. Bring the liquid to a boil over high heat, then immediately reduce the heat to low to maintain a gentle simmer.
6. Cover the skillet and let it simmer for 30 minutes, resisting the urge to peek so the steam works its magic.
7. After 30 minutes, remove the lid and increase the heat to medium-high to let the sauce reduce and thicken for about 15 minutes, stirring occasionally.
8. Tip: To check if the chicken is done, insert a thermometer into the thickest part of a thigh; it should read 165°F.
9. Once the sauce has thickened to a glossy, syrupy consistency and coats the back of a spoon, remove the skillet from the heat.
10. Stir in the sliced green onions just before serving for a fresh, colorful finish.
Let’s be real: the chicken emerges fall-apart tender, soaked in a salty-sweet glaze that’s downright addictive. Serve it over a mountain of steamed rice to catch every drop of that glorious sauce, or get wild and pile it into soft buns for an island-style sandwich that’ll make your taste buds do a hula.
Hawaiian Electric Lomi Lomi Salmon
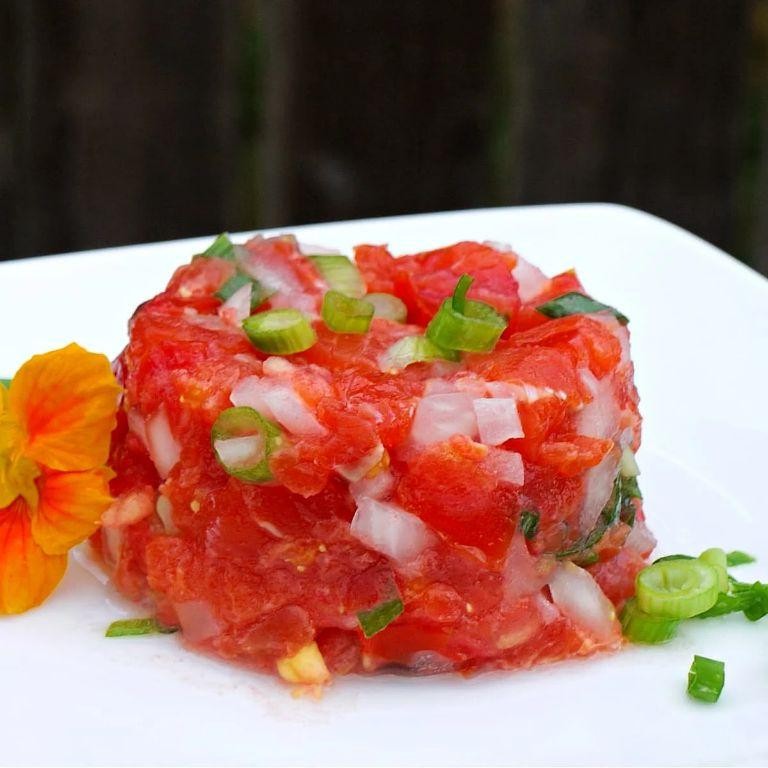
Kick off your holiday feast with a dish that’s shockingly simple yet electrifyingly fresh—Hawaiian Electric Lomi Lomi Salmon. This vibrant, no-cook marvel is like a tropical party in a bowl, ready to jolt your taste buds awake without turning on the stove. Perfect for when you’d rather be sipping a cocktail than slaving over a hot oven!
Serving: 6 | Pre Time: 20 minutes | Cooking Time: 0 minutes
Ingredients
– Salmon fillet – 1 lb
– Cherry tomatoes – 1 cup
– Red onion – ½ cup
– Green onions – ¼ cup
– Hawaiian sea salt – 1 tbsp
– Ice cubes – 1 cup
Instructions
1. Place 1 lb of salmon fillet in a large bowl and cover it with 1 cup of ice cubes to chill for 10 minutes—this firms up the fish for easier dicing.
2. Remove the salmon from the ice, pat it dry with paper towels, and cut it into ¼-inch cubes using a sharp knife.
3. Dice 1 cup of cherry tomatoes into quarters and ½ cup of red onion into fine pieces, then thinly slice ¼ cup of green onions.
4. In a clean bowl, combine the diced salmon, tomatoes, red onion, and green onions.
5. Sprinkle 1 tbsp of Hawaiian sea salt over the mixture and gently massage it with your hands for 2 minutes until the salmon turns slightly opaque—this “lomi lomi” technique tenderizes the fish.
6. Cover the bowl with plastic wrap and refrigerate it for at least 1 hour to let the flavors meld; for best results, chill it overnight if time allows.
7. Before serving, give the salmon a quick stir to redistribute the juices. Serve immediately over a bed of lettuce or with crispy taro chips for a crunchy contrast.
Salmon emerges silky and bright, with a tangy kick from the tomatoes and a subtle briny depth from the sea salt. Its refreshing, almost ceviche-like texture makes it a star appetizer for holiday gatherings—try scooping it into endive leaves or pairing it with a cold beer for an effortless island vibe.
Hawaiian Electric Poke Bowl

Crank up the voltage on your taste buds, because we’re about to electrify your dinner routine with a bowl that’s shockingly good. Forget the usual suspects; this Hawaiian Electric Poke Bowl is a jolt of tropical flavor that’ll make your standard weeknight meal look positively unplugged.
Serving: 2 | Pre Time: 20 minutes | Cooking Time: 0 minutes
Ingredients
– Sushi-grade ahi tuna – 1 lb
– Soy sauce – ¼ cup
– Sesame oil – 1 tbsp
– Sriracha – 1 tsp
– Green onions – 2, sliced
– Sesame seeds – 1 tbsp
– Cooked sushi rice – 2 cups
– Avocado – 1, sliced
– Nori seaweed sheets – 2, cut into thin strips
Instructions
1. Place the 1 lb of sushi-grade ahi tuna on a clean cutting board and dice it into ½-inch cubes using a sharp knife. Tip: For cleaner cuts, chill the tuna in the freezer for 10 minutes first.
2. In a medium bowl, whisk together the ¼ cup of soy sauce, 1 tbsp of sesame oil, and 1 tsp of Sriracha until fully combined.
3. Add the diced tuna to the bowl with the sauce and gently toss to coat every piece evenly. Let it marinate at room temperature for exactly 10 minutes.
4. While the tuna marinates, divide the 2 cups of cooked sushi rice between two serving bowls, pressing it down slightly. Tip: Use slightly warm rice for the best texture and flavor absorption.
5. Arrange the sliced avocado from 1 avocado on top of the rice in each bowl.
6. After 10 minutes, remove the tuna from the marinade with a slotted spoon and place it over the rice and avocado.
7. Sprinkle the sliced green onions from 2 green onions and 1 tbsp of sesame seeds evenly over both bowls.
8. Garnish each bowl with the thin strips from 2 nori seaweed sheets. Tip: Toast the nori lightly over a gas flame for 2-3 seconds per side for extra crispiness and aroma.
Now, for the grand finale: this bowl delivers a cool, silky texture from the avocado against the firm, marinated tuna, with a flavor that’s a savory, spicy, and umami-packed party. Get creative by serving it with a side of crispy wonton strips for an added crunch that’ll really make it pop.
Hawaiian Electric Haupia

Zesty as a tropical breeze and smoother than a ukulele melody, Hawaiian Electric Haupia is the coconutty dessert that’ll make you forget you ever owned a spoon. It’s basically a creamy, dreamy pudding that’s so simple, you could whip it up between beach naps—no oven, no fuss, just pure island vibes in a bowl. Get ready to shock your taste buds (in the best way possible) with this electrifying treat!
Serving: 6 | Pre Time: 10 minutes | Cooking Time: 15 minutes
Ingredients
– Coconut milk – 2 cups
– Sugar – ½ cup
– Cornstarch – ¼ cup
– Water – ¼ cup
– Vanilla extract – 1 tsp
– Salt – ¼ tsp
Instructions
1. In a medium saucepan, combine the coconut milk, sugar, and salt over medium heat.
2. Stir constantly with a whisk until the sugar fully dissolves and the mixture just begins to steam, about 3–4 minutes—don’t let it boil yet!
3. In a small bowl, whisk together the cornstarch and water until completely smooth with no lumps.
4. Slowly pour the cornstarch slurry into the warm coconut milk while whisking vigorously to prevent clumps.
5. Increase the heat to medium-high and cook, whisking continuously, until the mixture thickens to a pudding-like consistency that coats the back of a spoon, about 5–7 minutes.
6. Remove the saucepan from the heat and stir in the vanilla extract until fully incorporated.
7. Immediately pour the haupia into a 9×9-inch baking dish or individual serving cups.
8. Let it cool at room temperature for 15 minutes, then cover with plastic wrap pressed directly onto the surface to prevent a skin from forming.
9. Refrigerate for at least 4 hours, or until completely set and firm to the touch.
10. Cut into squares or scoop out portions to serve.
Heavenly and silky, this haupia boasts a rich coconut flavor with a jiggly, custard-like texture that melts on your tongue. For a fun twist, layer it with fresh mango slices or top with toasted coconut flakes—it’s like a mini vacation in every bite!
Hawaiian Electric Lau Lau

Brace yourselves, taste buds—we’re about to teleport straight to the islands with a dish that’s basically a tropical vacation wrapped in a leaf. Hawaiian Electric Lau Lau isn’t your average weeknight meal; it’s a savory, steamy bundle of joy that’ll make your kitchen smell like a luau, minus the awkward hula dancing (unless you’re into that, no judgment here). Think tender pork and buttery fish cocooned in taro leaves, all steamed to perfection—it’s the ultimate ‘set it and forget it’ feast for when you want maximum flavor with minimal fuss.
Serving: 6 | Pre Time: 30 minutes | Cooking Time: 3 hours
Ingredients
– Pork butt – 2 lbs
– Butterfish – 1 lb
– Taro leaves – 12 large leaves
– Hawaiian salt – 2 tbsp
– Ti leaves – 6 leaves (for wrapping)
Instructions
1. Cut the pork butt into 1-inch cubes and place them in a large bowl.
2. Cut the butterfish into 1-inch pieces and add them to the bowl with the pork.
3. Sprinkle the Hawaiian salt over the pork and fish, then mix thoroughly with your hands to coat evenly. Tip: For extra flavor, let this mixture marinate in the refrigerator for 30 minutes—it deepens the savory notes.
4. Rinse the taro leaves under cold water and pat them dry with paper towels to remove excess moisture.
5. Lay out one taro leaf flat on a clean surface and place about ½ cup of the pork and fish mixture in the center.
6. Fold the taro leaf over the mixture to form a tight bundle, ensuring no filling escapes. Tip: If the leaves tear, double them up for a sturdier wrap—it prevents leaks during steaming.
7. Wrap each taro leaf bundle securely with a ti leaf, tying it with kitchen twine to hold its shape. Tip: Soak the ti leaves in warm water for 10 minutes first to make them more pliable and easier to tie.
8. Place the wrapped bundles in a steamer basket over a pot of boiling water, making sure they don’t touch the water directly.
9. Cover the pot with a lid and steam the bundles over medium heat for 3 hours, checking occasionally to ensure the water doesn’t boil dry.
10. Remove the bundles from the steamer and let them cool for 5 minutes before carefully unwrapping the ti leaves.
And just like that, you’ve unlocked a taste of paradise! The pork turns melt-in-your-mouth tender while the butterfish adds a rich, oily sweetness that soaks into every bite. Serve these bundles hot with a side of steamed rice or poke a hole in the top to let the savory juices flow—it’s a messy, delicious adventure that’ll have everyone begging for seconds.
Hawaiian Electric Spam Musubi

Rally your taste buds for a tropical twist on a classic snack that’s shockingly simple and packed with flavor—Hawaiian Electric Spam Musubi. This savory-sweet handheld delight combines crispy, caramelized Spam with fluffy rice and a zesty sauce, all wrapped in a crisp nori blanket. It’s the ultimate fusion of island vibes and pantry staples, perfect for a quick bite or a party platter that’ll have everyone buzzing.
Serving: 4 | Pre Time: 10 minutes | Cooking Time: 15 minutes
Ingredients
– Spam – 1 can (12 oz)
– White rice – 2 cups cooked
– Soy sauce – ¼ cup
– Sugar – 2 tbsp
– Nori sheets – 4 sheets
– Vegetable oil – 1 tbsp
Instructions
1. Slice the Spam into 8 even pieces, each about ¼-inch thick.
2. Heat the vegetable oil in a non-stick skillet over medium-high heat until it shimmers, about 2 minutes.
3. Place the Spam slices in the skillet and cook for 3–4 minutes per side until golden brown and crispy.
4. While the Spam cooks, mix the soy sauce and sugar in a small bowl until the sugar dissolves completely.
5. Reduce the heat to medium-low and pour the soy-sugar mixture over the Spam in the skillet.
6. Simmer the Spam in the sauce for 2–3 minutes, flipping once, until the sauce thickens and coats the slices like a glossy glaze.
7. Remove the Spam from the skillet and let it cool on a plate for 5 minutes to firm up slightly.
8. Lay a nori sheet flat on a clean surface and place a musubi mold or a Spam can (emptied and cleaned) in the center.
9. Fill the mold with ½ cup of cooked white rice, pressing it down firmly with a spoon to compact it evenly.
10. Top the rice with 2 slices of glazed Spam, aligning them neatly.
11. Carefully lift the mold away and wrap the nori tightly around the rice and Spam, sealing the edge with a dab of water to stick.
12. Repeat steps 8–11 with the remaining ingredients to make 4 musubi total.
Glaze your way to a snack that’s irresistibly crispy on the outside with a tender, savory interior—the sweet-salty sauce caramelizes into a sticky perfection that pairs beautifully with the fluffy rice. Serve these musubi warm for a gooey treat or chill them for a firmer bite, and try drizzling with extra sauce or a sprinkle of sesame seeds for an electric kick.
Hawaiian Electric Macaroni Salad
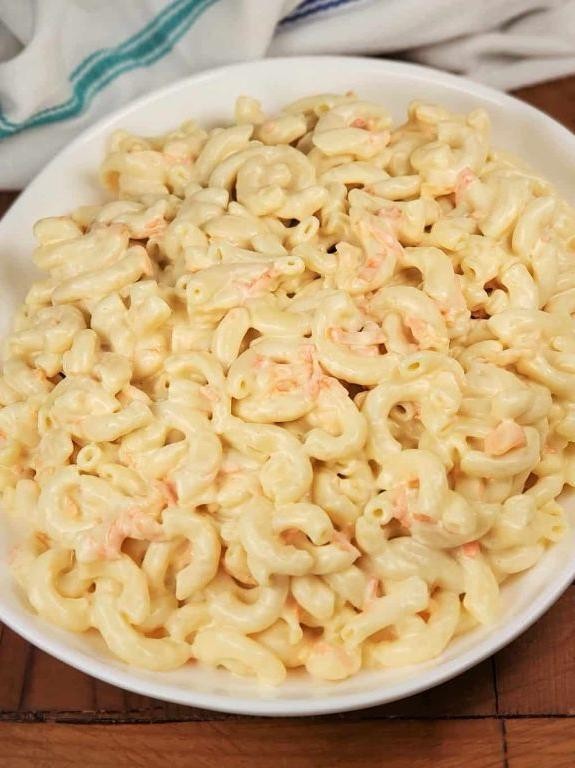
Every time I think of macaroni salad, my mind drifts to a tropical paradise—specifically, the kind that comes with a side of sunshine and a shocking electric kick. This Hawaiian Electric Macaroni Salad isn’t your grandma’s picnic fare; it’s a zesty, creamy, and downright electrifying twist that’ll make your taste buds do the hula! Get ready to power up your potluck game with this bold, island-inspired delight.
Serving: 6 | Pre Time: 15 minutes | Cooking Time: 10 minutes
Ingredients
- Elbow macaroni – 1 lb
- Mayonnaise – 1 cup
- Apple cider vinegar – 2 tbsp
- Granulated sugar – 1 tbsp
- Salt – 1 tsp
- Black pepper – ½ tsp
- Carrots – ½ cup, grated
- Green onions – ¼ cup, chopped
Instructions
- Bring a large pot of salted water to a rolling boil over high heat.
- Add the elbow macaroni to the boiling water and cook for 8–10 minutes, stirring occasionally, until al dente (tip: test a piece at 8 minutes to avoid mushiness).
- Drain the macaroni in a colander and rinse under cold running water for 30 seconds to stop the cooking process.
- Transfer the cooled macaroni to a large mixing bowl.
- In a small bowl, whisk together the mayonnaise, apple cider vinegar, granulated sugar, salt, and black pepper until smooth (tip: this ensures the dressing coats evenly without clumps).
- Pour the dressing over the macaroni and stir gently to combine.
- Fold in the grated carrots and chopped green onions until evenly distributed.
- Cover the bowl with plastic wrap and refrigerate for at least 1 hour to chill and let flavors meld (tip: don’t skip this—it’s key for that creamy, cohesive texture).
- Give the salad a final stir before serving to redistribute any settled dressing.
Buttery and smooth from the mayo, this salad packs a tangy punch from the vinegar, balanced by a hint of sweetness. Serve it alongside grilled meats for a tropical BBQ vibe, or scoop it into lettuce cups for a low-carb twist—either way, it’s guaranteed to spark some lively conversation at your next gathering!
Hawaiian Electric Huli Huli Chicken

Brace your taste buds for a tropical vacation without leaving your kitchen! This Hawaiian Electric Huli Huli Chicken is about to bring the sizzle of the islands straight to your dinner table, proving that paradise is just a perfectly charred, sweet-and-savory glaze away.
Serving: 4 | Pre Time: 15 minutes | Cooking Time: 25 minutes
Ingredients
– Boneless, skinless chicken thighs – 1.5 lbs
– Soy sauce – ½ cup
– Brown sugar – ½ cup
– Ketchup – ¼ cup
– Fresh ginger – 1 tbsp, grated
– Garlic – 3 cloves, minced
– Pineapple juice – ⅓ cup
Instructions
1. In a medium bowl, whisk together ½ cup soy sauce, ½ cup brown sugar, ¼ cup ketchup, 1 tbsp grated ginger, 3 minced garlic cloves, and ⅓ cup pineapple juice until the sugar is fully dissolved to create the marinade.
2. Place 1.5 lbs of chicken thighs in a large resealable bag and pour the marinade over them, ensuring all pieces are coated. Seal the bag and refrigerate for at least 1 hour, or up to 4 hours for deeper flavor—overnight marinating can make the chicken too salty, so stick to this range.
3. Preheat your grill or grill pan to medium-high heat, approximately 400°F, and lightly oil the grates to prevent sticking.
4. Remove the chicken from the marinade, letting excess drip off, and reserve the leftover marinade in a small saucepan.
5. Place the chicken on the preheated grill and cook for 6-8 minutes per side, flipping only once, until internal temperature reaches 165°F and you see nice grill marks.
6. While the chicken cooks, bring the reserved marinade to a boil over medium heat, then reduce to a simmer for 5 minutes until slightly thickened to create a glaze; always boil used marinade to kill bacteria before brushing it on cooked food.
7. During the last 2 minutes of grilling, brush the boiled glaze generously onto both sides of the chicken for a sticky, caramelized finish—watch closely to avoid burning, as the sugar content can char quickly.
8. Transfer the chicken to a clean plate, tent loosely with foil, and let it rest for 5 minutes before serving to allow juices to redistribute for maximum tenderness.
Oozing with juicy tenderness and a glossy, finger-licking glaze, this chicken boasts a perfect balance of sweet pineapple tang and savory umami depth. Serve it over a bed of fluffy rice to soak up every last drop of sauce, or chop it up for killer tacos topped with a crunchy slaw—either way, it’s guaranteed to disappear faster than a sunset in Maui.
Hawaiian Electric Chicken Long Rice
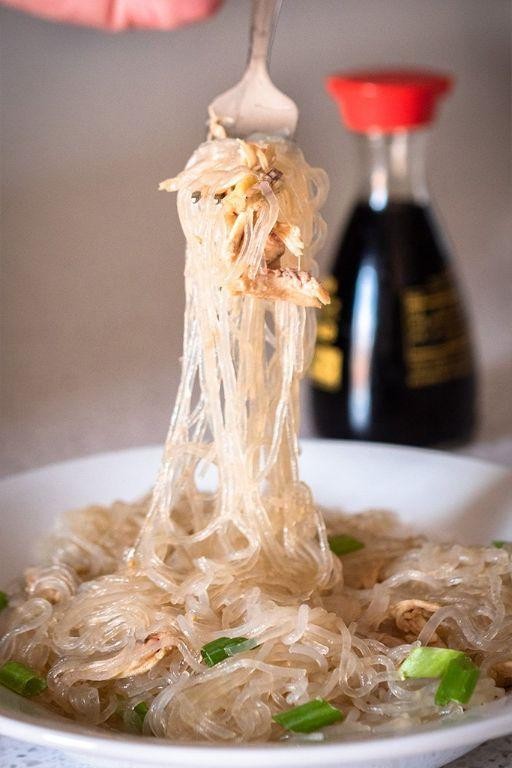
Just when you thought chicken soup couldn’t get any more comforting, along comes this Hawaiian twist that’s basically a tropical vacation in a bowl. Hawaiian Electric Chicken Long Rice is the cozy, slurpable noodle soup that’ll make you forget all about that bland canned stuff—it’s got tender chicken, slippery-smooth noodles, and a broth so flavorful you’ll want to drink it straight from the pot (no judgment here!).
Serving: 4 | Pre Time: 15 minutes | Cooking Time: 25 minutes
Ingredients
– Chicken thighs – 1 lb
– Chicken broth – 4 cups
– Ginger – 1 tbsp, minced
– Garlic – 2 cloves, minced
– Soy sauce – ¼ cup
– Long rice noodles – 4 oz
– Green onions – 2, sliced
Instructions
1. Place 1 lb of chicken thighs in a large pot and cover with 4 cups of chicken broth.
2. Bring the broth to a boil over high heat, then reduce to a simmer and cook for 15 minutes, or until the chicken is fully cooked and tender.
3. Remove the chicken from the pot using tongs, let it cool for 5 minutes, then shred it into bite-sized pieces with two forks.
4. While the chicken cools, add 1 tbsp of minced ginger and 2 cloves of minced garlic to the simmering broth and cook for 2 minutes to infuse the flavors.
5. Stir in ¼ cup of soy sauce into the broth and bring it back to a gentle simmer.
6. Add 4 oz of long rice noodles to the broth and cook for 5 minutes, or until they are soft and translucent, stirring occasionally to prevent sticking.
7. Return the shredded chicken to the pot and cook for an additional 2 minutes to warm through.
8. Turn off the heat and stir in 2 sliced green onions just before serving.
Yep, this dish is all about that silky, slurp-worthy texture—the noodles glide like a dream, and the savory broth packs a punch with every spoonful. Serve it up in big bowls with extra green onions on top, or get fancy by ladling it over a bed of steamed rice for a heartier meal that’ll have everyone asking for seconds!
Hawaiian Electric Pineapple Upside-Down Cake

Zap your taste buds with a tropical twist that’s shockingly good—this isn’t your grandma’s pineapple upside-down cake! We’re cranking up the voltage with a zesty, caramelized pineapple layer that’s pure island magic, baked into a fluffy, buttery cake that’ll have you doing the hula in your kitchen. Get ready to flip your world—and this cake—upside down for a dessert that’s electrifyingly delicious.
Serving: 8 | Pre Time: 15 minutes | Cooking Time: 45 minutes
Ingredients
– Pineapple rings – 1 (20 oz) can
– Maraschino cherries – ½ cup
– Unsalted butter – ½ cup
– Brown sugar – ¾ cup
– All-purpose flour – 1½ cups
– Granulated sugar – 1 cup
– Baking powder – 2 tsp
– Salt – ½ tsp
– Milk – ½ cup
– Eggs – 2
– Vanilla extract – 1 tsp
Instructions
1. Preheat your oven to 350°F (175°C) and grease a 9-inch round cake pan thoroughly.
2. Drain the pineapple rings and pat them dry with paper towels to prevent a soggy bottom—this tip ensures a crisp caramel layer.
3. Arrange the pineapple rings in a single layer at the bottom of the pan, placing a cherry in the center of each ring.
4. Melt ¼ cup of butter in a small saucepan over medium heat, then stir in the brown sugar until fully dissolved and bubbly, about 2-3 minutes.
5. Pour the brown sugar mixture evenly over the pineapple and cherries in the pan, spreading it with a spatula.
6. In a large mixing bowl, whisk together the flour, granulated sugar, baking powder, and salt until well combined.
7. In a separate bowl, beat the remaining ¼ cup of softened butter with the eggs, milk, and vanilla extract until smooth.
8. Gradually add the wet ingredients to the dry ingredients, mixing just until no flour streaks remain—overmixing can make the cake tough, so go easy!
9. Pour the batter over the pineapple layer in the pan, smoothing the top with a spatula.
10. Bake for 40-45 minutes, or until a toothpick inserted into the center comes out clean and the top is golden brown.
11. Let the cake cool in the pan on a wire rack for exactly 10 minutes; this allows it to set without sticking.
12. Run a knife around the edges of the pan, then place a serving plate upside down over the pan and flip it quickly and confidently to invert the cake.
13. Carefully lift the pan to reveal the caramelized pineapple topping.
14. Serve warm or at room temperature.
Kick back and savor that golden, gooey pineapple crown atop a moist, tender crumb—it’s like a tropical vacation in every bite. For a fun twist, top slices with a dollop of coconut whipped cream or a sprinkle of toasted macadamia nuts to amp up the island vibes.
Hawaiian Electric Coconut Shrimp
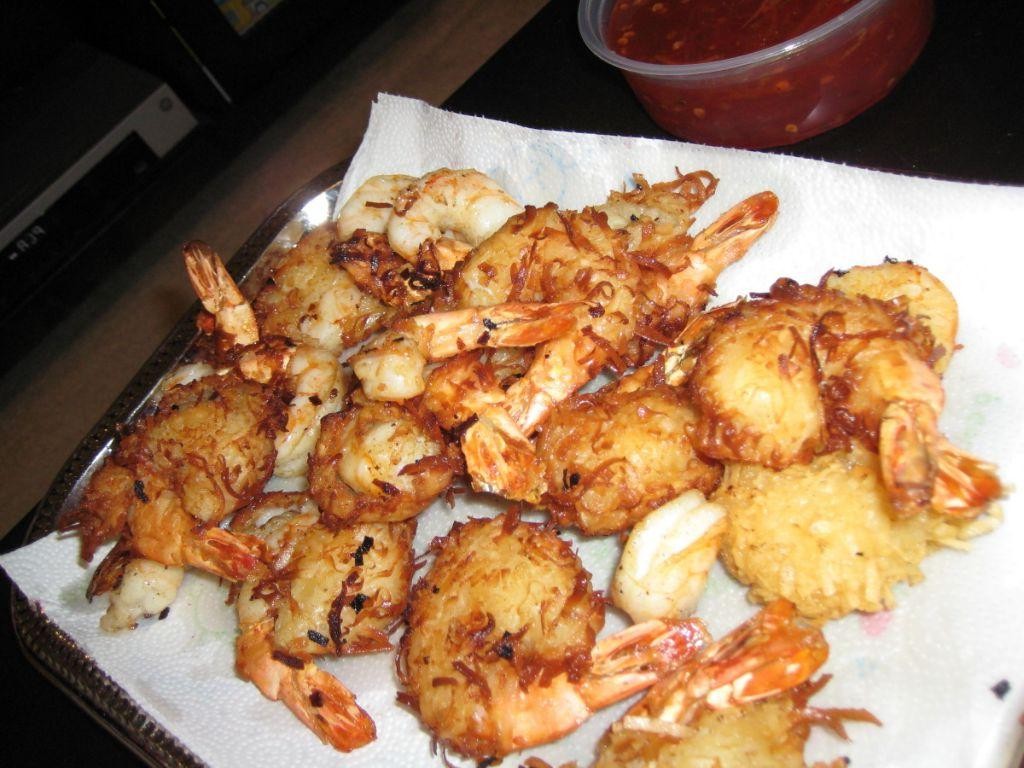
Picture this: you’re craving something crispy, tropical, and just a little bit electric—like a beach party for your taste buds. This Hawaiian Electric Coconut Shrimp is here to deliver exactly that, with a crunch so satisfying it might just make you forget about your holiday shopping stress. Let’s get frying!
Serving: 4 | Pre Time: 15 minutes | Cooking Time: 10 minutes
Ingredients
- Large shrimp – 1 lb, peeled and deveined
- All-purpose flour – ½ cup
- Eggs – 2
- Shredded sweetened coconut – 1 cup
- Panko breadcrumbs – 1 cup
- Vegetable oil – 2 cups
- Salt – ½ tsp
Instructions
- Pat the shrimp completely dry with paper towels to help the coating stick better.
- Set up three shallow bowls: place the flour in the first, beat the eggs in the second, and mix the coconut and panko in the third.
- Season the shrimp evenly with the salt.
- Dredge each shrimp in the flour, shaking off any excess.
- Dip the floured shrimp into the beaten eggs, letting any extra drip off.
- Press the shrimp firmly into the coconut-panko mixture, coating all sides thoroughly.
- Heat the vegetable oil in a large, heavy-bottomed pot or Dutch oven to 350°F, using a thermometer for accuracy.
- Fry the shrimp in batches of 4-5 for 2-3 minutes per side until golden brown and crispy.
- Transfer the cooked shrimp to a wire rack set over a baking sheet to drain and stay crisp.
- Repeat with the remaining shrimp, allowing the oil to return to 350°F between batches.
The result is shrimp with a shatteringly crisp exterior that gives way to juicy, tender meat inside. The sweet coconut pairs perfectly with the savory shrimp, creating a flavor that’s downright addictive—serve them with a spicy mango dipping sauce or pile them high on a bed of greens for a tropical twist on salad night.
Hawaiian Electric Teriyaki Beef

Just when you thought your taste buds had seen it all, along comes this Hawaiian Electric Teriyaki Beef to jolt them awake like a tropical thunderstorm! It’s the perfect fusion of island sweetness and savory sizzle, guaranteed to make your weeknight dinner feel like a beachside luana. So, grab your apron and let’s turn up the voltage on flavor!
Serving: 4 | Pre Time: 15 minutes | Cooking Time: 20 minutes
Ingredients
– Flank steak – 1.5 lbs
– Soy sauce – ½ cup
– Brown sugar – ¼ cup
– Fresh ginger – 1 tbsp, grated
– Garlic – 3 cloves, minced
– Pineapple juice – ⅓ cup
– Cornstarch – 1 tbsp
– Vegetable oil – 2 tbsp
– Green onions – 2, sliced
Instructions
1. Slice the flank steak against the grain into ¼-inch thick strips.
2. In a medium bowl, whisk together the soy sauce, brown sugar, grated ginger, minced garlic, and pineapple juice until the sugar dissolves completely.
3. Add the sliced steak to the bowl, tossing to coat every piece evenly, then let it marinate at room temperature for 10 minutes.
4. While the steak marinates, mix the cornstarch with 2 tablespoons of water in a small bowl to create a smooth slurry.
5. Heat the vegetable oil in a large skillet or wok over medium-high heat until it shimmers, about 2 minutes.
6. Using tongs, remove the steak from the marinade, letting excess drip off, and reserve the marinade in the bowl.
7. Add the steak to the hot skillet in a single layer, cooking for 3–4 minutes without stirring to get a good sear, then flip and cook for another 2–3 minutes until browned.
8. Transfer the cooked steak to a plate, then pour the reserved marinade into the same skillet and bring it to a boil over high heat.
9. Stir in the cornstarch slurry and cook for 1–2 minutes, whisking constantly, until the sauce thickens to a glossy consistency that coats the back of a spoon.
10. Return the steak to the skillet, tossing to coat it thoroughly in the sauce, and cook for 1 more minute to heat through.
11. Remove from heat and garnish with sliced green onions.
Succulent and bursting with flavor, this dish delivers tender beef coated in a sticky-sweet teriyaki glaze with a hint of tropical pineapple. Serve it over a bed of steamed rice to soak up every last drop of sauce, or get creative by stuffing it into warm tortillas for a fusion twist that’ll have everyone asking for seconds!
Hawaiian Electric Sweet Potato Haupia Pie

Tired of the same old holiday desserts? This Hawaiian Electric Sweet Potato Haupia Pie is about to jolt your taste buds awake with a tropical twist that’s shockingly delicious—think creamy, dreamy, and just a little bit electric. Trust me, it’s the sweet escape your dessert table desperately needs.
Serving: 8 | Pre Time: 30 minutes | Cooking Time: 45 minutes
Ingredients
– Graham cracker crumbs – 1 ½ cups
– Unsalted butter – ½ cup, melted
– Granulated sugar – ¼ cup
– Sweet potatoes – 2 lbs, peeled and cubed
– Coconut milk – 1 (13.5 oz) can
– Cornstarch – ¼ cup
– Water – ½ cup
– Vanilla extract – 1 tsp
– Salt – ¼ tsp
Instructions
1. Preheat your oven to 350°F (175°C).
2. In a medium bowl, combine the graham cracker crumbs, melted unsalted butter, and granulated sugar until the mixture resembles wet sand.
3. Press the crumb mixture firmly into the bottom and up the sides of a 9-inch pie dish to form the crust.
4. Bake the crust for 10 minutes at 350°F (175°C), then remove it from the oven and let it cool completely on a wire rack.
5. Place the peeled and cubed sweet potatoes in a large pot, cover them with water, and bring to a boil over high heat.
6. Reduce the heat to medium and simmer the sweet potatoes for 15–20 minutes, or until they are fork-tender.
7. Drain the sweet potatoes thoroughly and transfer them to a large mixing bowl.
8. Mash the sweet potatoes with a potato masher until smooth and free of lumps.
9. In a small saucepan, whisk together the coconut milk, cornstarch, water, vanilla extract, and salt until no lumps remain.
10. Cook the coconut milk mixture over medium heat, stirring constantly with a whisk, for 5–7 minutes until it thickens to a pudding-like consistency.
11. Pour the thickened coconut mixture into the bowl with the mashed sweet potatoes and stir until fully combined and smooth.
12. Spread the sweet potato filling evenly into the cooled pie crust.
13. Refrigerate the pie for at least 4 hours, or until the filling is fully set and firm to the touch.
14. Slice the pie into 8 servings and serve chilled.
Whip up this pie, and you’ll be rewarded with a velvety texture that melts in your mouth, balanced by the subtle sweetness of coconut and earthy sweet potatoes. For a fun twist, top it with toasted coconut flakes or a drizzle of caramel sauce to really make it shine—it’s the kind of dessert that’ll have everyone buzzing for seconds!
Hawaiian Electric Garlic Butter Shrimp
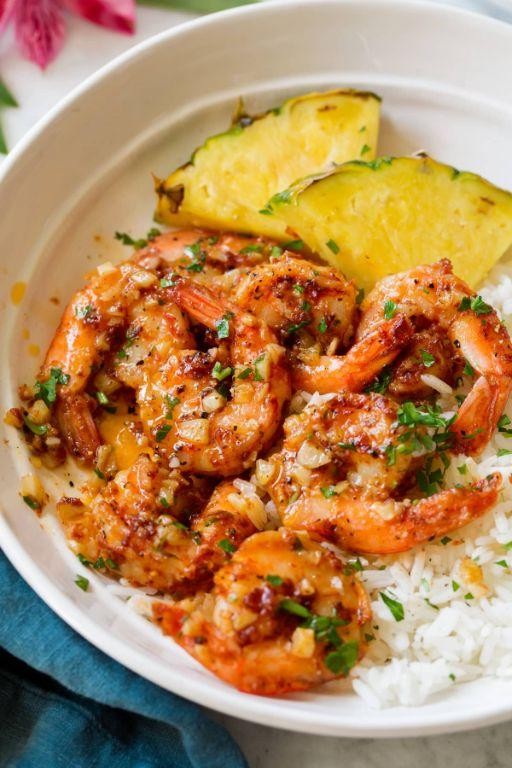
Oh, the holidays are upon us, and if you’re anything like me, you’re torn between wanting to impress your guests and not wanting to spend hours slaving over a stove. Enter this Hawaiian Electric Garlic Butter Shrimp—it’s the kind of dish that looks fancy but is secretly a weeknight hero, packing a punch of flavor with minimal fuss. Let’s dive into this tropical delight that’ll have everyone thinking you’ve been practicing your culinary skills in paradise.
Serving: 4 | Pre Time: 10 minutes | Cooking Time: 15 minutes
Ingredients
– Large shrimp – 1 lb
– Unsalted butter – ½ cup
– Garlic – 4 cloves
– Lemon juice – 2 tbsp
– Red pepper flakes – ½ tsp
– Salt – 1 tsp
– Black pepper – ½ tsp
– Fresh parsley – 2 tbsp
Instructions
1. Pat the shrimp dry with paper towels to ensure a good sear—this prevents steaming and gives you that crispy texture.
2. In a large skillet, melt the butter over medium-high heat until it bubbles slightly, about 2 minutes.
3. Add the minced garlic and cook for 1 minute until fragrant, stirring constantly to avoid burning.
4. Increase the heat to high and add the shrimp in a single layer, cooking for 2 minutes per side until they turn pink and opaque.
5. Sprinkle in the red pepper flakes, salt, and black pepper, tossing to coat evenly.
6. Pour in the lemon juice and let it simmer for 1 minute to deglaze the pan and create a rich sauce.
7. Remove from heat and stir in the chopped parsley for a fresh finish.
8. Serve immediately while hot, spooning the garlic butter sauce over the shrimp.
From the first bite, you’ll notice the shrimp are tender and juicy, with a buttery richness that’s balanced by the zesty lemon and subtle heat from the pepper flakes. Try serving it over a bed of fluffy rice to soak up every last drop of that irresistible sauce, or toss it with pasta for a quick, decadent meal that’ll make any dinner feel like a beachside feast.
Hawaiian Electric Mochi

Tired of holiday treats that require more effort than assembling IKEA furniture? Let’s plug into something delightfully different: Hawaiian Electric Mochi. This fusion dessert zaps traditional mochi with tropical flair, delivering a sweet, chewy jolt that’s shockingly simple to make.
Serving: 12 pieces | Pre Time: 15 minutes | Cooking Time: 30 minutes
Ingredients
– Sweet rice flour – 1 cup
– Granulated sugar – ½ cup
– Water – ¾ cup
– Coconut milk – ½ cup
– Pineapple juice – ¼ cup
– Cornstarch – ¼ cup
– Vegetable oil – 1 tbsp
Instructions
1. In a medium microwave-safe bowl, whisk together 1 cup sweet rice flour, ½ cup granulated sugar, ¾ cup water, ½ cup coconut milk, and ¼ cup pineapple juice until completely smooth with no lumps.
2. Cover the bowl loosely with a microwave-safe plate or plastic wrap, leaving a small vent.
3. Microwave the mixture on high for 3 minutes, then carefully stir it with a wet spatula to prevent sticking—this keeps the texture even.
4. Microwave for another 2 minutes until the dough is thick, glossy, and pulls away from the bowl’s sides; it should look like a sticky, translucent paste.
5. Lightly dust a clean work surface with 2 tablespoons of the cornstarch to prevent sticking, reserving the rest.
6. Using oiled hands or an oiled spatula, scrape the hot dough onto the dusted surface; let it cool just enough to handle, about 5 minutes.
7. Knead the dough gently for 2–3 minutes until it becomes smooth and pliable, adding more cornstarch if it’s too sticky—over-kneading can make it tough.
8. Roll the dough into a log about 12 inches long, then cut it into 12 equal pieces with an oiled knife for clean slices.
9. Dust each piece lightly with the remaining cornstarch and shape them into balls or squares, pressing firmly to seal any seams.
10. Arrange the mochi pieces on a parchment-lined tray and let them set at room temperature for 20 minutes to firm up before serving.
What you get is a chewy, pillowy bite with a subtle tropical sweetness from the coconut and pineapple. Serve these gems chilled for a refreshing treat, or get creative by stuffing them with a dab of fruit jam for an extra flavor surge.
Hawaiian Electric Ahi Tuna Poke
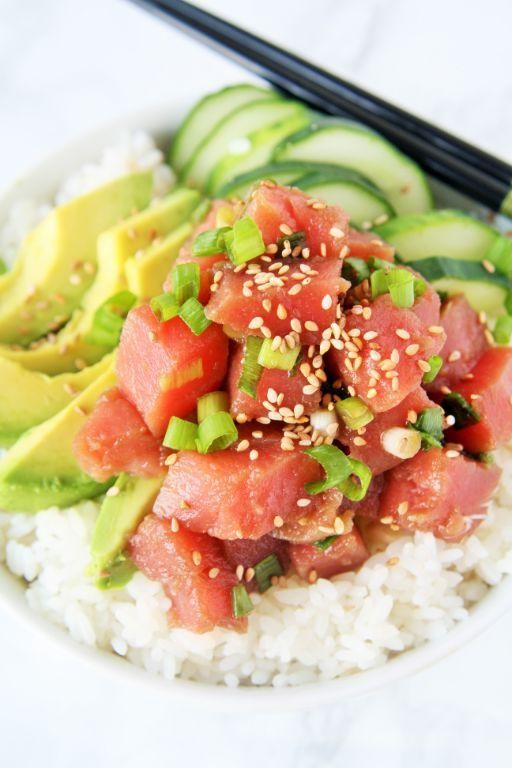
Gather ’round, poke enthusiasts and sushi skeptics alike—we’re about to electrify your taste buds with a dish that’s shockingly simple to make at home. Forget those sad, store-bought versions; this Hawaiian Electric Ahi Tuna Poke is a vibrant, zesty powerhouse that’ll have you feeling like a beachside chef in no time. Just don’t blame us if you start craving it for breakfast, lunch, and dinner.
Serving: 4 | Pre Time: 20 minutes | Cooking Time: 0 minutes
Ingredients
– Fresh ahi tuna – 1 lb
– Soy sauce – ¼ cup
– Sesame oil – 1 tbsp
– Rice vinegar – 2 tbsp
– Sriracha – 1 tsp
– Green onions – 2, sliced
– Sesame seeds – 1 tbsp
– Avocado – 1, diced
Instructions
1. Place 1 lb of fresh ahi tuna on a clean cutting board and dice it into ½-inch cubes using a sharp knife. Tip: For the best texture, chill the tuna in the freezer for 10 minutes before cutting to make it firmer and easier to handle.
2. In a medium mixing bowl, whisk together ¼ cup soy sauce, 1 tbsp sesame oil, 2 tbsp rice vinegar, and 1 tsp sriracha until fully combined.
3. Add the diced tuna to the bowl with the sauce and gently toss to coat every piece evenly. Tip: Use a folding motion with a spatula to avoid breaking up the delicate tuna cubes.
4. Fold in 2 sliced green onions, 1 tbsp sesame seeds, and 1 diced avocado until just incorporated.
5. Cover the bowl with plastic wrap and refrigerate the poke for 15 minutes to allow the flavors to meld. Tip: Don’t skip this chilling step—it helps the tuna absorb the sauce and enhances the overall taste.
6. After 15 minutes, remove the poke from the refrigerator and give it one final gentle stir.
7. Serve immediately in bowls or over a bed of rice if desired.
Perfectly tender tuna cubes soak up that savory-sweet marinade, while the avocado adds a creamy contrast that’s downright addictive. For a fun twist, scoop it into crispy wonton cups or layer it over a pile of crunchy slaw for an extra textural punch that’ll make your taste buds do a happy dance.
Hawaiian Electric Banana Bread
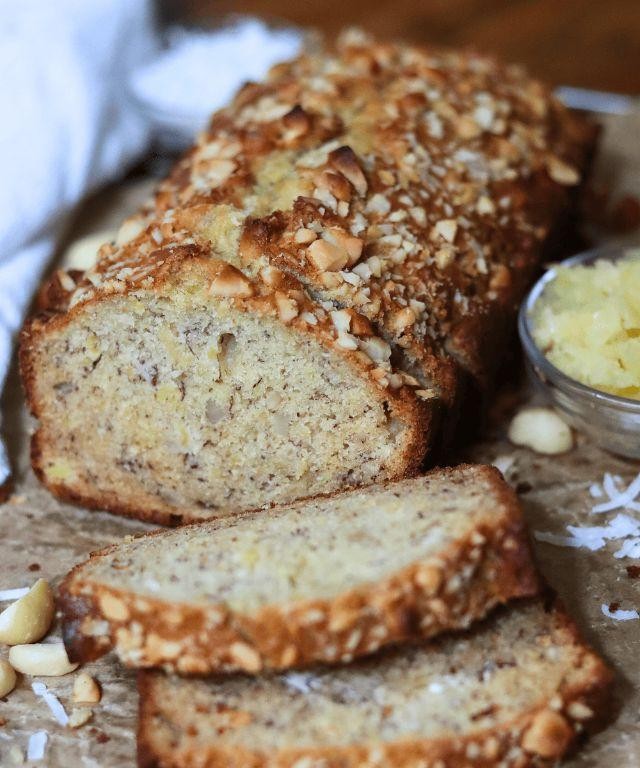
Crank up the voltage, because this isn’t your grandma’s banana bread—it’s a tropical lightning bolt of flavor that’ll jolt your taste buds awake. Imagine the classic comfort food, but supercharged with a sunny, island-inspired twist that makes it impossible to eat just one slice.
Serving: 8 | Pre Time: 15 minutes | Cooking Time: 65 minutes
Ingredients
– Ripe bananas – 3 medium
– All-purpose flour – 2 cups
– Granulated sugar – ¾ cup
– Unsalted butter – ½ cup (1 stick)
– Eggs – 2 large
– Baking soda – 1 tsp
– Salt – ½ tsp
– Vanilla extract – 1 tsp
– Crushed pineapple (drained) – ½ cup
– Shredded sweetened coconut – ½ cup
Instructions
1. Preheat your oven to 350°F and grease a 9×5-inch loaf pan.
2. In a large bowl, mash the ripe bananas with a fork until smooth, leaving a few small lumps for texture.
3. Tip: Use bananas with lots of brown spots for maximum sweetness and moisture.
4. Melt the unsalted butter in a microwave-safe bowl for 30 seconds, then let it cool slightly.
5. Add the granulated sugar, eggs, and vanilla extract to the mashed bananas, and whisk until fully combined.
6. Stir in the melted unsalted butter until the mixture is uniform.
7. In a separate medium bowl, whisk together the all-purpose flour, baking soda, and salt.
8. Tip: Sift the dry ingredients to prevent lumps and ensure an even rise.
9. Gradually fold the dry ingredients into the wet mixture until just combined—do not overmix.
10. Gently stir in the crushed pineapple and shredded sweetened coconut until evenly distributed.
11. Pour the batter into the prepared loaf pan and smooth the top with a spatula.
12. Bake at 350°F for 60–65 minutes, or until a toothpick inserted into the center comes out clean.
13. Tip: If the top browns too quickly, loosely tent it with aluminum foil after 40 minutes.
14. Let the bread cool in the pan for 10 minutes, then transfer it to a wire rack to cool completely.
15. Slice and serve once cooled. Ready to experience the shockingly good results? This bread emerges with a moist, tender crumb speckled with tropical pineapple and coconut, delivering a sweet, tangy punch that’s pure sunshine in every bite. For a creative twist, toast a slice and top it with a dollop of whipped cream or a drizzle of caramel sauce for an extra jolt of indulgence.
Hawaiian Electric Coconut Rice
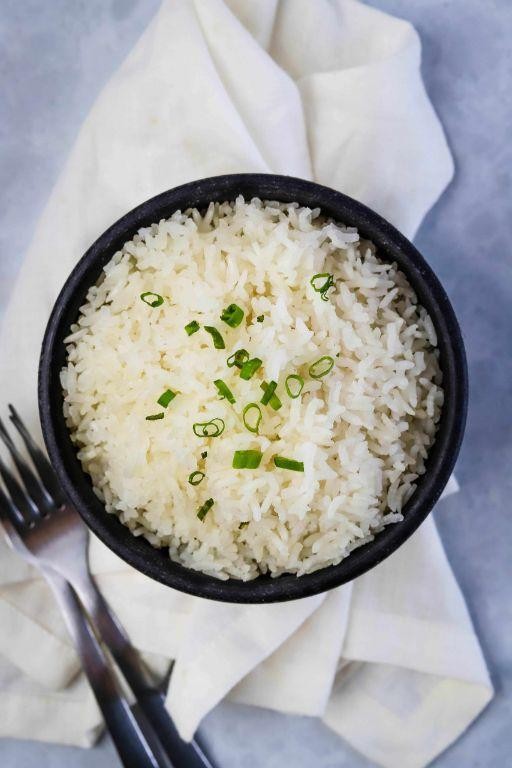
Coconut lovers, unite! This Hawaiian Electric Coconut Rice is about to jolt your taste buds with a tropical voltage that’ll make you forget all about plain old steamed rice. Imagine fluffy grains infused with creamy coconut and a zesty kick—it’s like a vacation in a bowl, minus the sunburn and overpriced souvenirs. Get ready to whip up this electrifying side dish that pairs perfectly with grilled meats or stands boldly on its own.
Serving: 4 | Pre Time: 5 minutes | Cooking Time: 20 minutes
Ingredients
– Jasmine rice – 1 cup
– Coconut milk – 1 cup
– Water – 1 cup
– Salt – ½ tsp
– Lime – 1
– Green onion – 1
Instructions
1. Rinse 1 cup of jasmine rice under cold water in a fine-mesh strainer until the water runs clear to remove excess starch for fluffier results.
2. In a medium saucepan, combine the rinsed rice, 1 cup of coconut milk, and 1 cup of water.
3. Add ½ tsp of salt to the saucepan and stir gently to mix.
4. Bring the mixture to a boil over high heat, then immediately reduce the heat to low.
5. Cover the saucepan with a tight-fitting lid and simmer for 15 minutes—do not peek, as this lets steam escape and can lead to uneven cooking.
6. After 15 minutes, remove the saucepan from the heat and let it sit, covered, for 5 minutes to allow the rice to steam and absorb any remaining liquid.
7. While the rice rests, zest the lime and set the zest aside, then juice the lime to get about 2 tbsp of fresh juice.
8. Finely chop the green onion, using both the white and green parts for added flavor and color.
9. Fluff the cooked rice with a fork to separate the grains, then gently fold in the lime zest, lime juice, and chopped green onion until evenly distributed.
10. Taste and adjust seasoning if needed, but avoid overmixing to keep the rice light and airy.
Yep, this Hawaiian Electric Coconut Rice delivers a creamy yet fluffy texture with a bright, tangy finish from the lime. Serve it alongside grilled pineapple chicken for a full tropical feast, or scoop it into lettuce cups for a fun, handheld twist that’ll make any meal feel like a luau.
Hawaiian Electric Mango Chicken

Oh, you thought chicken couldn’t get any more exciting? Buckle up, because this Hawaiian Electric Mango Chicken is about to jolt your taste buds awake with a tropical twist that’s shockingly delicious. It’s the perfect way to bring a little sunshine to your dinner table, no plane ticket required.
Serving: 4 | Pre Time: 15 minutes | Cooking Time: 25 minutes
Ingredients
– Boneless, skinless chicken breasts – 1.5 lbs
– Mango – 1 large, ripe
– Soy sauce – ¼ cup
– Brown sugar – 2 tbsp
– Rice vinegar – 1 tbsp
– Fresh ginger – 1 tbsp, grated
– Garlic – 2 cloves, minced
– Red pepper flakes – ½ tsp
– Vegetable oil – 1 tbsp
– Green onions – 2, sliced
Instructions
1. Dice the mango into ½-inch cubes, setting aside half for the sauce and half for garnish.
2. In a medium bowl, whisk together the soy sauce, brown sugar, rice vinegar, grated ginger, minced garlic, and red pepper flakes until the sugar dissolves completely.
3. Add the diced mango (half portion) to the bowl and mash it lightly with a fork to create a chunky sauce base.
4. Pat the chicken breasts dry with paper towels and cut them into 1-inch cubes for even cooking.
5. Heat the vegetable oil in a large skillet over medium-high heat until it shimmers, about 2 minutes.
6. Add the chicken cubes to the skillet in a single layer, cooking for 5–7 minutes until golden brown on all sides, stirring occasionally to prevent sticking.
7. Pour the mango sauce mixture over the chicken, reduce the heat to medium-low, and simmer uncovered for 10–12 minutes, stirring every few minutes, until the sauce thickens and coats the chicken evenly.
8. Remove the skillet from the heat and stir in the remaining diced mango and sliced green onions.
9. Let the dish rest for 3 minutes off the heat to allow the flavors to meld before serving.
Firm yet tender chicken pieces swim in a glossy, sweet-and-tangy sauce with bursts of fresh mango that practically sing “aloha.” Serve it over a bed of fluffy rice to soak up every last drop, or get creative by stuffing it into warm tortillas for a tropical twist on taco night—just don’t be surprised if it disappears faster than a sunset in Maui.
Summary
Gathering these 20 authentic Hawaiian Electric recipes brings the islands’ vibrant flavors right to your kitchen. We hope you’ll try a few, share your favorites in the comments below, and pin this roundup on Pinterest to spread the aloha. Happy cooking!


