Busy weeknights don’t have to mean boring meals or derailed health goals! We’ve gathered 19 flavorful chicken and rice recipes that are as delicious as they are nutritious, perfect for anyone looking to enjoy satisfying comfort food while staying on track. Get ready to transform your dinner routine with these easy, wholesome dishes that prove healthy eating can be absolutely irresistible.
Lemon Garlic Baked Chicken with Brown Rice
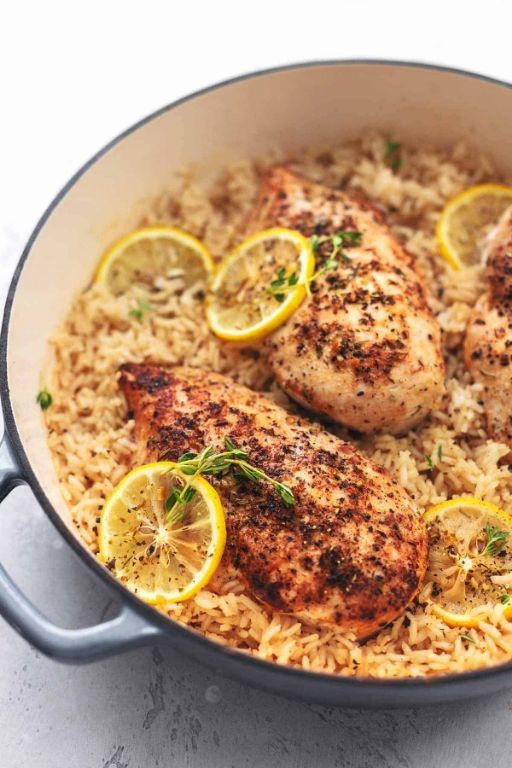
A cozy kitchen and the aroma of lemon and garlic—that’s my happy place, especially on a chilly evening like this. I’ve been making this Lemon Garlic Baked Chicken with Brown Rice for years; it’s my go-to when I want something wholesome without fuss, and it always reminds me of Sunday dinners growing up.
Serving: 4 | Pre Time: 15 minutes | Cooking Time: 45 minutes
Ingredients
– 4 boneless, skinless chicken breasts (I like to pat them dry with paper towels for better browning)
– 1 cup brown rice (I use long-grain for a fluffier texture)
– 2 cups chicken broth (low-sodium is my preference to control saltiness)
– 4 cloves garlic, minced (freshly minced makes all the difference—I avoid the jarred stuff)
– 1 lemon, juiced and zested (I zest first to get that bright flavor, then juice it)
– 2 tbsp extra virgin olive oil (my go-to for its fruity notes)
– 1 tsp dried oregano (I sometimes swap in fresh if I have it from the garden)
– Salt and black pepper (I keep a pepper mill handy for a coarse grind)
Instructions
1. Preheat your oven to 375°F (190°C) to ensure even cooking from the start.
2. In a large oven-safe skillet, heat 1 tbsp olive oil over medium-high heat until it shimmers, about 2 minutes.
3. Season the chicken breasts evenly with salt and black pepper on both sides.
4. Sear the chicken in the skillet for 3–4 minutes per side until golden brown—this locks in juices for tender meat.
5. Remove the chicken from the skillet and set it aside on a plate.
6. In the same skillet, add the remaining 1 tbsp olive oil and sauté the minced garlic for 1 minute until fragrant, being careful not to burn it.
7. Stir in the brown rice, coating it with the garlic and oil for about 30 seconds to toast lightly.
8. Pour in the chicken broth, lemon juice, lemon zest, and dried oregano, stirring to combine everything.
9. Return the seared chicken breasts to the skillet, nestling them into the rice mixture.
10. Cover the skillet tightly with a lid or aluminum foil and bake in the preheated oven for 30 minutes.
11. After 30 minutes, remove the cover and bake for an additional 10–15 minutes until the rice is tender and has absorbed most of the liquid, and the chicken reaches an internal temperature of 165°F (74°C) when checked with a meat thermometer.
12. Let the dish rest for 5 minutes off the heat before serving to allow the flavors to meld.
Just out of the oven, this dish offers tender, juicy chicken with a zesty lemon-garlic punch, paired with fluffy brown rice that soaks up all the savory broth. I love serving it straight from the skillet for a rustic feel, maybe with a sprinkle of fresh parsley or a side of steamed greens—it’s comfort food that feels both hearty and bright.
Spicy Cilantro Lime Chicken with Quinoa Rice
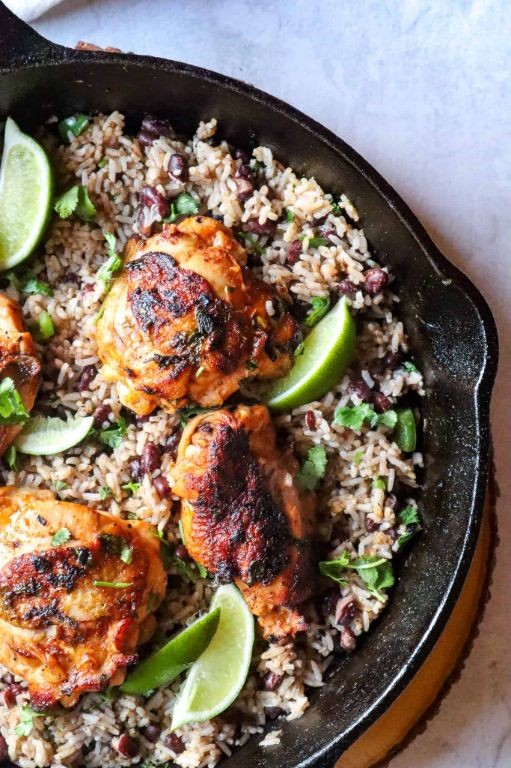
Every time I make this Spicy Cilantro Lime Chicken with Quinoa Rice, it reminds me of those vibrant summer evenings when I crave something fresh yet satisfying. I first experimented with this recipe after a trip to a local farmers’ market where I found the most fragrant cilantro—it’s become my go-to weeknight dinner that never disappoints. The combination of zesty lime and spicy chicken over fluffy quinoa rice is pure comfort in a bowl.
Serving: 4 | Pre Time: 15 minutes | Cooking Time: 25 minutes
Ingredients
– 1.5 lbs boneless, skinless chicken breasts, cut into 1-inch pieces (I always pat them dry with paper towels for better browning)
– 1 cup quinoa, rinsed well under cold water (this removes the natural bitterness)
– 2 cups low-sodium chicken broth (homemade stock works wonders if you have it)
– 2 limes, juiced and zested (I zest them first to capture all that bright flavor)
– 1/2 cup fresh cilantro, chopped (don’t skimp—it’s the star here)
– 3 cloves garlic, minced (freshly minced makes all the difference)
– 1 tbsp olive oil (extra virgin is my kitchen staple)
– 1 tsp chili powder (adjust based on your heat preference)
– 1/2 tsp cumin (toasted cumin seeds ground fresh add depth)
– Salt and black pepper (I use kosher salt for even seasoning)
Instructions
1. Rinse 1 cup quinoa under cold running water in a fine-mesh strainer for 1 minute to remove bitterness.
2. In a medium saucepan, combine rinsed quinoa and 2 cups low-sodium chicken broth, then bring to a boil over high heat.
3. Reduce heat to low, cover the saucepan, and simmer quinoa for 15 minutes until liquid is absorbed and grains are tender.
4. While quinoa cooks, pat 1.5 lbs boneless, skinless chicken breast pieces dry with paper towels to ensure a crispy sear.
5. Season chicken evenly with 1 tsp chili powder, 1/2 tsp cumin, and a pinch of salt and black pepper.
6. Heat 1 tbsp olive oil in a large skillet over medium-high heat until it shimmers, about 2 minutes.
7. Add seasoned chicken to skillet in a single layer, cooking for 5-6 minutes until browned on all sides and internal temperature reaches 165°F.
8. Mince 3 cloves garlic and add to skillet with chicken, stirring for 1 minute until fragrant.
9. Zest and juice 2 limes directly into skillet, stirring to coat chicken evenly.
10. Remove skillet from heat and stir in 1/2 cup chopped fresh cilantro.
11. Fluff cooked quinoa with a fork and divide among serving bowls.
12. Top quinoa with spicy cilantro lime chicken mixture.
Zesty and vibrant, this dish delivers a perfect balance of tender chicken with a kick from the chili and cumin, paired with fluffy quinoa that soaks up all the lime-cilantro goodness. I love serving it with extra lime wedges on the side for squeezing, and it’s fantastic topped with avocado slices or a dollop of Greek yogurt for a creamy contrast.
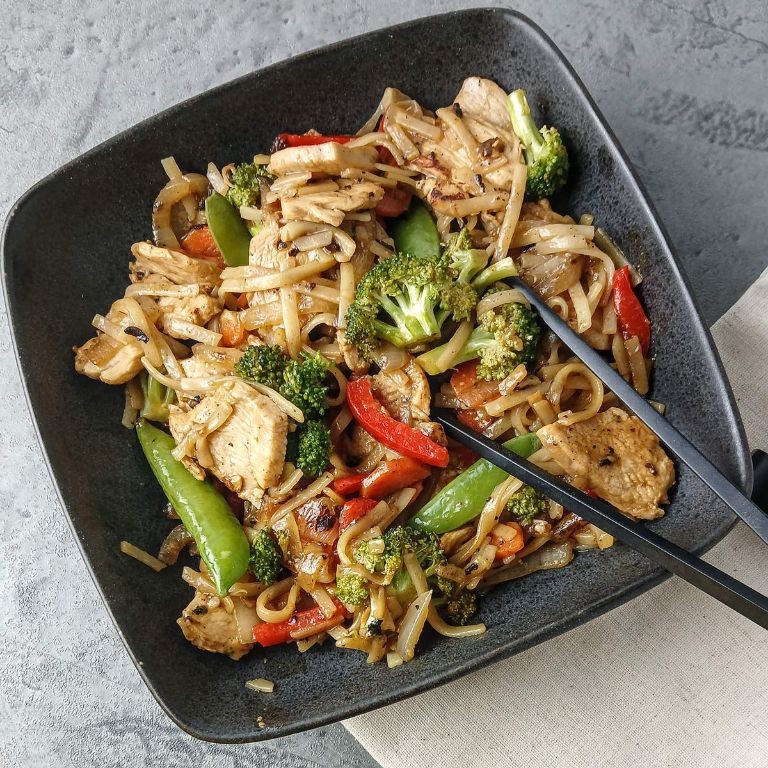
Teriyaki Chicken and Vegetable Stir-Fry with Brown Rice

Pulling together a quick, healthy dinner doesn’t have to mean sacrificing flavor—just ask this teriyaki chicken and vegetable stir-fry with brown rice, which has become my go-to on busy weeknights. I love how the sweet-savory sauce clings to every bite, and it’s a fantastic way to use up whatever veggies are hanging out in the fridge. Honestly, it’s the kind of meal that makes you feel like you’ve got your life together, even when you’re scrambling to get dinner on the table.
Serving: 4 | Pre Time: 15 minutes | Cooking Time: 20 minutes
Ingredients
– 1 ½ lbs boneless, skinless chicken breasts, cut into 1-inch pieces (I like to pat them dry with a paper towel first—it helps them brown better)
– 2 cups cooked brown rice (I usually make a big batch on Sunday to have ready)
– 1 red bell pepper, thinly sliced
– 1 cup broccoli florets (fresh is my preference, but frozen works in a pinch)
– 1 medium carrot, julienned
– 3 cloves garlic, minced (don’t skimp here—it adds so much depth!)
– 1 tbsp fresh ginger, grated (I keep a knob in the freezer and grate it frozen—no peeling needed)
– ¼ cup low-sodium soy sauce
– 2 tbsp honey (local if you have it, for a touch of floral sweetness)
– 1 tbsp rice vinegar
– 1 tsp sesame oil (toasted is my favorite for that nutty aroma)
– 2 tbsp vegetable oil, divided
– 1 tbsp cornstarch mixed with 2 tbsp water (this slurry is key for thickening the sauce)
– 2 green onions, sliced, for garnish
– 1 tbsp sesame seeds, for garnish
Instructions
1. In a small bowl, whisk together ¼ cup low-sodium soy sauce, 2 tbsp honey, 1 tbsp rice vinegar, and 1 tsp sesame oil to make the teriyaki sauce; set aside.
2. Heat 1 tbsp vegetable oil in a large skillet or wok over medium-high heat until shimmering, about 1 minute.
3. Add 1 ½ lbs chicken pieces in a single layer and cook without stirring for 4–5 minutes, until browned on one side (this creates a nice sear—tip: don’t overcrowd the pan, or they’ll steam).
4. Flip the chicken and cook for another 3–4 minutes, until cooked through and no longer pink inside; transfer to a plate.
5. Add the remaining 1 tbsp vegetable oil to the same skillet.
6. Add 3 cloves minced garlic and 1 tbsp grated ginger; stir for 30 seconds, until fragrant (be careful not to burn it—tip: keep the heat medium to avoid bitterness).
7. Add 1 sliced red bell pepper, 1 cup broccoli florets, and 1 julienned carrot; stir-fry for 5–6 minutes, until vegetables are tender-crisp.
8. Return the cooked chicken to the skillet.
9. Pour the teriyaki sauce over the chicken and vegetables, stirring to coat everything evenly.
10. Give the cornstarch slurry a quick stir and add it to the skillet; cook for 1–2 minutes, until the sauce thickens and coats the back of a spoon (tip: this step ensures a glossy, clingy sauce—don’t skip it!).
11. Remove from heat.
12. Serve the stir-fry hot over 2 cups cooked brown rice, garnished with 2 sliced green onions and 1 tbsp sesame seeds.
Just out of the skillet, this dish is a vibrant mix of tender chicken and crisp-tender veggies, all glazed in that sticky-sweet teriyaki sauce. The brown rice soaks up every bit of flavor, making each forkful satisfyingly hearty. For a fun twist, try wrapping spoonfuls in lettuce leaves or topping it with a fried egg—it’s endlessly adaptable to whatever you’re craving.
Mediterranean Chicken and Rice Bowl with Tzatziki

Gathering around the table for a vibrant, fuss-free meal is one of my favorite weeknight rituals, and this Mediterranean Chicken and Rice Bowl with Tzatziki has become a go-to in our house. It’s packed with fresh flavors and comes together in about the time it takes to watch an episode of your favorite show—perfect for those evenings when you want something wholesome without a lot of fuss.
Serving: 4 | Pre Time: 15 minutes | Cooking Time: 25 minutes
Ingredients
– 1.5 lbs boneless, skinless chicken breasts, cut into 1-inch pieces (I like to pat them dry with a paper towel first for better browning)
– 1 cup long-grain white rice, rinsed until the water runs clear (this removes excess starch for fluffier rice)
– 2 cups low-sodium chicken broth (homemade if you have it, but store-bought works great too)
– 1 large cucumber, peeled and grated (I squeeze out the excess liquid with my hands to keep the tzatziki thick)
– 1 cup plain Greek yogurt (full-fat gives the creamiest texture)
– 2 tbsp fresh lemon juice (about half a lemon, and I always zest it first to save for garnish)
– 3 cloves garlic, minced (I press mine for a smoother paste)
– 2 tbsp extra virgin olive oil (my go-to for its fruity flavor)
– 1 tsp dried oregano
– 1/2 tsp ground cumin
– Salt and black pepper
– 1/4 cup chopped fresh dill (don’t skip this—it adds such a bright, herby punch)
– 1/2 cup crumbled feta cheese (I love the tangy saltiness it brings)
– 1/4 cup sliced Kalamata olives (pitted, because no one wants a surprise bite!)
Instructions
1. In a medium saucepan over high heat, bring the chicken broth to a boil, then stir in the rinsed rice. Tip: Rinsing the rice prevents it from becoming gummy.
2. Reduce the heat to low, cover the saucepan, and simmer the rice for 18 minutes, or until all the liquid is absorbed and the rice is tender. Remove from heat and let it sit, covered, for 5 minutes to steam.
3. While the rice cooks, season the chicken pieces evenly with salt, black pepper, dried oregano, and ground cumin.
4. Heat the extra virgin olive oil in a large skillet over medium-high heat until it shimmers, about 1 minute.
5. Add the chicken to the skillet in a single layer, cooking for 6-8 minutes, turning occasionally, until the pieces are golden brown and reach an internal temperature of 165°F. Tip: Avoid overcrowding the skillet to ensure even browning.
6. In a medium bowl, combine the grated cucumber, Greek yogurt, minced garlic, fresh lemon juice, and chopped dill. Stir until smooth, then season with salt and pepper to taste. Tip: Let the tzatziki chill in the refrigerator for at least 10 minutes to allow the flavors to meld.
7. Fluff the cooked rice with a fork and divide it evenly among four bowls.
8. Top each bowl with the cooked chicken, crumbled feta cheese, and sliced Kalamata olives.
9. Spoon a generous dollop of tzatziki over each bowl.
Delightfully fresh and satisfying, this bowl offers a wonderful contrast of textures—from the fluffy rice and juicy chicken to the cool, creamy tzatziki. I love serving it with a sprinkle of extra dill or a side of warm pita for scooping up every last bite.
Slow Cooker Chicken and Wild Rice Soup
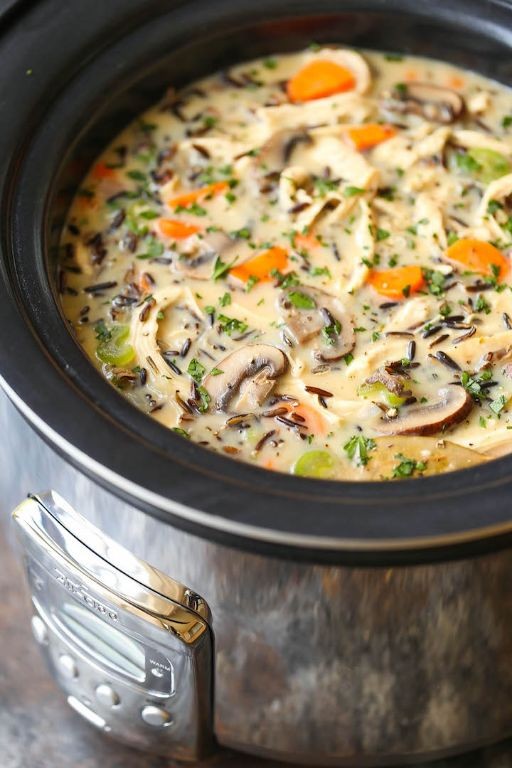
Venturing into the kitchen on a chilly evening always calls for something comforting and effortless, which is exactly why my slow cooker becomes my best friend. I remember one snowy afternoon when I whipped up this chicken and wild rice soup—the aroma filled the house, making everyone cozy and content, and it’s been a staple in my winter rotation ever since. It’s the kind of dish that simmers away while you tackle other tasks, leaving you with a hearty, flavorful meal that feels like a warm hug.
Serving: 6 | Pre Time: 15 minutes | Cooking Time: 6 hours
Ingredients
– 1.5 lbs boneless, skinless chicken breasts (I like to use organic for a cleaner taste)
– 1 cup wild rice blend (the nutty texture is key here)
– 1 large yellow onion, diced (I always keep these on hand for soups)
– 3 carrots, peeled and sliced into 1/4-inch rounds (fresh from the farmer’s market if possible)
– 3 celery stalks, chopped (the crispness adds a nice bite)
– 4 cloves garlic, minced (I’m generous with garlic for extra depth)
– 6 cups low-sodium chicken broth (homemade stock is my go-to when I have time)
– 1 cup whole milk (room temperature helps it blend smoothly)
– 2 tbsp unsalted butter (I prefer unsalted to control the seasoning)
– 1 tsp dried thyme (from my garden stash)
– 1/2 tsp black pepper (freshly ground for the best flavor)
– 1 tsp salt (adjust based on your broth’s saltiness)
Instructions
1. Place the boneless, skinless chicken breasts in the bottom of a 6-quart slow cooker.
2. Add the wild rice blend, diced yellow onion, sliced carrots, chopped celery, and minced garlic to the slow cooker.
3. Pour in the low-sodium chicken broth, ensuring all ingredients are submerged.
4. Stir in the dried thyme, black pepper, and salt until evenly distributed.
5. Cover the slow cooker with its lid and set it to cook on low heat for 6 hours, checking that the temperature reaches at least 165°F internally for the chicken.
6. After 6 hours, carefully remove the chicken breasts from the slow cooker using tongs and transfer them to a cutting board.
7. Shred the chicken with two forks into bite-sized pieces, a tip: let it cool slightly to avoid burning your hands.
8. Return the shredded chicken to the slow cooker.
9. In a small saucepan over medium heat, melt the unsalted butter until it bubbles lightly, about 2-3 minutes.
10. Gradually whisk in the whole milk until the mixture is smooth and heated through, avoiding boiling to prevent curdling.
11. Pour the milk mixture into the slow cooker and stir everything together until well combined.
12. Let the soup cook on low heat for an additional 15 minutes to allow the flavors to meld, stirring occasionally.
13. Taste and adjust seasoning if needed, but avoid over-salting since the broth may vary.
14. Ladle the soup into bowls and serve immediately.
Unbelievably creamy and rich, this soup boasts tender chicken and chewy wild rice in every spoonful, with the vegetables adding a subtle sweetness. I love garnishing it with a sprinkle of fresh parsley or a dollop of sour cream for an extra touch—perfect for dunking crusty bread on a cold night.
Greek Yogurt Marinated Chicken with Basmati Rice
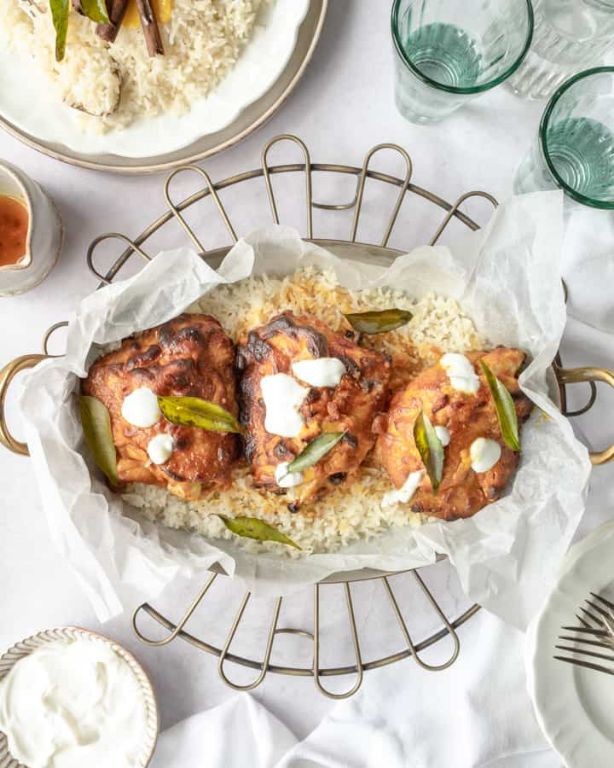
Diving into my kitchen after a busy week always calls for something comforting yet healthy, and this Greek Yogurt Marinated Chicken with Basmati Rice has become my go-to. I first tried it on a whim when I had leftover yogurt, and now it’s a staple that reminds me of cozy dinners with friends, where the tangy marinade always gets compliments. It’s simple enough for a weeknight but feels special enough for company.
Serving: 4 | Pre Time: 30 minutes (plus marinating) | Cooking Time: 25 minutes
Ingredients
– 1.5 lbs boneless, skinless chicken breasts (I like to slice them into even strips for quicker cooking)
– 1 cup plain Greek yogurt (full-fat is my preference for creaminess)
– 3 cloves garlic, minced (freshly minced makes all the difference)
– 2 tbsp extra virgin olive oil (my go-to for its fruity flavor)
– 1 tbsp lemon juice (freshly squeezed, never bottled)
– 1 tsp dried oregano (I keep a jar from my garden)
– 1 tsp salt (I use kosher salt for better control)
– 1/2 tsp black pepper
– 1 cup basmati rice (rinsed until the water runs clear to remove excess starch)
– 2 cups water (for perfectly fluffy rice)
– Fresh parsley, chopped (for garnish, optional but adds a pop of color)
Instructions
1. In a medium bowl, combine 1 cup Greek yogurt, 3 cloves minced garlic, 2 tbsp olive oil, 1 tbsp lemon juice, 1 tsp oregano, 1 tsp salt, and 1/2 tsp black pepper to make the marinade.
2. Add 1.5 lbs chicken strips to the bowl, tossing until fully coated in the marinade. Tip: Let it marinate in the refrigerator for at least 30 minutes or up to 4 hours for deeper flavor.
3. While the chicken marinates, rinse 1 cup basmati rice under cold water until the water runs clear to remove excess starch.
4. In a saucepan, combine the rinsed rice and 2 cups water. Bring to a boil over high heat, then reduce to low, cover, and simmer for 15 minutes until the water is absorbed and the rice is tender. Tip: Avoid lifting the lid during cooking to keep the steam in.
5. Heat a large skillet over medium-high heat. Add the marinated chicken strips in a single layer, cooking for 5-7 minutes per side until the internal temperature reaches 165°F and the outside is golden brown. Tip: Don’t overcrowd the pan to ensure even browning.
6. Remove the chicken from the skillet and let it rest for 5 minutes before slicing to retain juices.
7. Fluff the cooked basmati rice with a fork and divide it among plates.
8. Top the rice with the sliced chicken, garnishing with chopped fresh parsley if desired.
Buttery and tender from the yogurt marinade, the chicken pairs perfectly with the light, fluffy basmati rice for a meal that’s both satisfying and guilt-free. I love serving it with a side of roasted vegetables or a simple salad to round it out, and leftovers make for a delicious lunch the next day—just reheat gently to keep that juicy texture.
Cajun Spiced Chicken with Cauliflower Rice
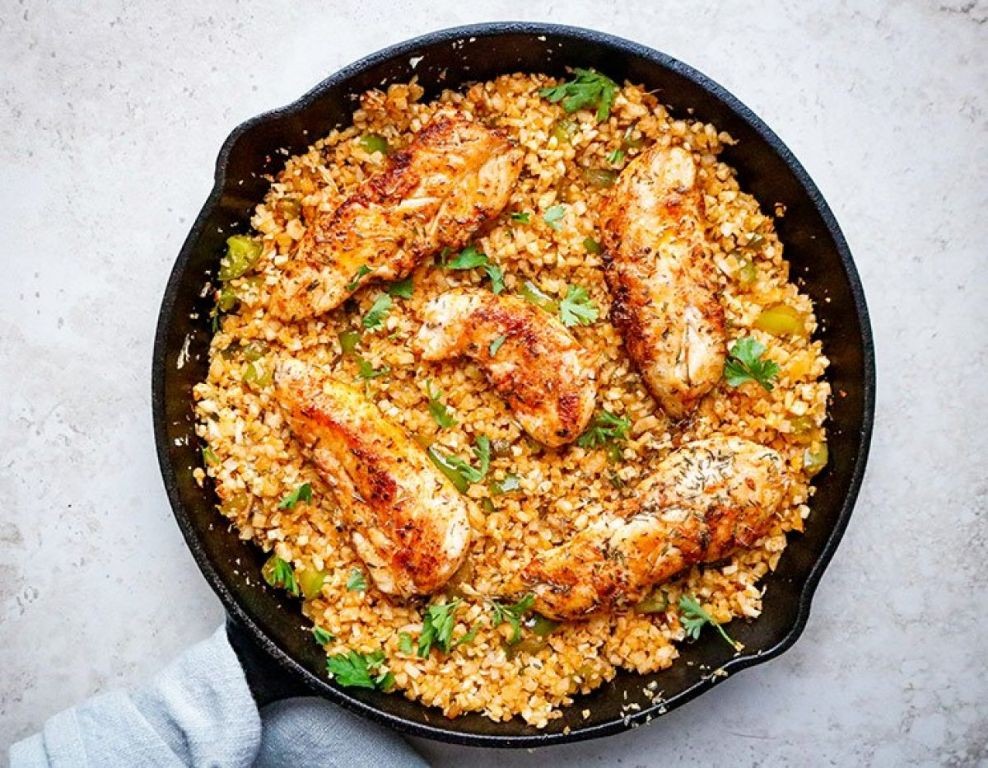
Every time I’m craving something hearty yet healthy, this Cajun Spiced Chicken with Cauliflower Rice comes to mind—it’s my go-to for a quick weeknight dinner that never fails to satisfy. I first whipped it up during a busy holiday season when I needed a flavorful escape from the usual leftovers, and now it’s a staple in my kitchen. Trust me, the bold spices and light cauliflower base make it a winner for any occasion.
Serving: 4 | Pre Time: 15 minutes | Cooking Time: 25 minutes
Ingredients
– 1.5 lbs boneless, skinless chicken breasts, cut into 1-inch cubes (I always pat them dry with paper towels for better browning)
– 2 tbsp Cajun seasoning, store-bought or homemade (my homemade blend has a bit less salt, so adjust to your preference)
– 2 tbsp extra virgin olive oil, my go-to for its fruity notes
– 1 large head cauliflower, riced (about 4 cups—I use a food processor for speed, but a box grater works too)
– 1 medium yellow onion, finely diced (I like the sweetness it adds)
– 3 cloves garlic, minced (fresh is best here for that punchy flavor)
– 1 red bell pepper, diced (it adds a nice crunch and color)
– 1 cup chicken broth, low-sodium to control the saltiness
– 1/4 cup fresh parsley, chopped (for a bright finish)
– Salt and black pepper, as needed (I season in layers throughout)
Instructions
1. In a medium bowl, toss the chicken cubes with 1 tbsp of the Cajun seasoning until evenly coated, and let it sit for 5 minutes to absorb the flavors.
2. Heat 1 tbsp of olive oil in a large skillet over medium-high heat until it shimmers, about 2 minutes.
3. Add the chicken to the skillet in a single layer, cooking for 5–7 minutes until browned on all sides and cooked through to an internal temperature of 165°F, then transfer to a plate and set aside.
4. In the same skillet, add the remaining 1 tbsp of olive oil and reduce the heat to medium.
5. Sauté the diced onion and red bell pepper for 4–5 minutes until softened and slightly caramelized.
6. Stir in the minced garlic and cook for 1 minute until fragrant, being careful not to let it burn.
7. Add the riced cauliflower to the skillet, stirring to combine with the vegetables, and cook for 3–4 minutes until it starts to soften.
8. Pour in the chicken broth and remaining 1 tbsp of Cajun seasoning, stirring well to coat everything evenly.
9. Simmer the mixture uncovered for 5–7 minutes, or until the cauliflower is tender and most of the liquid has evaporated, stirring occasionally to prevent sticking.
10. Return the cooked chicken to the skillet, tossing gently to reheat and combine with the cauliflower rice for 2 minutes.
11. Remove from heat and stir in the chopped parsley, seasoning with salt and black pepper to taste.
12. Serve immediately while hot. What I love most is how the tender, spiced chicken pairs with the light, fluffy cauliflower rice—it’s a texture dream with just the right kick. For a creative twist, top it with a squeeze of lime or a dollop of Greek yogurt to balance the heat, making it perfect for sharing with friends or enjoying as leftovers the next day.
One-Pan Garlic Butter Chicken and Rice
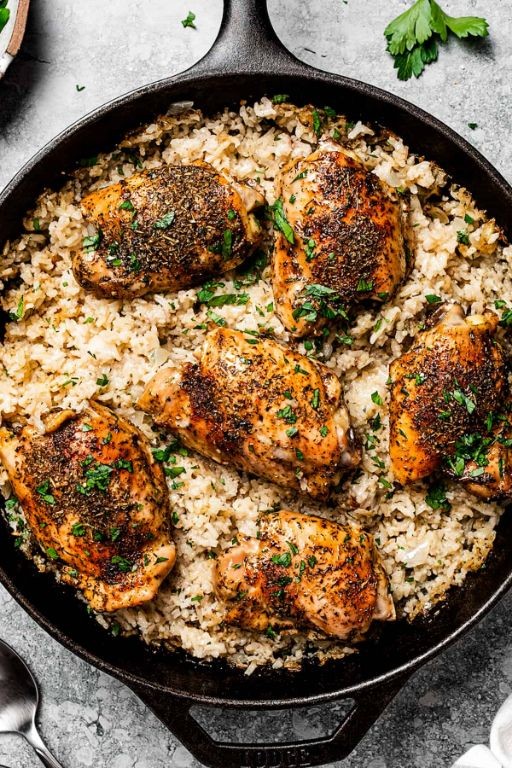
Busy weeknights call for simple solutions, and this one-pan wonder has become my family’s favorite solution to the “what’s for dinner?” dilemma. I first made it during a hectic holiday season when I needed something comforting yet effortless, and now it’s in regular rotation—especially when I’m craving that cozy garlic butter aroma filling the kitchen.
Serving: 4 | Pre Time: 10 minutes | Cooking Time: 30 minutes
Ingredients
– 4 boneless, skinless chicken thighs (I find thighs stay juicier than breasts)
– 1 cup long-grain white rice (rinsed until the water runs clear—trust me, it makes a difference)
– 2 cups chicken broth (I use low-sodium so I can control the salt)
– 4 tbsp unsalted butter (salted works too, but I prefer unsalted for balance)
– 6 garlic cloves, minced (freshly minced, not jarred—it’s worth the extra minute)
– 1 tsp paprika (smoked paprika adds a nice depth if you have it)
– 1/2 tsp dried thyme (or fresh if you’re feeling fancy)
– Salt and black pepper (to season the chicken generously)
– 2 tbsp chopped fresh parsley (for garnish, but it brightens everything up)
Instructions
1. Pat the chicken thighs dry with paper towels and season both sides generously with salt, black pepper, and paprika.
2. Heat a large, oven-safe skillet over medium-high heat and add 2 tbsp of butter until melted and foamy, about 1 minute.
3. Place the chicken thighs in the skillet and sear for 4–5 minutes per side until golden brown, then transfer to a plate—they’ll finish cooking later.
4. Tip: Don’t overcrowd the pan; sear in batches if needed for even browning.
5. Reduce the heat to medium and add the remaining 2 tbsp of butter to the same skillet.
6. Add the minced garlic and sauté for 30–45 seconds until fragrant but not browned, stirring constantly to prevent burning.
7. Stir in the rinsed rice, dried thyme, and a pinch of salt, coating the rice in the garlic butter for about 1 minute.
8. Pour in the chicken broth and scrape up any browned bits from the bottom of the pan—that’s flavor gold!
9. Tip: Bring the broth to a gentle simmer before adding the chicken back.
10. Return the seared chicken thighs to the skillet, nestling them into the rice mixture.
11. Cover the skillet tightly with a lid or aluminum foil and reduce the heat to low.
12. Simmer for 20–25 minutes, without peeking, until the rice is tender and has absorbed most of the liquid.
13. Tip: Check for doneness by fluffing the rice with a fork; if it’s still crunchy, add a splash of broth and cook 5 more minutes.
14. Remove from heat and let it rest, covered, for 5 minutes to allow the flavors to meld.
15. Garnish with chopped fresh parsley before serving.
Creating this dish feels like a warm hug in a pan, with the rice soaking up all the savory garlic butter goodness and the chicken staying incredibly tender. I love how the edges of the rice get slightly crispy if you let it sit a bit longer. Sometimes, I’ll squeeze a little lemon over the top for a zesty kick or serve it with a simple green salad to round out the meal.
Turmeric Coconut Chicken with Jasmine Rice
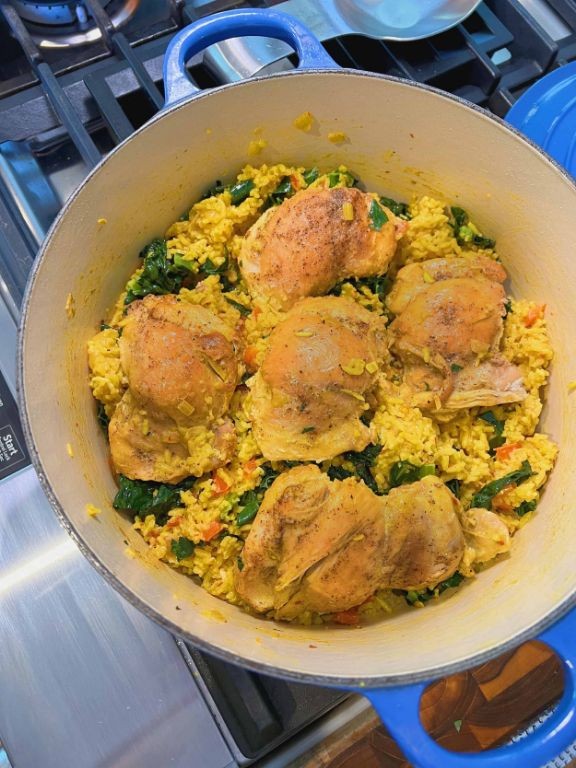
Zesty and aromatic, this turmeric coconut chicken with jasmine rice is my go-to cozy meal when I want something comforting yet vibrant. I first discovered this dish during a rainy weekend when I was craving something warm and golden—the turmeric gives it that beautiful sunset hue I adore. It’s become a staple in my kitchen because it’s surprisingly simple but feels like a special treat.
Serving: 4 | Pre Time: 15 minutes | Cooking Time: 30 minutes
Ingredients
– 1.5 lbs boneless, skinless chicken thighs, cut into 1-inch pieces (I prefer thighs for their juiciness)
– 1 cup jasmine rice, rinsed until the water runs clear (this removes excess starch for fluffier rice)
– 1 can (13.5 oz) full-fat coconut milk (don’t skimp—the richness makes the sauce)
– 1 medium yellow onion, finely chopped
– 3 cloves garlic, minced (I always use fresh for that punch)
– 1 tbsp fresh ginger, grated (keep the peel on while grating—it’s easier!)
– 2 tsp ground turmeric
– 1 tsp ground cumin
– 1/2 tsp red pepper flakes (adjust if you like less heat)
– 2 tbsp coconut oil, melted (it adds a subtle tropical note)
– 1 tbsp fish sauce (my secret umami booster)
– 1 lime, cut into wedges for serving
– Fresh cilantro, chopped, for garnish (I love a big handful)
– Salt, to taste (I use about 1 tsp kosher salt total)
Instructions
1. In a medium pot, combine 1 cup jasmine rice with 1.5 cups water and a pinch of salt; bring to a boil over high heat.
2. Once boiling, reduce heat to low, cover, and simmer for 15 minutes until the water is absorbed and rice is tender. Tip: Don’t peek—keeping the lid on ensures even cooking.
3. While rice cooks, heat 2 tbsp coconut oil in a large skillet over medium-high heat until shimmering, about 2 minutes.
4. Add 1 medium yellow onion, finely chopped, and sauté for 5 minutes until softened and translucent.
5. Stir in 3 cloves garlic, minced, and 1 tbsp fresh ginger, grated; cook for 1 minute until fragrant.
6. Add 1.5 lbs boneless, skinless chicken thighs, cut into 1-inch pieces, and cook for 6 minutes, stirring occasionally, until lightly browned on all sides.
7. Sprinkle in 2 tsp ground turmeric, 1 tsp ground cumin, and 1/2 tsp red pepper flakes; stir for 30 seconds to toast the spices.
8. Pour in 1 can (13.5 oz) full-fat coconut milk and 1 tbsp fish sauce; bring to a gentle simmer.
9. Reduce heat to medium-low and cook uncovered for 15 minutes, stirring occasionally, until the chicken is cooked through and the sauce thickens slightly. Tip: If the sauce gets too thick, add a splash of water.
10. Season with salt to taste—I use about 1 tsp kosher salt here, but start with less and adjust.
11. Fluff the cooked jasmine rice with a fork and divide among bowls.
12. Spoon the turmeric coconut chicken over the rice, garnish with fresh cilantro, chopped, and serve with lime wedges on the side. Tip: Squeeze lime juice right before eating for a bright finish.
Comforting and vibrant, this dish has a creamy coconut sauce that clings to the tender chicken, with the jasmine rice soaking up all those golden turmeric flavors. I love serving it in shallow bowls with extra lime wedges for squeezing—it’s perfect for a cozy dinner that still feels a bit fancy.
Chicken and Broccoli Rice Casserole (Light Version)
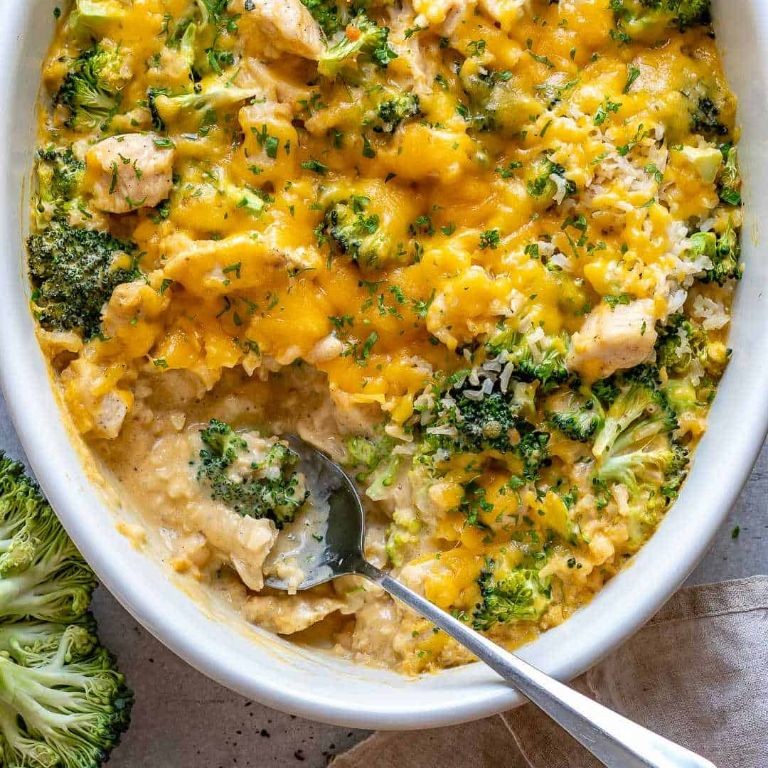
Perfect for those busy weeknights when you’re craving something cozy but don’t want the heavy, creamy casserole of old—this lighter version is my go-to. I started making it a few years ago when my sister was trying to eat healthier, and now it’s a family favorite that feels indulgent without the guilt.
Serving: 6 | Pre Time: 15 minutes | Cooking Time: 40 minutes
Ingredients
- 1 tablespoon extra virgin olive oil (my go-to for sautéing—it adds a nice fruity note)
- 1 pound boneless, skinless chicken breasts, cut into 1-inch cubes
- 1 small yellow onion, finely diced (I like the sweetness it brings)
- 2 cloves garlic, minced
- 3 cups fresh broccoli florets (about 1 medium head—I chop them small so they cook evenly)
- 1 ½ cups long-grain white rice, rinsed
- 2 ½ cups low-sodium chicken broth
- 1 cup plain Greek yogurt (I use full-fat for creaminess, but any works)
- 1 cup shredded sharp cheddar cheese (divided—half for mixing, half for topping)
- ½ teaspoon kosher salt
- ¼ teaspoon black pepper
- ¼ teaspoon paprika (for a hint of smokiness)
Instructions
- Preheat your oven to 375°F and lightly grease a 9×13-inch baking dish.
- Heat the olive oil in a large skillet over medium-high heat until shimmering, about 1 minute.
- Add the chicken cubes and cook for 5–7 minutes, stirring occasionally, until browned on all sides and no longer pink inside.
- Transfer the chicken to a plate and set aside. Tip: Letting the chicken rest here keeps it juicy.
- In the same skillet, add the diced onion and cook for 3–4 minutes over medium heat until softened.
- Add the minced garlic and cook for 30 seconds, just until fragrant.
- Stir in the broccoli florets and rinsed rice, coating them in the onion-garlic mixture.
- Pour in the chicken broth and bring to a boil over high heat.
- Reduce heat to low, cover the skillet, and simmer for 15 minutes, until the rice is tender and liquid is absorbed. Tip: Don’t peek—keeping the lid on ensures even cooking.
- Remove from heat and stir in the Greek yogurt, half of the cheddar cheese, salt, pepper, and paprika until well combined.
- Fold in the cooked chicken, then transfer the mixture to the prepared baking dish.
- Sprinkle the remaining cheddar cheese evenly over the top.
- Bake in the preheated oven for 20 minutes, until the cheese is melted and bubbly and the edges are lightly golden. Tip: For extra browning, broil for the last 1–2 minutes, watching closely.
- Remove from the oven and let it cool for 5 minutes before serving.
Buttery rice soaks up all those savory flavors, while the broccoli stays tender-crisp for a nice bite. I love serving this straight from the dish with a simple side salad, or packing leftovers for lunch—it reheats beautifully in the microwave.
Honey Mustard Chicken with Wild Rice Pilaf

Cooking for a crowd during the holidays can be a challenge, but this honey mustard chicken with wild rice pilaf has become my go-to solution—it’s flavorful, comforting, and always a hit. I first made it for a potluck last winter when I needed something that felt special but wouldn’t keep me in the kitchen all day. The sweet and tangy glaze paired with the nutty rice creates a meal that’s both elegant and easy to love.
Serving: 4 | Pre Time: 15 minutes | Cooking Time: 40 minutes
Ingredients
– 4 boneless, skinless chicken breasts (I like to buy them thick-cut for juicier results)
– 1/4 cup honey (local wildflower honey adds a lovely floral note)
– 3 tbsp Dijon mustard (I prefer the grainy kind for extra texture)
– 2 tbsp extra virgin olive oil (my pantry staple for sautéing)
– 1 cup wild rice blend (the mix of grains gives a wonderful chew)
– 2 cups low-sodium chicken broth (homemade stock is ideal, but store-bought works fine)
– 1/2 cup diced onion (yellow onions are my favorite for their sweetness)
– 2 cloves garlic, minced (freshly minced makes all the difference)
– 1/4 tsp black pepper (freshly ground, if you have it)
– 1/4 tsp salt (I use sea salt for a cleaner flavor)
Instructions
1. Preheat your oven to 375°F (190°C) to ensure it’s ready for baking.
2. In a small bowl, whisk together 1/4 cup honey and 3 tbsp Dijon mustard until smooth to create the glaze.
3. Pat 4 chicken breasts dry with paper towels—this helps the glaze stick better.
4. Brush the honey mustard mixture evenly over both sides of the chicken breasts, reserving about 2 tbsp for later.
5. Heat 1 tbsp olive oil in a large oven-safe skillet over medium-high heat until it shimmers, about 2 minutes.
6. Place the chicken in the skillet and sear for 3-4 minutes per side until golden brown.
7. Transfer the skillet to the preheated oven and bake for 20-25 minutes, or until the internal temperature reaches 165°F (74°C).
8. While the chicken bakes, rinse 1 cup wild rice blend under cold water in a fine-mesh strainer to remove excess starch.
9. In a medium saucepan, heat the remaining 1 tbsp olive oil over medium heat.
10. Add 1/2 cup diced onion and sauté for 5 minutes until translucent and fragrant.
11. Stir in 2 cloves minced garlic and cook for 1 more minute, being careful not to burn it.
12. Add the rinsed rice to the saucepan and toast for 2 minutes, stirring constantly to enhance its nutty flavor.
13. Pour in 2 cups chicken broth, 1/4 tsp salt, and 1/4 tsp black pepper, then bring to a boil.
14. Reduce the heat to low, cover the saucepan, and simmer for 25-30 minutes until the rice is tender and liquid is absorbed.
15. Remove the chicken from the oven and brush with the reserved honey mustard glaze for a glossy finish.
16. Let the chicken rest for 5 minutes before slicing to keep it juicy.
17. Fluff the rice pilaf with a fork and serve alongside the sliced chicken.
After baking, the chicken emerges tender with a sticky-sweet crust, while the pilaf offers a satisfying chew from the wild rice blend. I love pairing it with a simple green salad to balance the richness, or you could spoon any extra glaze over the rice for an extra flavor boost.
Skinny Chicken Fried Rice with Egg Whites
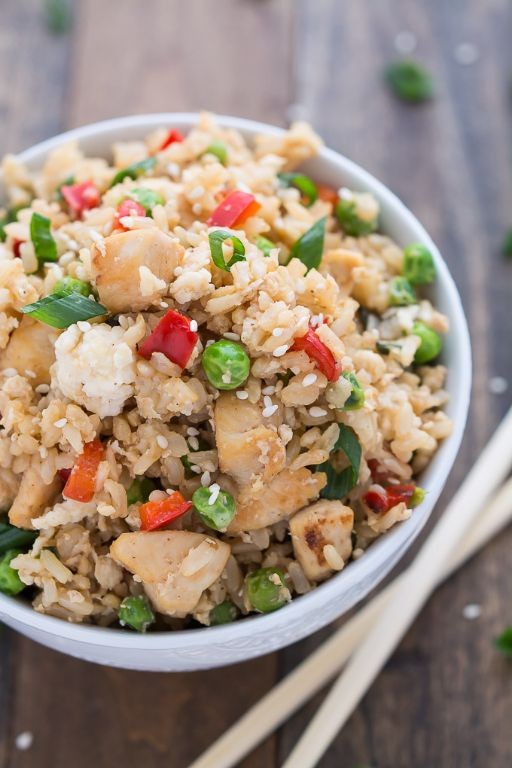
Just when I thought my weeknight dinner rotation couldn’t get any more streamlined, this skinny chicken fried rice with egg whites swooped in to save the day—it’s become my go-to for using up leftover rice and that lonely chicken breast in the fridge, all while keeping things light and satisfying.
Serving: 4 | Pre Time: 15 minutes | Cooking Time: 15 minutes
Ingredients
– 1 tablespoon extra virgin olive oil (my trusty bottle is always within arm’s reach)
– 1 boneless, skinless chicken breast, cut into ½-inch cubes (I find this size cooks evenly without drying out)
– ½ cup chopped yellow onion (I keep mine diced and ready in the freezer for moments like this)
– ½ cup frozen peas and carrots mix (no shame in this shortcut—it’s a lifesaver on busy nights)
– 3 cups cooked and cooled white rice (day-old rice from the fridge works best; it fries up perfectly without getting mushy)
– 3 large egg whites (I crack whole eggs and save the yolks for another recipe, like a quick custard)
– 2 tablespoons low-sodium soy sauce (I prefer this to control the saltiness, but you can adjust to your pantry staples)
– 1 teaspoon sesame oil (just a drizzle adds that authentic fried rice aroma I love)
– ¼ teaspoon ground black pepper (freshly ground from my pepper mill makes all the difference)
Instructions
1. Heat the extra virgin olive oil in a large nonstick skillet or wok over medium-high heat until it shimmers, about 1 minute.
2. Add the cubed chicken breast to the skillet and cook, stirring occasionally, until it turns opaque and reaches an internal temperature of 165°F, about 5–7 minutes.
3. Transfer the cooked chicken to a plate and set it aside, covering loosely with foil to keep warm.
4. In the same skillet, add the chopped yellow onion and frozen peas and carrots mix, cooking over medium heat until the onion softens and turns translucent, about 3–4 minutes.
5. Push the vegetable mixture to one side of the skillet and pour the egg whites into the empty space, scrambling them with a spatula until fully set, about 1–2 minutes.
6. Add the cooked and cooled white rice to the skillet, breaking up any clumps with the spatula, and stir to combine with the vegetables and egg whites.
7. Return the cooked chicken to the skillet, then pour in the low-sodium soy sauce, sesame oil, and ground black pepper, stirring everything together until evenly coated and heated through, about 2–3 minutes.
8. Remove the skillet from the heat and let the fried rice rest for 1 minute before serving to allow the flavors to meld.
Rely on this dish for a quick, protein-packed meal that never disappoints—the rice gets delightfully crispy in spots, while the egg whites keep it light and fluffy. I love topping mine with a sprinkle of green onions or a dash of sriracha for an extra kick, and it reheats beautifully for lunch the next day.
Spinach and Feta Stuffed Chicken with Herbed Rice
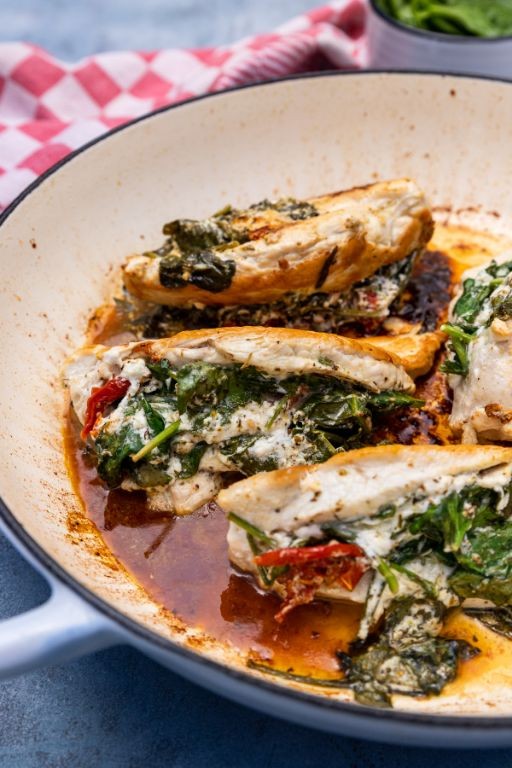
Kind of like that cozy sweater you reach for on a crisp fall evening, this recipe is my ultimate comfort food. It’s a dish I turn to when I want something impressive for guests but secretly easy enough for a Tuesday night, and it never fails to make the whole house smell incredible.
Serving: 4 | Pre Time: 20 minutes | Cooking Time: 40 minutes
Ingredients
– 4 boneless, skinless chicken breasts (I always pat them super dry with paper towels—it helps the sear)
– 5 oz fresh spinach (a whole clamshell container, roughly chopped)
– 4 oz feta cheese, crumbled (I love the block feta in brine for its creaminess)
– 2 cloves garlic, minced (fresh is non-negotiable for me here)
– 1 tbsp extra virgin olive oil (my go-to for everything)
– 1 cup long-grain white rice
– 2 cups chicken broth (low-sodium so I can control the salt)
– 1 tbsp dried oregano
– 1 tsp dried thyme
– Salt and black pepper
Instructions
1. Preheat your oven to 375°F (190°C).
2. In a medium bowl, combine the chopped spinach, crumbled feta, and minced garlic.
3. Using a sharp knife, carefully cut a horizontal pocket into the thickest side of each chicken breast. Tip: Don’t cut all the way through; leave about a ½-inch border to keep the filling secure.
4. Evenly stuff each chicken pocket with the spinach-feta mixture.
5. Season the outside of the stuffed chicken breasts generously with salt and black pepper.
6. Heat the olive oil in a large, oven-safe skillet over medium-high heat until it shimmers.
7. Place the chicken breasts in the hot skillet and sear for 3-4 minutes per side, until deeply golden brown. Tip: Don’t move them while searing to get that perfect crust.
8. Remove the skillet from the heat (keep the chicken in it).
9. To the same skillet, around the chicken, add the rice, chicken broth, oregano, and thyme. Stir gently to combine.
10. Bring the liquid to a simmer, then immediately cover the skillet tightly with a lid or foil.
11. Transfer the covered skillet to the preheated oven and bake for 25 minutes. Tip: No peeking! This keeps the steam in for perfectly fluffy rice.
12. After 25 minutes, remove the skillet from the oven. Let it rest, covered, for 5 minutes.
13. Carefully uncover and check that the chicken’s internal temperature has reached 165°F and the rice has absorbed all the liquid.
Every bite of this chicken is incredibly juicy, with the warm, salty feta and wilted spinach creating a creamy pocket of flavor. The herbed rice cooks right in the pan juices, becoming fragrant and pilaf-like. I love serving it straight from the skillet at the table for a rustic, family-style meal that always feels special.
Balsamic Glazed Chicken with Farro Rice
Holiday chaos got you craving something wholesome yet impressive? I whipped up this Balsamic Glazed Chicken with Farro Rice last week when my family descended for an early Christmas visit—it’s become my new go-to for feeding a crowd without spending all day in the kitchen. The sweet-tangy glaze and hearty farro make it feel special, but it’s surprisingly simple to pull together.
Serving: 4 | Pre Time: 15 minutes | Cooking Time: 35 minutes
Ingredients
– 1.5 lbs boneless, skinless chicken breasts (I like to buy them thick-cut for juicier results)
– 1/2 cup balsamic vinegar (a good-quality one makes all the difference—I splurge on a aged bottle for this)
– 2 tbsp honey (local raw honey is my favorite for its floral notes)
– 2 cloves garlic, minced (freshly minced, please—it beats the jarred stuff every time)
– 1 tbsp extra virgin olive oil (my go-to for sautéing; it adds a lovely fruity base)
– 1 cup uncooked farro (I opt for pearled farro since it cooks faster and has a nice chew)
– 2 cups chicken broth (low-sodium so I can control the seasoning)
– 1/2 tsp salt (I use fine sea salt for even distribution)
– 1/4 tsp black pepper (freshly ground adds a pop of flavor)
– Fresh parsley, chopped (for garnish—it brightens up the whole dish)
Instructions
1. Pat the chicken breasts dry with paper towels to ensure a good sear.
2. Season both sides of the chicken evenly with the salt and black pepper.
3. Heat the extra virgin olive oil in a large skillet over medium-high heat until it shimmers, about 2 minutes.
4. Add the chicken to the skillet and cook for 6-7 minutes per side, or until golden brown and the internal temperature reaches 165°F on a meat thermometer.
5. Remove the chicken from the skillet and set it aside on a plate to rest, tented loosely with foil.
6. In the same skillet, reduce the heat to medium and add the minced garlic, sautéing for 1 minute until fragrant.
7. Pour in the balsamic vinegar and honey, stirring to combine, and let it simmer for 5-7 minutes until the mixture thickens to a syrup-like consistency that coats the back of a spoon.
8. While the glaze simmers, rinse the farro under cold water in a fine-mesh strainer to remove any excess starch.
9. In a medium saucepan, combine the rinsed farro and chicken broth, bringing it to a boil over high heat.
10. Once boiling, reduce the heat to low, cover the saucepan, and simmer the farro for 25 minutes, or until tender but still chewy and all the liquid is absorbed.
11. Return the rested chicken to the skillet with the balsamic glaze, turning to coat each piece evenly and heating through for 2 minutes.
12. Fluff the cooked farro with a fork and divide it among four plates.
13. Top each serving of farro with a glazed chicken breast.
14. Drizzle any remaining glaze from the skillet over the chicken and farro.
15. Garnish with the chopped fresh parsley before serving.
Perfectly balanced, this dish offers tender chicken with a sticky-sweet glaze that pairs wonderfully with the nutty, chewy farro. I love serving it with a simple arugula salad on the side for a fresh contrast, or doubling the farro for leftovers that reheat beautifully the next day.
Sesame Ginger Chicken with Brown Rice and Steamed Veggies
Every time I need a comforting yet healthy weeknight dinner that feels like a hug in a bowl, I turn to this sesame ginger chicken. It’s the perfect balance of savory, slightly sweet, and packed with fresh veggies—plus, it makes fantastic leftovers for lunch the next day.
Serving: 4 | Pre Time: 15 minutes | Cooking Time: 25 minutes
Ingredients
– 1.5 lbs boneless, skinless chicken breasts, cut into 1-inch cubes (I find this size cooks evenly)
– 1 cup brown rice, rinsed (I love the nutty flavor it adds)
– 2 cups water, for cooking the rice
– 2 tbsp avocado oil, divided (my high-heat favorite for searing)
– 3 tbsp low-sodium soy sauce
– 2 tbsp honey (local if you have it—it makes a difference!)
– 1 tbsp toasted sesame oil
– 1 tbsp fresh ginger, finely grated (don’t skip the fresh stuff—it’s key)
– 2 cloves garlic, minced
– 1 tbsp rice vinegar
– 1 tsp cornstarch, mixed with 1 tbsp cold water
– 4 cups mixed veggies like broccoli florets and sliced carrots, for steaming
– 2 green onions, thinly sliced, for garnish
– 1 tbsp sesame seeds, for garnish
Instructions
1. In a medium saucepan, combine 1 cup rinsed brown rice and 2 cups water. Bring to a boil over high heat.
2. Once boiling, reduce heat to low, cover, and simmer for 25 minutes, or until water is absorbed and rice is tender. Remove from heat and let sit, covered, for 5 minutes. Tip: Don’t peek while it’s simmering—this keeps the steam in for perfect rice.
3. While rice cooks, pat 1.5 lbs chicken cubes dry with paper towels to ensure a good sear.
4. Heat 1 tbsp avocado oil in a large skillet over medium-high heat until shimmering, about 2 minutes.
5. Add chicken to skillet in a single layer. Cook without stirring for 4-5 minutes, until golden brown on one side.
6. Flip chicken and cook for another 4-5 minutes, until cooked through and internal temperature reaches 165°F. Transfer to a plate.
7. In a small bowl, whisk together 3 tbsp soy sauce, 2 tbsp honey, 1 tbsp sesame oil, 1 tbsp grated ginger, 2 cloves minced garlic, and 1 tbsp rice vinegar.
8. Reduce skillet heat to medium. Pour sauce into skillet and bring to a simmer, scraping up any browned bits from the chicken.
9. Stir in 1 tsp cornstarch mixed with 1 tbsp cold water. Cook for 1-2 minutes, stirring constantly, until sauce thickens slightly. Tip: The cornstarch slurry should be cold to prevent clumping.
10. Return cooked chicken to skillet, tossing to coat in sauce. Remove from heat.
11. While sauce thickens, steam 4 cups mixed veggies in a steamer basket over boiling water for 5-7 minutes, until crisp-tender. Tip: Don’t overcook—they should still have a bit of crunch.
12. Fluff cooked brown rice with a fork.
13. Serve chicken and sauce over brown rice with steamed veggies on the side.
14. Garnish with 2 sliced green onions and 1 tbsp sesame seeds.
What I love most is how the sticky ginger sauce clings to the tender chicken, contrasting with the fluffy brown rice and crisp veggies. For a fun twist, try wrapping it all in lettuce cups for a hands-on meal that’s always a hit with my family.
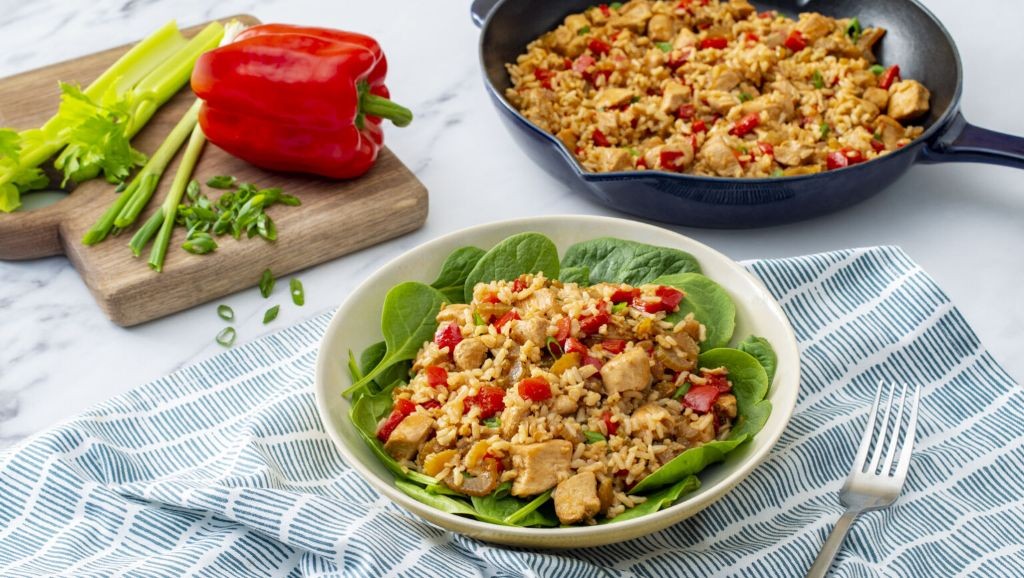
Low-Sodium Chicken and Rice Stir-Fry
Finally, a stir-fry that doesn’t leave me reaching for a glass of water! I love a good chicken and rice dish, but so many are loaded with salty sauces. This low-sodium version is my weeknight hero—it’s flavorful, filling, and feels like a hug in a bowl.
Serving: 4 | Pre Time: 15 minutes | Cooking Time: 20 minutes
Ingredients
– 1.5 lbs boneless, skinless chicken breasts, cut into 1-inch cubes (I find this size cooks evenly)
– 1.5 cups long-grain white rice, rinsed (rinsing removes excess starch for fluffier rice)
– 2 tbsp avocado oil, divided (my high-heat favorite for stir-frying)
– 1 large yellow onion, thinly sliced
– 3 cloves garlic, minced (fresh is best here for that punchy aroma)
– 1 red bell pepper, cut into thin strips
– 1 cup frozen peas, no need to thaw
– 3 tbsp low-sodium soy sauce (I always check the label for under 140mg sodium per serving)
– 1 tbsp rice vinegar
– 1 tsp ground ginger (or 1 tbsp fresh grated if I have it)
– 1/2 tsp freshly ground black pepper
– 1/4 cup chopped fresh cilantro for garnish (it adds such a bright finish)
Instructions
1. In a medium saucepan, combine the rinsed rice with 3 cups of water and bring to a boil over high heat.
2. Once boiling, reduce the heat to low, cover the saucepan tightly, and simmer the rice for 15 minutes, or until all the water is absorbed and the rice is tender. (Tip: Don’t peek while it’s simmering to keep the steam in!)
3. Remove the saucepan from the heat and let the rice sit, covered, for 5 minutes to finish steaming.
4. While the rice cooks, pat the chicken cubes dry with a paper towel to ensure a good sear.
5. Heat 1 tablespoon of avocado oil in a large skillet or wok over medium-high heat until it shimmers, about 1 minute.
6. Add the chicken cubes to the hot skillet in a single layer and cook for 5-6 minutes, stirring occasionally, until the chicken is browned on all sides and reaches an internal temperature of 165°F.
7. Transfer the cooked chicken to a clean plate and set it aside.
8. Add the remaining 1 tablespoon of avocado oil to the same skillet.
9. Add the sliced onion to the skillet and cook for 3-4 minutes, stirring frequently, until it becomes soft and translucent.
10. Add the minced garlic and cook for 1 more minute, stirring constantly, until fragrant. (Tip: Watch the garlic closely so it doesn’t burn!)
11. Add the bell pepper strips to the skillet and cook for 3-4 minutes, stirring occasionally, until they begin to soften.
12. Stir in the frozen peas and cook for 2 minutes, just until they are heated through.
13. Return the cooked chicken to the skillet with the vegetables.
14. In a small bowl, whisk together the low-sodium soy sauce, rice vinegar, ground ginger, and black pepper.
15. Pour the sauce mixture over the chicken and vegetables in the skillet.
16. Add the cooked rice to the skillet and gently toss everything together until the rice is evenly coated with the sauce and heated through, about 2-3 minutes. (Tip: Use a folding motion to keep the rice grains intact.)
17. Remove the skillet from the heat and stir in the chopped cilantro.
18. Serve the stir-fry immediately while hot. Comes together beautifully, the rice is perfectly separate and fluffy, soaking up the savory, ginger-kissed sauce without any salt overload. I love topping mine with a squeeze of lime or a sprinkle of sesame seeds for a little extra crunch.
Buffalo Chicken Stuffed Peppers with Quinoa Rice

Tired of the same old buffalo chicken dip? I was too, until I transformed those classic flavors into a wholesome, satisfying meal with these Buffalo Chicken Stuffed Peppers with Quinoa Rice. It’s the perfect solution for a busy weeknight when you crave something comforting yet nutritious, and it’s become a regular in my dinner rotation ever since I first experimented with the idea.
Serving: 4 | Pre Time: 15 minutes | Cooking Time: 35 minutes
Ingredients
– 4 large bell peppers (any color, but I love the vibrant red ones for a pop of color)
– 1 lb ground chicken (I find 93% lean works best for flavor without being too greasy)
– 1 cup cooked quinoa (I like to cook a big batch on Sundays to have on hand)
– 1/2 cup Frank’s RedHot Buffalo Sauce (this is non-negotiable for that authentic tangy kick!)
– 1/2 cup shredded sharp cheddar cheese (extra sharp gives a better melt, in my opinion)
– 1/4 cup blue cheese crumbles (optional, but I always add them for that classic buffalo pairing)
– 2 tbsp unsalted butter (I use Kerrygold for its rich flavor)
– 1/2 cup diced yellow onion (I keep these finely diced so they blend seamlessly)
– 2 cloves garlic, minced (freshly minced makes all the difference here)
– 1/2 tsp garlic powder
– 1/2 tsp onion powder
– 1/4 tsp black pepper
– 1/4 tsp salt (I use kosher salt for even seasoning)
Instructions
1. Preheat your oven to 375°F (190°C) and line a baking sheet with parchment paper for easy cleanup.
2. Slice the tops off the bell peppers and remove the seeds and membranes, then place them cut-side up on the prepared baking sheet.
3. In a large skillet over medium-high heat, melt the unsalted butter until it’s just bubbling, about 1 minute.
4. Add the diced yellow onion to the skillet and cook, stirring occasionally, until softened and translucent, about 5 minutes.
5. Add the minced garlic to the skillet and cook for 1 more minute, just until fragrant—be careful not to burn it!
6. Add the ground chicken to the skillet, breaking it up with a spatula, and cook until no pink remains, about 6-8 minutes.
7. Stir in the cooked quinoa, Frank’s RedHot Buffalo Sauce, garlic powder, onion powder, black pepper, and salt until everything is well combined and heated through, about 2 minutes.
8. Evenly divide the chicken and quinoa mixture among the bell peppers, packing it in gently.
9. Top each stuffed pepper with shredded sharp cheddar cheese and blue cheese crumbles, if using.
10. Bake in the preheated oven for 20-25 minutes, or until the peppers are tender and the cheese is melted and lightly golden.
11. Remove from the oven and let the peppers cool for 5 minutes before serving—this helps them set and makes them easier to handle.
Oozing with cheesy goodness and packed with spicy, savory flavor, these peppers offer a delightful contrast between the tender bell pepper shell and the hearty quinoa-chicken filling. I love serving them with a side of crisp celery sticks and extra buffalo sauce for dipping, or crumbling a few extra blue cheese bits on top for an extra tangy finish that really brings the whole dish together.
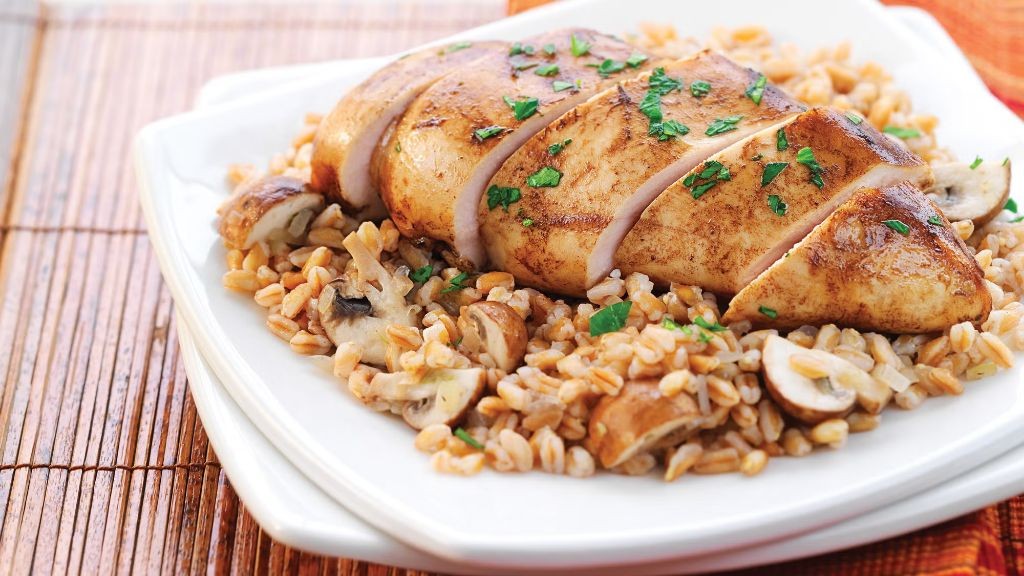
Mushroom and Thyme Chicken with Wild Rice
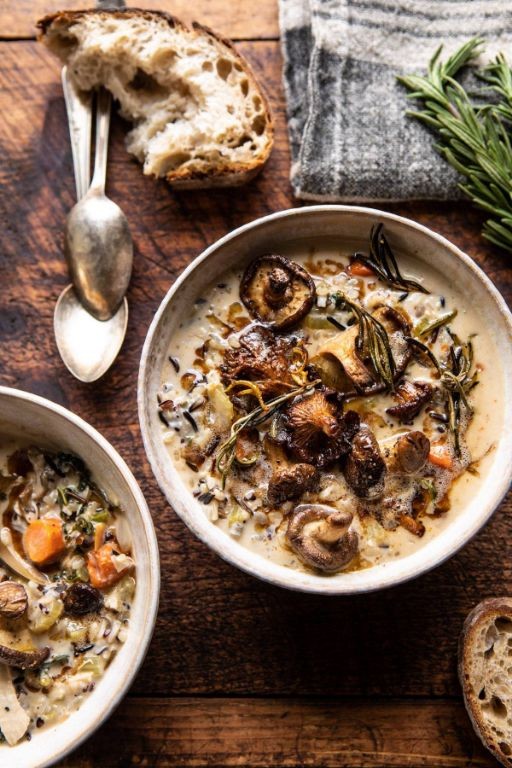
Finally, after a long day, I crave something hearty yet elegant—this mushroom and thyme chicken with wild rice is my go-to. It’s the kind of meal that feels like a warm hug, perfect for cozy evenings when you want to impress without stressing. I love how the earthy mushrooms and fragrant thyme come together, making the kitchen smell absolutely divine.
Serving: 4 | Pre Time: 15 minutes | Cooking Time: 45 minutes
Ingredients
– 1.5 lbs boneless, skinless chicken thighs, trimmed of excess fat (I find thighs stay juicier than breasts)
– 8 oz cremini mushrooms, sliced (baby bellas work great too—just avoid canned ones!)
– 1 cup wild rice blend, rinsed (I like the texture mix with brown rice)
– 2 cups low-sodium chicken broth (homemade stock is a game-changer if you have it)
– 1 large yellow onion, diced
– 3 cloves garlic, minced (fresh is best—I always keep a head on hand)
– 2 tbsp extra virgin olive oil (my go-to for sautéing)
– 1 tbsp fresh thyme leaves, stripped from stems (dried works in a pinch, but fresh adds brightness)
– 1 tsp kosher salt
– ½ tsp black pepper, freshly ground
Instructions
1. In a large skillet or Dutch oven, heat 1 tbsp olive oil over medium-high heat until shimmering, about 2 minutes.
2. Pat the chicken thighs dry with paper towels to ensure a good sear, then season both sides with ½ tsp salt and ¼ tsp pepper.
3. Add the chicken to the skillet in a single layer, cooking for 5–6 minutes per side until golden brown and internal temperature reaches 165°F; remove and set aside on a plate.
4. Tip: Don’t overcrowd the pan—sear in batches if needed to avoid steaming.
5. Reduce heat to medium, add the remaining 1 tbsp olive oil, and sauté the diced onion for 4–5 minutes until softened and translucent.
6. Stir in the minced garlic and sliced mushrooms, cooking for 6–8 minutes until mushrooms release their liquid and brown slightly.
7. Tip: Let the mushrooms sit undisturbed for a minute to develop a nice caramelized crust.
8. Add the rinsed wild rice blend to the skillet, toasting for 1 minute while stirring constantly to coat with the oil and aromatics.
9. Pour in the chicken broth, scraping up any browned bits from the bottom of the pan for extra flavor.
10. Bring the mixture to a boil, then reduce heat to low, cover, and simmer for 35–40 minutes until rice is tender and liquid is absorbed.
11. Tip: Check at 30 minutes—if rice is still firm, add a splash of broth and cook longer.
12. Stir in the fresh thyme leaves, remaining ½ tsp salt, and ¼ tsp pepper.
13. Return the seared chicken thighs to the skillet, nestling them into the rice, and heat through for 3–4 minutes until warmed.
14. Remove from heat and let rest for 5 minutes before serving.
Wondering how to elevate this dish? The wild rice adds a delightful chewiness that contrasts beautifully with the tender chicken, while the thyme infuses every bite with an herby aroma. Serve it straight from the skillet for a rustic touch, or garnish with a sprinkle of parsley for a pop of color—it’s hearty enough to stand alone but pairs wonderfully with a simple green salad.
Pineapple Salsa Chicken with Coconut Rice
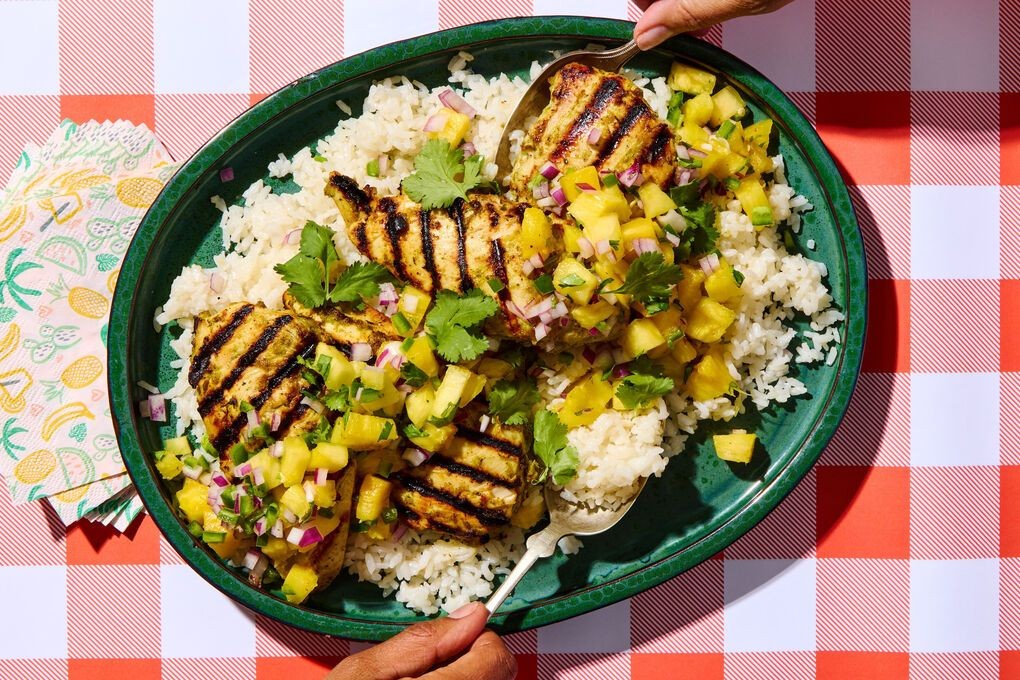
Nothing says tropical escape like this vibrant Pineapple Salsa Chicken with Coconut Rice, which I first fell for during a beach vacation and now make weekly to chase away winter blues. It’s my go-to for a quick, flavor-packed dinner that feels like a mini-holiday on a plate.
Serving: 4 | Pre Time: 15 minutes | Cooking Time: 25 minutes
Ingredients
– 1.5 lbs boneless, skinless chicken breasts (I always pat them dry with paper towels for better browning)
– 2 cups jasmine rice (rinsed until the water runs clear—it makes the rice less sticky)
– 1 (13.5 oz) can full-fat coconut milk (shake it well before opening)
– 2 cups fresh pineapple, diced into 1/2-inch pieces (I use a ripe pineapple for maximum sweetness)
– 1 red bell pepper, finely chopped (seeds removed for less bitterness)
– 1/2 red onion, finely diced (soak in cold water for 5 minutes if you want to mellow the sharpness)
– 1 jalapeño, seeded and minced (adjust to your heat preference)
– 1/4 cup fresh cilantro, chopped (I add extra because I love the bright flavor)
– 3 tbsp fresh lime juice (about 2 limes, squeezed right before using)
– 2 tbsp extra virgin olive oil (my go-to for sautéing)
– 1 tsp ground cumin
– 1 tsp chili powder
– 1/2 tsp salt
– 1/4 tsp black pepper
Instructions
1. In a medium saucepan, combine the jasmine rice, coconut milk, and 1 cup of water over high heat, then bring to a boil.
2. Once boiling, reduce the heat to low, cover the saucepan, and simmer for 15 minutes until the liquid is absorbed and the rice is tender. Tip: Don’t peek while it’s cooking to keep the steam in.
3. While the rice cooks, season the chicken breasts evenly on both sides with the cumin, chili powder, salt, and black pepper.
4. Heat the extra virgin olive oil in a large skillet over medium-high heat until it shimmers, about 2 minutes.
5. Add the seasoned chicken breasts to the skillet and cook for 6–7 minutes per side until the internal temperature reaches 165°F and the exterior is golden brown. Tip: Use a meat thermometer to avoid overcooking.
6. Transfer the cooked chicken to a cutting board, let it rest for 5 minutes, then slice it into 1/2-inch thick strips.
7. In a medium bowl, combine the diced pineapple, chopped red bell pepper, diced red onion, minced jalapeño, chopped cilantro, and fresh lime juice, then stir gently to mix. Tip: Let the salsa sit for 10 minutes to allow the flavors to meld.
8. Serve the sliced chicken over the coconut rice, topped generously with the pineapple salsa.
Generously spoon the salsa over each plate for a burst of freshness that balances the savory chicken and creamy rice. The juicy pineapple adds a sweet tang, while the tender chicken and fluffy rice create a comforting texture—perfect for serving in bowls with extra lime wedges on the side.
Summary
A fantastic collection of healthy chicken and rice recipes that make weight loss deliciously simple! We hope you find some new favorites to add to your weekly rotation. Don’t forget to leave a comment telling us which recipe you loved most and share this roundup on Pinterest to help other home cooks discover these flavorful meals. Happy cooking!